Article Contents:
- What Wainscoting Molding Actually Means
- Chair rail versus picture-frame molding
- Where the effect works best
- Measure from the finished floor
- 1. A continuous chair rail with two-tone paint
- 2. Rectangular frames below the chair rail
- 3. Tall picture-frame panels with minimal color contrast
- 4. Square or near-square frames
- 5. A single accent wall with an applied lower panel band
- Why a decorative molding is not a substitute for every trim component
- Decorative corners and applied ornaments
- Decide what must line up across adjacent walls
- Make a full-scale test before placing an order
- Count the chair rail separately
- Think about mistakes before they happen
- What about nails or fasteners?
- Keep electrical components accessible
- Dining room with a long buffet
- Hallway with several doors
- Bedroom behind a bed or nightstands
- Children's room or family entry
- Tall foyer or stair landing
- Is faux wainscoting the same as wood wainscoting?
- Does a chair rail need to sit exactly one-third of the way up the wall?
- Can polyurethane molding be painted to match the wall?
- How much extra molding should I order?
- Can a narrow panel molding act as a protective chair rail?
- Is it better to install the rail before the frames?
- Where can I compare STAVROS profile sizes?
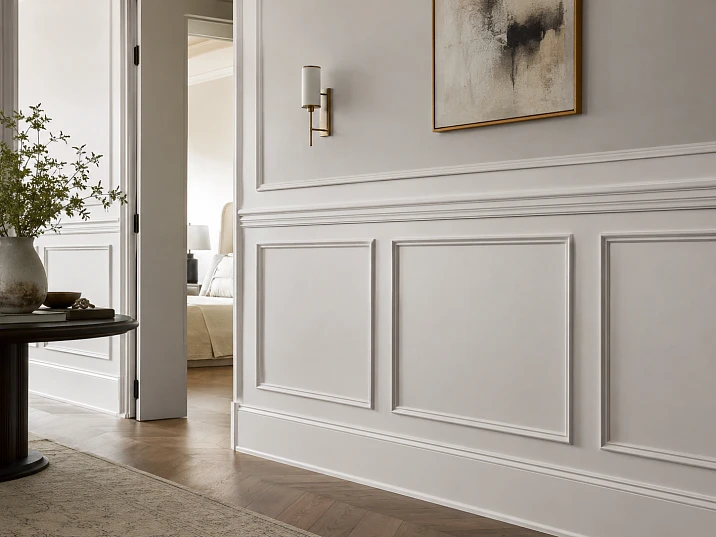
Want the character of traditional wainscoting without rebuilding a wall with wood panels? A carefully designed chair rail, a painted lower wall, and applied picture-frame molding can give a dining room, hallway, or bedroom the proportions of paneled architecture. The critical decisions are not the number of decorative pieces. They are the height of the rail, the relationship to the baseboard, the spacing of the frames, and the selection of trim that can actually be cut and finished for that layout.
This guide explains a practical American approach to wainscoting molding: how to tell decorative applied molding from real panel construction; how to set a chair rail in a room with 8-, 9-, or 10-foot ceilings; how to calculate material for a 12-foot wall; and how to install and paint the details without accidentally blocking an electrical device or turning the lower wall into a collection of mismatched profiles. STAVROS polyurethane options are identified by their published dimensions, not by unverified claims about performance or US availability.






What Wainscoting Molding Actually Means
In American interior design, wainscoting traditionally means a treatment of the lower part of a wall. In a historic room that might be solid wood paneling. In a newer home it might be beadboard, board-and-batten, flat panels, a raised-panel system, or applied molding that creates the suggestion of panel outlines directly on drywall. These are visually related but materially different assemblies. Knowing which one you are building affects measuring, cost, durability, and the skills required.
For a homeowner comparing wall trim molding, it helps to sort the options by function before choosing a decorative shape. A chair rail is the horizontal trim line that defines the top of a lower-wall treatment. A baseboard covers the transition at the floor and usually receives the impacts of ordinary cleaning equipment. Panel molding creates the interior rectangular or square outlines. A cap or small ledge may be part of a traditional wainscot assembly, but an ordinary wall molding is not automatically a load-bearing cap or a substitute for the baseboard.
An applied-molding project is the least invasive of these approaches. You leave the existing drywall in place, attach decorative profiles to it, and paint the background and molding to read as a coordinated design. This is sometimes called faux wainscoting or picture-frame wainscoting. The finish is real architectural detail, but the recessed-looking center remains the original wall surface. Do not advertise it as full solid-wood paneling.
| Lower-wall treatment | What is attached | Typical visual effect | Key planning consideration |
|---|---|---|---|
| Paint and chair rail | A horizontal profile | Clear division between two colors or finishes | Level rail and careful paint line |
| Applied picture-frame wainscoting | Rail plus rectangular moldings | Paneled rhythm without full sheet panels | Repeated margins and clean miters |
| Board-and-batten | Vertical battens, often a cap and base | Strong vertical farmhouse or transitional rhythm | Wall flatness and spacing |
| Beadboard or sheet paneling | Actual panels with edge and top trim | Texture and a continuous lower-wall covering | Panel thickness, seams, outlets |
| Raised-panel woodworking | Built-up or machined panel parts | Deep traditional panel relief | Joinery, movement, specialized layout |
The selection should follow the room. For an existing painted dining room, applied moldings can be a relatively contained decorative project. For an entryway regularly hit by luggage or carts, a more robust wall finish may be preferable. Narrow polyurethane wall molding gives an architectural outline; it does not by itself create an impact-resistant barrier across the painted drywall inside each frame.




Chair rail versus picture-frame molding
These two details are related but not interchangeable. The chair rail generally runs horizontally, sometimes around the entire room. Frame molding is placed inside defined fields. A rail can exist without any frames at all, and frames can be used on a feature wall without a rail. Decide whether the project needs a strong horizontal datum, a repeated panel pattern, or both. Combining every detail in a small room is not automatically a better design.
American search terms reflect this distinction. A homeowner researching chair rail molding installation wants the sequence for establishing and attaching one level line. Someone comparing panel molding for walls needs profile selection, frame proportions, and miter details. A useful plan answers both questions but keeps them in their proper roles.
Наша фабрика также производит:



Смотреть весь Каталог продукции
Why the Lower Third of a Wall Deserves Its Own Design
The base of a room is an active zone. Chairs are pulled back from a dining table. Backpacks brush against an entryway. A child's toys roll into the wall. A vacuum or mop approaches the baseboard. At the same time, the eye uses the line of the baseboard and the top rail to understand the room's proportions. Treating this zone intentionally can make an ordinary painted interior more coherent.
It is important not to overstate the protective role of decorative moldings. A narrow raised strip does not shield every square inch of drywall, and a sharp edge may itself become the point that gets bumped. Much of the everyday practicality in a faux-wainscot scheme comes from the choice of a cleanable, repairable wall paint; a correctly selected baseboard; and a layout that does not trap dirt in unnecessarily deep ornament. Compare finish specifications and use conditions rather than assuming polyurethane automatically makes a wall childproof or waterproof.
The other benefit is visual order. Imagine a 12-foot dining-room wall with a buffet placed off-center. One horizontal rail introduces a stable reference line; three equally spaced frames make the surface deliberate. The room does not need a large collection of ornaments because the repeated dimensions carry the design. Good decorative wall molding often looks restrained from a distance and rewards closer inspection through precise junctions and consistent shadows.
Получить консультацию
Where the effect works best
The approach is adaptable to dining rooms, entries, bedrooms, home offices, and hallways. It is especially useful where the surrounding casing and baseboard already have a recognizable style. You can pick a related molding profile, preserve the architectural hierarchy, and extend that rhythm across the wall. In a small apartment, a single-color treatment can provide depth without creating a busy contrast. In a larger home, a darker lower field may visually anchor an otherwise open space.
Before buying, inspect the wall. Does it have uneven drywall, damaged paint, loose wallpaper, moisture marks, an awkward outlet, or a baseboard that is already poorly fitted? Decorative trim will not correct underlying defects. Repair the surface and solve any water or electrical issues first. Applied molding draws attention to alignment, so it can actually make a crooked wall more noticeable unless the layout is planned for the real conditions.
Choose the Chair Rail Height for the Room, Not a Formula Alone
There is no universal code-required height for a decorative chair rail in a residential interior. A common visual starting point is roughly one-third of the wall height, but the final dimension should be chosen against door hardware, furniture backs, windows, and adjoining trim. In a dining room, a rail that disappears entirely behind a buffet or repeatedly collides with a chair back is not serving the design well. Measure furniture in the room rather than relying on a generic number from an inspiration photo.
For a typical 8-foot ceiling, many homeowners experiment with a rail in roughly the 30- to 36-inch zone. At 9 feet, a similar visual proportion may suggest 32 to 40 inches; at 10 feet, a taller field can work. These are layout ranges for mockups, not mandatory dimensions. Houses with tall baseboards, high windows, or unusual door proportions may benefit from a different datum.
| Approximate ceiling height | Starting rail-height mockup | What to verify on site |
|---|---|---|
| 8 ft / 96 in | 30-36 in above finished floor | Door casings, dining chairs, 4-6 in baseboard |
| 9 ft / 108 in | 32-40 in | Window stools, longer wall fields, furniture backs |
| 10 ft / 120 in | 36-44 in | Proportion to taller doors and ceiling trim |
| 11-12 ft or more | Evaluate by room elevation rather than a fixed rule | Large furniture, opening heights, architectural style |
Use a laser level or a long level to mark the proposed top line on removable painter's tape. Walk through the room and look at it while seated and standing. Check how it appears from the hallway and through doorways. A computer drawing can help, but a taped full-scale mockup catches interactions with real objects. Try one alternate height before committing, especially when a visible wall intersects a staircase or a kitchen peninsula.
Measure from the finished floor
Use the actual finished floor as the reference, not the subfloor or an assumed architectural plan dimension. Older homes frequently have uneven floors. If the floor changes elevation, keeping a rail truly level can produce a slightly varying distance from the floor. That may be the least visible compromise. Do not blindly follow a sloping baseboard with the chair rail; two parallel but tilted lines can make the entire wall look out of level.
Confirm whether the published rail height refers to its centerline, top edge, or lower edge. This becomes important when using a wide profile. A one-inch-wide molding and a three-inch chair rail can share a centerline while creating different visual boundaries. Record the chosen reference in your drawing so each wall is installed consistently.
Five Lower-Wall Layouts Worth Considering
1. A continuous chair rail with two-tone paint
This is the clearest entry point. Install a horizontal rail and use a durable finish below it, with a quieter color above. The lower field can be a deep olive, charcoal, navy, or clay tone, while the top remains a warm neutral. The rail may match the lower color for a seamless effect or contrast gently with both fields. On a narrow hallway, one deliberate line is often stronger than many small rectangles.
The detail succeeds when door casings and interruptions are resolved. Plan whether the rail will terminate against the casing, continue around an inside corner, or stop at a built-in cabinet. End cuts need a clean return or deliberate transition; abruptly exposing the raw cross-section of a decorative profile makes the installation look unfinished.
2. Rectangular frames below the chair rail
Picture frame molding on walls is useful when you want repeated panel outlines without covering the entire surface with sheet goods. This applied picture-frame scheme uses consistent panels across a long wall. Keep the outer margins and gaps between frames proportional. A broad wall may support three or four panels; a narrow pier beside a door may need one slender panel or no panel at all. The frame outlines should relate to the rail above and baseboard below. Avoid squeezing an additional frame into every remaining few inches.
For the internal outlines, a relatively slim MLDPU-001 polyurethane molding can be evaluated because its published face measures 10 mm (about 0.39 inch). A restrained profile works where a narrow decorative line is preferable to a heavy raised border. It should not be described as a baseboard or as a structural chair rail.
3. Tall picture-frame panels with minimal color contrast
Raise the lower field and use taller, narrower frames to reinforce verticality. This can suit a high-ceilinged foyer or a formal dining room. Painting the wall, frames, and rail the same color produces subtle shadows and prevents the composition from competing with artwork or lighting. This is a design option, not a rule for every high room: a crowded foyer with several doorways may look better with fewer frames.
4. Square or near-square frames
Short, broad rectangles can feel informal, especially in a bedroom, breakfast area, or relaxed family room. They require enough horizontal length to keep the repeated spacing meaningful. On a short wall near a corner, one square may be more coherent than two narrow rectangles. Tape up at least one full panel before cutting anything.
5. A single accent wall with an applied lower panel band
When full-room wainscoting would make a space feel busy, treat the wall behind a bed, an entry console, or a dining banquette. Repeat the chosen profile on the visible section, then terminate it clearly at the inside corners. An accent treatment still benefits from a consistent baseboard transition; the lower field should not appear to float independently above the floor.
The key choice is continuity. A full-room rail gives a strong horizontal relationship across several walls. An accent-wall arrangement depends more on the proportions and furniture on that wall. Neither automatically uses less material: numerous small panels can consume more total molding than one long rail.
Match the Molding Profile to Its Job
For this kind of project, choose the components in three distinct categories. The baseboard is the durable lower border near the floor; the chair-rail or dividing profile is the visible top boundary; and thinner panel molding provides the decorative interior lines. All three do not have to share the same face width or material, but they should be compatible in scale and finish.
Start with the STAVROS molding collection and compare the cross-section, available lengths, and intended applications. The company lists several polyurethane moldings that can be relevant to applied frames. Their individual pages identify them as polyurethane rather than MDF, polystyrene, or solid wood. Do not choose by a product photograph alone, because a very narrow piece photographed close-up can appear much more substantial than it will in a real room.
| STAVROS profile | Published face x projection | Published stock length | Potential role in a lower-wall composition |
|---|---|---|---|
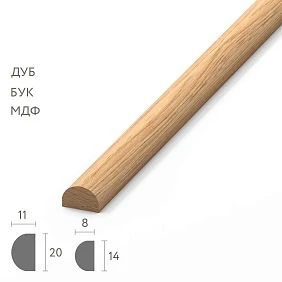
| MLDPU-001 | 10 x 6 mm / 0.39 x 0.24 in | 2600 mm / 102.36 in | Fine, understated frame outlines |
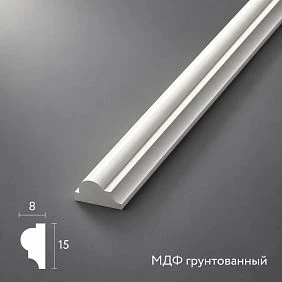
| MLDPU-004 | 15 x 8 mm / 0.59 x 0.31 in | 2600 mm / 102.36 in | Small frames or secondary contours |
| MLDPU-027 | 14 x 9 or 20 x 12 mm / 0.55 x 0.35 or 0.79 x 0.47 in | 2600 mm / 102.36 in | Rounded lines for soft repeated geometry |
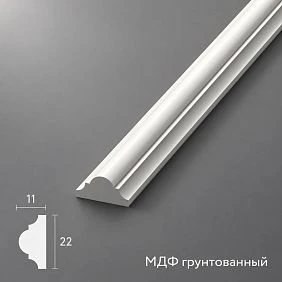
| MLDPU-002 | 22 x 11 mm / 0.87 x 0.43 in | 2600 mm / 102.36 in | More visible framed fields |
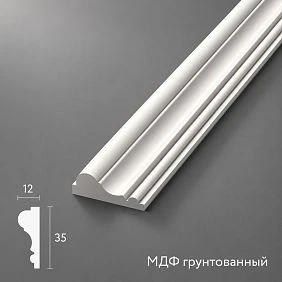
| MLDPU-003 | 35 x 12 mm / 1.38 x 0.47 in | 2600 mm / 102.36 in | Stronger borders in larger compositions |
These are actual published product dimensions, not a recommendation that every profile can serve as a chair rail or take chair impacts. Confirm the product drawing and intended installation details for the exact SKU. For example, MLDPU-002 has a pronounced, stepped relief and is best judged as a visible decorative frame line. MLDPU-003 is wider and casts a stronger shadow; it can overwhelm a tight sequence of small frames. A wide molding does not become a purpose-built chair rail merely because it is installed horizontally.
The simpler MLDPU-004 can help outline smaller fields. For a rounded profile without an elaborate stepped silhouette, compare both listed sizes of MLDPU-027. Their published lengths are all approximately 8.53 feet. That figure matters when planning cuts and joints, especially on runs longer than the available stock.
Why a decorative molding is not a substitute for every trim component
Baseboards are selected for the floor-wall interface, cleaning conditions, and the expected visual base of the room. STAVROS also lists a separate baseboard category, which includes materials that are not the same as the polyurethane frame profiles above. Check the exact item's material before making statements about it. A shallow panel molding attached just above the floor may be decorative, but it does not automatically replace a properly fitted baseboard.
At the top of the composition, the dividing rail should be considered for projection, edge shape, and exposure to contact. A thin wall-frame profile may make a lovely horizontal boundary but offer little physical protection. If the dining chairs genuinely strike the wall, examine the chair backs, the rail projection, and the mounting requirements. A repairable paint finish below the rail may be a better practical solution than promising the molding will stop every mark.
Decorative corners and applied ornaments
Traditional work sometimes uses ornamental corner pieces, but ordinary 45-degree miter joints can be cleaner in a modern home. The molding decor collection is worth reviewing when a project intentionally calls for corner details or additional relief. Check the shape and dimensions of any chosen corner against the frame molding before including it in the cut list. A compatible aesthetic is not enough if the reliefs do not physically meet.
Survey the Room Before Drawing Panels
Successful DIY wall molding begins with a wall elevation, not a shopping cart. Measure the wall's finished width at the height where the rail will run, then measure the height at several positions. Record all doors, windows, returns, vents, built-ins, thermostats, thermostatic controls, outlets, switches, and baseboard changes. Note the visible part of the wall once the furniture is in place. The face of a bookcase or banquette may hide much of a small panel; do not spend time centering a complicated composition behind something permanent.
Mark the outside edges of door casings and window trim. Panel frames normally need visual clearance from those boundaries, and the chair rail must meet or terminate against them intentionally. If a short wall segment remains between a door and a corner, treating it as an empty painted field may look more deliberate than forcing a narrow frame into the space. The eye recognizes consistent decision-making more readily than it recognizes a forced rule that every wall must have a panel.
A survey should also include surface condition. Painted drywall may be ready after cleaning and minor patching, while slick wallpaper, unstable coatings, crumbling plaster, and damaged substrate require a separate solution before trim is attached. In older homes, be cautious about disturbing potentially hazardous finishes or materials. Evaluate the applicable precautions before sanding, drilling, or demolition. A decorative finish should never conceal an active leak or other unresolved defect.
Decide what must line up across adjacent walls
From the doorway, you may see the chair rail turn into the hall, a panel midpoint next to a door, or the upper edge of an existing wainscot in the adjoining room. Choose the dominant lines that should remain continuous. A rail height that is perfect on one wall but shifts by three inches on the next will look like separate projects unless a doorway or deliberate transition explains the change. Use sightlines as part of the design process.
The frame modules themselves can change width when walls change length, as long as their top and bottom clearances remain consistent. It is usually better to maintain a stable rail and frame height while adjusting panel widths than to change panel height every time a doorway reduces the available space. For a living room with different-length walls, use one family of proportions and allow each wall to carry a sensible number of frames.
Make a full-scale test before placing an order
Use low-tack painter's tape to reproduce the proposed frame outline on one wall. Check the panel width, the space above the baseboard, and the space below the rail from normal viewing positions. Place a chair where it actually sits. Open the nearest door. Stand at the end of the hallway. A design that looks elegant in a flat diagram can feel crowded at full scale; a quick tape test is less expensive than replacing a dozen cut moldings.
Photograph the mockup straight on, not from a dramatic diagonal angle. A straight-on image reveals irregular margins and differences in frame size. If the tape layout feels too ornate, try one fewer frame and a slightly wider blank margin. For many wall molding ideas, the biggest improvement comes from subtraction rather than another decorative layer.
A Worked Example: Three Wainscot Frames on a 12-Foot Wall
Here is a repeatable calculation rather than a vague instruction to add 10 percent. Assume a straight interior wall measuring 12 feet, or 144 inches. The proposed chair rail is at 36 inches above the finished floor. The baseboard occupies approximately the lower 5 inches. The room has no openings on this particular wall, and the design uses three matching rectangular applied-molding frames.
Choose 10-inch outside margins on the left and right, and an 8-inch gap between adjacent frames. For three frames there are two internal gaps. The remaining horizontal space is 144 minus 20 inches of outside margins minus 16 inches of internal gaps. That leaves 108 inches, so each frame has an outside width of 36 inches. Write down which edge is being measured: for mitered profile pieces, use the outer long-point-to-long-point size consistently.
For a straightforward lower-wall frame, set its upper edge 4 inches below the rail reference and its bottom edge 4 inches above the top of the 5-inch baseboard. On this simplified drawing, the frame therefore runs from 9 inches to 32 inches above the floor, for a frame height of 23 inches. Check the actual rail width and baseboard top before using these numbers on site. The dimensions are illustrative, not a standard for all homes.
Each rectangle uses two horizontal pieces measuring 36 inches and two vertical pieces measuring 23 inches. Its nominal molding perimeter is 2 x (36 + 23) = 118 inches. Three rectangles require 354 inches, or 29.5 linear feet of the chosen profile. That is the length inside the design, before allowing for test cuts, saw kerf, corner mistakes, and stock-length constraints.
| Calculation item | Example result |
|---|---|
| Wall width | 144 in / 12 ft |
| Left and right margins | 10 in each |
| Gaps between the three frames | 8 in each, two gaps |
| Outside width of each frame | (144 - 20 - 16) / 3 = 36 in |
| Outside height of each frame | 23 in |
| Perimeter of one frame | 118 in / 9.83 ft |
| Total required finished pieces | 6 x 36-in cuts and 6 x 23-in cuts |
| Nominal total linear footage | 354 in / 29.5 ft |
| Published stock length for the compared MLDPU profiles | 102.36 in / approximately 8.53 ft |
A theoretical length-only calculation divides 354 inches by 102.36 inches and rounds up to four stock pieces. That answer happens to be workable for this example, but it is not automatically true for every layout. A simple cut schedule shows why: three stock pieces can each yield two 36-inch cuts and one 23-inch cut, consuming 95 inches before saw kerf. A fourth stock piece can yield the remaining three 23-inch cuts, consuming 69 inches. This tentative schedule leaves some tolerance for saw cuts, but the installer must still verify the actual miter orientation and usable stock length. If any long-point measurement changes, redo the cut list.
Do not order exactly four pieces just because the arithmetic demonstrates a theoretical minimum. A spare length may be wise for a first-time installer or a hard-to-replace profile. At minimum, plan realistic waste and a replacement strategy based on your cutting experience, the number of joints, and the project schedule. The important insight of a picture frame molding calculator is that total linear footage and feasible stock-piece cutting are two separate questions.
Count the chair rail separately
The 29.5-foot figure covers the three rectangles only. If the design also includes a horizontal rail across the full 12-foot wall, add 12 linear feet of the selected rail profile, plus its own cutting and joint allowance. If it wraps around adjacent walls, measure those individual runs rather than multiplying by room perimeter without accounting for openings or the trim's stopping points. Different profiles must have their own quantity columns; spare frame molding cannot automatically replace a missing section of a different chair-rail profile.
Likewise, the example assumes the baseboard remains in place. Replacing the baseboard changes the scope, the paint transitions, and possibly the measured frame height. Make a schedule with distinct lines for frame profiles, rail profile, baseboard, corner details, adhesive, finishing supplies, and any needed surface repair. That separates what is decorative from what is necessary for a durable installation.
How to Convert a Layout Into a Reliable Cut List
Make one row for every type of cut: finished outside length, number of copies, angle or joint type, and the stock profile used. For picture-frame rectangles, label the long and short pieces, and confirm which face of the molding must be visible after the 45-degree miters. Cutting a 36-inch length on the wrong side of the saw can produce a part that is impossible to use in the intended corner. A pencil arrow on the back indicating the top or outside edge can prevent confusion.
Lay the required cuts against the manufacturer's published stock length. Several short pieces may come from one length, but one long piece might dictate a separate stock length even if a lot of offcuts remain. Keep the cutting schedule realistic: allow for blade kerf, imperfect ends, quality checks, and any joints required by long rail runs. If two pieces meet along a straight line, a scarf joint may give a less conspicuous transition than a simple blunt butt joint, provided the material and manufacturer's instructions support the method.
The site publishes 2600 mm lengths for the five compared STAVROS polyurethane profiles. That is approximately 102.36 inches, a little over 8.5 feet. Do not quietly round this up to a common US 9-foot stock length. For a 16-foot hallway rail, expect a planned joint and verify where the joint will fall relative to doors, lighting, and seating. A single 2600 mm length will not span 16 feet, however attractive the product page looks.
Think about mistakes before they happen
Inexperienced installers often calculate a correct perimeter but forget they need twelve individually correct mitered ends. A 45-degree miter cut cannot simply be reversed after the fact if the finished measurement is wrong. Work from a marked diagram and identify the outside long points before each cut. If possible, use a short scrap to test the saw setting and how the molding profile nests against the saw fence. For a deeply contoured profile, a poor support position changes the apparent angle even when the saw reads 45 degrees.
Also consider whether the trim is straight when delivered. Store it in the condition recommended by the supplier and inspect for transport damage before cutting. Do not assume bowed or damaged sections will disappear under paint. An extra piece is cheaper than a full installation stopped by the final missing 22-inch vertical.
Preparing Painted Drywall for Applied Polyurethane Molding
For anyone researching how to install wall molding, surface preparation is more important than aggressive adhesive. Remove dust, kitchen grease, loose paint, and other contamination. Repair nail holes and small dents with a compatible filler, let the repairs cure, and prepare the finish according to the coating and adhesive instructions. Confirm that the wall is dry and that the underlying paint is sound. An adhesive bond can only be as reliable as the surface to which it is attached.
Lay out the rail using a level or laser line. Measure and mark each frame corner, then check that opposite sides have the same length and that each rectangle is square. Measure the two diagonals of a rectangular layout; if they differ meaningfully, something is out of square. Small layout errors become obvious when three panels are repeated across a wall, especially after shadows from side lighting reveal their edges.
Choose an adhesive explicitly approved for the molding material and substrate, and follow its stated application and curing conditions. A general-purpose product can be suitable for some assemblies but not for every paint, tile, or coating. STAVROS provides a category for installation and finishing materials; the correct selection still depends on the actual technical data and the installation conditions. Never assume the article is a substitute for a product-specific adhesive instruction sheet.
What about nails or fasteners?
Some trim systems allow supplemental mechanical fastening; others do not need it or have substrate-specific requirements. Follow the selected product's instructions rather than driving nails through decorative polyurethane because that is customary for wood casing. Locate plumbing and wiring before any drilling or fastening, and take special care near outlet and switch boxes. If the finish is on a masonry wall, an unfamiliar coating, or an unusual substrate, seek the appropriate installation guidance before proceeding.
Keep electrical components accessible
Do not place a decorative rail over a receptacle, switch, or cover plate. Do not bury junction boxes, trim across faceplates, or improvise electrical-box extensions as a decorative task. A panel outline should be redesigned to keep electrical equipment accessible, and any electrical modifications should be handled in accordance with applicable rules by a qualified person. In the US, outlet and switch positions vary considerably between homes; never presume a single national mounting height from a design article.
For a rail that would collide with a switch in a hallway, changing the rail height by a few inches or deliberately terminating it at an architectural feature is better than a visibly notched profile around the device. The cleanest outcome is one planned early, while moving a tape line is still easy.
Step-by-Step Chair Rail Molding Installation
First, mark the intended rail height and verify the entire route, including corners, casings, and terminations. Decide where full stock lengths begin and end. Test-fit a short piece at door casing to confirm whether the profiles meet neatly or need a small return. A horizontal molding that dies into a flat painted wall without a finished return often appears accidental.
Second, cut the sections according to the cut list, checking angles on scrap before using the finished material. For inside and outside corners, be clear about which point is the outside face. If the walls are not square, the exact miter may need adjustment; a nominal 90-degree corner is only a starting assumption. Mark the back of each section to match the elevation drawing.
Third, apply the approved adhesive as directed. Press each section into the intended position along the level line and maintain contact for the period the supplier requires. Do not assume painter's tape alone will hold an unusually wide or heavy profile. If the installation method includes temporary supports, use them as specified. Clean up excess adhesive promptly with a compatible method that does not damage the profile or wall finish.
Fourth, inspect the continuity of the top and bottom edges. A rail should appear level through a doorway and into the next wall. At joints, make sure adjacent lengths do not step forward or backward. Allow the installation to cure before adding finishing products, sanding, or loading the surface. Where a wall is wavy, forcing a stiff molding flat can create visible gaps at alternating points; assess whether the substrate needs local repair instead of trying to hide a poor fit with excess caulk.
Fifth, finish the exposed ends and transitions. A neatly returned molding is usually more convincing than an abruptly cut end. Test the return details on scraps, because reversing a small return at a door casing can be confusing even for experienced DIY installers. The finished assembly should read as a complete architectural line.
Install the Picture-Frame Molding Below the Rail
After the horizontal datum is established, begin with the central or most visible frame. Position all four pieces dry first and confirm the planned margin to the rail and baseboard. Use a square to check the corner geometry. Install the first frame, then work outward according to the marks. If small adjustments are needed to accommodate an imperfect wall, make them symmetrically so one outer margin does not suddenly become much narrower than its counterpart.
Frame corners deserve extra attention. A pair of miters can look tight before installation but open slightly when adhesive is applied or the pieces slide against the wall. Use the joining method specified for the profile and hold the corners in alignment while the adhesive cures. Do not fill a large alignment error with caulk and expect paint to make it invisible. Good finish work begins with parts that fit well.
Compare each completed frame to the others with a straightedge and tape measure. You do not need laboratory precision, but consistent visual dimensions matter. The six 36-inch horizontals in the worked example should all be made to the same measurement convention. If the first frame is an inch shorter than the rest, repeated shadows will reveal it. Mark and stage the cut parts as matched sets when the layout contains several identical rectangles.
A small stepped profile such as MLDPU-004 should be oriented consistently so its bead and step cast the same shadow around each rectangle. Reversing one strip can make the detail read as a different product, even if its total width is identical. Check the cross-section before cutting multiple pieces.
Caulking, Priming, and Painting Without Hiding the Detail
Allow the adhesive to cure as instructed before final finishing. Inspect the wall-to-molding junctions under raking light. Where appropriate, a paintable, compatible caulk can refine small gaps along the edges; suitable filler may be needed for some joints. Keep beads restrained. Overfilled joints can swallow the molding relief and make an otherwise elegant profile appear soft or irregular. Use only finishing products recommended for the selected material and paint system.
After repairs have dried, prepare the surfaces to match the primer and paint requirements. Some decorative products may be supplied in a finish that needs little preparation, while others require specific priming. Do not generalize this characteristic across every SKU. Test adhesion and appearance in an inconspicuous spot if there is any doubt. Choose an interior paint finish that fits the room's cleaning needs rather than relying on a purely decorative recommendation.
There are three classic color approaches. With a monochromatic scheme, wall, rail, and frames all share one color; the molding is read through light and shadow. With a two-tone scheme, the lower field contrasts with the upper wall while the rail unites them. With an accent scheme, the rail or frames are a third shade, which can be attractive but also emphasizes every joint and inconsistency. The more colors used, the more carefully the corners and paint lines must be finished.
| Finish approach | Best visual use | Common risk to manage |
|---|---|---|
| All one color | Quiet bedrooms, modern transitional spaces | Detail disappears if the profile is too shallow |
| Dark lower wall, light upper wall | Dining rooms, entries, offices | Strong horizontal line exaggerates uneven installation |
| Light lower wall, darker upper wall | Rooms where upper color is the focal point | Lower panels may feel visually weak |
| Contrasting trim | Formal, deliberately graphic interiors | Paint edges and joints become highly visible |
| Matte or low-sheen color-matched trim | Subtle architectural texture | Cleaning and scuff resistance depend on coating selection |
Apply thin, consistent coats following the coating manufacturer's instructions. Heavy coats can pool in the grooves and reduce the definition of a fine bead. Pay attention to inside corners of panel frames, where paint tends to collect. Allow sufficient drying time before moving furniture back against the finished surface. Do not place adhesive hooks or other loads on newly finished trim unless the product instructions permit it.
Room-by-Room Design Decisions That Change the Plan
Dining room with a long buffet
Center panel groups on the full wall or on the main architectural bay, not automatically on the dining table. A buffet may obscure the lower half of the center panel, and a row of chairs creates contact points at varying heights. Test the rail against the actual chair-back height and decide whether the paint finish, rather than the trim alone, will handle the cleaning. If a buffet permanently covers one wall, a plain lower field there may be sufficient while the visible walls carry framed panels. For a stronger decorative outline, compare the MLDPU-002 panel profile at full scale.
Hallway with several doors
Door casings dictate where the rail stops and how much space remains for frames. A narrow pier between two doorways often looks cleaner with no panel than with a squeezed rectangle. Where a long hall has identical doors, align the rail across the visible runs and make the casing terminations consistent. Keep profiles shallow enough that they do not interfere with normal circulation or the opening of doors. A thin polyurethane trim profile may be appropriate for restrained geometry.
Bedroom behind a bed or nightstands
A bedroom often needs less visual activity, not more. Consider two generous panels positioned to relate to the bed and nightstands, or a single calm lower band that continues through the room. Evaluate switches and wall-mounted reading lights before marking any rectangles. Monochromatic paint is especially forgiving when the room already contains patterned bedding, curtains, or artwork. Any decorative pieces behind the bed should be attached according to the specified installation method, without relying on the headboard to hold them in place.
Children's room or family entry
Choose uncomplicated profiles and a finish suitable for cleaning. Deep ornaments may collect grime in heavily used zones, and a raised edge can be another point of contact. A two-tone painted wall with a modest horizontal rail can make later touch-ups easier than a field of intricate frames. If objects regularly hit the wall, assess actual wall-protection products rather than presenting applied polyurethane molding as impact-rated equipment. Compare the intended wall system with the rounded MLDPU-027 options only for their visual geometry and published dimensions.
Tall foyer or stair landing
Carry the main horizontal line only where it makes architectural sense. On an ascending stair, rail transitions become more complicated, and a horizontal hallway rail does not simply follow the slope without redesign. Mark elevations on each wall before any cutting. Complex intersections, curved walls, and stair runs may justify an experienced trim installer. For ornate areas, browse decorative molding accents only after resolving the straight-line geometry; an ornament will not repair misaligned rails.
Common Questions About Lower-Wall Molding
Is faux wainscoting the same as wood wainscoting?
No. Applied molding on drywall creates decorative outlines with the original wall as the panel center. Wood wainscoting generally includes physical boards or a built-up assembly. Both can create a paneled appearance, but their thickness, preparation, costs, repair methods, and resistance to contact differ. Describe the finished project accurately when planning or selling a home improvement.
Does a chair rail need to sit exactly one-third of the way up the wall?
No. One-third is a useful proportion to test, not a requirement. Chair backs, door casing, windows, existing trim, and sightlines can justify a higher or lower line. A taped full-scale mockup is more useful than treating a ratio as an inflexible construction standard.
Can polyurethane molding be painted to match the wall?
Many decorative polyurethane applications are finished with paint, but the exact primer, coating, preparation, and curing requirements depend on the manufacturer and the specific item. Confirm the instructions rather than assuming any wall paint bonds to any factory finish. A same-color finish can highlight shape through shadows without a high-contrast outline.
How much extra molding should I order?
Begin with a complete cut list and the actual stock length. The required reserve depends on miter count, piece lengths, skill level, and the ability to use offcuts. A simple percentage is only a planning aid. For the 12-foot wall example, four 2600 mm stock pieces are theoretically enough for the rectangles, but a spare piece may be sensible if a mistake would delay the job.
Can a narrow panel molding act as a protective chair rail?
Do not assume it can. Narrow decorative molding establishes a line and may project slightly, but that does not imply a tested impact-protection function. If the purpose is to prevent chair damage, study chair clearance and the complete rail or wall protection system. Applied molding should be selected for the use stated by its manufacturer.
Is it better to install the rail before the frames?
Usually the rail establishes the main reference line for an applied lower-wall composition. Once that line is level and the terminations are resolved, the frame margins are easier to measure consistently. Always follow the specific installation instructions; some coordinated systems have their own recommended sequence.
Where can I compare STAVROS profile sizes?
Use the polyurethane molding catalog and the individual product pages. Compare actual width, projection, stock length, and material. For example, a 10 mm bead and a 35 mm raised profile will not look interchangeable on a wall, even if both can form a rectangular outline.
Final Buying and Installation Checklist
Before ordering, keep one dimensioned elevation, a list of finished cuts, separate totals for the chair rail and frame profiles, the actual baseboard specification, and notes about outlets, door casing, and visible furniture. Verify each SKU and its current dimensions, choose an appropriate adhesive and coating system, and confirm the exact availability and delivery options directly with the seller. Order only after the taped mockup looks balanced from normal viewing positions.
The best applied wainscoting project does not depend on an exaggerated promise of luxury or protection. It depends on proportions you can measure, a profile whose published geometry you understand, joints you can finish cleanly, and a lower-wall paint treatment suited to the room. With those decisions made, a modest set of polyurethane moldings can create a purposeful architectural rhythm without pretending that applied decorative trim is the same construction as a solid-wood paneled wall.