


Article Contents:
- What are stucco models and why are they needed in a design project
- 3D models for visualization
- Drawing profiles and sections
- Catalog data with dimensions and article numbers
- Why all three formats should be linked
- Who works with stucco models: seven professional scenarios
- Interior Designer
- Architect and designer
- Visualizer
- Repair Studio and Supplier
- Private Client with Design Project
- Builder and Foreman
- Showroom, Hotel, Restaurant, Office
- Which stucco elements are most often needed in a project
- Wall moldings
- Cornices and Ceiling Transitions
- Ceiling Rosettes
- Stucco Overlays and Decorative Elements
- Wall Decor: Panels, Frieze, Pilasters
- Brackets
- Facade Molding
- Why It's Important to Choose Models Based on Real Products: An Honest Conversation with a Designer
- Beautiful Model vs. Real Article
- Correct algorithm
- What a real catalog with article numbers gives
- How to choose a stucco model by size: proportions, scale, compatibility
- Ceiling height as the main reference point
- Molding width and room scale
- Profile projection and relief
- Element length and repeatability
- How to choose stucco for a project style: seven style scenarios
- Classic and historical stylization
- Neoclassicism
- Modern classicism
- Art Deco
- Country house, rustic, traditional style
- Restaurant, hotel, commercial property
- Study, library, study style
- Wall molding models: practical usage scenarios in a project
- Frame wall design
- Horizontal band
- Accent wall with symmetrical ornament
- TV area with decorative framing
- Vertical pilasters
- Cornice and ceiling decor models: how to fit them precisely into a project
- Wall-to-ceiling transition: cornice as a solution
- Ceiling rosette: diameter to match room size
- Ceiling composition
- Facade stucco models: from cottage visualization to real facade decor
- Which facade stucco elements are needed in the project
- How to use facade models in 3D
- Facade project and specification: one logic
- How to link 3D model, article number, and purchase: a seamless workflow
- Step 1. Selection from catalog with dimensions
- Step 2. Checking proportions in the project
- Step 3. Loading 3D models linked to article numbers
- Step 4. Approval with the client
- Step 5. Generating the specification
- Step 6. Purchase without surprises
- Calculating linear meters for the specification: error-free math
- For a cornice along the perimeter of the room
- For frame molding
- For a horizontal belt
- Reserve: why 10% is mandatory
- Mistakes when choosing stucco models in a design project
- Mistake 1. Choosing a model without a real article number
- Mistake 2. Not checking the dimensions of the actual product
- Mistake 3. Not considering ceiling height
- Error 4. Using too small a profile in a large room
- Error 5. Mixing different style series
- Error 6. Forgetting about joints and corners
- Error 7. Not calculating linear meters accurately
- Error 8. Not preparing a specification for procurement
- FAQ: answers to the main questions about stucco models for a design project
- STAVROS: from a model in the project to a product on the wall
Every designer knows this moment. The project is almost ready. The visualization is approved. The client is happy. And then the most unpleasant part begins: searching for real decor that at least slightly resembles what was shown in 3D.
The molding from the visualization — beautiful, with a complex profile, with correct proportions — turns out to be either a non-existent article from a free library, or is only produced in Italy with an eight-week delivery, or has a width of 120 mm, not 80 mm as required by the project.
This is a systemic problem in the design market: Molding models they live separately from real products. And that's why a competent designer first selects a real manufacturer's catalog, and then builds a project around specific SKUs — not the other way around.
This article is for designers, architects, visualizers, specifiers, and everyone who works with stucco decoration in projects. Here's about how to choose stucco models correctly: so that visualization turns into a specification, and the specification turns into a purchase without surprises.


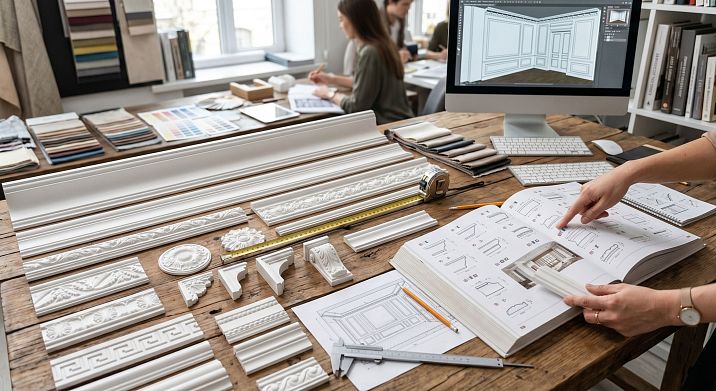
What are stucco models and why are they needed in a design project
When people say "stucco models," they mean several different things — and it's important to separate these concepts right away.


3D models for visualization
Geometric objects in OBJ, 3DS, MAX, SKP, FBX formats — ready for import into 3ds Max, Cinema 4D, SketchUp, Revit. They are used to create photorealistic visualization: placing moldings on walls, cornices on the ceiling, rosettes in the center of the ceiling. The render looks convincing, the client approves the project.
Our factory also produces:


Drawing profiles and sections
DWG, DXF files with the exact cross-section profile of each product. Necessary for architectural drawings, working documentation, specifications. Builders use them to understand exactly how the cornice should look in section.
Get Consultation
Catalog data with dimensions and SKUs
Tables and PDF catalogs with precise geometric parameters — height, width, profile projection, element length, center distances, bend radius. The specifier uses them to create a purchase order.
Why all three formats must be linked
The gap between these formats is the source of most problems at the project implementation stage. A beautiful 3D model of a molding without an article number and without the ability to buy a real analog is just a picture.
The correct workflow looks different: the designer selects Moldings made of polyurethane from a real catalog with specific dimensions → transfers them to 3D → approves with the client → generates a specification with article numbers → passes it to procurement.
Who works with stucco molding models: seven professional scenarios
Different specialists enter the query "stucco molding models" — and each has their own tasks.
Interior designer
The designer selects decor at the concept stage: which molding will fit into this niche, which rosette will suit this chandelier, which cornice will match the height of 2.8 m. They need 3D models for visualization and a catalog with dimensions — to ensure the decor will physically fit into the space.
Architect and designer
The architect needs drawing profiles (DWG) — for inclusion in the working documentation. They specify the product article number, its dimensions, and the number of linear meters in the project. Builders work strictly according to this document.
Visualizer
The visualizer creates a photorealistic render. It needs 3D objects with correct geometry and UV unwrapping for applying textures. A good visualizer uses models of real articles, not "beautiful but non-existent" objects.
Repair and fitting studio
The fitter creates a supply request: article, quantity, length, color. They need a specification with accurate data that can be passed to the supplier.
Private client with a design project
A person received a project from a designer and wants to check: does such decor actually exist, how much does it cost, can it be purchased. They search for "stucco models" to visually match what is drawn with real products.
Builder and foreman
The foreman looks at the drawing, sees the molding article number, and checks the catalog for how this profile is attached, its width, and whether corner trimming is needed.
Showroom, hotel, restaurant, office
A commercial facility with a large purchase volume. Here, stucco models are needed for coordinating the interior image with the owner, tender documentation, and coordination with the architect and construction company.
Which stucco elements are most often needed in a project
Before choosing specific models, it's worth understanding which stucco decoration elements are most common in design projects — and which one is needed for which task.
Wall moldings
Moldings made of polyurethane — horizontal and vertical decorative profiles that create frame design for walls, panels, accent zones. Used to form "frames" around the wall surface, horizontal bands, TV area framing, and creating vertical rhythmic lines.
Parameters needed for the project: profile height (mm), profile width (mm), projection from the wall (mm), element length (m).
Cornices and ceiling transitions
Ceiling cornice — a horizontal profile at the wall-ceiling transition. This is one of the key elements of a classic interior. Polyurethane trim — base material for cornices, baseboards, profiles.
Important for the project: cornice height (mm), projection from the wall (mm), profile character (simple, complex, composite), compatibility with ceiling height.
Ceiling Rosettes
Round or oval decorative elements in the center of the ceiling — under a chandelier or as independent decor. Parameters for the project: diameter, relief height, diameter of the central hole for wiring.
Stucco overlays and decorative elements
molded decoration made of polyurethane — these are individual three-dimensional overlays: medallions, cartouches, ornamental inserts, corner blocks, decorative rosettes. Used as point accents on walls, in frame corners, in the center of panels.
Wall decor: panels, frieze, pilasters
Polyurethane wall decor — larger elements: pilasters, decorative panels, frieze inserts. For the project, the following are important: full element size (height × width × depth), installation step, compatibility with moldings and cornices of the series.
Brackets
Polyurethane brackets — decorative supports for a cornice or canopy. Rarely used in interior projects, but necessary for facade projects and grand entrance groups.
Facade moldings
Polyurethane moldings for facades: moldings around windows, cornices, brackets, keystones, decorative frames. In country house projects — a full set of elements for visualization and approval with the client.
Why it's important to choose models based on real products: an honest conversation with the designer
This block is the most important in the article. Because this is where the main professional pitfall lies.
Beautiful model vs. real article
Imagine a situation: a designer downloaded a beautiful cornice with a lush profile from a free library, placed it in the project, got it approved by the client, and handed it over for procurement. The procurement specialist searches for this profile for three days — and doesn't find it. Because the model was drawn by an artist without reference to actual production.
Result: project rework, re-approval with the client, wasted time, nerves.
Correct algorithm
A professional designer works the opposite way:
-
Opens a real catalog moldings from polyurethane with SKUs and sizes
-
Selects specific products according to project parameters (ceiling height, style, room scale)
-
Uses Molding models linked to real SKUs for visualization
-
Passes the specification with SKUs and quantities to procurement
This algorithm saves time at all stages: approval, procurement, installation.
What a real catalog with SKUs provides
-
Accurate dimensions for integration into the project without recalculations
-
Guarantee of product availability and delivery
-
Specification is generated automatically: SKU, name, quantity
-
Ability to share the specification with builders and installers
How to choose a molding model by size: proportions, scale, compatibility
Size is not just numbers in a catalog. It is the relationship between the element and the space. An incorrectly chosen size ruins the decor as surely as an incorrect style.
Ceiling height as the main reference point
The ceiling cornice should be proportional to the room height. Here is a reference table:
| Ceiling Height | Cornice height | Cornice type |
|---|---|---|
| 2.5–2.7 m | 60–80 mm | Simple profile |
| 2.7–3.0 m | 80–120 mm | Medium complexity |
| 3.0–3.5 m | 120–180 mm | Complex, composite |
| More than 3.5 m | 180–300+ mm | Composite of several profiles |
A cornice 200 mm high in a room with 2.6 m ceilings creates a visual disproportion: the cornice will "eat up" the height of the space. A cornice 60 mm in a hall with 4 m ceilings will be lost, like a state seal on an A0 sheet.
Molding width and room scale
Molding for wall panel framing: the profile width should be proportional to the frame size.
-
Small frame 600×800 mm → molding 25–40 mm
-
Medium frame 900×1,200 mm → molding 40–60 mm
-
Large frame 1,200×1,800 mm → molding 60–80 mm
Too wide a molding compresses the frame field. Too thin — it disappears on the surface.
Profile projection and relief
The profile projection (the depth to which the element protrudes from the wall or ceiling surface) determines the plasticity of the decor.
For residential interiors: projection 20–50 mm is sufficient to create a play of light and shadow without excessive massiveness.
For formal interiors (hotels, restaurants, lobbies): projection 60–120 mm — pronounced volumetric relief.
Element length and repeatability
Polyurethane moldings and trim are supplied in standard lengths: 2 m, 2.5 m, sometimes 1 m. When designing, consider the element length: calculate the number of linear meters, number of joints, and corner cut locations.
Tip: In a 3D project, the model length is arbitrary. In reality, each element has a fixed length. Don't forget to recalculate.
How to choose moldings to match the project style: seven style scenarios
Relief Decoration is never 'universal for any style.' Each style dictates its own set of elements, proportions, and ornament character.
Classic and historical stylization
Full set: composite ceiling cornice (3–5 profiles in one assembly), ceiling rosette with lush ornament, moldings with ogee + fillet relief profile, decorative wall overlays, pilasters in piers.
For the project: each element must belong to the same series — a consistent ornamental code. Mixing profiles from different series is not allowed.
Neoclassicism
Moderate set: cornice with medium-complexity profile (ogee + shelf + band), moldings without rich ornament, simple-shaped rosette, possibly flat pilasters. No heavy decorative overlay elements.
Modern classic
Minimum set: thin rectangular molding for panel frames, simple cornice with a small overhang, no rosettes or overlays. The decor works through line, not ornament.
Art Deco
Geometric decor: moldings with stepped profile, straight lines, horizontal bands. No foliage or volutes — only geometry. Wall Decor In an Art Deco project, these are vertical and horizontal bands creating a graphic grid.
Country house, rustic, traditional style
Moldings with a soft profile without rich ornament. Cornice with a small compound profile. On the facade — Brackets with a rusticated profile, moldings around windows, horizontal bands.
Restaurant, hotel, commercial space
Here the scale is different. Ceilings 3.5–5 m, large halls — elements with pronounced relief and large overhang are needed. Compound cornices of 3–4 profiles. Large ceiling rosettes 600–900 mm in diameter. Decorative pilasters.
Study, library, cabinet style
Restrained set with emphasis on horizontal lines: molding band at a height of 1200 mm (divides the wall into a lower "panel" zone and an upper one), simple cornice, no large overlays. The image — strictness and solidity.
Wall molding models: practical usage scenarios in a project
Moldings for walls — the most frequently used element in design projects. Let's break down specific scenarios.
Frame wall design
Moldings create decorative 'frames' on the wall surface: horizontal rectangles or squares. This is a classic technique for traditional interiors.
In the project: placement of moldings should account for distances from the floor, ceiling, and between frames. Standard: bottom edge of the lower frame — 100–150 mm from the baseboard; top edge of the upper frame — 100–150 mm from the cornice or ceiling; width of gaps between frames — 60–100 mm.
Horizontal belt
A single molding installed horizontally at a certain height on the wall creates a 'horizon' — dividing the wall into lower and upper zones. Installation height: 900 mm (at work surface level), 1,200 mm (eye level of a standing person), 1,800 mm (to separate the upper decorative zone).
Accent wall with symmetrical ornament
The wall behind the headboard or sofa: symmetrical arrangement of moldings and decorative overlays creates a 'backdrop' — the main decorative element of the room. This also includes molded decoration made of polyurethane in the form of a central medallion or cartouche.
TV zone with decorative framing
Moldings frame the niche or area around the TV: they create a "frame" for the screen, visually highlighting the zone. A simple rectangular molding or a molding with a small profile is for a modern minimalist interior. A complex profile with ornamentation is for classic style.
Vertical pilasters
Vertical moldings or pilasters divide the wall into sections. They are especially appropriate in long hallways or large living rooms — creating rhythmic division and additional depth of perception.
Models of cornices and ceiling decor: how to match the project precisely
Ceiling decor is an area where size errors are immediately visible. A cornice installed according to an incorrectly calculated project must either be accepted as is or dismantled.
Wall-to-ceiling transition: cornice as a solution
Polyurethane trim — the basis for a ceiling cornice. In the project, the cornice "covers" the transition between two planes and creates a horizontal rhythm around the perimeter of the room.
Three approaches depending on ceiling height and style:
-
Simple single-element cornice — one profile. For ceilings 2.5–2.8 m, modern classic, minimalist interior.
-
Two-element cornice — cornice + lower band. For ceilings 2.8–3.2 m, neoclassical style.
-
Composite cornice — three or more elements: cornice + frieze + band. For ceilings above 3.2 m, classical style, formal interiors.
Ceiling rosette: diameter according to room size
Ceiling rosette in the center of the room — under a chandelier or as an independent accent. Diameter recommendations:
| Room area | Socket diameter |
|---|---|
| up to 15 m² | 250–350 mm |
| 15–25 m² | 350–500 mm |
| 25–40 m² | 500–700 mm |
| more than 40 m² | 700–1,000 mm |
Ceiling Composition
Several concentric moldings around the rosette — a ceiling "frame" forming the central zone. In the project, this is one of the most effective techniques: it creates a "layering" of decor and emphasizes the center.
For design: inner ring diameter = chandelier diameter × 1.5–2. Outer ring — proportional to the width of the perimeter cornice.
Models of facade stucco: from cottage visualization to real facade decor
For designers of country houses, the topic of facade decor models stands apart. Here the intent is even more commercial: the client looks at the 3D render of the house and wants to understand what the real facade will look like.
Which elements of facade stucco are needed in the project
Polyurethane moldings for facades in the cottage project:
-
Moldings around windows — framing the window opening along the perimeter
-
Horizontal belts — dividing the facade into tiers
-
Cornice under the roof overhang — horizontal profile along the top of the wall
-
Brackets — decorative supports under the cornice above the entrance
-
Keystone above windows and door
-
Decorative overlays — point accents on the facade plane
How to use facade models in 3D
In a 3D facade project, all the above elements are placed according to real coordinates: window axes, cornice installation height, distance from the roof overhang. The more accurately the geometry of 3D objects matches the real products, the more accurately the render reflects the future facade.
That is why Molding models with reference to real STAVROS article numbers give the architect a tool that works at all stages — from sketch to construction.
Facade project and specification: one logic
The architect places the cornice article number in the drawing → specifies the linear footage → the builder purchases the exact quantity. No "similar", "approximately the same profile" — a specific article number, specific quantity, specific link to the STAVROS catalog.
How to link 3D model, article number, and purchase: a seamless workflow
This is the most practically important section. Let's break down the process step by step.
Step 1. Selection from the catalog with dimensions
Open the section molding, trim, appliqués or wall decor. Filter by height, width, projection — according to your project parameters. Write down the article number and exact dimensions.
Step 2. Checking proportions in the project
Using exact dimensions from the catalog, you check proportions in 3D: whether a cornice of this height will fit under this ceiling, whether the molding will be too heavy in this frame, how a rosette of this diameter looks under this chandelier. If adjustments are needed, you return to the catalog and change the article number.
Step 3. Loading 3D models linked to article numbers
Download 3D models of stucco molding from the download section. Import them into the scene. Now the visualization features not "beautiful items from the internet," but real products with real article numbers.
Step 4. Approval with the client
The client sees the actual decor in the render. You can show them the product page, and they understand exactly what will be in their home. No "similar but slightly different" situations during implementation.
Step 5. Generating the specification
Article number + name + quantity + link to the product page. This is a full technical specification for transfer to procurement or the construction team.
Step 6. Procurement without surprises
The picker opens the specification, follows the links, places the order. The article numbers match the project. The quantity is calculated. No questions.
This algorithm is not a complication of the process, but its simplification at every step after the first.
Calculation of linear meters for the specification: error-free math
For linear elements (moldings, cornices, belts), the specification is formed in linear meters. Here's how it's calculated.
For a cornice along the perimeter of the room
Room perimeter − width of doorways (if the cornice does not go above the door) = required number of linear meters.
For example: a room 5 × 4 m, one door 0.9 m wide.
(5 + 4 + 5 + 4) − 0.9 = 18 − 0.9 = 17.1 linear meters + 10% reserve = 18.8 linear meters → order 20 linear meters
For frame moldings
One rectangle: (width + height) × 2 = frame perimeter.
For a 600 × 900 mm frame: (0.6 + 0.9) × 2 = 3.0 linear meters.
10 frames = 30 linear meters + 10% allowance = 33 linear meters.
For the horizontal belt
The length of the belt along each wall where it is installed. Door openings are subtracted.
Allowance: why 10% is mandatory
Cutting at 45° at corners creates waste. In non-standard corners (not 90°), cutting is more complex, waste is greater. Different batches of the same profile may have slight differences in length. A 10% allowance protects against all of this.
Mistakes when choosing molding models in a design project
Mistake 1. Choosing a model without a real article number
The most expensive mistake. The model in the project must be linked to a specific article number of a real manufacturer. Otherwise, the project will need to be reworked at the procurement stage.
Error 2. Not checking the dimensions of the actual product
The 3D model is scaled. The actual product is not. A cornice 200 mm high will not magically become 100 mm "because you want it to." Always check dimensions against the catalog and recalculate proportions.
Error 3. Not accounting for ceiling height
A cornice that looked beautiful in a render of a 3.5-meter room becomes a monster in a real room of 2.6 m. Scale applies to the entire scene, not an individual element.
Error 4. Using too small a profile in a large room
A thin 20 mm molding in a 50 m² hall is invisible decor. The scale of the room demands the scale of the decor.
Error 5. Mixing different style series
A classic cornice with acanthus leaves + a geometric Art Deco molding on the same wall. This is a stylistic conflict that cannot be fixed with lighting or color. All elements should be from the same series.
Error 6. Forgetting about joints and corners
In a render, the molding looks like a continuous strip. In reality, it is assembled from segments that are joined at corners at 45°. Non-standard angles, bay windows, bevels — all of this affects installation and material quantity.
Error 7. Not counting linear meters accurately
"Approximately enough" — and as a result, there isn't enough for one wall, and the next batch comes from a different shipment. Count accurately using the described algorithm.
Error 8. Not preparing a specification for procurement
A project without a specification is a pretty picture. A project with a specification is a document used for construction. Article + quantity + link = a complete technical task for the procurement specialist.
FAQ: answers to the main questions about stucco models for a design project
Where to find stucco models for a design project?
In the STAVROS download section: Molding models — 3D objects and profiles linked to real articles.
Why are 3D stucco models needed?
For project visualization, client approval, and checking the proportions of decor in the space — before procurement and installation.
How to choose a wall molding model?
By room height, frame size, interior style. Specific parameters are in the catalog of polyurethane moldings. Check the height, width, and profile projection.
Why is it important to check the dimensions of stucco molding?
A 3D model can be scaled arbitrarily. A real product cannot. A size error during procurement can only be corrected by replacing the decor after installation.
Can a real product be purchased based on a 3D model?
Yes, if the model is linked to a real SKU from STAVROS catalog. This is why it is important to work with models that correspond to real products.
What stucco molding models does an interior designer need?
Wall moldings, ceiling cornices, rosettes, Relief Decoration for overlays and accents, Wall Decor. Full range in the catalog moldings from polyurethane.
How to choose a cornice by model and article number?
By ceiling height, profile width, and projection — from the catalog polyurethane molding. Article number in the product description.
What mistakes are made when choosing stucco models?
Main ones: choosing a model without a real article number, not checking dimensions, ignoring ceiling height, not calculating linear meters, not creating a specification.
Are facade stucco models suitable for a house project?
Yes. Polyurethane moldings for facades: moldings around windows, cornices, Brackets, trims — all with article numbers and exact dimensions.
Where to view stucco with dimensions and article numbers?
Full the STAVROS catalog — moldings, cornices, rosettes, overlays, brackets, linear elements. Each product with precise geometric parameters.
STAVROS: from model in the project to product on the wall
The gap between visualization and reality is a problem solved by a systematic approach. When the 3D model in the project matches the actual article number, when the dimensions in the catalog match the dimensions in the drawing, when the specification leads directly to the shopping cart — the project is realized as intended.
STAVROS provides designers and architects with a complete toolkit: Molding models for downloading, an extensive catalog moldings from polyurethane with precise dimensions and article numbers — Moldings, Trim, Wall Decor, sculpted appliqués, Brackets. Full Catalog with delivery across Russia.
STAVROS — because a good project deserves a real implementation. Precise, coordinated, flawless.


