Article Contents:
- Carved cabinet in classic style: how to choose wooden decor for facade, cornice and doors
- What makes a cabinet carved: a system, not a single detail
- Top finish: cornice as a crown
- Door facades: frame system and central overlays
- Vertical elements: pilasters and layouts
- Handles: the final touch that changes everything
- Carved cabinet facade: how to build a decorative system on doors
- Step 1: Assess the door size
- Step 2: Build the molding frame
- Step 3: Place the central or corner overlays
- Step 4: Align the handle with the overlay
- Important nuance: symmetry of a double-door wardrobe
- Carved cornice for a wardrobe: top finish with architectural meaning
- Why a wardrobe needs a cornice
- How to choose the height of the cornice
- Cornice profile: what to choose
- Coordinating the cornice with the facade and pilasters
- Cornice in a wardrobe up to the ceiling
- Types of wardrobes and specifics of decor for each
- Swing wardrobe for clothes
- Carved bookcase
- Sliding wardrobe: carved facade without extra thickness
- Wardrobe with mirror: wooden frame as architectural decor
- White carved wardrobe: principles that work
- Why a white carved wardrobe looks different
- Patina on a white wardrobe
- Handles on a white wardrobe
- Portal wardrobe and decor around the TV zone
- Styles of carved wardrobe: what decor is needed
- Wooden decorative elements: when additional accents are needed
- Corner rosettes
- Central rosettes for handles
- Decorative frieze strips
- How to properly assemble a decor set for a carved wardrobe: algorithm
- Mistakes when decorating a carved wardrobe
- Where to find wooden elements for a STAVROS carved wardrobe
- Frequently asked questions about carved wardrobes


Carved wardrobe in classic style: how to choose wooden decor for the facade, cornice and doors
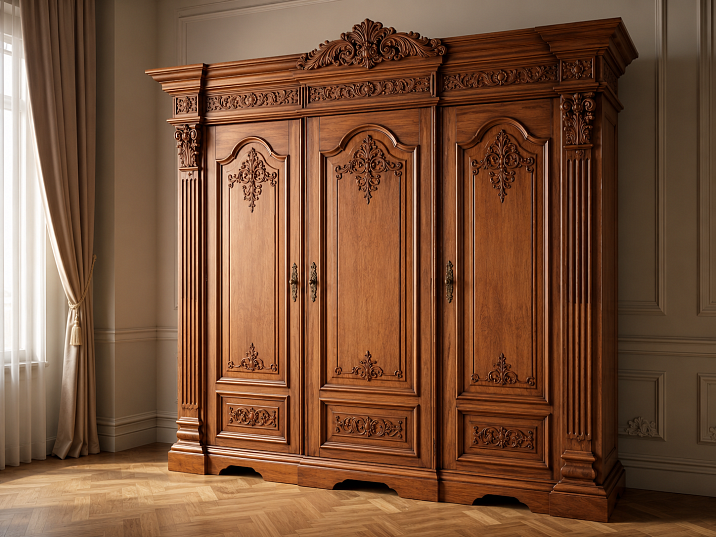
A wardrobe is not just a piece of furniture. It is a vertical architectural volume that occupies a wall, structures the space, and sets the scale of the room. In a classic interior, the wardrobe is one of the main statements of taste. And it is precisely how it is designed from top to bottom: what kind of cornice it has, how the doors look, how the facades are decorated — that forms the impression of the entire interior.
A carved wooden wardrobe is an image that cannot be confused with anything else. It is not 'bought' assembled on a marketplace. It is created: overlays for doors are selected, a cornice for the top finish, moldings for frame facades, handles, and moldings. That is how a wardrobe with character appears.
It's important to clarify things right away. STAVROS is not a furniture factory producing ready-made serial cabinets. STAVROS is a manufacturer of wooden decorative of solid wood: overlays, moldings, cornices, millwork, handles, decorative elements, and carved decor. This is a building material for those who create true classic furniture — not for those who buy something "conventionally beautiful."
If you are looking for how to design a carved wardrobe, a bookcase, a sliding wardrobe with a decorative facade, a wardrobe with a mirror in a wooden frame, or a built-in portal wardrobe — this article is written specifically for you.


What makes a cabinet carved: a system, not a single detail
Ask yourself: what do you see when you imagine a classic carved wooden cabinet? Most likely, it's not a single detail — not just an overlay on the door and not just a cornice on top. It's a complete image. A certain surface plasticity, horizontal and vertical lines, a play of shadows from the relief.
A carved wooden cabinet is built from several decorative levels simultaneously. And understanding this means learning to choose correctly.
Our factory also produces:


Top finish: the cornice as a crown
The first thing that catches the eye when looking at the wardrobe from bottom to top is the upper cornice. It completes the vertical line of the furniture, creating a horizontal "lid" over the entire system. Without a cornice, the wardrobe looks unfinished — like a house without a roof.
Carved cornice for a cabinet is not just a decorative strip. It is an architectural element with a profile: belts, breaks, possible consoles and a frieze. Cornice height for wardrobe: 80–180 mm depending on furniture height and style richness.
Get Consultation
Door fronts: frame system and central panels
Doors are the "face" of the cabinet. It is the carved cabinet front that defines the style. The frame front made of of wooden moldings creates rectangular "pictures" on each door. In the center or at the corners of these frames — carved appliqués.
This is a classic scheme: molding frame + central panel = a decoratively finished door.
Vertical elements: pilasters and moldings
Between cabinet sections and along its sides, vertical decorative elements work. wooden pilasters and columns create an architectural "trim" of the cabinet body. solid wood millwork — for moldings, vertical lines, and transitions.
Handles: the final touch that changes everything
Wooden furniture handles — the final element that "completes" the look. An incorrectly chosen handle can negate all the decor. The right handle makes the cabinet look finished.
Carved cabinet facade: how to build a decorative system on doors
The facade is always a dialogue between surface and relief. A flat door without decor is a blank slate. A door with a molding frame and overlay is an architectural 'picture'. How to build this dialogue correctly?
Step 1: Assess the door size
Narrow door (width up to 40 cm) — decoration should be compact and vertically oriented. Wide door (from 60 cm) — horizontal accents, large central overlays, and a double frame system are acceptable.
For tall doors (from 220 cm) — double frame: upper and lower "picture" with a dividing horizontal belt. This is a classic two-tier facade technique.
Step 2: Build the molding frame
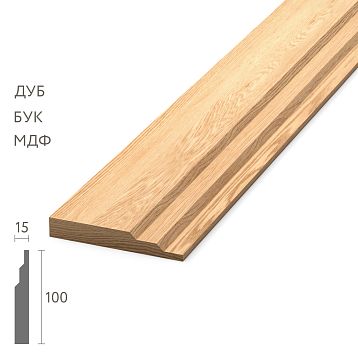
From solid wood moldings or molding with profile strips are cut at 45° for corners. The frame is attached to the door surface, forming a rectangular field.
Molding width for the frame: 10–20 mm. Distance of the frame from the door edge: 20–40 mm.
Step 3: Place the central or corner overlays
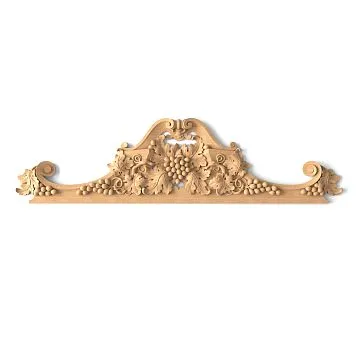
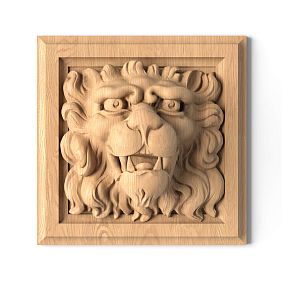
Carved decorative inserts for furniture STAVROS includes over 400 models: from compact rosettes to large cartouches and ornamental panels. The choice depends on the door size and cabinet style.
Central overlay — in the center of the frame field. Corner overlays — in the four corners of the frame (mask molding joints and add a decorative accent). A combination is possible: corner rosettes + central overlay.
Step 4: Coordinate the handle with the overlay
The handle should not overlap the overlay. Placement options:
-
Handle at the bottom of the door → overlay in the upper part of the frame field
-
Handle in the center → overlay slightly above or below center
-
Handle on the side (on a hinged door) → overlay in the center
Wooden furniture handles STAVROS — made from the same solid wood as the overlays. Single material → consistent behavior during tinting and painting.
Important nuance: symmetry of a double-door cabinet
If the cabinet has two doors, both doors must have mirror-symmetrical decor. Identical frames, identical overlays at the same level, identical handles. This is mandatory: asymmetry on a symmetrical object looks like a mistake.
In the STAVROS carved appliqués most models are presented with a mirror image (left and right versions) — precisely for such symmetrical paired solutions.
Carved cornice for a cabinet: the top finish with architectural meaning
A carved wardrobe cornice is not a decoration "for beauty." It is a functional architectural element without which the wardrobe visually does not feel "closed." Let's figure out how to choose it.
Why a cabinet needs a cornice
Look at any classical building. The top cornice is the boundary between the vertical wall and the horizontal roof. It 'reads' the scale of the building, creates shadow and a visual 'boundary' of the volume.
The same logic applies to a cabinet. A cabinet cornice:
-
Completes the vertical of the furniture
-
Creates a horizontal 'weight' at the top, balancing the lower part
-
Forms a shadow that 'emphasizes' the height of the cabinet
-
Connects the cabinet with the room's ceiling cornice
How to choose the cornice height
The height of the cornice depends on the height of the cabinet and the richness of the style:
| Cabinet height | Recommended cornice height | Style |
|---|---|---|
| Up to 200 cm | 60–90 mm | Neoclassical, Provence |
| 200–240 cm | 90–130 mm | Classic, neoclassic |
| 240–260 cm | 120–160 mm | Classic, study |
| From 260 cm (up to the ceiling) | 150–200 mm | Rich classic, Empire style |
The taller the cabinet, the larger the cornice should be. A small cornice on a tall cabinet looks like a "hat that doesn't fit."
Cornice profile: what to choose
Profile cornice for a cabinet may include:
-
Gusek (reverse or direct S-curve) — classic finishing molding
-
Fillets (straight horizontal steps) — create profile structure
-
Cavetto (concave quarter) — provides a soft smooth transition
-
Roll and bead — small protruding profile elements
-
Frieze — horizontal zone with possible decor or simple plane
For a cabinet in strict classic style — cornice with 3–4 fillets and a gusek. For neoclassicism — laconic cornice with 1–2 fillets without complex moldings.
Coordinating the cornice with the facade and pilasters
The cornice should be "richer" than the moldings on the facades. This is the principle of decor hierarchy: the larger and higher the element, the more developed its profile.
If the cabinet has Wooden pilasters on the sides or between sections — the cornice should continue above the pilaster capitals. Cornice + capitals = a complete architectural entablature.
Cornice in a ceiling-height wardrobe
A cabinet that reaches the ceiling is a special case. Here, the cornice serves as a "junction" with the ceiling. Two solutions:
-
The cornice fits tightly into the ceiling — creating the effect of a built-in wardrobe
-
The cornice almost reaches the ceiling, and the gap is concealed wooden molding at the ceiling base
The second option is preferable: it allows the wardrobe to "breathe" and compensates for ceiling irregularities.
Types of wardrobes and specific decor for each
A carved solid wood wardrobe is a broad concept. A bookcase and a wardrobe for clothes are different objects with different decorative tasks. Let's break down each case.
Swing wardrobe for clothes
A carved wardrobe for clothes is a classic wardrobe with swing doors. Typically, it is a wide volume with 2–4 doors.
Decorative program:
-
Frame facade made of moldings on each door
-
Central overlay at the top of the frame (lower part — for the handle)
-
Corner rosettes in the four corners of the frame
-
Upper cornice (90–130 mm) across the entire width
-
Lower base or legs
-
Wooden rail handles or knob handles
Feature: all cabinet doors are designed identically. Symmetry is mandatory.
Carved bookcase
A carved bookcase is an object of cabinet style. The decor here should be more strict, "masculine." Floral baroque carving is appropriate here in moderation, while geometric moldings and strict overlays are just right.
Decorative program:
-
The top cornice of great height (130–180 mm) is the "crown" of the bookcase
-
Glass upper doors in a wooden frame with wooden cornice — an elegant frame around the glass
-
Blind lower doors with molding frames and small overlays
-
Wooden pilasters between sections and on the sides
-
Vertical layouts of molding on the body
-
Lower monumental base (100–150 mm)
Finish for the bookcase: dark walnut, wenge, or dark oak tinting. Varnish or oil with wax.
If the study is decorated in a system of boiserie and wall panels — the bookcase must be decoratively coordinated with that system.
Sliding wardrobe: carved facade without extra thickness
A sliding wardrobe with carved decor is a solution that requires a special approach. Sliding doors move along rails — and any decor on the facade that "protrudes" too far will interfere with movement.
For a carved sliding wardrobe, the rule is simple: the decor must be flat or have minimal protrusion.
What works:
-
Thin moldings (8–12 mm) as a frame
-
Flat carved overlays with low relief (no more than 8–10 mm)
-
Wooden pull handles or rail handles
-
No large volumetric cartouches or overlays with deep relief
Not suitable:
-
Cornice on movable sliding doors — only on the fixed side parts of the wardrobe body and on the upper horizontal part of the frame
-
Large corner overlays on the corners of the door leaf
A carved sliding wardrobe creates a more restrained image than a hinged one — and this is its advantage: sophistication without monumentality.
Wardrobe with mirror: wooden frame as architectural decor
A carved wardrobe with a mirror is a separate and very expressive scenario. A mirror on the wardrobe door requires a frame. A wooden frame made of molding around the mirror — a classic solution.
Frame options for the mirror:
-
Simple molding frame with chamfer and bands
-
Frame with corner decorative elements at four corners
-
Frame with top arch or semi-arched cornice
-
Extended frame with "ears" and a "lock" at the top (classic mirror frame technique)
For a carved cabinet with a mirror, the top Carved cornice for a cabinet must match the mirror frame in profile. If the frame has three bands, the cornice must have at least three bands.
White carved cabinet: principles that work
A white carved cabinet is one of the most sought-after requests in classic decor. Why? Because white enamel is a universal "neutralizer": it unites different elements into a single whole and "ennobles" any carving.
Why a white carved cabinet looks different
On a white surface, shadows from the relief read softer than on a dark one. This means that for a white cabinet, you need to choose elements with deeper and more developed relief — otherwise the decor will be "lost."
Rule for a white carved cabinet: the depth of the overlay relief must be at least 12–15 mm.
Patina on a white cabinet
Patina is a technique that "restores" the readability of the relief on a white surface. Dark recesses + light protrusions = the feeling of "living" decor.
Patina can be:
-
Silver (cold tone) → for cabinets in "palace" and Empire style
-
Golden (warm tone) → for classic and baroque
-
Gray/anthracite → for modern neoclassicism
-
Dark brown → for "historical" finishes in Provence
Handles on a white cabinet
For a white carved cabinet, two paths:
-
White handles (wooden under the same enamel) — a uniform, "delicate" solution
-
Metal handles in bronze, brass, or matte gold — a classic contrast
Metal handles on a white facade with patina — one of the most "European" looks in classic furniture.
Portal cabinet and decor around the TV area
A cabinet composition with a niche is a separate topic that requires a systematic approach. A furniture portal is a built-in cabinet system with a niche in the center (for a TV, fireplace, decorative area).
for TV zone frames and the decorative system of the cabinet portal is fundamentally different from that of a regular cabinet:
-
Side sections — cabinet "towers" with doors and facades
-
Pilasters along the edges of the niche — wooden columns or pilasters frame the niche
-
Horizontal "entablature" above the niche — a horizontal plank with decor
-
Top cornice — unified across the entire system
-
Bottom plinth — unified along the entire perimeter
This is a cohesive architectural system. And solutions for STAVROS cabinets include exactly such systematic approaches.
Carved cabinet styles: what decor is needed
A carved wooden cabinet can embody different stylistic images. Let's systematize.
| Style | Overlays | Crown Molding | Moldings | Pilasters | Finish |
|---|---|---|---|---|---|
| Classic | Large, with acanthus, cartouche | Developed, 3–4 bands | Frames with corner elements | Yes, with capitals | Toning, patina |
| Neoclassical | Calm, geometric | Strict, 2 bands | Thin frames | Optional | White or gray enamel |
| Provence | Floral, small | Soft, light | Soft frames | No | White/cream enamel |
| Empire | Geometric, medallions | Massive, strict | Clear geometry | Yes, strict | Dark tint or white + gold |
| Study style | Minimal, strict | Large, dark | Strict geometry | Yes, if the cabinet is large | Dark walnut, wenge |
| English | Vertical slats | Minimalist | Thin frames | No | Light oak or white enamel |
Decorative wooden elements: when additional accents are needed
In addition to the main elements (overlays, moldings, cornice, handles), the design of a carved wooden cabinet can feature wooden decorative elements.
Corner rosettes
Installed in the corners of molding frames on door fronts. The task is twofold: masking the 45° molding joints and providing a decorative accent. Size: 25–50 mm.
For classic style — corner rosettes with a floral motif. For neoclassical style — geometric corner overlays. For cabinet style — no corner elements (clean molding joints).
Central rosettes under the handle
The handle is attached through the center of a small rosette. The rosette masks the attachment point and adds a decorative accent near the handle. This is a technique with a 'double' purpose: both functional (fasteners hidden) and decorative (relief near the handle).
Decorative frieze strips
Between two molding frames on a tall door — a horizontal dividing element. Or Wooden trim with a simple profile. Creates a horizontal accent and divides the tall door into 'top' and 'bottom'.
How to properly assemble a decor set for a carved cabinet: algorithm
Let's talk about practice. How to move from the idea "I want a carved wooden cabinet" to a specific order of elements?
Step 1: Determine the type of cabinet.
Swing? Sliding? Bookcase? With mirror? For clothes? Built-in portal? Each type requires its own decorative program.
Step 2: Take measurements.
Height and width of each door. Width of the body and side walls. Height of the cabinet. Based on this — the size of the cornice, the size of the overlays, and the length of the moldings.
Step 3: Choose a style.
Classic, neoclassical, Provence, study. The style determines the language of all other choices.
Step 4: Choose a cornice.
Height according to the table above. Profile — according to the style. Length = width of the cabinet + overhang on the sides (if the cornice extends beyond the cabinet).
Step 5: Choose moldings for the frames.
For each door — 4 strips (cut at 45°). Plus horizontal dividing elements if the door is two-tier.
Step 6: Choose overlays.
Central overlays for each door. Corner elements for frame corners.
Step 7: Select handles.
Handle type, length, placement. Check: does it conflict with the overlay?
Step 8: Decide on the bottom part.
Base or legs. If base — which profile and height.
Step 9: Decide on pilasters.
Are vertical decorative elements needed between sections or on the sides?
Step 10: Coordinate everything into one finish.
All elements — one type of wood or one color. Finish before installation.
Mistakes when designing a carved cabinet
Knowing typical mistakes saves time, money, and nerves. Here are the ten most common ones.
1. Overloaded small facade. A large overlay on a narrow cabinet door takes up the entire facade and "swallows" it. The overlay should be no more than 35% of the door width.
2. Different style of overlays and cornice. Baroque overlay + strict geometric cornice = two different cabinets in one. All decor should be in one style.
3. Lack of corner elements on the frame. Mitered joints at 45° without corner overlays are "bare" joints that are visible up close. Corner rosettes solve this issue.
4. Cornice not coordinated with cabinet height. A 60 mm cornice on a 250 cm tall cabinet is almost invisible. The cornice should be proportionate to the furniture.
5. Handles overlapping overlays. If a handle is placed directly above an overlay, it "presses" on the decor. The placement of the handle and overlay should be planned together.
6. Decor on sliding doors with large protrusion. A sliding door with voluminous overlays will not be able to move properly along the rails. For sliding doors, only flat or minimally relief elements.
7. Different wood species without tone coordination. Oak and beech under the same varnish will give different colors. All elements should be either the same species or under enamel/tinting.
8. Finishing after installation. Internal grooves of profiles and back sides of overlays will not be painted after installation. Everything should be painted before installation.
9. Pilasters of different heights. If pilasters between sections and on the sides of the cabinet differ in height, the bottom horizontal line "breaks." All pilasters must be the same height, the base must be at the same level.
10. Ignoring the bottom part. A beautiful cornice and luxurious overlays + no base at the bottom = an unfinished look. Bottom finishing is mandatory.
Where to find wooden elements for the STAVROS carved cabinet
All elements for creating a classic carved wooden cabinet — in the STAVROS catalog:
-
solutions for STAVROS cabinets — inspiration and system solutions
-
Carved decorative inserts for furniture — more than 400 models for facades and doors
-
wooden moldings, cornices, and baseboards — frames, cornices, profiles
-
solid wood millwork — layouts, vertical and horizontal lines
-
wooden decorative elements — rosettes, corner elements, inserts
-
Wooden furniture handles — for facades and doors
-
wooden pilasters and columns — for portal and cabinet systems
-
STAVROS carved decor — for rich classic projects
-
Solid Wood Items — full catalog
-
furniture solutions — decor for furniture projects
-
Boiserie and wall panels — for interiors where the cabinet is built into a wall system
-
TV Zone Frames — for cabinet portals with a niche
Frequently asked questions about carved cabinets
What is a carved cabinet?
This is a cabinet whose facades, doors, and cornice are decorated with wooden decorative elements: overlays, moldings, carved decor, pilasters, and handles. STAVROS offers all necessary solid wood elements for creating such a cabinet.
What elements are needed for a carved cabinet?
Basic set: carved door overlays + molding frames + top cornice + wooden handles. The extended set includes corner decorative elements, pilasters between sections, a bottom base, and decorative trim on the body.
How to choose a carved cornice for a cabinet?
The cornice is selected based on the cabinet height (60–200 mm), matched in style with the facades, and in profile with the moldings on the doors. The cornice should be "richer" than the moldings — this is the principle of decor hierarchy.
How does the decor of a hinged cabinet differ from a sliding wardrobe?
For a hinged cabinet, overlays with deep relief, large cornices, and shaped handles are acceptable. For a sliding wardrobe, the decor should be flat (protrusion no more than 8–10 mm) so as not to interfere with the movement of the doors.
How to design a white carved cabinet?
All elements — white enamel of the same shade. To preserve the readability of the relief — patina in the recesses (silver, gold, or gray). Handles — wooden under the same enamel or metal in warm tones.
How to choose handles for a carved cabinet?
The handle should be proportionate to the door, matched in style with the overlays, and positioned so as not to cover the central decorative element. Wooden handles from the same array provide unity of finish.
Are pilasters needed on a carved cabinet?
For cabinets with multiple sections — yes, pilasters between sections create vertical structure. For bookcases and cabinet portals — mandatory. For a simple two-door cabinet — optional.
How to design a carved bookcase?
For a bookcase: large cornice (130–180 mm), wooden frame around glass in upper sections, strict molding frames on lower doors, pilasters between sections, dark tinting. Style — office classic.
Can I buy a carved cabinet from STAVROS?
STAVROS does not produce ready-made case furniture. STAVROS offers a complete system of wooden decorative elements — overlays, cornices, moldings, handles, pilasters — to turn any cabinet into a carved classic one.