Article Contents:
- When the door is installed, but the renovation still looks unfinished
- What is a door extension: without unnecessary terms
- When an extension is not just desirable, but mandatory
- The wall is thicker than the door frame
- After replacing a door in an old house
- When installing a door in an opening with additional finishing
- A door opening in a partition with enhanced sound insulation
- An opening without a casing on one side of the room
- Which extension to buy for an interior door: the main commercial choice
- Parameter one: extension width
- Parameter two: color and material
- Parameter three: trim and molding style
- How to correctly measure extension width: step-by-step instructions
- Step one: measure the wall thickness
- Step two: subtract the door frame width
- Step three: check for unevenness
- Step four: account for the trim space
- Step five: order with a small margin
- Extension and casing: what's the fundamental difference
- Door frame
- Extension
- Baseboard
- How they work together
- Table: functions of door kit elements
- Wooden extension or MDF: an honest comparison
- Wooden extension: when it's the right choice
- MDF: when it's sufficient
- Extension for painting
- Extension matching door color or wall color: what to choose
- Matching door and casing color — the safest option
- Matching the wall color is a modern, neutral technique.
- Matching the trim color is a systematic solution.
- Contrasting extension is only by designer's intent.
- Door extension for entry doors: why slopes are especially noticeable here.
- How an entry door differs from an interior door.
- How a door extension helps in the hallway.
- Door trim: extension as part of the system.
- How trim forms a unified system.
- Extension with trim and baseboard: how it looks in the interior.
- Entry Hall
- Bedroom
- Living Room
- Kitchen
- Installing a door extension: what to know before buying.
- Methods of attaching the extension
- What influences the choice of attachment method
- Preparing the slope
- Mistakes when buying extensions: real cases and how to avoid them
- Buying without measuring the wall thickness
- Choosing a color separately from the door and casing
- Installing the extension on only one side
- Using a random board
- Not accounting for the casing width
- Covering an expensive door with a cheap slope
- Not thinking through the joint between the extension and the baseboard
- Forgetting about wall unevenness
- Kit: frame, extension, casing, baseboard — how it all comes together as a single solution
- Where to buy a door extension: a choice that won't require rework
- STAVROS: door extension as part of a wooden system
- FAQ: Answers to Popular Questions
- When is a door extension needed?
- How is an extension different from a casing?
- How to determine what width extension is needed?
- Can you buy an extension separately from the door?
- What's better: an extension matching the door color or the wall color?
- Do I need an extension if the wall is slightly wider than the frame?
- How does the extension join with the baseboard?
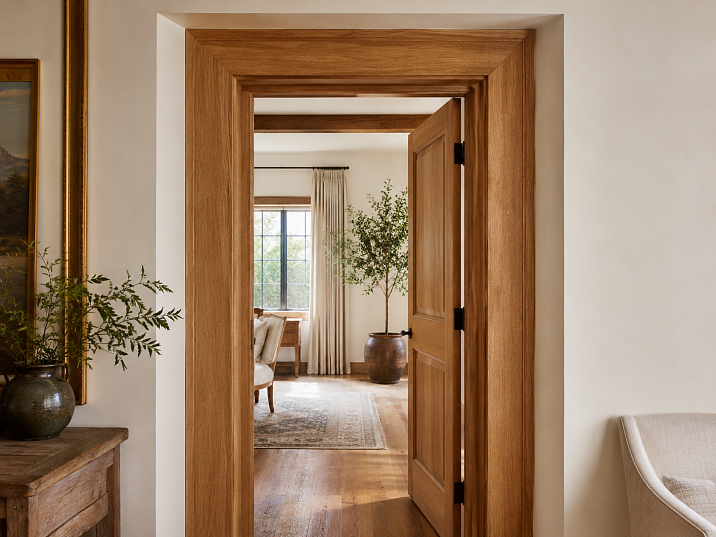


When the door is in place, but the renovation still looks unfinished
The renovation is done. The door is installed. The walls are painted or wallpapered. The floor is laid. Everything is ready — and yet something is off. Your eye stops at the doorway: between the frame and the wall, there remains a strip of uncovered slope. An untreated surface, a gap, emptiness — and it is this spot that turns a completed renovation into an unfinished one.
This problem is familiar to anyone who has dealt with installing an interior door in a wall whose thickness exceeds the width of the door frame. This is not rare — it is the norm for most residential buildings: load-bearing walls, panel ceilings, aerated concrete with finishing — all of this gives thicknesses from 100 to 300 millimeters. And a standard door frame is designed for a specific size, which often turns out to be smaller than the actual opening.
The solution is called simply: door extension. A plank that covers this difference — between the frame and the wall — and makes the doorway visually whole, finished, neat. This is exactly what we will discuss — in detail, specifically, and with answers to real questions.


What is a door extension: without unnecessary terms
If you are not a builder or a finisher, the word "extension" may be unfamiliar. But as soon as you understand what it does — the question "why is this needed" will disappear on its own.
Door extension — is a profile strip that attaches to the door frame and covers the open part of the doorway. If the wall is thicker than the frame, the extension brings the width of the trim up to the wall thickness. It acts as an extension of the frame deeper into the opening.
Imagine the end of a wall in a doorway. On one side is the door leaf and frame. On the other side, behind the frame, is the wall surface. Between them is a side strip of the slope, which without an extension remains unprotected and unsightly. Door Extension covers this strip — precisely, neatly, in the color of the door.
This is not a decorative excess. It is a functional part of the door set, without which the door installation is considered incomplete.
Our factory also produces:


When an extension is not just desirable, but mandatory
There are situations where it is physically impossible to do without an extension — the opening will look like rough finishing in a finished renovation. Let's break them down honestly.
Get Consultation
Wall thicker than the door frame
The most common case. Door frames are standardly designed for a specific wall thickness. When the actual thickness exceeds the design thickness, the frame does not cover the entire opening. An open slope remains.
This occurs when:
-
on load-bearing brick walls with thick plaster;
-
on aerated concrete blocks with double-sided finishing;
-
on walls with a thermal or sound insulation layer;
-
a door installed not in the center of the wall, but closer to one of the planes.
After replacing a door in an old house
In Soviet-era houses, openings are often non-standard. The new frame does not match the depth of the opening — and the slope remains uncovered again.
When installing a door in an opening with additional finishing
If after installing the frame the walls were plastered, covered with drywall, or finished in another way — the wall thickness increased. The frame that was flush is now insufficient.
Door opening in a partition with enhanced sound insulation
Soundproof partitions often have a double layer of drywall with backfill or mineral wool. The thickness of such a partition is 120–150 mm or more. A standard frame will not cover the entire slope.
Opening without a casing on one side of the room
Sometimes the design requires a casing only on one side — for example, in a niche or hallway. The extension then covers the wall end and looks like part of the design solution.
Which extension to buy for an interior door: the main commercial choice
The question "which extension for an interior door to buy" breaks down into three independent parameters. Determine each — and the choice becomes obvious.
Parameter one: extension width
This is a calculated value. You don't guess — you measure. Details on measuring are in the next section. It's important to understand: the extension width must exactly cover the difference between the wall thickness and the frame width. Neither less nor significantly more.
Parameter two: color and material
Wooden extension or MDF? For painting or to match the door? The answer depends on the interior style, door material, and casing.
Parameter three: style of casing and trim
The extension is part of a single door set: frame, extension, casing. All three elements must be compatible in style, material, and color. Not just in size—but in character.
How to correctly measure the width of the extension: step-by-step instructions
This is a practical section. A measurement error means wasted money and time on rework.
Step one: measure the wall thickness
Measure the wall thickness including plaster, putty, and finish on both sides. Tool: tape measure. Measure horizontally through the opening at several points—near the ceiling, in the middle, near the floor. Walls can be uneven, especially in older homes.
Step two: subtract the frame width
Take the door's specification sheet or measure the installed frame directly. The frame width is the distance from one edge to the other horizontally (along the wall end).
Required extension width = wall thickness − frame width
If the wall is 115 mm and the frame is 100 mm — the extension is 15 mm. If the wall is 135 mm and the frame is 100 mm — the extension is 35 mm.
Step three: check for unevenness
If the difference at different points on the wall is 3–5 mm — take the extension based on the maximum measurement. Gaps under the trim will hide small differences.
Step four: account for the trim space
The trim will lie on top of the extension. If the extension is too wide — the trim will not cover the joint neatly. If too narrow — there will be a gap between the extension and the trim. The standard trim width is 60–70 mm. The extension should end where the trim begins.
Step five: order with a small margin
It's better to take an extension with a margin of 10–15 mm in width. Excess can be trimmed during installation. Missing material cannot be added later.
Extension and trim: what is the fundamental difference
This question is asked often — and the confusion is understandable because both elements cover the doorway. But they cover different parts of it and perform different tasks.
Door frame
The frame is the base. It holds the door leaf, ensures hanging, and shapes the geometry of the opening. The frame is the foundation.
Extension
Door extension — is an extension of the frame. It attaches to the end of the frame and covers the exposed part of the slope. The extension is not visible from the outside — its plane is parallel to the wall plane and faces inward into the opening.
Casing
wooden casing — is a decorative strip that covers the joint between the frame (with extension) and the wall on the front side. The casing is visible — it is the external framing of the door.
How they work together
Frame + extension + casing = a closed door opening. This is a three-level system:
-
the frame holds the door;
-
the extension covers the slope from inside the opening;
-
the casing covers the joint from the outside.
More details about this system — in the article about casings and extensions for doors.
Table: functions of door kit elements
| Element | What it covers | Where visible | Main task |
|---|---|---|---|
| Frame | Door leaf perimeter | On both sides | Holds the door leaf |
| Extension | Slope inside the opening | Inside the opening | Covers the thickness difference |
| Casing | Joint of frame and wall | From the front side | Decorative framing |
Wooden extension or MDF: an honest comparison
On the market, extension planks are offered in two main materials: solid wood and MDF. Each has its own area of application.
Wooden extension: when it is the right choice
Wooden extension — a choice for interiors where material quality is fundamental. These are:
-
classic and neoclassical interiors with natural materials;
-
country houses with wooden doors, furniture, beams;
-
apartments with wooden parquet, solid wood baseboards, and natural doors;
-
rooms where the extension will be part of a system with wooden casings, wooden baseboards and moldings.
Advantages of wood:
-
Natural texture and warm appearance.
-
Accepts tinting, varnish, and oil well.
-
Long-lasting with proper care.
-
Can be sanded and the surface refreshed.
-
Pairs with any wooden trim.
Limitations:
-
Sensitive to humidity fluctuations (not for bathrooms without ventilation).
-
Requires proper storage before installation.
-
Costs more than MDF.
MDF: when it is sufficient
MDF extension is a practical option for standard interior doors in typical apartments where price and speed are the main priorities.
Advantages:
-
Stable geometry without warping.
-
Uniform surface for painting or film.
-
Cheaper than solid wood.
Limitations:
-
Ends require careful handling during installation.
-
Less suitable for interiors with natural materials.
-
Harder to bend or fit on uneven slopes.
Extension for painting
If the door, trim, and extension are to be painted in a single color, an extension for painting made of MDF or prepared solid wood provides a perfectly smooth surface without visible texture. This option is especially relevant in modern and minimalist interiors where all door elements are painted white, gray, or another neutral color.
Extension in door color or wall color: which to choose
This is a question that seems secondary but actually determines the visual result. The wrong extension color can ruin even a well-installed door.
In the color of the door and trim — the safest option
Extensions for interior doors in the same color as the door and casing, creating a unified framing system. The opening is perceived as a complete set. The eye does not stumble over the boundary between the extension and the frame.
This always works — in any style, in any room.
In the color of the wall — a modern, neutral technique
If the extension is painted in the color of the wall, it visually 'dissolves' into the slope. The doorway appears deeper, and the door itself seems built into the wall. This is relevant for minimalist interiors where you want a minimum of visible details.
Minus: an extension in the color of the wall often 'gets lost' next to a bright casing and creates a strange transition — the casing is bright, the extension is inconspicuous, the wall behind it is different. This effect needs to be thought through in advance.
In the color of the casing — a systematic solution
If the color of the casing and the color of the door match, it is logical to make the extension the same. If the casing differs from the door, it is better to make the extension in the tone of the casing: after all, it will be the one bordering the extension on the front side.
Contrasting extension — only by designer's intent
An extension of a different color is a specific technique that requires precise calculation. Without a conscious design decision, it looks like a mistake.
Extension for the entrance door: why slopes are especially noticeable here
Extension for entrance door — a separate story. The entrance door is located in an external or load-bearing wall, the thickness of which is rarely less than 300–400 mm. Even considering that part of the slope is finished with slope panels from the outside, the inner part of the opening requires covering.
How an entrance door differs from an interior door
-
The wall thickness is significantly greater.
-
The slope from the apartment side is clearly visible from the hallway.
-
An unfinished slope of the entrance door is especially noticeable — it is the first surface seen upon entry.
How the extension helps in the hallway
In the hallway, the entrance door extension is part of the cohesive look of the entry area. If the hallway is decorated with wooden skirting boards, moldings, and wooden details, then an extension made of the same solid wood continues this system.
The entry area looks especially expressive when the doorway is designed as door portal — with pilasters, capitals, moldings, and architraves. In this case, the extension is one of the details of the architectural framing of the entrance.
Door trim: extension as part of the system
The extension does not exist in isolation. It is part of a broader door trim system for interior doors.
The complete door trim system includes:
The frame. The main load-bearing element — three strips (two vertical and one horizontal — the lintel). The frame forms the opening.
Extension. Covers the difference between the frame width and the wall thickness.
Architrave. Decorative trim that is attached over the joint of the frame and the wall. Wooden casings — an independent decorative element that can be smooth, profiled, or carved.
Cover strip. A strip for closing gaps and joints — if necessary. It is part of the system wooden moldings and baseboards.
Baseboard at the base. Wooden baseboard at the base of the doorway should correctly join with the casing — not overlap it or leave a gap.
How trim forms a unified system
Wooden trim — this is not a set of individual planks, but a finishing system. When the extension, casing, and baseboard are made from the same wood species and with the same tint — the doorway looks like a designed architectural element, not a construction site simply covered with pieces of wood.
That is why professional designers and experienced finishers always order all trim as a set — from one source and from one material.
Extension in a set with casing and baseboard: how it looks in the interior
A doorway is a vertical accent in a room. In small spaces, it occupies a significant part of the wall. How it looks directly affects the perception of the entire space.
Entryway
In the hallway, the doorway is often one of the most noticeable places. The wooden extension, solid wood casing and the wooden baseboard create a cohesive design for the entry area. If the hallway is small — trim made of light wood visually does not narrow the space.
Bedroom
In the bedroom, the door is not the center of attention, but it shouldn't look like an abandoned opening either. A quiet, neat extension in the color of the door with a modest profiled trim is exactly what is needed.
Living Room
In the living room, the doorway can be decorated more richly — with a profiled trim, moldings, or even a door portal. Here, the extension works as a base that "hands over" the final look to the trim.
Kitchen
In the kitchen, there are often doors to the pantry, utility room, or hallway. The extension here is practical: it cleans up lines and removes unfinished slopes.
Installing the extension: what to know before buying
Buying an extension means understanding how it will be attached. This affects the choice of material, width, and profile.
Methods of attaching the extension
With glue. The extension is glued to the frame using construction adhesive or liquid nails. Fast, neat, with no visible fasteners.
With screws followed by putty. The extension is fixed with screws, the heads are countersunk and filled with putty. Reliable, but requires careful finishing.
Into the frame groove. Some door systems provide a special groove for the extension in the frame. The extension is inserted into the groove — and that's it. The neatest method.
What influences the choice of attachment method
-
Box material (wood or MDF).
-
Slope evenness (the more crooked, the more important mounting flexibility).
-
Requirements for the final appearance.
Slope preparation
Before installing the extension, the slope must be leveled: large irregularities, dust, and moisture removed. If the slope is crumbling, it is primed. An uneven slope holds the extension poorly and creates gaps.
Mistakes when buying extensions: real cases and how to avoid them
Buying without measuring the wall thickness
The most common mistake. They buy "approximately" — and end up with either a narrow extension that doesn't cover the slope, or a wide one that protrudes beyond the wall plane.
Solution: measure at three points, choose based on the maximum value with a 10 mm margin.
Choosing a color separately from the door and casing
A dark-toned extension next to a light door and light trim creates a visual break. Or the extension is lighter than the trim, although it should be uniform with it.
Solution: order the extension, trim, and baseboard from the same set or compare samples.
Install the extension on only one side
If the opening is through on both sides, the extension is needed on both. One side with an extension, the other with an open slope. This looks asymmetrical and unprofessional.
Solution: always check both sides of the opening.
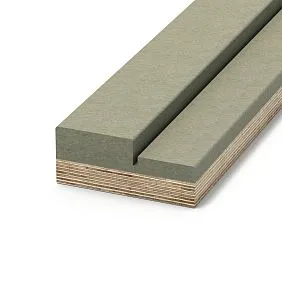
Use a random board
A board is not an extension. A door extension has precise width and thickness dimensions, even geometry, and proper edge treatment. A random board creates an uneven joint, poorly accepts coating, and does not match the trim profile.
Solution: purchase Door molding — specially manufactured profile material.
Not accounting for the trim width
The casing will lie on top of the extension. If the extension extends beyond the frame wider than the casing covers, a gap between the extension and the wall will be visible.
Solution: measure the width of the casing and ensure it covers the entire joint.
Covering an expensive door with a cheap slope
An expensive wooden door with a plastic slope is a mismatch that immediately catches the eye. The material of the extension and casing should match the class of the door.
Solution: a wooden door requires a wooden extension and casing made from the same or compatible material.
Not planning the joint between the extension and the baseboard
At the base of the doorway, the extension meets the baseboard. If they do not match in thickness or profile, the joint will look unsightly.
Solution: select the baseboard and casing as a set, considering their intersection points.
Forgetting about wall unevenness
In old houses, walls are rarely perfectly level. An extension purchased without allowance may not fit tightly in uneven conditions.
Solution: take an extension with width margin and use flexible mounting adhesive.
Kit: box, extension, casing, baseboard — how it all comes together as a single solution
A professional approach to a doorway is not "buy an extension" or "add a casing." A professional approach is a kit where each element is designed in conjunction with others.
When Extensions for interior doors, casings, baseboards, and moldings are made from the same wood species, with the same stain and a coordinated profile — the doorway ceases to be a technical hole in the wall. It becomes an architectural element. One that catches the eye — not because something is wrong, but because everything is done right.
door portal — the highest level of this system. The portal combines casings, extension, moldings, and decorative elements into a single frame that works as an architectural door frame.
Where to buy a door extension: a choice that won't require rework
Buy a door extension — means choosing not just a strip of the right width, but an element in a unified system with the casing, baseboard, and all wooden trim of the room.
Buy extensions for interior doors with the ability to select Wooden casings, Wooden trim и Solid wood skirting boards In a unified style is the right approach.
STAVROS: door extension as part of a wooden system
STAVROS — manufacturer and supplier of solid wood for interior projects. Wooden moldings, architraves, baseboards, casings, frames, extensions, door portals — all these elements are made from natural wood and form a unified door opening finishing system.
Buy door extension from STAVROS means getting a product that fits exactly into the door set in terms of wood species, tint, and profile. The door slope after renovation will no longer look unfinished.
FAQ: Answers to popular questions
When is a door extension needed?
A door extension is needed when the wall thickness is greater than the width of the door frame and part of the door slope remains exposed. This is the most common situation when installing interior doors in brick, aerated concrete walls, or insulated partitions.
How is a door extension different from an architrave?
Door extension covers the side surface of the slope inside the opening. wooden casing covers the joint between the frame and the wall on the front side. These are different elements with different functions.
How to determine the required width of an extension?
Measure the wall thickness, subtract the door frame width. The resulting number is the required extension width. Take measurements at several points, use the maximum value with a margin of 10–15 mm.
Can I buy an extension separately from the door?
Yes. Buy door extensions separately. It is important to correctly choose the color, material, and width — in accordance with the installed frame and casing.
What is better: an extension matching the door color or the wall color?
An extension matching the door and casing color is a universal and safe choice. An extension matching the wall color is a modern minimalist technique where the extension visually "disappears." The choice depends on the interior style.
Is an extension needed if the wall is slightly wider than the frame?
Yes, even a difference of 10–15 mm is a visible slope. A narrow extension will cover it as neatly as a wide one covers a large gap.
How does the extension join with the baseboard?
The lower end of the casing meets the upper edge of the baseboard. To make the joint look neat, the profile of the baseboard and the thickness of the casing must be coordinated. When purchasing wooden moldings and baseboards from the same catalog, this problem is solved automatically.