Article Contents:
- What is a decorative bracket and why it's not just a "decoration"
- Polyurethane as a material: characteristics that matter
- Where to use polyurethane brackets: a complete overview of zones
- Under a decorative shelf
- At a console in the hallway or foyer
- Under the cornice: along the top line of the room
- On the sides of a fireplace or decorative portal
- In the fireplace area: under the shelf above the fireplace
- In the study: under the bookshelves and under the shelf above the desk
- For built-in furniture: furniture decor
- In the mirror area: decorative frame and accent
- Shelf brackets: scenarios and selection recommendations
- How to choose a shelf bracket
- What to buy together with shelf brackets
- Cornice brackets: how this technique works
- How to properly position brackets under the cornice
- Ceiling decor near brackets
- Brackets and stucco decor: how to create a system without overloading the interior
- "One Main Element" Rule
- The symmetry rule
- Consistent Style Rule
- Painting Rule
- Bundling: What to Buy with Brackets
- Styles and Brackets: What Suits Whom
- Classic and neoclassic
- Modern Neoclassicism
- Provence and Country Style
- Art Deco
- Scandinavian Classic
- Practical Scenarios: Stories About Specific Places
- Entryway with Console and Mirror
- Living Room with Fireplace and Shelf Above It
- Study with Bookshelves
- What to buy for different tasks: summary table
- Installation of Polyurethane Brackets: A Step-by-Step Guide
- Tools and Materials
- Sequence of work
- Frequently Asked Questions
- STAVROS: Manufacturer with a Full Range for Architectural Decor
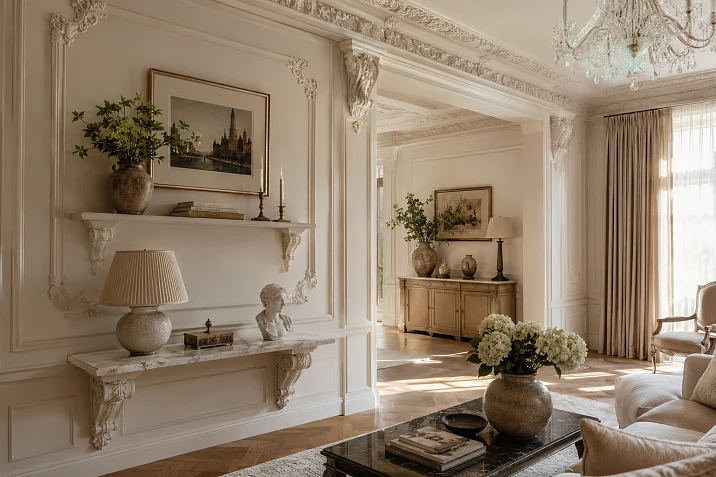
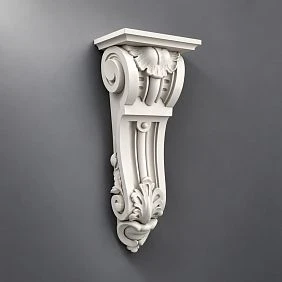
There is a moment in renovation when everything is already done: walls, ceiling, furniture in place — but something is off. The space looks correct, but it doesn't feel alive. The wall above the console is empty. The shelf hangs "just like that." The cornice ends abruptly, without transition. The fireplace area is marked but not decorated. It is precisely in such places Polyurethane brackets they do what no molding and no overlay can do: add architectural volume to the interior — where a regular molding is already too little, but columns or pilasters are too much. Polyurethane brackets work as an architectural detail: they support a shelf or cornice, enhance a portal, add volume next to moldings, and help make the interior more expensive without heavy joinery and complex renovation.
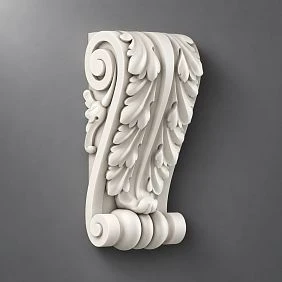
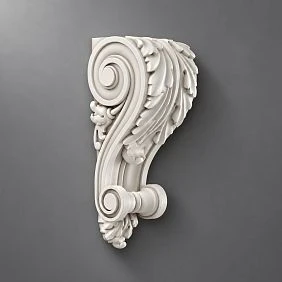
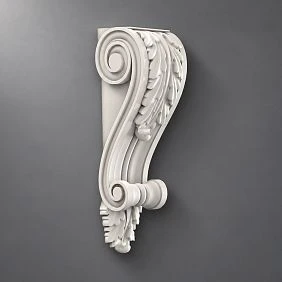
What is a Decorative Bracket and Why It's Not Just "Decoration"
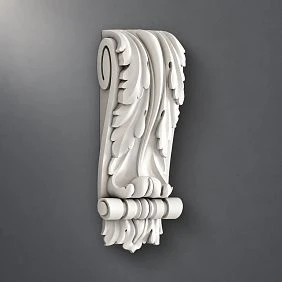
Let's start with a definition that many understand simplistically. A bracket in the architectural sense is a protruding load-bearing or decorative element that visually supports the structure above: a shelf, beam, cornice, console, wall projection. In historical architecture, brackets carried real load — they held stone balconies, projecting cornices, support ledges. In a modern interior, a decorative polyurethane bracket plays this role visually: it creates the illusion of support, making the upper line of the room, shelf, or console architecturally justified.
Why is this important? Because humans have an intuitive sense of gravity. When a shelf is "just nailed" to the wall, the brain registers: no transition, no logic. When there are a couple of brackets underneath, even decorative ones, logic appears: there is support, there is transition, there is an architectural connection between the wall and the horizontal. The space gains explanation.
That is why Decorative brackets — this is not just stucco "for beauty." It is a tool that solves specific architectural tasks in the interior. And these tasks are quite commercial: under a shelf, at a console, under a cornice, on the sides of a portal, in a fireplace area — everywhere where volume and architectural transition are needed.




Polyurethane as a Material: Characteristics That Matter
Before discussing application, it's worth understanding the material. A polyurethane bracket is not plaster, not wood, and not foam. It is a high-density foamed polymer that combines lightness and strength in a unique way.
Several characteristics that define the choice of professionals:
-
Weight. A polyurethane bracket weighs 8–15 times less than a plaster counterpart of the same size. For wall mounting, this means: no anchors, no complex fastening systems. Glue — and it's done.
-
Stability. Polyurethane does not deform from temperature and humidity changes. This is important for hallways, foyers with entrance doors, kitchens, and areas near fireplaces.
-
Relief. Polyurethane is cast in high-precision molds, reproducing the smallest details of the ornament. Leaves, curls, weaves — all of this is conveyed with an accuracy unattainable in hand-molded plaster.
-
Painting. After installation, the bracket surface can be painted with any composition: acrylic paint, enamel, patina, gilding. No special primers — just standard surface preparation.
-
Durability. Polyurethane does not rot, crumble, or absorb moisture. With proper installation, the service life is decades without loss of appearance.
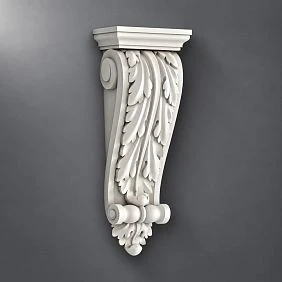
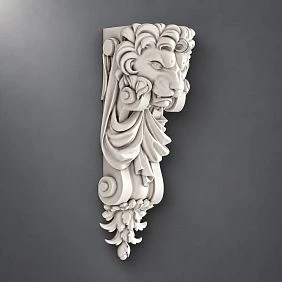
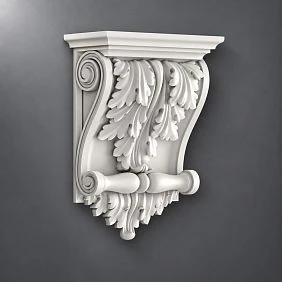
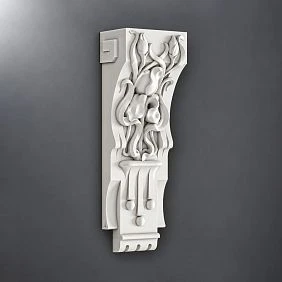
Assortment polyurethane brackets STAVROS — from small models starting at 1,370 RUB to large architectural elements for 17,310 RUB and above. This is a wide range covering tasks from a delicate accent on a shelf in the bedroom to a grand bracket under a hall cornice.
Our factory also produces:
Where to use polyurethane brackets: a complete overview of areas
Before discussing specific scenarios, it is useful to create a "map" of places in the interior where a decorative bracket works best. This is not an exhaustive list — rather a guide to help understand the logic of application.
Get Consultation
Under a decorative shelf
The most obvious and commercially active scenario. A decorative shelf in the living room, bedroom, study, or hallway is not just a storage item. It is an architectural element that must be "seated" organically on the wall.
Two brackets at the edges of the shelf (or four if the shelf is wide) create visual support points that connect the horizontal line of the shelf with the vertical line of the wall. If the shelf is painted the same color as the brackets, it becomes a monolithic architectural detail. If it matches the wall color, the detail "dissolves" into the wall but retains volume and shadow.
For shelves in classic and neoclassical interiors, suitable are Decorative brackets with floral or geometric patterns. For minimalist spaces, smooth brackets with a clear angular profile.
For a console in the hallway or foyer
A console is one of the main "architectural" furniture pieces. It is thin, protrudes from the wall, holds a mirror, and often stands beneath it. The console sets the first impression upon entering a home or apartment.
Brackets under the side parts of the console or under its tabletop add visual weight. Without brackets, the console looks light, almost weightless. With brackets, it looks substantial, architectural, and expensive. This is exactly the effect needed in formal hallways and foyers, where the console must make an impression.
Next to the console, it is appropriate to use decorative molding on the wall—a small cartouche or symmetrical overlays on the sides of the mirror. Brackets, stucco, and the mirror together form a complete composition—the wall "iconostasis" of the hallway.
Under the cornice: along the top line of the room
A cornice bracket is a classic architectural element that accompanies the ceiling cornice along the perimeter or at key points: above doorways, above windows, at corners. It visually "holds" the cornice, creating the illusion that the cornice rests on point elements rather than being simply attached to the ceiling.
This technique is used in classical architecture. In modern interiors, it is applied in hallways, living rooms with high ceilings, and studies in a classical style. Brackets under the cornice are placed at equal intervals — typically from 80 to 150 cm — and create a rhythmic decorative band.
For such a solution, it is important to coordinate the bracket with ceiling moldings и polyurethane moldings in style: the profile of the cornice and the design of the bracket should come from the same architectural vocabulary.
On the sides of a fireplace or decorative portal
Brackets on the sides of a fireplace portal are a strong architectural technique. In the classical tradition, they "support" the horizontal fireplace shelf above the portal: visually justifying this protrusion, creating a sense of architectural transition.
In modern interiors with decorative portals, bio-fireplaces, or TV zones in a fireplace format, brackets perform the same task: they add volume to the side parts of the portal, making the area more monumental. They can work independently — without pilasters and capitals — as a lighter, less structural alternative.
If the fireplace area is designed with of polyurethane moldings и decorative molding, brackets on the sides of the portal fit into this system as an additional accent, without disrupting the logic of the overall composition.
In the fireplace area: under the shelf above the fireplace
A mantel shelf — a horizontal shelf above the portal — is one of the main structural and decorative elements of the fireplace area. It carries decor: clocks, vases, paintings, a mirror. And it is precisely this shelf that requires brackets — as an architectural justification for its projection.
Two brackets under the mantel shelf make it architecturally "correct": it is no longer simply nailed to the wall but rests on supports, as it should. In a classic interior, this is a mandatory element. In modern neoclassicism, it is recommended.
In the study: under bookshelves and under the shelf above the desk
A classic-style study is an ideal environment for decorative brackets. Bookshelves with brackets look solid and dignified. A workspace with built-in shelves, where each shelf has decorative supports, gives the impression of a thoughtfully designed architectural interior, rather than just a "cabinet without doors."
For a study, brackets with geometric or restrained floral patterns work particularly well — active baroque ornamentation in a workspace can be distracting.
For built-in furniture: furniture decor
Decorative brackets are actively used as an element of furniture decor. Polyurethane Items for furniture allow turning an ordinary white cabinet into something more architectural: small brackets under the upper cornices of the cabinet, on the sides of built-in columns, at corner posts — all this creates the feel of handcrafted luxury furniture without its actual cost.
This is especially relevant for kitchens with classic-style facades: the upper kitchen cornice with brackets around the perimeter is no longer just a kitchen, but an architectural furniture system.
In the mirror area: decorative frame and accent
A mirror in the hallway, living room, or bathroom can be designed as a wall architectural composition. Two brackets on the sides of the mirror — symmetrically, at the same level — create a "pilaster" effect: the feeling that the mirror is set into a niche with supports on the sides. This works especially well if there is a console or vanity table nearby.
Brackets for a shelf: scenarios and selection recommendations
Decorating a decorative shelf with brackets is the most accessible and most noticeable scenario in terms of results. Let's break it down in detail.
How to choose a bracket for a shelf
The first thing to determine is size. The bracket should not be thinner than the shelf: if the shelf is 2 cm thick, the bracket must protrude at least that much, otherwise it will get lost. Optimal: the height of the bracket is approximately equal to the width of the shelf or slightly less.
Second is the style of the design. For a shelf in a classic interior, brackets with ornamentation are suitable: leaves, curls, floral motifs. For neoclassicism — minimalist, with a clear profile and minimal relief. For Scandinavian and modern styles — smooth brackets in the color of the wall, which add volume without drawing unnecessary attention.
Third is the quantity. For a shelf up to 60 cm long, two brackets at the edges are enough. For a shelf 80–120 cm — two at the edges and one in the center (or two with a 20–25 cm indent from the edges). For long shelves from 150 cm — brackets with a spacing of 50–60 cm.
What to buy together with brackets for a shelf
To make a shelf with brackets look complete, a decorative background is often needed. Several options:
-
Molding frame. Moldings made of polyurethane around the shelf zone, brackets create a rectangular field, inside which the shelf with brackets looks like a built-in architectural detail, not just a nailed board.
-
Decorative overlay above the shelf. A small stucco accent in the center of the wall above the shelf — a medallion, cartouche, or ornamental overlay — completes the vertical composition and makes the zone independent.
-
Painting the zone. A rectangle of wall around the shelf, highlighted with a contrasting color or background, turns the shelf with brackets into a "niche without a niche" — a visually recessed area that looks more expensive than it actually is.
Brackets under the cornice: how this technique works
A cornice bracket is one of those elements that does not catch the eye individually, but radically changes the perception of the entire space. When it is present, the ceiling area looks architecturally complete. When it is absent, the cornice hangs "on glue" and the entire top line looks unfinished.
How to properly place brackets under the cornice
The spacing is determined by the scale of the space and the character of the cornice:
-
For a hall or living room with ceilings of 3–3.5 meters — spacing of 90–120 cm.
-
Above openings and windows — brackets on both sides of the opening create a visual "accent" above it.
-
In the corners of the room — brackets near the corners fix the top line and prevent it from "sinking" at the junction of planes.
The brackets under the cornice can be identical — creating a uniform rhythm — or alternate: a large one at central points, a smaller one between them. The second option is more architecturally rich but requires precise marking.
To coordinate the bracket with the cornice, it is important that the bracket's projection depth does not exceed the cornice's projection depth: the bracket should not "stick out" beyond the cornice. Ideally, the bracket is slightly recessed relative to the cornice line or aligns with it.
Ceiling decor near the brackets
Ceiling molding in combination with cornice brackets creates a multi-level upper zone. The cornice is a horizontal band. The brackets are vertical accents beneath it. The ceiling rosette is a central accent above the entire zone. Three levels, three types of decor — and the upper part of the room transforms into an architectural tier visible from any point in the space.
This technique works especially well in halls and living rooms with ceilings from 3 meters, where the upper zone without decor looks empty and "tubular."
Brackets and stucco decor: how to create a system without overloading the interior
One of the main fears when working with decorative brackets is "overdoing it." A bracket itself is a protruding, noticeable, voluminous element. If next to it there is active stucco, rich moldings, and something else, the eye gets lost in details and stops perceiving the composition as a whole.
How to avoid this?
The "one main element" rule
Each zone should have one main decorative accent. If brackets under a shelf are the main element, they are the focus. Moldings around the zone are auxiliary, in the wall color. Stucco decor is minimal — one element in the center. Not three different overlays, not lush ornamented frames, but a delicate background for the bracket as the main character.
If the main element is decorative stucco above the fireplace, and the brackets on the sides are a complement, then the brackets are chosen to be subdued: smooth profiles, without ornament, in the wall color.
The rule of symmetry
Decorative brackets are always installed in pairs or in an even rhythm. A single bracket under a shelf is a mistake. Two at the edges or four with equal spacing is the rule. Symmetry creates a sense of intentionality: this interior is designed, not "happened by accident."
Rule of consistent style
buy a polyurethane bracket with an active baroque ornament — and placing it next to geometric moldings in the art deco style — means creating a dissonance that catches the eye. All decorative elements of the zone must be from the same architectural vocabulary. For classic — floral ornament. For neoclassical — geometric relief. For Scandinavian and modern — smooth profiles.
Rule of painting
Brackets in the color of the wall are a "soft" option: they add volume but don't shout. Brackets in a contrasting color or with patina are a "loud" option: they attract attention and become the decorative dominant. The choice depends on the task: if you want an accent — contrast. If you want architectural volume without extra attention — wall color.
Bundling: what to buy with brackets
A bracket is rarely bought alone. Here are standard "bundles" for different tasks.
Brackets + moldings. The most common combination. Moldings made of polyurethane create a frame, brackets — volume inside or under it. Moldings set horizontals and verticals, brackets — point protrusions. This is a balanced pair.
Brackets + decorative stucco. For fireplace areas and halls. Buy Moldings Suitable as central overlays, cartouches, or symmetrical elements above the bracket zone. The stucco is flat, the bracket is voluminous; together they create a multi-textured, rich decorative area.
Brackets + ceiling stucco. For the upper zone of the room. Ceiling molding And cornice brackets work as a system: the cornice is a horizontal line, the brackets are rhythmic accents beneath it.
Brackets + glue + paint + spare. Mandatory construction "kit". Acrylate-based mounting adhesive, acrylic putty for joints, primer and paint. Spare 1–2 brackets in case of chipping during cutting.
Styles and brackets: what suits whom
Classicism and neoclassicism
Brackets with floral ornament—acanthus leaves, vine tendrils, scrolls—are organic in a classic interior. They are appropriately used in a full decorative set: under the cornice, under the mantel shelf, under shelves in the living room. Color—white or cream, matching the rest of the stucco.
Modern neoclassicism
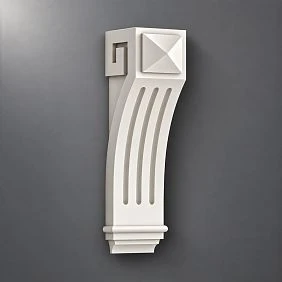
Brackets with a laconic geometric relief or smooth profile ones. Mounted primarily under shelves and under the cornice of a hall or living room. Color—white or matching the wall. The style is strict, without baroque opulence.
Provence and country
Brackets with a small-scale plant motif: leaves, twigs, simple floral overlays. White or in warm pastel shades. Ideal for wooden or laminated shelves in a Provencal style.
Art Deco
Brackets with geometric ornament: zigzags, fans, stepped profiles. Color—white with gold patina or anthracite with a gold accent. Quantity—minimal: only at key points.
Scandinavian classic
Smooth brackets without ornament or with minimal relief. White, matching the walls. Size—small, delicate. The goal is to add volume and architectural completeness while staying within the bounds of "quiet" decor.
Practical scenarios: stories about specific places
Entryway with a console table and mirror
Imagine: a narrow entryway, light gray walls, a white console table with thin legs. Above it — a rectangular mirror. To the left and right of the mirror — two wall sconces. Everything is correct, everything is in place — but something is missing.
Add: two decorative brackets under the side parts of the console tabletop. A small stucco cartouche made of decorative molding between the sconces and the mirror. A thin molding frame around the rectangle of the wall above the console. Everything — in white matte. Result: the same entryway, but now the entrance area has architectural logic. It looks designed.
Living room with a fireplace and a shelf above it
Living room in neoclassical style. Fireplace portal made of MDF with marble finish. Above it — a wooden shelf on brackets. Wall — white. What to add?
Two brackets under the shelf — with a laconic geometric relief, white. On the sides of the portal — symmetrical sculpted appliqués in the form of vertical floral elements. Molding frame around the portal — straight profile 40 mm. Along the ceiling perimeter — cornice with ceiling moldings 80 mm, brackets under it with a step of 100 cm. Everything in white. Cost of the set — several thousand rubles. Visual result — level of an architectural project.
Study with bookshelves
Home office, built-in bookshelves along one wall. Shelves — MDF, white. On each shelf — two brackets. On top along the perimeter — cornice 60 mm with brackets at corners and above central uprights. Everything in white. At the bottom — baseboard 80 mm. Result: the wall with bookshelves looks like a handcrafted built-in library, not a standard doorless cabinet.
What to buy for different tasks: summary table
| Task | What to purchase |
|---|---|
| Decorate a decorative shelf | Polyurethane brackets, glue, paint |
| Make the console more architectural | Brackets + Moldings for a frame around the zone |
| Design the top line of the room | Brackets + Ceiling molding and the cornice |
| Emphasize the portal or fireplace area | Brackets + Relief Decoration on the sides |
| Add decor without overloading | Brackets in wall color, without ornament |
| Assemble a classic set | Brackets + moldings + Decorative stucco |
| Design furniture and cabinets | Small brackets under furniture cornices |
| Decorate the mirror area | Two brackets on the sides + stucco cartouche |
Installation of polyurethane brackets: a step-by-step guide
Installing decorative brackets does not require a professional builder. It is a DIY-level task with basic tools and accuracy.
Tools and materials
-
Acrylate-based mounting adhesive (suitable for polyurethane and most surfaces)
-
Putty knife for applying adhesive
-
Pencil and tape measure for marking
-
Spirit level
-
Painter's tape — to fix the bracket while the glue sets (30–60 minutes)
-
Acrylic spackling compound for filling joints
-
Primer and paint for final painting
Work sequence
Step one: marking. The axis of the zone is determined (center of the shelf, center of the portal, cornice line). The positions of all brackets are symmetrically laid out from it. Each point is checked with a level.
Step two: surface preparation. The wall must be clean, dry, and primed. Dust and grease reduce adhesive adhesion. If the surface is glossy, lightly sand it.
Step three: applying the adhesive. The adhesive is applied in a snake pattern to the back surface of the bracket. Not in a continuous layer — this will make "leveling" difficult when pressing. Dots or a snake pattern with a 2–3 cm spacing is optimal.
Step four: installation. The bracket is pressed against the wall and held for 30–60 seconds. Additionally, it is secured with painter's tape while the adhesive fully cures (according to the adhesive manufacturer's instructions — usually 30–60 minutes).
Step five: filling the joints. After curing, the joint between the bracket and the wall is filled with acrylic putty. This hides the gap and creates a seamless transition.
Step six: painting. The entire area is painted after the putty has completely dried. The bracket, wall, and moldings are all the same color. This unifies all elements into a single field.
Frequently asked questions
Where to use polyurethane brackets?
Under decorative shelves, at consoles in hallways and foyers, under ceiling cornices, on the sides of fireplace portals, in studies under bookshelves, under upper cornices of built-in furniture, next to mirrors. This is a versatile element that works in any area where an architectural transition between the horizontal and the wall is needed.
Can brackets be combined with moldings?
Yes, and this is one of the best combinations. Moldings made of polyurethane create horizontal and vertical lines, set a frame. Brackets add volume — point protruding accents. Together they form a complete decorative system that works as architectural trim, not just "stucco on the wall."
What to buy together with brackets?
Depends on the task. Basic set: glue, putty, primer, paint, and a spare 1–2 brackets. Extended: Moldings for a frame system around the area. Full classic: brackets + moldings + Buy decorative stucco for accent points + Ceiling molding to complete the top area.
Are brackets only suitable for classic interiors?
No. In a smooth finish, without ornament, in the wall color Polyurethane brackets they blend seamlessly in neoclassical, Scandinavian style, and modern interiors with architectural details. The main thing is to choose the right pattern (or lack thereof) and color.
How not to overload the interior with brackets and stucco?
Rule one: one main accent per zone. If brackets are the main element, moldings and stucco around them should be restrained. Everything in a single color, in a single style. Do not mix baroque ornamentation with art deco geometry. Do not place more than two types of decor with equal "weight" in one zone.
Can brackets be mounted on wallpaper or paint?
On paint — yes, provided a primer is applied. On wallpaper — not recommended: the adhesive does not ensure reliable adhesion to the paper surface. If the wall is covered with wallpaper, it is better to remove the wallpaper at the bracket mounting points and apply primer to the plaster.
What glue should be used for polyurethane brackets?
Acrylate or polyurethane-based construction adhesive. It provides reliable adhesion to polyurethane, does not deform the material (unlike some solvent-based compounds), and allows adjusting the bracket position within a few minutes after application.
STAVROS: manufacturer with a full range for architectural decor
When the task is to design an interior systematically — with brackets, moldings, stucco, and ceiling decor in a unified style — it is important to work with one manufacturer that offers the entire necessary range. This eliminates the problem of mismatched styles, scales, and materials.
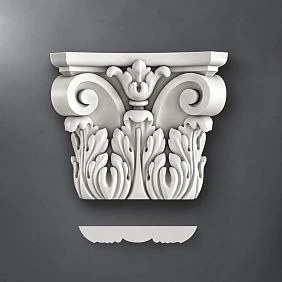
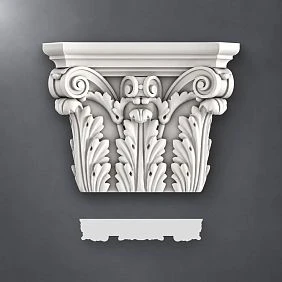
STAVROS is a Russian manufacturer of decorative products made from polyurethane and solid wood, operating since 2002. The company produces Polyurethane brackets more than 12 models — from compact ones starting at 1,370 RUB to large architectural elements; a full line molding of various profiles and cross-sections; an extensive collection decorative molding и stucco decoration for walls and openings; ready-made kits ceiling decoration. Additionally in the assortment — wooden capitals, pilasters, balusters, and solid wood moldings.
All Polyurethane Items are produced on our own CNC equipment, ensuring precise geometry and repeatability of each part. The surface is ready for painting with any composition, without special primers. Packaging is individual, with relief protection.
Orders are accepted online, delivery — to any region of Russia. Pickup — in St. Petersburg and Moscow. STAVROS specialists provide consultation on selecting a kit, help calculate the quantity, and coordinate the style for a specific project.
Because an interior where the bracket, molding, and stucco speak the same language is not a coincidence. It is the result of a correctly chosen manufacturer and a precisely selected kit.