Article Contents:
- Flat 50 mm brush with natural bristles: what tasks it is designed for
- Paint brush 50 mm for wooden baseboard and long molding
- Baseboard width 30–35 mm
- Baseboard width about 50 mm
- Baseboard 80–100 mm
- Deep leaves and petals
- Curls
- Small grooves
- Internal corners
- Joints of carved elements
- Transition from primer to enamel
- Transition from stain to clear varnish
- Transition from oil to water-based paint
- Transition from dark color to white
- First the recesses
- Then the side surfaces
- Finally the peaks and blending
- Scenario 1. Ten meters of smooth baseboard 80 mm, white enamel
- Scenario 2. Baseboard 80 mm plus four deep carved overlays
- Scenario 3. Molding 45 mm and small shallow decor
- Scenario 4. White baseboard, dark carved decor
- Scenario 5. Baseboard stain + varnish, decor enamel
- Scenario 6. Only oil on smooth wooden molding
- Scenario 7. Oil on deep carving
- Scenario 8. Polyurethane molding and wooden carved insert
- Mistake 1. Chose a brush based on the overall width of the baseboard
- Mistake 2. Did not check the depth of the carving
- Mistake 3. Decided that natural bristle is universal for any jar
- Mistake 4. Switched from dark stain to white enamel after a quick rinse
- Mistake 5. Dipped the brush too deeply
- Mistake 6. Tried to paint a deep corner with strong pressure
- Mistake 7. Did not inspect the thread after the first pass from the side
- Mistake 8. Painted an installed narrow baseboard with a wide brush without protection
- Mistake 9. Used an old brush for the final varnish
- Mistake 10. Bought a set of five brushes without real need
- Is one 50 mm brush enough for a smooth wooden baseboard?
- Can the same brush be used to paint carved overlays?
- How to understand that 50 mm is too much?
- Is natural bristle suitable for water-based paint?
- Can one brush be used to apply primer and then enamel?
- Is a separate brush needed for clear varnish?
- Can oil be applied with this brush?
- What second brush should I buy for carving?
- Do I need to buy a separate brush for each color?
- Why do drips appear on the carving?
- Can I paint an installed baseboard with a 50 mm brush?
- What should come first: baseboard or carved decor?
- Is it worth buying a spare brush?
- Can one brush be used on wood and polyurethane?
- Where to choose moldings and carved decor for finishing?
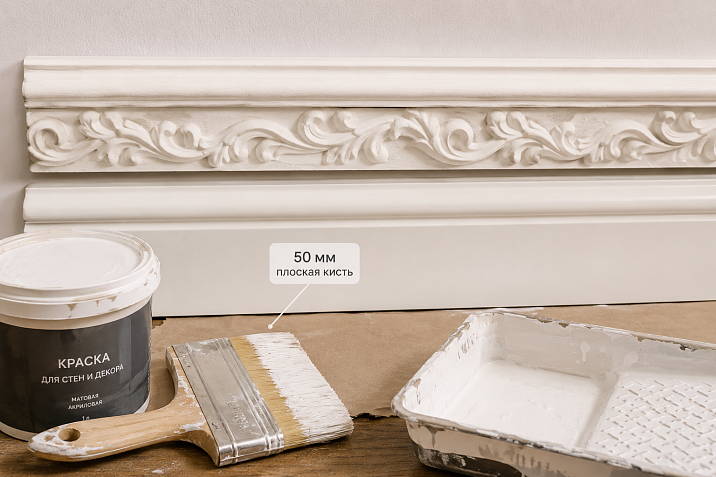
In one project, you can easily end up with two completely different surfaces: a few meters of smooth wooden baseboard, where an even, quick pass is needed, and a carved overlay or bracket with deep leaves, curls, and inner corners. On the shelf lies one flat brush 50 mm wide. It seems logical to buy it and finish the entire job with one tool. Sometimes that is indeed enough. But not always.
A flat 50 mm brush with natural bristles is convenient on long sections of medium-width trim, edges, ends, moldings, casings, and simple profiles. It provides a working strip that can quickly distribute primer, paint, varnish, stain, oil, or another compatible compound. But deep carved relief presents a different task: the bristles must reach not only the tops of the ornament but also narrow grooves, undercuts, and inner corners. If the entrance to the recess is narrower than 50 mm or the geometry is highly broken, a wide brush may cover the relief from above without working the depth.
Therefore, the direct answer is this: one 50 mm brush is usually enough for smooth baseboard, simple molding, and a small volume of simple decor when working with one compound; for deep carved relief, narrow channels, multiple colors, or different incompatible materials, it is wiser to immediately add a second narrow brush. This is not a question of "a professional can manage with one, a beginner needs two." The geometry of the tool must match the geometry of the surface.
If the task is already clear and a main universal medium-sized tool is needed, you can buy a flat paint brush 50 mm. But before ordering the entire set, it is useful to go through the project by sections: separately assess the width of the baseboard, the depth of the carving, the number of colors, and the type of coating. Then it becomes clear whether this brush will be the only one or the main one in the set.


Flat 50 mm brush with natural bristles: what tasks it is designed for
The STAVROS card describes this model as a flat, or sash, paint brush. The width of the working part is 50 mm. The bristles are natural, light; the handle is wooden, the ferrule is metal. The tool is intended for painting and finishing work on wood, MDF, chipboard, polyurethane, furniture, moldings, and decorative elements.
The flat shape means that the bristle bundle is gathered into a wide, relatively thin strip. Such a tool is convenient where you need to simultaneously hold the compound and distribute it in a controlled path. On a flat surface, the brush works with its full width. On an edge, it can be turned and guided with part of the working area. On a simple profile, the bristles wrap around protrusions and help blend the layer.
The 50 mm width falls into the medium size range. This is important for the current scenario. The tool is not narrow enough to slowly paint every meter of baseboard with many small strokes, nor wide enough to automatically suit a wall panel or a large countertop. It sits between the task of detailing and the task of a large flat surface.
That is why 50 mm often turns out to be a good "first" brush for a decorative project. But the word "first" is more accurate than "only." If a single order includes smooth molding 70–100 mm wide and carved overlays with grooves 10–20 mm, the 50 mm width fits the first surface well and the second one worse.
| Surface | How the 50 mm brush works | Is a second tool needed |
|---|---|---|
| Smooth baseboard of medium width | Convenient to distribute the layer along the length | Often no, if there is one compound and accessible corners |
| Simple molding | Works with the flat and edge of the brush | Sometimes — for narrow joints |
| Ends and edges | You can guide the brush with its edge | Usually not required |
| Shallow relief | Bristles wrap around the shape | Depends on the size of the grooves |
| Deep carving | May cover the tops and not reach into the depths | Often yes — narrow brush |
| Several colors | Technically possible after thorough cleaning | Practically more convenient as a separate tool |
| Different types of compositions | Requires thorough cleaning and compatibility check | Often more reasonable to use separate brushes |
Before starting work, you need to read the instructions specifically for the chosen finishing material. The brush card indicates a wide range of water-based and organic-based compositions, but this does not mean that any specific enamel, varnish, or oil is guaranteed to give the best result with natural bristles. The coating technology takes priority over the universal description of the tool.




Paint brush 50 mm for wooden baseboard and long molding
A long smooth baseboard is one of the most straightforward scenarios for a 50 mm flat brush. On an extended surface, even paint pickup, long strokes, and the ability to quickly blend the edge of the previous pass before the coating starts to set are important.
Our factory also produces:



Baseboard width 30–35 mm
On a narrow strip, a 50-mm brush is wider than the working area by about 15–20 mm. Theoretically, you can use it on its edge or use only part of the bristle bundle, but this reduces the advantage of the wide flat shape. If there are many such narrow parts, a separate brush of smaller width will speed up the work and give more control.
Get Consultation
A baseboard about 50 mm wide
This is the most natural geometry for such a flat brush. The working part matches the width of the part, and the painter can hold a straight line along the profile. But the edges are still processed separately: one load of bristles cannot simultaneously perfectly paint the face and both ends without the risk of runs.
Baseboard 80–100 mm
Here, a 50-mm brush remains convenient, just the work is done with overlapping passes. On an 80-mm face plane, the first pass covers one part, the second covers another with a slight overlap. The nominal 50 + 50 mm provides a margin for blending. On a 100-mm profile, two passes are also more logical than one overly wide tool if there are complex edges nearby.
Speed depends not only on width. A too-wide brush may follow the profile worse and transfer more compound than needed, while a too-narrow one will leave many brush stroke joints. 50 mm is a reasonable compromise specifically for medium linear footage.
If the profile itself has not yet been selected in the project, the section buy wooden baseboard and molding helps to match the width of the product with the future finishing method in advance. It is easier to choose the tool before installation than already on the wall between the floor, trim, and inner corner.
How to assess the profile width before buying a brush
Do not rely only on the overall height of the baseboard. A profiled product may be 100 mm in outer dimensions, but the actual smooth strip, convenient for guiding a brush, occupies 30–40 mm. The remaining width consists of rollers, grooves, and bevels.
It is useful to divide the profile into zones: the main face plane, upper and lower edges, longitudinal grooves, rounded areas, rollers, joints, and ends. If the main plane is 50–80 mm, a 50 mm brush will work effectively. If the entire surface consists of narrow steps of 10–25 mm, a wide brush ceases to be the main advantage—you have to constantly work with the edge.
For already installed trim, take into account the protection of the wall and floor. The wider the brush relative to the part, the harder it is to control the edge without masking tape, a shield, or another way to protect the adjacent surface.
Flat brush for carved decor: where a width of 50 mm is already too much
Carved decor differs from trim in that the working surface unfolds in different directions over a very short distance. On one sheet of ornament, there is a peak, a bevel, a deep groove, and a sharp inner corner. A wide flat brush can lie on two peaks at once and form a kind of bristle bridge over the recess.
As a result, the upper parts receive a lot of material, while the bottom of the groove remains dry. Trying to press harder on the brush increases the risk of runs on the peaks and does not always improve access to the narrow gap. This is where a second narrow tool gives a real advantage.
Deep leaves and petals
First, you need to apply the material to the base of the leaf, then go along the side walls, and only then blend the top. If the width of the recess is significantly less than 50 mm, a wide brush works more as a material source than as a precise tool. A narrow brush allows you to work the depth precisely.
Spirals
In a spiral ornament, the surface direction constantly changes. A flat brush is convenient on the outer radius, but in the inner part of the curl, the bristles can fold and push out excess compound. A narrow brush better follows the small radius.
Small grooves
If the channel is several times narrower than the working part of the brush, do not try to press the entire bristle bundle in. Work with a narrow tool or the edge of the main brush only on short sections. For a large volume of such work, a separate brush saves time.
Internal corners
At two intersecting surfaces, the material tends to accumulate in the very corner. A wide brush transfers more compound there than needed. A narrow one makes it easier to control the amount, and afterwards, blend the outer areas with a 50 mm flat brush.
Joints of carved elements
After installation, two parts with a very narrow gap may be adjacent. A 50 mm brush physically covers both, but does not necessarily paint the gap. Here, the tool size is determined not by the overall width of the decor, but by the width of the most difficult access.
If the project contains a large volume of such relief, it is wiser to immediately assemble a set: 50 mm for general distribution and blending, a narrower brush for recesses. Buying a second brush in this case does not duplicate the first, but separates the operations.
How to choose the width of a second brush for deep relief
There is no universal number because carving varies. The main brush's card itself contrasts 50 mm with narrow brushes of about 25–30 mm for detailing. This is a good starting range if recesses and local elements are noticeably narrower than 50 mm.
But it's better to focus on the actual relief. Take the narrowest groove that needs full painting and assess whether the working bristle bundle can enter it without excessive bending. For fine carving, an even narrower tool may be needed. For large floral decor, 25–30 mm is sometimes sufficient as a pair to a 50 mm flat brush.
You don't have to buy a dozen sizes. In a typical project like "baseboard + carved decor," a two-level set works well: a medium flat brush and one narrow brush for details. A third tool is needed only for very fine carving, individual flowers, or specific coatings.
Brush made of natural bristle for enamel, varnish, stain, and oil
The brush's card allows working with paint, primer, varnish, stain, antiseptic, oil, and wax, as well as with water-based and organic-based compounds. For the buyer, this is convenient: one model is not tied to a single can of coating. But technologically, these materials cannot be mixed into one universal instruction.
Covering enamel forms a colored layer and requires control of thickness and blending. Varnish must lay cleanly, without contamination from previous pigment. Stain often quickly changes the wood's color and requires even distribution to avoid dark spots. Oil works on a different logic: it's usually applied thinly, and excess is removed according to the product's instructions.
Before each material, check the bristle's compatibility with the specific compound, surface preparation, allowable layer thickness, working time, tool cleaning method, and the need for interlayer sanding. The brush's description sets the application area but does not replace the coating manufacturer's instructions.
For example, buy Rubio Monocoat oil for wood can be used as a separate finishing material, but its technique must follow the instructions of that specific product. The Rubio card indicates application to well-prepared and dust-free wood with a brush or cloth, followed by removal of excess with a lint-free cloth.
Brush for painting wood: why one tool cannot be transferred between different compounds without cleaning
Even if the brush itself is compatible with two coatings, residue of the first material inside the bristles can ruin the second. This is especially noticeable when transitioning from a dark compound to a light one, from pigmented stain to clear varnish, or from oil to water-based paint.
The problem is not always visible immediately. A separate dark stripe, a spot with different gloss, or an area that dries differently may appear on the surface. On a smooth baseboard, the defect stretches along its length and becomes noticeable under side light. In carved decor, contamination settles in recesses and emphasizes them not as intended.
Transition from primer to enamel
If the primer and enamel belong to the same system and the manufacturer allows such work, the brush still needs to be fully cleaned and dried according to the instructions. Residues of thickened primer make the bristles less elastic and increase the brush mark.
Transition from stain to clear varnish
This is one of the riskiest cases for a shared brush. Pigment left at the base of the bristles can get into the clear varnish and produce an accidental colored stripe. For critical clear finishing, a separate clean brush is often simpler and more reliable.
Transition from oil to water-based paint
Here it is especially important not to rely on surface rinsing. Traces of oil can alter the wetting and behavior of the next material. If the project requires both types of coating in one day, separate brushes reduce the risk of incompatible contamination.
Transition from dark color to white
Even a small amount of dark pigment is noticeable in light enamel. If the white finish is critical, saving on a second brush may cost more than repainting several meters of baseboard.
Therefore, the rule "one brush for the entire object" is only reasonable when stages are technologically compatible, there is enough time for proper cleaning, and confidence that the previous coating is completely removed. If work is done in parallel, separate tools are practically more convenient.
Flat paint brush on smooth trim: how to avoid streaks and runs
On a smooth baseboard, mistakes are more visible than on a textured surface. Light slides along the long surface and highlights streaks, local thickenings, and dried edges of strokes. Therefore, the 50 mm width itself does not guarantee an even result; the technique of loading and blending is important.
Do not immerse the working part into the coating up to the metal ferrule. For most tasks, it is enough to load part of the bristle length, then remove the excess against the edge of the working container. The specific depth depends on the viscosity of the material, so it is better to test on a sample.
On extended trim, work in sections of such length that the previous zone remains workable for joining the next stroke. If the coating sets quickly, too long a front leads to visible overlaps. If the material dries slowly, you can stretch the section further.
The final movement is usually made along the length of the piece, merging individual passes. On wood under a transparent coating, the direction is often aligned with the grain, so the brush marks conflict less with the texture. On opaque enamel, the key is a uniform rhythm in the final blending.
Sags more often occur on the lower edge and in longitudinal grooves. After distributing the layer, inspect the profile from the side and below. Excess material is better removed while the coating remains workable, rather than trying to fix an already dried ridge with a new stroke.
Natural bristle on carved wooden element: how to paint the depth of the relief
On carved decor, the logic of work changes. If you first paint the tops nicely and only then try to reach the recesses, new material will inevitably get onto the already finished face surface and create local thickenings. It is more practical to start with the difficult areas.
First the recesses
Take a small amount of the compound and work into the bottom of the grooves, inner corners, leaf bases, and intersections of elements. This is easier with a narrow brush, but on large carvings you can also use the edge of a 50mm flat brush.
Then the side surfaces
After the depth, distribute the material over the bevels and side walls. Make sure that no "puddles" form at the lowest points. The deeper the relief, the easier excess compound accumulates there.
Finally — the tops and blending
Once the recesses are filled, a wider brush is convenient for unifying the visible surface, removing excess from the peaks, and leveling the overall layer. It is at this stage that the 50mm flat brush shows its strength — it acts as a blending tool on raised areas.
For carving, inspection from different angles is important. From the front, missed coverage in the depths may be unnoticeable, but under side lighting it will appear as a light spot. After the first pass, rotate the piece or change the direction of light and check the shadows in the recesses.
Is one 50mm brush enough, or should I buy a set?
The decision can be made before ordering by answering a few questions. The main one is not the area of the object, but the variety of surfaces and materials.
| Project conditions | One 50mm brush | Set of two or more brushes |
|---|---|---|
| Smooth baseboard without intricate carving | Often sufficient | Not required |
| Simple molding plus several ends | Usually possible | Deep carved decor |
| Deep carved decor | Misses possible in narrow spots | Narrow brush recommended for detailing |
| One compound and one color | Practical | Not required just for color |
| Primer + enamel in one working day | Only with full cleaning and a technological pause | Often two are more convenient |
| Stain + clear varnish | Increased risk of contamination | A separate clean brush is more rational |
| Dark + white color | Undesirable without perfect cleaning | Better to separate the tools |
| Large volume of work without pauses | The brush needs to be cleaned constantly | The set saves time |
One brush is sufficient if the profile is simple, the composition is uniform, the area is moderate, and the relief contains no deep narrow sections. In such a situation, a second tool can remain idle.
A set is needed not because "two brushes are more professional." It is needed when the same bundle physically cannot handle two different tasks equally well. A wide brush speeds up linear work, a narrow one provides access to relief. Different brushes also break the risk of pigment and binder transfer between materials.
Practical test: can you finish an object with one brush
Before purchasing, you can perform a simple check based on the project. Take a list of all parts and for each one note three parameters: width of the working area, depth of the relief, and composition. Then find the most complex section.
Suppose the project includes 12 meters of smooth baseboard 80 mm wide, two casings with a simple groove, and four carved overlays 180 × 90 mm with deep curls. The main volume is the baseboard, so a 50 mm brush is clearly needed. But the four overlays contain narrow spots of 10–15 mm. This is already a reason to add a narrow brush: it will determine the quality of the most complex part of the work.
Another project: 6 meters of smooth molding 45 mm wide and two small rosettes with shallow relief. Everything is painted with one opaque enamel. Here, one 50 mm brush may be enough if the craftsman confidently works with the edge and the relief does not require separate access.
Third project: the same molding and the same rosettes, but the molding is white, and the rosettes are tinted with dark stain and then lacquered. Even with simple geometry, one tool becomes inconvenient due to different materials and colors. The set is justified by the technology, not the relief.
Why the area of work does not determine the number of brushes by itself
A large area does not always require multiple brushes. Twenty meters of identical smooth baseboard can be done sequentially with one flat brush if the coating is uniform and the tool maintains its working condition. Conversely, a small decorative panel measuring 400 × 400 mm may require two or three brushes if it has a wide flat surface, deep carving, and two colors.
Therefore, the number of brushes is counted not by square meters, but by operations. One tool for one repeating operation is normal logic. An additional tool appears when the access width, material, or color changes.
How to avoid mixing dark stain and light enamel in one project
If one element is tinted and another is painted with opaque light enamel, it is better to separate the tools from the start. Even thoroughly washed natural bristles can retain pigment residue deep near the ferrule.
For a craftsman, this is also a matter of time. Full cleaning, rinsing, drying, and checking the brush between dark and white compounds can take more time than the cost of a second tool. If the finishing is on schedule without a long pause, two brushes allow the process to continue without stopping.
Label the tools: "primer," "white enamel," "stain," "varnish." A small note on the handle prevents accidental use of the wrong brush after a break.
How to work with one brush if you don't want to buy a second tool
Sometimes a project is really small, and buying an extra tool for two small recesses is not rational. In that case, you can use a few techniques, understanding their limitations.
First, work with the edge of the brush. Turn the flat ferrule and use the narrow edge for the groove. This works well on accessible longitudinal relief, but worse in a small enclosed corner.
Second, reduce the material load. The deeper the area, the less compound should be on the bristles during the first pass. This reduces the risk of runs.
Third, do not try to reach the depth with strong pressure. If the ferrule does not fit geometrically, pressure only spreads the bristles over the tops. Better to make several short, directed strokes.
Fourth, change the angle of your hand and the part itself more often. A removable carved element is easier to turn so that the brush enters the groove along its geometry.
But if you have to work with the edge dozens of times on each element, saving on a narrow brush stops being rational. The tool should speed up the technology, not complicate it.
Priming a baseboard and carved decor with one brush
Primer often forgives slightly more active brushwork, because its task is to prepare the base. But even here, thick accumulations in the carving must not be allowed. After drying, primer runs will have to be sanded in a hard-to-reach groove.
On smooth trim, a 50 mm brush is convenient for even primer distribution. On carving, first paint the depth, then remove excess from the protrusions. If the primer is highly filling, a narrow brush is especially useful: it allows you to control the layer in corners.
After priming, the brush must be cleaned according to the product instructions before moving to the next material. Thickened residues at the base of the bristles make the ferrule stiffer and increase marks on the finish enamel.
Enamel on smooth trim and carving: where 50 mm is convenient and where it is not
Covering enamel hides the base color but emphasizes defects in the shape of the layer. On a long smooth baseboard, 50 mm provides a good balance of speed and control. On deep carving, a wide brush can transfer too much material into the recess, especially if the enamel is viscous.
For carved decor, it is important not to "flood" the details. If the ornament is fine, a thick layer can visually soften small edges. Therefore, it is better to apply material to the depth in a controlled manner, and blend on the peaks with a wide brush.
When working with enamel, do not go back over a layer that has already begun to set, unless the material's instructions allow it. A late stroke can leave a ragged mark and lift a partially dried film.
Varnish and clear finish: why brush cleanliness becomes critical
Clear varnish does not hide contamination. A hair, pigment from previous paint, a particle of primer, or dust remains visible in the film. Therefore, for a clear finish, it is especially sensible to have a separate clean brush or use a tool that has never worked with dark enamel.
On a smooth molding, varnish is applied in an even thin layer, but on carving, you need to watch the recesses where material accumulates due to gravity. After application, inspect the piece after a few minutes within the open time of the coating: a drip can form already after the first pass.
Stain: why a wide brush speeds up work but increases requirements for uniformity
Stain quickly changes the color of the wood. On a long baseboard, a width of 50 mm is useful because it allows you to move quickly across the surface and reduces the number of joints between individual passes. But on end grains and areas with different absorbency, the color may turn out darker.
On carving, stain collects in the recesses and naturally enhances contrast. Sometimes this is a desirable effect, sometimes not. A narrow brush gives more control over how much material enters a single channel.
Before a large batch, do a test on the same material and sanding quality. Beech, oak, MDF with veneer, and different areas of solid wood react to tinting differently.
Oil: when 50 mm is convenient and why you don't need to copy enamel technique
Oil should not be applied like a covering enamel just because the same brush is used. The specific system sets its own thickness, reaction time, method of distribution, and removal of excess. For example, the Rubio Monocoat Oil Plus 2C card specifies application to prepared wood and removal of excess material with a lint-free cloth after the interval set by the technology.
On a smooth baseboard, 50 mm helps quickly distribute oil in a thin layer. On threads, it's important not to leave excess in deep pockets. If the groove is inaccessible to a cloth, the tool must be especially careful in dosing the compound.
Do not use the text of this article as a substitute for the instructions of a specific oil. Always check the manufacturer's technical data before starting.
Surface preparation: why even a good brush won't fix dust and weak sanding
Choosing a tool makes sense only after preparing the base. On a smooth baseboard, dust turns into individual dots and roughness, which are especially noticeable under enamel and varnish. In carved decor, dust hides in recesses and mixes with the first layer, forming a dirty coating in the shadows of the ornament.
Before finishing, the product is cleaned according to the coating technology. If sanding is required, it must be completed before applying the finish. For carving, you cannot aggressively "level" small edges just because they are inconvenient to reach with a brush: the tool is selected to fit the shape, not the shape is ruined for the tool.
If STAVROS parts are purchased with different levels of preparation, it's useful to study in advance quality of STAVROS product processingThe surface condition affects material consumption, the appearance of the layer, and the amount of intermediate preparation.
How to prepare a new brush for first use
Do not immediately immerse a new brush into a can of finishing varnish or white enamel. First, inspect the bristle bundle, remove loose hairs, gently straighten the bristles, and check for manufacturing dust. If the instructions for the chosen composition allow pre-wetting or other preparation of the bristles, follow them exactly according to the material's technology.
For critical finishing, it is useful to make a few test strokes on a clean test surface. This shows whether individual hairs fall out and how evenly the bundle opens under pressure.
Do not try to "break in" the brush by strongly bending the bristles with your hands. Natural bristles must maintain their geometry. The main working shape is formed by normal loading and movement across the surface.
How to load a flat brush without flooding the baseboard and threads
The more material is in the brush, the higher the risk that it will flow into the lower edge of the baseboard or into the deep pocket of the threads. Therefore, the main principle is even but not excessive loading.
Immerse the working part so that the material spreads over the bristles but does not reach the ferrule unnecessarily. Then remove the excess against the working container. Do not "squeeze" the entire composition dry: the brush should remain workable and carry a sufficient amount of coating.
For a smooth area, you can pick up slightly more material than for narrow threads. Before moving into deep decoration, it is useful to remove excess and work with shorter strokes. If a separate narrow brush is used, its loading is usually smaller in volume because the task is to fill the recess precisely.
How to organize work if the baseboard is already installed on the wall
Painting an installed baseboard is more difficult than painting a separate strip on a workbench. Two adjacent surfaces appear — the wall and the floor. A 50 mm brush may be convenient for the front part, but on a narrow profile its edge constantly approaches the room's finish.
Before starting work, protect the floor, wall, and adjacent elements using a method compatible with their coating. Painter's tape must be removable without damaging the substrate; the specific type of tape is chosen based on the surface. If the baseboard adjoins trim or furniture, check all short joints where a wide brush maneuvers worse.
The inner corner of a room is better painted not with a long stroke, but with controlled short passes. On the outer corner, it is important not to overload the end: material accumulates on the edge and forms a thickening after drying.
If the profile is significantly narrower than 50 mm, in the installed state a second narrow brush becomes more useful than on a free strip, because you cannot simply turn the product to a convenient angle.
How to organize work with carved decor before installation and after installation
A removable carved piece is easier to finish before installation if the project technology allows it. You can rotate, tilt, and illuminate it from different sides. Recesses become more accessible, and excess compound is easier to notice.
But finishing before installation has limitations: glue points and joints must remain technologically compatible with installation, and after installation, local touch-up is sometimes required. Therefore, the decision "paint before or after" is made together with the installation technology.
If carved decor is already fixed on a wall or furniture, a wide brush is convenient on external parts, but internal channels become more difficult due to the limited angle of the hand. Here, a narrow brush provides a particularly noticeable advantage.
When selecting the decor itself, you can go to the catalog and to buy carved wooden decor, and evaluate the tool based on the actual depth and scale of the chosen ornament. The word "carved" by itself does not indicate whether a 20, 30, or 50 mm brush is needed.
How to clean a brush between stages without ruining the next coat
The cleaning method depends on the composition. You cannot recommend one solvent for all paints, varnishes, oils, and stains. The material's instructions should clearly state what to rinse the tool with.
The general principle remains constant: do not let the composition fully dry inside the bristles, remove the bulk of the coating, rinse with the recommended agent, then shape the bristles and dry the brush so it does not deform.
Pay special attention to cleaning the base of the bristles near the ferrule. That is where material most often remains, which later makes the brush stiff. On the next coat, such a bristle pack blends worse and leaves more pronounced streaks.
If there is little time between stages and the compositions differ, separate brushes again prove more advantageous. Cleaning is a full technological operation, not a quick rinsing gesture.
When it's time to replace the brush rather than continue working
Even a quality tool wears out. The brush stops being precise if the bristle pack constantly spreads into a fan, part of the bristles has become stiff from dried composition, the working edge has lost its shape, or bristles actively shed into the coating.
On primer, such a tool may still be usable, but using it for a final clear varnish or white enamel is risky. Minor defects that are invisible on the first coat become obvious at the finish.
If a brush has gone through several aggressive stages in one project, reassess its condition before the final coat. Sometimes it is wiser to take a clean, fresh tool for the finish than to try to stretch the old one for the sake of savings.
What to add to the order along with a paint brush
The set should not turn into a random basket. Only what is needed for the chosen technology is added. The basic list looks like this:
- the finishing compound itself;
- a working container, if needed for dosing;
- lint-free cloth for compounds where excess needs to be removed;
- material for cleaning the brush according to the coating instructions;
- protective gloves and protective equipment required by the compound;
- a narrow brush if there is deep relief;
- a test sample of the same material if the color or technique is not yet confirmed.
In the general section, you can Buy materials for installation and finishing and gather tools and coatings according to the project. The presence of a product in one section does not automatically mean compatibility between all items; the specific system is still checked against the instructions.
Where to buy a 50 mm flat brush and wood finishing materials
If the main work is wooden baseboard, molding, casing, furniture part, or a simple decorative profile, Buy a 50 mm flat brush it makes sense as the main tool of medium size. Natural bristle and flat shape allow working on flat and profiled areas, and the 50 mm width maintains a balance between speed and control.
If the same project includes deep carving, immediately assess the narrow channels. If they require constant work with the edge of the main brush, add a narrower tool. It is better to do this before starting painting than to stop the process after the first unpainted curl.
For a comprehensive order, it is convenient to simultaneously check materials for finishing wooden products, the selected molding and carved decor. Before payment, also look at payment and delivery of the order, especially if part of the products is made to order, and the brush and materials are in stock.
Checklist before buying a brush for wood
Before the cart, it is enough to go through eight points. If there is no answer to half of them, the brush choice is still based on assumption.
| Check | What to record | How it affects the set |
|---|---|---|
| Profile Width | Working face area | Shows whether 50 mm is convenient |
| Relief depth | The narrowest grooves | Determines the need for a narrow brush |