Article Contents:
- Slat panel PAN-003 1000×11×2670 mm: which SKU is needed for a wall with electrical fittings
- PAN-003 made of MDF 1000×11×2670 mm
- Primed PAN-003 1000×11×2670 mm
- Short PAN-003 1000×8×740 mm
- 950 mm options
- Beech and oak 2400 mm
- Basic painted wall
- After installing PAN-003, a new decorative surface appears
- The switch remains in the old plane
- The intercom also visually 'sinks'
- Why the frontal photo doesn't show the problem
- What needs to be measured after the test sample
- What not to do
- The frame completely lands on a flat field
- The frame is surrounded by slats on all sides
- The frame crosses the top of the relief
- The frame falls into the gap between slats
- Why you can't just "cut out a rectangle along the frame"
- Electrical
- Compositional
- Installation
- What's better
- What's worse
- Why a photo without dimensions is not suitable
- Why coordinates need to be from a single zero point
- What it shows instantly
- What can be changed
- Option 1. The switch falls into a calm zone
- Option 2. The frame crosses the top of a decorative slat
- Option 3. The switch falls on the joint of two PAN-003
- Option 4. The rhythm is shifted before cutting
- Scheme A. PAN-003 fits flush against the intercom body
- Scheme B. A smooth rectangular field remains around the intercom
- Scheme C. The intercom is brought out to a new finished plane
- Scheme D. The boundary of the slat wall runs along an architectural line next to the intercom
- What needs to be done
- Why symmetry is not always the best option
- What can get in the way
- Layout
- What becomes more complicated
- Conclusion
- Shift the rhythm
- Leave it and make a design cutout
- Why you cannot automatically cut out the batten
- Risks
- Best action
- Error 1. The cutout falls on an inconvenient part of the rhythm
- Error 2. The device ends up near a joint
- Error 3. The frame rests on different levels
- Error 4. You have to cut the adjacent panel
- Error 5. The electrician and the installer use different zero points
- Error 6. The percentage margin doesn't help
- Basic formula by width
- What gets adjusted later
- Purchased width
- Nominal excess
- Scenario 1. One edge is cut by 200 mm, the other remains full
- Scenario 2. The wall is centered
- Scenario 3. The rhythm shifts for the switch
- What needs to be checked
- Why the 650 mm coordinate is useful
- When a cutout can help
- When not
- Primed option
- Why you can't compare only the panel price
- When a reserve may be justified
- When the sixth is redundant
- Regular MDF
- Primed MDF
- Why color affects electrical fittings
- Why the relief still remains
- Oak
- Oak
- What will change
- Therefore, you cannot change the material after calculation
- What to check near the switch
- Near the intercom
- At the baseboard
- From the trim
- Why OPAN-003 is more useful than a computer render
- PAN-003 goes down to the floor
- PAN-003 starts above the baseboard
- The baseboard is thicker than the relief of PAN-003
- The baseboard is thinner
- Why the joint needs to be decided in advance
- Why this is not yet the final setback
- What to do with the remainder
- Why 70 mm cannot be universally considered an "ideal margin"
- How to simplify
- When it is better not to continue panels behind the casing
- Risk
- Solution
- Panel installer hands over
- Electrician checks
- What a finishing installer cannot decide on their own
- What an electrician cannot leave for later
- Smooth field
- Strip without PAN-003 along the entire height
- Changing the boundary of the slat wall
- Why this is not “worse”
- Options
- Check
- Why a smooth field is more maintainable
- Why an exact shaped cutout is worse
- But what to check
- Main conclusion
- Remainder
- Commercial effect
- Why a field in the center and a field at the edge are economically different solutions<When it is better to center by the inter-batten gap
- What does this give
- Plus
- Minus
- Commercial effect
- If the sections are 2100 + 1750 mm
- Therefore, the correct order
- Before installation
- Before final fastening of the module
- If modification of the electrical unit is required
- Why you cannot first firmly secure the panel and then try to "pull out" the switch
- What is checked
- Why dry fitting is especially important with the expensive PAN-003
- Possible consequences
- The right way
- Frame in panel color
- Contrast Frame
- Frame in wall/trim color
- Metal frame
- Why color does not solve the plane difference
- Why
- What not to do
- Alternative
- Mistake 1. Using an 8 mm depth for the 2670 mm version
- Error 2. Count only square meters
- Mistake 3. Buying panels before marking out devices
- Error 4. Making a cutout "in place" without a modular grid
- Error 5. Treating an intercom as a regular decorative frame
- Error 6. Positioning a switch according to catalog 11 mm without actual installation
- Error 7. Delegating electrical work to the panel installer
- Error 8. Not marking the architrave
- Error 9. Not deciding on the baseboard before cutting
- Error 10. Considering the cutout for the intercom as material savings
- Error 11. Buying +10% without a risk map
- Error 12. Not checking OPAN-003
- Error 13. Mixing MDF 2670 with wooden 2400 in one calculation
- Error 14. Making the smooth field too small
- Error 15. Making the field too large for the sake of a "reserve"
- Error 16. Not checking the intercom replacement in the future
- Error 17. Placing the PAN joint too close to the frame
- Error 18. Not accounting for the socket housing at the floor
- Error 19. Ordering the primed version just because "it's better"
- Error 20. Not agreeing on a single zero point
- Regular MDF 26,410 ₽
- Primed 43,700 ₽
- Difference across five modules
- What to compare with this amount
- Example
- When such a scenario is stronger
- But why “exactly” still requires verification
- What is especially important
- Why write down the wall geometry
- Why specify OPAN-003
- Why specify the quantity
- Why module numbering is useful
- Why a spare sixth panel is not always the best answer
- Geometry
- Electrical fittings
- Plane
- Finish
- Bottom junction
- Why the line "new finished plane" should be factual
- Why it's better to store intercom coordinates by center and by dimensions
- Why the zero point should be physically clear
- Cost of regular MDF
- If the same 500 mm are in the center
- What is the size of PAN-003 made of MDF with a length of 2670 mm?
- Why does the depth of 8 mm appear for PAN-003 on the internet?
- Is there a PAN-003 made of MDF?
- Can I buy a primed PAN-003?
- What is better near the switch — a smooth field or PAN-003 right next to it?
- Do I need to move the socket box forward?
- Can I simply cut out PAN-003 around a ready-made frame?
- What to do if the switch falls on a decorative rail?
- What to do if the frame ends up at the joint of two panels?
- Can I leave a smooth rectangular field around the intercom?
- How to choose the size of such a field?
- How many PAN-003 should I buy for a 4200 mm wall?
- Why can't I buy four and cover the remaining 200 mm with a leftover piece?
- Why can't I count only square meters?
- Can a smooth field reduce the number of PAN-003?
- Why do a field in the center and one at the edge give different consumption?
- What is OPAN-003 for?
- What is the size of OPAN-003?
- Can OPAN-003 be used for a cutout test?
- Where to buy slat wall panels?
- How much do five MDF PAN-003 cost?
- How much do five primed PAN-003 cost?
- Why is the difference so big?
- Should you search for "MDF slat panels buy" and only look for the cheapest option?
- Which baseboard goes well with PAN-003?
- Can PAN-003 be installed after the baseboard is mounted?
- Do you need to buy a sixth PAN-003 as a spare?
- What to do if the intercom is later replaced with a model of a different size?
- Do I need to turn off the electricity before working near the switch?
- Can I move the device to a new plane myself?
- When is it better not to use PAN-003 on this wall?
- How to order PAN-003 correctly?
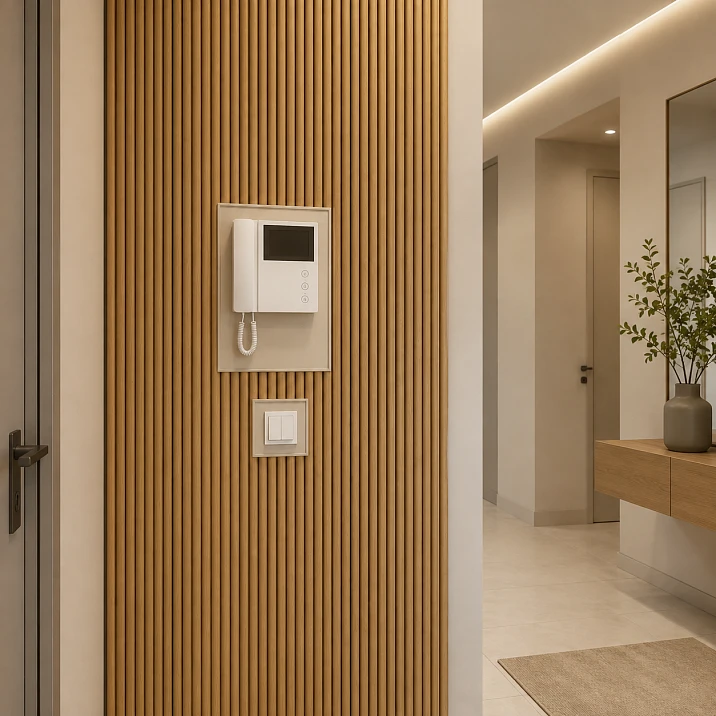
The most expensive mistake here occurs not when connecting the switch or cutting the panel. It happens earlier — when the old finished wall is still considered the only plane of the room.
After installing PAN-003, this logic stops working.
There was a painted wall. On it are already installed:
-
intercom;
-
a switch or a block of switches;
-
frames;
-
socket boxes;
-
cable outlets;
-
possibly, sockets and other service points.
Then, a slat panel PAN-003 made of MDF 1000×11×2670 mm is added to part or the entire wall. The decorative surface ends up in front of the old wall by approximately the thickness of the panel itself plus the actual mounting layer. And the electrical fittings remain in their original plane, unless their assembly has been reworked in advance.
As a result, the device may appear visually "recessed" between the relief slats. The frame may cross the top of the profile, the key may end up too deep relative to the new surface, and the cutout for the intercom may land right on an inconvenient part of the rhythm or on the joint of two original modules.
Therefore, the correct order is:
-
first, build a modular grid of PAN-003 across the entire wall;
-
mark the real coordinates of the intercom, switches, and other points;
-
determine where the new finished plane will be;
-
decide whether a smooth field remains around the device or PAN-003 fits flush;
-
only then do the cutting and hand over the electrical work to a qualified specialist to decide on the specific system of socket boxes, wiring, and device extension.
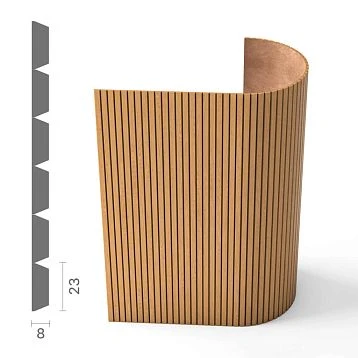
For the selected article, PAN-003 made of MDF 1000×11×2670 mm is used. This is important because the PAN-003 card also contains other SKUs. The short version of 740 mm currently has a different depth — 1000×8×740 mm. Its C=8 mm cannot be transferred to the full-size 2670 mm panel.
At the time of verification, for MDF 1000×11×2670 mm, the card shows:
-
"Prestige" — 26,410 ₽;
-
availability — 31 pcs.;
-
primed version of the same geometry — 43,700 ₽;
-
for items made to order, the production lead time is approximately 5–10 business days.
If the wall geometry has already been verified, you can order the slat panel PAN-003 1000×11×2670 mm in a specific quantity, rather than buying panels before it becomes clear where exactly the switch frame and intercom unit will be located.
Slat panel PAN-003 1000×11×2670 mm: which SKU is needed for a wall with electrical fittings
For PAN-003, one model combines several sizes and materials. For the article, the selected SKU must be strictly separated from adjacent options.




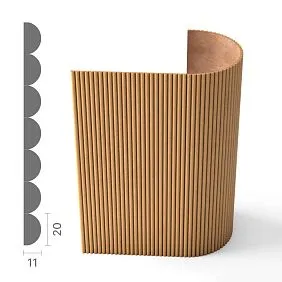
PAN-003 made of MDF 1000×11×2670 mm
This is the main product of the scenario.
Critical parameters:
-
module width — 1000 mm;
-
depth — 11 mm;
-
length — 2670 mm;
-
material — MDF;
-
quality — "Prestige".
It is the 11 mm depth that is involved in the geometry of the new wall.
Our factory also produces:








Primed PAN-003 1000×11×2670 mm
Geometrically, the task is the same:
-
1000 mm;
-
11 mm;
-
2670 mm.
The difference is the surface condition and cost.
A primed version may be more logical if the entire slat wall will be painted and it is important to reduce the amount of preparation before finishing.
But primer does not solve the conflict with electrical fittings. The frame still needs to be brought to a new plane or a properly designed field left around it.
Get Consultation
Short PAN-003 1000×8×740 mm
This is a separate SKU.
It cannot be used as a source of parameters for the long panel.
If you come across this in an old article or table:
PAN-003 — depth 8 mm,
you need to clarify what length is being referred to.
For the selected full-size MDF panel, 11 mm is used.
Options 950 mm
The card contains other dimensions.
They may be useful in individual projects, but in our article the task is already fixed at 1000×11×2670 mm.
Mixing SKUs breaks the quantity calculation and joint placement.
Beech and oak 2400 mm
Long wooden versions have a different length.
You cannot take a wall calculation for 2670-mm MDF and then replace the material with beech or oak 2400 mm without recalculating.
The following will change:
-
vertical cutting;
-
number of horizontal joints;
-
remnants;
-
logistics;
-
cost;
-
finishing.
Why ready-made electrical wiring changes the slat wall project
The problem is not that PAN-003 "interferes with electricity."
The problem is in the new geometry of the finish.
Base painted wall
The intercom and switch are already installed relative to the existing surface.
Their frames are designed for this plane.
After installing PAN-003, a new decorative surface appears.
The relief protrudes forward.
For the full-size SKU, the nominal panel depth is 11 mm.
The actual mounting layer is added to it.
The switch remains in the old plane.
If nothing is changed, the frame ends up deeper than the new surface.
The intercom also visually "sinks in"
Especially if the housing has a small thickness of its own.
Why a frontal photo doesn't show the problem
From the front, you can see a neat rectangle of the device and a beautiful rhythm of the slats.
But only a side cutaway shows:
-
the depth of the panel;
-
the thickness of the frame;
-
the actual protrusion of the housing;
-
the distance to the finger;
-
possible difference.
Slat panels for walls and a switch: first we build a new plane
If planning buy wall slat panels, before ordering, you need to decide where the new front line of the wall is.
Simplified:
new plane = old wall + PAN-003 + mounting layer.
But in the article, you cannot assign a universal adhesive thickness.
It depends on:
-
the base;
-
mounting systems;
-
actual wall flatness;
-
the selected composition;
-
mounting method.
Therefore, 11 mm is only the nominal depth of the panel.
What needs to be measured after the test sample
If possible, attach OPAN-003 to the wall using the same mounting principle and measure the actual protrusion.
This gives a more honest value than "11 mm per the card."
What not to do
Do not install electrical fittings "flush by eye" based on catalog depth.
Even 1–2 mm of difference around the frame can be visually noticeable under side lighting.
What happens to the switch frame next to the PAN-003 relief
There are several different situations.
The frame fully lands on a flat field
The most convenient option.
PAN-003 ends nearby, and the device remains on a separate smooth area.
The frame is surrounded by slats on all sides
Then it is especially important to bring it out relative to the new surface.
The frame intersects the relief peak
A bad option for random cutting.
Part of the frame rests on one height, part on another.
The frame falls into the gap between the slats
This also requires a design solution.
Why you can't just "cut out a rectangle along the frame"
Because the panel has its own rhythm.
A rectangular cutout can:
-
cut off half of the slat;
-
leave a narrow brittle fragment;
-
get to the edge of the module;
-
create an asymmetrical frame around the device.
Intercom on a slatted wall: three different functions of one zone
Around the intercom, three tasks can be solved simultaneously:
-
electrical/service;
-
compositional;
-
installation.
If you design only one, the other two will later cause rework.
Electrical
Access to wires, mounting, and maintenance.
Compositional
The intercom should not look randomly cut into a single rail.
Installation
The cutout must be feasible without damaging adjacent elements.
Why electrical fittings should not randomly fall on the joint of two original panels
The joint is already a separate vertical line.
If something appears nearby:
-
intercom;
-
switch;
-
frame edge,
the node becomes visually overloaded.
What is better
Either the device is deliberately centered relative to the joint.
Or the joint is moved away from it.
What is worse
The joint runs 10–20 mm from the frame without a compositional reason.
Before buying slat panels: what dimensions to take around the intercom and switch
A full measurement list is needed.
| What to measure | Value |
|---|---|
| Wall width | ___ mm |
| Finished wall height | ___ mm |
| Intercom center on X | ___ mm |
| Intercom center on Y | ___ mm |
| Intercom body dimensions | × mm |
| Intercom protrusion from wall | ___ mm |
| Switch block center | ___ |
| Frame overall dimensions | × mm |
| Frame protrusion | ___ mm |
| To nearest trim | ___ mm |
| To corner | ___ mm |
| Skirting board height | ___ mm |
| Baseboard depth | ___ mm |
| Ceiling junction | ___ |
| Assumed PAN-003 joints | ___ |
Why a photo without dimensions is not suitable
It is impossible to reliably determine from the image:
-
scale;
-
the exact axis;
-
distance to the corner;
-
position of the joint;
-
the width of the future trim.
Why coordinates are needed from a single zero point
The electrician and the panel installer must work in the same coordinate system.
For example:
X — from the left finished corner.
Y — from the finished floor.
If one measures from the door casing, another from the center of the wall, it is easy to get an error.
Wall layout 1:1: why it is needed before cutting
A full-size layout is especially useful on a complex node.
It marks:
-
boundaries of each module 1000 mm;
-
relief;
-
joints;
-
intercom;
-
switches;
-
the casing;
-
baseboard;
-
the ceiling;
-
trims.
What it shows instantly
For example, a switch frame crosses the boundary of two modules.
This is visible before purchase.
What can be changed
-
start of layout;
-
width of the edge trim;
-
position of the smooth field;
-
number of modules;
-
framing method.
Slat wall panels and switch: four options regarding the rhythm PAN-003
This is the central fork of the entire article.
Option 1. The switch falls into a calm zone
The frame ends up between pronounced relief peaks or in a pre-left smooth field.
This is the most predictable option.
Option 2. The frame crosses the peak of a decorative slat
If left as is, the cutout may split the profile.
Then you need:
-
shift the modular grid;
-
change the smooth field;
-
or rework the frame node.
Option 3. The switch falls on the joint of two PAN-003
Not always prohibited, but requires a particularly precise design.
Option 4. The rhythm is shifted before cutting
This is often the cheapest way.
The panels are not yet purchased or cut.
Shifting the module start by 50–150 mm can move the frame out of an inconvenient zone.
The exact offset is determined by the layout, not by a universal number.
Why the modular grid is built first, and then the opening
Bad sequence:
-
buy panels;
-
apply to the wall;
-
where the switch falls, cut out there.
Good:
-
measure the wall;
-
build the rhythm;
-
apply the electrical layout;
-
adjust the grid;
-
approve the cutting layout;
-
only after this, cut.
This reduces the risk of ruining the second module due to one bad cut.
Intercom on PAN-003: leave a smooth field or surround with a slat panel
The intercom is usually larger than the switch and has a stronger impact on the wall composition.
There are four working schemes for it.
Scheme A. PAN-003 fits flush against the intercom housing
Advantages:
-
The slat wall looks continuous;
-
The device becomes part of the finish;
-
There is no additional rectangular insert.
Disadvantages:
-
A very precise cutout is required;
-
The device is harder to maintain;
-
The side difference is especially noticeable;
-
Any rhythm error is visible next to the large housing.
Scheme B. A smooth rectangular field remains around the intercom
This is a strong option for an already finished wall.
The panel ends around the device, and the intercom remains on the old finished surface.
Advantages:
-
there is no need to force the device body to "rise" into the relief unnecessarily;
-
easier service;
-
a rectangular field can be aligned with the switch frames;
-
fewer complex shaped cutouts.
Disadvantages:
-
it is required to design the field dimensions;
-
a field that is too small looks like a random gap;
-
one that is too large can break the PAN-003 pattern.
Scheme B. The intercom is brought out to a new finish plane
Such a solution may look the most cohesive, but it affects the installation of the device and, possibly, its electrical connections.
Here, the article deliberately does not provide step-by-step instructions for wiring, socket boxes, or cable extension. The specific method should be determined by a qualified electrician based on the intercom model, the wall base, and the existing electrical system.
Scheme G. The boundary of the slat wall runs along the architectural line next to the intercom.
For example, PAN-003 ends:
-
along the axis of the cabinet;
-
at the trim;
-
on the mirror line;
-
near the vertical of the furniture.
Then the intercom remains on the smooth part of the wall without any separate framing.
How to choose the size of the smooth field around the intercom
There is no universal rule:
"leave 50 mm each."
The size depends on:
-
the device body;
-
PAN-003 rhythm;
-
of the adjacent switch;
-
platband;
-
of the total wall width.
What needs to be done
On the elevation, build at least three options:
-
minimal field;
-
medium;
-
architecturally aligned with adjacent objects.
Why symmetry is not always the best option
If the intercom is close to the door trim, a symmetrical field may leave a narrow inconvenient strip on one side.
In such a case, it is better to align the field with the trim.
How to check finger access to the switch in the relief
Even if the frame is installed beautifully, the user must be able to press the key normally.
What can interfere
-
closest convex rail;
-
frame position too deep;
-
narrow side gap;
-
large decorative frame.
Layout
Place the PAN-003 sample next to a real switch.
Try pressing:
-
thumb;
-
pointing;
-
with a bag or object in hand.
This is a simple UX test.
Why the new plane is especially important for a multi-post frame
A block of three switches or sockets has a large width.
It crosses more rhythm elements.
What becomes more complicated
-
cutout;
-
frame support;
-
symmetry;
-
position relative to the joint.
Conclusion
The wider the frame, the more important it is to build a modular grid before purchasing.
What to do if the switch falls exactly in the middle of one decorative slat
There are two options.
Shift the rhythm
Often the best.
Leave it and make a design cutout
If the grid is already tied to other important elements.
Why you can't automatically cut the slat
A visually weak offcut may remain at the top or bottom.
What to do if the switch falls on the edge of a 1000 mm panel
This is especially inconvenient.
The cut is divided between two modules.
Risks
-
harder to align;
-
two cuts instead of one;
-
joint next to the frame;
-
higher risk of plane difference.
Best action
Try shifting the layout start.
What to do if the electrical fittings have already been moved once
Do not move them again just for panels without necessity.
First check the option of a smooth field or changing the modular start.
Why can't you order PAN-003, and the holes "figured out later on site"
This seems like a flexible approach.
In reality, it creates a cascade of errors.
Error 1. The cutout lands on an inconvenient part of the rhythm
You have to ruin the appearance.
Error 2. The device ends up near a joint
Two vertical lines compete.
Error 3. The frame rests on different levels
It looks visually skewed or doesn't fit flush.
Error 4. You have to cut the adjacent panel
One bad cut ruins two modules at once.
Error 5. The electrician and the installer use different zero points
The hole turns out to be offset.
Error 6. Percentage margin doesn't help
There is a spare panel, but the needed fragment still doesn't match in rhythm or orientation.
Buy slat panels: how many PAN-003 are needed for a specific wall
If you need Buy slatted panels, the quantity cannot be calculated only by square meters.
PAN-003 has a modular width of 1000 mm.
Basic formula by width
N = ceil(W / 1000)
Where:
-
W is the finished width of the wall;
-
1000 — width of the source module.
But this is only the beginning.
What is then adjusted
-
final trimming;
-
intercom;
-
switches;
-
joint;
-
useful leftovers;
-
repair reserve.
Numerical example: wall 4200×2600 mm
Let's take a scenario from the plan.
Wall width:
4200 mm.
One module:
1000 mm.
Four:
4 × 1000 = 4000 mm.
Missing:
4200 − 4000 = 200 mm.
Minimum width required:
5 full-size PAN-003.
Purchased width
5 × 1000 = 5000 mm.
Nominal excess
5000 − 4200 = 800 mm.
This does not mean that a single convenient 800 mm offcut will appear at the site.
It may be distributed along the edges or between cutouts.
How to use the 800 mm nominal excess
There are several scenarios.
Scenario 1. One edge is cut by 200 mm, the other remains full
The remainder is approximately 800 mm from one module.
If its rhythm and height are suitable, it can be useful.
Scenario 2. The wall is centered
Approximately the following needs to be removed from the edges:
800 / 2 = 400 mm of total trimming,
that is, 400 mm from each of the two outer modules, if the layout is built symmetrically.
The remnants become two pieces.
Scenario 3. The rhythm shifts to accommodate the switch
The edge trims may be asymmetrical.
For example:
250 mm on one side;
550 mm on the other side.
The main thing is not arithmetic beauty, but the correct position of the electrical fittings.
Intercom at 650 mm from the right edge: how it affects the layout
If the intercom is located close to the right edge, the last module becomes especially important.
What to check
-
whether the housing falls on the cut;
-
whether the frame ends up on the module boundary;
-
whether there is too narrow a strip of PAN left between the intercom and the corner.
Why the 650 mm coordinate is useful
It allows you to build a real grid rather than reasoning "approximately on the right."
Why the cutout for the intercom does not automatically reduce the number of panels
Let's say the intercom takes up 250×180 mm.
It seems:
"since there's a hole, less material is needed."
But you still have to buy the panel as a whole.
The cutout creates waste inside the module, not a minus one panel.
When a cutout can help
If the cut-out fragment remains intact and can be used elsewhere.
When not
If it:
-
cut with complex geometry;
-
includes part of the relief;
-
too small;
-
does not match in orientation.
Cost of slat panels: example of five PAN-003
MDF PAN-003 1000×11×2670:
26,410 ₽ at the time of check.
5 pcs.:
5 × 26 410 = 132 050 ₽.
This is the base product cost of five full-size modules without:
-
delivery;
-
finishing;
-
electrical installation works;
-
installation;
-
sample;
-
reserve.
Primed version
43 700 ₽ × 5 = 218 500 ₽.
The difference:
218 500 − 132 050 = 86 450 ₽.
Why you can't compare only the panel price
A primed version can reduce some of the finishing preparation.
But the final economics should be calculated based on the actual painting system.
Slat wall panels price: when the sixth PAN-003 is justified as a reserve
Five modules are the mathematical minimum for a 4200 mm wall.
The sixth adds:
26,410 ₽ for regular MDF at the time of checking.
This is a significant amount.
When a reserve may be justified
-
complex shaped cutouts for the intercom and switches;
-
The installer is working with PAN-003 for the first time;
-
A reorder may delay the object;
-
The finish of the batch is difficult to replicate;
-
Other wall sections remain where material can go.
When the sixth is redundant
-
The cutting layout is already optimized;
-
There is OPAN-003;
-
The cutouts are simple;
-
the product is available;
-
A repair remainder of 800 mm is already useful.
Why the 'plus 10%' rule works poorly here
Five panels × 10% = 0.5 panels.
In a real order, you cannot buy half of a full-size module.
Rounding to six gives +20% in quantity.
Therefore, the reserve must be justified by a specific risk.
PAN-003 from MDF: when a uniform color of the wall and equipment matters
If the project involves a painted slat wall, MDF is especially convenient.
Regular MDF
Requires the chosen preparation and finish system.
Primed MDF
Part of the preparatory layer has already been completed.
Why color affects electrical fittings
A white frame on a wall painted in the same tone can visually blend in.
Black — becomes an accent.
Why the relief still remains
Even with one color, the frame and PAN-003 reflect light differently.
Buy MDF slat panels or switch to beech/oak
If you need buy PAN-003 made of MDF, the material is already selected according to the scenario.
But the buyer can compare the wood.
Beech
Natural wood, length 2400 mm.
Oak
Pronounced texture, also a different length.
What will change
Not just price.
The vertical layout of the wall will change.
At a height of 2600 mm, a wooden panel of 2400 mm as a single piece is no longer sufficient.
Therefore, the material cannot be changed after calculation.
MDF 2670 and wood 2400 are different design systems.
Why electrical fittings enhance the advantage of MDF in a painted interior
If the intercom and switches should look built-in, a unified paint finish helps assemble the wall into a single composition.
But this is a design advantage, not a technical rule.
Before the main purchase — sample OPAN-003
The cheapest way to check the actual relief is — to order a sample of the slat panel OPAN-003.
The sample card confirms:
-
200×11×310 mm;
-
MDF;
-
beech;
-
Oak.
What to check near the switch
-
real difference;
-
shadow;
-
finger access;
-
frame color.
Near the intercom
-
body scale;
-
smooth field size;
-
side profile.
At the baseboard
-
bottom junction.
At the trim
-
two adjacent vertical lines.
Why OPAN-003 is more useful than a computer render
It shows a physical depth of 11 mm.
How to try on OPAN-003 without interfering with the electrical system
Place the sample next to the device without removing the frame or touching the wiring.
This way you can evaluate:
-
visual relief;
-
the new plane;
-
shadow line.
If after this an electrical change is required, a qualified electrician is brought into the project.
How to finish PAN-003 at the floor if the baseboard has not been chosen yet
The bottom junction often seems like a separate task, but for a wall with electrical fittings, it affects the entire modular grid.
PAN-003 goes down to the floor
Then the baseboard is either absent or installed on top/in front of the panel according to a separate project.
PAN-003 starts above the baseboard
Then the height of the vertical part is reduced.
This is important for the 2670 mm cut.
The baseboard is thicker than the relief of PAN-003
The bottom line may visually overlap the panel.
The baseboard is thinner
The slats protrude forward relative to it.
Why the joint needs to be decided in advance
If the baseboard appears after cutting, the actual panel height may change.
To select, you can open buy a wooden baseboard, but the article does not turn this block into a separate baseboard review.
Panel 2670 mm on a wall 2600 mm: how much actually remains in height
In our numerical example, the wall is 2600 mm.
PAN-003 — 2670 mm.
Nominal margin:
2670 − 2600 = 70 mm.
Why this is not yet the final cut
If a baseboard is installed below and the panel starts above it, the vertical piece will be shorter.
For example, working height 2500 mm:
2670 − 2500 = 170 mm.
What to do with the remainder
The short piece can be:
-
kept as a finish sample;
-
used for a color test;
-
saved for local repairs if the geometry fits.
Why 70 mm cannot be considered an “ideal allowance” universally
On the other wall, the height may be 2660 mm.
Then only 10 mm remains to the end cut, which already requires a very precise measurement.
Switch, intercom, and door casing: three verticals on one wall
The complexity increases sharply when electrical fittings are located near the door.
There are three competing lines:
-
the edge of PAN-003;
-
the edge of the casing;
-
the edge of the switch or intercom frame.
If random strips of 20–40 mm remain between them, the wall looks fragmented.
How to simplify
Attach one element to another.
For example:
-
The smooth field around the switch continues up to the trim;
-
PAN-003 starts from the next clean vertical line.
When it's better not to extend panels beyond the trim
If the area is too narrow and creates a single random fragment of the slat rhythm.
What to do if the intercom is 60 mm from the trim
A separate symmetrical field around it may not fit.
Then it's better to build a single smooth block:
trim → intercom → smooth zone → PAN-003.
This makes the solution look architectural.
What to do if the switch is located almost at the corner
The panel can create a very narrow edge module.
Risk
After cutting, a thin strip of MDF will remain.
Solution
Shift the start of the layout or leave a smooth side zone.
Electrician and panel installer PAN-003: what data should they coordinate with each other
This article does not provide step-by-step instructions for working with wiring.
But it should help the customer organize interaction between specialists.
The panel installer provides
-
the actual thickness of the decorative layer;
-
module positions;
-
cutout boundaries;
-
new finish plane;
-
joint coordinates.
The electrician checks
-
a specific switch model;
-
socket box;
-
cable reserve;
-
permissibility of moving the device;
-
safety and compliance with the current system.
What a finishing installer cannot decide on their own
-
wire extension;
-
change of electrical connection;
-
relocation of a socket box;
-
change of intercom scheme.
What cannot be left for the electrician "for later"
Modular grid PAN-003.
If the electrician comes after the finished layout, they have fewer options.
Why work with already installed electrical fittings must be performed by a qualified specialist
Intercom and switch are not decorative covers.
Inside there may be:
-
power circuits;
-
low-current lines;
-
connections;
-
contact groups.
Any change in their position must be made taking into account the specific system and safe power disconnection where required.
The article helps design the finishing, not teaches intervention in wiring.
How to avoid the situation “the installer has already cut, the electrician disagrees”
One approved sheet is needed.
On it:
-
wall size;
-
PAN-003;
-
all devices;
-
new plane;
-
selected junction type.
This sheet is signed or approved by both parties before cutting.
What to do if the device cannot be moved forward
Then architectural solutions remain.
Smooth field
The most obvious one.
Strip without PAN-003 across the entire height
For example, a vertical service zone.
Changing the boundary of the slat wall
The panel ends earlier.
Why this is not “worse”
Sometimes a technical limitation creates a cleaner design.
What to do if the device can be moved, but the housing is too deep
Even after moving it out, the frame may protrude above PAN-003.
This is not necessarily a defect.
It is important that the difference is intentional and comfortable.
What to do if the intercom housing is thinner than 11 mm
After installing PAN-003, it may visually appear deep in the niche.
Options
-
removal;
-
smooth field;
-
decorative backing;
-
panel border change.
The specific backing must be part of the furniture and finishing project, not a random spacer.
What to do if the intercom protrudes significantly
Then PAN-003 can fit it without a feeling of being “sunken in.”
But you still need to check the side shadow and service access.
Why the device body cannot be clamped tightly by the panel without access
Any equipment may require:
-
removing the cover;
-
repair;
-
replacement;
-
maintenance.
If PAN-003 overlaps the mounting hardware or latches, future service turns into dismantling the trim.
Service gap: how to design without a made-up standard
Do not assign universal 5 or 10 mm.
Check the specific device's manual and how to remove the housing.
Check
-
where the cover slides;
-
where are the screws;
-
whether a screwdriver is needed from the side;
-
whether the frame is removed forward.
If the intercom is replaced after five years
The new model may be a different size.
Why a smooth field is more maintainable
It gives more freedom.
Why a precise shaped cutout is worse
A new housing may not cover the old opening.
Slat panel and the service lifecycle of a wall
PAN-003 — a durable decorative system.
Electrical fittings may change faster.
Therefore, a good solution should consider not only today's installation but also future equipment replacement.
When a smooth field around devices is especially justified
-
the intercom may be updated;
-
The smart switch is planned to be replaced;
-
The object is rented;
-
The equipment is regularly maintained;
-
There is no desire to cut expensive relief for each frame.
When can you surround the PAN-003 device closely
-
The device model is stable;
-
The cutout is simple;
-
The service remains available;
-
The composition wins.
Why the choice of "closely or field" must be made before purchase
It affects consumption.
A smooth field reduces the actual coverage width of PAN-003.
But it does not always reduce the number of source modules.
Example: wall 4200 mm, smooth field 300 mm
If PAN-003 covers only 3900 mm:
4 modules of 1000 = 4000 mm.
Then mathematically 4 might be enough instead of 5.
But what to check
Where is the field located?
If it is in the middle, panels are needed on both sides.
For example:
-
left 2100 mm;
-
field 300 mm;
-
to the right 1800 mm.
For the left part:
ceil(2100/1000) = 3 modules.
For the right:
ceil(1800/1000) = 2.
Total again 5.
Key takeaway
Dividing the wall into zones can increase the count, even if the total covered width is less.
Why this is one of the most important calculations in the article
The total area says:
3900 mm of coverage = seems like 4 panels.
The actual layout across two independent zones says:
3 + 2 = 5.
This is the practical calculation, which is stronger than square meters.
Smooth field at the wall edge: when four panels can indeed be enough
If the 300 mm smooth zone is on one edge:
4200 − 300 = 3900 mm of continuous PAN-003.
Then 4 panels give 4000 mm.
Nominally sufficient.
Remainder
100 mm.
Commercial effect
One PAN-003 is saved:
26,410 ₽ for regular MDF at the time of checking.
Why a field in the center and a field at the edge are economically different solutionsWhen it is better to center by the inter-batten gap
If the frame is narrow enough.
Then two symmetrical verticals remain nearby.
Why the exact geometry of the relief should be taken from a sample or card
You cannot invent the batten pitch if it is not confirmed in the source data.
In this article, we operate with a module of 1000 mm and a depth of 11 mm, and we check the specific internal profile PAN-003 against a real sample.
Order a sample OPAN-003: what exactly to mark on it
After receiving the sample, do not just hold it against the wall.
It is useful to mark with a marker on the temporary protective side:
-
frame axis;
-
assumed cut edge;
-
the new plane;
-
installation direction.
What this gives
At a small scale, you can see how the actual terrain interacts with the rectangular frame.
If the switch is at a height of 900 mm and the intercom at 1450 mm
Two devices form a vertical block.
You can use one common smooth area.
Plus
The wall looks more cohesive.
Minus
The area without PAN-003 becomes larger.
Commercial effect
The number of modules may change only if the field affects the continuous width of the covering.
How to calculate the modular field around two devices
Assume both devices fit into a vertical rectangle 350 mm wide.
If it is located at the edge of the wall, PAN-003 covers:
4200 − 350 = 3850 mm.
4 modules are enough.
If the field is in the center and divides the wall into:
1900 + 1950 mm,
You need to:
ceil(1900/1000) + ceil(1950/1000)
= 2 + 2
= 4 modules.
In this case, the central field also does not increase the quantity.
If the sections are 2100 + 1750 mm
We get:
3 + 2 = 5.
That is, the field coordinate changes the purchase again.
Why wall slat panels cannot be calculated only by total area
Area 4200×2600:
4.2 × 2.6 = 10.92 m².
One module 1000×2670:
1 × 2.67 = 2.67 m².
Area math:
10,92 / 2,67 ≈ 4,09.
Rounding:
5 panels.
In this example, the area coincidentally gives the same answer.
But with a smooth field in the center, it can give 4, while the actual discrete layout gives 5.
Therefore, the correct order
-
wall geometry;
-
zones;
-
modules;
-
only then the area as a check.
How to attach slat panels to the wall near electrical fittings
The specific installation technology for PAN-003 must comply with the manufacturer's instructions, the wall base, and the chosen material.
The article does not replace the installation map.
But near devices, there are special rules for organizing the work.
Before installation
Electrical fittings must be protected from dust and accidental damage.
Before final fastening of the module
Checked:
-
alignment of the cutout;
-
depth;
-
access;
-
joint.
If modification of the electrical assembly is required
The work is performed by a qualified electrician with the corresponding circuit safely disconnected.
Why you cannot first permanently secure the panel and then try to "pull out" the switch
Access becomes worse.
Installing slat panels on a wall: dry fitting is more important than adhesive
On a complex section, it is useful to first assemble the layout without irreversible fastening.
What is checked
-
module;
-
seam;
-
straightness;
-
frame;
-
intercom;
-
edge.
Why dry fitting is especially important with expensive PAN-003
A mistake in one panel costs tens of thousands of rubles.
What to do if the cutout turned out to be 3 mm larger than the frame
Do not try to automatically seal everything with sealant.
Possible consequences
-
uneven contour;
-
noticeable gap;
-
service disruption.
The right way
Assess whether it is covered by the device's standard frame according to the actual geometry.
If not, redo the section.
What to do if the cutout is 2–3 mm smaller
Do not force the frame or housing.
The fitting is done according to the project, maintaining a straight edge.
Why the outer edge of the cutout should be neater than the inner area
It remains visible next to the frame.
Especially with a contrasting color.
How to protect the front surface when making a cutout
The specific tool and technology are chosen by the installer based on the material.
The article does not specify the saw speed or router bit type without manufacturer instructions.
But it is mandatory:
-
avoid chipping;
-
support the module;
-
make a clean edge.
What to do if the cut crosses the fabric or flexible base of the panel
The design of PAN-003 must be taken into account.
If the internal structure affects edge rigidity, the solution is verified on a real sample.
Why OPAN-003 is useful for the installer, not just the designer
You can safely test on the sample:
-
cut;
-
edge finishing;
-
paint;
-
material reaction.
This reduces the risk on a full-size panel.
How to match the switch color with PAN-003
There are four basic options.
Frame in panel color
The calmest.
Contrasting Trim
The device becomes a graphic accent.
Frame in wall/trim color
Connects with smooth elements.
Metal frame
Supports room hardware.
Why color doesn't solve plane level differences
Even a perfectly matched shade doesn't fix a device that is set too deep.
White intercom, PAN-003 dark
A smooth field can become especially useful.
A white rectangle in a complex relief will be very noticeable.
Black intercom, PAN-003 dark
It can be made part of a slatted surface.
But service access is still checked.
Slat wall and floor-level outlet
Although H1 mentions the intercom and switch, the outlets need to be placed on the same map.
Why
The baseboard, bottom of PAN-003, and the outlet form a single node.
What not to do
Resolve the upper electrical work, leaving the lower part for later.
Baseboard and outlet: which line is more important
If the frame is close to the floor, the baseboard may physically interfere.
Therefore, the bottom junction of PAN-003 needs to be coordinated together with the electrical work.
When the slat panel is not yet needed on the entire wall
Sometimes after marking, it turns out there are too many devices.
For example:
-
intercom;
-
thermostat;
-
switch block;
-
sockets;
-
sensor.
The relief turns into a set of cutouts.
Alternative
Make PAN-003 only on part of the wall.
This is an honest case where less product gives a better result.
When it's better not to buy PAN-003 for this wall at all
if:
-
electrical fittings cannot be safely relocated or serviced;
-
there are too few smooth sections;
-
the rhythm constantly breaks;
-
the wall has many devices;
-
the 11 mm depth conflicts with adjacent elements;
-
another material solves the task more simply.
An expert article should not sell PAN-003 at any cost.
When PAN-003 is particularly well suited
-
devices can be neatly integrated;
-
the rhythm of the wall is readable;
-
there is room for smooth service zones;
-
a height of 2670 mm is suitable;
-
MDF is needed for painting;
-
a modular width of 1000 mm provides rational cutting.
Mistakes when ordering PAN-003 for a wall with an existing intercom and switches
Mistake 1. Using an 8 mm depth for the 2670 mm version
Why it occurs: the card contains a short PAN-003 740 mm with C=8 mm.
Consequence: the new plane is calculated incorrectly.
How to prevent: use 1000×11×2670 mm for the selected MDF SKU.
Mistake 2. Counting only square meters
Why it occurs: finishing is usually ordered by area.
Consequence: the central smooth field divides the wall into two sections, and the actual cutting requires more modules.
How to prevent: calculate each continuous section by width of 1000 mm.
Error 3. Buy panels before marking devices
Why it occurs: the product is already selected.
Consequence: the switch falls on a joint or the top of the relief.
Error 4. Make a cut "in place" without a modular grid
Consequence: you have to cut the second module or leave a narrow strip.
Mistake 5. Treating the intercom as an ordinary decorative frame
Why it happens: frontally it is a rectangular body.
Consequence: service access is blocked.
Mistake 6. Positioning the switch according to the catalog 11 mm without actual installation
Why it happens: the adhesive layer is forgotten.
Consequence: the frame ends up higher or lower than the new surface.
Mistake 7. Moving the electrical part by the panel installer
Why it happens: "you just need to push it out a little."
Consequence: unsafe intervention in the electrical system.
How to prevent: any work with wiring and devices should be entrusted to a qualified electrician.
Mistake 8. Not installing the trim
Consequence: random narrow strips remain between the door, frame, and PAN.
Mistake 9. Not deciding on the baseboard before cutting
Consequence: the vertical length and bottom joint change.
Mistake 10. Considering the cutout for the intercom as material savings
The panel is still purchased as a whole.
Mistake 11. Buying +10% without a risk map
Five panels plus one = already +20% in quantity.
Mistake 12. Not checking OPAN-003
The expensive module is used as the first test of the material.
Error 13. Mixing MDF 2670 with wooden 2400 in one calculation
Vertical cutting becomes incorrect.
Error 14. Making the smooth field too small
The device looks squeezed.
Error 15. Making the field too large for the sake of a "reserve"
The slat composition falls apart.
Error 16. Not checking the replacement of the intercom in the future
The new housing does not cover the old figured cutout.
Error 17. Applying the PAN joint too close to the frame
Parallel lines look random.
Error 18. Not accounting for the socket housing near the floor
Baseboard and lower electrical wiring conflict after installation.
Error 19. Ordering the primed version just because "it's better"
Price is higher by 17,290 RUB per module according to the current card.
Primer should solve a real finishing task.
Error 20. Not agreeing on a single zero point
Electrician and installer receive different coordinates.
Which PAN-003 option to choose: regular MDF or primed
For a wall with ready electrical fittings, the choice depends on the finish.
Regular MDF 26,410 ₽
Suitable if the workshop handles the full preparation cycle itself.
Primed 43,700 ₽
May be more convenient if the object requires the surface to be ready for further painting.
Difference across five modules
5 × (43 700 − 26 410)
= 5 × 17 290
= 86 450 ₽.
What to compare with this amount
Not an abstract “primer is better.”
But the cost:
-
the primer;
-
preparation;
-
labor;
-
timelines.
If the wall is painted and PAN-003 is needed only on one section
It is not necessary to cover the entire wall.
Example
The wall width is 4200 mm.
The slat zone is 2400 mm.
The smooth part is 1800 mm.
For 2400 mm:
ceil(2400/1000) = 3 panels.
Product cost:
3 × 26 410 = 79 230 ₽.
This is significantly less than five modules for the entire wall.
When such a scenario is stronger
If the intercom and switches remain in the smooth part.
If the slat zone is 3000 mm
Exactly 3 panels are needed across the width.
But why does "exactly" still require verification
You need allowance for the actual wall geometry and trimming.
If the finished width is 3003 mm, three modules are no longer enough.
Why you should measure the wall after finishing
Plaster, putty, trims, and corners change the actual dimensions.
What is especially important
Do not use the size from the construction project if the wall is already finished.
When the cost of electrical rework can change the panel choice
If moving several devices is complex, a smooth field may be cheaper.
The article does not set an electrician's price.
But the buyer must compare:
With device transfer
versus
With additional/reduced PAN-003 zone.
What to send to the STAVROS manager before ordering
The request must be specific.
Example:
PAN-003 / MDF / 1000×11×2670 mm / wall 4200×2600 mm / intercom ___×___, center X=___ Y=___ / switch block ___×___ / modular layout from left corner / smooth field ___ / quantity 5 pcs. / OPAN-003 checked yes / baseboard ___ / finish ___ / delivery ___.
Why write wall geometry
The manager understands the order context.
Why specify OPAN-003
Shows that the actual terrain has already been verified.
Why specify the quantity
Do not leave the wording "approximately 5".
How to format the internal specification for the installer
Separate sheet:
-
PAN-003 1000×11×2670;
-
module numbers P1–P5;
-
width of each trim;
-
intercom coordinates;
-
switch coordinates;
-
smooth zones;
-
direction;
-
joints;
-
bottom junction;
-
top junction.
Why module numbering is useful
If P3 has a complex cutout, the installer won't confuse it with P4.
What to do if one module is damaged during cutting
First, check if another leftover can be used.
If not — reorder.
Why a spare sixth panel isn't always the best answer
It freezes 26,410 ₽.
For one residential property, this is significant.
When reordering is dangerous
if:
-
the batch is painted non-standardly;
-
deadlines are critical;
-
the product is running out;
-
logistics are complex.
When reordering is normal
If PAN-003 is in stock and the finish is reproducible.
How to accept a finished slat wall with electrical fittings
After installation, check not only the panels.
Geometry
-
the joints are even;
-
the rhythm is not broken;
-
the outer strips are aligned.
Electrical fittings
-
the frames are level;
-
the keys press freely;
-
the intercom housing is accessible;
-
service elements are not covered.
Plane
There is no accidental deep "well" around the switch.
Finish
There are no chips at the cutouts.
Bottom junction
The plinth and PAN-003 meet neatly.
Why acceptance should be done with the side light on
The relief reveals:
-
steps;
-
frame skew;
-
uneven cutout;
-
different depths.
When PAN-003 cannot be ordered yet
Do not buy a full-size batch if:
-
exact SKU is not selected;
-
depth 8/11 mm is confused;
-
wall not measured;
-
electrical fittings not applied;
-
unknown whether smooth field will be;
-
skirting board not resolved;
-
OPAN-003 not checked at complex node;
-
electrician did not confirm technical feasibility of selected scheme;
-
quantity counted only by m²;
-
joints not applied.
When order is already ready
-
Selected PAN-003 MDF 1000×11×2670.
-
Finished wall measured.
-
Modular grid built.
-
Intercom applied.
-
Switches and sockets applied.
-
Trim checked.
-
Smooth field resolved.
-
New plane checked.
-
Electrician approved device nodes.
-
Baseboard approved.
-
OPAN-003 attached or geometry confirmed.
-
The number of modules has been counted.
-
The balances have been checked.
-
The decision on the reserve is justified.
-
price and availability rechecked.
How to order PAN-003 for a wall with ready electrical fittings
Final specification:
PAN-003 / MDF / 1000×11×2670 mm / Prestige / quantity ___ / wall × / intercom ___ / switches ___ / smooth field ___ / layout start X=___ / plinth ___ / finish ___ / OPAN-003 checked / electrical agreed with specialist.
After that, you can buy PAN-003 made of MDF already for the approved project.
Control checklist before one specialist leaves and another starts work
On a real site, the problem often appears not because of an incorrect decision, but because of a gap between participants. The electrician agreed on one plane, the PAN-003 installer came a week later and received only a photo of the wall. To prevent this, it is useful to leave a short common checklist before starting work.
| Checkpoint | Value |
|---|---|
| SKU PAN-003 | MDF 1000×11×2670 mm |
| Zero point X | ___ |
| Zero point Y | ___ |
| Start of the first module | ___ |
| Module joints | ___ |
| Intercom: dimensions | × |
| Intercom: coordinates | X=___ / Y=___ |
| Switch: dimensions | × |
| Switch: coordinates | X=___ / Y=___ |
| Smooth field | × |
| New finish plane | ___ mm from the old one |
| bottom junction | ___ |
| Top junction | ___ |
| Electrical unit is coordinated | Yes/No |
| OPAN-003 verified | Yes/No |
| Quantity of full-size PAN-003 | ___ |
Why the line "new finish plane" should be actual
Do not automatically write 11 mm.
After a test installation of a sample or control section, the actual finish offset is recorded. This is what the electrician should see if the device needs to be brought forward.
Why it is better to store intercom coordinates by center and by dimensions
If only the left edge is recorded, it is difficult to restore the axis when replacing the housing.
Center + width/height provide complete geometry.
Why the zero point should be physically understandable
The phrase "from the left edge" is insufficient if a trim later appears on the left.
Better:
X=0 — the finished inner corner after installing the trim.
Or another unambiguous reference point.
Second numerical example: a smooth service strip 500 mm near the door
The wall is again 4200 mm.
The intercom and switches are grouped into one vertical zone 500 mm wide at the right edge.
PAN-003 remains at:
4200 − 500 = 3700 mm.
Modulo 1000 mm:
ceil(3700/1000) = 4 panels.
Purchased width:
4000 mm.
Nominal remainder:
300 mm.
Cost of regular MDF
4 × 26 410 = 105 640 ₽.
Compared to a solid wall of five modules:
132 050 − 105 640 = 26 410 ₽.
That is, the architectural solution with a service strip simultaneously:
-
removes complex cutouts around electrical fittings;
-
preserves access;
-
reduces one full-size PAN-003.
But the savings here are a consequence of the strip's favorable placement at the edge, not an argument to make any service zone 500 mm wide.
If the same 500 mm are in the center
For example:
left 2250 mm;
on the right 1450 mm.
Then:
ceil(2250/1000) = 3;
ceil(1450/1000) = 2.
Total again 5 panels.
This pair of examples clearly shows the main purchasing principle: for modular finishing, the cost is determined not only by the total area, but also by how it is divided into continuous sections.
Last test before payment
If on one sheet you can show:
-
five or four specific modules;
-
their actual widths after trimming;
-
exact coordinates of devices;
-
the location of each joint;
-
solution for the smooth field;
-
bottom assembly;
-
the actual new plane,
the order is almost ready.
If instead the drawing still has notes like “intercom roughly here” and “switch to be routed on site,” it’s too early to buy full-size PAN-003.
If after marking out, the electrical fittings still fall into an awkward rhythm
This means the problem is no longer the “unfortunate hole” but the wall composition itself. Then three things are compared: shifting the start of PAN-003, increasing the smooth service zone, and reducing the slat finish to an independent architectural field. Sometimes the best result is not to try at all costs to bring the slats to every device. Such a sacrifice of a few hundred millimeters of PAN-003 can simultaneously simplify service, reduce the number of complex cutouts, and make the wall visually cleaner.
FAQ
What is the size of PAN-003 made of MDF with a length of 2670 mm?
For the selected SKU — 1000×11×2670 mm.
Why does PAN-003 show a depth of 8 mm online?
Because the product card contains several variants. The short version of 740 mm is currently listed as 1000×8×740 mm. These parameters cannot be applied to the full-size MDF of 2670 mm.
Is there a PAN-003 made of MDF?
Yes. The article specifically discusses the MDF version 1000×11×2670 mm.
Can I buy primed PAN-003?
Yes. The card contains a primed version of the same geometry 1000×11×2670 mm. At the time of checking, its price is higher than regular MDF.
What is better near the switch — a smooth field or PAN-003 flush against it?
It depends on the rhythm, frame sizes, and service access. A smooth field is often easier for already installed electrical fittings, but it is not mandatory.
Do I need to move the socket box forward?
This cannot be decided based on a single article. The specific switch, socket box, wiring, and new finish plane assembly must be assessed by a qualified electrician.
Can I simply cut out PAN-003 around an existing frame?
Technically, a cutout is possible as part of the project, but first you need to check where it falls relative to the relief and joints. A random rectangle may intersect an inconvenient part of the panel.
What to do if the switch falls on a decorative rail?
First check the modular grid offset. If the rhythm cannot be shifted, a cutout or a smooth field is designed.
What to do if the frame ends up at the joint of two panels?
It is better to try changing the start of the layout. If this is not possible, the node must be specially designed, not assembled randomly on site.
Is it possible to leave a smooth rectangular field around the intercom?
Yes. For an already installed device, this is often a maintainable option.
How to choose the size of such a field?
Based on the full wall layout, not on a universal offset. The intercom housing, adjacent switch, trim, and the PAN-003 rhythm need to be taken into account.
How many PAN-003 panels should be purchased for a 4200 mm wall?
If PAN-003 covers the entire width, at least 5 panels are needed by modules, because 4×1000=4000 mm.
Why can't you buy four and cover the remaining 200 mm with a leftover piece?
The remainder appears only after purchasing the fifth source panel. Four panels physically provide only 4000 mm.
Why can't we count only square meters?
Panels are purchased as discrete modules with a width of 1000 mm. Smooth fields and dividing the wall into sections can change the quantity even with a smaller total coverage area.
Can a smooth field reduce the quantity of PAN-003?
Yes, if it is positioned so that the remaining slat zone fits into a smaller number of continuous 1000-millimeter modules.
Why do a field in the center and one at the edge give different consumption?
A central field divides the slat part into two independent sections, each of which is rounded up separately.
What is OPAN-003 for?
To physically see the 11-millimeter relief, apply it to a switch frame, intercom, baseboard, and trim before purchasing full-size modules.
What is the size of OPAN-003?
The sample card confirms 200×11×310 mm.
Can OPAN-003 be used for a cut test?
Yes, if the installer wants to check the material's behavior and edge quality before working with a full-size panel.
Where to buy slat panels for walls?
In the STAVROS profile category. For the exact product PAN-003, it's better to go to the specific panel's card.
How much do five PAN-003 MDF panels cost?
At a price of 26,410 ₽ at the time of checking:
5 × 26 410 = 132 050 ₽.
How much do five primed PAN-003 panels cost?
5 × 43 700 = 218 500 ₽.
Why is the difference so big?
The primed version has a different level of surface preparation. You should compare not only the product price, but also the future cost of finishing work.
Should you search for "buy MDF slat panels" only for the cheapest option?
No. For a wall with ready-made electrical fittings, depth, length, cutting, and device service matter more than the minimum price of one module.
Which baseboard should be paired with PAN-003?
First, determine the bottom node: the panel goes to the floor or starts above the baseboard. Only after that is a specific wooden profile chosen.
Can PAN-003 be installed after the baseboard has been mounted?
Yes, if the dimensions and the junction are accounted for in advance. But the actual vertical length of the panel will change.
Do I need to buy a sixth PAN-003 as a spare?
Not automatically. For a wall where at least five are needed, a sixth panel means +20% in quantity. The spare must be justified by the complexity of cutouts, logistics, and the value of the remainder.
What to do if the intercom is later replaced with a model of a different size?
A smooth service field provides more freedom. A precise shaped cutout around the old housing may complicate replacement.
Do I need to turn off the electricity before working near the switch?
Any intervention in the electrical part is performed by a qualified specialist following a safe procedure for the specific circuit. Panel installation must not replace electrical work.
Can I move the device to a new plane myself?
It's not recommended. The method depends on the specific electrical fittings, recessed box, wiring, and base.
When is it better not to use PAN-003 on this wall?
If there are too many devices, service access cannot be maintained, the rhythm constantly breaks, or another finish solves the task more simply.
How to order PAN-003 correctly?
Provide the exact SKU, wall size, quantity, intercom and switch coordinates, layout diagram, smooth fields, bottom junction, and finish.
Conclusion
For a wall with an already installed intercom and switches, purchasing PAN-003 starts not with the number of panels, but with a new understanding of the plane.
An old painted wall already has electrical fittings in one geometry. PAN-003 1000×11×2670 mm creates a new decorative surface in front of it. If nothing is designed, the frames and housings of devices may end up visually recessed, fall on the peak of the relief, or on the joint of two modules.
Therefore, the correct sequence is as follows:
wall → modular grid 1000 mm → electrical fittings → new plane → smooth field or cutout → electrician → cutting → order.
The first fundamental fact is not to confuse SKUs. For the full-size MDF PAN-003, the geometry used is 1000×11×2670 mm. The 8 mm parameter refers to another short version of 740 mm and should not be included in the calculation for this wall.
The second is not to treat electrical work as a secondary "hole." The intercom and switches affect the start of the rhythm, the position of joints, the number of panels, the size of smooth zones, and the future maintainability of the wall.
The third is not to count only square meters. On a 4200 mm wall, four PAN-003 panels give only 4000 mm, so for continuous finishing, five modules are needed. But if a smooth zone is left, the consumption depends not only on its width but on its location. A 300 mm field at the edge can reduce the order to four panels. The same field in the center, if it divides the wall into 2100 and 1800 mm, still requires 3+2=5 modules.
The fourth is that the OPAN-003 sample here has real commercial value. The 200×11×310 mm fragment allows you to see the actual relief near the frame, assess the side shadow, check finger access, and test the material before the craftsman starts cutting a panel costing 26,410 ₽.
The fifth is that the electrical installation part cannot be decided by an article. If a switch or intercom needs to be physically brought out to a new finished plane, the specific decision is made by a qualified electrician based on the real system. The task of the article is to pre-form the finishing geometry so that the electrician and installer work on the same coordinate map.
For a 4200×2600 mm wall, five standard MDF PAN-003 panels cost 132,050 ₽ at the time of checking. Five primed ones cost 218,500 ₽. Therefore, a spare sixth panel, an accidental second cut, or an error at the joint is no longer a trifle. Marking before purchase is economically more important than the universal advice "take 10% extra."
If after the layout it becomes clear that the intercom is better left in a smooth service zone, this is not a compromise or a rejection of a beautiful wall. Sometimes such a boundary makes the interior cleaner and simplifies future equipment replacement.
If the devices are neatly integrated into the relief, service remains accessible, joints do not conflict with frames, the lower node with the baseboard is resolved, and the quantity is calculated based on actual sections, it can be order the slat panel PAN-003 1000×11×2670 mm already as part of a finished project, rather than as material that will later be trimmed around existing electrical work "on site."