Article Contents:
- Seven millimeters on paper do not yet mean that the trim will fit
- Nominal remainder and actual gap are different values
- Seven millimeters cannot be considered a safe margin
- The decision is made based on the narrowest point
- The width of 93 mm applies to the entire profile
- The thickness of 18 mm also plays a role in the selection
- The length depends on the material
- The outer boundary of the box must be visible or restored
- An extension piece may change the start of the profile
- Measure along finished surfaces
- Three heights are the mandatory minimum
- The template must match the full width
- A long template reveals curvature
- Mark not only the profile, but also the remainder
- A sample is needed not only for the color
- A convex corner takes up space
- A concave section creates a different risk
- The corner may become closer after finishing
- The switch frame requires its own space
- An outlet below eye level still affects installation
- The cabinet is checked in the open position
- A baseboard can disrupt the bottom joint
- The same profile connects the sides of the opening
- Asymmetry is sometimes more honest than a forced abutment
- You should count the surfaces being finished, not the number of doors
- A tall door accepts a large profile more calmly
- A wide frame does not always require wide trim
- A high baseboard should speak the same language as the casing
- In a narrow hallway, scale is perceived more strongly
- MDF is rational for a paintable system
- Beech is valued for its calm surface character
- Oak reveals itself when the wood grain becomes part of the design
- All materials must be coordinated with the rest of the trim
- First, a list of finish parts is compiled
- The total footage formula is needed, but it is not sufficient
- Example for one side of the door
- The top joint changes the length of the lintel
- Two sides of a door are not always six identical parts
- The additional strip is justified by a specific reason
- The remainder is not equal to the reserve
- The article number is more important than the colloquial name
- A wide casing is not equal to a carved casing
- The material cannot be changed without recalculation
- In the hallway, the main risk is furniture and switches
- In the living room, the entire wall facade matters
- In the study, the material is tied to the furniture
- In commercial interiors, repeatability is important
- The profile is worth considering if
- It's better to postpone the order if
- Measuring from the door leaf instead of the frame
- One measurement at eye level
- Calculation based on the rough wall
- Ignoring the 18 mm thickness
- Attempting to trim the outer edge of the casing
- Material selection after quantity calculation
- Order by total length
- Same quantity for all doors
- Missing control sample of finish
- Receiving long-length material without checking packaging
- Fields to fill in
- Add a wall diagram
- Mark parts before painting
- Reconciliation starts with documents
- Geometry is checked before coating is applied
- One trial unit saves the entire batch
- First, the card of a specific article
- Then, comparison with the category
- Material is chosen before the final quantity
- An approved sample is needed before a large batch
- Will MLD-007.1 fit if the distance from the box to the corner is exactly 100 mm?
- From which point should the distance to the corner be measured?
- Can a casing be installed almost flush against the corner?
- Do I need to take into account the 18 mm thickness?
- What material should be chosen for painting?
- When does it make sense to order an oak casing?
- Is beech suitable for a casing under enamel?
- How does the MDF version differ in calculation?
- How many strips are needed for one side of the door?
- How many strips are needed for both sides of the opening?
- Can two vertical pieces be obtained from one strip?
- Is a spare needed?
- Can the casing be trimmed in width if it hits the corner?
- Do I need to order the same trim on both sides of the door?
- What to do if there is a switch nearby?
- How to check the opening of a cabinet next to the trim?
- When is the best time to order a sample?
- Is the mounting hardware included in the MLD-007.1 item?
- Can MLD-007.1 be used as a baseboard or molding?
- Where to check the current price and availability?
- How to accept long planks after delivery?
- Do I need a design project for just one door?
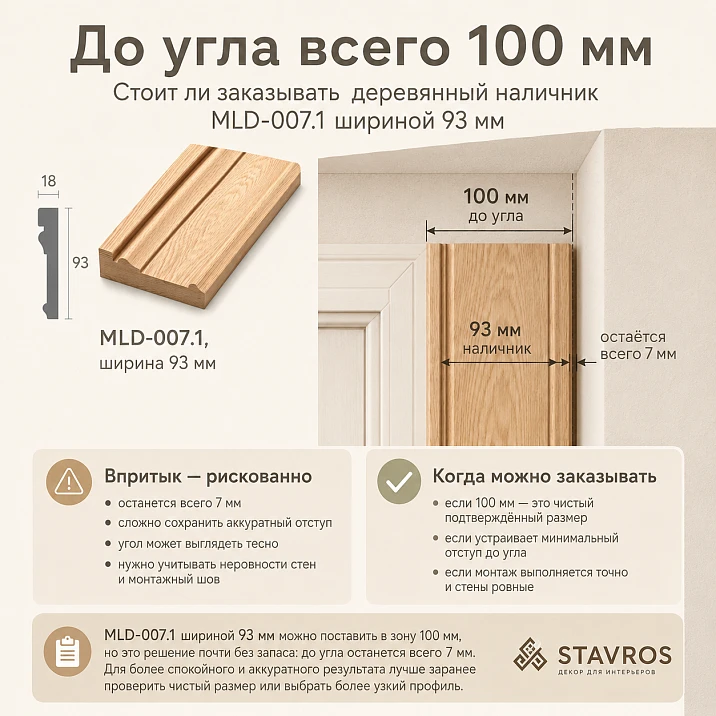
Between the outer edge of the door frame and the corner of the wall, exactly 100 mm remains. The MLD-007.1 trim has a face width of 93 mm. Simple arithmetic promises a smooth installation: 100 − 93 = 7 mm. It seems possible buy wooden trim MLD-007.1 93 × 18 mmput the required number of planks into the cart and close the issue. But it is precisely these seven millimeters that most often create a false sense of margin.
The size on the plan does not show the curvature of the corner, the thickness of the future finish, the actual position of the frame, the protrusion of the switch, the junction of the plinth, and the trajectory of the furniture door. Even the phrase "100 mm to the corner" itself can mean different measurements: from the edge of the panel, from the extension, from the outer line of the frame, from the installation seam, or from an existing narrow casing. Until the starting point is defined, it cannot be compared with the profile width.
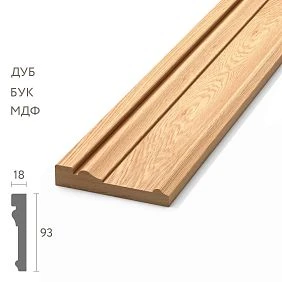
MLD-007.1 is a wide decorative trim profile with a cross-section of 93 × 18 mm. The card offers options in MDF, beech, and oak. For MDF, the length is 2600 mm; for solid wood, it is 2400 mm. These parameters affect not only the appearance but also the cutting layout: the number of planks for one door cannot be calculated solely by the total perimeter. You need to determine in advance how many full vertical pieces can be obtained from one blank, how the top will be finished, and whether casing is required on both sides of the opening.
The article answers a practical question: whether MLD-007.1 fits next to a wall corner and how to place an order without rework after delivery. There will be no universal advice here like "take a wide profile, it looks richer." The decision is based on an actual measurement, a full-size template, conflict checks, and a cutting list. Only after this can you consciously decide whether a 93 mm wide profile suits a specific door or whether it is better to open the section where buy wooden casings in the STAVROS catalog, and compare it with narrower options.
Seven millimeters on paper do not yet mean that the casing will fit
When the distance to the corner is 100 mm and the width of MLD-007.1 is 93 mm, the nominal remainder is 7 mm:
100 mm − 93 mm = 7 mm.
This is a correct arithmetic result, but not yet an installation conclusion. The formula takes into account only two numbers and says nothing about where exactly the profile will start, how straight the corner turned out to be, and what surface was used for the measurement—rough or already finished.




Nominal remainder and actual gap are different values
Nominal remainder is the difference between the measured distance and the full profile width. The actual gap appears only after the following are known:
-
the actual installation line of the casing;
-
the part of the profile that, under the chosen scheme, may overlap the frame or extension;
-
the deviation of the wall from vertical;
-
the shape of the outer edge of MLD-007.1;
-
the thickness of paint, wallpaper, decorative plaster, or wall panel;
-
protruding elements near the opening;
-
the precision of trimming and the position of the top joint.
If the profile is placed entirely on the wall from the outer boundary of the frame, the full width of 93 mm will be needed for a preliminary estimate. If the installation scheme provides for part of the casing to overlap the frame, the space occupied on the wall may decrease. However, the amount of such overlap cannot be assigned from memory: it must be checked against the actual assembly, drawing, and template. Random shifting to "gain" a few millimeters can open the mounting seam or make the trim visually crooked.
Our factory also produces:





Seven millimeters cannot be considered a safe margin.
There is no universal minimum gap between the trim and the corner. In one project, a neat fit almost flush is intended by design. In another, even a small remainder looks like a random gap where shadow collects and wall unevenness is emphasized. Therefore, seven millimeters is not a license to order, but a reason to perform a full-scale check.
A simple test: cut a strip 93 mm wide and at least a meter long from thick cardboard, apply it to the location of the future trim, draw a line along the outer edge, and inspect the joint from eye level, from the door, and from the depth of the room. A short sample shows only local fit. A long template reveals that the distance to the corner at the top, middle, and bottom may differ.
Get Consultation
The decision is made based on the narrowest point.
For a vertical profile, not one value is measured, but a series of values along the height. Let the distances be:
-
at the top — 101 mm;
-
in the middle — 99 mm;
-
near the floor — 96 mm.
Relying on 101 mm is not possible. The working constraint becomes 96 mm. With a full profile width of 93 mm, the nominal remainder at the bottom is only 3 mm. After accounting for unevenness, finishing, and installation line, such a scheme may prove unacceptable.
The rule is simple: for checking clearance, take the minimum actual distance, not the average or the most convenient value. The average figure is useful for statistics, but the trim will encounter the real corner exactly where the wall came closest.
MLD-007.1 in numbers: what is confirmed by the product card
Before calculation, it is worth separating confirmed parameters from assumptions. MLD-007.1 is named in the catalog as a molding, trim, and baseboard, meaning the profile allows for several interior scenarios. This article specifically discusses door framing, not floor or wall applications.
| Parameter | Confirmed value | What this changes when choosing |
|---|---|---|
| Article number | MLD-007.1 | Allows fixing the exact model in the specification |
| Type | Molding / casing / baseboard | Before ordering, it is necessary to explicitly state that the profile is used as a door trim |
| Front width A | 93 мм | Compared with the free space from the frame to the corner and neighboring objects |
| Thickness C | 18 мм | Affects the side silhouette, joint with baseboard, furniture, and wall finishing |
| Length from MDF | 2600 мм | Used when creating a cutting map for the painted set |
| Beech length | 2400 мм | Affects the number of solid verticals and leftovers |
| Oak length | 2400 мм | Requires separate cutting calculation, like beech |
| Materials | MDF, beech, oak | The choice is related to the future finishing and the rest of the trim. |
| Sanding quality | «Prestige» | The parameter must be saved in the order for all slats in the batch. |
| Regluing quality | The card shows the options "Under enamel" and "Under tinting". | The specific combination of material and preparation is checked before payment. |
| Mounting hardware | Not declared as a confirmed part of the item. | Selected separately for the base and the installation project. |
| Price and availability | Changed in the product card. | Checked immediately before ordering. |
The table does not replace the drawing. The designations A, C, and L show dimensions but do not answer the question of which part of the profile should overlap the frame and what its back surface looks like. For a precise fit, a drawing of the product and a trial fit in the actual assembly are needed.
The width of 93 mm applies to the entire profile.
You can't look only at the central convex part or the flat strip that seems to be the main one in the photo. The 93 mm size refers to the full face width. When marking, the entire dimension is transferred to the wall, including the outermost sections of the shaped profile.
The product photo can easily be misleading. On a white background, a wide part looks more compact than next to a real door. Conversely, a close-up emphasizes the relief and creates a sense of even greater width. A full-size cardboard strip is more honest than any photo because it shows the actual scale in a specific room.
The 18 mm thickness also plays a role in the choice
If there is enough space to the corner in terms of face width, the profile can still conflict with its side edge. The 18 mm thickness affects several points:
-
the junction with the baseboard, which protrudes from the wall by a different distance;
-
proximity to a cabinet, panel, or furniture door;
-
the position of a switch with a protruding frame;
-
the transition to a wall with decorative plaster;
-
the appearance of the end near the corner;
-
the shadow line under side lighting.
In a narrow wall space, the side profile is especially noticeable. A casing 93 mm wide and 18 mm thick works as an independent architectural frame, not as a thin strip covering the installation seam. Therefore, the check should be comprehensive: a cardboard template shows the width, and a small profile sample helps assess the protrusion.
The length depends on the material
The MDF version has a length of 2600 mm, while beech and oak options are 2400 mm. Externally, the 200 mm difference seems small, but during serial cutting, it changes the number of planks and the size of leftovers.
Suppose the net length of one vertical part is 2350 mm. From a 2400 mm plank, 50 mm will remain without accounting for the trimming allowance and connection method. From a 2600 mm plank, nominally 250 mm will remain. These leftovers cannot automatically be considered suitable for the top crossbar: its length depends on the opening width and the chosen joint. First, a parts list is compiled, then a cutting map, and only after that the number of product items is determined.
From which point to measure 100 mm
The phrase "from the frame to the corner" sounds unambiguous only until the first marking. A door unit has a leaf, frame, extension, installation seam, trim edge, and the intended casing line. An error in the starting point by 5–10 mm completely changes the conclusion for a 93 mm wide profile.
The outer boundary of the frame must be visible or restored
The working measurement starts from the line relative to which the inner edge of the casing will be installed. In a finished opening, the line is visible. In unfinished renovation, it must be restored based on the door drawing, actual frame, and extensions.
Do not measure from the edge of the door leaf. The leaf is inside the frame and does not determine the fit of the decorative frame. Do not measure from the edge of the mounting foam: after installing the extension and casing, this boundary will disappear. Do not use the old casing as the only reference if its width, position, or attachment method differ.
The extension can change the start of the profile
When the wall thickness is greater than the width of the box, the opening is supplemented with an extension. The outer line of the extension becomes part of the finishing assembly. The casing must neatly cover the joint, but the amount of overlap depends on the design and installation method.
Before ordering, record:
-
the wall thickness after finishing;
-
the position of the box in the opening;
-
the width and plane of the extension;
-
the line where the extension meets the wall;
-
the intended line of the inner edge of MLD-007.1.
Only after this is the space to the corner measured. A figure taken before installing the extension may lose its meaning after it is leveled.
Measurements must be taken on finished surfaces
If plaster has not yet been applied to the wall, wallpaper has not been hung, or a panel has not been installed, the 100 mm distance refers to the rough surface. Finishing can alter the geometry. Not necessarily significantly, but with only 7 mm remaining, even a small change is significant.
In the specification, it is useful to note at what stage the measurement was taken:
-
on rough plaster;
-
on a wall prepared for painting;
-
after wallpaper;
-
after the decorative panel;
-
after installing the frame and extension;
-
after installing the baseboard.
Such a note protects the project from a situation where one participant refers to the size on the rough wall, while another considers it final.
Three heights — the required minimum
For the vertical trim, the distance to the corner is measured at at least three points:
-
near the top joint;
-
at the level of the handle or the middle of the opening;
-
above the baseboard.
If there is a noticeable unevenness, add intermediate points. On a tall opening, it is useful to take measurements every 400–500 mm and record them in a table. This is not excessive precision: a wide casing runs along the wall almost the entire height, so a local protrusion of the corner can stop the installation.
| Measurement height | Distance to the corner | Nominal remainder after 93 mm | Comment |
| Top | 100 мм | 7 мм | Check the top joint and the deviation of the corner |
| Middle | 98 мм | 5 мм | Full-size template is mandatory |
| Bottom | 95 мм | 2 мм | Check the plinth and the actual plane of the wall |
The numbers in the table are given as an example of the methodology, not as data for a specific opening. Decisions are made based on your own measurements.
A full-size template is more accurate than a tape measure
A tape measure reports distance. A template shows occupied space. For MLD-007.1 this is especially useful because the width of 93 mm almost matches the wall segment in question, which is 100 mm.
The template must match the full width
Cut a strip of thick cardboard exactly 93 mm wide. Do not reduce it to 90 mm "for convenience" and do not round it to 95 mm. On the front side, mark:
-
the assumed inner edge at the frame;
-
the outer edge near the corner;
-
the profile axis;
-
the possible connection point with the top part;
-
the plinth junction line.
If a drawing is available, transfer the profile character onto the template: mark where the high relief is and where the edge becomes thinner. Such a mock-up helps assess not only the passage but also the visual balance.
A long template reveals curvature
A 93 × 93 mm square is convenient for a quick check of a switch, but it does not replace a vertical strip. Make a template at least 1200–1500 mm long and apply it sequentially along the height. Even more accurate is to make a strip almost the full height of the opening.
It should be applied to the actual installation line. If the frame is not yet installed, temporarily mark its design boundary with a laser or painter's tape. Any "by eye" shift of the template can add a few non-existent millimeters.
Mark not only the profile but also the remainder
After fitting, draw an easily removable line of the outer edge on the wall. Then it will be visible how the remaining strip to the corner looks. Seven millimeters can be perceived differently:
-
as a neat narrow seam;
-
as an accidental dark gap;
-
as a place where wallpaper cannot be trimmed evenly;
-
as a deliberate shadow line;
-
as an emphasis of a crooked corner.
The assessment depends on the wall color, light direction, and geometry quality. A white trim on a dark wall makes the gap more noticeable. A profile and wall in similar tones soften the contrast but do not fix the physical lack of space.
A sample is needed not only for the color
When in doubt, it is useful order STAVROS product samples and clarify whether a sample of a specific profile or a comparable piece of molding can be obtained. The sample helps to check:
-
the actual relief;
-
the appearance of the side edge;
-
the 18 mm depth;
-
the reaction of the chosen finish to light;
-
joint with the baseboard;
-
scale near the door frame.
The sample catalog does not guarantee that each set includes MLD-007.1, so the composition must be clarified before payment. This approach is more honest than ordering the entire batch based only on a photo.
A wall corner is rarely a perfectly straight line
On the plan, the corner looks like a thin vertical line. In the room, it is a junction of two planes with its own relief, finish, and possible deviations. The trim approaches it along its full height, so local unevenness matters more than a nice number on the drawing.
A convex corner takes up space
A perforated corner bead under plaster, a layer of putty, or decorative finish can create a protrusion. If the tape measure is not placed perpendicular to the wall, the protrusion is easy to miss. Apply a long straightedge to the plane of the future trim and check where the corner protrudes forward.
Suppose the nominal distance is 100 mm, but a protrusion in the middle reduces it to 96 mm. The remainder after a profile 93 mm wide turns from 7 mm to 3 mm. This does not mean installation is impossible, but the solution already requires physical fitting and an agreed type of junction.
A concave section creates a different risk
When the wall plane recedes, the trim may not lie evenly against the back side. A significant gap cannot be compensated by randomly increasing the adhesive layer without checking the chosen mounting system. The installer first assesses the base, then determines the preparation and fixing method.
A width of 93 mm increases the contact area, but at the same time makes the difference more noticeable. If one edge fits snugly while the other hangs, the profile may look skewed even if the box is perfectly vertical.
The angle after finishing may become closer
Decorative plaster, wall panels, tiles, or an additional leveling layer change the final size. With a distance of 100 mm, the rough measurement cannot be considered final. The project specifies what finish will be on both surfaces and where its edge will run.
Wallpaper is a separate issue. Its thickness is small compared to 93 mm, but the quality of trimming in a seven-millimeter strip can become a challenging task. If the outer edge of the casing almost touches the corner, the sequence of work needs to be coordinated before installation: either finish the wall first or install the trim first. There is no universal order, as it depends on the covering, technology, and the installer's skill.
A switch, outlet, and furniture may be more important than the corner
Even when the MLD-007.1 physically fits between the box and the corner, there may be elements nearby that change the decision. You need to check not only the fixed wall but also everything a person will use after the renovation.
The switch frame requires its own space
Measure the distance from the intended outer edge of the casing to the nearest point of the switch frame. Look not at the center of the mechanism, but at the full dimensions of the decorative frame. If replacing the electrical installation device is planned, use the size of the future model.
It is undesirable for the frame to partially overlap the relief of the casing or become wedged in a gap where it cannot be removed without dismantling the wooden part. Service access is a practical criterion that is often forgotten in favor of beautiful symmetry.
An outlet below eye level still affects installation
The lower part of the casing may run near an outlet, internet jack, thermostat, or sensor. Full-size vertical layout reveals these conflicts. Checking only at eye level leaves the lower joint unattended.
If the electrical installation is already mounted, measure its protrusion from the wall and the distance to the profile. The 18 mm casing thickness may be comparable to the frame protrusion, causing the side edges to visually collide.
The cabinet is checked in the open position
The stationary cabinet body may not touch the casing, but the door or handle may touch it when opened. Open the door to the working angle and check the trajectory. For a drawer, account for the handle protrusion and user movement.
The situation is especially dangerous when the cabinet is installed after the casing. On the plan, the body fits into the niche, but the furniture maker does not see that the trim protrudes by 18 mm. In the room specification, indicate the profile dimension and the forbidden zone next to it.
The baseboard can disrupt the lower joint
A tall or deep baseboard may protrude further than the casing or approach it at an awkward angle. It is necessary to decide in advance where the floor profile ends, how the transition is designed, and which part has priority in thickness.
Do not automatically saw off MLD-007.1 or the baseboard on site without approval. The trim composition should be drawn in the wall elevation and side section. Then the installer understands which profile continues, which ends, and where the visible end remains.
Is a wide casing needed on both sides of the door
One door has at least two face sides, but the conditions around the opening rarely match. From the corridor side, there may be 100 mm to the corner, while from the room side, there is a free wall. Ordering the same wide casing on both sides is convenient for unity, but symmetry should not ignore the actual geometry.
The same profile connects the sides of the opening
When both sides of the door are visible from connected rooms, a single model creates consistency. The relief, width, thickness, and finish character match. Purchasing in one batch simplifies material and sanding coordination.
But the same article number does not mean the same cutting layout. The finished floor height, presence of a threshold, baseboards, and the top connection method may differ. Each side is calculated separately, then the number of planks is combined.
Asymmetry is sometimes more honest than a forced abutment
If MLD-007.1 barely fits on the corner side, but fits freely on the other side, there are several design paths:
-
confirm the wide profile with a full-size trial and use it on both sides;
-
choose a narrower casing for the entire opening;
-
develop an asymmetric solution if the interior allows different sides;
-
change the position of the switch or furniture before finishing;
-
design the side near the corner as part of a portal composition under a separate project.
You cannot consider any path universal. Asymmetry may be unnoticeable if the sides are in different rooms, but it will be striking on a through opening. For a complex node, it is reasonable to order a design project for door opening finishing and get an approved wall facade, rather than resolve the issue during installation.
You need to count the surfaces being finished, not the number of doors
The phrase "five doors" does not indicate the number of trim sets. One door may have finishing:
-
only one side;
-
both sides;
-
one side fully, the other partially;
-
a side with a top piece of different length;
-
a portal without a door leaf with two independent frames.
The statement is compiled for each plane. It records the left vertical, right vertical, and top piece. After that, the pieces are grouped by lengths and materials.
When a width of 93 mm supports the proportions of the door
A wide casing is not chosen just because it fits. It must match the scale of the opening, the height of the room, the width of the frame, and the rest of the trim. Appropriateness is determined not by fashion, but by the relationship of dimensions.
A tall door accepts a large profile more calmly
On a tall opening, a narrow strip sometimes gets lost. MLD-007.1 creates a noticeable frame and holds the vertical. But height alone does not guarantee a successful result: there may be a tight corner, a low ceiling cornice, or a minimalist baseboard nearby.
Check the entire wall facade. The casing does not exist separately from the upper space, the floor, and adjacent furniture. For a preliminary selection, it is convenient to look at buy trim products made of oak, beech, and MDF and compare the width of MLD-007.1 with other profiles in the same product group.
A wide frame does not always require wide trim
A massive door structure can support a large casing, but the joint line and overall architecture matter more. If the frame has its own pronounced profile, an additional 93 mm wide trim may overload the assembly. If the frame is restrained, MLD-007.1 can become the main framing element.
The solution is verified with a mockup: photograph the wall strictly frontally, apply the real profile width to the image to scale, and then confirm with a cardboard template on site. The digital sketch helps compare options, the physical one checks the geometry.
A tall baseboard should speak the same language as the architrave
The combination of a wide architrave and a tall baseboard looks cohesive when their relief, thickness, and finishing method are coordinated. Matching the material alone is not enough. An oak baseboard can have a completely different profile and protrusion.
For a unified system, you can order solid wood millwork and select architraves, baseboards, moldings, and finishing elements in a common specification. The link leads to a category, not implying automatic compatibility of all listed items. Cross-sections are still checked against drawings.
In a narrow hallway, the scale is perceived more strongly
The smaller the distance from the observer to the door, the larger the profile appears. An architrave 93 mm wide is perceived differently in a spacious living room and in a narrow hallway. In a hallway, the relief, the shadow from the 18 mm thickness, and the narrow strip to the corner are especially noticeable.
The fitting is evaluated from the usual movement point: when entering the apartment, from the adjacent room, near the wardrobe. The view directly in front of the door is just one angle.
Oak, beech, or MDF: the material is chosen together with the finish
MLD-007.1 is available in MDF, beech, and oak. All three options retain the cross-section dimensions of 93 × 18 mm, but the plank length and finishing logic differ. You cannot choose a material only by the species name or by the minimum price.
| Material | Confirmed length | Typical design task | What to check before ordering |
| MDF | 2600 мм | Casing for opaque painting, when the natural wood grain is not required | Surface preparation, finishing system, compatibility with the door and baseboard |
| Beech | 2400 мм | Solid wood for painting or finishing selected by the project | Quality of veneering, color sample, cutting, and batch uniformity |
| Oak | 2400 мм | Solid wood, when a pronounced wood character is important and translucent finishing is possible | Specific preparation "for enamel" or "for tinting", sample, and combination with other oak parts |
The phrases "typical task" are recommendations, not a promise of specific finishing as part of the product. The actual combination of material, sanding, and veneering quality must be selected in the MLD-007.1 card or confirmed with a manager.
MDF is rational for a painted system
If the casing must match the color of the wall, door, or painted baseboard, MDF can be a logical material. Its length of 2600 mm is sometimes more convenient for tall verticals, but this does not cancel the cutting map.
Do not call MDF solid wood. In the article, broad queries about wooden casings are used for the category and general buyer choice, but the specific material in the order is recorded precisely. For a painted composition, you can buy MDF trim for painting and compare MLD-007.1 with neighboring profiles from the same group.
Beech is valued for its calm surface character.
Beech is chosen when the project needs solid wood with a more restrained grain or when an opaque finish is planned. However, the final decision depends on the specific sample, the quality of the lamination, and the coating system.
It cannot be guaranteed that any beech trim will look uniform after a transparent finish. Wood has natural variations, and the glued blank may be matched according to different rules depending on the "Under enamel" or "Under tinting" option. These parameters are fixed in the specification, not left to the discretion of the supply.
Oak reveals itself when the wood grain is part of the design intent.
An oak trim makes sense if the wood texture must be visible and supported by the door, baseboard, panel, or furniture. However, the word "oak" does not guarantee a complete match in shade with an already installed door. The species is the same, but the batch of wood, treatment, and coating may differ.
Before the main purchase, compare samples under the lighting in which the door will be located. Morning light, warm accent lighting, and directed side light show pores and relief differently. For semi-transparent finishes, the lamination option selected in the card is especially important.
All materials need to be coordinated with the rest of the trim.
If there is a baseboard, molding, or wall frame nearby, the material and finish must be specified in one system. It is convenient to start with the section buy wood and MDF products and compile a list of elements, but final compatibility is determined not by belonging to the same catalog, but by matching cross-sections, materials, and finishing specifications.
Plank 2400 or 2600 mm: the quantity is calculated by parts, not by perimeter.
The query "how much trim is needed for one door" seems simple. For a standard U-shaped frame, two vertical pieces and one top piece are needed. But the final number of product planks depends on height, width, connection method, material, and whether one side or two are being finished.
First, compile a list of finishing parts.
For each side being finished, write down:
-
length of the left vertical;
-
length of the right vertical;
-
length of the top piece;
-
type of connection at the top corners;
-
allowance for precise fitting;
-
material MLD-007.1;
-
required direction of pattern and finish.
The finished length of the verticals may differ even for the same door if the floor level is uneven on both sides or the baseboard fits differently. Do not round two parts to the same value before the control measurement.
The formula for total length is needed, but it is not sufficient
For one side of the opening, the preliminary length can be written as:
P = H₁ + H₂ + B, where:
-
H₁ — length of the left vertical;
-
H₂ — length of the right vertical;
-
B — length of the top casing.
For two identically finished sides, the value is doubled:
P₂ = 2 × P.
This formula reports the total length, but not the number of slats. From a 2400 mm slat, you cannot get two verticals of 2200 mm each, even though their total length is 4400 mm and dividing by 2400 gives 1.84. Physically, two separate slats will be required just for the verticals.
Example for one side of the door
Suppose, after the final measurement, you need:
-
two verticals of 2200 mm each;
-
one top piece of 1100 mm.
The total finished length is:
2200 + 2200 + 1100 = 5500 mm.
For beech or oak with a length of 2400 mm, each vertical takes a separate slat. The top piece is cut from the third one. This results in a minimum of three slats, provided that the chosen joining method, allowances, and quality of blanks allow such cutting.
For MDF with a length of 2600 mm, the picture remains the same: two full verticals and a third slat for the top. The extra 200 mm on each vertical blank creates longer offcuts, but does not reduce the quantity to two. This example shows why dividing the total length by the slat length gives an error.
The top joint changes the length of the crosspiece
When joining at an angle, the top piece is not measured the same way as in a straight butt joint. The length is affected by the profile width, the measurement point, and the chosen corner geometry. You cannot add "two casing widths" or subtract an arbitrary value in advance without a working drawing.
Before ordering, the installer or carpenter must specify:
-
a 45° joint or a straight butt joint;
-
along which line the length of the top piece is given;
-
whether an overhang beyond the verticals is needed;
-
how the profile pattern is oriented;
-
where the visible end remains.
MLD-007.1 is shaped, so not every joining method looks equally neat. The solution is checked on the drawing and on a test sample.
Two sides of a doorway are not always six identical pieces
When finishing both sides of an opening, you often get four verticals and two top pieces. But the lengths may differ due to the floor level, the thickness of the wall finish, the presence of a threshold, or a different solution for the top joint.
In the list, it is convenient to mark parts with codes:
-
D1-L — side 1, left vertical;
-
D1-P — side 1, right vertical;
-
D1-V — side 1, top;
-
D2-L, D2-P, D2-V — second side.
This method seems formal only until the first door with different sides. Marking prevents swapping elements after painting and helps link cutting to the room.
Objective stock instead of mechanical ten percent
The phrase "add ten percent" is convenient, but not always reasonable for long-length profiles. One extra strip can be much more than ten percent of the order, and the absence of a whole strip cannot be compensated by short leftovers. The stock is determined by cutting risks.
An additional strip is justified by a specific reason
Reserve is considered when:
-
the project has many angled connections;
-
walls and openings have varying heights;
-
exact matching of the wood batch is required;
-
installation is carried out far from the place of delivery;
-
redelivery of a single plank will be difficult;
-
some parts are planned to be selected by pattern for transparent finishing;
-
there is a risk of damage to long-length materials on a complex site.
If one additional plank is needed, it is recorded as: "reserve — 1 pc., reason — repeated cutting of top parts" or "reserve — 1 pc. for selecting oak by pattern." This approach is clearer than an abstract percentage.
Remainder is not equal to reserve
A piece 200–300 mm long may be useful for color testing, tool adjustment, or joint checking, but it does not replace a vertical part. In the cutting map, remainders are divided into categories:
-
suitable for the top part;
-
suitable for a short section or sample;
-
only a technological offcut;
-
kept for trim repair;
-
disposal.
This allows seeing the actual stock, not the total volume of wood without purpose.
What to add to the order together with MLD-007.1
One casing does not form a complete door unit. The buyer needs to coordinate adjacent trim, finishing, samples, junction design, and delivery of long-length parts. The SEO scheme has no confirmed link to a specific adhesive or fastener for this model, so the article does not assign a mounting compound without data on the base.
| What to check or add | Why this is needed | When it matters most | Inner page |
| Required quantity of MLD-007.1 | Assemble two verticals and the top of each side being finished | For any door | buy wooden trim MLD-007.1 93 × 18 mm |
| Other trims and profiles | Compare the width if 93 mm is too close to the corner | With a wall section of about 100 mm | buy wooden casings in the STAVROS catalog |
| Baseboards and moldings of the same project | Coordinate the material, thickness, and junctions | For classic and portal compositions | buy trim products made of oak, beech, and MDF |
| Solid wood molding | Select elements made of beech or oak | For finishing with natural wood | order solid wood millwork |
| MDF molding | Assemble a paintable system | When the trim, baseboard, and door are painted | buy MDF trim for painting |
| Samples | Check the texture, material, and color | Before a large batch or a complex junction | order STAVROS product samples |
| Design project | Coordinate the corner, switch, skirting board, and furniture | When there is almost no free space | to order a design project for door opening finishing |
| Long-length delivery | Coordinate packaging and receipt | For 2400 and 2600 mm strips | Delivery of wooden architraves across Russia |
After the table, an automatic transition to the cart is not needed; instead, the specification must be verified. If oak is selected, all related elements are recorded with the specific material and finish. If MDF is selected, the preparation and final coating are determined separately. If a sample is needed, it is obtained before the main batch is launched, not after all the strips are delivered.
How not to confuse MLD-007.1 with similar moulding
The card name includes the words "molding," "casing," and "baseboard." This reflects the versatility of the profile, but the buyer cannot be left with an undefined purpose. In the order, they write not just "MLD-007.1, 6 pieces," but "MLD-007.1 for door framing, material such-and-such, side of the opening such-and-such."
The article number is more important than the colloquial name
The words "wide casing," "shaped casing," or "wooden profile 93 mm" describe the product but do not identify it unambiguously. The article number MLD-007.1 specifies the exact cross-section.
When coordinating with the designer, supplier, and installer, use a single entry:
MLD-007.1, 93 × 18 × L mm, material, sanding quality, surface preparation option, quantity.
Where L equals 2600 mm for MDF or 2400 mm for beech and oak. This format reduces the risk that a neighboring profile of similar width ends up in the estimate instead of the required casing.
A wide casing is not equal to a carved casing
MLD-007.1 has shaped profiling, but it should not automatically be classified as a separate group of complex carved casings. For SEO, the phrase "shaped wooden casing" is natural since it describes the relief, but the specification retains the exact product name and article number.
The material cannot be changed without recalculation
Replacing oak with MDF is not just a change in price or finish. The length of the plank changes: 2400 mm versus 2600 mm. This means a new cutting plan is required. The finishing logic also changes: natural wood and MDF cannot be considered identical substrates just because the color should match after opaque painting.
Practical choice for different rooms
The same profile looks and works differently in an entryway, living room, study, and commercial interior. Listing rooms by itself is useless; the specific geometry determines the solution.
In the entryway, the main risk is furniture and switches
The entryway is often filled with cabinets, mirrors, electrical installation products, and a high baseboard. Check not only the 100 mm to the corner, but also the opening of facades, space for removing the switch frame, the end of the cabinet, and the line of the floor profile.
The wide MLD-007.1 can support the entrance group well if there is air around the door. If the profile is squeezed between the frame and the cabinet, its relief is lost and installation becomes more complicated.
In the living room, the entire wall facade is important
In a spacious room, a 93 mm wide casing can connect a tall door with the baseboard and wall panels. But next to thin minimalist decor, it can look like a separate random element.
Make a frontal sketch of the wall: door, casing, baseboard, furniture, lighting, and adjacent openings. If several doors are in the same field of view, their framing is better coordinated as a system.
In the study, the material is linked to the furniture
An oak or beech profile can support joinery furniture, panels, and bookcases. Matching the wood species does not guarantee a color match, so a finish sample is checked. If the furniture is already ready, apply the casing sample directly to its facade under working lighting.
In a commercial interior, repeatability is important
For a hotel, restaurant, salon, or office, one mistake multiplies across dozens of doors. First, one control opening is approved: geometry, material, shade, joints, and corner fit. After the sample is signed off, the rest of the volume is launched.
In the specification of a commercial facility, trims are distributed by rooms and door sides. You cannot limit yourself to the total number of strips without a cutting map and marking.
When MLD-007.1 is truly suitable, and when it is better to stop
An honest commercial article should not only lead to a purchase but also show the limits of application.
The profile is worth considering if
-
the minimum distance to the corner is confirmed after final finishing;
-
a full-size template fits along the entire height;
-
the outer edge does not conflict with the switch, socket, and furniture;
-
the 18 mm thickness is coordinated with the baseboard and adjacent parts;
-
the 93 mm scale suits the door and the room;
-
material is matched with the finish;
-
cutting map is prepared for length 2400 or 2600 mm;
-
top connection is drawn;
-
quantity is calculated based on the sides being finished.
It is better to postpone the order if
-
100 mm is measured at only one point;
-
the frame or extension is not yet installed and its line is not defined;
-
the final wall finish can change the size;
-
the adjacent cabinet is not yet designed;
-
the switch falls into the profile area;
-
The installer suggests "trimming on site" without showing the future appearance;
-
The material was chosen without a sample for transparent finishing;
-
The total footage is calculated, but the cutting map is missing.
Postponing the order does not mean rejecting MLD-007.1. It means first eliminating the uncertainty. Sometimes a template and a re-measurement are enough, sometimes you need to choose a narrower trim from the category.
Mistakes due to which 93 mm suddenly stops fitting
Problems with a wide trim rarely start with the product itself. They usually arise from an incorrect starting point, an unfinished assembly, or a calculation that was too simplified.
Measuring from the door leaf instead of the frame
The door leaf does not set the trim line. If you measure from its edge to the corner, part of the frame, the gap, and other elements will be included in the result. The resulting figure looks accurate but does not answer the installation question.
Correction: fix the outer boundary of the frame or extension and the design line of the inner edge of MLD-007.1. Only from it is the free wall space checked.
One measurement at eye level
The angle can approach the box at the bottom or top. A single value of 100 mm does not show the minimum distance. The wide profile runs the full height, so a local narrowing becomes critical.
Fix: a table of measurements by height and a long template of 93 mm. The minimum value is taken into account.
Calculation based on the rough wall
Plaster, panel, wallpaper, and leveling change the finished plane. Even a few millimeters matter when the nominal remainder is seven.
Fix: either re-measure after finishing, or a design calculation with the exact layer of each material. An undefined "approximate allowance" does not replace this data.
Ignoring the 18 mm thickness
The profile passed along the width but hit furniture with its side edge or turned out to be thicker than the baseboard. The frontal plan did not show this.
Fix: a side section of the assembly with the actual protrusions of all elements. Not only the space on the wall is checked, but also the volume in front of the wall.
Attempt to trim the outer edge of the trim
Cutting a few millimeters off the shaped edge seems like a quick way to fit the profile. But such intervention changes the relief, edge width, and symmetry. The possibility of reworking MLD-007.1 is not confirmed as a standard option.
Fix: do not change geometry without approval from the manufacturer and designer. If 93 mm does not fit, compare narrower models in the trim catalog.
Material selection after quantity calculation
First, oak planks of 2400 mm were calculated, then we decided to switch to MDF of 2600 mm length, but the quantity was left unchanged. Sometimes this only leads to excess leftovers, and sometimes to an incorrect parts list and labeling.
Fix: any material change triggers a re-cut. First the material and blank length, then the quantity.
Order by total length
Five and a half meters of trim does not equal three planks under any circumstances. Long verticals must be made as single pieces, and leftovers may not fit the top piece.
Fix: list of finished parts and layout scheme for each product plank.
Same quantity for all doors
In an apartment, doors can have different heights, one or two sides to be finished, different wall sections, and top joints. Multiplying "three planks by the number of doors" is convenient, but not always correct.
Fix: calculate each door separately, then combine identical parts into a common list.
Absence of a control sample of the finish
The oak casing was chosen to match the oak door, so the shade match is considered automatic. After coating, it turns out that the texture, tone, and gloss differ.
Fix: test the finish on a sample from the same batch and compare with the door under real lighting.
Receiving long-length material without checking the packaging
Planks of 2400 and 2600 mm are vulnerable during handling. If the packaging is accepted without inspection, damage may be discovered only during cutting.
Fix: study the conditions under which it is performed in advance Delivery of wooden architraves across Russia, and upon receipt, check the packaging, quantity, and condition of the planks before starting the finish.
The specification turns the choice of casing into a clear order
The phrase "need MLD-007.1 for three doors" leaves too many questions. A working specification should allow another person to verify the order without verbal explanations.
Fields that need to be filled in
| Specification field | Example entry | Why this is needed |
| Room | Corridor, door K-02 | Attaches parts to location |
| Opening side | From the corridor side | Shows which plane is being finished |
| Article number | MLD-007.1 | Excludes replacement with a similar profile |
| Cross-section | 93 × 18 mm | Records the verified dimension |
| Material | MDF / beech / oak | Determines length and finish |
| Product strip length | 2600 or 2400 mm | Needed for the cutting map |
| Sanding | «Prestige» | Saves the selected processing quality |
| Preparation | Specify the selected option | Links the product to the finishing system |
| Finished parts | 2 verticals and 1 top | Shows the frame composition |
| Top connection type | According to the approved drawing | Affects length and miter cut |
| Minimum space to the corner | Actual value | Confirms the 93 mm fit |
| Adjacent elements | Switch, baseboard, cabinet | Records verified conflicts |
| Reserve | Quantity and reason | Does not hide stock in the total count |
| Finishing | Color code, gloss level, system | Needed for a unified appearance |
The example does not set parameters for a specific order. It shows the document structure. You need to fill it with your own data after measuring and approval.
Add a wall diagram
The specification is accompanied by a front sketch and at least one side section. The facade shows the door, MLD-007.1, corner, switch, baseboard, and furniture. The section shows the 18 mm thickness, the protrusion of adjacent parts, and the position of the box.
Even a simple hand-drawn sketch is more useful than a long message in a messenger. It allows you to see that project participants call different lines by the same word.
Mark parts before painting
When several doors look alike, verticals are easy to mix up. After individual fitting, each part receives a code matching the specification. Marking is placed in an area that will not damage the face finish and will remain clear to the installer.
For transparent finishes, additionally coordinate the placement of parts by pattern. Two verticals of one door are best evaluated side by side before final processing, not after installation.
Batch control before the first cut
Receiving an order is not a formality. Before cutting, you need to ensure that the delivered slats are exactly those that were agreed upon.
Verification starts with documents
Check:
-
article MLD-007.1;
-
number of slats;
-
material of each item;
-
length 2400 or 2600 mm;
-
cross-section 93 × 18 mm;
-
sanding quality;
-
selected surface preparation;
-
integrity of the packaging.
If the batch consists of different materials for different rooms, divide it immediately. Do not rely on the external similarity of unpainted parts.
Geometry is checked before applying the coating
Apply the straightedge, inspect the profile along its length, compare several strips end to end. The task is not to set your own tolerances, but to detect in time an obvious mismatch with the order or transport damage. If in doubt, stop processing and contact the supplier.
One test assembly saves the entire batch
Before cutting all trims, assemble a control top corner from test pieces. Check the relief match, the cutting method, the quality of the visible line, and the operation of the selected tool. Then apply a full-size vertical piece to the tightest wall section.
Only after confirming two things — the geometry of the joint and the passage near the corner — does it make sense to proceed with serial cutting.
How to complete the purchase of MLD-007.1 without unnecessary guesswork
The commercial route begins not with the "Buy" button, but with ready initial data. The buyer must know the minimum distance to the corner, the number of sides to be finished, the lengths of the parts, the material, and the finish.
First, the card of the specific article
In the card, you can buy wooden trim MLD-007.1 93 × 18 mm and check current options, price, and availability. Do not carry old data into the estimate: commercial parameters change, so they are reviewed right before placing the order.
Then comparison with the category
If the 93 mm template does not fit or the wide frame looks heavy, open the catalog and compare other trims. A broad query like "buy wooden trim" should lead to the category, because the buyer needs choice, not a forced link to a single item.
The material is chosen before the final quantity
After deciding "MDF, beech, or oak," recalculate the cutting layout for lengths of 2600 or 2400 mm. Also check the finish of the door, baseboards, and adjacent molding. If one paintable system is required, you can buy MDF trim for painting. If solid wood is needed, go to the corresponding section and match parts by wood species and preparation.
An approved sample is needed before a large batch
A sample is especially useful when:
-
doors are already installed;
-
the finish is transparent;
-
several rooms are visible simultaneously;
-
the trim fits almost flush to the corner;
-
the order includes many identical openings;
-
the color must match the furniture or panels.
After approving the sample, it is designated as the reference. All subsequent decisions are compared against it, not against a photo on a phone.
FAQ: questions before purchasing MLD-007.1
Will MLD-007.1 fit if the distance from the frame to the corner is exactly 100 mm?
Arithmetically, 7 mm remains, but that is not enough for a final conclusion. You need to measure the minimum distance along the entire height, determine the inner edge line, account for the finish, and apply a template 93 mm wide.
From which point should the distance to the corner be measured?
From the design line where the trim begins at the outer edge of the frame or extension. Measuring from the panel, mounting foam, or old profile may give an incorrect result.
Can a platband be installed almost flush to the corner?
Physically, this depends on the geometry, and visually, on the project. There is no universal minimum gap. The junction needs to be checked with a full-size template and coordinated with the installer.
Do I need to take the 18 mm thickness into account?
Yes. The thickness affects the joint with the baseboard, switch frame, furniture, and wall panel. A frontal width of 93 mm is not enough for verification.
What material should be chosen for painting?
For opaque painting, MDF or a solid wood option prepared for enamel is often considered. The specific choice depends on the door, adjacent trim, and coating system. The available combination needs to be confirmed in the product card.
When does it make sense to order an oak platband?
When the oak grain should be part of the interior and is supported by the door, baseboard, or furniture. Before the main batch, it is advisable to approve a finish sample, because one wood species does not guarantee a tone match.
Is beech suitable for a platband under enamel?
Beech can be used in a painted project, but the quality of the lamination and surface preparation must be chosen deliberately. It cannot be assumed that any execution is automatically ready for the selected enamel.
How does the MDF version differ in calculation?
The length of an MDF plank is 2600 mm, while beech and oak are 2400 mm. Therefore, after changing the material, the cutting map is recalculated, even if the cross-section remains 93 × 18 mm.
How many planks are needed for one side of the door?
The quantity is determined by the length of the two verticals, the top piece, and the cutting map. In a common situation, each long vertical takes a separate plank, and the top takes a third, but your own dimensions need to be calculated separately.
How many planks are needed for both sides of the opening?
First, calculate each side as a separate frame, then combine the cutting. Simple doubling is only acceptable when the dimensions and joints are truly identical.
Can you get two verticals from one plank?
Only if the sum of lengths with allowances does not exceed the commercial length and both pieces allow such cutting. For full-size door verticals, this is often impossible, so you cannot rely on the total footage.
Is a reserve needed?
A reserve is needed for a specific risk: complex cuts, a large batch, a remote site, or wood selection by pattern. A universal percentage does not replace a cutting map. It is better to record the reserve in pieces and with the reason indicated.
Can the trim be cut down in width if it hits a corner?
The shaped edge should not be changed without approval. Cutting may disrupt the relief and symmetry. It is safer to check a narrower profile or develop a different joint.
Do I need to order the same trim on both sides of the door?
Not always. The same profile supports unity, but the sides may have different constraints. The decision depends on the visibility of both sides and the geometry of the rooms.
What to do if there is a switch nearby?
Mark out the full dimensions of its frame and ensure serviceability. The trim must not overlap the frame or hinder its removal. In case of a conflict, change the location of the element or choose a different profile.
How to check the opening of a cabinet next to the trim?
You need to simulate the full trajectory of the facade and handle, taking into account the 18 mm protrusion of the trim. Checking the closed cabinet says nothing about the movement of the door.
When is it better to order a sample?
At a distance of about 100 mm to the corner, with transparent finishing, a large batch, or when matching to an existing door. A sample allows you to assess the relief and thickness, and a cardboard template — the full width.
Does the fastening hardware come with the MLD-007.1 item?
The card does not confirm mounting hardware as part of the item. The fixing method and materials are selected separately based on the base and project, without adding them to the order by guesswork.
Can MLD-007.1 be used as a baseboard or molding?
The card allows multiple profile assignments, but this article discusses the door casing. For other applications, separate calculations, assemblies, and compatibility checks are required.
Where to check the current price and availability?
In the MLD-007.1 card, check immediately before purchasing. Do not transfer the old price or stock balance from a saved calculation to the order.
How to accept long planks after delivery?
Before cutting, verify the article number, material, quantity, length, cross-section, and packaging condition. Then inspect the geometry and front surface. If a problem is found, processing is not started until agreement is reached.
Is a design project needed for just one door?
Not always. But with a seven-millimeter nominal remainder, a complex baseboard, furniture, and a switch, a joint project can prevent expensive rework. Sometimes an accurate elevation and side section are enough.
Before ordering, leave on the wall not a number, but a verified outline
MLD-007.1 should be ordered for a 100 mm wall only after the 93 mm wide profile has been checked along the entire height and does not conflict with the corner, trim, switch, baseboard, or furniture. The arithmetic 7 mm is the initial difference, not a guaranteed installation gap.
First, restore the exact frame line, take several measurements, apply a full-size template, and check the 18 mm volumetric protrusion. Then choose MDF, beech, or oak, recalculate the cutting for a length of 2600 or 2400 mm, and prepare a specification for each side of the opening. If in doubt, compare the profile with other casings or get a sample before the main batch.
STAVROS company provides the opportunity to move from a general idea to a precise product, material, linear footage, and design service in one catalog. The next buyer step here is specific: fix the minimum free space, confirm the MLD-007.1 fit in full size, and only then place an order for the calculated number of planks with the required material and delivery.