


Article Contents:
- Where to buy wooden floor skirting in Tver and what to find out before ordering
- Which skirting to choose for a country house: profile, line and scale
- Five real STAVROS models: dimensions and differences
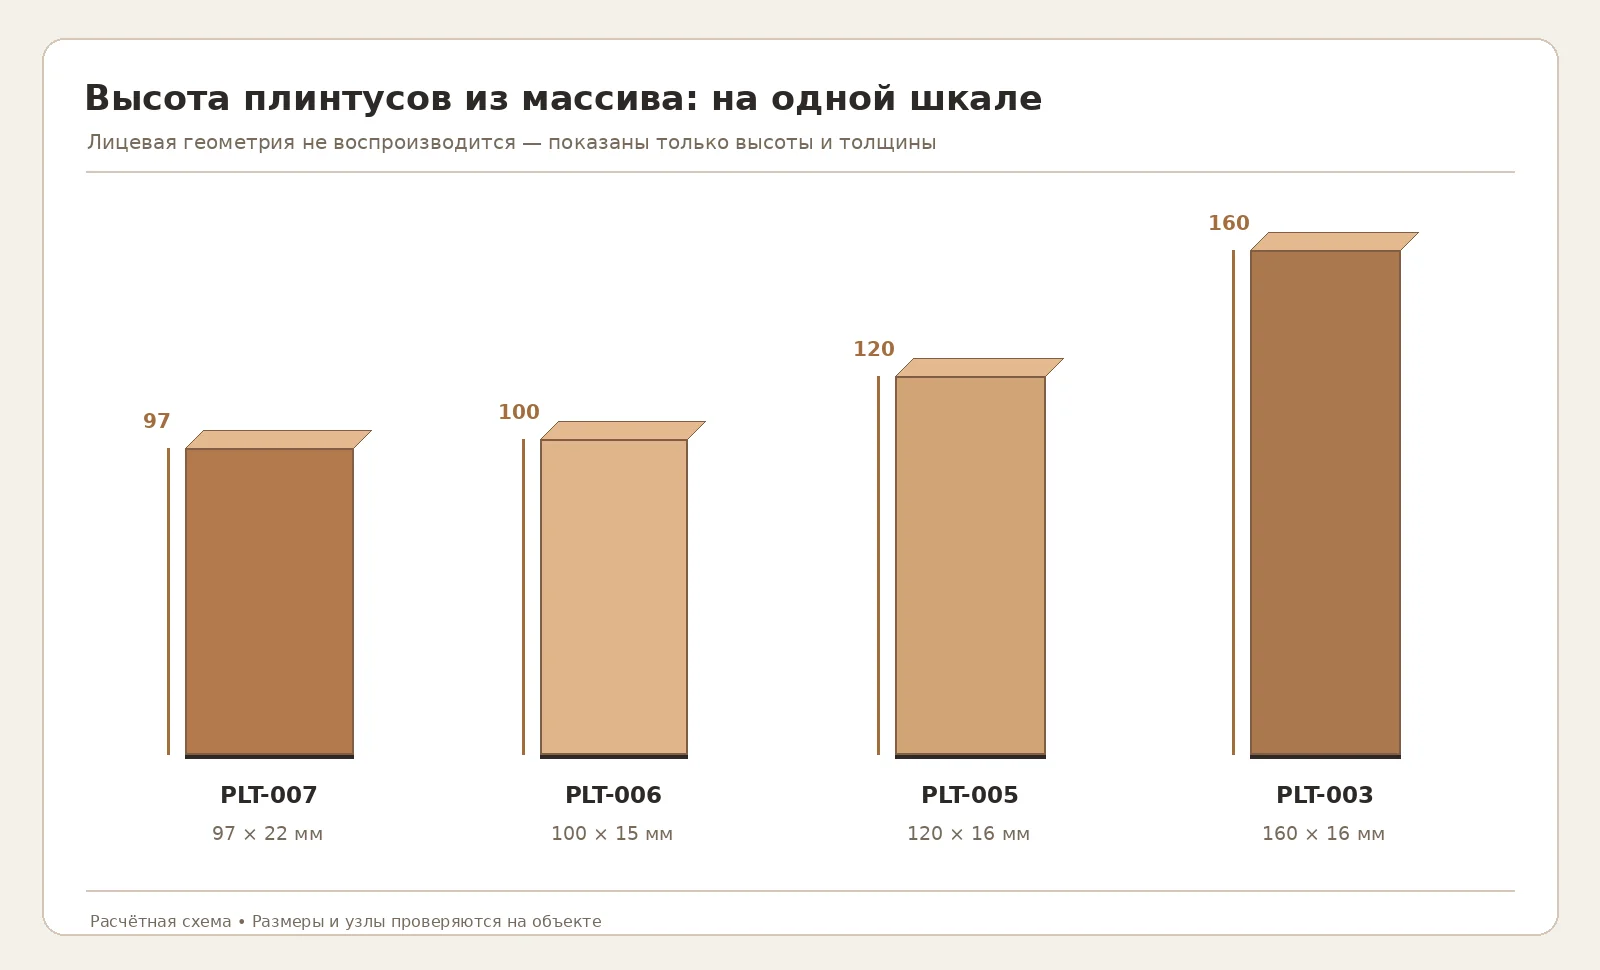
- PLT-006 and PLT-007: why seven millimetres of thickness change the door junction
- Height 120 mm: when to choose PLT-001-1 and when PLT-005
- PLT-003 at 160 mm high: where a large skirting won't get in the way
- Oak or beech: how to keep the floor, doors and skirting consistent
- How to measure a room with a niche and two doorways
- Perimeter calculation: from a rectangle to the actual 19.8 meters
- Wall segments: why the same linear footage yields a different order
- Cutting map for ten sections from nine 2400 mm planks
- How much to buy: nine planks by calculation or ten with a reserve
- Inside corners, outside corners and visible joints of long walls
- Doors, niches and built-in furniture: where skirting is actually needed
- How to join a wooden skirting with parquet, engineered board and laminate
- Natural wood, clear finish or painted profile
- A single order specification for the home: how not to mix up models and rooms
- Cost of PLT-006 and PLT-005: two estimates for the same cutting plan
- How much does a tall skirting board cost and when is overpaying justified
- How to place an order with delivery to Tver and the Tver region
- Mistakes when buying a wooden skirting board that show up during installation
- Frequently asked questions about solid wood skirting boards
- Can an oak skirting board be installed together with beech doors?
- Will PLT-006 work if there is a wide gap between the laminate and the wall?
- Can nine planks be used instead of ten in our example?
- Why should PLT-005 and PLT-001-1 of the same height not be considered the same product?
- Is a skirting board needed behind a built-in wardrobe?
- Can wires be hidden behind a solid wood skirting board?
- What should I do if some of the profiles have already arrived with damaged ends?
- When should I check the actual price and delivery time?
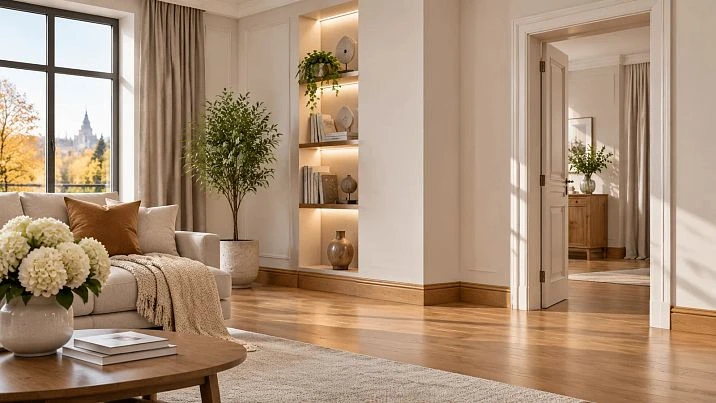
In a room six meters long and a little over four meters wide, simply multiplying the perimeter by the price per linear meter gives the wrong answer. Two doors interrupt the skirting line, a niche adds sections that are not on the rectangular plan, and the long wall will still have to be assembled from several planks. As a result, you can order twenty linear meters of oak profile and find that there is nothing left for two short sections of the required length.
For a country house in Tver, let's work through a specific task: choose a skirting board made of solid oak or beech, calculate it by walls, get a cutting map, and understand the order price before payment. The STAVROS catalog offers several PLT profiles with different heights — from 97 to 160 mm. The wooden versions under consideration are 2400 mm long. Therefore, two decisions need to be made separately here: which pattern and height suit the interior, and how to lay out the actual cut lengths across whole planks.
Where to buy a wooden floor skirting board in Tver and what to find out before ordering
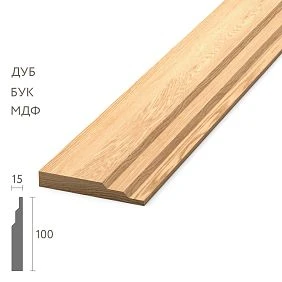
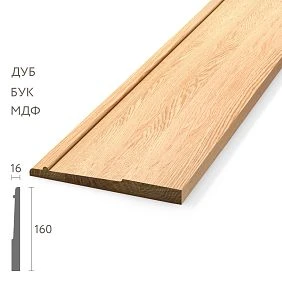
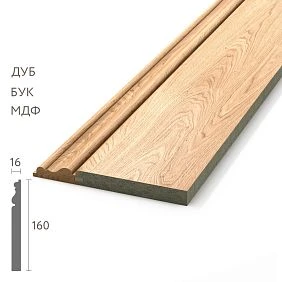
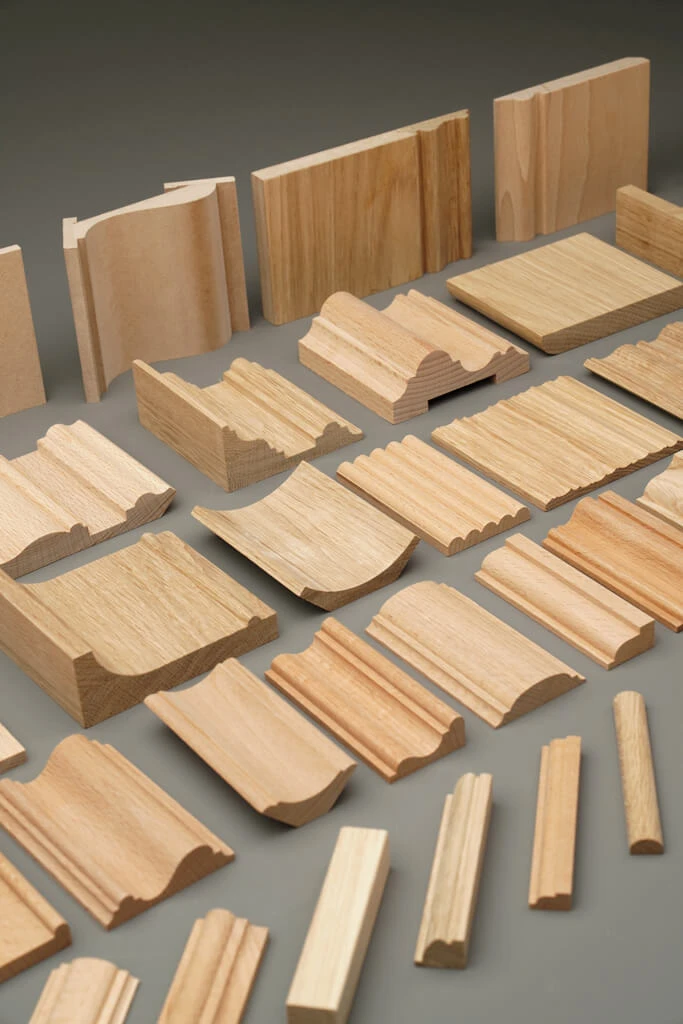
If the task is — buy a wooden floor skirting board in Tver, it is more useful to start with a proven product category rather than with an approximate number of meters. The STAVROS range includes skirting boards PLT-006, PLT-007, PLT-001-1, PLT-005 and PLT-003. For each one, you need to open specifically the beech or oak version: within a single product card there may be MDF items with a different length and thickness. A similar profile image does not make the materials interchangeable.
Before contacting the store, prepare a floor plan of the premises, the approximate ceiling height, the type of flooring, and photos of two or three complex junctions. If doors are already installed in the house, measure the distances between the architraves and the internal corners. If the doors have only just been ordered, clarify where the finished surface of the architrave will end: this dimension is more important than the width of the unfinished opening. A buyer from Tver does not necessarily need to determine the varnish shade down to the last half-tone in advance, but must decide whether the wood grain should remain visible on the skirting board.
A short specification is convenient to send in a single message: “House in Tver Oblast, profile PLT-006 or PLT-005, oak or beech, ceiling height 2.75 m, finish — engineered board, total calculated length 19.8 m, ten planks of 2400 mm required with clarification of the cuts.” This is an example wording, not a confirmed order. If there are no final measurements, it is better to state directly which dimensions are preliminary. Delivery to Tver and the cost of long-length packaging are agreed separately: the published price of the skirting board by itself does not equal the price of delivery to the house.
Which skirting board to choose for a country house: profile, line and scale
In a house with several rooms, the skirting board performs two noticeable tasks at once. It covers the joint between the wall and the floor with the gap provided for the floor covering and forms a continuous lower line of the interior. In a spacious room this line is readable from a distance, but near doors and projections a person examines it almost up close. Therefore a large profile may look good on a long straight wall, yet next to a narrow pier it may prove inconvenient for a neat finish.
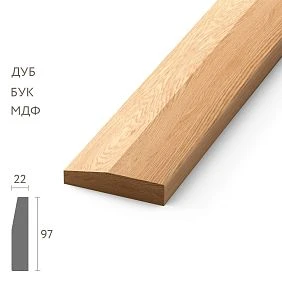
First look at the doors. If the architrave is thin and almost flat, a thick skirting board with pronounced relief may protrude forward and create a step. Conversely, a massive wooden architrave usually combines more easily with a skirting board that has noticeable thickness and a design of its own. Compare not only the height but also the projection of the profile from the wall: for PLT-007 it is 22 mm, and for PLT-006 it is 15 mm for the selected wooden versions. A difference of seven millimetres near the door frame is clearly distinguishable.
Then assess the wall height and the relationship with the furniture. A skirting board about 100 mm high gives a readable but restrained lower boundary. On a wall 2.5–2.6 m high it usually competes less with the doorway than a 160 mm profile. The tall PLT-003 model is appropriate where a large wall area, doors and architraves can support its scale. But you cannot draw a conclusion from the ceiling alone: a floor-to-ceiling built-in wardrobe, a low window or a staircase sometimes limit the permissible height more than the overall proportions of the room.
Discuss painting, tinting or a clear finish after choosing a wood sample. You should not choose oak merely because its colour seems warmer in the catalogue: the shade of the material on screen depends on the photograph, the lighting and the subsequent coating. If the floor is already laid, place the skirting board sample and the possible coating against the floor in daylight and under artificial light.
Our factory also produces:
Five real STAVROS models: dimensions and differences
For this calculation we consider only solid oak and beech. All five of the specified wooden versions are produced in a standard length of 2400 mm. This allows them to be compared on a single cutting plan without mixing them with MDF items 2600 mm long. The prices below are data from open STAVROS product pages as of 12 November 2026; the store may change them before the order is placed.
| Model | Cross-section, mm | Length, mm | Beech, per plank | Oak, per plank | Practical reference point |
|---|---|---|---|---|---|
| PLT-007 | 97×22 | 2400 | 4 890 ₽ | 7 000 ₽ | Compact height with noticeable thickness |
| PLT-006 | 100×15 | 2400 | 3 220 ₽ | 4 780 ₽ | Restrained height and relatively small thickness |
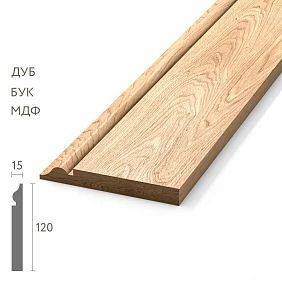
| PLT-001-1 | 120×15 | 2400 | 5 140 ₽ | 7 730 ₽ | Tall profile with a thickness of 15 mm |
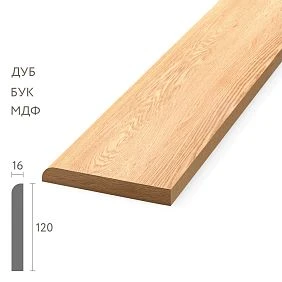
| PLT-005 | 120×16 | 2400 | 5 140 ₽ | 7 030 ₽ | Expressive line 120 mm high |
| PLT-003 | 160×16 | 2400 | 7 790 ₽ | 11 120 ₽ | Large profile for spacious interiors |
The figures in the table refer to a specific material and size, not to all variants of the product card. For example, PLT-006 is also available in MDF versions in the catalogue. Their length differs and, for some items, so does the thickness. When calculating wood at 2400 mm, you cannot substitute MDF at 2600 mm into the order: both the cutting plan and the final joints would change.
For a relatively understated finish, you might consider buy wooden skirting board PLT-006: the main wooden strip has a cross-section of 100×15 mm. If the main task is to emphasize a solid door outline with a not-too-high bottom band, this will come in handy buy wooden plinth PLT-007 with a cross-section of 97×22 mm. In both cases, the actual profile pattern should be checked against the drawing on the product card, not reconstructed from a generic size table.
Get Consultation
PLT-006 and PLT-007: why seven millimeters of thickness change the door junction
Imagine a corridor that leads into a living room. On the long wall, almost either profile can be installed if the owner is happy with the appearance. But near the door casing it will become clear that its projection from the wall plane is, say, 17 mm. The PLT-006 skirting board, 15 mm thick, will sit slightly deeper in the plane, whereas the PLT-007 at 22 mm thick will protrude forward by about five millimeters. This is not automatically a mistake: the projection can look like part of the composition. It is just that the end of the piece needs to be finished in advance.
For the PLT-006 with a height of 100 mm, it is easier to find a place near most low door thresholds. At the same time, the profile is not automatically intended for concealed wiring. If the old plastic skirting board served as a cable duct, first determine a new safe place for the wires, and then remove the old trim. You cannot assume that every solid wood profile has an internal void or a factory-provided cable compartment.
The PLT-007 is three millimeters lower but noticeably thicker. On a straight wall this produces a more pronounced horizontal line. In a narrow passage, it is better to hold against the wall not a picture on your phone but an actual section sample or a full-size template. At a niche with a depth of 550 mm, the thickness can make the internal corner look visually heavier. There you will see not one beautiful segment but two short returns joined to a long strip. If one of them is located right next to a cabinet, almost the entire relief may end up hidden.
Make a practical comparison at three points: at the outer corner, at the junction with the door casing, and near the furniture. If at one point the profile has to be cut down significantly in height, it is worth going back once more to the 100×15 mm option. The mounting method is wall fixing, taking into account the substrate and the manufacturer's tolerance; a solid skirting board should not be nailed to a floating floor covering just for rigidity.
Height 120 mm: when to choose PLT-001-1 and when to choose PLT-005
Two skirting boards can have the same height and a completely different visual effect. The PLT-001-1 has a wooden version size of 120×15×2400 mm. The PLT-005 is 120×16×2400 mm. The difference in thickness seems small, yet the pattern of the front face, the transition from the top edge to the wall, and the shape of the termination determine how wide the lower band will be perceived. If you choose by the number "120", these differences disappear from consideration altogether.
For a home where the doors and stair elements have already been finished, it is more convenient to first select a match by the character of the profile. In a sleek modern interior, a tall skirting board with an abundance of shaped transitions may look like a standalone ornament. This is acceptable if that is the effect you want. But if the goal is not to draw attention away from the texture of the oak floor, it is simpler to take samples of the two models and see how many lines they form in side light.
When ordering oak skirting board PLT-001-1 choose the material separately from the profile: oak and beech options are available in a single product card, and the price differs. Buy wooden skirting board PLT-005 logical after checking how its 16 mm thickness relates to the architrave and the door frame. For a country house with projections, the presence of a single millimetre does not by itself determine consumption. With an equal length of 2400 mm, the cutting plan will be almost identical, but work on corners and end faces must be assessed based on the surface shape.
The estimate for 10 beech planks will be the same in both cases at the verified prices — 51,400 ₽. The oak variant PLT-001-1 in this check is more expensive than the oak PLT-005: 77,300 versus 70,300 ₽ for ten planks. The price difference does not indicate better or worse quality: these are different products and specific price lines in the catalogue. The comparison should be made once both models suit the pattern and cross-section.
PLT-003, 160 mm high: where a large skirting board will not get in the way
A 160×16 mm skirting board looks different from the usual low profile. On the wall it forms a standalone band, so in a room with tall doors, plenty of free wall space and large architraves it can become part of a unified architectural finish. But in a small pantry or a narrow vestibule, the same 160 mm may prove disproportionate to the scale of the doors and furniture. This is not a question of fashion, but of which adjacent lines already exist in the room.
Look at the lower edge of the door architrave. If the decorative base of the architrave is below the top line of the skirting board, the junction will have to be resolved. Sometimes a provided plinth block or a standalone transition element looks more correct than an angled cut of the top edge. But such an element cannot be considered compatible based on its name alone: the height, thickness, projection and actual geometry must be compared. If the stair handrail or step cladding starts very low, a tall profile may physically obstruct the fastening or cover the required abutment.
Buy tall wooden skirting board PLT-003 it makes sense after test-fitting at least a small 160 mm high fragment on the wall. The check should cover not only the central part of the room, but also the areas near doors, radiators, built-in wardrobes, steps and service hatches. Some home systems require access to the lower part of the wall for maintenance; covering it with a solid decorative band without a removable solution is inconvenient.
In our calculation room, all segments will retain their previous length, so the number of standard 2400 mm planks will not change. What will change is the purchase price and the complexity of neatly finishing the corners. According to the verified data, ten beech PLT-003 planks cost 77,900 ₽, ten oak ones — 111,200 ₽, excluding processing, delivery and installation. Therefore, choosing it solely for the effect of a tall line in one room and then thoughtlessly repeating it throughout the house is not always economically reasonable.
Oak or beech: how to keep flooring, doors and skirting consistent
Buyers often compare these species by colour, but that is an unreliable starting point. Both oak and beech can look noticeably different once finished. Oak usually has a clearly visible natural pattern with pronounced pores and characteristic stripes. Beech is more often perceived as having a smoother, calmer structure; its tone can change substantially under different finishes. The words "oak" and "beech" do not describe the finished colour of a skirting board without a specific finish sample.
When oak engineered flooring is already laid in the home, the simplest route is to choose an oak skirting board. But this is not obligatory: a contrasting beech profile coated with an opaque paint matched to the wall can work better if the goal is not to repeat the floor pattern but to create a light lower border. It is more important to determine the main visible surface. If you want to preserve the wood texture, evaluate a sample in natural light. If the skirting will be covered with a dense enamel anyway, compare the cost of the base material, the preparation requirements and the quality of the edges.
Natural wood has a grain direction and the ability to react to humidity conditions. Because of this, long components cannot be stored carelessly: planks delivered in winter should not be left for long near a radiator, an open window or on a damp base. The acclimatisation procedure before installation, the permissible moisture content and the finishing method must be confirmed for the selected product and coating system, rather than borrowed from advice for any wood.
There is also a practical reason to choose one species along a continuous line. Even well-made oak and beech differ in the character of their texture. When two profiles of different species stand side by side on the same wall, the joint may be noticeable after identical tinting. If the materials are nevertheless separated by room, it is more convenient to make the boundary in a logical place: under a door, between different floor coverings, or at a separate door unit. Then the different tones are perceived as a deliberate decision.
How to measure a room with a niche and two doorways
For the calculation you need not just the overall perimeter from the house plan, but the sequence of sections where the skirting board will actually run. Start by walking around the room clockwise from a chosen corner. On your sheet, label the walls A, B, C and D. Separately mark doors, internal and external corners, niches, columns and the place where the skirting ends at a staircase or wardrobe. Do not confuse the room dimension from the project with the length of the finished wall after decoration: plaster, cladding and door casings can change the usable segment.
It is better to measure along the finished floor at the base of the wall, not at eye level. On curved or uneven surfaces, even a difference of a few millimetres can change how tightly the skirting fits. For deep niches, three measurements are needed: the width of the back wall and the length of each return. If the niche is not rectangular, you cannot simply double the depth: the left and right sides may differ. For each component, record separately the required length along the front or back edge, taking into account the future type of cut. Without this caveat, the number "550 mm" does not always turn into a finished component exactly 550 mm long.
A door requires one more decision. If the skirting really does stop at the door casing, the width of the opening is excluded from the perimeter, but the two remaining sides of the wall are recorded. When there is no door and the finish is to continue through the passage, subtracting the full width of the opening is wrong. If a threshold or different floors are planned, decide before calculating where the left profile ends and the right one begins. The situation with a built-in wardrobe is similar: behind a fully closed plinth the skirting is sometimes not needed, while behind a wardrobe on legs it may remain visible.
Do not forget to measure the distance from the floor to the lower edge of wall-mounted appliances and door leaves. Separately record heating pipes, inspection hatches and sockets that are close to the floor. The latter must not be covered by the profile. Such a list seems detailed only on paper: on site it saves you from buying an extra strip for a ten-centimetre section that was missed during the first measurement.
Perimeter calculation: from a rectangle to the actual 19.8 metres
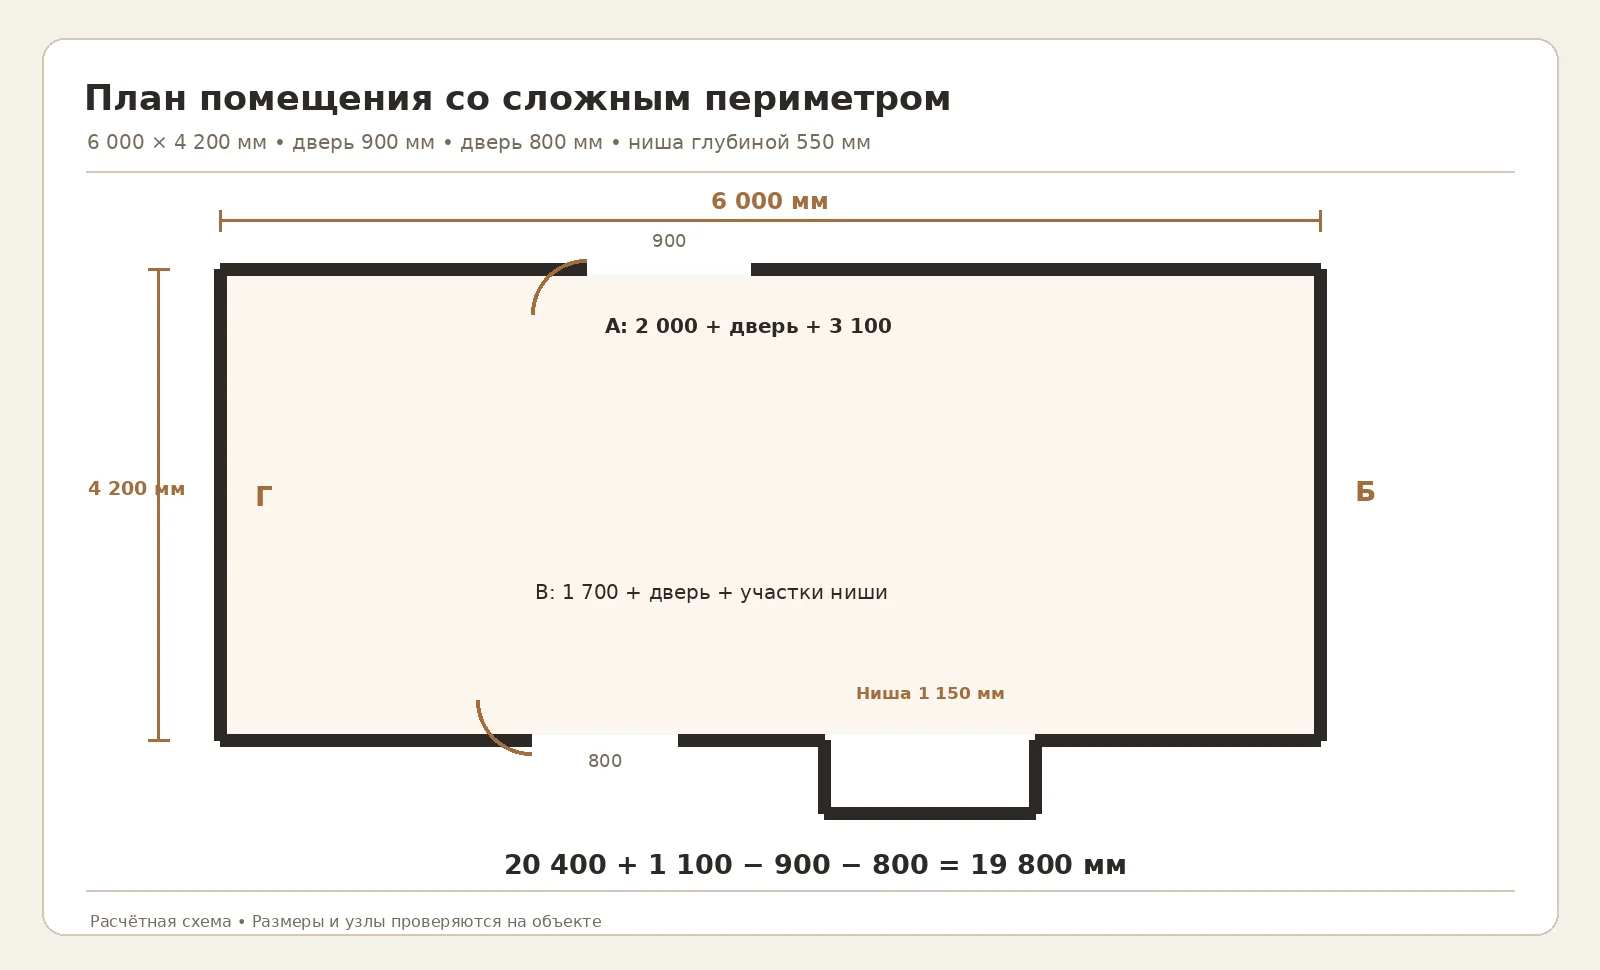
Let us take a room 6000 mm long and 4200 mm wide. One wall has a doorway 900 mm wide, another has one 800 mm wide. A rectangular niche 550 mm deep is located on part of the third wall and is indeed faced with skirting on both side edges. We assume that the openings do not require skirting inside and that nothing else interrupts the trim line. This is a hypothetical project that allows the method to be tested; it does not replace a drawing of a specific house.
A regular rectangular perimeter: 2 × (6000 + 4200) = 20,400 mm. The two returns of the niche add 2 × 550 = 1100 mm. We exclude the doorways from the continuous line: 900 + 800 = 1700 mm. We get 20,400 + 1100 − 1700 = 19,800 mm, or 19.8 linear metres. The width of the back of the niche is already included in the original wall length, so it must not be added to the perimeter again — this is a typical double entry of the same section.
| Element | Length change | Current total |
|---|---|---|
| Rectangle 6000×4200 mm | 20,400 mm | 20,400 mm |
| Two returns of the niche, 550 mm each | +1 100 mm | 21 500 mm |
| Door 900 mm wide | −900 mm | 20 600 mm |
| Door 800 mm wide | −800 mm | 19 800 mm |
At this stage, you can divide 19 800 by 2400: you get 8.25. Rounded up, the arithmetic minimum is nine boards. But this is only a check of the total amount of wood. It does not answer the question of what to make a 4200 mm wall from, how to match the grain direction on the visible line, and how much will be used for cuts near the outer corners.
It is more useful to count 19.8 m as the sum of ten real segments rather than as one invisible roll of material. Only then will it become clear which pieces can be obtained from a single board. For the calculation below, the door positions and the niche width are specified additionally. In your home they may be different — the cutting layout will change with them, even if the total footage remains the same.
Wall segments: why the same linear footage gives a different order
For example, let's specify the door locations. On the six-meter wall A, after subtracting a 900 mm door, segments of 2000 and 3100 mm remain. Wall B, 4200 mm long, is not interrupted. On the opposite wall C, an 800 mm door divides the line into a 1700 mm section and another part with a niche: 800 mm to the niche, 550 mm first return, 1150 mm back wall, 550 mm second return and 1550 mm to the corner. The last wall D is another 4200 mm. This is one of the possible layout options; the niche width of 1150 mm is chosen only to demonstrate the cutting.
| Wall or section | Length, mm | How we account for it |
|---|---|---|
| A1 | 2000 | To the first doorway |
| A2 | 3100 | After the first doorway |
| Б | 4200 | Solid wall |
| B1 | 1700 | To the second doorway |
| B2 | 800 | From the second opening to the niche |
| B3 | 550 | Left return of the niche |
| B4 | 1150 | Back of the niche |
| B5 | 550 | Right niche return |
| B6 | 1550 | From niche to corner |
| Г | 4200 | Solid wall |
| Total | 19 800 | Ten separate sections |
This already shows why buying skirting by "linear meters by eye" is inconvenient. Three sections are longer than a standard strip: 3100, 4200 and 4200 mm. Each will require at least one joint. But after cutting, offcuts of 700 and 1800 mm remain, which can be combined in one cutting batch with short pieces for the niche and door approaches. Without such a table, extra stock is often bought at a random point: for example, the tenth strip is taken just in case, then cut first, and a useful long section is lost.
The recording order itself also helps installation. The markings A1 and A2 do not mean store article numbers, but sections of a specific room. On the back of each prepared piece, you can mark the room, section, joint side and the direction of the face surface. For finishes with clear lacquer or oil, this is especially useful: after cutting, several wooden pieces of similar length may differ in grain and shade, even though they formally belong to the same batch.
Cutting map for ten sections from nine 2400 mm strips
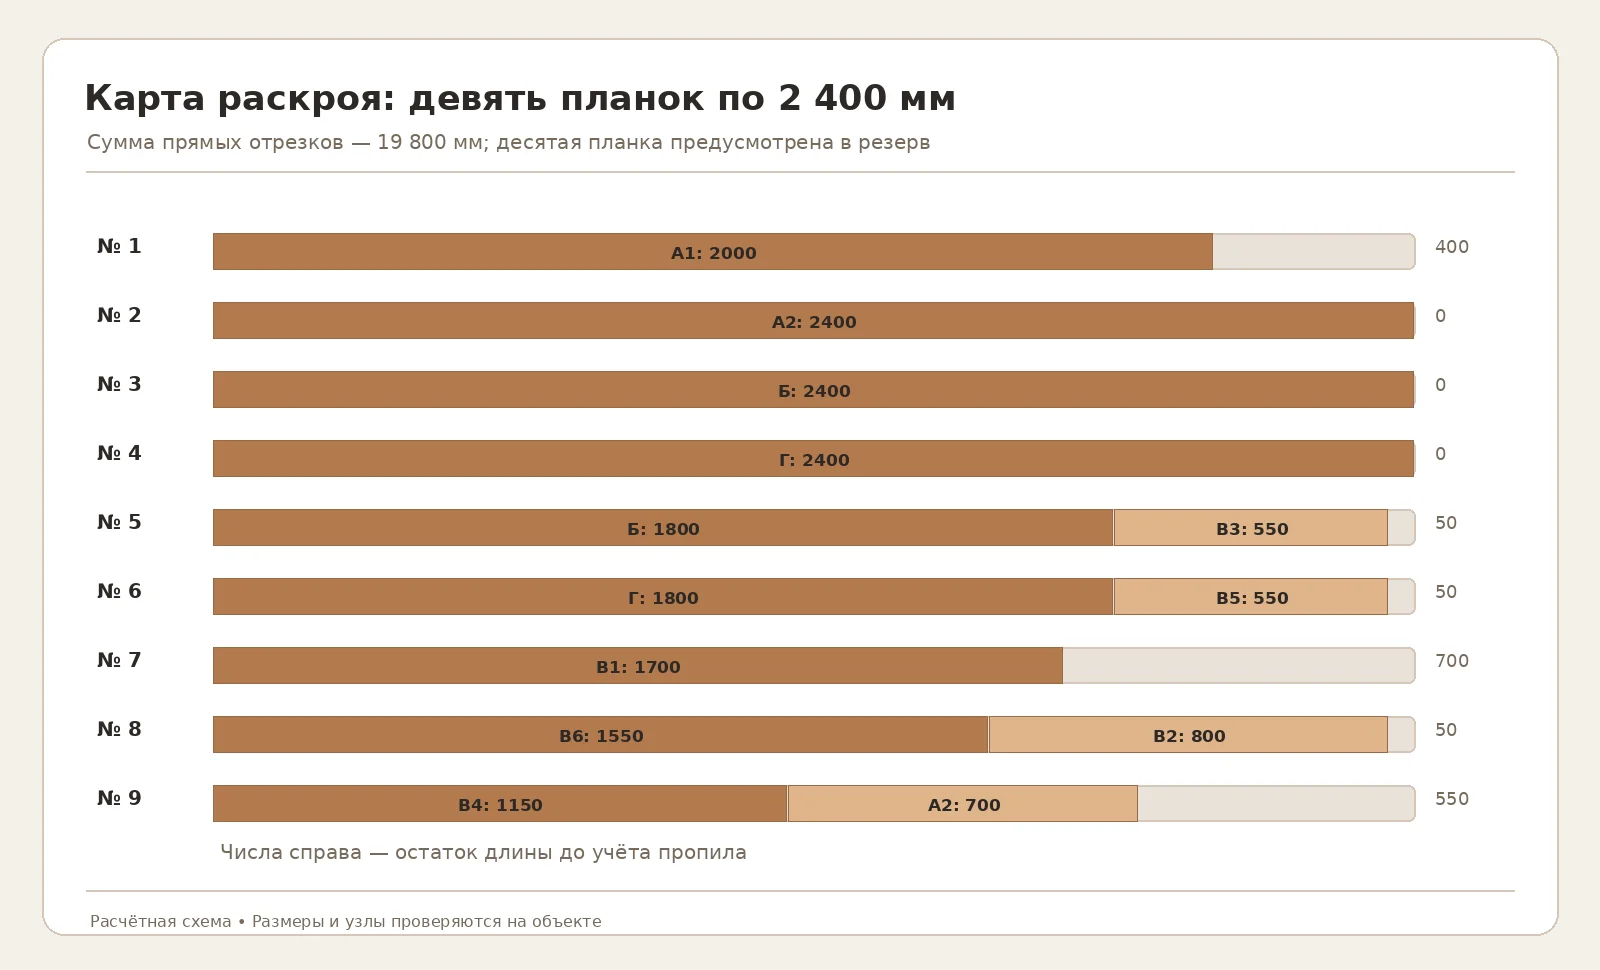
Let us show one possible cutting plan without an invented "zero" waste. We divide the long sections as follows: A2 = 2400 + 700 mm; B = 2400 + 1800 mm; D = 2400 + 1800 mm. Three whole strips go to the long parts. We distribute the remaining offcuts among the other six workpieces. The example uses straight part lengths; when manufacturing final parts with mitered and return cuts, the dimensions on the visible and back edges may differ.
| Plank 2400 mm | Cut purpose | Total useful parts |
|---|---|---|
| № 1 | A1: 2000 | 2000 мм |
| № 2 | A2: 2400 | 2400 мм |
| № 3 | B: 2400 | 2400 мм |
| № 4 | D: 2400 | 2400 мм |
| № 5 | B: 1800 + C3: 550 | 2350 мм |
| № 6 | D: 1800 + C5: 550 | 2350 мм |
| № 7 | C1: 1700 | 1700 мм |
| № 8 | C6: 1550 + C2: 800 | 2350 мм |
| № 9 | C4: 1150 + A2: 700 | 1850 мм |
| Total | All ten plots are closed | 19,800 mm |
The layout fits into nine planks with a nominal total length of 21,600 mm. The difference from the usable length is 1,800 mm; it consists of offcuts and allowances for cutting. In rows No. 5, No. 6 and No. 8, the sum of the two pieces is 2,350 mm: 50 mm remains, which is enough for a typical saw blade a few millimetres wide, but not enough to arbitrarily rework both pieces after a mistake. Plank No. 9 leaves substantially more free length, and part of this remainder can be used when test-setting the tool.
There is a subtlety: a plank fully used as a 2,400 mm section retains its full nominal length in our calculation. If both of its ends need to be re-cut, the usable size will be smaller. For a real specification, individual segments must be recalculated along the long and short edges of the profile, outer and inner corners marked, and tolerances checked against the actual length of each workpiece. Therefore, nine planks is an achievable demonstration layout for the given straight lengths, but not a guarantee that nine factory-made items will suffice in any installation.
The reader will find it useful to get into the habit of first drawing up such a table and then checking the angles. Some craftsmen start cutting from the longest sections in order to preserve the options for selecting short pieces later. Others sort the wood by grain pattern: the straightest planks are kept for visible walls, while those with unusual texture go to areas behind furniture. Both approaches are compatible with the calculation, provided the sections are labelled and a test cut is made before cutting begins.
How many to buy: nine planks by calculation, or ten with a reserve
An honest specification must distinguish between the mathematical minimum and the practical order. With the exact door and niche positions from the example above, all the segments can in principle be accommodated on nine planks. But if the factory end of a long piece needs to be trimmed, a complex outer corner requires a different length along the front edge, or a board arrives with damage near the edge, the calculated 50 mm on some rows will quickly disappear. On a wooden skirting board with a pronounced grain pattern, it is not always acceptable to put any leftover piece in the most visible spot on the wall.
For this house it is sensible to pre-order ten whole planks of one selected profile and one species. We distribute nine according to the map, and the tenth remains as a reserve for adjustments. It does not have to become waste: it can provide a return end, a separate section behind a door, or replace a piece with an unsuitable grain direction. If, after precise measurements, it turns out that the long walls have numerous offsets and you want to avoid visible joints, it is permissible to increase the reserve by one more plank, but the decision must follow from the map, not from a universal "plus ten percent" rule.
| Basis for selection | Quantity | Total purchased length | Difference from 19.8 m |
|---|---|---|---|
| Theoretically achievable layout | 9 planks | 21.6 m | 1.8 m |
| Example order with one spare plank | 10 slats | 24.0 m | 4.2 m |
| Increased reserve after additional verification | 11 planks | 26.4 m | 6.6 m |
A 4.2 m surplus with ten planks is not necessarily four meters of waste: it includes a full spare 2400 mm plank, offcuts after the main cuts, and process losses. For a clear finish, it is worth storing it together with the batch and the same finishing recipe. During future repairs, the exact same shade and wood grain may be harder to obtain than the standard length and model name.
Do not automatically apply this figure of ten to every room in the house. A rectangular study with no door breaks and a hallway with five niches may have the same floor area but require a different number of blanks. A sensible sequence for the remaining rooms: take the offcuts, distribute them among the planks, check the internal and external corners, set aside one clearly defined spare piece, and agree the result with the fitter.
Internal corners, external corners and visible joints on long walls
On a straight wall, the joint between two pieces should be as inconspicuous as the profile and finish allow. But there is no such thing as an endless wooden plank: with our lengths of 3100 and 4200 mm, there will be at least three joints on the long runs. It is better to choose their positions before cutting. If a joint ends up in an area of bright side light from a window, the slightest difference in plane or shade will be more noticeable. Sometimes it makes sense to move the joint closer to the furniture, even if this slightly changes the cutting plan.
For a shaped wooden skirting board, a simple butt joint may look harsher than a mitred joint, especially when the two planks differ in texture. However, a 45-degree joint must not be presented as universally strong: its execution depends on the profile, the direction of the grain, the fixing method and the condition of the wall. The fitter must choose the geometry and check a sample joint before cutting all the expensive oak pieces.
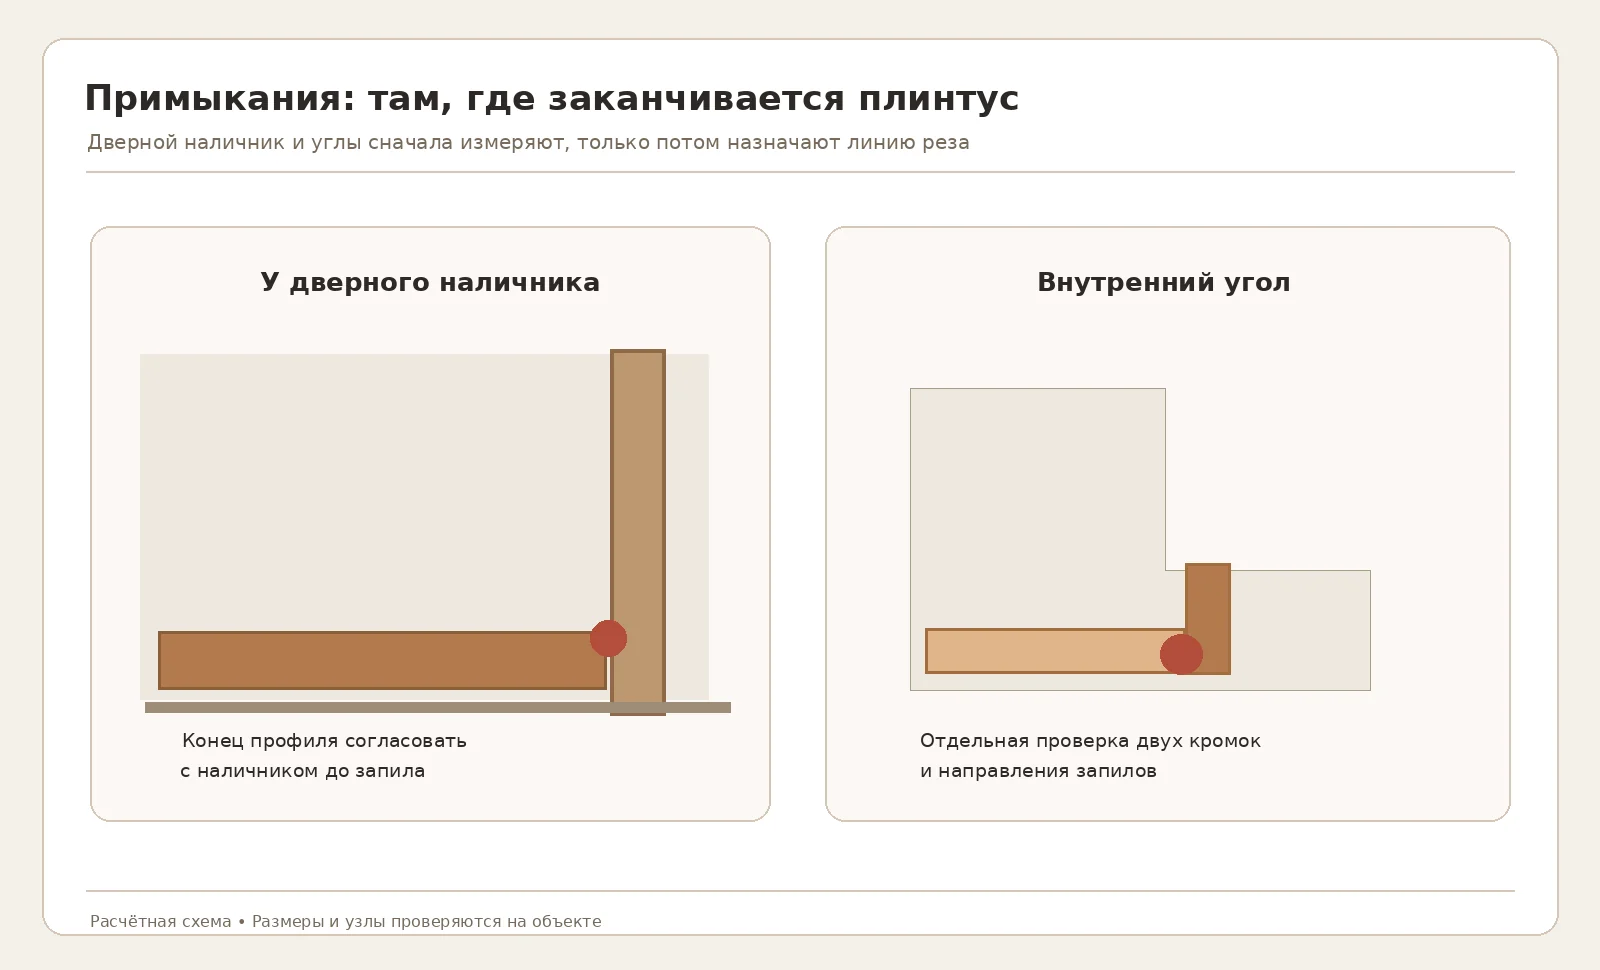
Different methods of joining may be used at an internal corner, including a mitre joint or fitting the contour of one piece to another. For an external corner, you should check the sharp edge and the absence of a gap that will later actively collect dirt. At the same time, the actual width of the wooden blank along the outer edge after cutting may differ from the dimension to the internal corner. That is why, when cutting, you should not unconditionally assume that two 550 mm offcuts are sufficient for the side walls of the niche: the method of joining to the back wall affects the finished dimensions.
If there is a skirting board at a door architrave, choose the type of termination in advance. This may be a neatly prepared straight end, a small return of the piece to the wall, or an agreed decorative transition. A cut oak end must not be left untreated if the chosen finishing system requires protection: an open cut absorbs the product differently and may differ in colour. The entrance to a room is exactly where people most often notice such details.
Doors, niches and built-in furniture: where skirting is really needed
A doorway is not always equal to the empty space between two vertical posts. If the architrave is already installed, the skirting board usually meets its outer edge. When there is no architrave yet, the point of abutment is determined by the future position of the finishing piece. The difference between the rough width of the doorway and the distance between the outer edges of the architraves can be considerable. It must not be replaced by subtracting a nominal 900 mm from the construction drawing when it comes to the final cut.
For a niche 550 mm deep, it is important not to forget the small side sections. There are two of them, but they are not necessarily two identical finished pieces: the right and left sides may differ in the method of cutting or in wall deviation. The width of the back part of the niche, 1150 mm in our example, has been chosen in advance. If the niche is intended for a wardrobe, first decide whether the skirting board will remain visible under the furniture. Sometimes furniture is installed flush against the wall, and the rear section of skirting simply prevents the plinth from seating correctly.
For a wardrobe on legs, the skirting line may be visible and should continue behind the furniture. For a built-in wardrobe with its own solid plinth, it is often better to finish the profile at the side walls. But do not make this decision after the fact: removing an already installed skirting board risks damaging the wall covering. Before placing the order, show the fitter the furniture plan with plinth heights and mark which furniture is considered fixed.
Near the staircase, the joint is especially noticeable. A horizontal skirting board may meet the bottom step, a decorative panel, or a railing post; each junction requires its own end. It should not automatically continue along the sloped line of the flight like the same floor skirting. If sloped trim is required, check whether the specific profile can be used and how it can be fixed in a different orientation. A good specification for a home ends not with the word "perimeter" but with a list of the areas actually being trimmed.
How to join a wooden skirting board with parquet, engineered board and laminate
A skirting board has a practical limit of responsibility: it covers the junction of the wall and floor, but it does not remove the requirements for the floor covering itself. For floating laminate or click-lock flooring, an expansion gap is often provided around the perimeter. Its size is determined by the manufacturer's instructions for the specific covering, the dimensions of the room and the chosen laying pattern. It cannot be claimed that a 15 mm skirting board will unconditionally cover any gap: you need to look at the shape of its rear part and the actual overhang along the bottom edge.
If the gap is wider than the available covering surface, first look for an agreed installation solution. Pulling the skirting board to the floor so as to forcibly clamp the movable covering is a poor substitute for calculation. For most options, the wooden skirting board is fixed to the wall taking into account the base material and installation recommendations; the specific fasteners or adhesive are selected after assessing the wall. In a country house there may be plasterboard partitions, brick, aerated concrete and clad walls, so there is no single fixing method for all rooms.
Parquet and engineered board differ in construction and installation method. On an adhesive base the junction has one character, on a floating base another. What they share is the need to preserve the technical conditions specified by the covering manufacturer. If the floor has an unevenness near the wall, a tall skirting board can visually emphasise it more than a low one. Before buying long pieces, check the base with a straightedge and clarify the permissible gaps between the lower edge of the profile and the finished floor.
Where wooden flooring transitions to tile in a doorway, the covering heights may differ. The skirting board should not automatically be run through the threshold as one continuous piece. First determine the termination line on each side, then the material of the transition element and the available space near the door leaf. Underfloor heating presents a separate difficulty: fasteners must not disturb hidden circuits and services. The route plan and safe fixing zones are agreed before drilling, not after a hole appears.
Natural wood, clear finish or painted profile
The choice of finish is especially noticeable at joints. If the oak texture is to be preserved under a clear finish, it is advisable to lay out adjacent planks by pattern in advance. On a long wall, two pieces may be of the same species and grade but have a different grain direction and tone. Under side lighting, such a boundary will be more noticeable than in a warehouse photo. In rooms with several doors, it is convenient to distribute the material before the first cut: the most similar planks for the central walls, the differing ones for hidden areas.
Tinting requires a separate test. On a small sample the finished colour sometimes seems calm, but on a continuous line of skirting board around the entire perimeter it becomes darker due to the continuous shadow near the floor. Check the sample next to the finished wall and floor under actual lighting. If a white or coloured opaque finish is planned, it is important to understand what relief will remain after several coats of paint, how the ends will be prepared and where touch-ups after installation are acceptable.
A wooden skirting board and a wooden door can differ in gloss level even when the shade is similar. A matte surface next to a glossy one is perceived as a different color. Therefore, the phrase "to match the oak doors" is not enough for ordering a finish: it is useful to provide the composition code, a sample, and the required gloss level if the manufacturer allows this to be agreed upon. The operating conditions of a country house should also be described. If the heating is turned on irregularly and the room stays cold for a long time in winter, the storage and installation conditions for wooden parts need to be discussed.
Wet areas are a separate case. A standard wooden skirting board for living rooms cannot automatically be declared suitable for a shower, a wet laundry room, or an open terrace just because the wood is durable. Water, humidity fluctuations, and the condition of the end faces affect the durability of the finish. In such places, the material and protection system are chosen based on actual conditions, with confirmation from the manufacturer. Sometimes it is wiser to avoid solid wood in a particular room than to try to compensate for unsuitable operating conditions with a thick layer of varnish.
A single order specification for the house: how not to mix up models and rooms
If the house has five rooms, a general list of "oak skirting board — 68 meters" is insufficient even with the correct footage. Each room may have different cut lengths, and different profiles of the same height cannot be arbitrarily swapped. Draw up a room-by-room schedule specifying the item code, cross-section, species, finish type, and the number of full-length planks. For our calculation room it will be small, but already suitable for verification by the manager and the installer.
| Order field | Option A | Option B |
|---|---|---|
| Model | PLT-006 | PLT-005 |
| Material | Oak or beech | Oak or beech |
| Size of the selected solid wood | 100×15×2400 mm | 120×16×2400 mm |
| Calculated perimeter | 19.8 m | 19.8 m |
| Preliminary quantity | 10 slats | 10 slats |
| Cutting map | Nine in use, one in reserve | Nine in use, one in reserve |
| Finishing | Confirm by sample | Confirm by sample |
| Delivery point | Tver or an address in the region | Tver or an address in the region |
The parameters of both columns are given as alternatives, not as a single mixed order for twenty strips. If you choose PLT-006, the main specification must contain only one model. If PLT-005 is already installed in the adjacent room, a separate line specifies how the finish at the door is handled and whether different cross-sections can be joined at all without a noticeable transition. You should not assume these profiles are compatible on your own based on a similar pattern alone.
For a purchase from solid wood, it is useful to agree in advance how the parts are sorted by visible surface, whether sanding is required before coating, and what document or marking will be on the packaging. Also check whether end preparation will be done at the factory, by the installer on site, or in a finishing workshop. This affects the installation sequence and costs that are not included in the price line for a whole strip.
If you are preparing an order not only for skirting boards but also for door components, you can immediately review buy solid wood moulding within a single configuration. However, combining items for the sake of conditional delivery savings is worth doing only after checking lengths, packaging, and actual rates. A single box with different lengths may prove inconvenient for unloading and storage.
Cost of PLT-006 and PLT-005: two estimates for the same cutting plan
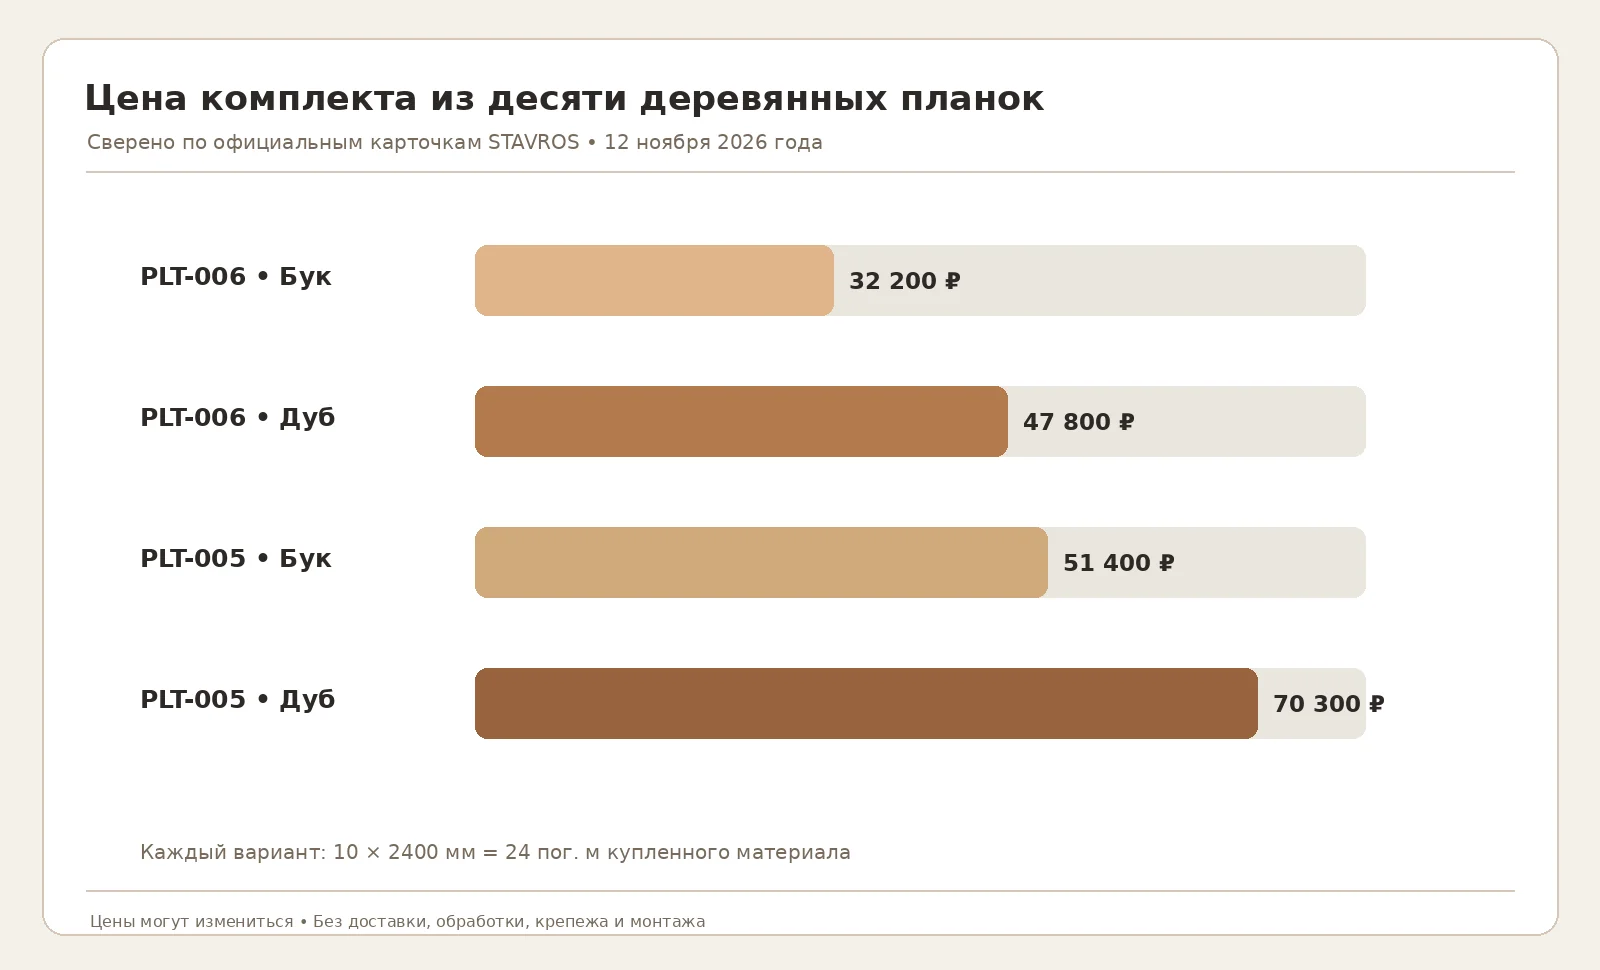
According to STAVROS product cards as of November 12, 2026, a beech strip PLT-006 measuring 100×15×2400 mm costs 3220 ₽, and the oak one costs 4780 ₽. For PLT-005 measuring 120×16×2400 mm, the beech item costs 5140 ₽, and the oak one costs 7030 ₽. This is the price of a whole strip in the selected finish, not the cost per linear meter, installation, or painting. For comparison, we will divide the price of one strip by 2.4 m, then calculate nine and ten whole pieces.
| Profile and wood species | Plank price | Price per 1 m of purchased length | Nine planks | Ten planks |
|---|---|---|---|---|
| PLT-006, beech | 3 220 ₽ | ≈1 342 ₽ | 28 980 ₽ | 32 200 ₽ |
| PLT-006, oak | 4 780 ₽ | ≈1 992 ₽ | 43 020 ₽ | 47 800 ₽ |
| PLT-005, beech | 5 140 ₽ | ≈2 142 ₽ | 46 260 ₽ | 51 400 ₽ |
| PLT-005, oak | 7 030 ₽ | ≈2 929 ₽ | 63 270 ₽ | 70 300 ₽ |
For a preliminary order of ten planks, the difference between beech and oak is 15,600 ₽ for PLT-006 and 18,900 ₽ for PLT-005. The difference between the two beech profiles is 19,200 ₽ for ten items, and between the oak ones it is 22,500 ₽. These amounts let you assess the impact of the decision on profile height and shape before you discuss color, finish, and installation. One cannot conclude that price is entirely determined by the amount of wood: the model includes geometry, processing, and the manufacturer's specific pricing.
Another metric is the price per installed meter. For example, with ten PLT-006 beech planks, the buyer pays for 24 linear meters, although the walls per the plan will have 19.8 m. Dividing 32,200 ₽ by 19.8 m gives about 1,626 ₽ per installed meter for material alone. For oak PLT-006, the equivalent figure is about 2,414 ₽. It is higher than the nominal price per meter of the purchased plank due to the reserve and cutting. It cannot replace the catalog price, but it is a useful figure when planning a budget.
The final estimate separately includes: the agreed finish, preparation of ends and joints, fastening materials, installer labor, packaging of long items, transportation to Tver, lifting and storage on site. Without actual rates and scope of work, we will not assign arbitrary figures to them. One reserve plank can reduce the risk of an additional delivery, but by itself does not guarantee savings: the decision depends on the complexity of the layout and the convenience of subsequent reordering.
How much does a tall skirting board cost and when is overpaying justified
The cost of a taller profile makes sense to compare with what the buyer will actually see on the wall. In our preliminary calculation for ten PLT-007 planks, the total is 48,900 ₽ for beech and 70,000 ₽ for oak. For PLT-001-1 it is 51,400 ₽ and 77,300 ₽ respectively, and for PLT-003 it is 77,900 ₽ and 111,200 ₽. All these amounts are calculated using verified prices for a whole wooden plank 2400 mm long. They contain no invented discount, no delivery cost, and no guarantee that exactly ten items are in stock on the chosen date.
If you need a calm line in a hallway, a tall model at a substantially higher price will not necessarily provide a useful advantage. But if the living room has tall doors, large casings and large clean wall surfaces, a 160 mm profile can support the intended scale. Here, choosing by price becomes meaningful after a visual trial. Compare not only two products, but also two scenarios: a single profile throughout the house, or a tall one in the formal rooms and a more restrained one in the service areas.
It is worth separating profiles between rooms only where the transition does not create an ugly joint on a single straight wall. A good boundary is a doorway finished with its own casing. A bad one is a random point in the middle of a long hallway. For a large house, it is sometimes more advantageous to take one coordinated profile of moderate height than to complicate production with numerous transition pieces. Such a conclusion cannot be drawn from a single figure of "rubles per meter": the adjacent finishing elements need to be calculated.
Therefore, first approve the height and geometry, then the species, then the cutting plan, and only after that the final purchase cost. If the budget does not allow finishing the whole house with an expensive profile, it is wiser to revise the architectural layout of the rooms rather than substitute half of the oak planks with beech ones without changing the design. Wood and finishing have noticeable differences that will show on a continuous line.
How to place an order with delivery to Tver and the Tver region
To order according to our example, one completed specification is enough, but before payment several practical conditions must be confirmed. Start with the exact item code: PLT-006 and PLT-005 have different cross-sections. Then confirm the species, the 2400 mm length, the quantity of ten planks and the coating requirements. Check that the order confirmation specifies the wooden item, not MDF. The latter may be on the same product page but have a different length and price.
Provide the delivery address as precisely as the carrier requires. For a home outside Tver, a district name alone may not be enough: there may be separate conditions for access, unloading and handover of long-length cargo. Do not automatically assume that a local STAVROS warehouse, in-house couriers across the region or a fixed delivery cost are available. These details depend on the chosen carrier, the packaging and current shipping capabilities.
Long wooden profiles require protection not only of the face surface but also of the corners. If the packaging is soft, damage to a two-meter plank can make it unsuitable for the most visible wall, even though most of the product remains intact. Upon receipt, check the number of packages, the labeling, the integrity of the long boxes, and the presence of visible signs of impact or moisture. If damage is found, act according to the carrier's and seller's rules: record the condition before final acceptance, and keep documents and photographs.
After delivery, do not start cutting immediately just because the installer has already arrived. Arrange safe horizontal storage according to the manufacturer's recommendations, check the humidity and temperature of the room, and compare the actual parts with the schedule. A quick check of item codes, material and cross-section is cheaper than redoing a corner in which an unsuitable profile has already been installed. If the finishing is not yet complete, protect the wood from wet work and finishing compounds.
To reorder, keep the exact wording of the item, a coating sample and the batch document, if such information is available. The message "send another two metres of the same wooden skirting" will not allow the grade, profile and finish to be unambiguously restored. This is especially noticeable in homes that are finished gradually, room by room.
Mistakes when buying wooden skirting that show up already during installation
The first mistake is measuring by the external dimensions of the room and forgetting about the doors. In our example this would have added 1700 mm, that is, almost a whole length, but even such an inflated total does not guarantee the correct distribution of the cut pieces. The second mistake is adding the width of the back wall of the niche a second time. It is already included in the initial length of the six-metre wall; two side returns are counted additionally only if the niche is actually finished along its entire perimeter.
The third is mixing up the dimensions of different versions of the same item code. In the PLT-006 card the wooden version is 2400 mm long, while some MDF versions are 2600 mm. If you order by name alone, you risk getting the wrong quantity, mismatched edges and a completely different material. The fourth is forgetting about the thickness next to the architrave. The skirting may be lower than the adjacent piece but protrude further into the passage, which makes an ordinary straight end look out of place.
The fifth is leaving the placement of joints to a random installation order. On a 4200 mm wall a joint is unavoidable with 2400 mm lengths. Place it where the wood grain and lighting allow, not automatically at exactly 2400 mm from the first corner. The sixth is failing to allow for process waste. The theoretical nine lengths in our example are calculated from straight runs; noticeable mitre joints and a defective edge on one piece may require a larger reserve.
The seventh is choosing a beautiful model without taking the floor into account. If the expansion gap is wider than the profile's overlap area, neither an expensive species nor a highly decorative face will solve the problem. The eighth is choosing a finish by its on-screen colour. Oak and beech after tinting can differ significantly from the photo; next to an already laid floor these discrepancies become noticeable.
The most unpleasant mistake is usually not the most expensive individual length. It is an order in which door dimensions, niche markings, species, finish and the actual delivery point have not been agreed at the same time. Then every detail has to be corrected separately. One detailed measurement sheet and one clear schedule protect against this better than a large "safety" reserve without calculation.
Frequently asked questions about solid wood skirting
Can an oak skirting be installed together with beech doors?
Yes, if the combination is coordinated in terms of finish and proportions. The same colour is not guaranteed by specifying the species alone: it is better to compare coating samples next to the door leaf and architrave. If the wood grains are different, it is sometimes calmer to make the skirting the colour of the wall rather than trying to achieve a perfect match.
Will PLT-006 work if there is a wide gap between the laminate and the wall?
This depends on the actual overlap at the lower edge of the profile and the laminate manufacturer's requirements. A height of 100 mm alone does not answer the question. You need to measure the gap, see the skirting cross-section, and check how the fastening will be done without pinching the floating floor.
Can nine planks be used instead of ten in our example?
The map shows a theoretical possibility. But on site, check all corners, the exact lengths after finishing, cutting allowances, and the condition of the face edges. If any of the conditions change, the tenth plank provides a reserve. Do not promise the installer nine pieces as an unconditional norm.
Why should PLT-005 and PLT-001-1 of the same height not be considered the same product?
The wooden versions have different cross-sections: 120×16 and 120×15 mm. Besides thickness, the shape of the face side must be verified. Different profiles cannot be silently combined on the same straight section just because the top point is at the same height.
Is skirting needed behind a built-in wardrobe?
If the wardrobe stands flush against the wall and has its own plinth, skirting may interfere with installation. If the furniture stands on legs and the space is visible, trim may be needed. The decision is made based on the furniture drawing and its installation method before counting parts.
Can wires be hidden behind a solid wood skirting?
Do not assume that a cable channel is a mandatory feature. For a specific model, check the drawing and permissible installation. If a cable needs to be routed, choose the safe solution specified by the design, and do not try to select wood from the back side on site without assessing the structure.
What should I do if some of the profiles have already arrived with damaged ends?
Before cutting, photograph the damage, check the packaging and the number of pieces, and keep the transport documents. If it is acceptable under the agreed cutting method, a small damaged fragment can sometimes end up as waste. But do not accept this option without checking the map: a long visible wall may not have a suitable replacement.
When should I check the actual price and delivery time?
After choosing the item code, material, quantity and address, but before confirming the order. The prices given in the article refer to a specific point of verification and do not guarantee the amount of a future invoice. Delivery, packaging and availability of the selected quantity are confirmed separately.
What to pair a wooden skirting board with in home finishing
A skirting board rarely exists separately from door casings, corners and wall moldings. In a home with wooden doors, it makes sense to decide in advance whether the floor will share a single texture with the door trim. To do this, it is useful to check buy the wooden architrave MLD-007.1 and compare the profile by its actual cross-section with the selected skirting board. The same material does not replace checking the geometry.
If an outer corner requires standalone wooden finishing, you can consider buy wooden corner piece UG-001, but only after measuring the installation location. The corner piece is not automatically intended for every skirting board transition: it may serve a different purpose. For finishing adjacent wall planes, this will be separately useful to buy wooden molding MLD-004First determine its role in the interior, and only then add it to the overall order.
If a detailed breakdown of the general principles is needed, three materials supplement this calculation: Wooden Baseboard from A to Z: Profile Selection, Dimensions, Installation, and Mistakes, Wood species for solid skirting boards и Wooden Baseboard with Coating: Painted, Varnished, with Patina. It is useful to clarify in them questions that do not require recalculating the geometry of our room.
Buying a wooden skirting board in Tver: what to provide for an accurate order
For the country house from the example, the final decision can be described specifically. If you need a relatively low solid wood profile and a moderate budget, compare PLT-006 in beech or oak. If a pronounced 120 mm line suits the interior better, check PLT-005. Both models have wooden versions 2400 mm long, and the preliminary cutting plan for ten planks accounts for nine used blanks and one spare. If you choose a different profile, return to its cross-section rather than copying the previous schedule.
Before payment, you will need the actual wall layout, the position of the two doors, the dimensions of the niche, the decision on corners, the material, a finish sample, and the delivery address. A perimeter of 19.8 m is a useful reference point, but the main part of the order becomes the cut map and the number of whole products. If during measurement it turns out that one door is offset, the niche has unequal returns, or part of the wall is covered by a built-in wardrobe, update the specification before manufacturing and shipping.
Choose not "a skirting board in general," but a specific model in a specific wood species with a calculated quantity. Then the purchase cost can be verified against the current STAVROS product page, and preparation, coating, packaging, and delivery to the Tver region can be agreed without unexpected changes at the final stage of renovation.