Article Contents:
- What is a polyurethane crowning cornice: architecture and material
- Why you need a cornice under the roof: ten arguments
- Where to install a crowning cornice: positions and tasks
- Crowning, interfloor or base cornice: what is responsible for what
- How to choose the size and overhang of a crowning cornice: nine parameters
- Building height
- Facade width
- Roof overhang
- Facade style
- Presence of rustication
- Presence of architraves and sandriks
- Modillions and dentils: needed or not
- Drip edge: mandatory
- Paint color
- Stylistic options for the cornice: from minimalism to palace decor
- Modern facade
- Neoclassicism
- Classic
- Palace style
- Russian style
- How to combine the cornice with other facade decor: nine combinations
- Cornice + rustication
- Crowning cornice + architraves
- Crowning cornice + sandriks
- Crowning cornice + interfloor belt
- Crowning cornice + base cornice
- Crowning cornice + pilasters
- Crowning cornice + brackets
- Crowning cornice + entrance group
- Crowning cornice + facade moldings
- Installation of polyurethane crowning cornice: precision and reliability
- Preparation and Marking
- Construction Adhesive
- Mechanical Fastening
- Corner joints
- Sealing of three critical zones
- Painting
- How to calculate a purchase: a practical algorithm
- Mistakes in choosing and installing a crowning cornice
- FAQ: Questions and Answers
- STAVROS: the top point of the facade is the point of trust
Imagine a person in an impeccable suit — but without a collar and tie. Everything is correct, everything is fitted, but something is clearly unfinished. The eye looks for the top point and does not find it. The same story applies to the facade. You can make beautiful architraves, place rustication at the corners, run an interfloor belt — but if the facade simply breaks off at the roof without a cornice, all this effort loses a third of its architectural power.
Crowning cornice made of polyurethane — this is the upper horizontal profile of the facade, which is installed under the roof overhang or directly in the transition zone from the wall to the roof. It completes the vertical composition of the facade, shapes the silhouette of the building, creates an architectural shadow at the most expressive point of the wall, and unites the entire facade system — from the base belt to the cornice — into a single architectural statement.
This is not just a profile. This is the top point of the entire facade. And it must be chosen consciously: with an understanding of the building's height, the scale of the facade, the style of decor, and how the cornice aligns with every element below.


What is a crowning cornice made of polyurethane: architecture and material
In the history of architecture, the cornice was one of the three main horizontal elements of the classical order: architrave, frieze, cornice — together they formed the entablature, completing the colonnade or facade. The cornice was always the most expressive of the three: it overhung the facade, created a deep shadow, protected the wall from water, and defined the silhouette of the building.
In modern private construction, this logic has not changed — only the material has changed. A polyurethane crowning cornice is a cast profile of facade formulation that reproduces the classical form of an entablature cornice with millimeter precision: with an overhang, drip edge, frieze, and supporting part.
Technical specifications of STAVROS facade polyurethane:
-
Density: 380–420 kg/m³ (facade formulation)
-
Water absorption: virtually zero (closed-cell structure)
-
Frost resistance: 300+ freeze-thaw cycles
-
Temperature resistance: from −45 to +70°C
-
Surface: white matte, factory-primed
-
Ready for painting: without additional preparation
Width (profile height) of the crowning cornice: 150–350 mm — depending on the facade style and building scale. Projection from the wall plane: 80–200 mm. Plank length: 2000–2500 mm. This is the largest of the horizontal facade profiles — it carries the maximum visual load.
Polyurethane molding for house facades — a systemic view of the entire facade decor, in which the crowning cornice stands at the top of the hierarchy: the largest, most expressive, most noticeable element of the entire system.


Why a cornice under the roof is needed: ten arguments
When asked "why is it needed if the building stands without it," one wants to ask a counter question: why are frames needed for a painting if the canvas itself exists without them? The cornice is the frame for the facade. More precisely, its upper part. And here is why it is indispensable.
Completes the vertical composition. The facade is a vertical object. Any vertical must have a beginning and an end. The plinth belt is the beginning. The crowning cornice is the end. Without it, the wall visually "breaks off" at the roof.
Shapes the silhouette of the house. It is the cornice that sets the top contour line of the building. Against the sky, this is the most readable line of the facade. How the house looks from a distance depends on its expressiveness.
Hides the sharp transition from the wall to the roof. Even with good roofing, the transition "plaster — metal/tile" looks rough. The cornice creates a smooth architectural transition with shadow and profile.
Creates an architectural shadow in the upper zone. A cornice projection of 100–200 mm gives a deep horizontal shadow under any lighting. This is the most expressive point of the facade.
Protects the upper part of the wall from water. With a drip edge (water drainage groove on the lower overhang), the cornice diverts water forward from the wall — even with insufficient roof overhang.
Supports the classical or neoclassical style. In both styles, the crowning cornice is a mandatory element. A facade without it simply does not correspond to the chosen architectural language.
Works with rustication and window decor. The verticals of rustication and the horizontals of window frames are "gathered" by the cornice into a single system: it acts at the top as an organizing horizontal element.
Builds a three-part facade system. Classic scheme: plinth cornice — interfloor belt — the crowning cornice. Three horizontals create a three-part division of the facade, which architects have used since the time of Vitruvius.
It makes the house visually more expensive. Not at the cost of material — through the feeling of design. A house with a crowning cornice looks designed, not just built.
It sets the upper horizontal of the facade. This is the final line along which the entire architectural story of the house is 'closed'. After it — only the sky.
Our factory also produces:


Where the crowning cornice is installed: positions and tasks
| Installation location | Architectural task |
|---|---|
| Under the roof overhang along the perimeter | To finish the wall and create a transition to the roof |
| On the main facade | To enhance the front side, create an axis of symmetry |
| Above the entrance group | Emphasize the main entrance, design the portal |
| On a tall facade | Reduce the feeling of a monotonous vertical |
| In a classical or neoclassical project | Create a full architectural silhouette |
| On the attic | Design the top parapet of a flat roof |
A special case is a house with a flat roof or attic. Here, the crowning cornice is installed on the top edge of the attic parapet, creating a horizontal finish. This is especially important for neoclassical-style houses with a flat or low-slope roof.
Facade decoration made of polyurethane STAVROS describes the crowning cornice as a basic element of the facade system — along with architraves, the entrance door portal, and corner rustication. Without it, the facade system is incomplete.
Get Consultation
Crowning, interfloor or plinth cornice: what is responsible for what
Before ordering a crowning cornice, it is useful to understand the hierarchy of all horizontal facade profiles. Confusion here is a source of ordering errors.
| Element | Position | Main task | Projection |
|---|---|---|---|
| Crowning cornice | Under the roof | Completes the facade from above | 100–200 mm |
| interfloor belt | Between floors | Divides the facade into levels | 60–120 mm |
| plinth cornice | Above the plinth | Frames the base | 80–150 mm |
| Pediment | Above the window | Completes the window portal | 60–100 mm |
| Window sill belt | Below the window | Completes the window from below | 40–80 mm |
| Facade molding | Walls, frames | Creates a line or frame | 20–50 mm |
Scale hierarchy: the crowning cornice is the largest. The remaining horizontal elements are smaller but proportionally coordinated with it. If the crowning cornice has a projection of 150 mm, the interfloor belt is 80–100 mm, the base belt is 100–120 mm. This is a system, not a set of random profiles.
How to choose the size and projection of the crowning cornice: nine parameters
Building height
This is the main parameter for determining the cornice width. The taller the house, the larger the cornice should be — otherwise it will get lost on the large vertical surface.
Guidelines:
-
One-story house 4–5 m high: cornice width 150–200 mm
-
Two-story house 7–8 m high: width 200–280 mm
-
Two-story house with high ceilings (8–10 m): width 250–350 mm
Facade width
Long facade — larger cornice. Short facade — narrower. Ratio of cornice width to facade width: 1.5–2.5%. For a house 12 m wide — cornice 180–300 mm. For a house 8 m wide — 120–200 mm.
Roof overhang
If the roof has a wide overhang (600–900 mm or more) — the cornice is installed underneath it, practically in the shadow of the roof overhang. Its projection can be small (80–120 mm) because the roof already creates shade. If the roof overhang is minimal (200–300 mm) — the cornice takes on the entire overhanging function and should have a larger projection (150–200 mm).
Facade style
-
Modern minimalist: profile with 1–2 steps, projection 80–120 mm, height 150–180 mm.
-
Modern classic: cornice profile with three steps, projection 100–150 mm, height 200–250 mm.
-
Neoclassical: more developed profile, possible frieze under the cornice, projection 120–180 mm, height 220–300 mm.
-
Classic with modillions: large profile with bracket-modillions, projection 150–200 mm and more, height 300–400 mm.
Presence of rustication
If installed on the corners of the house Polyurethane rustication, their width sets the scale module for the cornice. The height of the cornice should be 1.5–2 times the width of the rustication block — this is a classic ratio.
Presence of architraves and sandriks
If the window framing is rich (Facade trim + sandriks + keystones), the cornice should be proportionally large. A small cornice against the background of developed window decor looks unserious.
Modillions and dentils: needed or not
Modillions are console projections under the cornice slab. In classical architecture, they "supported" the cornice and set the rhythm of the step. In the polyurethane version, they are decorative but very effective: they break the horizontal line into rhythmic modules and create additional plasticity.
Dentils are small rectangular teeth on the cornice belt. A finer detail characteristic of the Ionic order. They add sophistication but require coordinated decoration across the entire facade.
For a simple modern or neoclassical house — a cornice without modillions. For a classical facade — with modillions or dentils.
Drip edge: mandatory
A drip edge is a groove on the lower plane of the cornice overhang that breaks the water droplet and prevents it from flowing onto the back surface of the profile. Without a drip edge, water flows along the lower plane onto the wall, leaving dark streaks.
When choosing a profile, ensure that the lower overhang has a drip edge groove or a cut geometry that performs this function.
Paint color
The crowning cornice is usually painted:
-
In the color of the wall: the cornice is "built into" the facade, working with form and shadow rather than color. Architecturally the strictest option.
-
White on a colored facade: strong contrast makes the cornice very noticeable. Classic.
-
In the color of the roof or gutters: creates a visual connection between the roofing and facade zones.
Stylistic options for the crowning cornice: from minimalism to palace decor
Modern facade
Here, a cornice with a clean horizontal line, minimal steps, and no ornament is appropriate. It is an "architectural line" — not decor, but geometry. Projection 80–120 mm. Height 150–180 mm. Relief: straight shelf + small ogee.
Nuance: on a modern house, the cornice is often made white against a colored facade plaster — this creates a clear horizontal boundary between the wall and the roofing system.
Neoclassicism
Profile with three to four steps, a cyma reversa, and a projecting slab. Projection 100–150 mm. Height 200–260 mm. A simple frieze (smooth horizontal band) between the lower molding and the main cornice is possible. Pairs well with straight pediments and rectangular architraves.
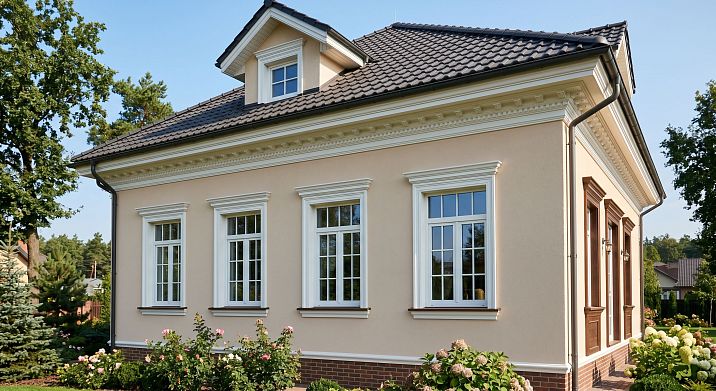
Polyurethane facade window decor in a neoclassical interpretation — a system where the cornice above the window pediments of the second floor creates a single top line, supporting the entire horizontal rhythm of the facade.
Classic
Developed profile with five to seven elements: frieze base, frieze, molding under the cornice, cornice slab, drip edge, ogee, finishing molding. Projection 140–200 mm. Height 280–380 mm. Dentils in the frieze area are possible.
For a classic facade, it is recommended to use a cornice from the same series as all other facade elements: architraves, bands, rustications — a unified family of profiles.
Palace style
Large composite cornice: cornice slab + frieze with decor + architrave. Under the cornice — modillions or corbels, mounted separately at equal intervals (300–600 mm). Projection 180–250 mm or more. Height 350–500 mm.
Such a cornice requires: a strong base (reliable mechanical fastening in several rows), coordinated facade decor (pilasters, rich architraves, keystones, balustrade) and, as a rule, professional installation.
Russian Style
In traditional Russian architecture, the cornice was often made as a row of kokoshniks or a profiled projection with ornament. Polyurethane allows reproducing this aesthetic — either in a "pure" form with an ornamental frieze, or in combination with carved wooden elements, while maintaining the moisture resistance of the entire structure.
How to combine a crowning cornice with other facade decor: nine combinations
Crowning cornice + rustication
Corner Polyurethane rustication — vertical accents at the corners of the house. The crowning cornice is the top horizontal. At the junction of the corner and the cornice — precise trimming: the cornice "covers" the top rusticated block or adjoins it closely. The height of the cornice should be 1.5–2 times greater than the width of the rusticated block — architectural hierarchy "main / secondary".
Crowning cornice + architraves
facade casings made of polyurethane for second-floor windows should "fit" under the cornice with a gap: the distance between the top edge of the pediment or architrave and the bottom edge of the cornice — 200–400 mm. Less — elements "merge" into one block. More — the connection is lost, and the cornice "detaches" from the window decor.
Crowning cornice + sandriks
If above the second-floor windows there are sanders, their relief and style should match the relief of the cornice. Ideally, the cornice looks like an "enlarged version" of the sandrik: the same profile logic, but on a larger scale.
Crowning cornice + interfloor belt
Three horizontals on a two-story house: plinth belt — interfloor belt — crowning cornice. Between them — approximately equal visual distances (plinth height = first floor height = second floor height). This is a classic three-part proportion. Cornice size: 30–50% larger than the interfloor belt.
Crowning cornice + plinth cornice
The lower and upper "anchors" of the facade. Both horizontal belts — in the same system: similar relief, unified profile origin. The plinth cornice projection — 60–80% of the crowning cornice projection. This is a hierarchy: main — upper, secondary — lower.
Crowning cornice + pilasters
If there are pilasters (vertical applied elements) on the facade, they "support" the cornice from below — or, more precisely, create the impression that they carry the horizontal. In this case, the cornice passes above the pilaster capitals — strictly along their top edge.
Crowning cornice + brackets
Brackets (consoles) under the cornice are decorative elements that imitate structural support. They are installed at equal intervals under the cornice slab: 400–800 mm depending on the size of the cornice. Brackets dramatically enhance the expressiveness of the upper zone of the facade.
Crowning cornice + entrance group
Above the entrance portal, the cornice can be "interrupted" by a pediment — a triangular or arched completion above the main entrance. Or it can continue uninterrupted, with the entrance group highlighted by pilasters and a keystone in the area below the cornice. Both solutions are correct — the choice depends on the scale of the entrance group.
Crowning cornice + facade moldings
A thin molding just below the main cornice creates a "double horizontal" — a cornice with a sub-cornice belt. The distance between them: 60–150 mm. This is called a sub-cornice frieze or belt under the cornice. It adds richness to the upper zone of the facade. Appropriate in neoclassicism and classicism.
Installation of a crowning cornice made of polyurethane: precision and reliability
The crowning cornice is the most difficult horizontal facade element to install. Reasons: a large overhang creates load on the fasteners, the installation height requires scaffolding or a lift, and a horizontal error is visible from afar.
Preparation and marking
The base is plaster or brickwork. The surface must be dry (at least 14 days after plastering), strong, without delamination. Penetrating primer is mandatory.
Horizontal marking — strictly with a laser level. Permissible error: ±2 mm per 5 m. Marking is done along the entire perimeter at once. The lower edge of the cornice is along the laser line.
Particularly careful marking — at the corners: corner cuts at 45° must create a mirror-precise joint. Preliminary "dry" fitting of corner fragments — before applying glue.
Mounting adhesive
Facade MS polymer or polyurethane adhesive. Apply in a zigzag pattern: along the perimeter of the back surface + three horizontal strips (at the top edge, center, bottom edge). For profiles taller than 250 mm — four strips.
Do not use mounting foam: it expands during polymerization and may deform the profile.
Mechanical fastening
When the cornice overhang exceeds 100 mm — mandatory two-row mechanical fastening:
-
Top row of dowels: 30–50 mm from the top edge of the profile, spacing 400–500 mm
-
Bottom row: 30–50 mm from the bottom edge, spacing 400–500 mm
Dowels: plastic with metal nail, length 100–120 mm (to pass through the profile and embed into the base by 60–70 mm). Countersink the heads, fill with putty, sand.
For cornices with large overhangs (150 mm or more), consider hidden reinforcement: a metal anchor embedded in the profile body during installation. Especially important for regions with high snow load and strong winds.
Corner joints
External corner: both profiles cut at 45°. For large cornices with overhangs over 150 mm — corner joints are preferably made using ready-made STAVROS corner elements: they eliminate cutting errors and guarantee a geometrically precise angle.
Joints on straight spans: neutral locations (above wall sections, away from window axes). Vertical joint between planks — fill with putty and seal after installation.
Sealing of three critical zones
Top seam (cornice / wall above cornice) — priority treatment. Here the wall plane and the top shelf of the cornice meet. Acrylic sealant, painter's tape, continuous seam along the entire perimeter.
Corner joints — second priority. External corners, joints with rustications, connections to downpipes and brackets.
Bottom seam at the drip edge — if the profile does not have its own drip edge or is installed on a horizontal plaster shelf. Acrylic sealant prevents water from flowing under the profile from below.
Silicone — exclude. Only acrylic. Acrylic sealant can be painted without issues.
Painting
Two coats of facade acrylic paint with UV filter and high moisture resistance. First coat — 24 hours after installation and sealing. Second — after 4–6 hours.
Bottom overhang of the cornice (especially the drip edge surface) — brush, thoroughly. This is where moisture accumulates and unprotected coating quickly deteriorates. Horizontal surfaces — short-nap roller. Relief parts — brush.
How to calculate the purchase: practical algorithm
1. Measure the perimeter of the house along the cornice line. Tape measure along each facade. Don't forget end walls and protruding parts — bay windows, pylons, entrance portal.
2. Decide: cornice along the entire perimeter or only on the main facade? Full perimeter — architecturally convincing. Only the main facade — economical, but the remaining sides remain unfinished.
3. Choose the profile by height and projection. Based on the height of the house, style, and presence of a roof overhang.
4. Calculate the number of planks. Total length / plank length + 15% for trimming and joints.
5. Count the corner elements. External corners, internal corners (if any), joints with pilasters and brackets.
6. Determine if modillions/brackets are needed. If yes — their spacing (400–600 mm), quantity for each facade.
7. Check compatibility with the drainage system. Downpipes and gutters must not conflict with the cornice: the profile goes around the gutter brackets or makes a break in the area of the drain funnel.
8. Coordinate the color. One color — all horizontal facade profiles.
9. Select consumables. Adhesive, dowels 100×6 mm, acrylic sealant, primer, paint.
10. Order in one batch. Together with polyurethane moldings, rustications, architraves and other STAVROS facade decor.
Mistakes when choosing and installing a crowning cornice
They install windows and rustications, but do not install the top cornice. The most common mistake. The facade gets vertical and window accents, but without the top horizontal line — it looks unfinished.
Too thin profile on a tall facade. A 120 mm cornice on a two-story house with high rooms is practically lost under the roof overhang. For such a house — at least 200–250 mm.
Too massive cornice on a small house. A 350 mm cornice on a one-story cottage overloads the upper zone and creates pressure on the facade.
They don't account for the roof overhang. A wide roof overhang "covers" the entire cornice, making it invisible from below. Then the cornice is either brought closer to the roof, or a profile with a larger projection is chosen — so that it "emerges" from under the shadow of the overhang.
Corners are not planned in advance. Corners require precise 45° cuts. Without preliminary calculation of corner fragments — material waste and unsightly joints.
The top seam is not sealed. There is a gap between the top shelf of the cornice and the wall, where rainwater flows directly. Without sealant, after a season — moisture, streaks, profile delamination.
Mixing different styles. A Baroque-style cornice on a house with minimalist trim — stylistic disharmony that cannot be hidden.
Not connected with the interfloor and base belt. The three horizontals should form a system. A cornice "by itself" is not a system.
Cornices with a large projection are not reinforced. Without hidden reinforcement, profiles with a projection of 150 mm or more may eventually pull away from the wall under snow weight or wind load.
Installed without precise horizontal marking. A 5–7 mm misalignment on the top line of the facade is visible from 30–40 m. A laser level is mandatory.
FAQ: Questions and Answers
What is a polyurethane crown cornice?
This is the top horizontal profile of the facade, which is installed under the roof overhang or on the attic. It completes the vertical composition of the wall, creates a transition to the roof, forms the silhouette of the building, and works in conjunction with rustications, architraves, interfloor belt, and plinth belt.
Where is the facade cornice installed under the roof?
Along the entire perimeter of the house or on the main facade — at the height of the top edge of the wall, directly under the roof overhang or in the area of the attic parapet. Also — above the entrance portal as an accent element.
How does the crowning cornice differ from the interfloor belt?
By position, scale, and function. The crowning cornice is the largest, installed under the roof, completing the facade. The interfloor belt is smaller, located at the floor level, dividing the facade into floors.
How to choose the size of the cornice under the roof?
Cornice height: 150 mm for a one-story house, 200–280 mm for a two-story house, 280–350 mm for tall facades. Overhang: 80–200 mm depending on the style and presence of a roof overhang.
Does a one-story house need a crowning cornice?
Yes. Even for a one-story house, the cornice under the roof completes the facade, hides the sharp transition to the roof, and creates an architectural silhouette. The size is more modest, but the logic is the same.
Can a polyurethane facade cornice be painted?
Definitely. Without painting, ultraviolet radiation destroys the surface in 2–3 years. Facade acrylic paint with UV filter — two coats. Special attention to the bottom overhang and drip edge.
How to combine a cornice with rustications and architraves?
The height of the cornice is 1.5–2 times greater than the width of the rustication block. The relief of the cornice should be in the same style as the architraves, sandriks, and belts. All elements are from the same STAVROS series.
Is it necessary to install a cornice around the entire perimeter of the house?
For architectural completeness — yes, around the entire perimeter. Limiting it to the main facade is acceptable, but then the side and rear walls will look visually unfinished.
How to install a facade cornice under the roof?
Mounting adhesive + facade dowels in two rows every 400–500 mm. Marking with a laser level. Corner joints — 45° miter cut or ready-made corner elements. Top seam — acrylic sealant. Painting — after installation.
Where to buy a crowning cornice made of polyurethane?
In the STAVROS catalog — a full range of crowning cornices of various sizes, reliefs, and styles. Delivery across Russia.
STAVROS: the top point of the facade — the point of trust
The crowning cornice is the last thing you install on the facade. And it becomes what everyone sees first: the top line, the contour, the silhouette. Everything below — trim, rustication, belts, base — are details within that contour. And the contour is set by the cornice.
STAVROS produces crowning cornices as part of a complete facade system: in unified dimensional ranges and style series with trims, rustications, pediments, base and interfloor belts. When you buy a STAVROS cornice, you get not just a profile — you get a guarantee that it will fit perfectly into the system with the rest of the decor: in proportion, relief, and scale.
molded decoration made of polyurethane STAVROS is architecture accessible to everyone. A system you can assemble yourself. A material that lasts for decades. And a cornice that makes your home — your architectural statement.
STAVROS — details that make a house a home.