Article Contents:
- Wooden ceiling plinth PLT-001: which parameters to use in the calculation
- Why A=120 mm does not yet mean that PLT-001 will cover a wall strip 100 mm wide
- Which number is actually needed
- Why a product photo does not replace a drawing
- Control table for measuring the old trace
- Why a template is better than calculating 120 versus 100
- When is it better to order one sample plank
- If the old trace is 90–100 mm almost throughout the room, but 125 mm in one spot
- When local touch-up is reasonable
- When the profile itself needs to be reconsidered
- Old glue under the ceiling: can PLT‑001 be attached directly over it
- Do you need to fully level the hidden strip before installing a new ceiling molding
- How to protect an already painted wall when installing PLT-001
- Oak PLT-001 in an old interior: keep the texture or paint it
- Do you need to repaint the entire room if PLT-001 covered an old strip
- If the old paint differs in color, but the base is level
- If a strip of wallpaper remains after dismantling
- A crack along the line of the old cornice: can it simply be covered with PLT-001
- How to position joints on walls longer than 2400 mm
- Internal corner after removing an old cornice: why it is checked separately
- External corner: an old trace may emerge from under the new profile
- How to make a control section 500–1000 mm long
- Scenario: a strip of 100 mm on the wall, and 70 mm on the ceiling
- Scenario: the old cornice was installed crookedly
- Scenario: the 100 mm strip is covered, but a dark glue outline remains
- Scenario: the old cornice trace is wider only behind the cabinet
- Scenario: the old trace ends near the door casing
- When a new PLT-001 is more logical than local restoration
- How to compare two solutions without invented prices
- How to check the enamel color before ordering the full volume
- "Under enamel" does not mean a ready painted profile
- Can you order PLT-001 and paint it to match the color of the old cornice
- If PLT-001 covers the wall but not the ceiling: what to choose
- If the trace on the ceiling is larger than on the wall
- How to calculate the perimeter of several rooms
- Can I use the remainder from one room in another
- How to record the old trace map in photos
- Practical scenario: trace 96–102 mm on the wall and 55 mm on the ceiling
- Practical scenario: 100 mm on the wall, 130 mm on the ceiling
- Practical scenario: wide strip only in two inner corners
- Practical scenario: the profile covered the trace, but the room became visually lower
- Checklist before payment
- What to do if an open strip of only 5–10 mm remains after fitting
- What to do if PLT-001 covers the trace only after shifting it down
- How to check the future bottom line under side lighting
- How to accept the PLT-001 trial plank before ordering a batch
- Why packaging and delivery should be agreed upon before the final estimate
- What to keep after completing the renovation
- Control example: 100 mm strip along the wall, 60 mm on the ceiling, and a room 4.2 × 3.6 m
- What is the size of the current PLT-001?
- PLT-001 — floor or ceiling plinth?
- Will PLT-001 cover a 100 mm strip after the old cornice?
- Does A=120 mm mean that 120 mm will be covered along the wall?
- What should be measured after dismantling?
- Is it necessary to completely remove the old adhesive?
- Can PLT‑001 be installed after painting the walls?
- Is it necessary to repaint the entire room?
- What to do if the strip is 125 mm in some places?
- What to do if the mark on the ceiling is wider than on the wall?
- What length is used in the calculation?
- Can I order one plank first?
- How to calculate the quantity?
- Will oak work under clear varnish?
- What to do if the base is loose after dismantling?
- When is it better not to buy PLT-001?
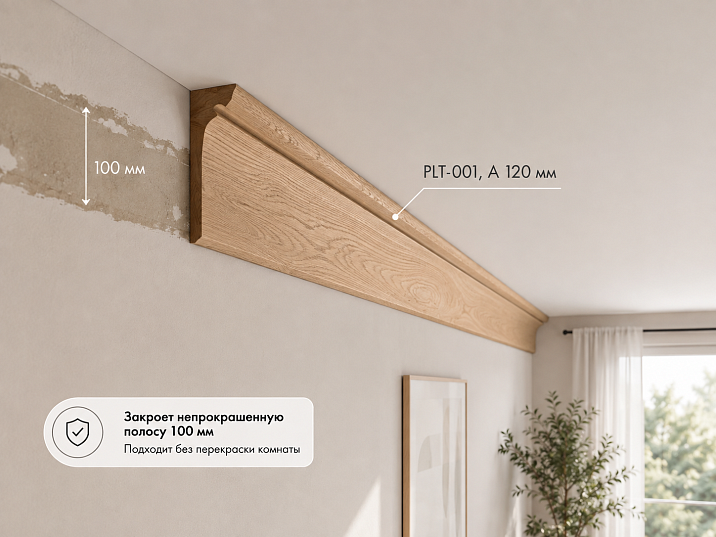
The old ceiling cornice was dismantled, and the renovation suddenly no longer looked finished: a strip of old paint, unpainted base, glue, and local putty opened up along the ceiling. The maximum width of the trace on the wall is about 100 mm. Repainting the entire finished room is undesirable, so the logical idea is to install a larger wooden ceiling plinth PLT-001 and cover the old mounting area with it.
In the current main version of PLT-001, size A 120 × C 15 × L 2400 mm is fixed, oak, "Prestige" quality, prepared for enamel. At first glance, 120 mm is more than 100 mm, and it seems that the new profile will cover the old strip with a margin of 20 mm. But such a conclusion is technically premature: parameter A is the size of the profiled product, not a ready-made guarantee that after installation in the "wall-ceiling" corner it will descend along the wall by exactly 120 mm.
Therefore, the correct answer is this: PLT-001 can save you from fully repainting the room only if its actual working projection on the wall and ceiling completely covers the widest old trace, and the base itself after dismantling remains strong and suitable for installation. This needs to be checked using a cross-section drawing, a full-size template, or a test plank before ordering the entire perimeter.
If the idea of a tall wooden ceiling profile suits the interior, you can first Buy wooden ceiling baseboard after checking the geometry. But the article will not promise that "120 mm will definitely cover 100 mm." Below, we will break down which dimensions really need to be taken, when a new profile truly replaces a full repaint, and when it only hides a defect that first needs to be repaired.

Wooden ceiling plinth PLT-001: which parameters to use in the calculation
For the new renovation, we only need confirmed specifications of a specific SKU, not the general history of ceiling cornices. Based on the current editorial image of the card, the main version of PLT‑001 is an oak ceiling profile A 120 × C 15 × L 2400 mm, sanding quality "Prestige", prepared for enamel.
| Parameter | PLT‑001 | Why it is needed in the current scenario |
|---|---|---|
| Article number | PLT‑001 | Do not mix with similar floor profiles PLT‑001‑1 |
| Purpose | Wooden ceiling plinth | Works at the wall and ceiling junction |
| A | 120 мм | Overall cross-section size that needs to be matched with the actual projection |
| C | 15 мм | Thickness/second profile dimension per the card |
| L | 2400 мм | Used in the joint map and quantity calculation |
| Material | Oak in the current main version | Affects the finish and appearance of joints |
| Sanding | Prestige | Characterizes surface preparation |
| Preparation | For enamel | Logical for covering painting of a new ceiling belt |
The old card cache still shows previous beech options and other lengths. Therefore, they are not promised as available today in the article. Before payment, you need to reopen the card and verify the current size line.
After checking the actual cross-section, you can wooden ceiling plinth PLT-001 120×15×2400 mm include it in the room estimate. Until then, a drawing or one test strip is sufficient.




Why A=120 mm does not yet mean that PLT‑001 will cover a wall strip 100 mm wide
This is the central technical check of the entire article. The ceiling plinth is a profiled part installed in the corner between the wall and the ceiling. In the drawing, it has an overall dimension, but after installation, we are interested in two real projections:
- how many millimeters the profile descends down the wall;
- how many millimeters it extends onto the ceiling.
If A=120 mm describes the overall height or another dimensional coordinate of the section, this does not yet prove that the wall projection is 120 mm. For a complex profile, it may differ.
Therefore, you cannot write:
120 − 100 = 20 mm of clearance, so the trace is covered.
Such arithmetic is only permissible after the drawing confirms that the working wall projection is indeed at least 120 mm or another known value.
Our factory also produces:


What figure is actually needed
The dimension from the wall-ceiling corner to the lower visible edge of PLT-001 after standard installation is needed. It is this that is compared with the maximum width of the old trace on the wall.
Separately, the dimension from the same corner along the ceiling to the outer edge of the profile is needed. The old cornice could have left a trace on the ceiling as well. If the wall strip is covered, but the ceiling strip remains visible by 15–20 mm, a full cosmetic rework is still unavoidable.
Get Consultation
Why a product photo does not replace a drawing
In a perspective photo, the profile looks large, but it cannot be used to accurately determine the wall and ceiling projections. Before purchasing, a section drawing or a physical sample should be used.
The old ceiling cornice left a 100 mm strip: what exactly to measure
One figure of "100 mm" is too rough. After dismantling, the line is rarely perfectly uniform around the entire perimeter. In one place, the old cornice covered 90 mm, near the corner — 108 mm, after local puttying — 115 mm. For the new profile, the maximum is important.
Maximum trace width along the wall
Measure from the ceiling line down to the lowest point where the color, texture, putty, or adhesive differs. If the trace is 100 mm only in the middle of the wall, but 118 mm near the corner, use 118 mm in the calculation.
Trace on the ceiling
The old cornice touches two surfaces. Measure how far from the wall the unpainted or damaged strip extends along the ceiling. The new PLT-001 must cover both areas or leave a clear local repair line.
Minimum strip width
The minimum is not needed for purchase, but to understand the unevenness of the old line. If the trace varies from 70 to 120 mm, the new profile can cover most of it, but individual protrusions will still need repair.
Thickness of old adhesive
Adhesive may remain in lumps. Even if the new profile geometrically covers the strip, it must not be installed on loose protruding remnants. The strength and flatness of the base must be checked.
Potholes after dismantling
If plaster came off along with the cornice, deep cavities cannot simply be hidden. They may fall within the bonding area of the new wooden product.
Internal and external corners
It is in the corners that the old cornice often had more glue and wider traces. Each corner area is photographed and measured separately.
Ceiling level
If the ceiling is noticeably wavy, the same plank will be at different heights relative to the old trace. A full-size template will show this better than a tape measure.
Control checklist for measuring the old trace
| Section | Trace on the wall | Trace on the ceiling | Base condition | Solution |
|---|---|---|---|---|
| Wall A, center | 96 мм | 54 мм | Solid | Check with template PLT-001 |
| Wall A, corner | 108 мм | 62 мм | Adhesive residue | Clean and level first |
| Wall B | 100 мм | 58 мм | Solid | Check working projection |
| Wall C | 124 мм | 61 мм | Local pothole | Opening area needs repair |
Such a table immediately shows that the "100 mm strip" is not one size for the entire room. If at least one section is wider than the working projection of PLT-001, it is that section that determines the scope of local finishing.
Full-size paper template PLT-001: the safest test before ordering
If a cross-section drawing is available, transfer it to thick cardboard at a 1:1 scale. Do not just draw a 120 × 15 mm rectangle: it will not replicate the actual profile shape and will give a false impression of overlap.
The template is applied to the actual corner of the wall and ceiling in several places:
- on the widest section of the old strip;
- in the inner corner;
- on the section with adhesive residue;
- near the outer corner, if there is one;
- on the most visible wall.
Mark the lower edge of the new profile with a pencil. Everything that remains below this line will be visible after installation and will require local painting or repair.
Why the template is better than calculating 120 versus 100
It simultaneously shows the wall projection, ceiling projection, base unevenness, and the architectural scale of the new profile. You can immediately see whether PLT‑001 looks too large in the room.
When it is better to order one trial strip
If the drawing does not give confidence, and a full order is expensive, one plank of 2400 mm turns into a real installation sample. It can be applied without glue, check the trace, corners, and future painting. After that, ordering the entire perimeter is significantly safer.
When PLT-001 can really save you from completely repainting the room
The new wooden ceiling profile can solve the problem if several conditions are met simultaneously.
- the entire old trace on the wall is behind the actual wall projection of PLT-001;
- the trace on the ceiling is also covered or requires only minimal local finishing;
- the base after dismantling is solid;
- old glue is removed where it interferes with a tight fit;
- cracks and potholes are not active defects;
- the new profile suits the interior in scale;
- installation can be done without damaging the finished wall.
In this scenario, there is no need to repaint the entire wall area just for a strip that will be completely hidden under the new architectural element. However, the hidden zone must still be prepared well enough to ensure reliable fastening.
When a new ceiling molding cannot be used to mask a defect
A wooden profile is not a way to hide a problematic substrate. If the following defects are found after dismantling, repairs are needed first:
- loose or crumbling plaster;
- signs of moisture;
- mold;
- active cracks;
- peeling of old paint along with the substrate;
- deep potholes in the bonding area;
- significant unevenness of the wall or ceiling.
If you close such an area with an oak profile, the problem will remain behind it and may affect the fastening, geometry, or finish.
What can be left hidden
A stable color difference, an old unpainted strip, or a thin cosmetic trace may be left without perfect decorative painting if they are completely covered and do not interfere with installation.
What cannot be left hidden
Everything that destroys the base, reduces adhesion, develops over time, or may extend beyond the boundary of the new profile.
If the old trace is 90–100 mm almost throughout the room, but in one place it is 125 mm
This is a typical borderline case where the new profile can solve 90% of the task, but not all of it. You cannot assume that an average width of 100 mm allows covering a rare 125 mm section.
First, a full-size template is used to check how many millimeters actually remain exposed in the problem area. If a narrow stable strip extends outward, it can be locally restored before installation. If the trace is significantly wider and stretches for several meters, the new PLT‑001 no longer fulfills the original task of "avoiding repainting" as effectively.
When local touch-up is reasonable
For example, 95% of the perimeter is completely covered, but near one internal corner, 8–12 mm of the old strip is visible over a length of 300–400 mm. Such an area is easier to restore locally than to replace the entire profile or repaint the room.
When it is necessary to reconsider the profile itself
If along one wall the old zone is systematically 20–30 mm wider than the working wall projection, you will get a long open strip. In this case, the new ceiling profile no longer solves the main commercial intent of the article.
Preparing the base after dismantling the old cornice
Old adhesive under the ceiling: can PLT‑001 be mounted directly over it
There is no automatic "yes." The mere fact that the old adhesive will be hidden does not make it a suitable mounting base.
Need to check:
- whether the adhesive holds firmly;
- whether there are peeled edges;
- whether it creates bumps;
- how level the wall line remains;
- whether the new mounting compound is compatible with this base.
The loose, crumbling, or peeling old layer is removed. A strong thin residue may remain only if it does not interfere with the geometry and the new installation technology allows such a base.
It is better to select the compound after resolving the joint. In the section Mounting and finishing materials you can view the relevant products, but the specific adhesive is chosen according to the manufacturer's instructions and the condition of the wall.
Do I need to completely level the hidden strip before the new ceiling plinth?
Not always to the level of the finished wall. But the base must be sufficiently flat and strong so that the profile sits in the design position without wobbling or gaps.
If a small cosmetic color difference is completely covered, it can be left unpainted. If there is a glue bump several millimeters high, it can push the lower edge of PLT‑001 away from the wall and create a visible gap. Such a bump must be removed.
Practical criterion
Apply a long straight batten to the area of future installation. If individual protrusions prevent tight contact, the base requires local preparation.
Wooden ceiling plinth for enamel: paint PLT‑001 before installation or after
In the current main version, PLT‑001 is prepared for enamel. For a room with already finished walls, it is logical to move the painting out of the room as much as possible.
Main coating before installation
The profile is primed and painted in the workshop or another prepared area. This reduces the risk of staining walls and ceiling. It is especially convenient to coat long planks on all visible sides before cutting corners.
Final touch-up after installation
After installation, joints, local sanding spots, and possible fastening points remain. They are finished minimally, protecting finished surfaces.
This order is not a universal technology for any enamel, but in a finished interior it reduces the volume of "wet" work directly at the wall.
Before finishing, it is useful to study Advice on finishing and installation, and apply the specific primer and enamel system according to its manufacturer's technical documentation.
PLT-001 finishing in an already finished room
How to protect an already painted wall when installing PLT-001
The new article should not repeat the general installation manual. In our scenario, only measures that reduce the risk of damaging the finished finish are important.
- protective tape along the lower edge of the new profile;
- film on the wall and floor;
- control the amount of glue so it does not come out onto the painted surface;
- local sanding away from the unprotected wall;
- pre-painting most of the profile;
- careful final touch-up of only the joints.
If a full installation sequence is required, it is better to use a separate material how to install a wooden ceiling plinth. The current article retains a different intent — covering the old mounting trace.
Oak PLT‑001 in an old interior: leave the texture or paint it
The main confirmed finish is oak under enamel. This means the product is prepared for an opaque coating, and this scenario most naturally connects the new profile with an already painted room.
If you want to keep the wood texture, you need to separately check the availability of the corresponding preparation for tinting at the time of ordering. You cannot automatically turn the "under enamel" option into a transparent finish.
When enamel is more convenient
If the task is to hide the repair trace and make the upper belt part of the wall architecture, the profile can be painted in the color of the ceiling, wall, or other trim.
When natural oak will require more approvals
Open texture emphasizes joints, corners, and transitions more strongly. In addition, the current card must confirm the appropriate sorting of the blank for transparent finishing.
Do I need to repaint the entire room if PLT-001 covered the old strip
No, if the problem was limited to the hidden mounting area and the rest of the paint is in good condition. This is the practical meaning of the topic.
But three levels of repair are possible:
| Situation after fitting PLT-001 | What to do with the wall |
|---|---|
| The old trace is completely covered | Locally prepare only the installation area |
| A narrow strip opens in certain places | Local putty/touch-up painting |
| A long strip opens along the walls | Review the profile or repainting plan |
That is, PLT-001 can save specifically from a full repaint, but not from any local preparation.
If the old paint differs in color, but the base is even
This is the simplest case. The color trace does not affect adhesion if the coating is durable. If the template shows that the entire line will be hidden under the new profile, there is no point in achieving a perfect color match in the hidden area.
However, below the new edge there should be no "halo" of old paint. It is especially visible under side lighting.
If a strip of wallpaper remains after dismantling
The scenario differs from a painted wall. Wallpaper can be a less stable base for a new adhesive bond. If the profile needs to be attached in an area where wallpaper remains, the technique must be coordinated separately and, if necessary, the covering should be removed down to a solid base.
The article does not claim that any wooden ceiling profile can be glued over wallpaper.
Crack along the line of the old cornice: can it simply be covered with PLT-001
If the crack is stable and cosmetic, it can be locally repaired before installation. If it is developing or related to deformation of the base, the new baseboard is not a repair of the cause.
Covering an active crack with an expensive wooden profile without diagnostics is unwise: the defect may continue to move and affect joints or fastening.
How to check if PLT-001 is too large for the room
Even if the new profile perfectly covers the old trace, it must be visually appropriate. A large template helps assess the scale before purchase.
Look at the room from a distance of 2-4 meters and assess:
- doesn't the ceiling seem visually lower;
- does the new profile match the door casings;
- does the furniture scale match;
- doesn't the upper cornice look heavier than the previous one.
If PLT-001 covers 100 mm but disrupts the room's proportions, it's better to fix the old trace with local painting and choose a different profile.
PLT-001 with a length of 2400 mm: how to calculate the quantity after checking the old trace
The quantity is calculated only after it's proven that the profile truly fits in cross-section. Then the actual ceiling route is measured.
For example, a rectangular room 4.2 × 3.6 m. Perimeter:
4.2 + 4.2 + 3.6 + 3.6 = 15.6 m.
By net length:
15,6 ÷ 2,4 = 6,5.
That is, the mathematical minimum is 7 planks. But this calculation doesn't yet account for corners, joints, end waste, and distribution of long segments across strips.
Why seven planks may not provide a convenient layout
A wall of 4.2 m requires at least two pieces. After joining, trims remain on one wall, which cannot always be used on the adjacent one. Therefore, a cutting map is more important than simply dividing the perimeter.
Example of a preliminary scheme
For a wall of 4.2 m, you can use 2400 + 1800 mm; the remainder from the second plank is 600 mm. For a wall of 3.6 m — 2400 + 1200 mm; the remainder is 1200 mm. Part of these trims can be distributed to other walls, but only after accounting for corner cuts and the direction of joints.
There is no universal percentage of allowance. First, a map of each segment is built.
Cutting of 2400-mm planks and corner zones
How to position joints on walls longer than 2400 mm
Joints should preferably be moved away from main visual axes and not gather several short trims on one visible wall. For an oak profile under enamel, the joint can be carefully finished, but the geometry must be precise.
The query "how to join ceiling plinth in corners made of wood" does exist, but this article does not turn into a cutting instruction. It is enough for the buyer to understand two principles:
- corner cuts consume the length of the plank;
- joints on long walls need to be included in the map before ordering.
Internal corner after removing the old cornice: why it is checked separately
In the corner, the old strip is often wider: there may have been more glue, putty, and manual fitting. Additionally, the new profile must align with the adjacent plank.
If the trace on a straight wall is 95 mm, but in the corner it rises to 118–125 mm, the corner may become the point requiring local repair.
External corner: the old trace may protrude from under the new profile
On the external corner, any unpainted strip below the new edge is especially noticeable. A full-size template is applied to both sides to check that the trace does not 'sink' below due to old manual trimming.
If there are many external corners, a test plank becomes even more useful.
Is it worth buying one test plank PLT‑001
For repairs after an old cornice, this is a rational intermediate step, especially when the actual profile projection has not yet been verified.
One plank allows:
- see the actual overlap of the wall and ceiling;
- check the widest trace;
- assess the scale in the room;
- check the joint with the ceiling;
- make a test paint application;
- clarify behavior on an uneven wall.
If the profile does not fit, the error is limited to one strip, not the entire perimeter.
How to make a control section 500–1000 mm long
It is not necessary to immediately mount the test strip permanently. You can temporarily attach a piece to the problem wall and mark the future lower edge.
It is better to choose a section where:
- the old strip is maximum;
- there is a noticeable unevenness;
- the main sight line runs through;
- lighting comes from the side.
That is exactly where potential problems will show up.
Boundary scenarios of the old mounting trace
Scenario: a strip along the wall of 100 mm, and along the ceiling of 70 mm
Such a case cannot be assessed only by the wall. The new profile must cover both surfaces simultaneously. If the wall projection of PLT-001 is sufficient, but the ceiling projection is less than 70 mm, a visible band of old finish will remain on the ceiling.
Before purchasing, the paper template is placed in the actual position and both boundaries are marked. If only a narrow stable strip opens along the ceiling, it can be locally restored. If a wide line opens around the entire perimeter, the idea of "doing without repainting" loses its meaning.
Scenario: the old cornice was installed crookedly
Sometimes the bottom line of the old cornice is not horizontal: on one wall the trace starts at 92 mm, then gradually drops to 110 mm. The new PLT-001, installed according to the correct geometry of the ceiling, does not have to follow this old curve.
As a result, part of the trace may end up below the new profile only at one end of the wall. Such a section is better marked in advance with a laser or a long level and locally restored. There is no need to intentionally tilt the new ceiling plinth to mask the old mistake.
Scenario: a 100 mm strip is covered, but a dark adhesive outline remains
If the profile covers the unpainted area itself, but a thin line of old adhesive or dirt runs below it, the result will still look unfinished.
Before installation, it is useful to wipe and inspect the wall under side lighting. Everything that remains below the future edge of PLT-001 must be brought to a finished state. This may be local cleaning or touch-up paint a few millimeters wide, not repainting the entire wall.
Scenario: the old cornice trace is wider only behind the cabinet
If a 120–125 mm section is hidden by a tall cabinet, and the visible perimeter fits within the working projection of PLT-001, the architectural decision can be made based on the open areas. But it should be remembered that furniture may be moved.
For stationary built-in furniture, this is less important. For a regular cabinet, it is better to locally restore the hidden section now, so that a future rearrangement does not expose an old defect.
Scenario: the old trace ends near the door casing
The ceiling profile is located high, but vertical door elements affect the overall composition. If the new PLT-001 is significantly larger than the old cornice, it may visually change the proportions of the casing and the upper part of the wall.
Therefore, the test strip is evaluated not only on an empty wall, but also next to the door. If the room already has large wooden casings, a new oak ceiling profile may logically tie the architecture together. If the finish is minimalist, a 120-millimeter dimension may look too heavy.
When local repainting is simpler than purchasing a new PLT-001
A new ceiling plinth does not need to be bought just to avoid painting. There are cases where local restoration is clearly simpler.
- the old trace is narrow and even;
- the wall color is easy to match;
- the surface is not damaged;
- a new large profile is not needed for the interior;
- a separate trace remains on the ceiling, which PLT-001 does not cover anyway;
- the room has complex geometry with many corners and joints.
In such a scenario, buying an expensive oak product only as a masking strip is irrational.
PLT-001 or local repainting: how to choose the rational path
When a new PLT-001 is more logical than local restoration
The reverse situation: an old profile left a wide uneven zone around the entire perimeter, the wall color is complex, and the new ceiling molding is really needed by the design. Then PLT-001 solves two tasks at once — decorative and repair.
The purchase is especially logical if:
- the trace almost completely fits into the actual projection of the profile;
- the old color is difficult to restore without noticeable stains;
- the walls are in good condition;
- the oak profile is planned to be painted with enamel;
- the room's architecture benefits from a more expressive upper molding.
How to compare two solutions without made-up prices
Without an up-to-date painter's estimate and the current price of the product, one cannot honestly claim that one option is cheaper. But you can compare the scope of work.
| Full/local repainting | PLT-001 as a new ceiling profile |
|---|---|
| Wall color selection | Profile and working ceiling check |
| Open strip preparation | Hidden mounting zone preparation |
| Wall/ceiling painting | Profile painting itself |
| No new architectural element | A new ceiling belt appears |
| Fewer carpentry joints | Need corners and joints for 2400-mm planks |
This way the buyer compares real consequences, not an abstract “baseboard is cheaper than repairs.”
How to check the enamel color before ordering the full volume
If PLT-001 is painted in the color of the ceiling or wall, the test plank can be used simultaneously as a size and color test.
Make a paint sample on part of the profile or a separate wooden sample, place it next to the wall and look:
- in daylight;
- under evening artificial lighting;
- near doorways;
- from a distance of 2–4 meters.
White enamel on an oak base may visually differ from a white wall in gloss and texture even with the same color code. This is normal if the difference is intended.
“Under enamel” does not mean a ready-painted profile
Preparation for enamel refers to sorting/re-gluing the workpiece. This does not mean that PLT-001 arrives with a finished color, unless the specific item card states otherwise.
Therefore, finishing works and materials are included separately in the estimate.
Can I order PLT-001 and paint it to match the color of the old cornice?
Such a design can be considered if the old color is known and suits the interior. However, an exact match to the old coating may be more difficult than a newly agreed color: old paint changes over time.
It is more practical to make a test paint-out and evaluate it directly in the room.
Wooden ceiling profiles as a category: when to look at alternatives
If the template shows that PLT-001 does not cover the old strip, you don't need to automatically reject wooden trim. You can look at wooden skirting boards for floor and ceiling and compare other cross-sections.
In the extended section Wooden moldings, cornices, and skirting boards you can search for a profile whose working projection better matches the actual trace.
The main thing is to compare not only the catalog size, but the actual cross-section in the corner.
If PLT-001 overlaps the wall but not the ceiling: what to choose
There are three options:
- locally restore a narrow strip of the ceiling and keep PLT-001;
- find another profile with a larger ceiling projection;
- abandon the masking strategy and restore both surfaces.
Which option is more rational depends on the width of the open area and the overall design.
If the trace on the ceiling is larger than on the wall
This is especially likely with old wide cornices of complex cross-section. For example, 80 mm remains on the wall, and 120 mm on the ceiling. In this case, the wall size is not the main constraint at all.
A full-size template immediately shows whether PLT-001 can cover the ceiling area. If not, choosing it only because of A=120 mm is pointless.
Multiple rooms: common cutting and photos of the old trace
How to calculate the perimeter of multiple rooms
If the old cornice is dismantled immediately in two rooms, do not combine the meters without a joint map. For each room, a separate list of walls and corners is compiled, then the required number of rods is summed up.
For example:
| Room | Perimeter | Clean minimum of 2400 mm |
|---|---|---|
| Living room | 15.6 m | 7 slats by simple length |
| Bedroom | 13.2 m | 6 slats by simple length |
Total clean mathematical minimum — 13 slats. The actual order is clarified based on corners, joints, and leftovers between rooms.
Can you use the leftover from one room in another
Yes, if the length fits the next segment and the orientation/finish match. That is why the overall cutting of two rooms is sometimes more economical than two independent orders.
But do not build the estimate on dozens of short offcuts: too many joints will worsen the appearance.
How to record the map of the old trace in photographs
Before permanently closing the defect, it is useful to take photos of each wall with a ruler. This helps the manager and installer understand the real task.
Minimum set:
- general view of the room;
- the widest trace on the wall;
- trace on the ceiling;
- inner corner;
- outer corner;
- area with glue or a pothole;
- ruler in the frame.
What to send to the manager before ordering PLT-001
The request should be specific:
- article PLT-001;
- photos of the old trace;
- maximum strip width along the wall;
- maximum strip width along the ceiling;
- room perimeter;
- the number of internal corners;
- the number of external corners;
- photos of the base;
- desired finish;
- question about the current material, length, and available preparation.
The last item is mandatory: the PLT-001 card has been changed, and the current configuration must be confirmed before payment.
Where to buy wooden ceiling plinth PLT-001 after template check
If a trial strip or precise drawing confirms that the old trace fully goes under the new profile, you can order a wooden ceiling plinth PLT-001 for the calculated perimeter.
If the working geometry does not fit, it is better to buy a wooden baseboard choose a different profile than to try to cover 100–125 mm with a trace that remains visible.
Before final payment, check payment and delivery terms, the current length, material, and availability.
When it is too early to order PLT-001
The purchase should be postponed if:
- the old cornice has not been completely removed;
- no trace measured on the ceiling;
- no drawing of the working projection PLT-001;
- the base is crumbling;
- cracks or moisture not resolved;
- profile scale in the interior not checked;
- joint map not built;
- the buyer expects that A=120 mm automatically means 120 mm on the wall.
Decision tree: repaint the room or install a new PLT-001
| Question | If "yes" | If "no" |
|---|---|---|
| Is the base after dismantling solid? | Check the profile geometry | first repairs |
| Does the working projection cover the maximum on the wall? | Check the ceiling | Local painting or another profile |
| Does the ceiling projection cover the old mark? | Check the corners | Local ceiling repair or another profile |
| Do the corners and unevenness fit the scheme? | Check the external scale | Prepare locally |
| Does PLT-001 suit the interior? | Build cutting map | choose an alternative |
| Are the cutting map and finishing agreed? | Can be ordered | Do not pay for the entire volume |
Practical scenarios after dismantling the old cornice
Practical scenario: trace 96–102 mm on the wall and 55 mm on the ceiling
This is a near-ideal case for testing PLT‑001. If a full-size template shows that the actual wall projection of the new profile covers at least 102 mm, and the ceiling projection covers 55 mm, the main repair trace can be completely hidden under it.
After that, attention shifts from cosmetics to the base: remove loose adhesive, fill potholes in the contact area, and check straightness. A full wall repaint can be avoided if there are no visible stains below the new edge.
Practical scenario: 100 mm on the wall, 130 mm on the ceiling
Here, size A=120 mm does not answer the main question at all. Even if the new profile confidently covers 100 mm on the wall, the ceiling trace may remain wider than its ceiling projection.
You need to either locally restore the ceiling or look for another profile with a larger working projection on the horizontal plane. Buying PLT‑001 just because "120 is greater than 100" is erroneous in such a scenario.
Practical scenario: wide strip only in two inner corners
On straight walls, old
Practical scenario: profile covered the trace, but the room became visually lower
This is a reminder that the buyer's task is not just to mask repairs. If the full-size plank looks too massive and the ceiling visually "dropped," the savings on repainting do not justify the result.
In such a case, it is better to restore the old strip and choose a more delicate profile, or abandon the new wooden belt altogether.
Mistakes when buying PLT-001 after dismantling the old cornice
Mistake 1: Considering A=120 mm as the working projection on the wall
This is the main risk. You need to confirm the position of the cross-section in the corner and the actual lower edge.
Mistake 2: Measuring only the wall
The old cornice leaves a trace on the ceiling too. It may be wider.
Error 3. Taking the average value of the old strip
For masking, the maximum trace matters, not the average.
Error 4. Measuring before removing loose glue
Thick old glue distorts geometry and interferes with the fit of the new profile.
Error 5. Covering up mold or moisture
A new wooden baseboard does not eliminate the cause of the defect.
Error 6. Ordering the entire perimeter without a trial fitting
If the profile does not cover the 100–125 mm trace, the mistake becomes expensive.
Error 7. Not checking the scale in the interior
The profile may technically solve the repair, but visually weigh down the room.
Error 8. Painting all planks before checking joints
After trimming and sanding, there will still be areas that require finishing.
Error 9. Calculating quantity only by dividing the perimeter by 2400
This does not account for joints of long walls and corners.
Error 10. Promising yourself "no painting at all"
Even if a large strip is covered, local touch-ups may be needed below the edge or on the ceiling.
Error 11. Using the old card cache as the current assortment
Available materials and lengths need to be re-checked before payment.
Error 12. Making a new profile only with masking
PLT-001 should be appropriate as an architectural detail, not just to cover a trace.
Final specification before ordering PLT-001
| Parameter | What to fix |
|---|---|
| Article number | PLT‑001 |
| Current size | 120 × 15 × 2400 mm per current main configuration |
| Material | Oak — confirm before payment |
| Preparation | For enamel — confirm in the selected line |
| Maximum wall footprint | per actual measurement |
| Maximum ceiling footprint | per actual measurement |
| Working wall projection | per drawing/test strip |
| Working ceiling projection | per drawing/test strip |
| Condition of the base | durable / requires repair |
| Perimeter | By room |
| Angles | internal and external |
| Joint map | compiled before ordering |
| Enamel color | confirmed by test patch |
Checklist before payment
The order is ready if the buyer can answer "yes" to the following questions:
- the old curtain rod is completely dismantled;
- the trace is measured along the wall and ceiling;
- maximum values are recorded;
- a drawing or test strip confirms the overlap;
- the base is solid;
- no active cracks or moisture;
- scale PLT-001 fits the room;
- the finish is agreed upon;
- perimeter and joints are calculated;
- the current version of the card is confirmed.
If one of the first six items is not closed, it is too early to order the entire volume.
How to check the working projection PLT-001 against the drawing without substituting it with size A
On the ceiling profile drawing, you need to find two reference points: the actual contact line with the ceiling and the actual contact line with the wall. Then measure the distance from the corner of the room to the lower edge of the profile along the wall and to the outer edge along the ceiling.
If the drawing is presented only with general geometry without explicit installation coordinates, it is better not to calculate the projection "by eye". Transfer the section to a 1:1 scale and place it in a right angle on paper. Then the working projections are obtained as ordinary linear dimensions.
Why you cannot use the diagonal of the section
A profiled part may have curved sections, chamfers, and voids. The overall diagonal between the extreme points is not equal to either the wall or ceiling projection.
How to check a template without printing CAD
If it is not possible to print the DWG to scale, you can ask the manager to send a PDF drawing with a control dimension, or measure a real test strip. It is more important to obtain reliable geometry than to quickly complete the entire order.
Checking the working projection and the bottom line before installation
What to do if after fitting there remains an open strip of only 5–10 mm
A small remainder does not automatically require changing the profile. First, evaluate the length and location. Five millimeters on a section of 20–30 cm near a corner is one task; a continuous line of 5 mm along the entire four-meter wall is another.
A local short section can be restored with putty and paint before installation. A long continuous line will act as a visual shadow under the new profile and will require careful touch-up painting around the entire perimeter. If the main goal was to completely avoid painting work, such a scheme no longer fulfills it.
What to do if PLT‑001 covers the trace only after shifting down
The ceiling profile cannot be arbitrarily lowered along the wall to mask an old strip if this changes its standard position relative to the ceiling. The shift may open a gap at the top, alter the contact angle, and affect the fastening.
If the template in the correct mounting position does not cover the mark, the exposed area must be repaired or a different profile section chosen. "Lowering by 10 mm" is not a universal way to increase the working projection.
How to check the future bottom line under side lighting
An old mark is often noticeable not by color but by micro-relief. Even after touch-up, the edge of the old putty can cast a shadow. Before ordering, mark the tentative bottom line of PLT-001 with painter's tape and turn on the main side lighting.
Anything remaining below the tape that casts a noticeable shadow must be eliminated before installation. After installing a large profile element, side lighting may further emphasize wall unevenness directly under the new edge.
Test strip, acceptance, and preservation of the repair sample
How to accept the PLT-001 test strip before ordering a batch
The test strip is needed not only for geometry. Upon receipt, check:
- article number;
- actual size;
- the material;
- the quality of sanding;
- preparation for the chosen finish;
- straightness;
- Condition of edges and ends.
Then apply it to at least two straight sections and one corner. If the task is solved, this same strip can be included in the total volume, rather than counted as purely test consumption.
Why packaging and delivery should be agreed upon before the final estimate
A strip 2400 mm long is a long-length item. If the site is in another city, repeat delivery of one missing piece may be inconvenient. Therefore, after a successful trial fitting, it is better to check the cutting plan especially carefully.
Upon receiving the batch, first verify the quantity and condition of the profiles, and only then begin painting and cutting. A damaged section is best detected before the entire batch has received its finish.
What to keep after completing the renovation
After installation, it is useful to keep a small painted offcut of PLT-001 and record the enamel code, article number, date, and room. If local repair of a joint is needed in a few years, this sample will help match the color and profile.
Also save a photo of the old base before it is covered. It will show where the previous mounting zone ran and where locally restored sections are located.
Control example: a strip of 100 mm along the wall, 60 mm along the ceiling, and a room of 4.2 × 3.6 m
Let's consolidate the solution into one complete scenario. After dismantling the old cornice, the maximum trace along the wall was 100 mm, along the ceiling — 60 mm. The base is solid, but in two corners there are small residues of old glue. The room is rectangular, 4.2 × 3.6 m.
First, loose residues are cleaned and the measurement is repeated. Then, using the drawing or a test strip, the actual wall and ceiling projections of PLT‑001 are determined. Only if both overlap 100 and 60 mm respectively can the new profile be considered a replacement for a full repaint.
The room perimeter is 15.6 m. With a strip length of 2400 mm, the pure mathematical minimum is seven pieces, but before ordering, a joint map is built for two walls of 4.2 m and two of 3.6 m. One test strip can then be included in the total volume.
If the template shows that in one corner, 8 mm of an old strip 250 mm long remains below the profile, this area is locally restored before installation. There is no need to replace the entire profile or repaint four walls. If, however, an open strip of 8–10 mm runs continuously across the entire room, the original idea of "covering the old trace without a paint strip" is no longer fulfilled.
After geometry, a test enamel coating is made, the profile is checked in daylight and evening light, the current PLT‑001 card is confirmed, and only then is the full order placed. This procedure is the practical alternative to the "buy first, then see what happens" approach.
FAQ about PLT‑001 after the old ceiling cornice
What is the size of the current PLT‑001?
In the original current image, the main version is specified as A 120 × C 15 × L 2400 mm, oak, "Prestige", for enamel. Before payment, the card must be rechecked because the assortment has changed.
Is PLT‑001 a floor or ceiling plinth?
In the card under consideration, PLT‑001 is positioned as a wooden ceiling plinth.
Will PLT‑001 cover a 100 mm strip after the old cornice?
Possibly, but parameter A=120 mm is not sufficient for a guarantee. The actual projection of the profile on the wall after installation needs to be known.
Does A=120 mm mean that 120 mm will be covered on the wall?
No, this cannot be stated without a cross-section drawing and installation position.
What should be measured after dismantling?
Maximum trace on the wall, maximum trace on the ceiling, angles, unevenness, adhesive residue, and the condition of the base.
Is it necessary to completely remove the old adhesive?
Everything loose and that interferes with the plane or the new mounting joint is removed. The durable residue is assessed according to the specific technology.
Can PLT-001 be installed after painting the walls?
Yes, installation in a finished interior is possible with careful surface protection. The full technology is best reviewed in a separate article on installation.
Is it necessary to repaint the entire room?
Not necessarily, if the old trace is completely covered, and open areas require only local finishing.
What to do if the strip is 125 mm in places?
Check it with a template. If it goes below PLT-001, locally restore the section or choose a different profile.
What to do if the trace on the ceiling is wider than on the wall?
Check the ceiling projection. If insufficient, perform local ceiling repair or use a different profile.
What length is used in the calculation?
In the current main version, it is 2400 mm. But before ordering, the length must be confirmed via the card.
Can I order just one plank first?
Yes, for such a repair, a trial plank is especially useful: it shows the actual overlap and scale.
How to calculate the quantity?
By the actual perimeter and joint map, not just by dividing meters by 2.4.
Will oak suit a clear varnish?
You cannot automatically transfer the 'under enamel' option to a transparent finish. You need to confirm the availability of preparation for tinting.
What to do if the base is loose after dismantling?
First, restore it. The new profile should not hide unstable plaster.
When is it better not to buy PLT-001?
When it does not cover the maximum old trace, does not fit the ceiling projection, looks too large visually, or the base requires serious repair.
Before publication, it is useful to save three source documents together with the order: a photo of the widest old trace with a ruler, a drawing or photo of the trial installation of PLT-001, and a joint map of the room. Then the painter, carpenter, and customer will rely on one geometry. If during preparation the width of the trace changes after removing glue or leveling, the calculation must be updated before cutting the batch.
If after repair there remains a painted offcut at least a few tens of centimeters long, it is better to keep it as a control sample of the profile and finish. This does not increase the project cost but simplifies future local restoration, especially when the main profile is already installed around the entire perimeter and finding exactly the same finish after several years is harder.
If the trial plank shows a doubtful result, do not start painting and cutting the entire volume. First, fix one of the most complex areas—for example, an internal corner with the maximum trace. A successful control node gives much more information than another calculation based on nominal dimensions.
Result: PLT-001 can cover the old 100 mm strip, but the decision is made not by the number 120, but by the actual profile projection.
After dismantling the old ceiling cornice, the new PLT-001 can indeed become a way to avoid a full repaint of the room. In the current main version, it has a size of 120 × 15 × 2400 mm, and nominally the number 120 is larger than the old 100 mm strip. But this comparison is not enough.
It is necessary to confirm how many millimeters PLT-001 actually covers on the wall and on the ceiling in the standard mounting position. Then compare these two projections with the maximum traces around the entire perimeter. If the old defect is completely hidden under the profile, the base is solid, and the new ceiling molding fits the interior, a full repaint may indeed be unnecessary.
If individual sections extend below the new edge, they can be locally restored. If a wide trace remains across entire walls or the ceiling, it is better to choose a different profile or abandon the masking strategy.
The correct sequence: dismantle the old cornice → clean loose residues → measure the maximum trace on the wall and ceiling → check PLT-001 against the drawing or a test strip → assess the scale → create a joint map → confirm the current product card → place the order.