Article Contents:
- KPU-125 is a carved molding, not another slat
- Three sizes of KPU-125 that need to be understood correctly: 9, 5, and 1000 mm
- 9 mm is not a recommendation for the gap width
- 5 mm determines the position of the decorative line in depth
- 1000 mm determines the rhythm of joints
- Gap No. 1
- Gap No. 2
- KPU-125 remains noticeably deeper than the front part of the slats
- KPU-125 approximately ends up in the deep zone, clearly visible between the slats
- KPU-125 appears visually too close to the front surface
- Above the console
- Near the mirror
- Behind the Sofa
- Behind the headboard
- In the entryway
- On a separate wall section
- Free gap is less than 9 mm
- Gap varies greatly across the width
- No suitable base
- The ornament is recessed so deeply that it is barely visible
- There is already too much ornament in the interior
- Want to install KPU-125 in every gap without a layout
- Installation requires removing or milling finished slats
- Practical kit
- From a distance
- From a medium distance
- Up close
- For those whose slat wall is already fully completed
- For those who only lack a small amount of ornament
- For owners of a neatly installed wall with a suitable gap
- For projects with multiple stylistic layers
- For those who are ready to first make a test sample
- For the owner of a wall with a gap smaller than 9 mm
- With highly uneven gaps
- If a large expressive ornament is needed
- If the entire wall is already saturated with decor
- If you want to fill absolutely every gap with KPU-125
- If the base inside the gap is unsuitable for the chosen mounting scheme
- Is KPU-125 a molding?
- What size is KPU-125?
- How much does KPU-125 cost now?
- Can KPU-125 be inserted between already installed slats?
- If the gap between rails is exactly 9 mm, will KPU-125 definitely fit?
- How to measure the gap correctly?
- Do I need to measure each gap separately?
- What to do if the gap is less than 9 mm?
- What if the gap is 10–12 mm?
- What to do with a 20 mm gap?
- Why consider the 5 mm size?
- Which is better: KPU-125 deeper than the face surface of the slats or almost flush?
- Can I insert KPU-125 into every gap?
- How many KPU-125 are needed for a height of 2700 mm?
- How much is needed for two lines with a height of 2700 mm?
- How much does it cost at the current price?
- Can one KPU-125 be used without an extension?
- Where is the best place to install the meter insert?
- Can KPU-125 be started directly from the floor?
- Does it need to be run up to the ceiling?
- How do you connect multiple KPU-125 units?
- Can KPU-125 be cut?
- Can the remaining offcut be placed in another gap?
- What color should be chosen for KPU-125?
- Will KPU-125 suit wooden slat panels?
- Can KPU-125 be used with MDF panels?
- What Adhesive to Use?
- The KPU-125 card offers KUDO HIGH TACK. Does that mean it automatically fits my wall?
- Do I need to remove the panel before installing KPU-125?
- What to do if KPU-125 doesn't fit?
- How to check KPU-125 before a large order?
- What's better: one line or three?
- Can I make two symmetrical lines?
- Can I use KPU-125 around a TV?
- Will KPU-125 work behind the headboard?
- Will KPU-125 fit in the hallway?
- Should I add KPU-125 if the slat wall already looks finished?
- Where can I buy KPU-125?
- Where to look at other polyurethane moldings?
- Where can I buy slat panels for a new project?
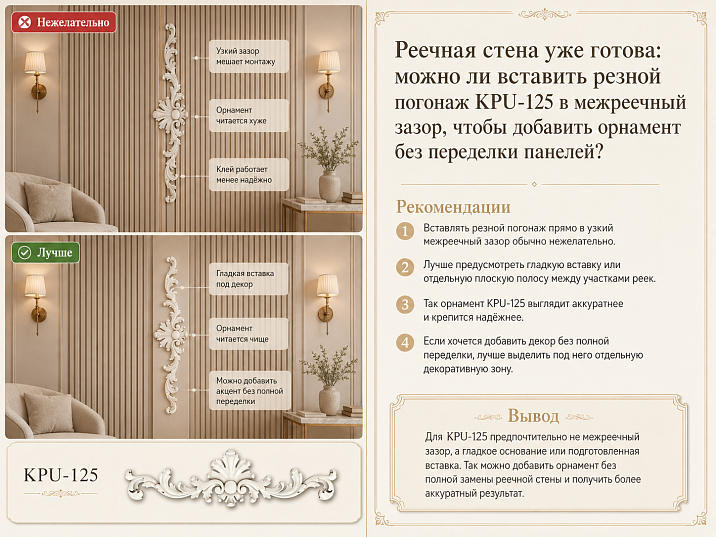
The slat wall is already assembled. The panels are aligned, the vertical rhythm turned out neat, and I don't want to redo the finish. But after completing the renovation, there's a feeling that the surface is missing one detail: the slats look too geometric, and adding a large overlay, a molding frame, or a separate decorative panel is already too late. A more subtle idea arises—to use the existing gaps between the slats and add a narrow ornamental line there.
For this scenario, attention is drawn to carved molding KPU-125 made of polyurethane. The element size is 9 × 5 × 1000 mm. That is, we are indeed dealing with a very narrow decorative molding: only 9 mm wide, 5 mm relief, and 1000 mm length per strip.
At the time of preparing the material, the price of one KPU-125 in the card is 840 ₽. The current cost should be re-checked before ordering, since the price is subject to change as a commercial parameter.
But a small size does not automatically mean compatibility with any slat wall.
The main question is not phrased as:
“Is it even possible to use KPU-125 next to slats?”
Much more precisely:
"Is there such an inter-lath gap in a specific already installed lath surface where a 9 mm wide molding can actually be installed without reworking the panels, and will its 5 mm relief work there visually and structurally?"
If the actual free gap is suitable, the base inside it is even, and the location of the decorative line is checked in advance, the idea can turn out to be very successful. KPU-125 allows you not to redo the entire wall finishing with slatted panels, but to add a thin ornamental accent to the existing geometry.
If the gap is less than 9 mm, has variable width, does not provide a normal support surface, or the molding ends up being pinched between the laths after installation, this method cannot be recommended. Then it is better to keep the finished wall or choose a different decorative scenario.
It is with checking these few millimeters that the correct solution begins.

KPU-125 is a carved molding, not another lath
First, it is important to name the product correctly.
KPU-125 is a carved polyurethane molding.
It is not:
-
a slat panel;
-
individual interior slat;
-
overlay;
-
a baguette;
-
large wall molding.
The difference is fundamental.
The slat panel creates the main surface. It is Slatted wall panels for interior finishing form a regular linear rhythm that is already present on the wall.
KPU-125 should not replace this system.
It can become a secondary decorative layer within the existing rhythm.
Its width of 9 mm allows for a completely different scale of work. Not a new wall zone, but a thin line. Not square meters of new finish, but a few selected gaps between slats. Not dismantling the entire surface, but local refinement — if the actual geometry of the finished wall truly allows it.
This is what makes the scenario interesting.




Three sizes of KPU-125 that need to be understood correctly: 9, 5, and 1000 mm
At first glance, there are very few specifications.
But for installation between slats, each of the three values is critical.
| Parameter | KPU-125 | Why it matters specifically on a finished slat wall |
|---|---|---|
| Product type | Carved molding | it does not need to be calculated as a slat panel |
| Material | Polyurethane | the product belongs to polyurethane molded decor |
| Width | 9 мм | compared with the minimum actual gap between slats |
| Relief height | 5 мм | determines the position of the front part relative to adjacent slats |
| Length | 1000 мм | determines the number of planks and the number of joints along a long line |
| Current price | 840 RUB per plank | the budget depends on the number of decorative lines and their length |
| Product card | buy carved molding KPU-125 | parameters are verified immediately before ordering |
Our factory also produces:



9 mm is not a recommendation for the gap width
This is the width of the KPU-125 itself.
If the gap between the slats is nominally 9 mm, one cannot yet conclude:
"Great, it fits exactly."
For the finished wall, the following are possible:
-
minor deviations;
-
uneven spacing;
-
local narrowings;
-
finishing marks;
-
uneven edge;
-
difference between actual size and calculated size.
Therefore, the gap is not measured just once.
What is needed is exactly the minimum free width across the entire section of the intended installation.
Get Consultation
5 mm determine the position of the decorative line in depth.
Suppose the width is sufficient.
Now you need to look at the wall from the side.
How deep is the recess between adjacent slats?
If the front part of the slats protrudes above the base significantly more than 5 mm, the KPU-125 after installation may end up recessed relative to their front surface.
If the depth is less, the decorative relief can approach the front plane of the slats or protrude relative to it — depending on the actual design.
There is no universally "correct" position here.
But it needs to be seen before purchasing a large number of planks.
1000 mm determine the rhythm of connections.
One plank — one meter.
For a small decorative fragment, this may be sufficient.
For a line from floor to ceiling height — usually not.
If the decorative insert needs to run at 2600, 2700, or 3000 mm, several elements will be needed.
So a new question arises: where and how will the connections of the carved pattern be located?
Therefore, a length of 1000 mm is no less important than a width of 9 mm.
First test: we measure not the panel, but the free space between the slats
The most common mistake is to open the specifications of the installed panel and take the size from the catalog.
For an already finished wall, this is not enough.
A measurement of the actual object is needed.
Why?
Because the article answers not the question of theoretical compatibility of two products, but the question of the possibility to refine a specific already installed surface.
Take a ruler, and for more precise work, a suitable measuring tool, and check the width of one intended gap:
-
at the bottom;
-
at about a quarter of the height;
-
in the center;
-
above the center;
-
in the upper part.
If the decorative insert should occupy only a meter-long fragment, measure this entire meter at several points.
Then repeat the check for the adjacent gap.
It may turn out that one gap fits, while another is slightly narrower.
This is already useful information.
Why can't you measure one gap and apply the result to the entire wall?
The slatted surface visually looks regular.
It is this regularity that creates the feeling of precise geometry.
But when refining after installation, you cannot rely only on visual impression.
Let's imagine:
the first gap is 10 mm;
the next is 9.5 mm;
the third narrows locally;
the fourth again has sufficient width.
To the eye, the difference is almost imperceptible.
For a part 9 mm wide, it becomes critical.
It is especially dangerous to order a lot of KPU-125 in advance, calculating:
"There are ten gaps on the wall, so we will insert them into five of them."
First, specific lines are selected, then each one is measured.
What to consider a suitable inter-rail gap
The minimum physical condition is clear: KPU-125 has a width of 9 mm.
But the practical question is more complex.
The gap must not only allow the product to be placed.
It is necessary that after installation:
-
KPU-125 does not look squeezed;
-
the line remained visually straight;
-
the edges of adjacent rails do not overlap the ornament;
-
there was a suitable base;
-
installation did not require forceful pressing;
-
the subsequent finishing was clear, if it was provided for by the project.
Therefore, the principle:
"9 mm is there — so we buy"
is too primitive.
More correctly:
"9 mm is the first condition, after which we check the depth, the base, and the visual result."
What to do if the gap is exactly 9 mm
This is a borderline case.
On the drawing it seems ideal:
trim 9 mm;
gap 9 mm.
But the actual finish is not a mathematical scheme.
Need to consider:
-
actual geometry;
-
edge condition;
-
possible local narrowings;
-
finish layer;
-
ease of installation.
One should not promise that an element with a nominal width of 9 mm will necessarily fit without issues into a nominal gap of 9 mm.
For a finished wall, the actual measurement is what matters.
If the KPU-125 has to be literally pushed between the slats, that is no longer the scenario of "quickly adding an ornament without rework," which is why the solution was chosen in the first place.
What to do if the gap is 10–12 mm
This option is already more interesting in terms of free width.
But a new visual question arises.
If the KPU-125 has a width of 9 mm and the gap is wider, visible background remains on the sides.
For example, with a conditional 11 mm:
11 − 9 = 2 mm.
With central placement — about 1 mm on each side.
On a single-color background, this may almost disappear.
On a contrasting one, it becomes a noticeable thin outline.
Is this good or bad?
It depends on the project.
That's why you need to make a short sample, not just decide with arithmetic.
If the gap is significantly wider than 9 mm
Suppose the gap is 18 or 20 mm.
KPU-125 physically fits freely.
But it no longer "fills the gap."
It turns into a thin ornamental thread inside a wider recess.
This is a completely different effect.
It can turn out to be very interesting.
For example:
dark background between light slats;
in the center — a light carved line of KPU-125.
Or the entire composition is one color, and the molding is noticeable only by its relief.
But such a scheme should be evaluated specifically as a separate design, not as a technical insert.
If the gap is less than 9 mm
Here the answer is much simpler.
If the actual free width is less than the width of KPU-125, it cannot be recommended to insert it there without changing the slat finish.
You cannot build an article on the idea:
"Let's trim the batten a bit."
This is already a modification of the panel, which is exactly what the buyer wants to avoid.
You cannot automatically promise arbitrary reduction of the carved molding itself: interfering with the geometry of the ornamental element may affect the pattern.
In such a situation, it is more logical to:
-
choose a different inter-batten gap if it is wider;
-
use KPU-125 on another part of the wall;
-
consider another decorative polyurethane molding;
-
abandon the idea of an inter-batten insert.
Preserving a quality finished wall is more important than using a specific article at any cost.
Second test: what is at the bottom of the inter-batten gap
The width fits.
Next question:
What exactly will the KPU-125 be attached to?
In different batten systems, the space between protruding elements is arranged differently.
This could be:
-
part of the panel's base itself;
-
a separate substrate;
-
the visible surface of the wall;
-
another structural layer.
Therefore, it is impossible to write universally:
"Apply glue to the gap and insert KPU-125."
First, the material and condition of the actual base are determined.
Need to check:
-
whether it is level;
-
whether it is durable;
-
whether there is any peeling coating;
-
whether there are significant differences in height;
-
whether a suitable mounting material can be selected for it.
And only after this is the fastening issue decided.
Why a level bottom of the gap is sometimes more important than its width
Let's imagine two cases.
Gap No. 1
Width — 11 mm.
The bottom is flat.
KPU-125 can be applied along the entire meter length to one plane.
Gap No. 2
Width — 13 mm.
But the base has unevenness or structural elements.
In the second case, there is more free space, but the installation task is more complex.
This leads to an important principle:
a wide gap is not necessarily more convenient than a narrow one.
For carved molding, you need not just empty space between the slats, but a clear base line.
Third test: compare the 5 mm relief of KPU-125 with the depth of the slat pattern.
Measure how much the front plane of the slats protrudes relative to the bottom of the gap.
Now mentally install a 5 mm high KPU-125 there.
There are three main outcomes.
KPU-125 remains noticeably deeper than the front face of the slats
Then the ornament reads within the shadow.
The effect is subtle and rather "jewel-like."
Under direct frontal light, it can be calm.
Side lighting can make the pattern more noticeable.
KPU-125 approximately falls into the depth zone, clearly visible between the slats
For this idea, this is often the most understandable visual scenario: the decorative line exists within the rhythm, without trying to replace the batten itself.
KPU-125 turns out to be visually too close to the front surface.
Then the ornamental strip becomes more active and may start to compete with the battens.
This is not necessarily bad, but such a composition needs to be evaluated on a sample.
That is why one gap width is not enough.
The most useful mockup for this article costs less than one plank.
You don't need to order material for the entire wall at once.
Make a simulation of 9 mm width and 1000 mm length.
You can mark the intended line with masking tape of suitable width or a paper strip.
The mockup won't show the real carved relief, but it will answer several important questions:
-
is the line well chosen;
-
are there too many ornamental inserts;
-
is one meter needed or the full height;
-
is the vertical accent starting to argue with the furniture;
-
which gaps between slats are better left empty.
After such a check, it makes sense to order KPU-125 linear molding made of polyurethane first for a trial fitting, if the project allows it.
Do not insert KPU-125 into every gap between slats
This is probably the main design mistake.
The slat wall already has a very frequent rhythm.
If the ornament appears in every gap, the secondary accent will cease to be an accent.
It will turn into a new primary texture.
And instead of:
strict slats + a few thin carved lines
The result will be:
a frequent complex ornamental grid.
Perhaps someone needs exactly this effect. But that is already a different project.
For the scenario “the finished wall seems too geometric, you want to add a bit of ornament,” it is wiser to start with a minimal number of inserts.
For example:
-
one;
-
two symmetrical;
-
three with a large step;
-
a small local fragment.
One KPU-125 line: the safest test
Let's imagine a slat wall with a width of 1800–2500 mm.
Instead of adding decor evenly, one gap between slats near the compositional center is selected.
The KPU-125 is placed there.
What happens?
The slatted surface remains the same.
But among the identical geometric strips, one more complex line appears.
From a distance, it barely disrupts the minimalism.
Up close, the ornament is revealed.
This is a very good way to test whether the language of carved molding suits a particular interior at all.
Two lines: when symmetry is needed
It makes sense to use two inserts if the wall architecture itself is paired.
For example:
-
on the sides of the mirror;
-
on the sides of the television;
-
on two identical slatted sections;
-
next to two doors;
-
on the sides of the central smooth panel;
-
relative to the console axis.
Then KPU-125 does not look like a random strip.
Two lines belong to two equal parts of the composition.
But symmetry requires precision.
If one insert is in the third gap between slats from the center, and the second is in the fourth without reason, the eye may notice the inconsistency.
Three lines: already an independent decorative rhythm
Three KPU-125 need to be designed more carefully.
For example:
central line;
two side ones at equal distance.
Then a structure emerges:
carved line — several regular gaps — carved line — several regular gaps — carved line.
This is already a second rhythm over the first.
He can make a large wall more interesting.
On a small pier — overload it.
Therefore, the number of KPU-125 is chosen not by the number of available gaps, but by the scale of the entire surface.
Can KPU-125 be placed only on one meter of height
Yes, this exact scenario is especially interesting due to the product length of 1000 mm.
It is not necessary to run a decorative line from floor to ceiling.
One meter-long section can be attached:
-
to the console;
-
to the upper part of the wall;
-
to the area above the sofa;
-
to the side of the mirror;
-
to the furniture facade;
-
to the decorative panel.
The advantage of this solution is the absence of an intermediate connection within a single element.
If one KPU-125, 1000 mm long, solves the compositional task, the project technically becomes simpler.
Meter-long insert near the console
Let's imagine a console with a height close to a standard furniture zone and a slatted wall behind it.
Instead of installing KPU-125 at full height, you can place one meter-long fragment vertically relative to the console.
For example, the line starts slightly above the countertop and continues the composition upward.
Then the thin ornament relates not to the entire room, but to a specific furniture group.
This is an important technique: decor doesn't have to belong to the entire wall.
It can have a local owner.
One meter next to the mirror
The mirror already creates a strong vertical or horizontal form.
A narrow ornamental line KPU-125 near its edge can support the composition.
At the same time, there is no need to turn the molding into a frame if the task is specifically an inter-slat insert.
The slats remain the background.
The mirror is the main object.
KPU-125 is a delicate additional detail.
For such a project, it's especially important not to make too many decorative lines.
Full wall height: then you need to count the joints
If you want to run KPU-125 from floor to ceiling, the 1000 mm length becomes the main limitation.
Suppose the decorative line has a height of 2700 mm.
At least three elements will be needed:
1000 + 1000 + 700 mm of the working section of the third plank.
Nominally, the product is sufficient.
But two joints appear.
Their position must be checked against the carved pattern.
One cannot assume that the seam of any ornamental molding will automatically become invisible.
Formula for the quantity of KPU-125
For one continuous decorative line, the preliminary calculation is simple:
N = H ÷ 1000
Where:
-
N — the number of meter-long planks;
-
H — the length of the decorative line in millimeters.
If the result is not an integer, the number is rounded up to fully cover the required length.
Then the quantity of one line is multiplied by the number of selected inter-lath inserts.
This is arithmetic.
After it, the pattern layout necessarily follows.
Line 1000 mm
One KPU-125 is needed.
This is the simplest scenario:
-
no intermediate joint;
-
a whole plank is used;
-
easy to do a test fitting.
Line 1800 mm
Nominally, two planks are needed.
One is used completely.
800 mm is required from the second.
One connection appears.
Now you need to check where it is best to place it.
Line 2000 mm
Two whole strips.
Mathematically convenient.
But even if the total length matches, the joint in the middle remains and requires careful layout.
Line 2500 mm
Minimum three planks.
It turns out:
1000 + 1000 + 500 mm.
Part of the third element remains.
Next, decide whether it is more advantageous to place the shortened section at the top, bottom, or otherwise distribute the joints considering the pattern.
Line 2600 mm
Three KPU-125 units give a maximum total length of 3000 mm before trimming.
By quantity — three.
By composition — need to decide how to distribute 2600 mm.
Line 2700 mm
Also three elements.
This is a common interior scale for a vertical line, but the fact of a convenient quantity does not automatically make the project good.
First, need to understand whether the ornament is really needed at full height.
Line 3000 mm
Three whole KPU-125 nominally give 3000 mm.
This is the most obvious calculation.
But three planks mean two joints.
Therefore, before installation, they are first laid out as a single line.
Line 3200 mm
At least four elements will be needed.
And here it is worth asking again:
is it really necessary to run the narrow ornament across the entire height, or would a one-meter or two-meter accent be more expressive?
If there are two decorative lines
Suppose the height of each is 2700 mm.
One requires three KPU-125.
For two:
3 × 2 = 6 slats.
At the current card price of 840 ₽, the cost of the six elements themselves is:
6 × 840 = 5040 ₽.
This is only the cost of KPU-125 at the time of writing the article, without installation materials and other work.
If there are three lines of 2700 mm
Each requires three slats.
Total:
3 × 3 = 9 KPU-125.
At the current price:
9 × 840 = 7560 ₽ for the slats themselves.
And here the quantity becomes a design question no less than a financial one.
Nine meter-long elements on one wall is a noticeable decor system.
Before purchasing such a volume, it is especially wise to assemble one control line.
The price of 840 ₽ makes the experiment more accessible, but does not cancel out the design process.
Compared to large stucco decor elements, one KPU-125 slat costs relatively little.
Because of this, it's easy to think:
"Let's take ten right away, we'll figure it out on the spot."
But the main cost of a mistake here is not necessarily the price of the goods.
What's much worse:
-
ruining the finished finish;
-
overloading the wall;
-
get an uneven line;
-
discover that several gaps are already 9 mm;
-
see unsuccessful joints after installation.
Therefore, the low price of one plank is not a reason to refuse the layout.
A short insert is often more interesting than a line from floor to ceiling
Slat panels already provide verticality for the full height.
If KPU-125 is repeated in the same way, it partially duplicates the existing direction.
And a short carved section introduces a new scale.
For example:
The slats run 2700 mm;
KPU-125 occupies only the central 1000 mm.
The eye notices the change in texture precisely in this fragment.
Thus, the decorative line becomes an accent, not just another constant vertical.
Where to place the meter-long KPU-125 in height
There is no universal mark.
The decorative fragment needs to be tied to a real object.
Above the console
The line can start near the top of the furniture composition and go upward.
Near the mirror
The height is determined by the mirror itself.
Behind the sofa
You need to consider the headboard and wall decor.
Behind the headboard
It's important not to hide half of the carved element behind furniture.
In the hallway
Need to evaluate the composition from a close distance.
On a separate wall section
You can place a meter-long insert approximately in the visual zone, but it's better to tie it to doors or furniture rather than to an abstract 'eye level'.
When it's better not to place KPU-125 in the center of the wall
The center is not a mandatory place for the ornament.
The slat composition is often asymmetrical.
For example:
the TV is shifted;
the console is on the right;
there is a door on the left;
the slat zone occupies only part of the wall.
in such an interior, one central carved line can look artificial.
It is much more natural to tie KPU-125 to an existing functional zone.
Slat TV wall: is KPU-125 needed next to the screen
The TV and the slatted texture already form a strong composition.
carved molding should be added carefully.
a suitable scenario:
-
one thin line on the side part;
-
two symmetrical lines along the edges of a wide TV zone;
-
a short meter-long fragment next to the console.
Risky option:
many KPU-125 directly around the screen.
The TV creates a simple rectangular center, and a frequent ornamental grid can make the background too active.
Behind the sofa: it's better to support the ornament with a furniture axis.
If the sofa is centered on the slatted wall, you can try two KPU-125 at equal distances from its axis.
This will result in delicate symmetry.
If the sofa is offset, the decorative lines can also be shifted.
There is no need to center the KPU-125 relative to the entire wall if the furniture composition itself lives around a different center.
Behind the headboard: a thin insert instead of large molding
In the bedroom, large carved decor can sometimes seem excessive.
KPU-125 is interesting precisely because of its narrowness.
The slats can remain the main background, and one or two ornamental lines can add a classic motif without a large overlay.
However, it is worth considering:
-
bed width;
-
position of sconces;
-
the height of the headboard;
-
number of other decorative details.
If the wall is already adorned with an intricate headboard, molding may be unnecessary.
Hallway: 9 mm works well from close range
In a long living room, the subtle pattern of KPU-125 may be almost invisible from a distance.
In the hallway, a person walks close to the wall.
Here, the subtle relief is better revealed.
You can use one meter-long fragment near a mirror or console.
It is especially important not to repeat the carved element in every gap: at close range, an excessive amount of fine ornament is perceived even more actively.
Narrow wall section: one line instead of a full renovation
Imagine a ready-made slat insert 500–700 mm wide.
It looks neat, but too neutral.
I don't want to add a large overlay — there's not enough room for it.
One KPU-125 in the selected inter-batten gap might be exactly the scale needed.
At the same time, the entire existing surface is preserved.
This scenario probably best matches the meaning of the topic:
not a renovation from scratch, but a very local refinement of a finished wall.
Large wall: don't try to ornament every meter identically
The wider the slat surface, the stronger the temptation to repeat KPU-125 regularly.
For example, every three slats.
This creates a mathematically beautiful grid.
But an interior is not a diagram.
On a large wall, there are:
-
furniture;
-
screen;
-
door;
-
light;
-
center of movement;
-
free areas.
It is better to tie the ornament to them.
Sometimes two lines on a five-meter wall look more convincing than ten.
KPU-125 in every fifth gap: is it worth making such a rhythm
You can calculate the regularity:
several regular intervals;
one ornamental;
again several regular ones.
On a large commercial surface, this can create an interesting repetition.
But first, you need to assemble at least one section at scale.
The reason is simple: the frequency of the slats and the frequency of the carved pattern add up.
If both rhythms are active enough, the wall may visually "flicker."
Uniform repetition is not always good
Modern slat surfaces are valued precisely for their regularity.
Carved trim is introduced because you want to step slightly outside this strictness.
If then the KPU-125 itself is arranged with a completely mechanical step, part of this idea will be lost.
Sometimes it's more interesting:
-
one line;
-
then a large empty section;
-
two more paired lines next to the furniture.
This way the ornament works as an accent, not a new grid.
One color with the slats: the most delicate scenario
If the KPU-125 and the surrounding slatted surface have a similar color scheme, the ornament is revealed primarily through the relief.
This is useful when the interior needs to be made more complex, but not colorful.
From a distance, the wall still reads as a single slatted surface.
An unexpected carved line appears nearby.
This technique is especially good for a small KPU-125, since it does not claim to be a large decorative object.
The specific finishing system should be chosen taking into account the materials of the existing wall and the requirements of the compounds used.
Contrast KPU-125: 9 mm unexpectedly become noticeable
Let the slats themselves be light.
The background between the slats is dark.
We insert light KPU-125.
Or vice versa.
Even a width of 9 mm starts to read well.
Contrast turns thin molding almost into a graphic line.
Therefore, before painting or choosing a finish, you need to decide what effect is required:
Hidden ornament or explicit decorative feature.
For the first, a close palette is better.
For the second, a more pronounced difference.
Why the background of the gap between slats is no less important than the KPU-125 itself
With a width of 9 mm, the surrounding space is constantly next to the ornament.
If the gap is wider than the detail, the background is visible at the edges.
If the KPU-125 is recessed relative to the front surface of the slats, the background becomes even more noticeable.
Therefore, you need to check in advance:
-
what color the base has;
-
how level it is;
-
whether it differs from the slats themselves;
-
Will the strips on the sides of the trim remain visible?
Sometimes it is the background that makes a narrow insert expressive.
Sometimes it shows all the unevenness.
Wooden slat surface and KPU-125: don't make materials pretend to be each other
If the slats have a pronounced wood texture, polyurethane trim can be used as a separate decorative material.
It doesn't necessarily have to imitate wood.
For example:
wooden slats;
dark background;
light ornamental line.
Or:
wooden slats;
neutral inter-slat background;
KPU-125 in the color of the wall.
The difference in materials may be part of the design intent.
Slat panels for painting give more freedom in color.
If the existing system is designed for final painting and the project allows its renewal, it becomes possible to make KPU-125 part of the overall color composition.
But it is important not to automatically transfer the panel finishing technology to polyurethane molding.
The same visual color does not mean that the preparation of different materials should be identical.
How side lighting works
KPU-125 has a relief of 5 mm.
On a brightly lit frontal surface, such a small profile may seem calm.
With side lighting, the shadow helps the carved pattern to emerge.
In the inter-rail gap, the situation is even more complicated: the rails themselves already create shadows.
Therefore, before a large order, it is useful to look at the selected area:
-
during the day;
-
in the evening;
-
with the main light on;
-
with side lighting, if available.
Sometimes a pattern that is almost invisible during the day becomes expressive in the evening.
Spot lighting can emphasize the wrong area
If the light fixture is directly above one decorative line, it will be perceived more strongly than the others.
This may be intentional.
But if two symmetrical KPU-125 are lit differently, the symmetry is visually broken.
Therefore, lighting must be considered together with the layout.
What to do near sockets and switches
A thin vertical insert can easily cross an electrical frame.
This looks random.
Especially if the KPU-125 is installed after the renovation is already complete.
Before choosing the gap between slats, be sure to mark on the diagram:
-
sockets;
-
switches;
-
sensors;
-
wall control panels;
-
lighting outputs.
Sometimes shifting by just one gap is enough to avoid a complex junction.
Do not interrupt KPU-125 with a switch if you can choose an adjacent line
Technically different solutions are possible, but the point of this idea is precisely a simple local update.
If the selected gap crosses a switch and requires complex fitting, while the adjacent one is free, it is usually wiser to choose the adjacent one.
Do not create complexity for yourself for the sake of a mathematical center.
What to do at the baseboard
If KPU-125 goes almost to the floor, its lower termination needs to be decided in advance.
Possible design options depend on the actual wall:
-
the line ends above the baseboard;
-
approaches its upper edge;
-
starts only in the middle part of the wall.
Do not automatically lead the decorative element down.
The plinth is already a strong horizontal boundary.
A meter-long insert starting higher often looks cleaner.
What to do at the ceiling
Same logic.
If the full vertical meets the cornice or other ceiling decor, the connection needs to be examined.
Sometimes KPU-125 finishes well lower.
Sometimes it fits into the overall composition.
But if the goal is "without redoing the finished slat wall," the simplest scenario often is to not bring the new piece up to complex junctions at all. Why the connection is better seen at full scale
In the card photo, the pattern is small.
When joining two meter-long elements, a real seam occurs.
Even if it becomes neat after processing, it is important to understand how the pattern itself continues before installation.
This is especially important if KPU-125 is used in a contrasting color.
Can the joint be located behind furniture?
If part of the line is hidden by a stationary object, this can affect the layout.
But designing the connection solely with the expectation that 'no one will see it anyway' is not always rational: furniture can change.
It is better to achieve a neat sequence of the entire line.
Should KPU-125 be placed strictly in the center of the gap?
If the gap is noticeably wider than 9 mm, a central position usually looks logical.
But there is no universal rule.
The main thing is that the chosen offset is intentional and consistent along the entire length.
Random "wandering" of a narrow part inside the gap is especially noticeable because the parallel edges of the slats act as guides.
The slats turn into a perfect ruler — and show any error of the KPU-125
This is the paradox of such installation.
On one hand, adjacent slats help visually guide the decorative line.
On the other hand, any deviation becomes more noticeable.
If the KPU-125 shifts by a millimeter to one side, the distance to the left and right slats changes.
The eye sees this as a violation of regularity.
Therefore, dry fitting and marking are especially important here.
You cannot rely on a curved wall if the slats themselves run differently.
KPU-125 is part of a ready-made slat composition.
It is more logical to align it relative to the actual adjacent slats, rather than an abstract construction vertical, if these systems differ slightly.
But the specific solution depends on the quality of the existing installation.
If the slat finish itself has a noticeable deviation, adding a thin parallel line can emphasize the problem.
When it is better to avoid KPU-125 precisely because of the quality of the finished wall
The molding can be beautiful, the gap suitable, but refinement is still unnecessary if:
- the slats have visible deviations;
- the gaps noticeably vary in width;
- the base is damaged;
- there are many uneven joints;
- A new thin line will only emphasize the defects.
Sometimes the absence of additional decor is more advantageous.
A finished wall with perfect geometry is the best candidate
The more precise the original slatted surface, the more interesting a small ornamental accent works.
Even parallel lines create a strict grid.
Against its background, KPU-125 reads precisely as an intentional variation.
This is a case where good quality of the base finish allows adding a more subtle second level.
When trim should be added even before installing the panels
Although the topic is about a finished wall, there is a useful takeaway for a new renovation as well.
If you like the idea of KPU-125 in advance, do not postpone it to the end.
You can immediately:
- choose specific slatted panels for walls;
- find out the actual geometry of the gaps between battens;
- make a sample;
- determine the number of decorative lines;
- only then install everything as a single system.
This is much more predictable.
But the value of KPU-125 is precisely that its small size allows at least considering modifying an existing wall.
Comparison of four finished wall options
| Solution | What changes | When to choose | Main risk |
| Change nothing | A clean rack rhythm is preserved | The wall is already self-sufficient | There will be no ornamental accent |
| One KPU-125 | A thin decorative line appears | Minimal intervention is desired | It may get lost on a very large wall |
| 2–3 KPU-125 | A second sparse rhythm is created | Large surface, there is a compositional scheme | easy to do too regularly |
| KPU-125 in many gaps | the ornament becomes part of the main texture | only if it is a conscious concept | overload and loss of original simplicity |
| Reworking the panel for large decor | the composition completely changes | if a small accent no longer solves the task | contradicts the original goal of avoiding rework |
It is reasonable to start with the top rows of the table.
That is, first check whether decor is needed at all, then try the minimal amount.
KPU-125 or a large overlay: different ways to change a slat wall
If you want a strong center, thin molding may not be enough.
A large overlay, rosette, or separate panel works differently.
KPU-125 is chosen if the desire is formulated like this:
"I want to keep the wall almost as it is, but add a small ornament."
If the buyer says:
"I want the whole composition to become classic and a main carved center to appear," —
A 9-millimeter line is likely too delicate.
Then it is worth looking at other polyurethane products for interior decor.
KPU-125 or other trim moldings
The choice of a specific article is justified precisely by its small width.
But if the gap between slats is significantly wider, and KPU-125 seems too thin, there is no need to artificially increase its quantity.
Better to open the section and Buy polyurethane trim of suitable scale after comparing other models.
The product must match the place.
Not the place — to the specific product.
When KPU-125 truly deserves a try
There is a particularly successful set of conditions:
- the slat wall is already installed with good quality;
- you don't want to dismantle it;
- the actual gap is slightly wider or at least really compatible with 9 mm after checking;
- the bottom of the gap provides a clear basis;
- the 5-millimeter relief looks good relative to the slats;
- a small ornamental accent is needed;
- the interior allows for a carved motif;
- one to three lines are enough.
In that case KPU-125 9 × 5 × 1000 mm buy it is quite logical for the chosen layout.
When it's better not to buy KPU-125 for this task
Free gap is less than 9 mm
The main physical condition is not met.
The gap varies significantly across the width
A thin line will be poorly controlled.
No suitable base
Free space by itself is not a mounting plane.
The ornament is recessed so deeply that it's barely visible
The product is physically between the rails, but it doesn't solve the decorative task.
There is already too much ornament in the interior
An additional carved line will only add noise.
Do you want to install KPU-125 in every gap without a mockup?
First, you need at least one test section.
To install, you have to remove or mill ready-made slats.
Then the original scenario of "without reworking panels" no longer works.
What to buy together with KPU-125
The main product is the carved molding KPU-125.
The rest of the kit depends on the project's condition.
If the wall is already fully finished, new panels may not be needed at all.
If the project is still expanding, you can Buy slatted panels for wall finishing.
If KPU-125 turned out to be too narrow after measuring or did not fit the pattern, proceed to the catalog decorative polyurethane molding.
If a different stucco accent is required, the general catalog is useful, where you can You can buy ready-made stucco matching the Baroque style. Calculate the quantity: linear meters of cornices and moldings, number of rosettes, pilasters, consoles, corner elements. Add a ten to fifteen percent allowance for trimming..
The mounting compound is selected after determining the actual base.
Practical kit
| What to look at | Why | When required |
| KPU-125 | create a thin carved line | Main Scenario |
| Polyurethane trim | compare other models | if 9 mm does not match the gap or scale |
| Rafter panels | continue or design the main finishing | if the slatted part is not finished yet |
| molded decoration made of polyurethane | choose a different accent type | if narrow trim is not enough |
| Mounting and finishing materials | select a mounting compound | after determining the actual base |
| KUDO HIGH TACK adhesive | presented in the card among related products | applicability is checked against the instructions and the base |
You should not buy the entire set automatically.
For example, if the slat wall is already done, additional panels in the cart are not needed.
Why it is impossible to write a universal adhesive consumption rate
KPU-125 is narrow, but the project length can be large.
However, calculating the consumption of the mounting compound based only on the number of planks is incorrect without the specific product's instructions and an understanding of the substrate.
Don't make things up:
- milliliters per meter;
- number of tubes;
- universal layer thickness.
First, a suitable compound is selected.
Then, its technical instructions are used.
Substrate preparation inside the gap
Before installation, it is important to assess the actual condition of the surface.
It must be suitable for the selected mounting system.
Pay special attention to checking:
- dust;
- peeling coating;
- contamination;
- local sagging;
- irregularities;
- residues of previous materials.
The specific preparation method depends on the substrate.
It is impossible to provide a single universal procedure for all slat panels.
Dry fitting is mandatory even for a 9-millimeter product.
A small size creates a false sense of simplicity.
But precisely because KPU-125 fits between two parallel lines, any deviation is noticeable.
Before fixing, you need to apply the strip and check:
- whether it fits freely;
- whether it is not pinched;
- whether it is not bent;
- whether the side margins are equal;
- how the depth looks;
- where the connection of the next element will be.
Only after this do they proceed to installation.
Why you shouldn't immediately glue the first meter
Suppose the line should be 2700 mm.
If the first KPU-125 is fixed without laying out the rest, after a meter you may find that the continuation of the pattern or the joint requires a different position.
It's better to first assemble the entire line "dry".
This especially applies to carved moldings.
If KPU-125 moves slightly within a wide gap
Don't automatically align it by eye during fixation.
Set one system in advance:
- central axis;
- fixed indent from one rail;
- another clear guide.
And maintain it along the entire length.
Parallel edges of the wall will show any change.
Mistake #1: relying only on the name "inter-rail gap"
The mere presence of a gap says nothing about its size and base.
Measurements are needed.
Mistake #2: considering 9 mm a guarantee of universal compatibility
KPU-125 is narrow, but gaps can be even narrower.
In addition, depth and bottom are important.
Mistake #3: measuring only one section
Check the entire planned length.
Especially on a finished wall.
Mistake #4: buying the quantity for the whole wall before testing one line
First a mockup or a test fitting.
Then scaling.
Mistake #5: inserting KPU-125 into every gap
The ornament ceases to be an accent and becomes the main pattern.
Mistake #6: forgetting about the 1000 mm length
Joints will appear on a tall wall.
They need to be designed.
Mistake #7: not looking at the wall from the side
The frontal view does not show how 5 mm relates to the depth of the slat relief.
Mistake #8: calculating installation only based on KPU-125 material
The second part of the joint is the existing base.
It is no less important.
Mistake #9: choosing a line that crosses the switch
Sometimes an adjacent gap solves the problem without extra work.
Mistake #10: using leftover scraps in random places
Having material is not a design reason.
Mistake #11: placing a thin ornament where a large accent is needed
KPU-125 does not replace a medallion or a large overlay.
Mistake #12: redoing good slats for the sake of an article
If there is no compatibility, a different decor is chosen.
Mistake #13: counting the price of one plank as the price of the entire solution
For a long line, several KPU-125 are needed.
For multiple lines, the quantity is multiplied.
Mistake #14: not considering lighting
Five millimeters of relief greatly depend on light.
Mistake #15: making the same ornamental rhythm throughout the room without a reason
One accent wall does not have to turn into a common system for all rooms.
Purchasing scenario No. 1: 8 mm gap
KPU-125 has a width of 9 mm.
The free space is smaller.
Without changing the existing slat geometry, the idea does not work.
Solution:
do not try to force the element into place;
check the adjacent gap;
consider a different molding or a different type of decor.
Scenario No. 2: 9 mm gap per design, but 8.5–9.5 mm in reality
This is a typical example of why the nominal size is insufficient.
On parts of length KPU-125, there may not be normal free space.
It is not advisable to recommend installation without additional verification.
Scenario No. 3: even gap of 11 mm
The 9 mm molding physically gets more freedom.
A small margin remains on the sides.
Now important are:
- centering;
- base color;
- depth;
- method of fastening.
This is a good candidate for a test fitting.
Scenario No. 4: 20 mm gap
KPU-125 does not fill the gap.
It becomes a thin decorative center inside it.
If this is the desired effect, the project is visually possible.
If the buyer wanted to cover the entire gap with ornament, 9 mm may be too little.
Scenario No. 5: large recess depth
KPU-125 remains deep between the slats.
The carved pattern becomes delicate.
With side lighting, it can work interestingly.
With a weak frontal one, it almost gets lost.
A sample is needed.
Scenario No. 6: depth close to 5 mm
The decorative line approaches the front plane more actively.
The ornament reads more strongly.
It should be ensured that it does not start competing with the slats themselves.
Scenario No. 7: one meter near the mirror
One slat is needed.
There is no intermediate joint.
This is one of the most rational ways to try KPU-125 on an already finished surface.
Scenario #8: 2700 mm line
At least three strips are needed.
Before installation, the layout of all three is assembled.
Two connections are checked.
If the joints specifically spoil the impression, you can return to a meter-long local accent.
Scenario #9: two lines of 2700 mm
Six strips.
At the current price of KPU-125, the elements themselves give a reference of 5040 ₽ at the time of writing the article.
Only those accompanying materials and works that are actually required by the project are added.
Scenario #10: five full-size lines
At a height of 2700 mm, this is already 15 meters of KPU-125.
Such a project cannot be considered a "small local addition."
The ornament becomes a full-fledged second surface system.
Before ordering fifteen slats, it is worth looking again to see if the original simplicity of the slatted wall is lost.
How to determine the maximum reasonable number of decorative lines
There is no universal formula.
But there is a good visual test.
Look at the wall from the usual point of entry into the room.
Ask:
Do I see the slatted surface or the carved inserts first?
If KPU-125 is intended to be a delicate addition, the slatted wall should still be the first thing that reads.
If the eye immediately catches a multitude of ornamental stripes, the quantity, contrast, or frequency may be too high.
Three levels of perception of a good wall
A successful composition can work across distances.
From afar
The overall slat architecture is visible.
From a medium distance
Individual unusual vertical lines appear.
Up close
The carved pattern of KPU-125 is readable.
For a product 9 mm wide, this is a very natural hierarchy.
Why KPU-125 should not turn into a "secret" that is not visible at all
Delicacy does not mean invisibility.
If the relief is completely lost in deep shadow and the color matches the background, the purchase does not solve the decorative task.
In such a case, you can:
- change the placement;
- evaluate different lighting;
- choose a more noticeable contrast;
- look at another Carved polyurethane molding.
What to do if you like the KPU-125, but the gap does not fit
There is no need to give up the product itself.
You can consider other areas:
- smooth part of the wall;
- furniture facade;
- framed composition;
- another decorative surface, if it matches the purpose and design.
But that's a different scenario.
Specifically for the inter-slat insert, the rule remains strict: the geometry must match.
Why you can't turn an article into a promise to "update any panels for 840 ₽"
Such a headline would be attractive, but incorrect.
840 ₽ is the price of one slat at the current moment.
For a wall, you may need:
- several KPU-125;
- mounting material;
- preparation;
- trimming;
- work with joints.
And most importantly, some slat surfaces are completely incompatible with the idea of a 9 mm wide insert.
A useful article should help filter out unsuitable cases, not just sell the product.
When an additional purchase of slat panels is not needed
The point of the scenario in question is precisely to preserve the existing finish.
If the wall is ready and the dimensions fit, there is no need to buy new panels for KPU-125.
Link to decorative slatted wall panels useful in another case:
- need to continue an existing rack zone;
- the project is not finished yet;
- a new wall is being compared;
- want to immediately include KPU-125 in the future layout.
This is important for honest commercial logic: not every internal transition should force the buyer to purchase an additional product.
When, on the contrary, it is better to redo a small part of the composition
Sometimes after trying on, the buyer realizes that a thin line is not enough.
Want:
- wide smooth insert;
- large rosette;
- ornamental panel;
- horizontal belt.
In such a case, preserving every slat at any cost becomes a constraint.
If the project truly benefits from a more serious rework, it is better to make this decision consciously rather than trying to force KPU-125 to solve a task of a different scale.
KPU-125 and modern interior
Carved decor does not necessarily turn a slat wall into a classic one.
With a small quantity and a close color, KPU-125 can work as a micro-detail.
It is precisely the 9 mm width that helps.
One or two carved lines do not change the overall modern character of the wall as much as a large ornamental overlay.
This is a good scenario for interiors where you want to avoid sterile geometry, but also do not plan to go into a rich stucco composition.
KPU-125 and a neoclassical interior
Here, the ornament gets more grounds for existence.
If nearby there are:
- framed facades;
- classic furniture;
- Moldings;
- decorative handles;
- stucco details,
thin carved moldings can connect the modern slatted surface with the rest of the interior.
But even in neoclassicism, there is no need to fill every gap with it.
Usually, rare accents look more convincing.
Eclecticism: the freest, but also the most dangerous scenario
Mixing the strict geometry of slats and carved polyurethane molding can be very expressive.
But eclecticism requires control.
If the following appear nearby:
- bright tiles;
- active wallpaper;
- several types of wood;
- complex textiles;
- metal parts;
- large stucco molding,
KPU-125 can become just another small pattern.
Then it's better to reduce the number of elements.
Minimalism: is carved molding needed there at all
Sometimes no.
If the interior idea is built on the absolute purity of repeating verticals, KPU-125 contradicts the task.
There's no need to prove that any product suits any style.
A buyer who likes the strictness of the slat wall itself is better off keeping it.
How to test the idea in one evening before ordering
Practical algorithm:
- Select one inter-rail gap.
- Measure it in at least five places.
- Check the base inside.
- Assess the depth of the depression.
- Mark the strip 9 × 1000 mm.
- Look at it in daylight.
- Look at it in the evening.
- Add a second strip with a mock-up.
- Compare one and two accents.
- Only after this, count the number of KPU-125.
This algorithm is much more useful than spending a long time looking at photos of other people's interiors.
What to check directly in the product card before purchasing
Before placing the order, open it again KPU-125.
Verify:
- article number;
- size 9 × 5 × 1000 mm;
- the material;
- current price;
- necessary accompanying items.
Do not order based on a photo from a saved collection if millimeters are critical in the project.
What to check on the wall before purchasing
The product card does not know your wall.
Therefore, additionally:
- minimum clearance;
- its depth;
- evenness of the base;
- height of the decorative line;
- number of lines;
- sockets and switches;
- Furniture;
- light points;
- future joints.
Only the combination of the product card and actual measurement gives a proper solution.
What to check after receiving KPU-125, but before installation
Apply the real element.
A 9 mm wide mock-up is useful, but does not show the relief.
Now we can finally assess:
- the landing;
- the depth;
- pattern;
- color;
- the connection of two planks;
- the distance to the battens.
If the actual part looks worse than expected, it is much easier to stop before fixing.
Why "without rework" does not mean "without preparation"
This is an important distinction.
The goal is not to dismantle the slat panels.
But installing an additional decorative element still requires:
- measurements;
- fittings;
- base preparation;
- layout;
- selection of mounting material.
That is, the scenario is simple in terms of the scale of intervention, but it should not be careless.
Who is the KPU-125 idea in the inter-lath gap especially suitable for
For those whose slat wall is already fully completed
Rework is undesirable; a local way to change the character of the surface is needed.
For those who lack only a small amount of ornament
Large stucco molding would be excessive.
For owners of a neatly mounted wall with a suitable gap
Accurate original geometry is especially important.
For projects with multiple stylistic layers
Modern slats can be delicately paired with more classic furniture.
For those ready to first make a test sample
This is the best approach for such a refinement.
Who the idea is likely not suitable for
For the owner of a wall with a gap smaller than 9 mm
Physical compatibility is absent.
With highly uneven gaps
Thin molding will emphasize deviations.
If you need a large expressive ornament
KPU-125 is too delicate.
If the entire wall is already saturated with decor
An additional carved layer may be unnecessary.
If you want to fill absolutely every gap with KPU-125
It should first be considered as a new holistic concept, not a local accent.
If the base within the gap is unsuitable for the chosen mounting scheme
Installation cannot be based solely on the availability of free width.
Seven questions before putting KPU-125 in the cart
First: what is the minimum actual gap on the selected line?
If it's less than 9 mm, we stop.
Second: what is at the bottom of the gap?
We need to understand the base.
Third: how does a 5 mm relief look relative to adjacent slats?
We check from the side and in real light.
Fourth: do we need one meter or the full height?
This drastically changes the quantity and number of connections.
Fifth: how many decorative lines are actually needed?
We start with the minimum.
Sixth: where are the furniture and electricals?
They affect the choice of gap.
Seventh: does KPU-125 decorate the wall or just fill empty space?
If the latter, it's better to stop.
Buying carved molding KPU-125: the correct ordering procedure
The most rational route looks like this.
First, the finished slatted surface is measured.
Then specific gaps are selected.
After that, the height of each ornamental line is determined.
Next, the number of meter-long elements is calculated.
Only then is it worth buy carved molding KPU-125.
If during measurement it turns out that 9 mm does not fit, there is no need to redo quality panels for the sake of one article. Go to the section and choose decorative polyurethane molding to match the actual geometry of the project, or consider a different shape of decor.
If it turns out that you no longer want a thin line but a full classic accent, it is better to look at the entire assortment and ordering polyurethane molding decor.
If the slat wall is only planned for another room, you can change the sequence: first choose Slatted wall panels for interior finishing, then check their actual geometry together with KPU-125 and incorporate decorative lines right away.
FAQ: KPU-125 between slats on a finished wall
Is KPU-125 a molding?
In this article, the product is called precisely: KPU-125 is carved polyurethane molding. It should not be replaced with a slat panel, overlay, or baguette.
What size is KPU-125?
9 × 5 × 1000 mm.
For installation between slats, the 9 mm width, 5 mm relief, and meter length are especially important.
How much does KPU-125 cost now?
At the time of preparing the material, the card shows 840 ₽ per plank. Before placing an order, the current price should be checked again.
Can KPU-125 be inserted between already installed slats?
This option can be considered if the actual gap fits in width, there is a suitable base inside, and the 5-millimeter relief aligns well with the wall geometry. There is no universal compatibility with all panels.
If the gap between slats is exactly 9 mm, will KPU-125 definitely fit?
Not necessarily. 9 mm is the nominal width of the product itself. You need to check the actual gap along the entire length, possible local narrowings, and the condition of the edges.
How to measure the gap correctly?
Not at one point. Measure the selected line in several places along the entire intended installation length.
Do I need to measure each gap separately?
If KPU-125 is planned to be installed in several gaps, yes, it is better to check each selected line. Visually identical gaps may differ slightly.
What to do if the gap is less than 9 mm?
Do not recommend KPU-125 as an insert without changing the existing finish. It is better to choose a different decorative scenario or a different product.
What if the gap is 10–12 mm?
This is already a more flexible geometry in width, but you need to see how the small margins on the sides of the 9-mm trim look and how easy it is to center it.
What to do with a 20 mm gap?
KPU-125 will be perceived as a thin carved line inside a wide recess, rather than a full fill of the gap. This effect needs to be checked visually first.
Why consider the 5 mm size?
It shows the relief of KPU-125 relative to the base. We need to understand how deep or high the decorative line will be between adjacent slats.
What is better: KPU-125 deeper than the face surface of the slats or almost flush?
There is no universal answer. A deep fit looks more delicate, a higher one more active. The decision is tested with a sample and lighting.
Can KPU-125 be inserted into every gap?
Physically, it all depends on the dimensions of the specific wall, but from a design perspective, such a scenario requires special caution. For a local accent, it is usually wiser to start with one to three lines.
How many KPU-125 are needed for a height of 2700 mm?
Nominally, at least three strips of 1000 mm per decorative line. At the same time, you need to plan two joints and trimming along the total length.
How many are needed for two lines with a height of 2700 mm?
Three elements per line, that is, six KPU-125 for two.
How much does it cost at the current price?
At a price of 840 ₽, six strips total 5040 ₽ for the KPU-125 units themselves. The current price must be rechecked before purchase; installation materials are not included in the calculation.
Can one KPU-125 be used without extending it?
Yes. A meter-long local insert is one of the most interesting scenarios for an already finished wall, since it does not require an intermediate joint.
Where is the best place to put a meter-long insert?
Near a console, mirror, furniture area, or another place where the decorative line has a compositional reason.
Can KPU-125 be started directly from the floor?
Different schemes can be considered, but first you need to decide how the line interacts with the baseboard. It is not necessary to run the decorative element all the way to the floor.
Do I need to run it all the way to the ceiling?
No. KPU-125 can be a local fragment. For a scenario without redoing a finished wall, this is sometimes even more expressive.
How do I connect multiple KPU-125 units?
Before installation, you need to do a dry layout of several elements and check the continuation of the carved pattern and connection points. It is impossible to universally promise an invisible joint without a specific fitting.
Can KPU-125 be cut?
For assembling a non-standard length, trimming may arise as a design task, but before modifying a carved element, its pattern must be considered. You should not assume in advance that any short fragment is equivalent to a whole plank.
Can the remaining offcut be placed in another gap?
Only if it has a compositional role. You should not place leftovers randomly just to save material.
What color should be chosen for KPU-125?
A color close to the surrounding surface makes the ornament more delicate. A contrasting one enhances even a very thin line. First choose the geometry, then the color.
Will KPU-125 suit wooden slat panels?
Visual combination is possible, but physical installation depends on the specific inter-slat space and the base. The slat material itself does not answer the compatibility question.
Can KPU-125 be used with MDF panels?
The same principle applies: you need to check the actual construction and gap size of the specific panel, not just the material name.
Which glue should I use?
The composition is selected based on the material of the actual substrate and the instructions of the specific installation product. You can look at Mounting and finishing materials.
The KPU-125 card offers KUDO HIGH TACK. Does this mean it automatically fits my wall?
No. The presence of a product among related items does not eliminate the need to check the instructions of the adhesive itself and the material of the existing substrate.
Do I need to dismantle the panel before installing KPU-125?
If the gap, substrate, and installation scheme allow for a local insertion, the point of the scenario in question is precisely to preserve the finished panel. If serious dismantling is required, the feasibility of the idea needs to be reassessed.
What to do if KPU-125 does not fit?
Do not force a good finished wall at any cost. Look at another Polyurethane trim or another type of decorative element.
How to check KPU-125 before a large order?
First, measure the wall and make a mock-up of 9 × 1000 mm. Then reasonably evaluate a real sample or a minimal test area before purchasing quantities for multiple lines.
Which is better: one line or three?
For a first experience, one. Three make sense when the entire composition truly requires a second regular rhythm.
Can two symmetrical lines be made?
Yes, if the wall itself or the furniture composition has a clear central axis.
Can KPU-125 be used around a TV?
It's better not to turn a thin ornament into a frequent frame without necessity. In a TV area, one or two side lines usually work if they are connected to the overall composition.
Is KPU-125 suitable behind the headboard?
It can be interesting as a delicate accent among slats, especially if large molding seems too active. First, you need to check the position relative to the bed and lighting fixtures.
Is KPU-125 suitable for a hallway?
The small scale of the product is well revealed from a close distance, so an entryway can be a successful scenario with suitable gap geometry.
Should I add KPU-125 if the slat wall already looks finished?
Rather not. The molding is needed to solve a specific problem — excessive geometricity or a lack of a small ornamental accent. If there is no such problem, it is better to keep the surface.
Where to buy KPU-125?
In the card, you can buy carved molding KPU-125 measuring 9 × 5 × 1000 mm.
Where to see other polyurethane moldings?
In this section you can Buy polyurethane trim and compare KPU-125 with other models.