Article Contents:
- What is a polyurethane ceiling rosette
- When a ceiling rosette is really needed
- Classical and Neoclassical Interior
- Living room with a large chandelier
- Hall and Foyer
- Bedroom
- Office and Library
- When a rosette is not needed
- How to choose the diameter of a ceiling rosette
- Rule of matching the chandelier
- Rule of matching the room
- Rule of Matching Ceiling Height
- Reference table for diameter selection
- Wire hole
- Smooth or ornamental rosette: which to choose
- Smooth rosette
- Ornamental rosette
- Multi-level rosette
- Principle of matching the chandelier
- Rosette for the living room: how to choose correctly
- Central composition
- Proportions for the living room
- How to connect the rosette with the cornice
- Bedroom socket: delicacy above all
- Size and scale for the bedroom
- Socket color in the bedroom
- Connection with Ceiling Crown Molding
- Ceiling socket for a low ceiling
- What not to do
- What to do
- Life hack: socket in ceiling color
- Why polyurethane is the best material for a ceiling socket
- Low weight
- Simple installation
- Ideal surface for painting
- Stability
- Geometric precision
- How to choose a socket for different interior styles
- Classicism and Baroque
- Neoclassicism
- Provence and Chateau
- Empire and Art Deco
- Modern classicism
- Color and Painting of Ceiling Rosette
- White Ceiling Rosette
- Colored Rosette
- Gold or Bronze Painting
- Painting Before Installation
- Ceiling Rosette Installation: Step by Step
- Tools
- Surface Preparation
- Applying adhesive
- Pressing and fixing
- Puttying Seams
- Central Hole
- How to combine a ceiling rosette with a cornice and moldings
- Stylistic Unity
- Proportional unity
- Color Unity
- Moldings as Transitional Elements
- Mistakes when choosing a ceiling rosette
- Where to buy a polyurethane ceiling rosette
- FAQ: Answers to Popular Questions
- About the manufacturer
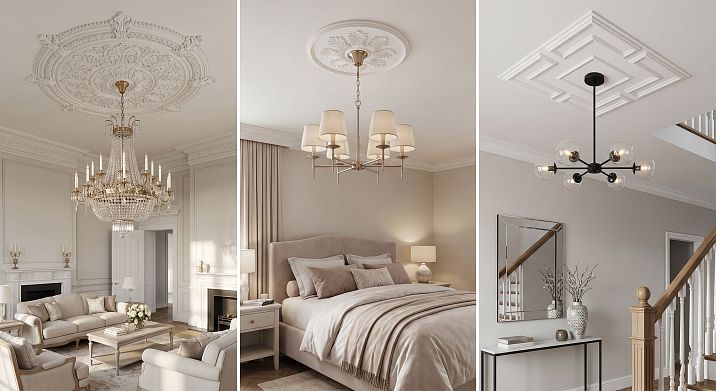
A ceiling without a rosette under a chandelier is like a formal portrait without a frame. The chandelier hangs, the light shines, everything functions. But the center of the ceiling remains bare: a wire from the plaster, a circle of fasteners — and no completeness. A decorative rosette solves this issue once and for all: it frames the suspension point, connects the chandelier to the ceiling, and turns a technical element into an architectural accent.
ceiling rose made of polyurethane — the most affordable and practical way to make this detail right. Lightweight material, precise geometry, a huge selection of shapes and diameters, simple installation, perfect compatibility with painting. That is why polyurethane rosettes have become the standard in classic, neoclassical, and simply well-thought-out interiors — from city apartments to country houses.
But choosing a rosette is not as simple as it seems. Too small gets lost under a large chandelier. Too large and ornate overwhelms a low ceiling. The wrong style of ornament disrupts the ensemble with the cornice and moldings. And all these are real mistakes that even experienced designers make. This article will help you choose correctly.


What is a polyurethane ceiling rosette
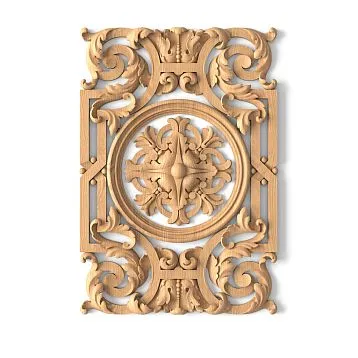
A ceiling rosette is a round decorative element that is attached to the ceiling around the base of a chandelier or central light fixture. In the classical architectural tradition, it is one of the most important decorative accents of the ceiling: it frames the "entry point" of light into the space, creates a central composition, and visually connects the chandelier with the rest of the ceiling decor.
Modern Polyurethane Rosettes inherit the shape of historical plaster ones but win in a number of parameters: they are significantly lighter, do not create a load on the ceiling, are easier to install, do not crack from vibration, are easy to paint, and do not require special tools for installation.
The socket can be:
-
flat — with minimal relief, barely protruding above the ceiling plane;
-
relief — with pronounced ornament, petals, leaves, geometric weaving;
-
multi-level — with several concentric belts of decor.
The diameter of serial sockets is from 150 mm to 1000 mm or more. The central hole is intended for the chandelier wire. Its diameter is typically standard — 10–20 mm, but can be expanded if necessary.


When a ceiling socket is really needed
Some consider the socket under the chandelier an outdated technique. This is a misconception. The socket is appropriate in many modern interiors — the question is what type and what scale.
Our factory also produces:


Classic and neoclassical interior
Here, the ceiling socket is a mandatory element. Chandelier with decorative shades, ceiling a polyurethane cornice, moldings around the perimeter — and a central socket. This is a unified system where each element supports the others.
The absence of a socket in a classic interior with cornices is like a suit without a tie. Technically, nothing prevents it. But something is clearly wrong.
Get Consultation
Living room with a large chandelier
A large chandelier on a bare ceiling visually "sags": a heavy object without framing looks random. A rosette creates framing, fixes the chandelier in the center of the ceiling composition, and connects it to the ceiling space.
Hall and Entrance
The hall is the first room a guest sees. Here, every detail contributes to the impression. A small, elegant rosette under a spot light or a small chandelier in the hall creates a sense of thoroughness and interior culture.
Bedroom
In the bedroom, the rosette works more softly: not as a formal accent, but as a delicate detail that decorates the ceiling. Here, the right scale is important — the bedroom does not tolerate overload.
Office and library
The ceiling of the study is often decorated moldings and with ceiling cornices. The rosette fits into this system as a central element.
When a rosette is not needed
In a minimalist interior without cornices and decor — the rosette will look out of place. With spot or recessed lighting without a central light fixture — the rosette has no use. In interiors with stretch ceilings without a chandelier — also.
How to choose the diameter of a ceiling rosette
Diameter is the key parameter. It determines whether the rosette will be proportionate to the chandelier, ceiling, and room. And this is where mistakes are most often made.
Chandelier matching rule
The diameter of the rosette should be equal to the diameter of the lampshade or the "cap" of the chandelier — or slightly larger. If the chandelier is sprawling, with long arms, the diameter of the rosette is taken according to the dimension that is visually perceived as the base: as a rule, this is the diameter of the central body plus 10–20%.
More specifically: if the central body of the chandelier has a diameter of 300 mm — the rosette should be 350–400 mm. If the chandelier is small, with a narrow suspension point — the rosette is 200–300 mm.
Room matching rule
There is also a "spatial" rule: the diameter of the rosette in centimeters approximately corresponds to the area of the room in square meters. A room of 20 m² — a rosette of about 200 mm. A room of 40 m² — a rosette of 350–450 mm.
This is a guideline, not a strict standard. But it describes the logic of scale well.
Rule of matching ceiling height
A high ceiling allows you to take a rosette with a higher relief and a larger diameter. A low ceiling requires a thin, flat, small element. A massive rosette with a diameter of 600 mm with a deep ornament with a ceiling of 2.5 m is visual pressure.
Table of guidelines for choosing the diameter
| Room area | Ceiling Height | Recommended rosette diameter |
|---|---|---|
| up to 15 m² | 2.4–2.6 m | 150–250 mm |
| 15–25 m² | 2.5–2.8 m | 250–350 mm |
| 25–40 m² | 2.7–3.2 m | 350–500 mm |
| 40–60 m² | 3.0–3.5 m | 500–700 mm |
| More than 60 m² | Above 3.5 m | 700 mm and more |
Wire hole
The standard central hole in the rosette is 10–20 mm. If the electrical channel is wider, the rosette can be modified: carefully drill it out to the required diameter. Polyurethane is easily cut with a knife and sanded with sandpaper.
Smooth or ornamental rosette: which to choose
This is a matter of style. But not only: the ornament on the rosette also creates a play of light. With side lighting, the relief ornament casts a beautiful shadow, enlivening the surface. A smooth rosette is a clean silhouette without shadows.
Smooth rosette
A smooth relief contour without ornamental filling. Only geometric bands, simple moldings, clean concentric circles. This is modern classic — calm, unobtrusive, suitable for neoclassical and modern interiors with minimal decor.
Smooth socket for chandelier good in a bedroom, in a hall with delicate decor, in a study where the ceiling is not the main visual accent.
Ornamental rosette
Acanthus leaves, vine shoots, rosettes with rays, geometric weaving, classic meanders — this is already an architectural decoration. Such an element works in a classic interior as a small piece of applied art.
An ornamental rosette is appropriate in a formal living room, a dining room with a large chandelier, and interiors with a rich ceiling cornice and wall moldings. Here, the relief of the rosette matches the relief of the cornice — together they create a decorative dialogue.
Multi-level rosette
Several concentric bands — alternating smooth and ornamental zones. This is the most expressive type: it adds volume, depth, and highlights the chandelier as the central element of the ceiling. Suitable for large formal rooms with high ceilings.
Principle of matching the chandelier
A chandelier with rich decoration — glass pendants, bronze curls, complex body — calls for an ornamental rosette: they should speak the same language. A minimalist modern chandelier on a cable or rod — calls for a smooth or geometrically clean option.
Rosette for the living room: how to choose correctly
The living room is the most critical room for choosing a ceiling rosette. Here, the scale is maximal, the chandelier is the largest, and the viewer's attention is the most focused.
Central composition
The living room ceiling is often built as a system: a cornice around the perimeter, possibly frame moldings or coffers, and a central rosette under the chandelier. These are three levels of one ensemble. Polyurethane moldings — the cornice, moldings, and rosette — should belong to the same style and the same manufacturer, so that profiles and ornaments match.
Buying a cornice from one supplier, moldings from another, and a rosette from a third means risking a mismatch of styles, profile thicknesses, and ornament patterns. This is noticeable even to a non-specialist.
Proportions for the living room
For a living room of 25–40 m² — a rosette with a diameter of 400–600 mm. This is the size at which the rosette is clearly visible from the far wall and convincingly supports a large chandelier. The ornamental type is leaf, classic, with several bands.
How to connect the rosette with the cornice
If the cornice has a leaf ornament — the rosette should also include a leaf motif. If the cornice is geometric with a meander — a rosette with geometric weaving. The stylistic unity of the cornice and rosette is what turns the ceiling from a set of elements into an architectural composition.
Cornice made of of polyurethane moldings and ceiling rosette in a unified style — this is a visual system that works as a single whole.
Rosette for the bedroom: delicacy above all
The bedroom is not the living room. Everything works differently here: dim light, soft lines, an atmosphere of peace. The ceiling rosette in the bedroom is not a grand accent, but a delicate detail framing the center of the ceiling.
Size and scale for the bedroom
For a bedroom of 15–25 m², a socket with a diameter of 250–380 mm is suitable. This is enough to create a suspension point, but not enough for the ceiling to 'speak' too loudly.
The relief should be soft: a light leaf pattern, simple petals, a calm geometric band — but not a deep, high relief with dark shadows. In the bedroom, shadows from the ornament when the chandelier is on should be soft and not disturbing.
Color of the ceiling socket in the bedroom
In the bedroom, the ceiling socket most often remains white — matching the ceiling. This is a delicate decor that is felt but does not shout. A light shadow from the relief under side lighting is all that is needed.
Connection with ceiling cornice
If there is a ceiling cornice in the bedroom, the socket should support its style. A thin, simple cornice — a thin, simple socket. A richer, ornate cornice — a socket with a delicate ornament.
Ceiling socket for a low ceiling
A low ceiling — 2.4–2.5 m — imposes restrictions on all decor. And the socket is no exception.
What not to do
Do not take a socket with a high relief — 30–50 mm protrusion. It creates a heavy shadow and visually lowers the ceiling even further.
Do not take a socket that is too large. A diameter of 600 mm with a ceiling of 2.4 m is almost a quarter of the room in diameter. The ceiling turns into one large detail.
What is needed
A flat or semi-flat rosette with a relief of no more than 10–15 mm. Diameter — no more than 250–300 mm for a room up to 20 m². Ornament — light, with thin lines, without large leaves and deep relief masses.
For a low ceiling, a thin one is ideal polyurethane molding with a geometric pattern and minimal relief. It creates the necessary accent without visual pressure.
Life hack: rosette in the color of the ceiling
For a low ceiling, it is best to paint the rosette strictly in the color of the ceiling — without emphasizing the relief with a contrasting tone. This allows you to create a delicate decorative accent that is only visible when looking straight up.
Why polyurethane is the best material for a ceiling rosette
Historically, ceiling rosettes were made of plaster. Plaster is beautiful, but heavy, fragile, requires complex installation and professional laying. Polyurethane offered a fundamentally different approach.
Low Weight
Polyurethane ceiling decoration weighs 5–7 times less than a plaster counterpart. A rosette with a diameter of 500 mm made of polyurethane weighs 300–500 g — it can be glued to the ceiling with ordinary mounting adhesive without additional fasteners.
A plaster rosette of the same diameter weighs 2–4 kg and requires dowel fastening, is dangerous if it falls, and can crack from house vibration.
Easy installation
Glue + a small anchor in the center for the chandelier — and it's done. Polyurethane fits tightly to the ceiling, glue sets quickly, seams are easily filled.
Perfect surface for painting
Polyurethane rosettes — all without exception — are designed for painting. The surface is already sanded, does not require priming with special compounds, and accepts regular water-based paint. One or two coats — and the rosette is ready.
Durability
Polyurethane does not crack from temperature and humidity changes, does not crumble under mechanical impact, and is not afraid of surface washing. A well-painted polyurethane rosette lasts for decades without losing its shape.
Geometric accuracy
Factory polyurethane rosettes are made using precise molds. The geometry is perfectly correct, the pattern repeats without distortion. This is important when the rosette must be strictly centered under the chandelier.
How to choose a rosette for different interior styles
Classical and Baroque
Maximum relief, acanthus leaves, sunburst rosettes with rays, and lush floral ornament. Diameter — large, belts — numerous. This is a ceiling rosette as a work of architectural art. Together with a rich ceiling cornice — forms a ceremonial ensemble.
Neoclassicism
More restrained but architecturally precise decor: clear concentric bands, geometric meander, laurel leaves — without excessive opulence. The rosette is visible and appropriate, but does not dominate. This is a modern balance of decor and restraint.
Provence and Château
Rounded petals, floral ornament, soft silhouette. A white rosette on a white ceiling with soft shadows from the relief. Delicate, lived-in, warm.
Empire and Art Deco
Strict geometry with botanical accents. Symmetrical rays, geometric bands, restrained leaves without Baroque opulence. Contrast coloring — white rosette, gold ornaments — is acceptable.
Modern classic
Smooth concentric rings, possibly a thin ornamental band along the outer diameter. No excess relief. This is a rosette that creates an accent but does not shout about itself.
Color and painting of the ceiling rosette
The painting issue is resolved before installation — this is fundamental. Painting an installed rosette is significantly more difficult: you need to carefully protect the surrounding surface, and it is hard to paint the inner corners of the ornament.
White ceiling rosette
Standard and universal option. White decorative ceiling rosette matching a white ceiling — this is a delicate decor based on relief and play of shadows. Suitable for any style.
colored rosette
ceiling in a neutral tone — rosette slightly lighter or darker within the same palette. This is a subtle, refined technique that creates visual depth without contrast.
a bolder option: colored ceiling (gray, blue, anthracite), white rosette. A striking contrast that focuses attention on the center of the ceiling.
gold or bronze painting
in a classic interior, delicate gilding of the protruding parts of the ornament — leaves, rays, frames — turns the rosette into a true architectural decoration. This is done with a brush with fine detailing: only the tops of the relief, not the recesses.
painting before installation
optimal order:
-
degrease the surface of the rosette
-
Apply a thin primer coat with water-based paint
-
After drying — main color (1–2 coats)
-
Install the ceiling rosette
-
Fill the joints with putty and paint to match the ceiling color
Thus, the inner corners of the ornament are fully painted before installation — only the edges need to be aligned along the perimeter on the ceiling.
Installing a ceiling rosette: step by step
Installing a polyurethane rosette is accessible to anyone with minimal construction skills. There are no special requirements — just carefulness.
Tools
-
Mounting adhesive (acrylic or polyurethane)
-
Painter's tape
-
Putty knife
-
Fine-grit sandpaper (120–180)
-
Drill with hole saw (if you need to enlarge the central hole)
-
Pencil, tape measure
Surface preparation
The ceiling in the installation area must be clean, dry, and degreased. If the ceiling is plastered and already painted — that's fine: the adhesive bonds to the painted surface as long as it is clean.
Mark the center of the future rosette — it should align with the chandelier's suspension point. Draw the axis.
Applying adhesive
Apply adhesive to the back surface of the rosette along the perimeter and crosswise in the inner areas. Do not skimp on adhesive: good adhesion over the entire surface is the key to avoiding gaps.
Pressing and Fixation
Press the rosette against the ceiling, aligning the central hole with the suspension point. Hold for 1–2 minutes. Check the position along the axes. If necessary, secure with painter's tape while drying (1–2 hours).
Puttying the seams
After the adhesive has dried, putty the seam between the rosette and the ceiling with finishing putty. After the putty has dried, sand it and paint it to match the ceiling color.
Central hole
After installation, thread the chandelier wire through the central hole. If necessary, enlarge the hole with sandpaper or a thin blade — polyurethane cuts easily.
How to combine a ceiling rosette with a cornice and moldings
This is a systemic issue. The rosette, cornice, and moldings are three levels of ceiling decor, and they must be coordinated.
Stylistic unity
A classic ornamental cornice requires a classic ornamental rosette. A simple geometric cornice requires a geometrically clean rosette. Mixing styles only works when it is a deliberate design decision, not a random purchase.
All Polyurethane trim Cornices, moldings, baseboards, and the ceiling rosette should be purchased from a single catalog. This guarantees matching styles and relief proportions.
Proportional unity
If the cornice is 100 mm high with rich relief, and the rosette is a thin 150 mm, they will not create an ensemble. The depth of the rosette's relief should be comparable to the depth of the cornice's relief. The same 'weight' of ornament in both elements is the rule.
Color Unity
If the cornice is white, the rosette is white. If the cornice is painted to match the wall color with white protruding relief, the rosette follows the same logic. One element cannot be painted with gold while the other is strictly white. Either all stucco has gilding, or none does.
Moldings as a transitional element
If there are framed Moldings made of polyurethane rectangular or square frames on the ceiling plane, the rosette should be centered within the central frame or compositionally complete the frame system. This is architectural logic: frames divide the plane into fields, and the rosette decorates the central field.
Mistakes when choosing a ceiling rosette
Let's look at typical mistakes that even those who have done renovations before make.
Choosing a ceiling rose that is too small for a large chandelier. A 200 mm diameter rose under a chandelier with a 500 mm shade — the chandelier 'hangs', the rose gets lost. Proportionality is the first rule.
Choosing a massive, deeply embossed ceiling rose for a low ceiling. High relief with a ceiling height of 2.4 m creates heavy visual pressure. For low ceilings, only flat and small decor.
Not considering the style of the light fixture. A minimalist modern chandelier and a ceiling rose with lavish baroque ornamentation is not classic, it's a mismatch.
Mixing different ornaments. A cornice with a geometric meander and a ceiling rose with acanthus leaves — different architectural eras, different styles. This is not 'rich', it's chaos.
Buying a ceiling rose separately from the cornice and moldings. Without a unified style and manufacturer, there is a risk of mismatched profiles, ornaments, and relief thicknesses.
Forgetting about the diameter of the chandelier base. If the chandelier has a wide decorative 'ceiling cup', the rose should be wider than it. If the cup covers part of the rose, the ornament is partially hidden and the purpose of the rose is lost.
Not planning the painting before installation. Painting the rose after installation means risking paint drips on the ceiling, unpainted corners of the ornament, and extra labor.
Forgetting about the combination with the ceiling color. A white rose on a colored ceiling without precise color matching is a contrast you might not have planned. Decide on the color issue in advance.
Where to buy a polyurethane ceiling rose
When choosing a supplier, two points are fundamentally important: the availability of a unified catalog with cornices and moldings (for stylistic consistency) and the precise indication of diameter, relief, and style.
In the STAVROS catalog Polyurethane ceiling rosettes are available in several diameters and styles — from minimalist geometric to classic ornamental. Nearby is all the necessary ceiling decor: Polyurethane moldings and cornices, decorative molding, overlay elements — all in a unified style and within a single system.
Full catalog polyurethane molding и the entire STAVROS assortment allows you to select all ceiling decor elements in one place — with a guarantee of stylistic unity.
FAQ: Answers to popular questions
How to choose a ceiling socket for a chandelier?
The diameter of the rosette should equal the diameter of the central body or lampshade of the chandelier, or be 10–20% larger. The ornament style of the rosette should match the style of the chandelier and the ceiling cornice.
What diameter of rosette is needed for a large chandelier?
For a large chandelier in the living room — a rosette with a diameter of 450–700 mm. Refer to the diameter selection table based on room area and ceiling height.
Is a polyurethane rosette suitable for a low ceiling?
Yes — when choosing a flat element with minimal relief and a diameter of no more than 250–300 mm. Avoid deep ornamental rosettes with a relief of 30–50 mm.
Can I paint a ceiling rosette?
Yes. All polyurethane rosettes are designed for painting. It is recommended to paint before installation: this way the ornament is fully painted, including the inner corners.
Which is better: a smooth or carved rosette?
It depends on the interior style. Smooth — for neoclassical and modern spaces. Ornamental — for classic, formal living rooms, interiors with a rich ceiling cornice.
Is a rosette needed in a modern interior?
In minimalist — no. In neoclassical, classic, Provence, art deco — yes. Even in a modern interior with one large chandelier, a laconic smooth rosette creates completeness.
How to combine a rosette with a ceiling cornice?
A unified ornament style, comparable relief depth, same color. Buy the rosette and cornice from the same catalog — then a match is guaranteed.
Can a rosette be installed after renovation?
Yes. A polyurethane rosette is mounted with glue on an already painted ceiling. The seams are puttied and painted over. Installation takes 2–3 hours.
How is a polyurethane ceiling medallion better than a plaster one?
5–7 times lighter, does not crack, mounts with glue without anchor fastening, easy to paint, resistant to vibration and temperature changes.
Where to buy a polyurethane ceiling rosette?
In the STAVROS catalog: socket for chandelier made of polyurethane in several diameters and styles with delivery across Russia.
About the manufacturer
STAVROS — Russian manufacturer moldings from polyurethane and decorative elements for the interior. The company's catalog includes — ceiling rosettes, Moldings and cornices, decorative molding, overlay elements made of polyurethane — the full range for systematic ceiling design in a unified style. If you are looking for a decorative ceiling rosette for a chandelier in the living room, bedroom, hall, or study — in the catalog STAVROS you will find the right size, ornament, and style.