Article Contents:
- What is already ready in CPU.VRS-064.1 and what is adjusted on site
- Specifications and contents of CPU.VRS-064.1
- Why uncut delivery is part of the design
- How the kit differs from a random set of moldings
- Why the central ornament cannot be used as a reserve
- Can the base width of 960 mm be reduced
- Can the composition be made wider
- First, find the central axis
- How to check the side margins
- Sockets, switches, and sconces are marked on the plan in advance
- How to connect the panel with furniture
- What to pass to the craftsman besides the photo
- Where it is convenient to lay out the set
- How to distribute the reduction between two sides
- How to get a clean cut and neat joints
- Who to assign the trimming to
- Why they first fit and then paint
- Why primer cannot be taken as a finished coating
- A calm option: a panel in the color of the wall
- A contrasting panel as an independent element
- Why the mounting compound is selected for the wall and parts
- Why the joint compound does not replace a precise cut
- Where to study the general procedure for installing molding
- Desktop Control
- Wall Control
- Above the console
- In the entryway
- In the bedroom
- In the living room
- In a Restaurant, Hotel, or Salon
- When the Composition Needs an External Frame
- Why This Is Not a Kit for Arbitrary Assembly
- When a Standard Kit Is Enough and When a Separate Project Is Needed
- What the Manufacturer Has Already Done
- When it's wiser to choose a different decor
- What data to provide to the STAVROS manager
- Considering individual parts as a sign of defect
- Ordering without measuring the wall
- Relying only on a photo of the interior
- Cutting the central ornament
- Removing all the allowance from one side
- Not doing a dry layout
- Paint until the cut is made
- Use random assembly composition
- Fix a wide gap with a thick layer
- Do not check the base
- Choose an additional molding based on a photo
- Do not account for switches and sconces
- Do not assign a person responsible for the cut
- Consider primer as final paint
- Do not mark elements
- Start the series without a control panel
- Don't try to get the desired width at any cost
- Don't stretch the composition without a project
- How to check symmetry after trimming
- How to try the panel on the wall before gluing
- What to do with an uneven base
- How to care for the finished composition
- Why the trimming allowance saves time and materials
- Why does the panel arrive as separate pieces?
- Is this considered a defect?
- What is the size of CPU.VRS-064.1?
- What materials is the set made of?
- Do the elements need to be glued before installation?
- Which parts can be trimmed?
- Can the central ornament be trimmed?
- Can the base width of 960 mm be reduced?
- Can the panel be made wider?
- What measurements are needed before ordering?
- Is a dry layout needed?
- When to make the cut?
- When to paint the panel?
- Can primed MDF be left without a finish?
- What Adhesive to Use?
- Where to get general installation recommendations?
- Is CPU.VRS-064.1 suitable for installation above a fireplace?
- Is the panel suitable for a hallway?
- Can the panel be used in a hotel or restaurant?
- What to buy together with the panel?
- Where can I see other decorative elements?
- Where can I check the current price?
- What to specify to the manager?
- When the renovation is already finished
- If the panel is being incorporated into a new interior
- How to distribute work between the designer, painter, and installer
- What to check after installation
- When the size can be considered finally approved
- Is an additional set needed for a large project
- Does the order include pre-painted finish?
- Who is responsible for the final width?
- Can installation start from the central part?
- Do I need to specify the color when ordering?
- Can I order a wall panel with decorative plaster already applied?
- What should I do if the size doesn't fit after laying out?
- What the cost of a finished wall consists of
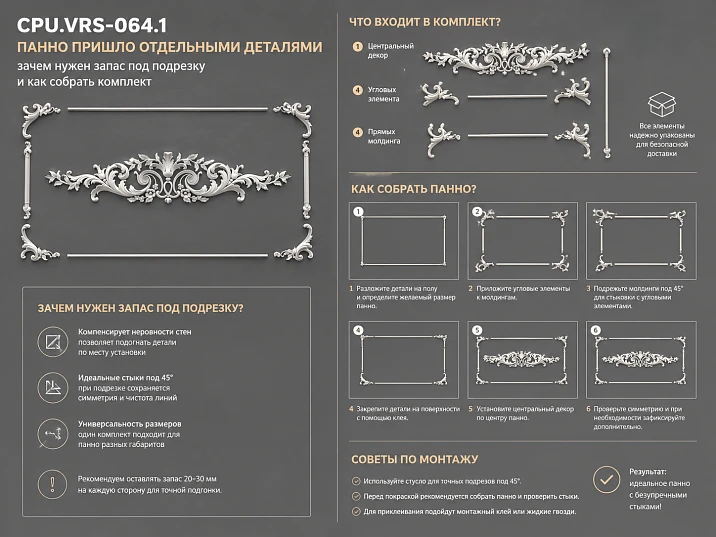
The customer opens the box and instead of a solid wall decor sees separate elements, unglued parts, and long moldings that still need to be trimmed. The first thought is quite understandable: "Did they send me an unfinished panel?" In the case of CPU.VRS-064.1, the answer is unequivocal: no. This type of delivery is provided by the design. The allowance on the moldings is left deliberately so that the composition can be precisely adjusted to the actual wall, furniture, and central axis.
Buy stucco panel CPU.VRS-064.1 960×370 mm better after measuring the wall and choosing the installation location. The base size of the set is 960 × 370 × 18 mm. It includes elements made of polyurethane and primed MDF. The panel is supplied uncut and unglued, and the extended shoulders of the moldings give the craftsman allowance for neat fitting on site.
Why doesn't the manufacturer cut everything in advance? Because two identical walls are rare. Above the fireplace, the panel is centered on the portal, above the console — on the furniture, in the bedroom — on the headboard. Nearby there may be sconces, switches, door trims, or already installed frames. A rigidly assembled rectangle does not account for these conditions. A composite set, on the contrary, allows preserving the central ornament and making the side fields truly identical.
Therefore, CPU.VRS-064.1 is better perceived not as an unfinished product, but as a ready-made artistic composition that is brought to its final size on site. The buyer does not have to independently select motifs and assemble a panel from random overlays. Their task is to take measurements in advance, determine the installer, dry-fit the set, and only then proceed to cutting, painting, and installation.
What is already ready in CPU.VRS-064.1 and what is adjusted on site
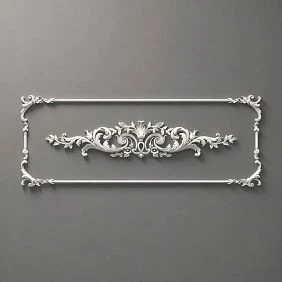
The artistic part of the set is already ready. The box contains not a scattering of unrelated parts, but a designed horizontal panel with a central ornament, paired elements, molding sections, and a technological allowance.
With self-assembly, one would have to choose a motif, calculate the width, look for symmetrical parts, compare profiles, and figure out joint locations. In CPU.VRS-064.1, this work is already done. On site, it remains to take measurements, distribute the allowance, make a precise cut, dry-fit the panel, and prepare the composition for painting.
The uncut supply is especially useful where the panel should be tied not to the entire wall, but to a specific object. Above the fireplace, the composition is centered on the portal. Above the console, on the furniture. In the bedroom, on the headboard. In the hallway, on the wall section or mirror. Each zone has its own axis, and a rigidly assembled rectangle does not always allow maintaining it.




Specifications and contents of CPU.VRS-064.1
| Parameter | Confirmed value | Practical Meaning |
|---|---|---|
| Article number | CPU.VRS-064.1 | The buyer orders a specific set |
| Type | Horizontal stucco panel | The composition is designed for elongated placement |
| Size | 960 × 370 × 18 mm | This is the base stated dimension |
| Materials | Polyurethane and primed MDF | Installation and painting are coordinated with both materials |
| Delivery condition | Unmitered and unglued | Fitting and pre-assembly are required |
| Feature | Moldings with extended shoulders | There is allowance for cutting to actual size |
| Central part | Preserves the axis of the composition | It cannot be used as a random trimming area |
| Finishing | For subsequent painting | Color and technology are approved before installation |
| Stylistic affiliation | Versailles Collection | Adjacent elements can be matched in the same line |
| Main task | Precise fit to the wall | The set is selected based on measurements, not just photos |
Before payment, open the CPU.VRS-064.1 card again and verify the current composition. Basic parameters help assess the scale but do not replace the wall plan.
Our factory also produces:



Why an uncut delivery is part of the design
In mass-produced furniture and ready-made accessories, the lack of final finishing may indeed be a sign of incompleteness. In a composite stucco panel, the situation is different. Here, the final size depends on the object. The wall sets the point where the composition receives its final geometry.
Suppose the free zone is 930 mm wide. A solid panel 960 mm wide will not fit. If the allowance is on the extended molding shoulders, the craftsman can reduce the side sections and preserve the central pattern. Another example: the free zone is wider than one meter, but the furniture under the panel has its own axis. The set can be kept close to the base size, with the free margins distributed to the sides.
The allowance is not excess material that the manufacturer forgot to remove. It is a functional part of the product. It allows for clean joints, compensates for actual dimensions, and ties the panel to the room's architecture.
Get Consultation
How a kit differs from a random set of moldings
| Criterion | CPU.VRS-064.1 | Independent moldings and overlays |
| Already ready | Already developed | Designed by the buyer or designer |
| Central ornament | Included in set | Needs to be selected separately |
| Base size | 960 × 370 × 18 mm | Depends on the selected parts |
| Reserve | Provided by the design | May be missing |
| Symmetry | Built into the scheme | Completely depends on the layout |
| Risk of style mismatch | Below | Higher |
| Purchasing task | Fit a ready-made system | Create a system from scratch |
| Installation preparation | Cutting and dry assembly | Design, selection, and assembly |
When a different pattern or a separate accent is needed, it is reasonable to look at panels and overlays made of polyurethane. But CPU.VRS-064.1 is bought specifically for the coordinated horizontal solution, not for a few independent parts.
Where CPU.VRS-064.1 is trimmed and how to preserve the pattern
A confirmed property of the set is the extended shoulders of the moldings. It is on these extended sections that the possibility of cutting is provided. This fundamentally distinguishes the technological allowance from the central decorative core.
Before processing, all elements are laid out on a flat surface. The installer must see:
-
central part;
-
paired decorative elements;
-
left elongated shoulder;
-
right elongated shoulder;
-
places of future connections;
-
outer contour;
-
axis of symmetry.
If it is unclear from the parts where the ornament ends and the permissible straight zone begins, cutting must not be performed. The set must be compared with the card and the diagram. An error on the central motif is irreversible, whereas proper trimming of the shoulders preserves the pattern.
Why the central ornament cannot be used as a reserve
The central ornament defines the character of CPU.VRS-064.1. Its lines, curls, and symmetrical parts are designed as a single artistic field. Removing a fragment changes not only the size but also the proportions.
If you shorten one side of the central part, the panel will become visually skewed. If you try to remove the same amount from both sides, you can damage the junction points and get rough seams in the relief. If you remove the central fragment entirely, the set loses its meaning and turns into an ordinary frame.
The size is adjusted where the allowance is specifically provided. The central decor is preserved without random trimming.
Can the base width of 960 mm be reduced?
The very presence of extended shoulders means that the set allows on-site fitting. However, the minimum possible width is not confirmed in the initial data. It cannot be assigned arbitrarily.
To answer, real lengths of spare sections are needed. After a dry layout, measure how much straight profile can be removed from the left and right without approaching the ornament or breaking the connections. Only then is the final width determined.
If the wall area is slightly smaller than the base 960 mm, fitting may be justified. If a significant reduction is required, the proportions of the panel may change. In that case, a different composition or a custom scheme should be considered.
Can the composition be made wider?
The allowance is intended primarily for trimming, not for endless enlargement. The standard set has a base size of 960 mm. To make it wider, inserting a random piece of profile is not enough.
The additional molding must match:
-
in pattern;
-
by height;
-
by thickness;
-
by width of the front part;
-
at the joint;
-
by material;
-
according to the future paint color.
If a wider wall composition is required, the panel can be left at its base size and surrounded by a separate frame. Another way is to develop an extended layout with coordinated profiles. Both solutions require a drawing.
What measurements to take before ordering a panel
One measurement is not enough: a simple wall map is needed. It helps to understand whether the set will fit, where the center will be, and which elements might interfere.
| What to measure | How to fix | Why |
| Available width | In the installation area, at several points | Check the base size and unevenness |
| Available height | From the lower to the upper boundary | Exclude conflict with furniture and cornice |
| Central axis | Along the wall, furniture, fireplace, or opening | Maintain symmetry |
| Side margins | Left and right | Distribute free space |
| Installation height | From floor to center or bottom line | Connect the panel with the interior |
| Rosettes | Centers and external dimensions | Avoid decor overlapping the frame |
| Switches | Coordinates | Exclude intersection |
| Sconces | Centers, bases, wire outlets | Leave installation zone |
| Furniture | Full dimensions | Check axis and proportions |
| adjacent moldings | Profile and position | Prepare joints |
| Wall irregularities | Plane deviation | Assess base preparation |
Do not measure only the distance between room corners. The panel may be located in a pier that has its own boundaries, or be tied to furniture rather than the entire wall.
First find the central axis
First, select the main object that sets the center. This could be a fireplace, console, sofa, bed, mirror, or the pier itself. Then draw a vertical line. The central part of CPU.VRS-064.1 is aligned with this line.
Only then are the left and right edges determined. This order protects against a common mistake: the craftsman starts from the nearest corner, and after assembly, the central ornament turns out to be shifted relative to the furniture.
In a complex room, the geometric center of the wall does not always coincide with the visual center. For example, a console may stand closer to the door due to a passage. Then it is more logical to center the panel relative to the furniture rather than the entire wall.
How to check the side margins
Let the free zone have a width W, and the approved panel width is P, with symmetrical placement, the side margin will be:
(W − P) / 2
This is a convenient check, but not the final design solution. There may be a sconce on the left, a cabinet on the right, and a tall lamp below. Therefore, mathematically equal margins are sometimes adjusted relative to the interior center.
A full-size paper mockup shows the result better than a small sketch. A rectangle 960 mm wide and 370 mm high is attached with painter's tape to the wall, step back a few meters, and evaluate the proportions.
Sockets, switches, and sconces are marked on the plan in advance
Electrical points cannot be considered minor obstacles that the installer will work around on site. The base of a sconce can overlap the molding. A switch can fall directly into the side shoulder. Wiring sometimes runs in the mounting area.
Before ordering, note:
-
center of the electrical point;
-
the width and height of the frame;
-
a protrusion;
-
the direction of the wire;
-
the intended drilling area;
-
the distance to the axis of the panel.
If an obstacle falls within the design, choose a different height, change the width, or adjust the location of the electrical point. The ornament around the outlet cannot be trimmed.
How to connect the panel with furniture
The panel above a console, fireplace, or dresser should form a connected group. Too small a gap creates the feeling that the molding is resting on the furniture. Too large a gap breaks the connection.
A universal distance is not confirmed, so it is determined by the mockup. The bottom line of the panel is marked on the wall, and the furniture is installed or marked to scale. Tall vases, lamps, mirrors, paintings, and opening doors are taken into account.
Particular attention is paid to consoles with table lamps. Lampshades should not overlap the relief or create heavy shadows on the central part.
What to give the master besides a photo
A photo shows the appearance but says nothing about the geometry of a specific wall. It doesn't show how much to remove from each side, at what height to mount the panel, and where the outlets are.
A proper task includes:
-
article CPU.VRS-064.1;
-
size 960 × 370 × 18 mm;
-
photo of the wall;
-
kit diagram;
-
available width;
-
final width;
-
central axis;
-
mounting height;
-
furniture position;
-
electrical points;
-
color;
-
wall material;
-
person responsible for cutting;
-
responsible for painting.
The phrase "assemble as shown in the photo" shifts all decisions to the installer and increases risk. The more accurate the initial data, the fewer reworks.
Dry layout: first assemble the panel without glue
Dry layout shows how the set comes together in reality, even before glue and paint appear. All elements are placed on a flat, clean surface in the correct order. Glue is not used.
At this stage, check:
-
presence of parts;
-
left and right sides;
-
ornament direction;
-
equality of shoulders;
-
base size;
-
joint locations;
-
condition of edges;
-
possibility of trimming;
-
final symmetry.
After laying out, the composition is photographed from above. The photo becomes an assembly map and helps avoid mixing up parts after cutting or painting.
Where it is convenient to lay out the set
A soft carpet, uneven floor, and cluttered workbench are not suitable. The base must be flat and larger than the panel. A clean protective material is placed under the parts.
It is useful to draw a horizontal line and a vertical axis on the backing in advance. Then mark the outer contour and the places of future joints. The elements receive temporary numbers.
Such organization is especially important if trimming and painting are done by different specialists. Everyone sees the same order rather than reassembling the composition from memory.
How to distribute the reduction between two sides
When the panel needs to be reduced by X millimeters, the preliminary trimming is divided between the left and right shoulders. With a symmetrical scheme, each side gets X / 2.
But arithmetic does not replace checking the parts. The cut points must be in permissible straight zones. After marking, the distance from the center to each edge is measured. Then the joints are dry-fitted.
You can't first cut off one side completely, mount it on the wall, and only then decide what to do with the second. This approach shifts the center and complicates control.
How to get a clean cut and neat joints
Before starting work, it is useful to study trimming and joining polyurethane moldings. For CPU.VRS-064.1, the general rules are supplemented by the requirement to preserve the central composition.
A precise joint depends on:
-
the correct angle;
-
fixed positioning of the part;
-
a clean cutting tool;
-
consistent marking;
-
checking after each cut;
-
minimum gap.
A thick layer of filler does not turn a bad cut into a good one. First achieve the geometry, then treat the joint.
Who to assign the trimming to
It is better to assign the trimming to a craftsman who knows how to work with decorative profiles and understands how to preserve the pattern. This could be a specialist in molded decor, an experienced finisher, or a workshop with precise equipment.
Self-work is acceptable if you have the skill and a workspace. The first experience should not be gained on a central piece. Before starting, you need to understand how to hold the profile, what tool to use for a clean cut, and how to check the angle.
The responsible person is specified in the order in advance. If it turns out after delivery that no one is ready to perform the trimming, the set remains in its packaging for a long time and is perceived as a problem, although the problem arose from the lack of a plan.
Why they first fit and then paint
Cutting damages the edge of the coating. Joints after assembly require preparation. If you fully paint the parts first, you will then have to restore the ends and mask the traces.
Convenient work order:
-
receive the set;
-
lay out the parts;
-
check the base size;
-
determine the final width;
-
make the cut;
-
assemble the panel dry;
-
process the joints;
-
approve the finish;
-
install;
-
apply the final coat according to the accepted technology.
The specific moment of painting depends on the project. Sometimes it is more convenient to do part of the work before installation, and the final coat after assembly. The main thing is that the cut and joint check precede the final finish.
Finishing of polyurethane and primed MDF
The CPU.VRS-064.1 kit uses different materials, but after installation they should look like a single composition. This means that the buyer and the craftsman should think not about each part separately, but about a unified system of preparation and finishing.
Polyurethane relief elements and primed MDF differ in their base. They may perceive intermediate layers differently, react differently to abrasive treatment, and require careful preparation for painting. You cannot take random paint, apply it to all parts, and assume the result will be the same in advance.
Before processing the entire set, a test is performed. On a small area, check:
-
adhesion of the coating;
-
coverage;
-
difference in tone;
-
behavior on edges;
-
preservation of relief;
-
gloss level;
-
appearance after full drying;
-
possibility of local correction.
If one part looks matte and another is denser or smoother, the problem is solved at the preparation stage, not with an additional thick layer that will fill in the fine pattern.
Why primer cannot be mistaken for a finished coating
The word "primed" is sometimes perceived as a promise of a finished white product. In reality, primer is intermediate preparation. It helps with further finishing but does not replace the topcoat.
After assembly, treated joints, local touch-up areas, and cut edges appear on the panel. Even if individual parts look neat before installation, the composition may differ in color and texture. For CPU.VRS-064.1 to be perceived as a whole, the finish is coordinated for the entire panel.
The buyer needs to decide in advance:
-
whether the panel will match the wall color;
-
whether contrast is needed;
-
whether the central decor will differ from the moldings;
-
what level of gloss is needed;
-
who performs the painting;
-
when the last layer is applied;
-
how the adjacent wall surface will be protected.
Calm option: a panel in the color of the wall
Painting in the color of the wall makes the relief calm. The composition is read through light and shadow, but does not turn into a separate bright insert. This approach suits an interior where there is already expressive furniture, textiles, paintings, or lighting fixtures.
The practical difficulty lies in exact matching. Two coatings with similar names may differ in shade and gloss. If the wall was painted long ago, its color may have changed. Therefore, the sample is compared directly on site.
A panel painted together with the wall is visually lighter. But the preparation of the joints must be especially careful: a monochrome surface emphasizes shadows from irregularities.
Contrasting panel as an independent element
A contrasting stucco panel becomes an independent object. It can be light on a saturated wall or dark on a calm background. This choice enhances the geometry, but at the same time makes any inaccuracies noticeable.
Before contrasting painting, check:
-
perfect joints;
-
symmetry;
-
cleanliness of the outer contour;
-
identical color of polyurethane and MDF;
-
absence of sagging;
-
preservation of fine ornament.
A full-size color mockup is not required, but a small sample helps to understand whether the panel will be too heavy for a specific wall.
What you will need along with CPU.VRS-064.1
Purchasing a panel does not end with a single product card. For a real result, materials for fixing, preparing joints, and painting will be required. Sometimes additional decorative profiles are needed if the composition is included in a larger wall scheme.
| What to add | Purpose | When especially needed | Link |
| Mounting compound | Secure the elements | During final installation | Mounting and finishing materials |
| Composition for joints | Prepare the joints | After dry assembly | Mounting and finishing materials |
| Primer and paint | Combine materials by color | For any finish | Mounting and finishing materials |
| Additional moldings | Create outer frame | When expanding the composition | panels and overlays made of polyurethane |
| Full-size template | Check scale | Before ordering and installation | Made to measurements |
| Precision tool | Make a clean cut | When fitting on site | Selected by the contractor |
| Protective packaging | Save details | For separate painting | Organized on site |
Mounting and finishing materials selected after checking the wall base and the chosen finish system. No compound can be considered universal just because it falls into the mounting category.
Why the mounting compound is selected for the wall and details
On one side of the joint is the panel, on the other — a specific wall. The base may be plastered, painted, tiled, or have an old weak layer. Therefore, the choice depends not only on the word "polyurethane."
Before purchasing, clarify:
-
wall material;
-
strength of the existing coating;
-
presence of primer;
-
condition of dusty areas;
-
contact area;
-
possibility of temporary fixation;
-
adjustment time;
-
drying conditions;
-
compatibility with future paint.
Even a suitable compound won't hold the panel if the old coating is peeling off the wall. Base preparation is part of the mounting system.
Why joint compound doesn't replace precise cutting
After trimming, a small technological seam may remain between parts. It is prepared for painting with a compatible material. But the compound cannot be used as a substitute for precise cutting.
If the angle is wrong, the gap becomes wide, the profile breaks, and the joint line is visible. Thick filling may show through over time or distort the relief. First, parts are fitted mechanically, then minimal finishing is applied.
Where to study the general installation procedure for moldings
General rules for base preparation, fixing, and finishing are covered in installation of polyurethane molding. For CPU.VRS-064.1, a mandatory on-site trimming step is added.
It is convenient to divide the work into two checks.
Desktop control
Here they check the composition, order of parts, cuts, joints, and final size. Errors are corrected before contact with the wall.
Wall control
Here they check the axis, height, side margins, position relative to furniture and electrical points.
One stage cannot be replaced by another. A perfectly assembled panel will look bad if it is shifted. A correctly positioned composition will not save rough joints.
Where to place a horizontal stucco panel
Above the fireplace, the panel is aligned with the portal axis. The width of the fireplace, top line, distance to the ceiling, and position of adjacent lights are measured.
It is important not to give universal promises about temperature and distance to the heat source. The panel card does not replace the fireplace manufacturer's requirements. Placement is coordinated with the equipment design and the actual surface condition of the wall.
If a mirror, screen, or large painting is already installed above the fireplace, CPU.VRS-064.1 may overload the zone. In this case, it is better to move the panel to an adjacent wall section or forgo additional decor.
Above the console
The console provides a clear lower boundary. The central ornament is aligned with the tabletop axis, and the side margins are assessed relative to the furniture width.
The panel may be slightly wider than the console and visually expand the area. It may be narrower and feel more intimate. But the difference should look intentional.
The plan shows table lamps, tall vases, and a mirror. Items should not overlap the relief or create a feeling that the panel is squeezed between accessories.
In the hallway
An entryway often has a limited wall section and many functional points. Nearby are doors, switches, cabinets, a mirror, and a bench.
CPU.VRS-064.1 is suitable if there is a clear horizontal area for it. The size 960 × 370 mm is checked with a full-size mockup. If the composition has to be arranged around a switch or trim, the chosen location needs reconsideration.
In a narrow entryway, the relief is also viewed from the side. The 18 mm thickness creates a shadow that may become more noticeable at close range.
In the bedroom
In the bedroom, horizontal decor can be placed above the headboard, vanity table, or on a free wall. Above the bed, the panel's axis is aligned with the axis of the sleeping area.
If wall sconces are present, measure their bases and light spots. The relief should not intersect with the mounting hardware. Additionally, shadows from the lights can emphasize certain elements and change the perception of symmetry.
If the headboard already has complex quilting, carving, or a tall shape, the panel may be redundant. In that case, it is better to use it in another area of the bedroom.
In the living room
In the living room, the panel can be tied to the sofa, console, fireplace, or a group of armchairs. The wall scale here is often larger, so the base 960 mm may require an external frame or free margins.
There is no need to automatically stretch the composition to the full width of the sofa. Sometimes a more compact panel creates a calm center, while empty margins preserve breathing space.
If paintings, a TV, or mirrors are planned on the wall, CPU.VRS-064.1 should have its own dedicated zone. Mixing multiple focal points weakens the composition.
In a restaurant, hotel, or salon
In commercial interiors, repeatability and documentation are especially important. If identical panels are installed in multiple rooms, first assemble one control set.
For each location, record:
| Room | Quantity | Final width | Height | Color | Note |
| Hall | ___ | ___ | ___ | ___ | ___ |
| Hall | ___ | ___ | ___ | ___ | ___ |
| Room number | ___ | ___ | ___ | ___ | ___ |
| Salon | ___ | ___ | ___ | ___ | ___ |
After approval, the templates, layout, and color become the standard for the remaining sets. This reduces the risk that the same item will look different.
How to combine panels with other decor
CPU.VRS-064.1 does not have to remain the only decorative element. If the project includes cornices, overlays, or other motifs, it is worth looking at decorative elements of the "Versailles" collection.
The collection-based approach helps avoid accidental mixing of ornaments. But it does not mean that the entire wall needs to be filled with details from one line. The panel already has an expressive center. The adjacent decor should support it, not compete.
A good scheme is built on a hierarchy:
-
main panel;
-
calm frame;
-
supporting elements;
-
free fields.
When the composition needs an external frame
An external molding contour is appropriate if the panel is included in large wall architecture. It can connect CPU.VRS-064.1 with the baseboard, cornice, or adjacent frames.
Before adding, check:
-
profile;
-
thickness;
-
distance to the panel;
-
width of the entire scheme;
-
position of corners;
-
color;
-
connection with other lines of the room.
You cannot choose an additional molding just based on a similar photo. Even a small difference in profile height is noticeable at the joint.
How CPU.VRS-064.1 differs from similar solutions
A solid panel is supplied as one piece and hardly allows width changes. CPU.VRS-064.1 consists of several parts and retains allowance on the molding shoulders.
Signs of a composite set:
-
separate elements;
-
unglued delivery;
-
need for layout;
-
extended sections;
-
trimming;
-
assembly;
-
preparation of joints;
-
single final painting.
When decor that is attached as a single piece without cutting is required, choose a different product.
Why this is not a set for arbitrary assembly
Separate delivery does not mean that the parts can be rearranged in any order. CPU.VRS-064.1 has a pre-designed composition.
The allowed freedom concerns width adjustment and wall mounting. Arbitrary removal of the central element, changing the sequence, or adding random inserts creates a different product.
When a standard set is sufficient, and when a separate project is needed
| Criterion | Standard CPU.VRS-064.1 | Individual composition |
| Basic idea | Ready | In development |
| Size | 960 × 370 × 18 mm | Determined by the project |
| Trimming | Within margin | May require other parts |
| Central ornament | Preserved | May be changed |
| Element selection | Completed | Requires approval |
| Risk of inconsistency | Below | Above without a project |
| How the work proceeds | Card, measurement, fitting | Sketch, selection, calculation |
The standard set is suitable if the base scale is close to the wall. An individual scheme is needed for significant size changes or complex integration.
What the manufacturer has already done
The buyer does not need to:
-
draw a baroque ornament;
-
cut out the relief;
-
look for a central motif;
-
select mirror parts;
-
check stylistic compatibility of random overlays;
-
calculate the base proportion;
-
assemble a panel from unrelated profiles;
-
develop collection logic.
Ready-made STAVROS elements reduce the artistic and production part. The buyer focuses on measuring, fitting, finishing, and installation.
Who is CPU.VRS-064.1 suitable for?
CPU.VRS-064.1 is suitable for a project where:
-
a horizontal decorative center is needed;
-
the free zone is close to the base size;
-
precise fitting required;
-
there is a miter saw for cutting;
-
central symmetry is important;
-
painting is planned;
-
the interior allows for an expressive ornament;
-
a set is needed, not a single overlay;
-
dry layout is possible;
-
the buyer is ready to prepare the wall.
When it is wiser to choose a different decor
Another option will be wiser when:
-
A complete finished part is required;
-
There is no one to do the cut;
-
The area is much smaller than 960 mm;
-
There are many obstacles on the wall;
-
A vertical format is needed;
-
The interior requires a minimalist solution;
-
The base cannot be prepared;
-
There is no way to preserve the axis;
-
A technical panel is required;
-
The panel must be removable without installation marks.
An honest choice of another product is better than trying to make an unsuitable set work in an inconvenient zone.
How to accept and save the set before mon<What to check before placing an order
| Check | What to specify |
| Model | CPU.VRS-064.1 |
| Base size | 960 × 370 × 18 mm |
| Wall width | ___ mm |
| Zone height | ___ mm |
| Final panel width | ___ mm |
| Central axis | Marked |
| Bottom line | ___ mm from the floor |
| Furniture | Size and position |
| Sockets and switches | Marked on the plan |
| Sconces | Centers and bases are indicated |
| Wall material | ___ |
| Condition of the base | ___ |
| Cutting contractor | Defined |
| Installation contractor | Defined |
| Color | Approved |
| Installation materials | Selected |
| Additional moldings | Approved |
| Dry layout | Scheduled |
This table turns a beautiful idea into an order that can be executed without guesswork.
What data to provide to the STAVROS manager
A useful request is not limited to the phrase "I need a panel above the console." It must contain precise initial data.
Example request:
Required CPU.VRS-064.1 for a wall ___ mm wide. The base size of the set is 960 × 370 × 18 mm. The central axis coincides with the axis of ___. The final desired width is ___ mm. On the left is ___, on the right is ___. The height of the bottom line is ___ mm. Please confirm the composition of the set, the placement of the extended arms, the current price, ordering conditions, and the possibility of fitting to the specified size. The cut is performed by ___, installation by ___.
Attach a photo of the wall and a sketch with dimensions to the request. Such a package helps to get a substantive response faster.
Mistakes that make the panel look assembled carelessly
Considering individual parts as a sign of defect
The customer expects a solid panel and concludes it is incomplete. In reality, the delivery is uncut and unglued to allow for fitting.
Ordering without measuring the wall
The base 960 mm may not fit between sconces, trim, or furniture.
Relying only on a photo of the interior
The photo shows the style but does not convey actual dimensions and axis.
Trimming the central ornament
This destroys the artistic scheme and symmetry.
Removing all the allowance from one side
The center of the panel shifts relative to the furniture or wall.
Not doing a dry layout
An error in the order of pieces is discovered after applying glue.
Paint until the cut
Edges and joints damage the finished coating.
Use a random mounting compound
The material does not account for the wall, polyurethane, MDF, and finish.
Fix a wide gap with a thick layer
The profile remains uneven, and the joint stands out.
Do not check the base
Weak paint peels off along with the panel.
Choose an additional molding based on a photo
Profiles may differ in height and pattern.
Do not account for switches and wall lamps
Decor falls into installation zones.
Do not assign responsibility for the cut.
The kit arrives, but work stops.
Consider primer as final paint.
Joints and material differences remain visible.
Do not mark elements.
Left and right parts get mixed after finishing.
Start the series without a control panel.
The same mistake repeats in all rooms.
Do not try to get the required width at any cost.
Sometimes a rectangle is already drawn in the project, and the contractor tries to fit CPU.VRS-064.1 into it at any cost. If the required width exceeds the capabilities of the extended arms, interference with the ornament begins.
The correct approach is the opposite. First, the adjustment range of the kit is determined, then the wall scheme is adjusted. The stucco panel should not lose its pattern for the sake of a random number in a preliminary sketch.
If the free zone is too small, it is better to change the position, choose another element, or abandon complex decor. This is a professional decision, not a failure.
Do not stretch the composition without a project
The larger the free wall, the stronger the desire to stretch the panel. But the central ornament has its own scale. Too long side sections make the center small and blur its character.
An additional frame often works better than direct extension. It preserves the proportions of CPU.VRS-064.1 and simultaneously connects it to a large wall.
Before expansion, a scale sketch is made and two options are compared:
-
a standard panel with wide margins;
-
a panel inside an additional frame.
How to check symmetry after trimming
After processing, the part is laid out again on a flat surface. Measurements are taken:
-
total width;
-
distance from the center to the left edge;
-
distance from the center to the right edge;
-
height of the left and right sides;
-
diagonals of the outer contour;
-
width of visible seams.
Then a photo is taken strictly from above. If the axis appears shifted, the issue is resolved before installation.
How to try the panel on the wall before gluing
A full-size paper template is secured with masking tape. If the parts are light and the craftsman uses safe temporary fixation, careful fitting is possible, but the specific method depends on the object.
On the wall, evaluate:
-
height;
-
the center;
-
side margins;
-
connection with furniture;
-
light;
-
shadows;
-
distance to the wall lamp;
-
view from the entrance;
-
perception from the sofa or armchair.
A person rarely looks at the panel strictly frontally from a distance of one meter. Therefore, the check is carried out from real points in the room.
What to do with an uneven base
A large horizontal composition emphasizes the curvature of the base. If the wall has bulges, individual elements may not fit tightly, and joints may diverge.
Before ordering, the plane is assessed with a straightedge or another suitable tool. Significant irregularities are eliminated before installation. You cannot rely on the glue to fully compensate for the geometry: a thick layer complicates leveling and affects the fit.
How to care for the finished composition
Final care depends on the chosen coating. The panel itself has a developed relief, so dust accumulates in the recesses. The surface is cleaned in a gentle way that does not damage the paint.
It is not possible to recommend universal cleaning agents in advance. Their compatibility is checked against the final paint. For regular maintenance, the key is to prevent heavy soiling.
In commercial premises, the maintenance technology is recorded together with the coating code. This helps staff avoid using aggressive compounds.
How to order CPU.VRS-064.1 without unnecessary rework
A practical ordering procedure looks like this:
-
open the CPU.VRS-064.1 product page;
-
check the dimensions 960 × 370 × 18 mm;
-
review the composition;
-
measure the wall;
-
determine the central axis;
-
mark furniture and electrical points;
-
determine the final width;
-
assign a cutting master;
-
Select Mounting and finishing materials;
-
study if necessary decorative elements of the "Versailles" collection;
-
agree on the color;
-
place the order;
-
after delivery, perform acceptance;
-
assemble the panel dry;
-
only then proceed to trimming.
This order does not complicate the purchase, but makes it predictable.
Why the allowance for trimming saves time and materials
The allowance allows adjusting the composition without interfering with the central pattern. The buyer gets a chance to fit the panel into a specific wall without altering the central ornament.
This is especially valuable when:
-
repair is already completed;
-
furniture is ordered;
-
electrical points are installed;
-
the wall has a non-standard width;
-
the panel must be connected to the fireplace;
-
equal margins are important;
-
several sets are installed in different rooms.
A solid element would rigidly dictate the size. An uncut set adapts within the specified limits.
Frequently asked questions about CPU.VRS-064.1
Why does the panel come in separate pieces?
Because the composition needs to be fitted to the actual wall. Separate delivery preserves the allowance on the molding shoulders and allows for precise cutting.
Is this considered a defect?
No, if the set matches the declared composition and the extended elements are left for trimming.
What is the size of CPU.VRS-064.1?
The base declared size is 960 × 370 × 18 mm.
What materials is the set made of?
The composition confirms polyurethane and primed MDF.
Do the elements need to be glued before installation?
The set is supplied unglued. The specific assembly sequence is determined after dry layout and preparation of the joints.
Which parts can be trimmed?
The allowance is provided on the extended shoulders of the moldings. Exact boundaries are determined by the actual parts.
Can the central ornament be trimmed?
Random trimming of the central pattern disrupts symmetry and should not be used as a common method of reduction.
Can the base width of 960 mm be reduced?
On-site fitting is possible, but the minimum width depends on the length of the provided allowance.
Can the panel be made wider?
The standard set has a base size. Expansion requires a separate scheme and coordinated profiles.
What measurements are needed before ordering?
Width and height of the area, central axis, position of furniture, outlets, switches, sconces, and adjacent moldings.
Is a dry layout needed?
Yes. She checks completeness, order of parts, symmetry, and final size.
When to perform the cut?
After acceptance, layout, and approval of the final width.
When to paint the panel?
After cutting and checking the joints. The specific order depends on the chosen finishing technology.
Can primed MDF be left without a finish?
Primer serves as a preparatory layer. For a cohesive panel appearance, a coordinated finish is required.
Which glue should I use?
The composition is selected based on the panel materials, wall base, and future finish. A universal option cannot be assigned without testing.
Where to get general installation recommendations?
In the article about installation of polyurethane molding.
Is CPU.VRS-064.1 suitable for installation above a fireplace?
Possibly, but distances and temperature conditions are coordinated with the requirements of the specific fireplace.
Is the panel suitable for a hallway?
Yes, if the free wall space allows maintaining the base scale and does not conflict with doors and switches.
Can the panel be used in a hotel or restaurant?
Yes. For the series, a control set is first assembled and templates are fixed.
What should be purchased together with the panel?
Mounting compound, materials for joints and final painting. When expanding the composition, coordinated moldings may be needed.
Where to view other decorative elements?
In the category panels and overlays made of polyurethane.
Where can I check the current price?
In the CPU.VRS-064.1 card before placing the order.
What should be specified to the manager?
Wall size, final width, central axis, obstacles, color, and the person responsible for cutting.
Two work scenarios: finished renovation and new project
CPU.VRS-064.1 arrives uncut not because the manufacturer stopped halfway through the work. The artistic part is already created: the composition is selected, the central motif is defined, and the base size is set. Only the precise fitting to the wall remains unfinished, which cannot be correctly determined without a specific wall.
The extended shoulders give the craftsman a manageable margin. He can preserve the central axis, create equal side fields, and tie the panel to a fireplace, console, bed, or partition wall. The buyer does not pay for random extra centimeters. They get the ability to make precise adjustments.
Before ordering, you need to measure the wall, note obstacles, determine the final width, and choose the installer. After delivery, accept the set, perform a dry layout, mark the cut, and check the joints. Only then proceed to final finishing and installation.
STAVROS offers CPU.VRS-064.1 as a coordinated molding set, not as a collection of random blanks. The product card, the Versailles collection, practical installation materials, and the finishing compounds section help carry the project from the first measurement to the finished wall. Here, the word "uncut" means not a flaw, but a preserved opportunity to make the panel precise for your specific interior.
When the renovation is already finished
When walls are painted, furniture is installed, and electrical wiring is routed, the cost of a mistake is especially high. In a new project, the position of a sconce or console can still be changed. In a finished interior, the panel must adapt to the existing geometry.
Work begins with protective fixation of boundaries. A rectangle of 960 × 370 mm is transferred to the wall, the central axis is marked, and the locations of old holes, cables, switches, and furniture are checked. Then, it is assessed whether a reduction is needed.
In a completed renovation, you cannot:
-
use the wall as a rough table for cutting;
-
apply glue before checking the entire composition;
-
drill without knowing about hidden wiring;
-
paint the panel without protecting adjacent surfaces;
-
fix the size only after gluing the central part.
An uncut delivery is especially useful in this scenario. It allows the panel to be adjusted in the workshop or in a protected work area, and a verified set can be brought to the wall.
If the panel is planned for a new interior
In a new interior, the panel can be planned even before electrical work and furniture. This gives more freedom, but does not eliminate the need for precise dimensions.
The designer must show:
-
the axis of the panel;
-
base and final dimensions;
-
height;
-
connection with furniture;
-
wall sconce;
-
sockets;
-
molding frames;
-
color;
-
junction nodes;
-
installation order.
The advantage of early selection is that other elements adapt to the panel. The electrician runs the sconces outside the moldings, the furniture maker maintains the required axis, and the finisher prepares a level base.
How to distribute work between the designer, painter, and installer
CPU.VRS-064.1 often passes through the hands of several specialists. The designer sets the position, the supplier assembles the order, the craftsman performs the cut, the painter is responsible for the color, and the installer secures the parts.
Without a single list, each person sees only part of the task. Therefore, a short passport is created:
| Field | Value |
| Article number | CPU.VRS-064.1 |
| Room | ___ |
| Final width | ___ mm |
| Height | ___ mm |
| Axis | ___ |
| Color code | ___ |
| Cut | Responsible ___ |
| Painting | Responsible ___ |
| Installation | Responsible ___ |
| Layout photo | Attached |
| Sketch version | ___ |
Such a document does not overload the project, but prevents verbal discrepancies.
What to check after installation
After installation, the panel is inspected not only up close. The check is carried out at several points in the room.
They check:
-
whether the central axis matches;
-
whether the side margins are equal;
-
whether the moldings are horizontal;
-
whether the joints have opened;
-
whether the color of materials is the same;
-
whether there are traces of glue;
-
is the relief distorted;
-
are the edges clean;
-
does the panel conflict with the lighting;
-
are the electrical points covered.
With side lighting, even a small difference creates a long shadow. Therefore, an evening check with the sconces turned on is as important as a daytime inspection.
Why a ready-made set is easier than assembling decor yourself
Assembling a similar panel from individual overlays seems like a flexible solution. But the buyer will have to independently decide whether the motifs match, how to build the center, where to make the joints, and how many elements to order.
CPU.VRS-064.1 already shortens this path. The buyer selects one article number, receives an agreed composition, and works with on-site fitting. This does not eliminate craftsmanship, but directs it toward precise installation rather than inventing an ornament.
Comparison by labor costs:
| Stage | CPU.VRS-064.1 | Self-assembly set |
| Selecting an artistic scheme | Already completed | Needs to be developed |
| Selecting a central motif | Included | Separate search |
| Search for paired parts | Included | Checked manually |
| Calculating proportions | Base size set | Executed from scratch |
| Trimming | Need | Need |
| Assembly | Need | Need |
| Risk of incompatibility | Below | Higher |
| Number of product items | One set | Multiple items |
When the size can be considered finally approved
The size can be considered approved when four checks are completed.
First, the panel fits in the accessible area and does not cross obstacles. Second, the central axis matches the selected object. Third, the allowance is distributed across the provided arms. Fourth, the master confirmed the possibility of a clean cut.
Until this moment, the figure remains preliminary. It cannot be passed into production as final just because it looks good on the sketch.
Is an additional set needed for a large object
CPU.VRS-064.1 is ordered as a set, so the "allowance" in the usual sense of additional footage refers not to a single product, but to the number of sets. For a series, an additional set can be provided only after assessing the budget and the possibility of future replacement.
It is much more important to preserve:
-
template;
-
color code;
-
layout photograph;
-
final width;
-
marking;
-
list of materials;
-
card and diagram version.
This data helps reproduce the result more accurately than one randomly leftover piece.
What else to clarify before payment
Does the order include finished painting?
Primed material is confirmed, but the specific finish and its inclusion need to be checked in the order card. Primer cannot be considered finished interior paint.
Who is responsible for the final width?
The width is determined on site based on measurements. Responsibility for layout and cutting should be assigned in advance.
Can installation start from the central part?
The sequence depends on the installation diagram, but before any gluing, the entire composition must be laid out and checked.
Do I need to specify the color when ordering?
If the finishing is done separately, the color is still coordinated before installation. This affects preparation, the order of work, and the combination with adjacent decor.
Can I order a wall panel for a wall with decorative plaster already applied?
The possibility of installation depends on the strength, relief, and compatibility of the base. The wall must be assessed by the installer.
What to do if the size doesn't fit after layout?
Do not start cutting. You need to reconsider the position, the final width, or choose a different solution.
The main thing you need to understand before ordering
CPU.VRS-064.1 should not look ready for immediate gluing right out of the box. Its value lies precisely in the fact that the final width is formed for a specific wall. The central ornament is preserved, and the length is adjusted on the provided molding shoulders. Before any irreversible action, the set is laid out, checked against the plan, and verified on the wall using a full-size template.
Before payment, not only the article number and base size should be known, but also the installation location, central axis, available width, color, the person performing the cutting, and the set of installation materials. When these questions are resolved, individual parts cease to cause doubt: it becomes clear how exactly they will turn into a complete panel.
What the cost of a finished wall consists of
The request "CPU.VRS-064.1 price" refers to the card of one set, but the final budget of the wall consists of several parts. In addition to the panel itself, measurements, precise cutting work, base preparation, installation compounds, joint treatment, painting, and possible additional moldings are taken into account.
It is useful to split the costs in advance:
| Part of the project | What affects the cost |
| CPU.VRS-064.1 | Current price of the set at the time of ordering |
| Trimming | Number of joints, profile complexity, and the contractor |
| Wall preparation | Evenness, coating strength, need for repairs |
| Installation | Height, access, number of elements |
| Finishing | Color, number of layers, relief complexity |
| Additional decor | External frame or adjacent elements |
| Work organization | Delivery to the site, room protection, re-fitting |
This calculation shows why savings on measuring or dry layout often turn out to be illusory. Reworking one incorrect cut can cost more than careful preparation. It is wiser to link the entire set, the craftsman's work, installation materials, and the wall layout into one plan in advance than to buy the panel as a separate beautiful item.
Conclusion: individual parts become a panel only after precise fitting
CPU.VRS-064.1 is supplied uncut and unglued not because the work was unfinished. The artistic part has already been created: the central motif is selected, the elements are coordinated, and the base size of 960 × 370 × 18 mm is set. What remains incomplete is only the attachment to a specific wall — and this cannot be done in advance without knowing the location of furniture, lighting fixtures, and side boundaries.
Before ordering, the wall is measured and the center is determined. After delivery, the set is laid out dry, the sides are checked, the allowance is distributed on the molding shoulders, and only then is the cut made. This order helps preserve the pattern, achieve equal margins, and avoid attempts to correct inaccurate geometry with a thick layer of joint compound.
on the Stavros website you can Buy stucco panel CPU.VRS-064.1 960×370 mmselect Mounting and finishing materials and view decorative elements of the "Versailles" collection. In this case, a conscious purchase begins not with the question “why wasn’t the panel assembled at the factory,” but with understanding where it will be installed and who will perform the precise fitting.