Article Contents:
- What is confirmed about NPU-126
- Why slats on the cabinet are really not mandatory
- When a smooth cabinet side already looks finished without NPU-126
- What one 130 × 130 mm square gives on a large furniture surface
- Don't automatically center the overlay along the entire cabinet height
- A paper template 130 × 130 mm is needed before purchase, even if the price is only 1,410 ₽
- Where to place NPU-126 on the cabinet side
- Rotation of the square NPU-126: along axes or as a diamond
- At what side width of 130 × 130 mm are they read differently
- The side and facade of the cabinet should remain one piece of furniture
- The NPU-126 color determines how "furniture-like" it will be
- Mounting on the cabinet side: first determine the surface material
- NPU-126 should not fall into a person's working trajectory
- Light from the slat wall changes the perception of a small overlay
- What to do if the side is very tall and NPU-126 seems small
- Furniture and slat color: how to connect two surfaces without literal repetition
- Side next to a slat wall: how much empty space to leave around NPU-126
- Permanent glue or reversible solution: what to consider if the cabinet may be moved
- It is better to conduct the coating test on a sample rather than on the finished side panel
- The 11 mm relief should be checked not only visually but also by hand
- If the wardrobe consists of several sections, the reference point may be not the center of the body, but the furniture module
- When it is still better to return to the option with slats on the side panel
- Cost of the solution: 1,410 ₽ versus full cladding of the side panel
- Mistakes that most often ruin a wardrobe side panel with a single overlay
- When it is better not to buy NPU-126 for a wardrobe side panel
- Practical algorithm before ordering NPU-126
- Conclusion: one NPU-126 works only as a point, not as filling for the side panel
- FAQ
- Can NPU-126 be installed on a removable side panel of a wardrobe?
- Will the NPU-126 fit a sliding wardrobe?
- Can the NPU-126 be placed next to an outlet on the side panel of the wardrobe?
- What to do if the side panel is veneered and you don't want to damage it with glue?
- Can the NPU-126 be placed on the side panel in a children's room?
- Should the NPU-126 be duplicated on two identical wardrobes?
- Can the NPU-126 be painted to match the color of wooden slats?
- Is it necessary to make a molding frame around the NPU-126?
- What matters more when trying it on: the width of the wardrobe or the viewing distance?
- Where can I see other overlays for furniture?
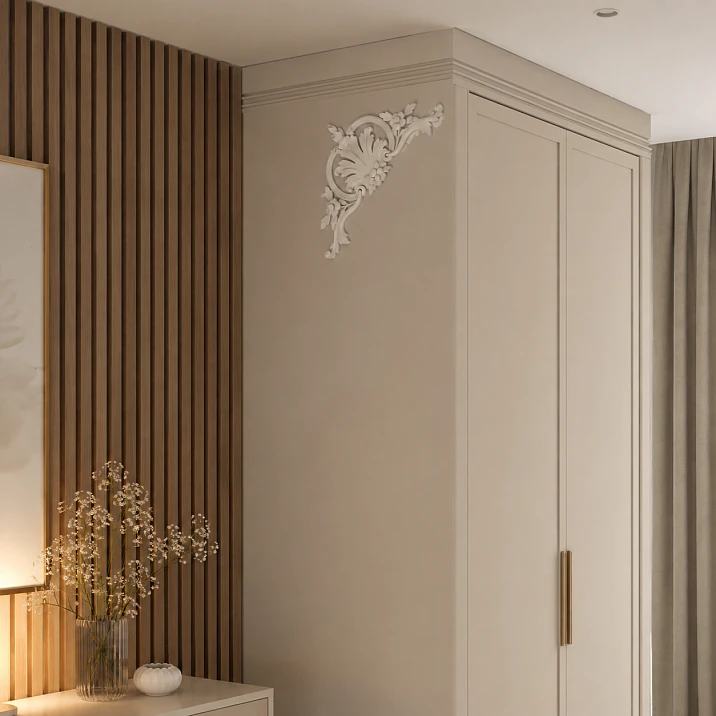
The slatted wall next to the wardrobe already creates a strong vertical rhythm. If you continue the same relief onto the furniture side panel, the wardrobe can indeed be visually connected to the wall, but this is not the only way. Sometimes such integration makes the room too "slatted": verticals run along the wall, wrap onto the furniture, continue almost to the floor and ceiling, and no calm flat surface remains nearby.
Therefore, the original solution for the article is different: leave the cabinet side smooth, and instead of slats, check one local polyurethane accent — the decorative overlay NPU-126.
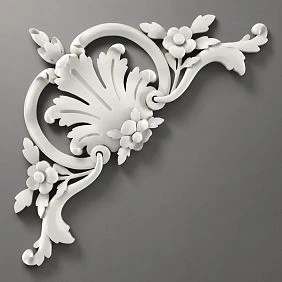
The current STAVROS product card shows for NPU-126 a fixed size of 130 × 130 × 11 mm, material — polyurethane, and a current price of 1,410 ₽ per piece. The item can be added to the cart individually. In the description, the manufacturer directly considers this overlay as a decorative element for furniture and doors, meaning its use on a furniture surface is not a made-up scenario.
But it does not follow that NPU-126 is automatically needed on any visible side panel. A tall cabinet about 600 mm deep provides a large vertical plane, and a 130 × 130 mm square can either become a precise small accent or look like a random "button" on a huge end surface.
The main question before purchasing is whether the smooth side panel has a clear compositional point to which a single 130 × 130 mm element can be anchored.
If such a point exists — for example, a console, bench, mirror, sconce, or a visible line of furniture fronts nearby — NPU-126 can complete the transition from an active slatted wall to calm furniture.
If the side panel is completely empty, 2.5 m high and 600 mm wide, with no reference points nearby, automatically centering a small overlay in the middle of the panel often looks weaker than just a clean smooth surface.
Therefore, the rational order is as follows:
do not continue the slats automatically → leave the side smooth → make a 130 × 130 mm template → find a visual anchor → test one NPU-126 → only then purchase.
What is confirmed about NPU-126
NPU-126 is in the STAVROS catalog among stucco decor and polyurethane overlays. The card provides one fixed option.
| Parameter | NPU-126 |
|---|---|
| Type | carved decorative overlay / stucco decor |
| Material | Polyurethane |
| Size | 130 × 130 × 11 mm |
| Current price | 1,410 ₽/pc. |
| Quantity for the original scenario | 1 pc. |
| Application in description | furniture, doors, interior decor |
After a full-size fitting, you can buy stucco decor NPU-126 made of polyurethane.
It is important not to lose precise terminology. NPU-126 is a decorative overlay, not a furniture handle, not a batten, not a molding, and not an applied panel. It adds relief and ornament but should not take on structural functions of furniture.
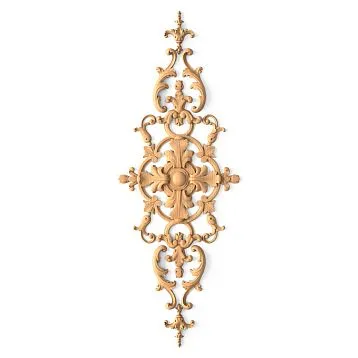
The card also shows a drawing and a 3D model. This is useful for checking the actual silhouette and orientation of the pattern: a square footprint of 130 × 130 mm by itself does not mean that the ornament looks equally good at any rotation.




Why slats on a wardrobe are really not necessary
STAVROS already has a separate detailed article on how to combine a built-in wardrobe and slatted panels in one finish. Among the options, it thoroughly examines continuing the slatted panels onto the side of the wardrobe as a way to make the furniture an extension of the wall.
This is a strong solution if the interior is built on a continuous vertical rhythm.
But it has a downside.
The side panel ceases to be a calm flat surface
If the slatted wall covers a large area, continuing the same lines onto the wardrobe increases the density of the texture.
In a small hallway or narrow passage, this can make the furniture visually heavier, although individual verticals usually stretch the plane upward.
The spacing needs to be coordinated
If the slats on the furniture do not exactly continue the rhythm of the wall, instead of a unified system you get two similar but mismatched patterns.
The thickness of the side panel changes
The slatted panel adds its own relief. This affects the external dimensions of the cabinet, its fit to the baseboard, ceiling, and adjacent elements.
Cleaning becomes more difficult
A smooth furniture side is wiped clean in one motion. The slatted relief requires working into the grooves.
The furniture becomes more tied to the current interior
If the cabinet is ever moved or the slatted wall is changed, the clad side continues to carry the previous finishing logic.
Therefore, abandoning slats is not a "simplification of the project." It is a separate design strategy: to leave furniture as furniture, wall as wall, and connect them with one small ornamental accent.
For comparing the two approaches, the existing STAVROS article is useful "Slatted panels and a built-in wardrobe: how to combine furniture and wall in one finish". It shows the option of continuing the slats; this article examines a deliberate rejection of it.
Our factory also produces:
When the smooth side of the cabinet already looks complete without NPU-126
Before purchasing, you need to honestly consider the option of "adding nothing."
A smooth side panel works on its own if:
-
the cabinet fronts are minimalist;
-
the side panel material is high-quality and matches the furniture;
-
there is an active slatted wall nearby;
-
the cabinet edge is neatly joined with the baseboard;
-
there is already a mirror, lamp, or other accent on the wall;
-
the side panel is mostly visible at an angle, not frontally;
-
the furniture should look modern and strict.
In such an interior, one classic carved overlay may not "complete" the cabinet but rather add a stylistically foreign element.
The check is simple: photograph the cabinet together with the slat wall from the main entry point. If your eye doesn't catch the empty side as a problem, there's no need to invent a problem for the sake of the product.
The overlay is justified when the empty surface truly looks too impersonal and the interior allows for ornamental furniture decor.
Get Consultation
What one 130 × 130 mm square gives on a large furniture surface
The 130 × 130 mm size seems noticeable in your hands, but on a tall cabinet it's a small object.
Suppose the visible side has a conditional size:
600 × 2400 mm.
Side area:
600 × 2400 = 1,440,000 mm².
Front overall square of NPU-126:
130 × 130 = 16,900 mm².
If we compare only rectangular dimensions, the overlay takes approximately:
16,900 / 1,440,000 × 100 ≈ 1.17% of the side panel area.
This is not a design standard. But the calculation shows the scale of the task: one NPU-126 will not fill a large side panel and should not try to do so.
Its role is a point accent.
If the buyer expects that one 130 mm element will visually "style the entire surface" of a cabinet 2.4–2.6 m high, it is better to adjust that expectation before purchase.
On a large side panel, NPU-126 works only with proper anchoring to furniture, a wall, or an adjacent object.
Do not center the overlay automatically across the entire cabinet height
The most obvious scheme is to find the geometric center of the side panel and glue NPU-126 there.
For a cabinet 2400 mm high, the center will be at about 1200 mm.
Mathematically, everything is perfect.
Compositionally — not necessarily.
A height of 1200 mm may turn out to be:
-
between two important furniture lines;
-
too low relative to the mirror;
-
too high above the banquette;
-
right at the level of the hand and bag in the passage;
-
in an empty area that a person barely examines.
Therefore, it is better to center not the “chipboard sheet” but the actual composition.
The side panel has external reference points:
-
top of the cabinet;
-
base;
-
the line of the facade handles;
-
top of the adjacent console;
-
bench seat;
-
center of the mirror;
-
wall sconce;
-
edge of the slat panel;
-
horizon of the shelf or open niche.
One of these reference points should explain the position of NPU-126.
Then the small square ceases to be random.
A paper template 130 × 130 mm is needed before purchase, even if the price is only 1,410 ₽
The low price of one overlay creates a false impression that it is easier to order and “find a place later.” For furniture, this is bad logic: if the chosen point does not work, the overlay remains a separate item, and the cabinet side remains just as empty.
Therefore, before ordering, a 130 × 130 mm template is needed.
It's better to make not just a white square, but one as close as possible to the real silhouette of NPU-126. The product card contains a drawing and a 3D model, so you can use them as a reference and cut out an approximate outline of the ornament.
Checking procedure:
-
Make one template 130 × 130 mm.
-
Secure it with masking tape on the side panel.
-
First, place it in the geometric center.
-
Then move it higher, toward the handle line or the area above the banquette.
-
Photograph each option from the same point.
-
Compare not the close-up, but the entire combination of 'cabinet + slatted wall + neighboring furniture'.
-
Leave the best option on the wall for at least a few hours and look at it in both daylight and evening light.
If the template seems small, don't immediately attach a second one.
First, find out whether the problem is in the position itself.
One small element in the right spot can look more convincing than two identical overlays that just fill empty space.
Where to place the NPU-126 on the side panel of the cabinet
There is no universal height. But there are several logical schemes that solve different tasks.
Align with the handle line
If the cabinet fronts have handles on the same horizontal line, the NPU-126 can be tied to that mark.
It is not necessary to place the overlay exactly at the handle level. It is enough that the center or one of the expressive parts of the ornament is in the same compositional zone.
This way the side panel starts to communicate with the front, even though the overlay is physically on a different plane.
Align with a console or bench
If there is low furniture next to the side panel, the NPU-126 can work as a small decor above it.
In this case, the position is calculated from the top surface of the item, not from the middle of the cabinet.
For example, a bench about 450 mm high creates a lower functional zone. The overlay can be raised above the level of constant contact so that it remains visible and does not end up under a shoulder, bag, or jacket.
Align with the mirror
If the side panel of the wardrobe is next to a wall mirror, the NPU-126 can be placed in an area that continues one of its axes.
But you shouldn't create artificial symmetry like "mirror on the left — overlay on the right" just for the sake of balance. First, you need to check the entire wall.
Make it a standalone point
Sometimes there is no furniture or lighting nearby. Then the NPU-126 can be a standalone point on a smooth surface.
In this scenario, viewing distance is especially important.
The farther a person sees the wardrobe, the weaker the 130-millimeter motif works.
It's better to move the template by zones rather than by centimeters
A bad way to find the position:
Let's move it 20 mm higher. No, 30 mm lower. Another 15 mm to the right.
You can keep moving the square endlessly without understanding what exactly is changing.
Better to check four different semantic zones:
-
geometric center of the side panel;
-
upper third;
-
zone associated with handles or facade lines;
-
zone associated with furniture or decor nearby.
Each option gives a new conclusion.
If the upper third works better, then the NPU is needed as a decorative accent.
If the handle zone works better, the overlay connects the side panel with the facade.
If the geometric center looks most calm, a standalone central composition suits the cabinet.
Such a comparison is more useful than ten nearly identical fittings.
Rotation of square NPU-126: along axes or as a diamond
The NPU-126 is square in dimensions — 130 × 130 mm. Therefore, when rotated 90°, the external size does not change.
But this does not mean that the product's pattern is fully rotationally symmetric.
The card shows a drawing and a 3D model, so before installation, you need to check whether the ornament has a distinct top and bottom.
Position along axes
The safest option for the first mockup.
The square is oriented parallel to the cabinet's verticals and slats.
Thus, NPU-126 is perceived as a calm furniture accent and does not add another direction to the interior.
45° rotation — "diamond"
This option may be more interesting next to vertical slats: diagonals break the strict linear rhythm.
But there are two limitations here.
First, the ornament itself must look good in this position.
Second, the overall projection of the square part increases.
For a square with a side of 130 mm, the diagonal is:
130 × √2 ≈ 184 mm.
That is, the NPU-126, rotated as a diamond, visually and physically occupies approximately 184 × 184 mm of overall space in width and height, although the part itself remains 130 × 130 mm.
This is a useful calculation for a narrow side panel or an area near the edge of a cabinet.
If the element fits comfortably along the axes, but after rotating it as a diamond it starts to approach the front edge, its position needs to be recalculated.
Rotation at an arbitrary angle
Technically possible, but rarely needed.
A random angle of 17° or 23° is hard to tie to the cabinet's architecture. It may look like a marking error.
For the original topic, it's enough to compare two options: along the axes and in a diamond shape.
At what width the side panels 130 × 130 mm are read differently
A cabinet about 600 mm deep gives a side panel of roughly the same width, but real cabinets can be narrower or deeper.
It's convenient to compare not dozens of examples, but a few characteristic scenarios.
| Visible width of the side panel | Share of 130 mm of the width | How to perceive |
| 300 мм | 43% | large local accent |
| 450 мм | 29% | noticeable overlap |
| 600 мм | 22% | Small accent |
| 800 мм | 16% | may get lost without anchoring |
These percentages are not a design standard.
They only show relative scale.
On a 300 mm side panel, the NPU-126 physically takes up almost half the width and requires precise fitting.
At a typical depth of about 600 mm, it is noticeably more compact.
On a very deep 800 mm side panel, a single square may look random if there is no compositional center around it.
Therefore, the question of whether 130 mm will fit cannot be resolved just by looking at the catalog.
Cabinet height matters more than it seems
Cabinet side panel — vertical plane.
If the cabinet is 2400–2700 mm high, one NPU-126 occupies a very small portion of the height.
So the main mistake is trying to "fill the height" with several identical overlays.
For example, placing three NPU-126 vertically with equal spacing.
This way the side panel gets a new rigid rhythm that starts competing with adjacent slats.
Initially, the task was the opposite — not to continue the repeating pattern onto the cabinet.
Therefore, if one NPU-126 seems small, the first solution should not be increasing the quantity, but checking:
-
a different mounting height;
-
a larger overlay;
-
a different type of decor;
-
of the need for decor at all.
The side panel and the facade of the cabinet should remain one piece of furniture
The overlay is on the side, but the user perceives the cabinet as a whole.
Therefore, the design of the facades must be taken into account.
Smooth facades without frames
NPU-126 on the side panel becomes the only ornament.
This is a strong contrast.
It can be successful in an eclectic interior, but in strict minimalism it looks random.
Facades with moldings
The overlay fits into the system more easily because the furniture already has a classic relief.
Facades with milling
Need to check whether the NPU repeats the milling character or argues with it.
Slatted cabinet facades
If slats are already present on the doors, adding NPU to the side panel should be done carefully.
The furniture is already saturated.
Sliding wardrobe
Large flat doors create a modern look. Small classic decor on the end may require support from another interior element, otherwise it will look detached.
A broader approach to polyurethane furniture decor can be seen in the STAVROS article about overlays for wardrobes, dressers, and built-in furniture.
The color of NPU-126 determines how "furniture-like" it will be
The safest way to integrate a small polyurethane element into a cabinet is to match it with the color of the side panel.
In the color of the cabinet
If the NPU-126 and the side panel share the same shade, the relief is read through the shadow.
The overlay looks like part of the furniture, not a separate object glued on after the cabinet is installed.
This option is especially useful near active wooden slats.
In the color of the slatted wall
If the cabinet is light and the slats are dark or wood-toned, you can repeat their color on the NPU.
This connects the two zones without transferring the slatted relief itself onto the furniture.
But you need to understand the difference between color coordination and material imitation. A polyurethane overlay painted brown does not automatically become wooden carving.
If you want the decor to be the main accent of the room, paint it in a contrasting color relative to the walls. For example, white decor on dark gray or beige walls looks very striking.
A black, gold, or bronze NPU on a light cabinet becomes a striking accent.
At a size of 130 mm, this can work if the hallway already has the same hardware.
Without repeating the color, a small element easily starts to look like a decorative insert "from another project."
One color with the furniture is often more important than complex patination.
On the side of a modern wardrobe, complex decorative painting can look heavier than the NPU-126 shape itself.
If the task is to replace the slats with a small accent, it is enough:
-
a flat furniture color;
-
a matte or semi-matte surface;
-
a quality shadow;
-
a neat joint.
Patina, gilding, and contrasting recesses are needed only if they are supported by the style of the entire furniture.
Installing on the cabinet side: first determine the surface material
The NPU-126 card mentions simple installation of the decorative overlay, but does not know what the specific cabinet side is made of.
And this is fundamentally important.
The visible side can be:
-
laminated chipboard;
-
painted MDF;
-
veneered panel;
-
plywood board;
-
plastic;
-
glass;
-
composite furniture panel;
-
natural wood.
The same mounting adhesive should not automatically be considered suitable for all these surfaces.
Laminated chipboard
A very common option.
The surface is smooth and weakly absorbent. Before installation, check the instructions of the chosen adhesive and its compatibility with both polyurethane and furniture laminate.
Do not roughly sand the front surface of the cabinet just for adhesion without understanding the technology: marks may remain visible if the overlay is ever removed.
Painted MDF
A convenient base for a monochrome solution.
But the strength of the attachment depends not only on the adhesive: if the paint coating is poorly bonded to the MDF, the overlay may come off together with the paint.
Therefore, it is especially important that the furniture enamel is fully dried and stable.
Veneer
Here you need to consider the finish coating — varnish, oil, wax, or other.
NPU-126 can pair beautifully with wood texture, but the mounting compound cannot be chosen based solely on the word "veneer."
50-100 years
If the side panel is made of solid wood or furniture board, you need to consider not only adhesion but also the behavior of the wood in use.
A small overlay should not be used as a rigid structural connection between furniture parts.
Plastic and other coatings
First, you need to determine the material precisely.
Some adhesives work well with one plastic and are unsuitable for another.
For selecting a mounting system, STAVROS has a separate section materials for installation and finishing.
If the specific coating of the cabinet is unknown, it is better to check with the furniture maker before buying the adhesive.
NPU-126 must not fall within a person's working trajectory
The side of the cabinet is often located exactly where people pass by.
This is especially noticeable in the hallway.
If a cabinet 600 mm deep stands perpendicular to the passage, its side may be near:
-
the entrance door;
-
a bench;
-
a coat rack;
-
a mirror;
-
a narrow corridor;
-
a turn into the room.
The thickness of NPU-126 is 11 mm.
This is a small protrusion, but the relief element still stands out from the smooth furniture.
Therefore, it is better not to place it:
-
at shoulder level in a narrow passage;
-
where a bag passes;
-
next to constantly hanging outerwear;
-
in the area where the door opens;
-
where the side panel is used as a hand rest;
-
next to a sliding furniture section.
The compositional center and the safe zone may not coincide.
If the "beautiful place" is exactly at the height of constant touches, it is wiser to move the NPU or abandon it.
The decorative overlay should not become an element that a person regularly bumps into.
Why NPU-126 is better not to use as a handle or a support point
On the side panel, there is no need to open the door by the overlay, but the relief may provoke touching.
Especially if the NPU is located near the facade.
It is important not to create a false function.
The overlay should be perceived as decor, not as:
-
a furniture handle;
-
a hook;
-
a stop;
-
limiter;
-
a place for gripping when rearranging the cabinet.
If people intuitively grab onto it, the position is chosen poorly.
This is especially important in rental apartments, hotels, offices, and other places where not all users understand the interior design intent.
Light from the slat wall changes the perception of the small overlay.
The slats work with light and shadow.
If a smooth side panel is left next to them, it becomes relatively calm.
NPU-126 adds a local shadow 11 mm thick.
Front light
An overlay in the color of the cabinet looks soft and can almost blend in.
Side light from the wall
The pattern reads much more strongly.
If the slats are lit nearby, their vertical shadows continue along the wall, and the NPU creates a separate complex shadow on the furniture.
Spots on top
On a small relief, contrasting bottom shadows may appear.
Sometimes because of this, the NPU seems larger than on the paper template.
Light from the mirror zone
If there is a mirror with backlighting opposite the cabinet, the side panel may receive almost frontal light.
Then the contrast of the relief will be less.
Therefore, after the paper template, it is useful to attach a real NPU-126 without glue and check it in the evening.
The visible side panel is not the facade: the viewing point is usually lateral
Decorative overlay cards usually show them frontally.
But in a real interior, a person often sees the side panel of the cabinet at an angle.
This changes the scale.
If the side panel is visible almost frontally at the entrance, one 130 × 130 mm element reads well as a separate figure.
If the cabinet stands along the wall and the side panel is only visible at a narrow angle, the NPU may almost disappear.
This means the test should be conducted from real movement points.
Three photos are useful:
-
from the front door;
-
from the middle of the hallway;
-
from the side of the adjacent room.
If the NPU is only visible when standing directly in front of the cabinet's end, it is worth asking whether it really solves the problem.
What to do if the side panel is very tall and the NPU-126 seems small
This is a probable scenario.
A cabinet 2500 mm high next to a slat wall looks like a large architectural volume.
One overlay of 130 mm is indeed a small accent.
But buying two or three NPU-126 in a row is not the first solution.
First, it's worth checking alternatives.
A larger separate overlay
It will preserve the principle of "one accent" but will match the scale of the cabinet.
Molding frame
If the furniture is classic, a frame can structure a large side panel better than a small central detail.
Painted decorative zone
You can highlight part of the side panel with color, and place the NPU-126 inside it or abandon the relief altogether.
Light
A small brace or backlighting of a slatted wall can enliven the transition more than additional overlays.
Leave smooth
Sometimes an empty side panel looks larger and calmer than a side panel with a small random element.
If you want to compare other sizes and shapes, you can Buy decorative polyurethane overlays after a full-size fitting of several options.
Why several NPU-126 should not automatically replace one that is too small
Suppose one overlay seems weak.
You can place four in the corners or three vertically.
But this is no longer the same composition.
One NPU-126 — local accent.
Three identical elements — rhythm.
Four — frame grid.
Five — ornamental field.
That is, increasing the quantity changes not only the degree of filling, but also the design technique itself.
If the original task is not to continue the slats on the cabinet, creating a new repeating rhythm from NPU can again lead to visual overload.
Therefore, the article deliberately keeps the commercial scenario at one piece for 1,410 rubles.
If one is not enough, it is better to choose a new type of solution rather than simply multiplying the product.
When the square shape of NPU-126 is especially useful
The square footprint offers several advantages.
It doesn't argue too strongly with the vertical of the cabinet.
An elongated vertical overlay could echo the direction of the slats.
A square creates a different scale.
It's easy to align with horizontal lines.
For example, to handles, a console, a shelf, or the center of a mirror.
It can be tried in a diamond orientation.
This adds an extra diagonal without choosing a different item.
It suits a small local area.
A square doesn't require a long clear strip.
But squareness doesn't mean full symmetry of the pattern itself.
Before turning, you still need to look at the drawing and the 3D model.
Furniture and slat color: how to connect two surfaces without literal repetition
If you don't want to extend the slats onto the cabinet, the connection can be built in other ways.
Repeat the slat color only in the NPU
For example, an oak slatted wall and a light cabinet.
NPU-126 can be painted in a close wood tone.
This creates a small "bridge" between materials.
Repeat the cabinet color in the wall environment
If the slats are painted, part of the wall or the backing can be made in the furniture color, while the NPU remains monochrome.
Connect through hardware
If there are black handles on the cabinet, the NPU can be made dark, and the slatted wall gets a black lamp or switch.
Do not connect by color at all
Natural slats and a white cabinet can work precisely on contrast.
In that case, it is better to leave the NPU white so that it belongs to the furniture rather than trying to imitate the wall.
The main question: what should be perceived as a single unit — the material or the composition?
Sometimes a common axis and proportions are enough.
Side panel next to the slatted wall: how much empty space to leave around the NPU-126
If the NPU is placed on the cabinet, it should not approach the front edge of the side panel without reason.
The front edge is connected to the facades, handles, and door movement.
The back edge is connected to the wall or the slatted zone.
Top and bottom are related to the cornice, plinth, and ceiling.
Therefore, the free space around the NPU is not an abstract margin, but a system of relationships.
Don't invent universal "minimum 100 mm" rules.
For a side panel 600 mm wide with a central position in width:
(600 − 130) / 2 = 235 mm on the left and right.
This is a large field.
If the NPU is moved closer to the front edge for connection with the facade, the fields become asymmetric.
This can be done if the reason is clear.
For example, 100 mm to the front edge and 370 mm to the back may be justified if the overlay visually continues the line of the handles.
Asymmetry is not a mistake in itself.
Error — random offset without a compositional reason.
Permanent adhesive or reversible solution: what to consider if the cabinet may be moved
On wall decor, reversibility is often secondary. On furniture, it matters more.
The side panel of a cabinet may today be next to a slat wall, but in a few years the cabinet may be moved, disassembled, or relocated to another room. NPU-126, perfectly matched to the current composition, may become inappropriate in a new location.
Before permanent installation, it is worth answering three questions.
Is the cabinet built-in or freestanding? For a built-in unit designed for long-term use in one place, permanent decorative finishing is more logical. For a freestanding cabinet that can be moved, the value of a reversible solution is higher.
Is it expensive to restore the side panel? On painted MDF, a local area can sometimes be repainted. On veneer, laminated board, or a complex factory finish, traces of adhesive may be significantly harder to remove.
Are there any manufacturer requirements? If the cabinet is new and under warranty, self-adhering decor to the body may affect the finish maintenance terms. This should be clarified with the furniture maker before any intervention.
The article does not propose a universal 'removable tape' as a substitute for mounting adhesive: a specific temporary system must be compatible with both polyurethane and the furniture finish, and its holding capacity must be sufficient for vertical mounting.
A practically useful compromise is to first live for a few days with a paper or lightweight mock-up, and only make permanent fixation after the position of NPU-126 no longer raises doubts.
It is better to conduct the coverage test on a sample rather than on the finished sidewall.
When a cabinet is made to order, the owner or furniture maker often has a leftover piece of the same board, a sample of the facade enamel, or a color swatch.
This is an ideal place to test the mounting system.
On a test sample, you can find out:
-
whether the adhesive holds on the finish coating;
-
whether it softens the paint or varnish;
-
whether a greasy outline appears around the application area;
-
how accidental excess is removed;
-
whether the polyurethane can be neatly painted in the desired shade;
-
how noticeable the seam is after drying.
Such a test is more useful than an experiment on the inside of a cabinet, because the inside may have a different coating.
If there is no sample, it is safer to first clarify the material with the furniture manufacturer and follow the instructions of the chosen mounting system.
For a professional furniture project this is especially important: the cost of NPU-126 is 1,410 rubles, but damage to an expensive painted or veneered side panel can cost significantly more than the decor itself.
The 11 mm relief should be checked not only visually, but also by hand.
A paper template shows the position, but does not convey the volume.
NPU-126 has a thickness of 11 mm. On an open furniture side panel, this is a small but clearly noticeable protrusion.
After a place for the template has been found, make a simple three-dimensional imitation: add a spacer of approximately the same thickness to the cardboard or attach a real overlay without glue.
Then perform not a "designer" test, but a household test:
-
walk past in a winter jacket;
-
carry a bag;
-
open the adjacent door;
-
sit down on the bench if it is nearby;
-
reach for the cabinet handle;
-
wipe the side with your hand as you would during regular cleaning.
If the relief constantly ends up in the path of movement, the position is bad, even if the frontal photo looks perfect.
This is especially important in a narrow hallway. Here, 11 mm do not critically reduce the passage by themselves, but the protruding carved contour can catch exactly where smooth furniture previously did not create an obstacle.
If the cabinet consists of several sections, the reference point may not be the center of the body, but the furniture module
A tall cabinet is often assembled from two or three sections that are read separately from the front.
The side remains one large plane, but the internal division of the furniture still affects the composition.
For example, the upper part of the cabinet may be a mezzanine, the lower part the main one, and a noticeable horizontal line of the facades runs between them.
In this case, NPU-126 can be tied to this line, even if there is no seam on the side itself.
This gives a more meaningful markup than a simple height center.
Before the layout, it is useful to transfer several facade axes to the side with masking tape:
-
the lower line of the mezzanine;
-
the height of the main handles;
-
the upper line of the drawers;
-
the horizon of the adjacent open niche.
After this, it is clear where the 130 × 130 mm square actually supports the furniture system.
Thus, the NPU-126 is perceived as cabinet decor, not as a wall overlay that accidentally ended up on its end.
When it is still better to return to the option with slats on the side
Abandoning the slats is the original hypothesis of the article, not a mandatory solution.
There are situations where a slatted side panel looks more convincing than a single NPU-126.
The cabinet should visually disappear into the wall. If the project is based on full integration of furniture and architecture, a single overlay specifically emphasizes the cabinet's independence. Slats, on the contrary, continue the wall.
The side panel is very large. On a surface 800–900 mm wide and from floor to ceiling, a single 130 mm square may be too weak.
There are already slats on the facades. Then a smooth side panel with a single classic overlay may look like a third design system.
Need to hide a bad surface. If the side panel has seams, damage, or non-uniform material, a small NPU won't fix a large plane. A slatted panel can indeed cover it entirely.
The interior is strictly modern. In this case, the rhythm of the slats is stylistically
Cost of the solution: 1,410 ₽ versus full side panel cladding
The purpose of NPU-126 is not only aesthetic.
One local element allows testing a completely different budget scenario.
With slatted side panel cladding, the buyer needs to calculate:
-
area or number of panels;
-
cutting;
-
edge profiles or extensions;
-
installation;
-
additional thickness;
-
finish coating.
For NPU-126 in the original task, the cost of the decorative item itself is fixed:
1 410 ₽.
But this does not mean that the overlay is "more profitable" by definition.
If it does not solve the problem of an empty side panel, even 1,410 ₽ is an unnecessary purchase.
The commercially correct choice looks like this:
-
NPU-126 works on the layout → buy one;
-
NPU is too small → look for a different scale;
-
NPU is stylistically alien → leave a smooth side panel;
-
Furniture needs full integration → return to slat cladding.
That is, price becomes an argument only after checking the composition.
Mistakes that most often ruin the side panel of a cabinet with a single overlay
Mistake 1. Gluing NPU-126 exactly in the geometric center without a mockup
Why it happens: a square element seems obviously central.
Consequence: it ends up between real compositional lines and looks random.
Check: compare the center with the handle zone, furniture, and the upper third.
How to avoid: center relative to the composition, not the sheet.
Mistake 2. Considering 130 × 130 mm as large decor only based on the product card
Why it happens: the product is shown in close-up.
Consequence: on a 2.5 m cabinet, the element seems too small.
Check: the pattern on the entire side panel.
How to avoid: view from the main distance.
Mistake 3. Add a second and third overlay if one is not enough
Why it happens: the desire to fill the emptiness.
Consequence: a new rhythm appears that competes with the slats.
Check: instead of a second element, try one larger one.
How to avoid: change the scale, not the quantity automatically.
Mistake 4. Rotate the square into a diamond without considering the new dimension of about 184 mm
Why it occurs: the side remains 130 mm, so it seems the size does not change.
Consequence: the overlay unexpectedly approaches the edges or the facade.
Check: cut out a rhombus in the actual dimensions.
How to avoid: take the diagonal into account.
Error 5. Rotate the ornament without checking its top and bottom
Why it occurs: the outer contour is square.
Consequence: the pattern looks inverted or placed at an angle without logic.
Check: drawing and 3D model.
How to avoid: do not confuse the square dimensions with the rotational symmetry of the pattern.
Error 6. Choose glue only based on polyurethane
Why it occurs: there is only one decorative detail, and installation seems simple.
Consequence: the compound works poorly with laminate, veneer, or furniture enamel.
Check: instructions for both surfaces.
How to avoid: first determine the cabinet material.
Mistake 7. Place the NPU in a zone of constant contact
Why it occurs: this is the most noticeable spot.
Consequence: the relief gets caught by bags and clothing.
Check: walk past the mockup several times.
How to avoid: shift the accent to a calm zone.
Mistake 8. Make the overlay contrasting without a connection to the interior
Why it happens: a small element wants to be "enhanced."
Consequence: it looks glued on separately.
Check: find a color repeat in handles, a lamp, or other decor.
How to avoid: monochrome or a related accent.
When it's better not to buy NPU-126 for the side panel of a cabinet
NPU-126 is not needed if the smooth side panel looks finished without it.
It's also not worth buying in the following cases:
-
the cabinet has a pronounced minimalist design;
-
the side panel is too large for a single 130-millimeter accent;
-
there are already many decorative elements nearby;
-
The slat wall itself is the main visual center;
-
There is no logical anchor point on the side panel;
-
The only noticeable spot falls into the touch zone;
-
The cabinet's coating is unknown and installation cannot be reliably coordinated;
-
The furniture is planned to be rearranged soon;
-
The NPU looks stylistically alien after fitting;
-
Rotating it diagonally seems like the only way to "make it more interesting," but the pattern itself does not support such a position.
The latter is especially important: the product is not obliged to solve the problem just because an item has already been selected.
If the side panel looks better empty, the correct commercial conclusion is not to buy the NPU-126.
When one NPU-126 actually works
The scenario becomes convincing if several conditions coincide.
-
The side panel is clearly visible from the main entry point.
-
It is smooth and technically neat, but visually too empty.
-
I really don't want to continue the rails onto the furniture.
-
The size of 130 × 130 mm is readable at a real distance.
-
There is a clear reference to height.
-
The overlay does not fall into the working trajectory.
-
The ornament matches the style of the furniture.
-
The color connects the NPU with the cabinet or the interior.
-
The mounting compound is suitable for the specific coating.
-
One element looks complete without needing to add several more.
Then NPU-126 solves the task precisely as local furniture decor, not as a replacement for the entire side panel finish.
Practical algorithm before ordering NPU-126
-
Take a photo of the cabinet and the slat wall together.
-
Check the version without decor. Does the side panel really look empty, or are you just looking for a place for the product?
-
Measure the width and height of the visible side panel.
-
Determine the surface material.
-
Mark the zones of contact and passage.
-
Make a template of 130 × 130 mm.
-
Check the geometric center.
-
Check the upper third and the handle line.
-
Attach the mockup to the console, bench, mirror, or another object if available.
-
Compare the position along the axes and with the diamond.
-
For the diamond, consider an approximate size of 184 mm diagonally.
-
Open the drawing and 3D model of NPU-126 and check the direction of the ornament.
-
Look at the mockup from the entrance and from the passage.
-
Check the daylight and evening light.
-
Choose the color.
-
Determine the compatible mounting compound.
-
Compare with the “slats on the side panel” option.
-
Only after that place the order.
If the mockup is convincing, you can order NPU-126 130 × 130 mm in the quantity of one piece.
Decision matrix: slats, smooth side, or NPU-126
| Side condition | Best first option |
| Smooth and neat, minimalist interior | leave without decor |
| Empty, but next to it a very active slat wall | check one NPU-126 |
| Need full visual integration with the wall | continue the slats |
| The side panel is large, NPU-126 gets lost | look for larger decor |
| There is a clear line of handles or a console | attach one NPU-126 |
| The passage is narrow and the decor will get in the way | do not use an overlay in this area |
| The furniture is painted and allows ornamentation | a monochrome NPU can work |
| The side panel is damaged over a large area | NPU won't solve the problem |
| The slats are already on the cabinet facades | check whether the NPU would be redundant |
| The cabinet will be moved soon | avoid decor that is too tied to the interior |
Result: one NPU-126 works only as a point, not as filling for the side panel
NPU-126 is a small carved decorative polyurethane overlay measuring 130 × 130 × 11 mm with a current price of 1,410 ₽ per piece.
For the visible side panel of the cabinet next to the slatted wall, its strength lies precisely in its compactness.
It allows you to avoid transferring the slats to the furniture, keep a smooth surface, and add just one local relief.
But this technique doesn't work on every side panel.
On a cabinet 2.4–2.6 m high, the NPU-126 remains a small detail. Therefore, it cannot be evaluated from a large product photo, nor automatically placed in the geometric center.
Best algorithm:
leave the side panel smooth → make a 130 × 130 mm template → find the compositional anchor → check the position along the axes and with a diamond → view from the actual distance → check the surface and installation → only then buy.
If a single NPU-126 looks precise and finished, 1,410 ₽ provides a simple local accent without additional slat cladding.
If the element gets lost, don't mechanically buy two or three more. Better to switch to a larger overlay, a frame composition, or leave the cabinet smooth.
If the entire interior requires a continuous slat rhythm, it's worth returning to the option of slat panels on the cabinet and wall.
For alternatives, available Polyurethane decorative appliques, general catalog moldings from polyurethane и slatted panels for walls.
FAQ
Can NPU-126 be installed on a removable side panel of a cabinet?
This option can be considered if the overlay does not interfere with panel removal and the mounting compound is compatible with its coating. It is important to preserve the possibility of service disassembly of the furniture.
Will NPU-126 be suitable for a sliding-door wardrobe?
Yes, if it concerns a stationary visible side panel of the body. It should not fall into the path of sliding doors, guides, or grip zones.
Can NPU-126 be installed next to an outlet on the side panel of a cabinet?
Only after checking the free space and the function of the outlet. The decor should not interfere with the plug, cable, or access to the electrical installation device.
What to do if the side panel is veneered and you don't want to damage it with glue?
First, you should decide whether the overlay is needed at all. If the furniture is expensive and the surface must remain reversibly clean, permanent adhesive mounting may be a poor choice. Temporary fastening needs to be selected separately and not presented as a universal method.
Can NPU-126 be installed on the side panel in a children's room?
Only if it is outside the zone of constant impacts and grips. In a children's room, it is especially important not to place relief decor where it could be used as a handle or hook.
Should NPU-126 be duplicated on two identical cabinets?
Only if the cabinets form a single composition. Then two pieces will cost 2,820 ₽. If the cabinets are in different zones, mechanical repetition is not necessary.
Can NPU-126 be painted to match the color of wooden slats?
You can use a close shade as a color link, but solid paint does not reproduce the texture of natural wood. First make a sample next to the real panel.
Is it necessary to make a molding frame around NPU-126?
No. The original meaning of the theme is one local accent without a frame and without continuing the slats. A frame is needed only if one overlay is not enough for the style and scale of the side panel.
What is more important when fitting: the width of the cabinet or the viewing distance?
Both parameters. The width determines the relative scale of the NPU, and the distance determines how well the ornament is read. A large side panel seen up close and the same side panel at the end of a long corridor require different solutions.
Where can I see other overlays for furniture?
In the category polyurethane decorative overlays and in the STAVROS article about polyurethane furniture decor.