Article Contents:
- KPU-129 is not a slat panel: you need to count by slats
- Don't count KPU-129 in square meters: the main calculation is done by width
- Why the insert width doesn't have to match a round number
- How to choose between the two closest options
- If the insert is located in a niche
- If the insert is on an open wall
- If the fluting is tied to furniture
- Example only for understanding the formula
- Central vertical insert
- Side insert
- Two symmetrical strips
- How many KPU-129 do you need for an insert 500 mm wide?
- How many slats are needed approximately for 600 mm?
- How many KPU-129 do you need for 800 mm?
- How many strips are needed per meter?
- How to calculate the quantity yourself?
- How to calculate the width if KPU-129 are installed butt-to-butt?
- How to calculate an insert with equal gaps?
- What gap should be left between KPU-129?
- Is it possible to install KPU-129 without any gaps at all?
- Is it necessary to make the entire wall fluted?
- Is it possible to make only three slats?
- Four or five slats — which is better?
- Is it possible to make two identical inserts?
- Can eight slats be used to make two panels instead of one?
- Will KPU-129 fit a niche?
- What to do if the niche is 650 mm?
- Can KPU-129 be installed behind the bed?
- How many slats should be taken for a console 1 m wide?
- Will KPU-129 fit a TV area?
- Can KPU-129 be used next to a built-in wardrobe?
- What to do if the wall height is more than 2600 mm?
- And what if the wall height is less than 2600 mm?
- Do I need to buy a spare plank?
- How does KPU-129 differ from a slat panel?
- Can the insert be framed with molding?
- What should I order together with KPU-129?
- Where can I look at other linear products if KPU-129 doesn't fit by width or pattern?
- Where can I see a wider range of moldings?
- What should I check right before paying for the order?
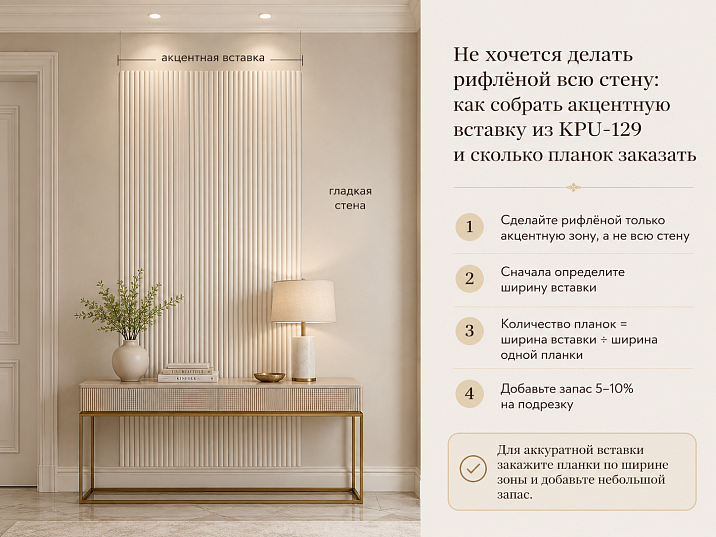
A full fluted wall is not always needed. Sometimes an interior only requires one vertical textured strip — behind a console, next to a built-in wardrobe, inside a niche, beside the TV, or on a selected part of the wall behind the bed. The rest of the surface remains smooth, and the relief works only where it is truly needed. It is for this scenario that decorative molding KPU-129 is worth considering: the polyurethane profile measures 105 × 7 × 2600 mm, so the width of the future insert can be calculated before placing the order.
Here it is especially easy to make one mistake: starting to calculate the material in square meters, as if it were a ready-made wall panel. KPU-129 is arranged differently. A specific number of individual slats with a fixed width of 105 mm is purchased. This means that first the width of the decorative field is determined, then the layout method — butt-jointed or with gaps — and only after that does it become clear how many pieces to put in the cart.
For example, you want to get about 800 mm of fluted surface. Seven slats installed tightly give 735 mm. Eight — 840 mm. Between these options there is no "wrong" one: you can make the insert slightly narrower, slightly wider, or include gaps between the profiles and get your own width. But such a decision needs to be made before the purchase, not after the material is delivered.
Therefore, before buying decorative molding KPU-129, it is useful to answer just three questions:
-
what width should the accent zone be;
-
will the slats be installed end-to-end or will there be gaps between them;
-
does the fixed length of 2600 mm fit the height of the selected area.
These three numbers determine the order much more accurately than a photo of a beautiful fluted wall.

KPU-129 is not a slat panel: you need to calculate by strips
Visually, the vertical fluted relief may resemble familiar slat wall panels. Hence the incorrect calculation logic: a person measures the wall area, gets a conditional 2.7 m², and tries to figure out how many "panels" to buy.
For KPU-129, this approach only complicates the task.
Before us is a polyurethane decorative molding in the format of a separate linear element. Each plank has a fixed geometry:
| Parameter | KPU-129 | What this means for the calculation |
|---|---|---|
| Article number | KPU-129 | When ordering, you need to check this specific model |
| Material | Polyurethane | The base material and mounting compound are checked separately |
| Width | 105 мм | Each new strip adds 105 mm when installed butt-to-butt |
| Thickness | 7 мм | The fluted part protrudes relative to the smooth wall |
| Length | 2600 мм | One whole plank forms a vertical line up to 2600 mm long |
| Surface characteristics | Vertical fluted relief | Several elements are assembled into a rhythmic textured strip |
| Layout options | Butt-jointed or with small gaps | The final width depends on the installation method |
| Application | Accent walls, decorative panels, niches, built-in furniture | It is not necessary to cover the entire wall with the profile relief |
| Purchase unit | Individual baluster | Quantity is counted in pieces |
It is precisely the 105 mm width that turns the calculation into simple arithmetic. If the elements are placed flush, each subsequent slat expands the decorative field by another 105 mm.
No complex area calculators are needed. You just need to choose the number of modules.




Don't calculate KPU-129 in square meters: the main calculation is done by width
Suppose a smooth wall is already ready. You want a fluted insert about 50–60 cm wide.
First, forget about the wall height altogether. At the first stage, only the horizontal size of the future panel matters.
One KPU-129 is 105 mm.
Two are 210 mm.
Three are 315 mm.
Then simple multiplication applies:
insert width = number of KPU-129 × 105 mm, if the slats are installed butt-to-butt.
This results in the following size grid:
| Number of KPU-129 | Width when installed butt-to-butt |
|---|---|
| 1 | 105 мм |
| 2 | 210 мм |
| 3 | 315 мм |
| 4 | 420 мм |
| 5 | 525 мм |
| 6 | 630 мм |
| 7 | 735 мм |
| 8 | 840 мм |
| 9 | 945 мм |
| 10 | 1050 мм |
| 11 | 1155 мм |
| 12 | 1260 мм |
| 13 | 1365 мм |
| 14 | 1470 мм |
| 15 | 1575 мм |
This table already answers a significant portion of customer questions.
Want a narrow vertical stripe next to the cabinet? Three slats give 315 mm.
Need an insert around half a meter? Five — 525 mm.
Need a textured zone slightly wider than 60 cm? Six — 630 mm.
Want about 80 cm? Here you'll have to choose between seven slats at 735 mm and eight at 840 mm.
For a meter-long zone, the options are also clear: nine KPU-129 give 945 mm, ten — 1050 mm.
The main advantage of this calculation is that the order stops being approximate.
You no longer ask: "How many should I take for this wall?"
The question is formulated more professionally:
"I need an insert around 1 m. For butt installation, I choose between 9 slats at 945 mm and 10 slats at 1050 mm. Which option looks better in my field?"
This is already a solution that can be verified with a paper mockup before purchasing.
Our factory also produces:




Why the insert width doesn't have to match a round number
People are used to designing interiors with nice numbers.
500 mm.
600 mm.
800 mm.
1000 mm.
But the KPU-129 module is 105 mm, so when laid end-to-end, most dimensions will turn out different:
525 instead of 500.
630 instead of 600.
840 instead of 800.
945 or 1050 instead of 1000.
You shouldn't perceive this as a problem.
A decorative insert is not a structural opening that must have a specified width to the millimeter. If there is no cabinet, niche, or other object with a rigid reference nearby, it is the product module that can determine the final size of the decorative zone.
Did you want 600 mm?
Look at the template of 525 and 630 mm.
It is quite possible that 630 mm looks significantly more confident, and the difference of only 30 mm relative to the original idea does not interfere with the interior at all.
Did you want 800 mm?
Compare 735 and 840.
Sometimes 735 mm better leaves a smooth field on the sides. Sometimes 840 mm more accurately connects with the width of the bed, console, or furniture block.
This way the project adapts to the real product, not the other way around.
Get Consultation
How to choose between two closest options
Let's imagine a task: a fluted vertical insert with a width of approximately 700 mm is required.
There are two closest options:
6 slats = 630 mm;
7 slats = 735 mm.
What to order?
You shouldn't automatically choose 735 just because it's closer to 700.
Look at the context.
If the insert is located in a niche
First, the actual width of the inner field matters. If the niche has rigid boundaries, the decorative zone should not accidentally touch them or leave a strange narrow strip of wall.
Here it may be more convenient to reduce the quantity.
If the insert is on an open wall
There is no exact boundary. Then 630 and 735 mm are two completely equal compositional solutions.
Cut out two paper rectangles of the corresponding width or mark the edges with painter's tape.
Look at the wall from the usual viewing point.
Often the choice becomes obvious without any formulas.
If the fluting is tied to the furniture
For example, the insert is behind a console or next to a built-in wardrobe.
Then it should be matched not with the round number 700 mm, but with the actual width of the furniture.
A small difference of a few centimeters can change the position of the side border relative to the facades.
Insert about 500 mm: four or five slats
This is a good example of how the module affects the design.
Four KPU-129:
4 × 105 = 420 mm.
Five:
5 × 105 = 525 mm.
The difference between them is exactly one profile width, 105 mm.
But visually these are already different panels.
420 mm is a fairly compact vertical strip. It can work on the side of a cabinet, near a mirror, in a narrow niche.
525 mm looks denser and more self-sufficient. Such a zone can be perceived as a separate decorative panel.
If the project originally specified "500 mm corrugation," there is no need to cut the edge profile just to match a nice number, unless such a need is confirmed by the project. First, consider whole modules.
Five KPU-129 units will give 525 mm — only 25 mm more than the original idea.
This is often simpler and cleaner compositionally than artificially fitting the system to a conventional 500 mm.
Insert around 600 mm: five or six slats
Here is the choice:
5 × 105 = 525 mm;
6 × 105 = 630 mm.
630 mm is only 30 mm wider than the conventional 600 mm.
Therefore, for an open wall, six slats look like a very natural option.
Five makes sense to choose if:
-
there is a corner nearby;
-
the decorative strip is limited by furniture;
-
more smooth wall is required;
-
the room itself is small;
-
the textured area should remain secondary.
Six — if:
-
The ribbed zone should be clearly readable;
-
The strip is located behind a separate piece of furniture;
-
a more architectural vertical is needed;
-
The smooth wall around it is large enough.
Before Order KPU-129 made of polyurethane, such a fork is easier to check with painter's tape directly on the wall.
Insert about 800 mm: seven or eight KPU-129
This is perhaps the most illustrative example.
7 × 105 = 735 mm.
8 × 105 = 840 mm.
The desired 800 mm lies between them.
If the texture should occupy a noticeable part of the wall, eight slats often give a more convincing standalone strip.
If smooth fields on the right and left are important, seven may be more accurate.
But here another option appears — gaps.
Seven elements with gaps can create a system wider than 735 mm.
And here the calculation changes.
Butt-jointed or with a gap: this needs to be decided before counting the quantity
KPU-129 can be assembled with several slats close together or with small gaps between them.
This is not a minor installation detail.
The decision determines:
-
the final width of the insert;
-
the density of the corrugation;
-
the number of profiles;
-
share of visible smooth wall;
-
the character of the entire composition.
When installing butt-to-butt, the arithmetic is elementary:
N × 105 mm.
With equal gaps between the slats, a second value appears.
Formula:
total width = N × 105 + (N − 1) × G
Where:
-
N — number of slats;
-
105 mm — width of one KPU-129;
-
G — selected width of one gap;
-
N − 1 — number of internal gaps.
Why are there one fewer gaps?
Because between three planks there are two gaps.
Between five there are four.
Between eight there are seven.
The edge fields of the wall are not included in this formula. They are calculated separately.
Example only for understanding the formula
Suppose the project selects a conditional gap of 5 mm. This is a mathematical example, not a recommendation for the mandatory gap size.
For 7 planks:
7 × 105 = 735 mm.
Between them there are 6 gaps.
6 × 5 = 30 mm.
Summary:
735 + 30 = 765 mm.
If we conditionally increase the gap to 10 mm:
735 + 60 = 795 mm.
That is, mathematically, seven profiles can form a field close to 800 mm, if the project deliberately provides for corresponding gaps.
But the gap width cannot be chosen solely to hit a specific number. First, you need to decide whether you like the sparse layout itself.
A dense panel and a sparse insert look different
When installed butt-to-butt, several KPU-129 are perceived as a single textured surface.
The boundary of an individual module fades into the background, and the main focus becomes the overall vertical fluted pattern.
With gaps, the wall begins to participate more actively in the composition.
Each plank reads more distinctly.
An alternation appears:
relief — smooth strip — relief — smooth strip.
This is already a different design.
Therefore, one cannot say that one option is "more economical" and therefore better.
A sparse layout may indeed require fewer profiles for the same total width, but it should be chosen for the desired wall pattern, not just to reduce the amount of product.
First draw the boundaries of the entire insert, then decide what happens inside.
There is a convenient design order.
On a smooth wall, use painter's tape to mark the left and right boundaries of the future fluted zone.
For example, 840 mm.
Do not draw individual slats yet.
Step back and look: does this width suit the room?
If yes, only then decide how to fill in the field.
Butt-joint:
8 KPU-129 = 840 mm.
Or more sparsely with fewer profiles in a pre-selected layout.
This way, you don't let the installation method randomly determine the entire design.
First, the architectural width.
Then, the internal structure.
KPU-129 with a length of 2600 mm: here a second constraint appears
With width, it's convenient: it's assembled by quantity.
With height, the situation is different.
The length of one KPU-129 is fixed at 2600 mm.
If the decorative insert should have a height of 2400 or 2500 mm, one plank covers such an area in length, taking into account the necessary fitting of the project.
If the zone height is exactly or about 2600 mm, you need to carefully check the actual wall dimensions and the way to finish at the top and bottom.
And if the decorative vertical should be higher than 2600 mm, one solid plank is no longer enough.
And it is important to find this out before purchasing.
Wall 2700 or 2800 mm: do not pretend that there is no limitation
Suppose the finished ceiling height is 2800 mm, and you want fluting from floor to ceiling.
KPU-129 with a length of 2600 mm does not cover such a size with a single solid piece.
This means the project requires a separate solution.
Different design approaches are possible:
-
finish the fluted insert below the ceiling;
-
do not start it from the very floor;
-
provide a horizontal finish;
-
design the joint;
-
change the geometry of the decorative field itself.
Which option is technically suitable for a specific object should be decided before ordering and taking installation into account.
Do not buy slats with the thought "we'll figure something out on site."
Especially when it comes to a repeating fluted pattern: a random horizontal joint can noticeably change the impression of a vertical surface.
The height of the insert does not have to equal the height of the wall
This frees you from many unnecessary restrictions.
An accent decorative fragment can well be a standalone rectangle.
For example:
-
start from the top of the console;
-
end below the ceiling cornice;
-
occupy only the space behind the TV;
-
be located inside a pre-defined niche;
-
decorate part of the furniture composition.
In this case, a length of 2600 mm is perceived not as a problem, but as the maximum initial format of the plank for the selected project.
That is why the article is devoted to the insert, and not to a mandatory fluted wall from floor to ceiling.
Why a partial fluted zone is often more interesting than a full wall
A fully textured wall is a bold solution. But bold does not mean universal.
When the relief occupies the entire surface, it becomes a background for everything:
furniture;
TV;
paintings;
lighting fixtures;
doors;
of other decorative elements.
If the interior already contains several noticeable objects, fluting across the entire wall may compete with them.
A partial insert works differently.
It introduces texture locally.
The smooth surface remains the background.
The relief gets a specific task.
For example, it highlights the console.
It emphasizes a furniture block.
It completes the niche.
It creates a vertical line beside the TV.
Thus, decorative molding does not cover the entire wall, but precisely changes one section.
Three strips — 315 mm: a narrow architectural band
Three KPU-129 already create a noticeable field 315 mm wide.
This is not a full large panel, but also not a single profile.
This size is interesting for local tasks.
For example, next to a built-in wardrobe.
The wardrobe ends with a vertical line, and a smooth wall begins next to it. Three profiles can create a transitional textured strip between the furniture and the wall.
Another scenario is a narrow niche.
The third is a side accent near a mirror.
At a width of 315 mm, the fluting doesn't have to become the main object of the room. It rather works as architectural punctuation: it emphasizes a boundary, introduces a vertical, and supports the geometry of the furniture.
If you need exactly this effect, buying eight or ten slats just for a "real panel" is pointless.
Four KPU-129 — 420 mm: already a standalone insert
420 mm feels more confident.
This width is enough for the fluted surface to become a separate rectangular wall element.
Four slats can be considered:
-
to the side of the TV zone;
-
behind a narrow console;
-
inside a vertical niche;
-
next to a tall cabinet;
-
as a symmetrical pair of sections on both sides of the furniture.
The scenario of two identical inserts is especially interesting.
For example, four KPU-129 panels on the left and right of the central smooth zone.
Then the total order is eight planks, but not the entire wall becomes fluted, but two clear verticals of 420 mm each.
Five KPU-129 — 525 mm: a convenient medium format
525 mm is one of those sizes that is easy to integrate into an interior.
It no longer looks like a narrow strip, but it doesn't yet turn the relief into a dominant part of the wall.
Such an insert is convenient to try on:
behind a small console;
beside the bed;
in a furniture composition;
in a fairly wide niche;
between two smooth sections of the wall.
If the original design idea was 'about half a meter of fluting,' five slats provide a practically ready answer.
No complicated math.
5 pcs. KPU-129 → 525 mm butt joint.
Six slats — 630 mm: the texture becomes a noticeable part of the wall
At a width of 630 mm, the insert is already clearly visible even in a more spacious room.
This is a suitable scale if the task is not just to add relief, but to make it an obvious participant in the composition.
For example, a console about a meter wide can stand against such a vertical strip, leaving smooth walls on the sides.
Behind the headboard, 630 mm can be used not as a background for the entire bed, but as one central or side textured zone.
In a niche, this width is perceived almost as a separate decorative panel.
If after marking out 525 mm seem too modest, the sixth plank adds exactly 105 mm and noticeably changes the character of the surface.
Eight strips — 840 mm: almost a ready-made accent panel
840 mm is already a solid width.
Such an insert can work independently without needing to cover the remaining two or three meters of the wall with fluting.
This is especially convenient:
behind a console;
in the area of a small TV;
behind part of the headboard;
in a wide niche;
as a vertical background for an art piece or mirror — if the specific composition allows it.
Before buy KPU-129 for a fluted wall, be sure to mark these 840 mm on the actual surface.
On the monitor, the number seems moderate.
On a narrow 84 cm wall, textures can take up a significant portion of the free space.
Ten slats — 1050 mm: the fluted zone is wider than a meter
Ten KPU-129 units give 1050 mm.
Here, you no longer need to explain to the wall where the decorative center is. The textured zone reads immediately.
This option is interesting for a spacious living room, bedroom, study, or commercial space, where the vertical relief is given enough free space.
But there's an important nuance.
The wider the insert, the more important its boundaries.
If a 315 mm strip can be perceived almost as a detail, then 1050 mm is already a separate plane within a plane.
Its left and right edges must be anchored to something:
furniture axes;
a niche;
wall architecture;
symmetry;
TV zone boundaries;
center of the bed.
A random 1050 mm strip in a random place looks exactly random.
Behind the headboard: you don't have to flute the entire width
The wall behind the bed is the first scenario where it's easy to overdo it.
The bed itself is a wide object.
If you repeat its width with fluting from edge to edge, the decorative zone becomes very large.
Sometimes it is justified.
But our task is to find a more local solution.
Central vertical insert
You can make a narrow fluted center along the bed axis.
For example:
5 slats = 525 mm;
6 = 630 mm;
8 = 840 mm.
The rest of the wall remains smooth.
The effect is built on the contrast of textures, not on the amount of material.
Side insert
If the interior is asymmetrical, KPU-129 can appear on only one side.
For example, behind a hanging cabinet or a lamp.
Then 315–525 mm can provide enough relief.
Two symmetrical strips
Four slats on the left and right:
420 + 420 mm of fluted surface.
The center behind the headboard remains smooth.
This option distributes texture across the wall quite differently than a solid panel.
Behind the console: first the furniture width, then the number of KPU-129
The console is a convenient anchor point.
Suppose the furniture has a width of 1000 mm.
This does not mean that the fluted insert should also be 1000 mm.
It can be made narrower.
For example:
6 KPU-129 = 630 mm.
8 = 840 mm.
10 = 1050 mm.
All three options can work with the same console in completely different ways.
630 mm form the central vertical.
840 mm provide a wider background.
1050 mm almost match the width of the furniture.
Which one to choose?
Mark it on the wall.
See whether you want the furniture to extend beyond the edges of the texture or sit entirely within the fluted field.
No universal rule will solve this.
TV zone: fluting doesn't have to be the background of the entire screen
TV walls are often automatically turned into a solid decorative panel.
But if a smooth surface already works, you can be more precise.
KPU-129 can form:
-
one vertical fluted strip to the side of the TV;
-
two symmetrical strips;
-
a section next to the cabinet;
-
insert between the cabinet and the screen;
-
a separate panel that does not match the width of the TV.
At the same time, the relief should not extend where it interferes with other wall details.
First, apply the boundaries of the future field to the photo or wall.
Only then count the profiles.
If the boundary is 840 mm, use eight KPU-129 end-to-end.
If 630 — six.
This is why modular calculation is more convenient than the abstract "we'll cover part of the wall."
In a niche: here the field width is set by the architecture
A niche differs from an open wall in that it already has rigid side boundaries.
Suppose the internal width of the niche is 650 mm.
Six KPU-129 units placed end-to-end give 630 mm.
There remains a 20 mm difference relative to the conditional 650.
What to do?
You don't need to make a decision based only on arithmetic.
First, determine whether the molding should fill the niche from edge to edge.
If yes, it is necessary to develop a precise scheme for joints and installation.
If not, the 630-mm ribbed insert can deliberately leave smooth fields.
But seven slats — 735 mm — are already wider than the niche and in such a scenario are obviously unsuitable without changing the project.
It is especially useful to count the product in niches before placing an order.
Next to a built-in wardrobe: the relief can become a transition to the wall.
Built-in furniture often ends with a tall vertical plane.
Then an ordinary painted wall begins.
The transition can be left neutral or emphasized.
Three, four, or five KPU-129 can create a textured strip:
315 mm;
420 mm;
525 mm.
It visually continues the height of the furniture, but at the same time already belongs to the architecture of the wall.
This technique does not require fluting the entire room.
Moreover, since KPU-129 can also be used in connection with built-in furniture, it is convenient to design the position of the profiles relative to the outermost facades in advance.
The main thing is not to place the first strip "by eye."
The boundary between the cabinet and the decorative zone must be defined in advance.
On the furniture structure: first check the geometry of the base
KPU-129 is considered not only as wall decor, but also for built-in furniture solutions.
But here you cannot transfer the wall calculation automatically.
Furniture has its own boundaries:
-
facade width;
-
door joints;
-
handles;
-
opening;
-
adjacent panels;
-
end caps;
-
gaps between facades.
For example, a field 525 mm wide made of five slats fits perfectly on a wall, but may not match the size of a specific furniture facade at all.
Therefore, the calculation in pieces remains the same, but the initial field changes.
First, furniture.
Then the 105 mm module.
Not the other way around.
A smooth wall and fluting should work together
An accent insert is interesting precisely because a smooth surface remains nearby.
This is not an "unfilled part."
This is the second material of the composition.
If fluting covers 840 mm on a wall 3 m wide, more than two meters of smooth surface remains around it.
It is this contrast that makes vertical flutes noticeable.
Therefore, when choosing the number of profiles, it is useful to ask not only:
"Will eight slats be enough?"
But also:
"How much smooth wall will remain after eight slats?"
Suppose the free section of the wall is 1800 mm.
6 KPU-129 = 630 mm.
1170 mm of smooth surface remains.
8 = 840 mm.
960 mm remains.
10 = 1050 mm.
750 mm remains.
These are already three different compositions, although the wall itself is the same.
Center the insert or shift it toward the furniture
Mathematically, the simplest is to place the fluted strip in the center of the wall.
From a design perspective, this is not always necessary.
The center is determined not only by the wall.
The room already has:
bed;
wardrobe;
TV;
door;
console;
opening;
Mirror.
If the insert relates to a specific object, it makes more sense to align its axis with that object.
For example, a panel of 8 KPU-129 with a width of 840 mm is located behind a console with a width of 1200 mm.
You can center these 840 mm relative to the furniture.
Then the console will protrude approximately equally on both sides.
This is a clear connection.
Randomly centering the panel relative to the entire wall can break this connection.
One insert or two: the quantity is counted for each separately
Sometimes two narrow sections look better than one wide one.
For example:
one central panel of 8 slats = 840 mm.
Or:
two panels of 4 slats each = 420 + 420 mm.
The quantity of goods is the same — eight KPU-129.
But the interior turns out completely different.
In the first case, there is one large fluted center.
In the second, there are two vertical supports with a smooth space between them.
This is a good example of why the number of profiles cannot be calculated in isolation from the wall layout.
Eight pieces is not a design.
Design is understanding exactly where those eight pieces go.
Comparison of several options with the same quantity
| Quantity | Scheme | Result |
|---|---|---|
| 6 | One strip | 630 mm of ribbing |
| 6 | Two groups of 3 | Two strips of 315 mm |
| 8 | One group | 840 мм |
| 8 | Two groups of 4 | Two inserts of 420 mm |
| 10 | One group | 1050 мм |
| 10 | Two groups of 5 | Two inserts of 525 mm |
| 12 | One group | 1260 мм |
| 12 | Three groups of 4 | Three inserts of 420 mm |
Therefore, before ordering, don't limit yourself to the question "how much is needed for the wall."
Draw a distribution diagram.
KPU-129 and regular moldings solve different tasks
Because it belongs to the category of linear trim, KPU-129 is easily mentally placed in the same row as traditional moldings.
But the buyer's task is different.
A regular molding more often creates a line or a frame.
In this article, KPU-129 is used as a repeating relief module to form a textured field.
If you need a thin rectangular frame on a smooth wall, it's more reasonable to look at Moldings made of polyurethane.
If you need a vertical fluted insert assembled from several identical profiles, then the logic of KPU-129 is much closer to the task.
Sometimes both types of decor can be combined in one project.
For example, a fluted area is located inside a large architectural frame.
But this should be a deliberate combination, not an automatic purchase of molding "as a set".
A fluted insert can be framed, but this is not mandatory
There are two opposite ways to finish the edges.
The first is to leave the transition from KPU-129 to the smooth wall open.
The relief simply ends with a vertical line.
This emphasizes the modern character of the insert.
The second is to integrate the textured field into more complex wall architecture, using frames and adjacent decor.
If the project follows the second path, you can look in advance. polyurethane wall moldings and check them against the size of the entire insert.
But first, KPU-129 is still calculated.
Because it is its 105 mm module that determines the actual width of the fluted field.
KPU-129 or a ready-made slat panel: do not mix two different products
The visual association is clear: vertical stripes mean a slat panel.
But the buyer must understand the product logic.
KPU-129 is a decorative polyurethane molding.
It is purchased as individual profiles.
The width is built up by the number of these profiles.
This allows you to create your own insert:
315;
420;
525;
630;
735;
840;
1050 mm and so on.
It is precisely this modularity that becomes the main advantage for local decoration.
There is no need to look for a ready-made panel of exactly the width that fits in a niche or near furniture.
You assemble the field from individual elements.
If you want to see other products of the same type, the section Decorative polyurethane moldings allows you to compare linear elements and their geometry.
Material: polyurethane is confirmed, the rest is better not to guess.
For KPU-129, the material is confirmed — polyurethane.
This fact should be the basis for selecting related products.
You should not automatically assume a specific paint, primer, type of adhesive, or preparation technology just because you have worked with other molding before.
The wall base may differ.
The future finish, too.
Therefore, before installation, it is worth checking the recommendations for the specific product and the chosen surface.
If the project involves painting or other finishing treatment, the current preparation requirements should be checked in the product card or clarified with a STAVROS specialist.
The main thing is not to turn decorative calculation into a set of unconfirmed technological advice.
What to buy together with KPU-129
In the basic scenario, the set is quite short.
You need calculated KPU-129 strips and suitable materials for installation.
Additional moldings and wall decor appear only when the project requires them.
| What to add to the order | When needed | Why | What to Check |
|---|---|---|---|
| KPU-129 in the calculated quantity | Always | Assemble the ribbed insert | Quantity, layout, length 2600 mm |
| Installation materials | For fixation | Attach the polyurethane profile to the selected base | Compatibility with the product and the wall |
| Moldings | If the textured insert is part of a frame composition | Connect the ribbing with other wall geometry | Profile and position relative to KPU-129 |
| Decor for Walls | When not only the insert is being styled | Support the overall wall composition | Scale and absence of overload |
| Other polyurethane decor | For a complex project | Assemble several types of relief | Compatibility of sizes and purposes |
For installation, it is useful to immediately open the section where you can buy materials for installing moldings, but choose the specific composition after checking the base and installation requirements.
Do not buy molding just because it "should be nearby"
A commercial article has a danger: turning the "what to buy together" section into an attempt to increase the cart at any cost.
For KPU-129 this would be a mistake.
If you need a clean ribbed strip on a smooth wall, perhaps only profiles and mounting materials are enough.
Molding is needed only when:
-
<
Example: niche 1260 mm
Here arises a pleasant exact coincidence.
12 × 105 = 1260 mm.
If the project indeed provides for filling this entire width with profiles butt-to-butt and the actual dimensions after verification match, twelve strips give the required modular size.
But even with such a nice coincidence, you need to check the actual geometry of the base and the installation scheme.
Do not transfer the design niche figure to the order without a control measurement.
Example: two inserts of 525 mm each
Each requires:
5 KPU-129.
Two:
10 pcs.
The total fluted width is 1050 mm, but it is divided by a smooth wall.
This is visually not at all the same as one 1050 mm panel made of ten slats.
That's why in the order it's useful to write the layout scheme next to the quantity:
10 pcs. = 2 groups of 5.
This way, during installation, there will be no question as to why the material is calculated this way.
Is a reserve needed
For KPU-129, the reserve rule from roll materials or tiles cannot be mechanically applied.
This is a piece linear element of fixed length.
Whether an additional profile beyond the calculated quantity is needed depends on the specific layout, cutting, height, installation features, and the project.
If the insert is assembled from six whole vertical elements at a suitable height, the basic calculation shows six pieces.
Buying a seventh one "just because you always need a spare" without understanding the reasons is not worth it.
But you also shouldn't design a large project without checking the trimming and installation diagram.
For complex layouts, the allowance should be determined based on the specific project.
Mistake: calculating the quantity by wall area
For example, a wall:
2.6 × 3 m.
The area is 7.8 m².
This number by itself doesn't answer the question of how many KPU-129 pieces are needed for the accent insert.
Because you're not going to cover the entire wall.
First, determine the width of the ribbing.
For example, 840 mm.
Then, for butt installation, you'll need eight strips.
That's all.
The area of the remaining smooth wall is not needed for this calculation.
Error: first buy five slats, then look for a place for them
Five profiles give 525 mm.
This is a specific width.
If it fits — great.
If not, the problem has already appeared after the purchase.
The order should be reversed:
wall;
borders;
width;
quantity;
order.
Especially if several expensive identical SKUs are used.
Mistake: thinking that one KPU-129 is already a wall panel
The width of one piece is only 105 mm.
It can be used as a separate decorative vertical if intended, but a fluted panel usually appears through repeating several elements.
Therefore, first determine whether you need a single profile, a narrow group, or a wide field.
Mistake: forgetting about gaps in the formula
Five planks butt-jointed — 525 mm.
Five planks with gaps — already more than 525 mm.
If you first calculate butt-to-butt, order the material, and then change the installation scheme, the finished insert will become wider than planned.
Therefore, the decision about gaps is made before the final marking.
Mistake: multiply the number of gaps by the number of slats
Between five slats there are four internal gaps.
Not five.
Between ten — nine.
Formula:
N × 105 + (N − 1) × G.
Edge offsets to a smooth wall are counted separately.
Mistake: choosing the gap size only for the sake of a round width
Suppose seven slats give 735 mm, but you want exactly 800.
You can mathematically select intervals and get closer to the desired number.
But first ask: do you like a sparse rhythm?
If not, it's better to choose eight profiles at 840 mm and slightly change the width of the entire insert.
Composition is more important than a round number.
Mistake: not checking 2600 mm in height
The most unpleasant situation is to perfectly calculate the width, order ten slats, and then discover that the decorative zone should run from floor to ceiling with a height of 2800 mm.
KPU-129 has a length of 2600 mm.
This means such a project initially required a different vertical solution.
Check the height before the basket.
Mistake: making a horizontal joint without a project
If the strip is shorter than the required vertical field, it cannot be assumed that the missing section is automatically added as a small piece on top.
On a repeating relief, the horizontal joint may be noticeable.
First, the layout is developed.
Then, the material is calculated.
Mistake: making the entire wall fluted just because one insert seems "insufficient"
Start with marking.
A strip of 630, 840, or 1050 mm on a real wall can be much more expressive than it seems from the numbers.
More material does not mean a more precise interior.
Sometimes a fully fluted wall removes the very contrast with the smooth surface that started it all.
Mistake: not taking into account the object in front of the insert
Fluting rarely exists on its own.
In front of it may be:
bed;
console;
a pedestal;
TV;
an armchair;
a table.
If the furniture covers most of the decorative area, you need to check in advance what will remain visible.
There is no point in carefully calculating 525 mm of texture if only a narrow strip remains visible after furniture installation.
Mistake: placing the insert too close to the corner
Technically, 840 mm can fit.
But if 20 mm of smooth wall remains to the corner after them, the boundary looks random.
Sometimes it is better to reduce the number from eight to seven and get 735 mm, leaving a more convincing margin.
Error: buying adjacent decor before approving KPU-129
First, determine the main textured plane.
Then decide whether you need decorative polyurethane elements around.
Otherwise, it's easy to buy several beautiful items that don't work well together.
Who is the KPU-129 accent insert suitable for?
This design approach is especially interesting for those who don't want to redo the entire wall.
The smooth surface is already there.
The renovation is finished or close to completion.
One architectural section is needed.
You want vertical relief, but without the feeling of a solid slat wall.
There is a niche or furniture to which the texture can be anchored.
An accurate calculation of the quantity based on a fixed module is required.
In these cases, KPU-129 is convenient to consider as a width constructor.
It's better for someone to choose a different path
KPU-129 does not have to fit every task.
If you need a completely smooth interior without pronounced relief, the fluted pattern itself may be unnecessary.
If the decorative field must have a rigid width that fundamentally does not align with the 105 mm module and you do not want to use gaps, a different solution will be required.
If the height of a continuous vertical section significantly exceeds 2600 mm, the finish or joint must first be designed.
If you want not a fluted surface but thin frames, it is better to study Buy polyurethane wall moldings and build a composition of a different type.
What to choose for the living room
In the living room, a fluted section is usually visible from a fairly large distance.
Therefore, a very narrow insert of 210–315 mm can be perceived as a small decorative strip.
525–840 mm are already read more confidently.
1050 mm and more turn the texture into a significant architectural part of the wall.
But the scale needs to be matched with the furniture.
If there is a large sofa, a long cabinet, and a big TV nearby, 315 mm can get lost.
For a compact console, on the contrary, 1050 mm may be excessive.
For the bedroom, the connection with the bed is important
The bed forms a strong horizontal line.
KPU-129 forms a vertical line.
Expressiveness appears at the intersection of these two directions.
It is not necessary to duplicate the width of the headboard.
Sometimes a central strip of 630 or 840 mm is more interesting.
In other cases, two inserts of 420 mm each are placed symmetrically on the sides.
The main thing is to mark them out together with the furniture, not on an empty wall.
For a hallway, it is better to start with a smaller number.
Narrow spaces are viewed from a close distance.
Therefore, the relief becomes visually more noticeable.
Three, four, or five profiles may be sufficient.
315;
420;
525 mm.
Before moving on to eight or ten KPU-129, look at a small-scale version.
For an office, it is convenient to tie the fluting to cabinets and a desk.
Tall built-in furniture creates natural vertical lines.
KPU-129 can continue them on the wall.
For example, a narrow strip of 315–420 mm at the edge of a cabinet.
Or a wider field behind the work area.
Here it is especially important to determine in advance whether the relief will be covered by furniture after the final arrangement.
For a commercial interior, first one module is made.
If identical inserts are planned in several zones of a showroom, salon, reception area, or other space, do not rush to multiply the calculation by ten walls.
First, determine one typical panel.
For example:
8 KPU-129;
840 mm;
specific height;
a specific layout.
After checking it, you can multiply the quantity by the number of identical sections.
Thus, a large order is built from a verified module.
How not to confuse KPU-129 with other trim
The category has many products with KPU indices.
Therefore, the single word "trim" is not enough.
Before purchasing, check:
article KPU-129;
width 105 mm;
thickness 7 mm;
length 2600 mm;
material polyurethane;
relief pattern;
Quantity.
Pay special attention to the width.
It is exactly 105 mm that forms the basis of all calculations in this article.
If you accidentally choose a different profile of a different width, the quantity table will stop working.
How to buy at STAVROS: a ready-made route
First, determine the scheme.
For example:
one insert 840 mm, butt installation, height fits the 2600 mm strip.
Hence the order:
8 KPU-129.
After that, open the card and check the article number and size again.
If a wider selection of similar products is required, you can view the entire Relief Decoration and the molding section.
If the project simultaneously includes other wall elements, separately check Polyurethane wall decor.
Mounting materials are selected based on the specific base.
This is how the cart is assembled according to the project:
KPU-129 in the calculated quantity → necessary mounting materials → additional elements only as needed.
Check before ordering: seven digits and solutions
Before placing an order, you should have written down:
1. Width of one KPU-129 — 105 mm.
2. Length — 2600 mm.
3. Thickness — 7 mm.
4. Desired insert width.
5. Number of profiles.
6. Layout method — butt or with gaps.
7. Height of the actual field.
If these seven points are defined, the risk of buying a random quantity drops sharply.
Quick quantity selection table
| I want approximately | Nearest KPU-129 options butt-joint | What to compare |
| 300 мм | 3 pcs = 315 mm | Is a narrow strip suitable |
| 400 мм | 4 pcs = 420 mm | Is it too noticeable |
| 500 мм | 5 pcs = 525 mm | Almost ready-made module |
| 600 мм | 5 pcs = 525 mm or 6 pcs = 630 mm | Smooth field on the sides |
| 700 мм | 6 pcs = 630 mm or 7 pcs = 735 mm | Scale relative to furniture |
| 800 мм | 7 pcs = 735 mm or 8 pcs = 840 mm | Is a wider background needed |
| 900 мм | 8 pcs = 840 mm or 9 pcs = 945 mm | Position of edges |
| 1000 мм | 9 pcs = 945 mm or 10 pcs = 1050 mm | Both options are almost equivalent |
| 1200 мм | 11 pcs = 1155 mm or 12 pcs = 1260 mm | Scale of the entire wall |
| 1250–1300 mm | 12 pcs = 1260 mm | Convenient one-piece module |
This is not a table of "mandatory sizes."
This is a table of options for fitting.
FAQ: questions before ordering KPU-129
How many KPU-129 are needed for an insert 500 mm wide?
When installed butt-to-butt, five strips give 525 mm.
Four give 420 mm. Therefore, for a planned width of about half a meter, it is worth first trying a variant of five KPU-129.
How many slats are needed for approximately 600 mm?
Five elements give 525 mm, six — 630 mm.
If the width is not limited by a rigid niche, it often makes sense to compare both options directly on the wall.
How many KPU-129 are needed for 800 mm?
When installing butt-to-butt, seven slats give 735 mm, eight — 840 mm.
If gaps are allowed, seven elements can form a wider composition, but the size of the gap must be provided in advance by the project.
How many slats are needed per meter?
Nine KPU-129 give 945 mm.
Ten — 1050 mm.
Both sizes are close to one meter, so the final choice is best made based on the actual wall composition.
How to calculate the quantity yourself?
Divide the desired width in millimeters by 105.
You will get the approximate number of slats.
Then compare the two nearest whole-number options and their actual sizes.
For example:
800 ÷ 105 ≈ 7,62.
So, we check 7 and 8 slats.
How to calculate the width if KPU-129 are installed butt-to-butt?
Multiply the quantity by 105 mm.
For example:
6 × 105 = 630 mm.
8 × 105 = 840 mm.
10 × 105 = 1050 mm.
How to calculate an insert with equal gaps?
Use the formula:
N × 105 + (N − 1) × G, where G is the selected gap.
Remember: between N planks there are N − 1 internal gaps.
What gap should be left between KPU-129?
A single mandatory value cannot be set in the article without a specific project and a confirmed installation scheme.
First determine the visual pattern, then check the installation requirements. Do not choose a gap just for a nice final width figure.
Can KPU-129 be installed without any gaps at all?
Yes, the option of assembling several profiles butt-to-butt is considered.
With this scheme, the width calculation is the simplest: each plank adds 105 mm.
Do you need to make the entire wall fluted?
No.
KPU-129 can be used for a local decorative panel or an accent area.
It is the partial insert that allows most of the wall to remain smooth.
Can only three slats be made?
Yes, if such a width matches the composition.
Three profiles placed end-to-end give 315 mm and can work as a narrow textured vertical.
Four or five slats — which is better?
Four give 420 mm.
Five give 525 mm.
If the space is not limited by strict boundaries, mark both widths on the wall and compare them relative to furniture and free margins.
Can two identical inserts be made?
Yes.
For example, two groups of four profiles will give two zones of 420 mm each.
In this case, the order will contain eight KPU-129 units.
Can eight slats be made into two panels instead of one?
Yes.
Instead of one 840 mm surface, you can assemble two groups of four slats, each 420 mm wide when installed butt-to-butt.
This is a completely different compositional scenario with the same quantity of goods.
Will KPU-129 fit a niche?
It may fit if the niche dimensions align with the chosen layout.
First, measure the actual internal width, then compare it with the 105 mm modules.
What to do if the niche is 650 mm?
Six KPU-129 units placed end-to-end give 630 mm.
Seven is 735 mm and already exceeds 650 mm.
So, six slats is the first option to test if the project allows for the remaining fields.
Can the KPU-129 be installed behind the bed?
Yes, an accent wall zone is one of the suitable scenarios.
It is not necessary to repeat the fluting across the entire width of the headboard. You can make a narrower central or side insert.
How many slats should be taken for a console 1 m wide?
The width of the console does not determine the quantity automatically.
For comparison, you can consider 6 slats = 630 mm, 8 = 840 mm, 9 = 945 mm, or 10 = 1050 mm and see whether the furniture should extend beyond the fluting boundaries.
Is the KPU-129 suitable for a TV zone?
Yes, it can be used for a local vertical accent.
It is not necessary to cover the entire wall behind the TV with profiles. Sometimes one side strip works more precisely.
Can KPU-129 be used next to a built-in cabinet?
Yes, this scenario is especially convenient for a vertical textured strip connecting furniture and a smooth wall.
The quantity is determined by the width of the selected area.
What to do if the wall height is more than 2600 mm?
A single solid KPU-129 is not enough for a continuous vertical line above 2600 mm.
Before ordering, you need to design the finish of the insert, its height, or the connection option. Do not leave this issue until installation.
What if the wall height is less than 2600 mm?
Then the length of the original strip is greater than the height of the field.
Precise fitting and cutting method should be performed according to the installation diagram and actual measurements of the site.
Do I need to buy a spare strip?
There is no automatic rule of "plus one piece" for any insertion.
The amount of reserve depends on the layout, trimming, height, and installation conditions. For a simple field of solid elements, first calculate the actual number of planks, and assess the need for reserve separately.
How does KPU-129 differ from a slat panel?
KPU-129 belongs to polyurethane decorative molding and is purchased as separate profiles with a width of 105 mm.
From several elements, a custom ribbed surface of the required width is formed.
Can the insert be framed with a molding?
Yes, if the frame fits into the wall design.
But the molding is not a mandatory part of KPU-129. On a modern smooth wall, the textured strip can end without additional decorative framing.
What to order together with KPU-129?
Basically, the calculated number of profiles and suitable installation materials.
Add moldings and other wall decor only when they are actually specified in the project.
Where to look for other linear products if KPU-129 does not fit in width or pattern?
You can open the section Decorative polyurethane moldings and compare other linear options.
Do not change the project to fit a specific item if its geometry does not suit your field.
Where to see a wider range of stucco decoration?
If the task has changed and instead of a fluted insert a different type of finish is required, you can to buy molding from the general catalog of polyurethane decor.
This makes it easier to move from one specific item to another group of products without picking random substitutes.
What should be checked immediately before paying for the order?
Check:
article KPU-129;
size 105 × 7 × 2600 mm;
quantity;
number of decorative groups;
width of each group;
presence or absence of gaps;
actual height;
Installation materials.
If the project is complex, it is better to separately verify the layout before purchasing.
First width, then quantity: the simplest way not to overpay for an unnecessary fluted wall
The main idea of KPU-129 is simple: you don't need to solve the interior with square meters of texture if you only need one expressive fragment.
The profile has a clear module — 105 mm.
Therefore, the future insert can be literally assembled with numbers:
3 slats — 315 mm;
4 — 420 mm;
5 — 525 mm;
6 — 630 mm;
7 — 735 mm;
8 — 840 mm;
10 — 1050 mm;
12 — 1260 mm.
If the slats are installed with gaps, the width of the internal gaps is added to the total width of the elements.
If the height of the decorative field exceeds 2600 mm, the issue of vertical finishing must be resolved at the project stage.
This is enough to move from a vague desire "I want some fluting on the wall" to a specific order.
For example:
"Need a central insert about 80 cm. After fitting, I choose 8 KPU-129, getting 840 mm when installed butt-to-butt."
Or:
"I want two narrow verticals on the sides of the cabinet. I take 4 KPU-129 for each, 8 pcs total, each insert is 420 mm."
This is no longer a decorative fantasy, but a ready-made specification.
STAVROS company allows you to assemble such a project from specific linear elements, without turning the entire wall into a continuous ribbed surface. First, determine the area, mark it out at full scale, count modules of 105 mm, check the length of 2600 mm, and only then proceed to the product card and order.
If the calculation shows that KPU-129 is suitable, you can Buy Polyurethane Molded Decoration and assemble exactly as much textured surface as the interior requires — no more and no less.