Article Contents:
- Short answer for those already assembling the kit
- What is SNL-2 and what task does it solve
- Confirmed specifications of SNL-2
- Why SNL-2 cannot be evaluated separately from the platband
- Full size does not equal the uncut area
- Full size does not equal the installation tolerance
- Full size does not prove pattern compatibility
- Is the square pattern preserved
- Does the thickness match
- Does the connector look too large
- Is there enough space for the slope and adjacent parts
- Preliminary conclusion on NL-5
- Why 27.5 mm cannot automatically be considered a frame
- Central and offset position
- Proportions on a tall window
- Preliminary conclusion on NL-1
- Why one millimeter cannot be considered a margin
- Can such a combination be used at all
- What to check on a full-size template
- Preliminary conclusion on NL-7 164 mm
- What happens with a regular overlay
- Is another composition possible
- What mistake is often made
- Preliminary conclusion on NL-7 294 mm
- Why a square will not cover the joint
- Can the square be rotated
- Which element to consider instead of SNL-2
- Preliminary conclusion on NL-8
- Example with NL-1
- Example with NL-5
- Example with NL-7 164 mm
- How parts adjoin
- Is there relief on the front surface
- What happens after finishing
- What the craftsman should check
- Step 1. Draw a square 165 × 165 mm
- Step 2. Transfer the contour of the carved pattern
- Step 3. Make two strips the width of the casing
- Step 4. Place the strips according to the intended layout
- Step 5. Trace the actually closed area
- Step 6. Transfer the layout to the window
- Step 7. Look from several distances
- Step 8. Secure the approved scheme
- What a physical fitting provides
- When the test is especially needed
- Only the two top corners
- All four corners
- Top corners and central element
- Two frames around one window
- Connectors between multiple slats
- Example: five windows, only top corners
- Example: three windows with a closed frame
- Example: two windows with four corners and a top central insert
- Example: facade with different windows
- Test painting
- Control assembly
- Replacement in case of damage
- Future repair
- When reserve turns into an extra order
- Basic formula
- Plank length 2000 mm
- Cutting map
- Ornament and cutting
- Divide the set by windows
- Do not stack threads face to face without protection
- Do not lose the approved template
- Store finishing information
- Stage 1. Base inspection
- Stage 2. Base lines
- Stage 3. Dry layout
- Stage 4. Marking
- Stage 5. Finishing and installation
- Small window with NL-5
- Medium window with NL-1
- Tall window with NL-7 164 mm
- Large window with NL-8
- Several identical windows
- Different windows on one facade
- Repairing existing trim
- Mistake 1. Comparing only 165 and the trim width
- Mistake 2. Treating one millimeter as a full allowance
- Mistake 3. Buying NL-7 without specifying the width
- Mistake 4. Considering SNL-2 universal for the NL series
- Mistake 5. Ordering four squares for each window automatically
- Mistake 6. Ordering two elements even though the frame is closed
- Mistake 7. Not accounting for central connections
- Mistake 8. Choosing a percentage-based margin
- Mistake 9. Evaluating one SNL-2 in hand
- Mistake 10. Not looking at the window from a distance
- Mistake 11. Not checking the thickness
- Mistake 12. Painting before fitting
- Mistake 13. Consider the preparation for enamel a finished finish
- Mistake 14. Use primer to fix geometry
- Mistake 15. Cover the central pattern with architraves
- Mistake 16. Shift the planks in place
- Mistake 17. Not mark the direction of the ornament
- Mistake 18. Order architraves by the height of the opening
- Mistake 19. Divide the total footage by 2000 mm without cutting
- Mistake 20. Use leftovers without checking the pattern
- Mistake 21. Install SNL-2 on NL-8 due to the same thickness
- Mistake 22. Automatically replace SNL-2 with SNL-1
- Error 23. Rotate the square 45 degrees without a drawing
- Error 24. Order glue before determining the base
- Error 25. Do not accept goods before painting
- Error 26. Mix parts from different windows
- Error 27. Do not protect threads during storage
- Error 28. Not saving the color recipe
- Error 29. Solve the joint directly during installation
- Error 30. Buy a separate socket instead of a system
- Step 1. Select the platband
- Step 2. Check SNL-2
- Step 3. Count the nodes
- Step 4. Calculate the platbands
- Step 5. Add finishing and installation
- Step 6. Check the invoice
- Step 7. Coordinate delivery
- When a design project is needed
- What is the size of SNL-2?
- What material is SNL-2 made of?
- What is its grinding?
- Does SNL-2 come painted?
- Is SNL-2 wider than the 110 mm trim?
- How much will remain on each side of NL-1?
- Will SNL-2 fit NL-5?
- Will SNL-2 fit NL-7 with a width of 164 mm?
- Will SNL-2 fit NL-7 with a width of 294 mm?
- Will SNL-2 fit NL-8 with a width of 250 mm?
- If the square is wider than the trim, is compatibility guaranteed?
- What does the full size 165 × 165 mm mean?
- How do I find out the size of the uncut area?
- Do I need to print the template?
- Can I use only an empty square without a pattern?
- How to check the thickness?
- Does the thickness of NL-1 match SNL-2?
- Does the thickness of NL-5 match SNL-2?
- Can I place SNL-2 only on top?
- How many SNL-2 are needed for one window?
- Is it always necessary to use four for a closed frame?
- How do I calculate the set for ten windows?
- Do I need to buy a spare element?
- Can I add ten percent extra?
- How to calculate trims together with SNL-2?
- Can I calculate by window height and width?
- What is the length of NL-1?
- What is the length of NL-5?
- Can two planks be joined along the length?
- Can leftovers be used?
- Can the carved trim be flipped over?
- Do I need to buy trims and SNL-2 in one batch?
- Can I buy one SNL-2 first?
- Do I need to buy one trim as a sample?
- Can I cover the mismatch with putty?
- Can I trim the SNL-2?
- Can I trim the trim to a square shape?
- Can I rotate the SNL-2 by 45 degrees?
- Can I use the SNL-2 as a central socket?
- Which connector is larger than the SNL-2?
- Will the SNL-1 fit the NL-8?
- Which connector is smaller than the SNL-2?
- Is the SNL-19 a square?
- Where can I watch the full series?
- Where can I see the current price of SNL-2?
- Is the trim included in the SNL-2 kit?
- Is mounting glue included?
- What Adhesive to Use?
- Can it be installed on a painted surface?
- Do I need to prime SNL-2?
- Can SNL-2 and the trims be painted separately?
- What should be done first: painting or fitting?
- How should SNL-2 be stored?
- What to check upon receipt?
- When should installation not be started?
- What question should I ask the manager before ordering?
- What question to ask a designer?
- What question should be asked to the installer?
- What question should I ask the finisher?
- How do you know that the set can be ordered?
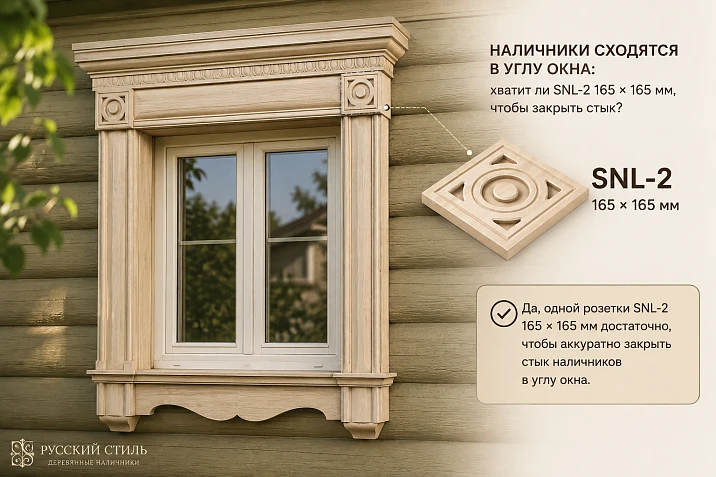
The trims have already been chosen, the width of the strips is known, and the pattern matches the facade. All that remains is to finish the window corners, and the square connecting element SNL-2 seems like an obvious solution: its size is 165 × 165 mm, so, the buyer reasons, it should cover any trim up to 165 mm wide. Formally, the arithmetic looks convincing. In practice, comparing only external dimensions is not enough.
SNL-2, measuring 165 × 165 × 18 mm, can indeed cover the corner joint of relatively narrow carved trims. For example, with a strip width of 89 or 110 mm, a visible field of the square element theoretically remains around it. But with a trim 164 mm wide, the margin shrinks to one millimeter. The corner is no longer perceived as an independent decorative rosette: its outer square almost completely coincides with the strip width. For trims 250 or 294 mm wide, SNL-2 is physically narrower than the strip itself, so it cannot fully cover such a joint in the usual way.
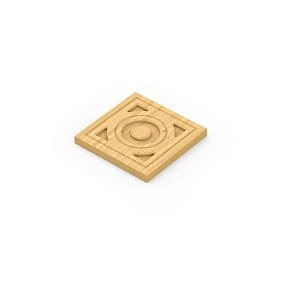
However, even a positive size difference does not prove ready compatibility. The 165 × 165 mm size shows the full outer square of the product, not the width of the uncut central area. Part of the element is occupied by the carved pattern. It is important to understand where the vertical and horizontal trims will go, whether they will cover significant fragments of the ornament, whether a decorative protrusion will remain around the joint, and whether the thickness of the parts matches.
Therefore, before buy connecting element SNL-2, they compare not just two numbers. Five parameters need to be checked:
-
full size of SNL-2;
-
actual width of the trim;
-
thickness of both parts;
-
drawing and the uncut zone of the connecting element;
-
the layout diagram of the strips in a specific corner.
Only after a full-size layout can you determine whether SNL-2 is sufficient for the selected trim, how many squares are needed for one window, and which items should be included in the overall order.
Short answer for those already assembling the kit
SNL-2 is a separate square carved element made of pine. Its full size is 165 × 165 × 18 mm. The sanding quality is "Standard", and the preparation is for enamel.
A preliminary width check gives the following results:
-
for NL-5 with a width of 89 mm, the square is 76 mm wider than the trim;
-
for NL-1 with a width of 110 mm — by 55 mm;
-
for narrow NL-7 with a width of 164 mm — only 1 mm wider;
-
for NL-8 with a width of 250 mm, SNL-2 is 85 mm narrower than the trim;
-
for wide NL-7 with a width of 294 mm — already by 129 mm.
So, SNL-2 has a real geometric margin for strips with widths of 89 and 110 mm. With a casing of 164 mm, the external size formally matches almost exactly, but there is practically no independent decorative field around the strip. For widths of 250 and 294 mm, the standard full-overlap scheme is impossible: a different connector or a specially designed joint is required.
This table shows the first stage of verification, but does not replace a mock-up.
| Casing | Confirmed width | Difference: 165 mm minus casing width | Field with conditional central position | Preliminary conclusion |
|---|---|---|---|---|
| NL-5 | 89 мм | 76 мм | 38 mm each | The margin is noticeable, but the pattern needs to be checked |
| NL-1 | 110 мм | 55 мм | 27.5 mm each | Geometric overlap possible |
| NL-7, narrow version | 164 мм | 1 мм | 0.5 mm each | Square almost equals trim |
| NL-8 | 250 мм | −85 mm | No margin | SNL-2 already slats |
| NL-7, wide version | 294 мм | −129 mm | No margin | No full overlap |
The field in the fourth column is calculated for clarity only. It assumes that the trim is positioned strictly in the center and that all 165 mm can be used as a working area. For a real carved element, this is not necessarily the case. The outer contour, ornament, and uncut areas require separate verification.




What is SNL-2 and what task does it solve
In the house carving system, straight trims form the sides of the window frame, and connecting elements help to design the places where the strips meet, change direction, or form a decorative node. SNL-2 works not as a random overlay on top of a mistake, but as a pre-planned part of the composition.
Its task consists of three levels at once.
The first is geometric. The square covers the junction area of the horizontal and vertical strips. The installer does not have to try to turn the carved pattern of two trims into an inconspicuous corner miter.
The second is decorative. The corner receives an independent ornament, thanks to which the window frame is perceived as a complete framing, rather than four separately attached slats.
The third is compositional. Repeating squares set the rhythm of the facade, connect several windows, and allow the top or all four corners to become a noticeable part of the house carving.
But SNL-2 will be able to perform these functions only if the sizes and patterns match. A too narrow square will not cover the trim. A too large one may look heavy. An element whose size is formally suitable can lose its ornament under the overlaid strips.
Our factory also produces:
Confirmed characteristics of SNL-2
| Parameter | Value |
|---|---|
| Article number | SNL-2 |
| Product type | Carved connecting element |
| Shape | Square |
| Full size | 165 × 165 × 18 mm |
| Material | Spruce |
| Sanding | "Standard" |
| Preparation | For enamel |
| Main purpose | Design of decorative joints of platbands |
| Selection method | By width, thickness, pattern, and layout scheme of platbands |
| Quantity | By the number of actually designed nodes |
| Price and availability status | Checked in the current product card |
Preparation for enamel does not mean that a finished topcoat has already been applied to the part. Before installation, the set must be inspected, a trial layout performed, and the finishing specified by the project completed.
Get Consultation
Why SNL-2 cannot be evaluated separately from the platband
The square shape seems universal. One might think that choosing a connector wider than the strip is enough, and the corner will automatically turn out neat. This simplification does not take the pattern into account.
A carved platband has a front ornament, edges, cut-out sections, and its own compositional axis. SNL-2 also has a pattern. When two strips are overlaid on the square, part of its surface is covered. The remaining area should look meaningful, not like random carving fragments at the edges.
Therefore, the product is considered together with a specific platband article. In the category, you can buy wooden carved trims and immediately compare their width with the dimensions of the connecting elements. Buying separately without an overall scheme increases the risk of incompatibility.
Size 165 × 165 mm is the outer square, not a guaranteed overlap
The main mistake arises from misunderstanding the word "size." The card shows the full dimensions of the product: from the extreme point of the left side to the extreme point of the right, and from the top edge to the bottom. But the buyer is interested not only in the outer square. They need to know what part of the surface will remain visible after applying the platbands.
Let's imagine a simple smooth square board 165 × 165 mm. Two strips 110 mm wide are placed on it in the center: vertical and horizontal. Theoretically, 27.5 mm remains on each side. For a smooth part, such a calculation might be sufficient.
SNL-2 is a carved element. Its outer edge and inner pattern have an independent shape. Part of the ornament may be located exactly in those 27.5 mm that will remain around NL-1. Another part may end up under the strips. In one position, the pattern will be preserved; in another, it will look cut off.
The full size is not equal to the uncut area
The connecting element may have:
-
protruding ornament areas;
-
recesses;
-
cut-out zones;
-
central composition;
-
edges that cannot be covered with a trim;
-
pattern direction;
-
different visual axes.
Therefore, you cannot take 165 mm, subtract the width of the trim, and declare the result a guaranteed decorative reveal. The calculation only shows potential space.
Full size is not equal to installation tolerance
The 1 mm difference between SNL-2 and the NL-7 trim with a width of 164 mm is not a useful installation allowance. With a central position, 0.5 mm remains on each side. Such a value cannot be considered a full frame around the trim.
The result will be affected by:
-
actual geometry of parts;
-
deviation during marking;
-
features of the side edge;
-
layer of finishing material;
-
location of carving;
-
alignment accuracy;
-
state of the wooden workpiece.
Formally, the square is wider, but visually the separate connecting element almost disappears.
Full size does not prove pattern compatibility
Even if SNL-2 is wider than the trim by 55 or 76 mm, the ornament may not align automatically. The trim can cover the central part or cross an important motif.
Compatibility is confirmed only after overlaying full-size contours or actual samples.
NL-5 with a width of 89 mm: the most noticeable margin around the strip
NL-5 has dimensions of 2000 × 89 × 18 mm. Its width is significantly smaller than the outer square of SNL-2.
Calculation:
165 − 89 = 76 mm.
With a conditional central position, the following remains:
76 ÷ 2 = 38 mm on each side.
Compared to other models under consideration, this is the most significant margin. SNL-2 can be perceived not just as a technical backing under the joint, but as a separate square ornament.
To buy carved trim NL-5 with a width of 89 mm together with SNL-2, four things need to be checked.
Is the square pattern preserved
Thirty-eight millimeters on the edges sounds quite confident, but the useful visible area depends on the ornament. Print SNL-2 at full scale and overlay two strips 89 mm wide. The mockup will immediately show which parts of the square remain open.
Does the thickness match
The confirmed thickness of NL-5 is 18 mm, and the thickness of SNL-2 is also 18 mm. This is a positive initial sign: the parts have the same nominal value. However, the actual joint is still checked on samples. It is necessary to understand whether the front planes are at the same height and how exactly the strips adjoin the square.
Does the connector look too large
A large margin is not always an advantage. On a small window, a 165 mm square can dominate over narrow strips. The corner ornament will become more noticeable than the trims themselves.
Evaluate not just one node, but the entire opening. Four large squares around a small window can create a heavy rhythm. The two upper elements — a calmer one.
Is there enough space at the slope and adjacent details?
SNL-2 extends beyond the side borders of NL-5 by approximately 38 mm on each side when centered. This protrusion must not fall:
-
on the edge of the facade board;
-
on an adjacent decorative element;
-
under the cornice;
-
on the slope protrusion;
-
into the drainage zone;
-
on another window frame.
The size of the narrow strip does not exempt from checking the space around the square.
Preliminary conclusion on NL-5
The binding has a good geometric margin. It is promising for a project where the square should read as a standalone element. But the final decision is made after checking the drawing and the scale of the entire window.
NL-1 with a width of 110 mm: a noticeable margin without an excessive scale gap
NL-1 has dimensions of 2000 × 110 × 18 mm.
Calculation:
165 − 110 = 55 mm.
With a central position:
55 ÷ 2 = 27.5 mm on each side.
This margin is smaller than that of NL-5, but it remains noticeable enough for a preliminary consideration of SNL-2 as a corner rosette.
In the card, you can buy a carved trim NL-1 with a width of 110 mm and compare its drawing with a 165 mm square.
Why 27.5 mm cannot automatically be considered a frame
The calculation is based on outer rectangles. The actual edge of SNL-2 may be shaped. Part of the conditional 27.5 mm strip may be missing due to the cut-out pattern.
It is necessary to check not only the minimum width of the visible edge, but also the integrity of the motif:
-
whether individual thin fragments remain;
-
whether the center of the pattern is covered;
-
whether the corner looks the same when rotated;
-
whether the axes of the two platbands coincide;
-
whether there is a clear junction line.
Central and offset position
By default, the calculation assumes centering. But the project may require an offset due to the pattern or the location of the platband relative to the window.
The offset changes the output:
-
on one hand, the field increases;
-
on the other, it decreases;
-
the symmetry of the square is broken;
-
the corners of one window may look different.
If the ornament requires an offset, its value is fixed in the template, not determined by eye during installation.
Proportions on a tall window
NL-1 with a width of 110 mm and SNL-2 of 165 mm create a noticeable transition. On a tall window, a square can confidently complete the vertical. On a small opening, four such elements may be too frequent.
Take a photo of the facade with paper mockups and step back to the distance from which the house is perceived from the plot or street. A solution that looks neat up close may appear fragmented from afar.
Preliminary conclusion on NL-1
Geometrically, the overlap is possible, and the theoretical output is 27.5 mm each. This combination requires mandatory verification of the carved pattern, but has sufficient dimensional potential for a full corner joint.
NL-7 with a width of 164 mm: one millimeter that guarantees nothing
NL-7 is available in two width options: 164 and 294 mm. This model best demonstrates why one cannot limit oneself to the phrase "the connector is wider than the trim."
For the narrow version:
165 − 164 = 1 mm.
With a central position:
1 ÷ 2 = 0.5 mm on each side.
Mathematically, SNL-2 is wider. Visually, the square is almost completely hidden behind the planks in the main directions.
You can buy carved trim NL-7 with a width of 164 mm only after checking the actual joint.
Why one millimeter cannot be considered a margin
Nominal values do not describe all features of a wooden part. Even with precise manufacturing, installation layout requires actual alignment.
The visible result is affected by:
-
shape of the side edges;
-
thread;
-
position of the trim;
-
finish;
-
marking accuracy;
-
possible offset;
-
junction line.
Half a millimeter on each side does not create a decorative field. SNL-2 ceases to read as a square rosette and works more like a part hidden under the intersection of strips.
Can such a combination be used at all
Physical coincidence of external widths does not automatically mean prohibition. A project is possible where trims adjoin SNL-2 differently, not overlapping the square across its full width, or ending at its edge. But such a scheme must be shown in the drawing.
You cannot buy a kit expecting the installer to come up with a junction on the facade.
What to check on a full-size template
-
How the vertical NL-7 ends.
-
How the horizontal strip fits.
-
Does the central part of SNL-2 remain visible.
-
Is the square silhouette preserved.
-
Does a step form.
-
Does the thickness match.
-
Is it necessary to trim the trim.
-
Can the junction be repeated identically on all windows.
Preliminary conclusion on NL-7 164 mm
The standard scheme, where SNL-2 lies under two intersecting platbands, does not provide a noticeable protrusion. The formal excess of 1 mm is too small. The set is acceptable only after developing and verifying a specific junction scheme.
NL-7 with a width of 294 mm: the wide platband completely changes the joint
For the wide version of NL-7, the calculation looks different:
165 − 294 = −129 mm.
SNL-2 is 129 mm narrower than the platband. The square is unable to cover the entire width of the strip.
This is not a minor flaw in the decorative field or a matter of marking accuracy. Geometrically, the connector is smaller than the platband.
What happens with a standard overlay
If the wide strip is passed through SNL-2, it will completely cover the square along one axis and extend beyond its edges by:
129 ÷ 2 = 64.5 mm on each side with conditional centering.
The second platband will create the same overlap along the other axis. As a result, only part of the central node or individual fragments in the corners may remain from the square element. SNL-2 cannot be considered a full-fledged rosette in this scheme.
Is another composition possible
A wide platband can end at a separate large connector, enter it with a narrow inner part, or use a specially designed overlay scheme. But these solutions require a drawing and are not confirmed by a single external dimension.
For a finished order, it is more reasonable to look at NL-7 with a width of 164 or 294 mm and immediately determine which version is actually intended by the project.
What mistake is often made
The buyer sees one article NL-7 and does not notice that the card presents different widths. The estimate shows "NL-7 — 8 pcs.", but the modification is not specified. One project participant implies 164 mm, another — 294 mm.
The full line must include the width. Otherwise, the SNL-2 calculation loses its meaning.
Preliminary conclusion for NL-7 294 mm
SNL-2 does not cover the width of such a platband. For a standard square corner joint, a different node or a larger element is needed, whose compatibility is also checked against the pattern.
NL-8 with a width of 250 mm: matching thickness does not compensate for the lack of width
NL-8 has a width of 250 mm. Calculation:
165 − 250 = −85 mm.
SNL-2 is narrower than the strip by 85 mm. With NL-8 centered, it extends beyond the square by approximately 42.5 mm on each side.
In the card, you can buy a wide carved platband NL-8, but do not automatically pair it with SNL-2.
Why the square will not cover the joint
For the decorative connector to fully cover the width of the platband, its working area must be no narrower than the strip. For SNL-2, even the full external size is less than 250 mm. Therefore, the useful part certainly cannot provide full coverage.
Can the square be rotated
A 45-degree rotation increases the diagonal projection, but completely changes the composition, attachment points, and pattern direction. Such a rotation cannot be considered a simple way to achieve a larger size.
Diagonal installation requires a separate layout:
-
where the trim ends;
-
which areas of the square remain visible;
-
whether the ornament is destroyed;
-
whether there is enough uncut area;
-
how the voids are designed;
-
whether the style of all windows matches.
Without a project, the rotation does not solve the problem.
Which element to consider instead of SNL-2
The full size of SNL-1 is 250 × 250 × 18 mm. You can view the large connecting element SNL-1 as a starting point for verification.
But the match of the external size of SNL-1 with the width of NL-8 is not proof of compatibility. With equality of 250 and 250 mm, there is no decorative release left either. It is necessary to compare the ornament, the working area, and the junction scheme.
Preliminary conclusion on NL-8
SNL-2 is not suitable as a square that completely covers the width of NL-8. A different connecting element or another method of forming the corner is required.
Comparison of four trims: where SNL-2 has margin and where it does not
| Trim model | Plank size | Thickness | Relation to SNL-2 | What to Check |
|---|---|---|---|---|
| NL-5 | 2000 × 89 × 18 mm | 18 мм | SNL-2 is 76 mm wider | Square scale and ornament preservation |
| NL-1 | 2000 × 110 × 18 mm | 18 мм | SNL-2 is 55 mm wider | Visible field 27.5 mm and overlay scheme |
| NL-7, narrow | Width 164 mm | Specified in the selected modification's card | 1 mm allowance | Real joint, square almost invisible |
| NL-8 | Width 250 mm | Specified in the card | SNL-2 is already 85 mm | Another connector or another node |
| NL-7, wide | Width 294 mm | Specified in the card | SNL-2 is already 129 mm | Large connection system |
The table does not mean that NL-5 and NL-1 are guaranteed to be compatible, and NL-7 with a width of 164 mm is guaranteed to be incompatible. It divides the options into three groups:
-
there is a noticeable geometric margin;
-
external dimensions are almost equal;
-
The connector is smaller than the trim.
For the first group, they proceed to check the pattern. For the second, node development is required. For the third, they look for another solution.
Geometric allowance and decorative field are not the same thing.
The difference between 165 mm and the width of the trim shows the potential output. But only the part of SNL-2 that meets the following criteria can be called a decorative field:
-
actually exists in a specific form;
-
is not cut through where support is required;
-
remains open after application;
-
preserves a meaningful fragment of the pattern;
-
is repeated identically on all corners;
-
does not become too thin after painting.
Example with NL-1
Theoretical margin — 27.5 mm on each side. Suppose the outer ornament of SNL-2 has large cut-out areas. In one place, the visible strip may take up almost the entire calculated size, while in another, only a few millimeters of wood.
Therefore, on the mockup, you need to look not only at the rectangular boundary, but also at the actual contour.
Example with NL-5
With a margin of 38 mm, the square reads more confidently. But if the strip covers the central part of the ornament, four unconnected fragments may remain around it. The geometry fits, but the composition does not.
Example with NL-7 164 mm
Half a millimeter cannot be considered a decorative margin. Any shaped edge or offset will completely change the outer contour. Here, the issue is not the margin, but the very principle of joining.
Thickness 18 mm: a good starting parameter, but not a finished joint
SNL-2 has a thickness of 18 mm. NL-5 and NL-1 are also specified with a thickness of 18 mm. This simplifies the preliminary check: the front faces can potentially be at the same level.
However, nominal equality does not answer all questions.
How the parts adjoin
Different layouts are possible:
-
The trims align with the edges of the square;
-
partially overlap it;
-
pass over the top;
-
the square is installed over the ends;
-
the elements join in the same plane;
-
one part gets trimmed.
Each scheme uses the thickness differently.
Is there relief on the front surface
Even with a total thickness of 18 mm, the maximum carving points and the base plane can be perceived differently. The joint is checked in profile.
What happens after finishing
Primer and enamel add coating, but should not be used to level out incompatible geometry. A thick layer does not fix an incorrect joint.
What the master should check
-
rear planes;
-
front heights;
-
end faces;
-
contact point;
-
pattern depth;
-
need for adjustment;
-
acceptable edge treatment.
Full-size template: the cheapest check before ordering
A 1:1 mockup allows you to see the error before paying for the entire batch. It does not require a complex graphic design. An accurate outer contour of SNL-2 and strips equal to the width of the selected trims are sufficient.
Step 1. Draw a square 165 × 165 mm
Use thick paper, cardboard, or another stable material. Check the size with a ruler after printing: a home printer may change the scale.
Step 2. Transfer the outline of the carved pattern
It is better to use a drawing or image from the card. A simple empty square shows only the geometry and does not allow assessing the preservation of the ornament.
You can view the drawing of the connecting element SNL-2 and prepare a working template.
Step 3. Make two strips of the width of the trim
For NL-1, strips of 110 mm are needed, for NL-5 — 89 mm each. One imitates a vertical plank, the other — a horizontal one.
On the strips, mark the front pattern, its axis, and direction.
Step 4. Overlay the strips according to the proposed scheme
Don't limit yourself to one option. Check:
-
passing through the center;
-
adjacency to the square;
-
partial overlap;
-
position relative to the drawing;
-
rotation of SNL-2;
-
top-left and top-right nodes.
Step 5. Outline the actually closed area
After removing the strips, it will become visible which part of SNL-2 remains open.
Evaluate:
-
ornament integrity;
-
minimal field;
-
symmetry;
-
weak thin sections;
-
visual connection with the casing.
Step 6. Transfer the layout to the window
Place four or two squares on the facade along with the casing strips. A single separate corner does not show the scale of the entire frame.
Step 7. Look from several distances
Up close, evaluate the joint. From a distance, the rhythm of the window and the entire facade.
Step 8. Fix the approved scheme
Take a photo and add dimensions. The installer should receive not a verbal explanation, but a clear node.
Testing on real samples: when a paper template is not enough
Paper shows dimensions but does not convey thickness, thread depth, and actual wood processing. For a large order, it is reasonable to purchase control elements.
Minimum test kit:
-
one SNL-2;
-
a short sample or one plank of the selected trim;
-
material of the intended finish;
-
agreed installation composition;
-
a fragment or imitation of the base.
What a physical fitting provides
-
exact thickness match;
-
real position of front planes;
-
visible pattern;
-
junction line;
-
ease of fitting;
-
wood reaction to finishing;
-
relief scale;
-
quality of shadow at the joint.
When the test is especially needed
-
many windows are being designed;
-
trim with a width of 164 mm is used;
-
non-standard overlap is being designed;
-
elements will be painted in a contrasting color;
-
the facade is viewed from a close distance;
-
reordering after installation is difficult;
-
the connector is planned to be used differently than in the standard scheme.
Top corners or all four: the quantity depends on the project
It cannot be unconditionally stated that four SNL-2 are required for one window. A closed rectangular frame indeed has four corners, but house carving may be constructed differently.
Only the two top corners
A common compositional logic is that connectors are placed on top, where vertical platbands meet the top plank. The lower parts end in a different way or go to the window sill element.
Two SNL-2 will be required for one window.
All four corners
If the platbands form a closed rectangular frame, each turn may be decorated with a square.
Four SNL-2 per window.
Top corners and central element
Sometimes the composition includes two corners and an additional connecting or decorative element in the center of the top part.
The count is based on actual positions, not on the word "window".
Two frames around one window
A complex frame can have an outer and inner contour. Then the number of nodes increases.
Connectors between multiple planks
T-shaped or cross-shaped sections may appear on the facade. A square element is considered separately for each connection, but its suitability for such a node must be confirmed by the drawing.
Formula for the quantity of SNL-2
Quantity of SNL-2 = number of framed corners + number of additional connecting nodes + agreed reserve.
The formula does not include the number of windows as an independent parameter. First, a scheme is determined for each window.
Example: five windows, only top corners
Two connectors on one window.
5 × 2 = 10 SNL-2.
If one spare element is provided:
10 + 1 = 11 pcs.
Example: three windows with a closed frame
Four corners on one window.
3 × 4 = 12 SNL-2.
The reserve is determined separately.
Example: two windows with four corners and a top central insert
If the central position is also made with SNL-2 and confirmed by the project:
2 × 5 = 10 pcs.
However, the use of SNL-2 in the center cannot be assumed automatically. The diagram should show which strips adjoin it.
Example: a facade with different windows
-
two small windows — two top elements each;
-
three large ones — four each;
-
one decorative window — four corners and two additional nodes.
Calculation:
2 × 2 + 3 × 4 + 6 = 22 pcs.
Such a calculation is clearer than the formula "six windows × four."
Is a spare connecting element needed
A spare is useful if it has a specific purpose.
Test painting
One SNL-2 can be used to match enamel, evaluate the pattern, and check surface preparation.
Test assembly
An additional part helps practice the joining of trims before installation on the facade.
Replacement if damaged
On a large remote site, redelivering one item may be less convenient than a pre-planned spare.
Future repairs
If the entire set is painted in one batch, it is easier to prepare the spare part at the same time and store it with the project documentation.
When the spare becomes an extra order
For one small window with professional installation, a spare may not be needed. You cannot mechanically add ten percent: for two connectors that is 0.2 parts, and for four — 0.4.
The spare is calculated in whole pieces and linked to the real risk.
The trims are also not calculated based on the window height.
Connectors affect the length of straight planks. If SNL-2 is installed in the corners, the trim can:
-
fit up to the square;
-
partially overlap it;
-
end underneath it;
-
continue beyond it according to a special pattern.
Therefore, the quantity and length of trims are determined after the joint is approved.
Basic formula
For each side:
The finished length of the trim = the distance between the points of contact with adjacent elements.
You cannot take the height of the window opening and automatically add two squares. The trim boundary depends on the layout.
Plank length 2000 mm
For NL-5 and NL-1, a length of 2000 mm is confirmed. If the finished vertical section is longer, a composite element or another scheme will be required. The joint position is planned in advance.
Cutting map
All finished segments are recorded and distributed across product planks. The total meter count does not show whether the required long pieces can be obtained from actual blanks.
Ornament and cutting
A carved trim cannot be considered an ordinary smooth batten. The direction and repeat of the pattern may limit the use of remnants. Before calculation, check:
-
start of the ornament;
-
direction;
-
possibility of flipping;
-
symmetry of the left and right sides;
-
cut position;
-
permissibility of joining two segments.
What to order together with SNL-2
SNL-2 is sold as a separate item. A system is required for a finished window framing.
| Position | What it is for | How to determine the quantity |
|---|---|---|
| SNL-2 165 × 165 × 18 mm | Finishing of agreed corners and connections | By the number of nodes |
| Carved window surrounds | Forming the sides of the framing | By layout and cutting map |
| Reference sample | Checking the joint and finish | By project complexity |
| Material for installation | Attachment to a specific base | According to the composition and area instructions |
| Primer | Pine preparation for finishing | by the selected system |
| Enamel or other confirmed coating | Finish | According to project technology |
| Materials for joint treatment | Preparation of joints | By installation method |
| Template | Repeating identical angles | One set per joint type |
| Protective packaging | Storage until installation | By number and size of parts |
| Reserve | Sample or replacement | As reasonably necessary |
In the catalog you can buy materials for installing platbands. The specific composition is chosen after checking the base, placement conditions, and the manufacturer's instructions for the material. The mere presence of an adhesive or coating in a general section does not prove its suitability for every facade.
How not to confuse SNL-2 with other connecting elements
The SNL series includes parts of different sizes and shapes. Choosing them only by prin
Storage before installation: long strips and carved squares require order
Wooden decor should not be left scattered on the site. It is especially dangerous to mix prepared, painted, and yet unchecked parts.
The website presents rules for storing wooden platbandswhich need to be considered together with the specific project conditions.
Divide the set by windows
The marking may look like this:
- O-01 — top left SNL-2;
- O-01 — top right;
- O-01 — left casing;
- O-01 — right;
- O-02 — the next group.
Do not stack threads face to face without protection
Protruding parts may get damaged. The packaging method depends on the state of the finish.
Do not lose the approved template
After delivery, the installer must reproduce the joint that passed inspection. If the template is lost, the decision is made again on site.
Store finishing information
Along with the spare element, it is useful to save:
- system name;
- color;
- processing date;
- photographs;
- joint diagram;
- article numbers;
- dimensions.
Installation begins not with glue, but with layout
The article cannot prescribe a universal mounting method for any base. Wooden facades, plaster, painted surfaces, and other substrates require different solutions. However, the sequence of preparation remains clear.
Stage 1. Base inspection
Determine:
- the material;
- evenness;
- strength;
- condition of the coating;
- moisture level;
- presence of dust;
- position of structural elements;
- feasibility of using the chosen mounting method.
Stage 2. Baseline lines
On the facade, mark:
- window axis;
- top line;
- verticals;
- outer and inner frame boundaries;
- SNL-2 coordinates.
Stage 3. Dry layout
Temporary templates or actual parts are installed without final fastening.
Check:
- symmetry;
- orientation of the pattern;
- length of platbands;
- quantity;
- coincidence of nodes;
- distance to the slope;
- interaction with the drip edge and other elements.
Stage 4. Marking
Each part gets its own place. You cannot assume that identical squares can be freely swapped after individual fitting.
Stage 5. Finishing and installation
The order depends on the technology: some work may be done before installation, some after. The main thing is that joints, ends, and front surfaces receive the intended protection.
It is useful to study in advance recommendations for installing carved trim and coordinate them with the master responsible for the specific base.
Practical scenarios for choosing SNL-2
A small window with NL-5
The strip width is 89 mm. SNL-2 has a noticeable protrusion. The main question is not overlap, but scale: will four squares turn out to be too large.
Practical route:
- Make a full-size layout.
- Compare the two tops and four corners.
- Check the drawing.
- Count the planks.
- Order the set as one batch.
Average window with NL-1
Width is 110 mm. The geometric allowance is 55 mm. The connection looks promising for a standard square joint.
The main check is the actual ornament field and the end point of the trim.
Tall window with NL-7 164 mm
The external dimensions are almost equal. Using SNL-2 as a wide rosette will not work. A drawing of a special junction or another element is needed.
Large window with NL-8
SNL-2 is smaller than the trim. These items cannot be purchased as a ready-made pair. First, another node is selected.
Several identical windows
After one node is approved, a unified template is prepared. The quantity is calculated by the number of repetitions.
Different windows on the same facade
It is not necessary to use the same pattern everywhere. But changing the dimensions of the connectors must be compositionally justified. Otherwise, the facade will lose its rhythm.
Repair of existing trim
First, measurements of the surviving parts are taken. The new SNL-2 must match not only the width, but also the thickness, pattern, and actual damage area.
Errors due to which a 165 mm square does not cover the joint
Error 1. Comparing only 165 and the width of the trim
The pattern and working area remain unknown.
Solution: make a template with an ornament.
Error 2. Considering one millimeter as a full reserve
For NL-7 164 mm, 0.5 mm remains.
Solution: develop a different component.
Error 3. Buying NL-7 without specifying the width
Versions 164 and 294 mm require completely different solutions.
Solution: record the full modification.
Error 4. Considering SNL-2 universal for the NL series
Item numbers of one category do not prove compatibility.
Solution: compare specific dimensions.
Error 5. Ordering four squares for each window automatically
The project can only have top-level nodes.
Solution: count the mounting points.
Error 6. Order two elements, although the frame is closed.
The bottom corners remained without decoration.
Solution: approve the layout.
Error 7. Do not take into account central connections.
There are more actual nodes than corners.
Solution: compile a list.
Error 8. Choose a margin by percentage.
The result is a fractional number of parts.
Solution: set reserve in pieces.
Error 9. Evaluating one SNL-2 in hand
On the facade, four squares look larger.
Solution: place all layouts.
Error 10. Not looking at the window from afar
The composition becomes too fragmented.
Solution: evaluate the facade as a whole.
Error 11. Not checking the thickness
Front planes diverge.
Solution: assemble a physical sample.
Error 12. Painting before fitting
The unsuitable set has already been changed.
Solution: first, a dry joint.
Error 13. Treating the preparation for enamel as a finished finish
Parts are installed without finishing.
Solution: include a finishing cycle.
Error 14. Using putty to correct geometry
A thick coating fills the thread but does not create a proper joint.
Solution: correct the joint before painting.
Error 15. Covering the central pattern with architraves
Random edges remain from the square.
Solution: overlay contours onto the drawing.
Error 16. Shift the strips in place
The corners of one window turn out different.
Solution: use a template.
Error 17. Not marking the ornament direction
The left and right sides cease to be mirror images.
Solution: mark each position.
Error 18. Order trim by the height of the opening
Connecting elements are not taken into account.
Solution: measure the distances between attachment points.
Error 19. Divide the total length by 2000 mm without cutting
Long parts do not fit.
Solution: create a map of planks.
Error 20. Use leftovers without checking the pattern
The ornament unfolds incorrectly.
Solution: take direction into account.
Error 21. Install SNL-2 on NL-8 due to the same thickness
The width differs by 85 mm.
Solution: choose a large node.
Error 22. Automatically replace SNL-2 with SNL-1
250 mm matched, but the pattern is not verified.
Solution: repeat the full analysis.
Error 23. Rotate the square by 45 degrees without a drawing
Junctions are not coordinated.
Solution: design the diagonal scheme separately.
Error 24. Order glue before determining the base
The composition does not match the surface.
Solution: first check the installation location.
Error 25. Do not accept goods before painting
Damage is detected late.
Solution: recalculate and inspect the set.
Error 26. Mix parts from different windows
Individual fitting is lost.
Solution: mark groups.
Error 27. Do not protect the thread during storage
Protruding parts get damaged.
Solution: use separate packaging.
Mistake 28. Not saving the color recipe
The spare element cannot be replicated.
Solution: store the finishing specification.
Error 29. Solve the joint directly during installation
The material has already been delivered and painted.
Solution: approve the test assembly in advance.
Error 30. Buying a separate socket instead of a system
After delivery, it turns out that there are no suitable trims and materials.
Solution: order a complete set.
Who SNL-2 is suitable for
SNL-2 should be considered when:
- a square carved unit is needed;
- the 165 mm scale fits the window;
- the trim is already SNL-2;
- the pattern is preserved after application;
- thickness is agreed upon;
- there is a full-size template;
- the number of nodes is counted;
- enamel finish is included in the schedule;
- the entire set is ordered as one system;
- installation is carried out according to the approved layout.
When SNL-2 won't fit
Another option is needed if:
- the casing is wider than 165 mm and full coverage is required;
- the square is too large for the window;
- the ornament is almost completely covered;
- The thickness or plane of the joint does not match;
- The strips require a different form of connection;
- A rectangular node is needed;
- The project does not allow a 165 mm protrusion;
- There is no free space around the window;
- The base is not prepared for installation;
- The buyer is not ready to perform finishing;
- The scheme exists only in verbal description.
How to record an order to avoid confusing parts
Insufficient recording:
SNL-2 — 8 pcs., platband — 12 pcs.
It is impossible to check compatibility using it.
Working specification:
Connecting element SNL-2 — 8 pcs. Size 165 × 165 × 18 mm. Material — pine. Sanding — “Standard”. Preparation — for enamel.
Platband NL-1 — width 110 mm, thickness 18 mm, length 2000 mm. Quantity — according to the cutting map.
Diagram: four corner elements for each of the two windows. Platbands adjoin according to the approved template. The orientation of the ornament is indicated.
Finishing: unified system according to the reference sample.
Installation materials: after checking the base.
Such a record links the product to a real task.
How to assemble an order on STAVROS
The customer journey begins not with the checkout button, but with the window opening.
Step 1. Select the trim
In this section you can buy wooden carved window architraves, comparing the actual width and pattern.
Step 2. Check SNL-2
Match 165 × 165 mm with the strip, create a mockup, and determine the working scheme.
Step 3. Count the nodes
Record each window and the number of elements separately.
Step 4. Calculate the trims
Determine the finished lengths between connection points and create a cutting map.
Step 5. Add finishing and installation
Select a system after checking the basis and conditions of application.
Step 6. Check the invoice
The document must include article numbers, sizes, quantities, and purpose of each item.
Step 7. Arrange delivery
Before payment, you can review delivery conditions for carved architraves, considering the length of the slats and the need for safe storage.
When a design project is needed
If the architrave width is close to 165 mm, the facade has many different windows, or wide models are used, it is reasonable to order a window framing layoutA full-size template helps check angles before production and finishing of the entire batch.
Frequently asked questions about SNL-2 and trim joints
What is the size of SNL-2?
The full size is 165 × 165 × 18 mm.
What material is SNL-2 made of?
Pine.
What is its sanding finish?
"Standard."
Is SNL-2 delivered painted?
It is prepared for enamel. The final finish and specific finishing system need to be checked and arranged separately.
Is SNL-2 wider than the 110 mm trim?
Yes, on 55 mm.
How much will remain on each side of NL-1?
With a strictly central position, theoretically 27.5 mm on each side. The actual visible field depends on the pattern.
Will SNL-2 fit NL-5?
In terms of external dimensions, the clearance is 76 mm, or 38 mm on each side. Final compatibility is checked by the ornament.
Will SNL-2 fit NL-7 with a width of 164 mm?
The external difference is only 1 mm. There is no full decorative release. A drawing of the specific unit is needed.
Will SNL-2 fit NL-7 with a width of 294 mm?
As a square that completely covers the strip, no. It is already 129 mm narrower than the trim.
Will SNL-2 fit NL-8 with a width of 250 mm?
No for standard full overlap. SNL-2 is already at 85 mm.
If the square is wider than the trim, is compatibility guaranteed?
No. You need to check the ornament, the uncut part, the thickness, and the joining scheme.
What does the full size 165 × 165 mm mean?
This is the external dimension of the product, not the guaranteed working area.
How do I find out the size of the uncut zone?
Based on the technical drawing and the actual sample. A conclusion cannot be drawn from the outer square.
Do I need to print the template?
For a responsible order, a 1:1 template significantly reduces the risk of error.
Can I use only an empty square without a pattern?
It will show the geometry, but not the preservation of the ornament. Better to transfer the actual contour.
How to check the thickness?
Assemble one physical node from SNL-2 and the selected platband.
Does the thickness of NL-1 match SNL-2?
In the confirmed data, both parts have a thickness of 18 mm.
Does the thickness of NL-5 match SNL-2?
Yes, the NL-5 card specifies 18 mm.
Can SNL-2 be installed only on top?
Yes, if this exact scheme is approved by the project.
How many SNL-2 are needed for one window?
Two, four, or another number — depending on the number of nodes being designed.
Is it always required to have four for a closed frame?
If each of the four corners is finished with SNL-2, four elements are required.
How to calculate a set for ten windows?
First determine the number of SNL-2 for each window, then sum the results and add an agreed reserve.
Do I need to buy a spare element?
Only with a clear purpose: trial finishing, control joint, replacement, or remote site.
Can I add ten percent reserve?
For piece items, a percentage is inconvenient. The reserve is set as a whole number.
How to calculate trims together with SNL-2?
Measure the finished distances between the connection points of the connecting elements.
Can it be calculated by the height and width of the window?
These dimensions are initial, but do not account for the area occupied by SNL-2.
What is the length of NL-1?
2000 mm.
What is the length of NL-5?
2000 mm.
Can two planks be joined along the length?
The possibility and location of the joint are determined by the project, the trim pattern, and the installation technology.
Can remnants be used?
Only if the length, direction, and ornament fit.
Can the carved trim be flipped over?
It depends on the pattern. Both directions cannot be considered the same without checking.
Do the trims and SNL-2 need to be purchased in the same batch?
For a common project, this simplifies checking dimensions, pattern, and finish.
Can I first buy one SNL-2?
Yes. A control element is useful for the mockup and trial finishing.
Do I need to buy one casing as a sample?
For a large order, physical assembly from two real parts is significantly more reliable than a paper template.
Can I cover the mismatch with putty?
Putty does not turn a small connector into a large one and does not restore the hidden pattern.
Can I trim SNL-2?
Any trimming changes the ornament and must be accounted for in the project.
Can I trim the casing to a square?
Only according to the approved scheme, without violating the pattern and construction of the node.
Can the SNL-2 be rotated 45 degrees?
Such placement requires a separate project. It is not a simple way to increase the working width.
Can the SNL-2 be used as a central socket?
Only when the corresponding connection of the strips has been developed for it.
Which connector is larger than SNL-2?
SNL-1 has dimensions of 250 × 250 × 18 mm.
Will SNL-1 fit NL-8?
The matching external dimensions of 250 mm do not guarantee compatibility. The pattern and node need to be checked.
Which connector is smaller than SNL-2?
SNL-3 has dimensions of 120 × 120 × 18 mm.
Is SNL-19 a square?
No. Its dimensions are 128 × 105 × 18 mm.
Where can I see the entire series?
In the general material about SNL connecting elements and in the roof thread category.
Where can I see the current price of SNL-2?
In the product card. Price and availability are checked before placing an order.
Is the trim included in the SNL-2 set?
SNL-2 is sold as a separate connecting element. Trims and related materials are calculated separately.
Is mounting adhesive included?
The order composition is checked in the card. Installation materials are selected separately based on the base and technology.
Which glue should I use?
The one that is compatible with the wood, the specific substrate, and the installation conditions. A universal answer cannot be given without verification.
Can it be installed on a painted surface?
The possibility depends on the strength of the coating and the compatibility of the mounting compound.
Is it necessary to prime SNL-2?
The exact preparation depends on the chosen enamel system and the recommendations of the contractor.
Can SNL-2 and the trim be painted separately?
It is possible with an agreed-upon technology, but the shade, texture, and gloss must match after assembly.
What should be done first: paint or dry-fit?
First check the geometry and the joint, then start the finishing.
How should SNL-2 be stored?
Under conditions that protect the wood and carving from damage, contamination, and deformation, taking into account storage recommendations.
What to check upon receipt?
Article number, size, quantity, material, surface, carving, edges, and compliance with the project.
When should installation not begin?
Until the quantity, orientation, lengths of the platbands, finish, and dry layout have been checked.
What question should you ask the manager before ordering?
"Confirm the size, material, SNL-2 preparation, and current quantity for my order."
What question should you ask the designer?
"What part of the SNL-2 ornament will remain visible after the selected platband is applied?"
What question to ask the installer?
"According to what scheme do the platbands adjoin the square, and where does each plank end?"
What question should you ask the finisher?
"How should pine be prepared and the assembled joint treated so that the color and texture are uniform?"
How can you tell that the set is ready to order?
There is an approved 1:1 layout, the width and thickness of the platband are known, the pattern remains legible, the number of nodes is calculated, and a cutting map is prepared.
The size must not just overlap the strip — the corner must look finished.
SNL-2 has a clear full size — 165 × 165 × 18 mm. But the answer to the question "is the square enough" depends on the specific platband.
For NL-5 with a width of 89 mm and NL-1 with a width of 110 mm, the external dimension of the connector provides a noticeable geometric margin. These combinations deserve further checking against the pattern. For NL-7 with a width of 164 mm, the margin shrinks to one millimeter, so there is practically no separate decorative field. At widths of 250 and 294 mm, SNL-2 is smaller than the strip and cannot be used as a square that fully covers the joint without another node scheme.
Before purchasing, perform three steps:
- overlay the full-size outline of the platbands onto the SNL-2 pattern;
- assemble one physical node before painting;
- count the elements based on actual corners, not on the number of windows.
After that, you can order SNL-2 sized 165 × 165 mm along with suitable platbands, finishing, and mounting materials.
The STAVROS company allows you to assemble a window frame from specific coordinated elements: carved trim, SNL connectors, and materials for preparation and finishing. But a strong result starts not with the number of items in the cart. It starts with a proven assembly where the size, pattern, thickness, and direction of each part work together.