Article Contents:
- Short slat panel PAN‑003 1000 × 8 × 740 mm: what the product card confirms
- PAN‑003 740 mm and PAN‑003 950 mm: why these are not just two lengths of the same profile
- OPAN‑003 sample: why it is useful but does not prove the geometry of the short version
- Island side panel 720 mm: why a PAN‑003 740 mm long looks like a logical purchase
- What does a margin of only 20 mm mean for a slat panel PAN‑003
- Calculation table: how much margin remains for PAN‑003 740 mm
- The finished height of the island and the height of the decorative zone are not always the same thing
- Slat panel PAN-003 8 mm under the countertop: is the existing overhang sufficient
- Panel next to a door or drawer: check the trajectory, not just the closed position
- Can 740 mm be replaced with 950 mm for a larger margin
- Do I need to buy a sample before a single short PAN-003
- Finished island: how to make a template for PAN-003 1000 × 8 × 740 mm
- How to check the color of PAN-003 next to already finished facades
- Materials for installation and finishing: when to choose them
- Base of the finished side panel: what to check before gluing
- What to do with the leftover after trimming 740 → 720 mm
- If the side panel width is less than 1000 mm: what to do with the side leftover
- How to check the side panel if it is not perfectly rectangular
- Shadow gap at the top or bottom: how it changes the 20 mm calculation
- The panel should go under the countertop: why the working height may increase
- Practical scenario: side panel 720 × 900 mm
- Practical scenario: height 727 mm and width 980 mm
- Practical scenario: island 720 mm, but the countertop has a small overhang
- Practical scenario: one side panel 720 mm, the second 724 mm
- Practical scenario: side panel 750 mm
- When one short PAN-003 is truly the best order
- How to compare a short PAN-003 with an existing design project
- How to check one panel before final installation
- How to make a trimming map for one short panel
- Why an area of 0.72 m² does not answer the question of quantity
- Short PAN-003 and the existing article about a kitchen island: what to read for different tasks
- When to switch to the general catalog instead of buying PAN-003 740 mm
- Delivery of one short panel: why it is still worth checking the terms
- PAN-003 740 or 950 mm: selection table specifically for a finished island
- If the side width is more than 1000 mm: the long version of PAN-003 will not solve the width problem
- If the island side is removable: will PAN-003 block service access
- How to check the top edge under the countertop
- Which edge of PAN-003 is better to trim in height — top or bottom
- How to calculate two sides of different widths from two short PAN-003 panels
- Why two short panels can be more cost-effective than one long one only after checking price and cutting layout
- How to keep a repair reserve for a painted side
- What to check when receiving a short PAN-003
- Installation sequence on an already assembled island
- Why you need to determine the bottom line first, and then the top
- Do you need to adjust PAN-003 to a crooked floor
- What to do if a short PAN-003 has already been purchased, but the height turned out to be 745 mm
- What to do if you want to clad the second side after installation
- Final check before paying for one short PAN-003
- Sample order: finished end 900 × 720 mm
- Is there a PAN-003 with a length of 740 mm?
- What is the thickness of the short PAN-003?
- Is it different from PAN‑003 950 mm?
- Will 740 mm be enough for a 720 mm side panel?
- Is a 20 mm margin sufficient?
- How to measure the island correctly?
- Is one panel 1000 mm wide enough?
- Can PAN‑003 be installed after assembling the kitchen?
- Will the panel interfere with the door?
- How to check the countertop overhang?
- Do I need to buy two panels?
- Can OPAN‑003 be used as an exact template?
- Can the panel be painted after installation?
- What to do if the side panel is 750 mm?
- What to do if the project requires oak?
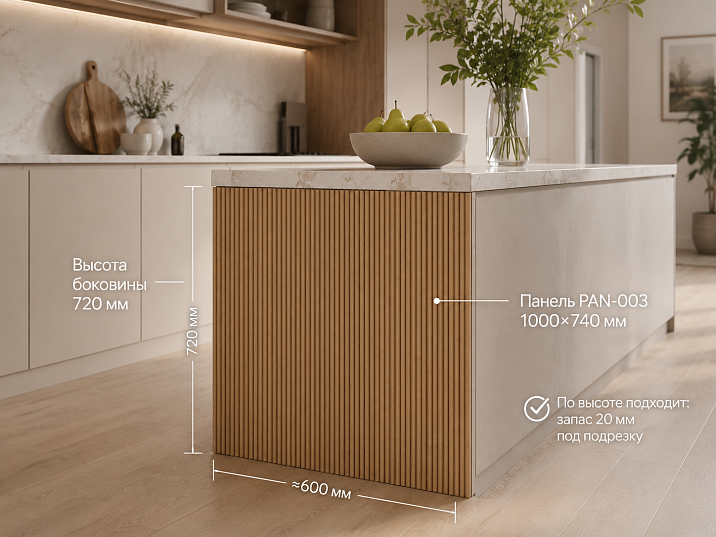
The kitchen island is already in place, the countertop is installed, the facades are adjusted, and one end side panel remains smooth. Redoing the cabinet is not desirable. The PAN‑003 card now includes a short MDF option sized 1000 × 8 × 740 mm, and its height almost matches the decorated area of 720 mm. The simple arithmetic looks favorable: 740 − 720 = 20 mm. It seems you could buy one short panel, trim it on site, and avoid overpaying for the 950- or 2670-millimeter format.
But 20 mm is only a nominal reserve along one coordinate. Before ordering, you need to confirm the actual height of the side panel at several points, decide on the top and bottom connections, check the end width, countertop overhang, the trajectory of the adjacent facade, and the slat rhythm after trimming. There is also a fundamental limitation: the short PAN‑003 has a thickness of 8 mm, while the 950 mm version is 11 mm. Therefore, the short modification cannot automatically be considered simply a shortened version of the standard panel.
If all dimensions are confirmed, one short PAN‑003 may indeed be the most rational order for one finished side panel. If the design project was calculated for 11-millimeter geometry, replacing it with the 8-millimeter version just to reduce waste could change the relief and protrusion of the panel relative to the facades.
To compare models, you can Buy slatted panels for wall finishing in the general section, but the central task of this article is already defined: to understand whether the short PAN‑003 1000 × 8 × 740 mm is suitable for one island side panel about 720 mm high and whether one piece is enough.
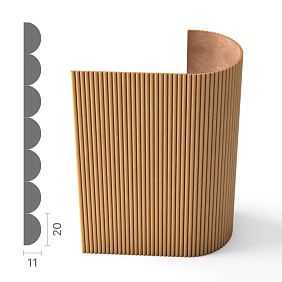
Short slat panel PAN‑003 1000 × 8 × 740 mm: what the card confirms
The short PAN‑003 is an independent product modification. The current card specifies size A × C × L = 1000 × 8 × 740 mm, material — MDF, processing quality — “Prestige”. The table also includes a primed version, which is important for a project intended for subsequent painting.
| Parameter | Short PAN-003 | What it means for the finished island |
|---|---|---|
| Width A | 1000 мм | Compared to the width of the end side panel |
| Thickness C | 8 мм | Adds volume to the already finished cabinet |
| Length L | 740 мм | Compared to the finished height of the decorated area |
| Material | MDF | Suitable for a paintable furniture project |
| Quality | Prestige | Characterizes surface preparation |
| Base | Fabric-based slats | The panel can be used in interior and furniture applications |
After geometric verification, you can Slat panel PAN-003 1000×8×740 mm include in the exact specification. But until then, it cannot be considered that the word PAN‑003 guarantees the same profile in all lengths.




PAN‑003 740 mm and PAN‑003 950 mm: why these are not just two lengths of one profile
In the current card, next to the short version 1000 × 8 × 740 mm, there is a version 1000 × 11 × 950 mm. The difference in thickness is 3 mm:
11 − 8 = 3 mm.
For a wall, 3 mm may seem small. On a finished kitchen island, they affect several nodes at once: how far the panel will protrude forward relative to the body, whether the countertop overhang will remain, whether the relief will be flush with the facade, and whether the short version matches what the designer saw in the sample or visualization.
| Execution | Size | Key difference |
|---|---|---|
| Short PAN‑003 | 1000 × 8 × 740 mm | MDF, smaller thickness |
| PAN‑003 950 mm | 1000 × 11 × 950 mm | Different thickness, different relief dimensions |
Therefore, the formula "740 mm is cheaper and almost matches the height of 720 mm — let's take it" is incomplete. First, you need to confirm that the project allows exactly 8-millimeter geometry.
Our factory also produces:


Sample OPAN‑003: why it is useful but does not prove the geometry of the short version
OPAN‑003 exists as a separate sample measuring 200 × 11 × 310 mm made of MDF, beech, and oak. It is convenient for evaluating the material, processing quality, color, and overall slat character. However, its thickness is 11 mm, while the short PAN‑003 740 mm has 8 mm.
This means that Sample of slatted panel OPAN-003 it cannot be used as an exact dimensional mock-up of the short version without separate confirmation. It shows the family and material, but does not replace verification of the specific PAN‑003 1000 × 8 × 740 mm.
If the designer approved the relief based on OPAN‑003 11 mm, and then the buyer decided to switch to the short 8-millimeter modification, this change needs to be sent back for approval. The savings on the remainder should not silently change the depth of the decorative surface.
Get Consultation
Island side 720 mm: why PAN‑003 740 mm long seems like a logical purchase
Pure calculation:
740 − 720 = 20 mm.
Nominally, the panel is 20 mm longer than the decorated area. This is indeed a strong argument in favor of the short format: the long version of 950 mm would leave 230 mm, and 2670 mm would leave a much larger remainder.
But these 20 mm cannot be pre-distributed as "10 mm at the top and bottom." In finished furniture, the panel is usually trimmed to a specific joint. At the top, it may fit against the underside of the countertop, and at the bottom, against the furniture plinth or finished floor. One edge may require more trimming, while the other may require almost none.
What does a margin of only 20 mm mean for the slat panel PAN‑003
20 mm is a small but potentially workable reserve. Its sufficiency depends on actual measurements and the installation sequence.
Margin after installation = 740 mm − maximum required height − technological trimming.
If the maximum height is actually 720 mm, and the confirmed finish trimming totals 8 mm, then 12 mm remains. If the height is 729 mm and another 12 mm needs to be removed from the edges, one panel is no longer enough.
Therefore, the word "margin" should refer not to the advertised figure of 20 mm, but to the remainder after all real operations.
Where exactly to measure 720 mm before ordering PAN‑003
One vertical line at the center of the side does not describe the finished island. You need to measure at least three points.
| Point | What to measure | Why |
|---|---|---|
| Left edge | from the bottom trim line to the top junction | check the skew of the body/floor |
| Center | the same height | find a deflection or local difference |
| Right edge | the same height | get the maximum required length |
Additionally, measure the height to the bottom plane of the countertop, to the decorative apron, above the plinth, and relative to the finished floor.
If you get 720 / 724 / 727 mm, the calculation uses not "approximately 720" but the maximum required height of 727 mm. Then the nominal reserve of the short PAN‑003 decreases to 13 mm even before final trimming.
Calculation table: how much reserve remains for PAN‑003 740 mm
| Actual side height | Nominal remainder from 740 mm | Preliminary assessment |
|---|---|---|
| 700 мм | 40 мм | more comfortable for trimming |
| 710 мм | 30 мм | there is working reserve |
| 720 мм | 20 мм | Central scenario of the article |
| 724 мм | 16 мм | need an exact trimming map |
| 727 мм | 13 мм | dense option |
| 730 мм | 10 мм | Borderline |
| 735 мм | 5 мм | ordering tight is risky |
| 740 мм | 0 мм | No allowance for final trimming |
This table does not establish a mandatory reserve. It shows the order's sensitivity to the actual size. If the installer says that for a specific joint a minimal trim is sufficient, 727 mm may be workable. If both edges need to be aligned, the same height becomes risky.
The finished height of the island and the height of the decorative zone are not always the same
The overall kitchen cabinet may be 720 mm, but the decorative end zone sometimes starts above the plinth and ends below the countertop. Then the actual panel length is less than the full cabinet. Conversely, if the panel must go under the countertop or cover an additional strip, the working height may be greater than 720 mm.
Therefore, in the order you need to write not "case 720", but "finishing cladding zone from point A to point B = ... mm".
The island is already assembled: check the PAN‑003 protrusion relative to the facades.
The short panel has a thickness of 8 mm and is installed on an existing side panel. This means that after installation, the external dimension of the island will increase by at least the thickness of the panel itself plus the actual installation layer.
There is no need to invent a universal glue thickness. But the fact of the added layer must be taken into account. Check:
- the plane of the adjacent facade;
- door opening;
- the drawer;
- the handle or profile handle;
- tabletop overhang;
- the furniture plinth;
- the passage next to the island.
If the side panel was previously flush with the facade, after adding the 8-millimeter relief it will protrude. This may be intentional, but it must be checked.
Rack panel PAN-003 8 mm under the countertop: is the existing overhang sufficient?
On an already finished island, the countertop usually protrudes beyond the side plane of the cabinet. After installing PAN-003, this overhang is reduced by the thickness of the decorative cladding and the mounting layer.
Suppose that before cladding, the countertop protrudes 20 mm relative to the side. After adding an 8 mm thick panel, the net visual overhang, excluding the adhesive layer, decreases to approximately 12 mm. This does not mean that 12 mm is a correct or incorrect value. It simply shows that the final geometry will change.
If the initial overhang is only 8–10 mm, a short PAN-003 may almost bring the side flush with the edge of the countertop. The designer might have intended a more pronounced overhang, and in that case, the panel decision must be coordinated before installation.
What to measure on the countertop
You need to take the dimension from the plane of the existing side to the outer edge of the countertop. Then subtract the 8 mm panel and the actual mounting layer. The resulting remainder is the future overhang after cladding.
future overhang = existing overhang − 8 mm − mounting layer.
The mounting layer is not substituted according to a universal standard: it is determined by the chosen technology.
Panel next to a door or drawer: check the trajectory, not just the closed position
Even if PAN-003 does not overlap the front from the front, when opening, the door may pass near the new relief side. This is especially important for a front whose hinges are located at the end of the island.
The check is performed in several positions:
- facade closed;
- opened at 30–45°;
- opened to the working angle;
- drawer fully extended;
- handle or profile handle passes by the new cladding.
If the island is already assembled, this is easy to check with an 8-mm rigid template temporarily attached to the side panel. Such a mock-up is more useful than a calculation like "it shouldn't interfere."
Will one PAN‑003 with a width of 1000 mm be enough for the end of the island
Along the second coordinate, the short PAN‑003 has a width of 1000 mm. If the island side, for example, is 900 mm, the nominal remainder is:
1000 − 900 = 100 mm.
This is enough for the net width, but the remainder must be used deliberately. For a slat panel, rhythm matters: you cannot automatically cut all 100 mm from one edge and consider the job done.
If the side width is 920 mm, the allowance is 80 mm. At 960 mm, it's already 40 mm. The smaller the remainder, the less freedom there is for symmetrical centering of the slats.
| Side width | Remainder from 1000 mm | What to Check |
|---|---|---|
| 850 мм | 150 мм | rhythm and symmetry of the outer slats |
| 900 мм | 100 мм | the trimming can be distributed across both sides |
| 920 мм | 80 мм | a precise layout is needed |
| 950 мм | 50 мм | less freedom for centering |
| 980 мм | 20 мм | dense option |
| 1000 мм | 0 мм | no allowance for side trimming |
How to position the slat pattern PAN‑003 centered on the side panel
On a finished island, symmetry is especially noticeable: the end is usually fully visible and perceived as a separate decorative plane. If you start the panel from the left edge without layout, a narrow incomplete slat or another inter-slat gap may remain on the right.
It is better to work from the central axis of the side. First, mark the middle of the island and the middle of the panel, then see how the slat rhythm extends to both edges.
Why a 100 mm remainder does not necessarily have to be cut off from one side
For a 900 mm side, the theoretical 100 mm remainder can be distributed approximately 50 mm on the left and right. But this is only a geometric starting point. The actual cut line must account for the position of the slats and the fabric backing.
If symmetrical trimming results in two unattractive half elements, the panel can be slightly shifted so that one edge ends more completely. The decision is made based on the actual pattern.
What matters more — the geometric center or the slat center
Sometimes the central axis of the island falls not in the center of a slat, but in the inter-slat gap. Both options can be design-acceptable. The key is deliberate symmetry, not a random start from the edge.
Short PAN‑003 for one side or continue the slats across the entire island
The number of panels depends not only on the size of one end. Before purchasing, you need to decide where the decorative idea actually ends.
Option 1. Only one accent end
The most straightforward scenario for this article. One smooth side facing the living room gets PAN-003, the rest of the island remains as is. If dimensions are confirmed, one short panel may be sufficient.
Option 2. Both sides
If the island is visible from both ends and symmetry matters, one panel no longer solves the problem. Each side needs a separate cutting map. Even with the same design size, both actual heights and widths need to be measured.
Option 3. Side and part of the facade
The slats continue through the corner onto the adjacent plane. This is no longer a simple "one end 720 mm": corner joining and a different amount of material appear. This scenario cannot be calculated by the area of one side.
Option 4. Only the area from the living room side
If the island functionally separates the kitchen and living room, the slat decor can be left only on the outer side. This preserves the commercial sense of a short modification: not buying material for hidden kitchen areas.
Why short PAN-003 is a separate product scenario, not a replacement for any long panel
The main advantage of the 740-millimeter version is its proximity to furniture height. But this modification differs in thickness of 8 mm from the 950-millimeter variant of 11 mm.
Therefore, replacement is allowed only after checking:
- relief depths;
- protrusion relative to the facade;
- countertop overhang;
- visual rhythm;
- primer and finish option;
- coordination with the design project.
If the designer initially specified PAN‑003 950 mm and 11 mm in depth, the short 740-millimeter version may require separate approval even with an ideal height.
Can 740 mm be replaced with 950 mm for a larger margin
Technically, the longer version provides more material in height: with a side panel of 720 mm, the remainder will be 230 mm. But at the same time, the thickness changes from 8 to 11 mm. This means the buyer gets not just a larger margin, but a different panel dimension.
For a finished island, the extra 3 mm can reduce the countertop overhang, push the relief further beyond the facade, and change the side view. Therefore, “better to take a longer one to avoid mistakes” is not a universal solution here.
Do I need to buy a sample before one short PAN‑003
If the panel is needed in painted MDF and the color is already determined, a separate sample may seem unnecessary. But OPAN‑003 is useful for understanding the material and the slat rhythm. However, its 11-millimeter thickness does not match the short version of 8 mm, so it should not be used as an exact dimensional template.
To check the overhang itself, it is easier to make a rigid strip 8 mm thick and temporarily attach it to the island. To evaluate the color and surface, use OPAN‑003 or another agreed finish sample.
Finished island: how to make a PAN‑003 template 1000 × 8 × 740 mm
A full-size mockup can be made from cardboard or thin sheet material. For the front view, a rectangle of 1000 × 740 mm is sufficient. To check the depth, add an 8-millimeter strip or a spacer layer.
The template is temporarily attached to the end and checked:
- top junction with the countertop;
- bottom line at the plinth or floor;
- side protrusion;
- adjacent facade;
- the handle;
- view from the kitchen and living room;
- walkway around the island.
If the mockup already looks too protruding or falls into the facade trajectory, there is no need to buy a panel just for a "trial fit on site."
PAN-003 made of MDF: paint before installation or after mounting on the finished kitchen
The short version made of MDF is especially logical for an enamel project. But the finished kitchen creates constraints: nearby are the countertop, facades, appliances, and the finished floor.
Finishing before installation
It is more convenient to paint the slatted relief and groove areas without protecting the entire kitchen. But after trimming to the actual height, fresh ends appear that also need to receive a finish.
Finishing after installation
You can simultaneously treat the trimmed edges, but you will have to carefully protect the facades, countertop, and floor. The relief requires careful painting without runs.
A rational order is often this: first a dry trial fit and precise trimming, then finishing the part outside the kitchen, then final installation. But a specific coating system may require a different technology.
How to check the color of PAN-003 next to already finished facades
Even if the panel is painted "in the same RAL," the actual shade depends on the base, primer, gloss level, and lighting. The relief additionally creates shadows.
Therefore, it is better to apply the test swatch to the finished island: next to the facade, countertop, and floor. Evening light can reveal a difference that is unnoticeable during the day.
If the panel must match the painted kitchen as accurately as possible, it is useful to approve one small fragment before the main finishing.
Materials for installation and finishing: when to choose them
Adhesive and finishing materials are selected after checking the base of the side panel and the specific PAN-003 execution. A universal composition cannot be assigned in advance based solely on the word "MDF."
In the section Mounting and finishing materials You can look at related items, but final compatibility must be confirmed by the technical instructions of the composition, the fabric backing of the panel, and the furniture surface.
Base of the finished side panel: what to check before gluing
The panel can be mounted on laminated chipboard, MDF, painted panel, veneer, or another furniture base. The surface must be strong, clean, and compatible with the chosen adhesive.
Pay special attention to checking:
- glossy laminated coating;
- old paint;
- silicone contamination;
- protective film;
- unevenness of the end panel;
- removability of the side panel itself.
If the side panel is a service or removable part of the kitchen, the cladding must not block its dismantling.
Should you order one PAN‑003 or two at once
For one 720 mm side panel, one panel is the basic option only after a confirmed cutting map.
One panel is rational if
- only one side is being clad;
- the maximum height fits within 740 mm with working reserve;
- the width fits within 1000 mm;
- the rhythm can be centered;
- a trial finish does not require a full-size second part;
- delivery allows you to quickly buy a replacement if needed.
Two panels make sense if
- two side panels are being faced;
- a repair stock is needed at a remote site;
- the installation map still contains a risk of error;
- the project requires matching the rhythm between two sides;
- one panel will be used as a reserve from the same batch.
Buying a second one just out of fear is not necessary. The short format actually has a commercial advantage — the ability to solve one local furniture task without a large leftover.
What to do with the remainder after trimming 740 → 720 mm
At an ideal height of 720 mm, the nominal remainder is only 20 mm. This is not a full decorative element. It is more reasonable to consider it as a technological offcut rather than inventing a separate interior project from it.
If the actual height is less and a larger fragment remains, it can be saved for:
- enamel testing;
- primer checking;
- minor repairs;
- a color sample on site.
Mark the remainder with the article number and finish so that it is clear later which panel it belongs to.
If the side width is less than 1000 mm: what to do with the side remainder
With an end of 900 mm, about 100 mm remains in width. Such a remainder can be large enough for finish testing or future local repairs. But first, what matters more is not the remainder itself, but the correct centering of the slat pattern.
Do not cut the panel immediately to 900 mm from one edge. First, hold it up at full size and determine from which sides it is more reasonable to remove material.
Special joints and deviations of the finished side panel
How to check the side panel if it is not perfectly rectangular
Finished furniture may have a slight difference in diagonals, the countertop may have its own angle, and the floor may have a slope. Therefore, in addition to height and width, measure both diagonals of the area being decorated.
If the diagonals differ noticeably, the side panel is not a perfect rectangle. Then the 740 mm panel is trimmed to the actual contour, and the nominal 20 mm may be used unevenly.
Shadow gap at the top or bottom: how it changes the calculation of 20 mm
If the designer intentionally wants to leave a shadow gap between the panel and the countertop or base, the working height of the cladding decreases. For example, with a total area of 720 mm and two gaps of 5 mm each, the panel itself should cover 710 mm.
Then the nominal reserve is 740 − 710 = 30 mm. But the gap sizes should be part of the project, not a way to "save" a short panel after purchase.
The panel must go under the countertop: why the working height may increase
The reverse scenario: the top edge goes behind a decorative overhang or into a groove. Then the visible height of 720 mm is not equal to the length of the part. If a hidden insertion of 8–10 mm under the countertop is required, the actual workpiece becomes longer.
Therefore, before ordering, you need to know not only the visible size, but also the mounting contour of the part.
Practical scenarios for a short PAN-003 on a ready-made island
Practical scenario: side panel 720 × 900 mm
This is the cleanest option for a short PAN-003. In height, 20 mm remains, in width — 100 mm. Nominally, one panel is sufficient for both coordinates.
But before ordering, you need to resolve two different trims. Vertical: how to distribute 20 mm between the top and bottom. Horizontal: how to distribute 100 mm between the left and right edges so that the slat rhythm looks symmetrical.
If the countertop has a good overhang, the facade does not interfere, and the 8-millimeter thickness is agreed upon, one short PAN-003 here really looks more rational than the 950-millimeter one.
Practical scenario: height 727 mm and width 980 mm
This is already a tight order. In height, 13 mm remains, in width — 20 mm. Mathematically, the panel fits, but the installer has almost no freedom to correct a skew or shift the rhythm.
In such a scenario, the decision that "one will definitely be enough" is made only after a dry fit or an accurate template. If the actual height in one corner turns out to be 733–735 mm, the margin shrinks sharply.
Practical scenario: island 720 mm, but the countertop has a small overhang
In height, PAN-003 fits perfectly, but the original side overhang of the countertop is only 9 mm. After adding the 8-mm panel and the mounting layer, the visual overhang almost disappears.
Here, the short format does not solve the problem by itself. You need to either accept an almost flush-finished edge, or change the countertop joint, or choose a different decorative thickness.
This is a good example of why choosing based on a single size of 740 mm can be wrong even with an ideal height.
Practical scenario: one side panel is 720 mm, the second is 724 mm
If you decide to clad both sides, you cannot automatically order two identical parts sized "720". The first has a margin of 20 mm, the second — 16 mm. With the same top and bottom joint, both can fit, but the trimming map differs.
For visual symmetry, it is better to achieve the same finished height of the slat pattern relative to the countertop and the plinth, rather than simply cutting each panel to its own number.
Practical scenario: side panel 750 mm
The short PAN-003 at 740 mm no longer covers the full height. You cannot add a separate 10-mm strip and consider the result equivalent to a solid panel: the horizontal joint on the slat relief becomes a separate element.
In such a situation, you need to consider a longer format or a different cladding scheme. This is exactly where the commercial savings of the short version end.
When it is better not to buy the short PAN-003
Even with a side panel of about 720 mm, there are situations where the short format is not the best choice:
- the design is approved for the 11-mm version of PAN‑003;
- the countertop overhang is insufficient for the additional 8 mm;
- the adjacent facade interferes with the new relief;
- the actual height is close to 740 mm and there is no margin;
- the side panel width is close to 1000 mm and the pattern cannot be centered;
- the cladding must continue onto other surfaces;
- natural beech or oak is needed, but the short 740-mm modification is confirmed specifically as MDF;
- the cabinet has a complex removable side panel or service access.
In these cases, it is better to choose a different format than to adapt the short PAN‑003 at any cost.
When one short PAN-003 is truly the best order
One panel is rational if:
- decoration of only one finished end is needed;
- the actual height is significantly less than 740 mm;
- the width is less than 1000 mm with sufficient freedom for centering;
- the 8-mm geometry is agreed upon;
- the countertop retains the required overhang;
- the facades open freely;
- the MDF for painting matches the project;
- the mounting assembly at the top and bottom is already drawn.
It is precisely in this scenario that the new short format works as intended: the customer does not take extra length that would have to be cut off anyway.
Decision tree: one PAN‑003 740 mm, two, or another format
| Question | If yes | If no |
|---|---|---|
| Is the side height less than 740 mm with working allowance? | Check width | Select a longer format |
| Is the width less than 1000 mm with centering possible? | Check thickness | Need a different scheme/multiple modules |
| Does 8 mm match the design project? | Check overhang | Compare PAN-003 11 mm or another product |
| Does the countertop maintain the required overhang? | Check the facades | Modify the node |
| Do the facades not conflict? | Check the rhythm | Shift/modify the panel or abandon it |
| Is one side being cladded? | One panel may be sufficient | Count each side separately |
Such an algorithm does not impose the purchase of a second panel and at the same time does not reduce the decision to a single difference of 740 − 720.
Mistakes when buying a short PAN‑003 after kitchen assembly
Mistake 1. Looking only at the height of 720 mm
The width, countertop overhang, and facade opening are not checked.
Mistake 2. Considering 740 mm as guaranteed sufficient
20 mm may be used for aligning the top and bottom edges.
Mistake 3. Considering PAN‑003 740 and 950 identical in profile
The card shows 8 and 11 mm respectively.
Mistake 4. Using OPAN‑003 11 mm as an exact mockup of the 8 mm version
The sample is useful for material and rhythm, but should not replace the dimensions of the short modification.
Error 5. Trim 100 mm of width from only one edge
The slat pattern may become asymmetrical.
Error 6. Not checking the countertop overhang
After installation, the relief may end up almost flush with the edge.
Error 7. Not opening the facade with the 8-mm template
The conflict is detected after gluing.
Error 8. Painting the panel before final trimming
After cutting, unfinished edges appear.
Error 9. Buying two panels "just in case" without calculation
The new short format allows avoiding excess material with one side panel.
Error 10. Continue slats to the second side after ordering one panel
Composition and quantity change, and finish batches may differ.
How to compare the short PAN-003 with an existing design project
If the kitchen visualization was made before the short modification appeared, ask the designer which version of PAN-003 was used. The working project should include not only the length, but also the thickness/depth of the decorative relief.
Compare:
- external protrusion of the slats;
- position relative to the facades;
- tabletop overhang;
- color and gloss;
- slat rhythm;
- cladding boundaries.
If the project was based on different geometry, the short version requires separate approval.
How to check one panel before final installation
After receiving PAN-003, do not start with glue. First, dry-fit it to the side panel and temporarily secure it in a safe way.
Check four views:
- from the front, from the living room side;
- from the kitchen side;
- diagonally from above;
- at floor level.
Then open the fronts and drawers. Only after that, transfer the final trim lines.
How to make a trim map for one short panel
On a sketch of 1000 × 740 mm, draw the finished contour of the side panel. Separately label:
- top cut;
- bottom cut;
- left trim;
- right trim;
- the central axis;
- direction of the slats;
- zones that must not be damaged during cutting.
If the side panel is 900 × 720 mm, the map shows a total waste of 100 mm in width and 20 mm in height, but the actual lines may be distributed asymmetrically to preserve the rhythm.
Why an area of 0.72 m² does not answer the question of quantity
A side panel of 900 × 720 mm has an area of 0.648 m², and a panel of 1000 × 740 mm has 0.74 m². By area, the material is sufficient. But this calculation says nothing about the slat rhythm, height allowance, countertop overhang, or the impossibility of rotating the remainder.
For furniture facing, linear dimensions and orientation are important, not just square meters.
Short PAN-003 and existing article about kitchen island: what to read for different tasks
If the buyer is still choosing the material, rhythm, and overall concept of the island, the material is useful how to choose slat panels for a kitchen island. It covers the overall design choice.
The current article addresses a different stage: the kitchen is assembled, the specific smooth side panel is measured, and you need to decide whether you can buy one PAN-003 740 mm without redoing the entire island.
What to send to the manager before ordering PAN-003
To let the manager see the specific task, prepare:
- article number PAN-003;
- size 1000 × 8 × 740 mm;
- photo of the entire island;
- photo of the end side;
- height on the left, center, and right;
- width at the top and bottom;
- countertop overhang size;
- thickness of the existing side panel;
- photo of the adjacent facade in the open position;
- color/finish;
- number of sides to be faced.
If the short version is suitable, you can order the short slat panel PAN-003 as an already calculated position.
When to switch to the general catalog instead of buying PAN‑003 740 mm
If the 8-millimeter relief does not suit the design project, the height exceeds 740 mm, or natural wood is needed, you should not stretch the short modification to an unsuitable task.
In that case, it is better to buy slat panels for interior wall finishing after comparing other formats and materials.
Delivery of one short panel: why it is still worth checking the terms
740 mm is more compact than long 2400–2670-millimeter panels, but delivery, packaging, and availability remain part of the order. Before payment, it is useful to open payment and delivery terms and check the current cost/shipping method.
If you need one panel in another city, logistics can sometimes significantly affect the final savings compared to buying a long format from local stock. This needs to be calculated based on current terms, not assumed.
PAN‑003 740 or 950 mm: selection table specifically for a ready-made island
The short and 950-millimeter versions should be compared not on the principle of "less waste is better." For ready-made furniture, the main factor becomes geometry alignment.
| Criterion | PAN-003 740 mm | PAN-003 950 mm |
|---|---|---|
| Size | 1000 × 8 × 740 mm | 1000 × 11 × 950 mm |
| Material in short version | MDF | The card has MDF and beech, other versions follow |
| Allowance at height 720 mm | 20 мм | 230 мм |
| Offset from existing side panel | 8 mm + mounting layer | 11 mm + mounting layer |
| Risk of large remainder | Minimal | Higher |
| Freedom in height trimming | Limited | Significantly more |
| Can one be replaced with the other without checking | No: the thickness differs | |
If the side panel is indeed 720 mm, the 8-mm relief is consistent, and the installation trim fits within 20 mm, the short version is more logical. If the height varies, the top assembly is not yet defined, or the design requires 11 mm, 950 mm may be safer in length — but that is already a different geometry.
If the side panel width is more than 1000 mm: the long version of PAN‑003 will not solve the width issue
It is important not to confuse length and width. Both the short version and the considered 950-mm version have a width of 1000 mm. If the island end has a width of 1040 or 1100 mm, switching from 740 to 950 mm does not add width.
Then you need to design two panels or a different layout. For example, with a side panel of 1100 mm, the net deficit of one panel is 100 mm. But you cannot simply add a narrow strip from a second PAN‑003 without evaluating the slat rhythm: the joint will become noticeable.
For a wide island, first choose the position of the vertical joint, then distribute the width of the two modules so that the outer slats and the central zone look intentional.
If the island side panel is removable: will PAN‑003 block service access
On some kitchens, the end panel is removed for access to fasteners, electrical components, or internal assemblies. Gluing PAN‑003 directly to it may increase the dimensions or cover
If the panel goes to the floor, the bottom edge receives more operational load during cleaning and contact with shoes. Edge finishing and MDF protection become more important.
How to check the top edge under the countertop
At the top, a short PAN‑003 can:
- fit flush against the bottom plane of the countertop;
- leave a shadow gap;
- go under the overhang;
- stop at a decorative apron.
Each option changes the required length. Therefore, the pure size "720 mm to the countertop" needs to be clarified: to which exact surface, and whether the edge should be visible.
If there is an uneven silicone seam or a mounting rail under the countertop, the slat panel should not mask the problem with a random cut. First, prepare the base and the top assembly.
Which edge of PAN-003 is better to trim in height — the top or the bottom
There is no universal answer. The choice depends on which edge is more visible and where it is easier to make a neat joint.
If the bottom is hidden by the plinth, most of the height trimming can be concentrated at the bottom, preserving the factory top. If the bottom edge is visible from the living room side and the top goes under the countertop, it is logical to preserve the bottom instead.
If both edges need to be cut, the 20 mm allowance is distributed according to the actual geometry. You cannot assign "10 mm each" in advance without measuring.
How to calculate two side panels of different widths from two short PAN‑003 panels
Suppose the first end is 900 × 720 mm and the second is 940 × 720 mm. Each side needs one panel if the rhythm and height are confirmed. The width remainder will be 100 mm and 60 mm respectively.
Attempting to cover both sides with a single 1000 mm wide panel is impossible: the 100 mm offcut from the first side does not yield a second piece of 940 mm. Therefore, the quantity is determined not by total area but by the size of each individual element.
Why two short panels can be more cost-effective than one long one only after checking the price and cutting layout
Sometimes a buyer tries to compare two PAN‑003 panels of 740 mm with one long panel by total area. But different formats may have different prices, thicknesses, and geometry. Without an up-to-date product card and cutting layout, such a comparison is meaningless.
The price in the article is not fixed: it changes. Before payment, you need to open the product card and compare the cost of exactly those options that are technically suitable. First compatibility, then economics.
How to preserve a repair reserve for a painted side panel
If a strip 50–100 mm wide remains after side trimming, it is useful to paint it with the same system and keep it. Such a sample will help with future repair of scratches or chips.
On the back side, write:
- PAN‑003;
- 1000 × 8 × 740 mm;
- color code;
- gloss level;
- date of painting;
- room.
In a few years, this is more practical than a random untreated offcut.
Specification, acceptance, and final order check
What to check upon receiving the short PAN‑003
Before cutting and painting, the size and version are verified. For this article, the modification 1000 × 8 × 740 mm made of MDF is specifically needed. A 950-millimeter 11-millimeter panel should not be accepted as "almost the same" if the project is agreed upon for the short one.
Also check the integrity of the slats, fabric base, corners, absence of damage, and compliance with the ordered quality.
Final specification for one finished island side panel
| Parameter | What to write before payment |
|---|---|
| Product | PAN‑003 |
| Finish | 1000 × 8 × 740 mm, MDF |
| Side panel height | left / center / right |
| Maximum working height | As per actual |
| Side panel width | top / bottom |
| Tabletop overhang | before and after adding 8 mm |
| Facade | opening trajectory verified |
| Top node | flush / gap / overhang under countertop |
| Bottom node | floor / plinth / shadow gap |
| Slat rhythm | axis and side trim approved |
| Finishing | color, primer, enamel |
| Quantity | 1 pc. with one confirmed side panel |
If the actual height, overhang, or facade trajectory remains unknown in this table, the order is not ready yet.
Installation sequence on an already assembled island
A finished kitchen requires a more careful sequence than a furniture carcass in the workshop. Here there are already finished facades, countertop, hardware, and floor, so a trimming or glue error immediately affects the finished interior.
- Take precise side panel measurements at several points.
- Make an 8-millimeter template and check the countertop overhang and facades.
- Determine the central axis of the rack pattern.
- Align the top and bottom nodes.
- Apply the real PAN-003 dry and transfer the cut lines.
- Perform a finishing trim with a suitable tool.
- Process the new edges according to the finishing system.
- Conduct a control fitting again.
- Protect the countertop, facades, and floor.
- Perform the final installation.
This sequence is especially important when the allowance is only 20 mm. An error of 10–15 mm in the first cut can completely eliminate the possibility of re-fitting.
Why you need to determine the bottom line first, and then the top
If the side panel ends at the furniture plinth, the bottom line is often visually more important: it must align with the architectural boundary of the island. Then the panel is first anchored to the bottom, and the excess length is removed from the top.
If the lower part is hidden, and the top PAN-003 is clearly visible under a thin tabletop, the priority changes. They keep a neat top line and trim the bottom. The point is that the 20-millimeter allowance is used where the cut is less noticeable.
Do I need to fit PAN-003 to an uneven floor
If the panel goes down to the floor, and the covering has a slight difference in level, the bottom edge cannot be blindly cut to a single height of 720 mm. First, determine whether the cladding should follow the floor or remain strictly horizontal with a compensation gap. This is already a design and installation decision.
With a difference of, for example, 4 mm between the left and right edges, one side of the panel may require more trimming. The nominal 20 mm allowance is then distributed unevenly.
What to do if a short PAN-003 has already been purchased, but the height turned out to be 745 mm
There is no need to try to "stretch" the fabric base vertically or add a narrow 5 mm strip. A short panel is physically shorter than the required area. Normal options are to change the upper/lower architectural node so that the visible area becomes smaller, or to use a longer format.
If reducing the area is possible through a separate plinth or shadow profile, it should be designed as an independent part, not to mask a measurement error.
What to do if, after installation, you want to clad the second side as well
It is better to make this decision before painting the first panel. If the second PAN-003 is ordered later, the MDF batch may be the same in base, but the color of the applied enamel, gloss, and painting conditions may differ. For a symmetrical island, it is more reasonable to paint both sides at the same time.
If the second side is definitely not needed now, purchasing one panel remains logical. The new short format just allows you not to turn local decor into mandatory cladding for the entire island.
Final check before payment for one short PAN-003
The order is ready if there is a specific answer to all the questions below:
- maximum side height is less than 740 mm with confirmed reserve;
- width is less than 1000 mm and the slat pattern can be centered;
- 8 mm thickness matches the project;
- the countertop overhang after installation is acceptable;
- facades and drawers pass freely;
- the top and bottom edges have a clear junction;
- the base is compatible with the mounting compound;
- color and finish are agreed upon;
- Need to face exactly one side.
If all points are covered, the second panel is not mandatory insurance. You can buy one short PAN-003 as an exact local part of the finished island.
Order control example: finished end 900 × 720 mm
Let's combine all checks into one complete scenario. The island is already assembled, the decorative area has actual dimensions: left 719 mm, center 720 mm, right 722 mm; width top 899 mm, bottom 901 mm. The countertop overhangs relative to the smooth side by 24 mm. The designer confirmed a short PAN-003 with a thickness of 8 mm.
For height, the calculation is based on the maximum value of 722 mm:
740 − 722 = 18 mm.
For width, the maximum width of 901 mm is taken:
1000 − 901 = 99 mm.
Before installation, these 18 and 99 mm are not considered waste. The height reserve is distributed between the top and bottom joints after a dry fit. The side reserve is used to center the slat pattern. The countertop overhang after adding the 8 mm panel, without considering the mounting layer, will become about 16 mm, which is separately agreed visually.
Next, the 8-mm template is placed on the end, the adjacent facade is opened, and the trajectory is checked. If there are no obstacles, the base is suitable for the selected mounting compound, and the slat rhythm can be centered, then one PAN-003 1000 × 8 × 740 mm can be put in the specification.
However, if the designer expected an 11-mm relief, this same arithmetic does not give the right to buy the short version: the changed depth must first be approved. This example illustrates the main principle of the article — the 740 mm size does indeed reduce waste, but the savings become an advantage only after the entire finished island geometry is confirmed.
FAQ about the short PAN‑003 740 mm for a finished island
Is there a PAN‑003 with a length of 740 mm?
Yes. The current product card shows a separate version of 1000 × 8 × 740 mm made of MDF.
What is the thickness of the short PAN‑003?
8 mm.
Does it differ from the PAN‑003 950 mm?
Yes. In the product card, the 950 mm version has a thickness of 11 mm, so it is not just a different length.
Will 740 mm be enough for a side panel of 720 mm?
Nominally, 20 mm remains. The final answer depends on the actual height and trimming.
Is a 20 mm allowance sufficient?
Not always. You need to know the maximum height of the side panel and the technology for the top/bottom junction.
How to correctly measure the island?
Take the height on the left, in the center, and on the right; the width at the top and bottom; the overhang of the countertop and the position of the facades.
Will one panel 1000 mm wide be enough?
If the actual width of the side panel is less than 1000 mm and the rhythm can be correctly centered — yes, based on pure geometry.
Can PAN‑003 be installed after the kitchen is assembled?
Yes, if the base is suitable for installation and the new thickness does not interfere with the facades, countertop, or other components.
Will the panel interfere with the door?
This needs to be checked with an 8 mm thick template with the facade fully open.
How to check the countertop overhang?
Subtract 8 mm for the panel and the actual mounting layer from the existing overhang.
Do I need to buy two panels?
Not automatically for one side. The second one is needed for the other side, repairs, or another confirmed scenario.
Can OPAN-003 be used as an exact template?
No, without confirmation. OPAN-003 has a thickness of 11 mm, while the short PAN-003 is 8 mm.
Can the panel be painted after installation?
Yes, within a suitable technology, but the finished kitchen will need careful protection. Dry fitting and trimming are best done before the finish.
What to do if the side is 750 mm?
The short panel of 740 mm is not enough in height; a different format or another joint is needed.
What to do if the project requires oak?
Short modification 740 mm confirmed as MDF. Need to compare other versions of PAN‑003 or other panels.
Summary: for a 720 mm side panel, one short PAN‑003 740 mm may be the optimal order, but only after checking the 8-millimeter geometry.
Short PAN‑003 1000 × 8 × 740 mm does exist as a separate MDF modification. For a finished height of 720 mm, the nominal allowance is 20 mm. If the end width is, for example, 900 mm, there is still 100 mm left in width. By simple geometry, one panel is sufficient.
But the decision cannot be made based only on these two allowances. Short PAN‑003 differs from the 950-millimeter version in thickness: 8 vs 11 mm. This affects the relief, countertop overhang, and position relative to facades. The OPAN‑003 sample also has 11 mm and should not automatically be considered an accurate mockup of the short version.
Correct purchase order: measure the side panel at several points → check overhang and facades with an 8-millimeter template → agree on the short geometry specifically → center the slat rhythm → build a trimming map → decide whether one or two sides are needed → choose the finish → place the order.
If these checks are passed, the new 740 mm format does allow solving the local task of a finished kitchen island without buying a long panel and a large unnecessary leftover.