Article Contents:
- Why a floor-standing wooden clothes rack can be assembled from ready-made parts
- What is a floor-standing wooden clothes rack stand
- What parts does a floor-standing clothes rack consist of
- Which STAVROS products to use for a wooden clothes rack
- Construction kit elements for the stand and decorative nodes
- Furniture legs for a stable base
- Solid wood molding for the post and crossbars
- Hardware and fasteners
- Materials for finishing
- Classic
- Scandinavian interior
- Modern Interior
- Boutique, showroom, hall
- Need a coat rack for the hallway
- Need a coat rack for the bedroom
- Need a coat rack for the dressing room
- Need a stand for a boutique or showroom
- Does STAVROS have a ready-made floor coat rack?
- How to make a floor coat rack from wood without complex carpentry?
- What parts are needed for a wooden coat rack stand?
- Can I assemble a coat rack from STAVROS construction kit elements?
- How to make a stable base?
- What height should a floor coat rack be?
- What to choose: oak or beech?
- How to finish the top of the stand?
- How to make a crossbar for hangers?
- What to coat a wooden coat rack with?
- Can the coat rack be made to match the furniture color?
- What to buy at STAVROS for assembling a wooden coat rack?
A floor coat rack seems like a simple thing only until you hang a coat, jacket, bag, scarves, and several hangers on it. At that moment, it becomes clear that a beautiful stand should be not only decorative but also stable, comfortable in height, neat in joints, suitable for the interior, and protected by finish. Therefore, the question "how to make a wooden floor coat rack" cannot be reduced to a simple homemade structure from a random stick and crosspiece.
A buyer often starts with a commercial query: "buy wooden floor coat rack", "buy wooden floor coat rack", "buy wooden floor coat rack for clothes". But in ready-made standard models, the height, style, finish, base shape, or decorative nature of the stand are not always satisfactory. The hallway requires one logic, the bedroom another, the dressing room a third, and for a boutique, showroom, or lobby, an even more neat appearance is needed. Therefore, the interest in DIY assembly is understandable: you want to get a wooden stand that looks like part of the interior, not like a temporary item by the door.
The elements of the STAVROS construction kit allow you to approach the task differently. You don't need to create all the decor from scratch, turn complex transitions, search for random wooden blanks, and manually adjust each shape. You can assemble a custom floor coat rack from ready-made wooden parts: stands, decorative balls, bushings, washers, discs, cone elements, furniture legs, moldings, fittings, and finishing materials. Then the main work shifts from labor-intensive part manufacturing to proper selection, assembly, stability, and final appearance.
The main goal of such an article is to help the buyer understand what a wooden coat rack stand consists of, which elements can be selected from the STAVROS catalog, how to avoid mistakes with the base, height, diameters, material, and finish, and also what to buy together so that the structure is not random but well-thought-out.


Why a wooden floor coat rack can be assembled from ready-made parts
A typical instruction "how to make a wooden floor coat rack" often suggests starting with a board, beam, handle, pipe, screws, and a rough crosspiece. This approach works if you need a simple utility stand for a dacha, workshop, or temporary use. But for a hallway, bedroom, dressing room, or commercial interior, this is not enough. The coat rack is in plain sight, greets guests, holds clothes every day, and constantly contributes to the visual impression of the room.
Ready-made wooden elements help move away from rough homemade appearance. A ball covers the transition, a bushing softens the joint, a washer separates parts, a disc creates a visual pause, a cone finial completes the top of the stand, furniture legs help shape the base, and solid wood moldings can become part of the vertical stand or crossbar. The buyer gets not just a set of raw materials, but a system of parts that can be combined with each other.
This approach is especially useful if you want to make a coat rack without welding, complex lathe work, or lengthy manual fitting. In a wooden structure, every node matters. If the top of the post looks ragged, the base is too rough, the side holders are random, and the finish doesn't match the furniture, the coat rack will look amateurish. Ready-made parts allow you to predefine the shape, scale, and style.
For the commercial query «buy wooden floor coat rack», this is also a strong route. The buyer is not limited to a ready-made standard model but can assemble a product for their interior: taller or shorter, with a heavier base, with rounded details for classic style, with cubes and discs for modern style, with beech for enamel or oak for tinting. At the same time, all key elements can be selected within the real product groups of STAVROS.
If you need not just a purchase of a ready-made coat rack, but a custom wooden clothing stand, the first section to explore becomes STAVROS construction kit elements. This section contains parts for posts, rods, balusters, furniture legs, and interior structures. For a coat rack, they are useful because they help shape the central axis, cover joints, add decorative accents, and assemble a neater form.


What is a wooden floor coat rack stand
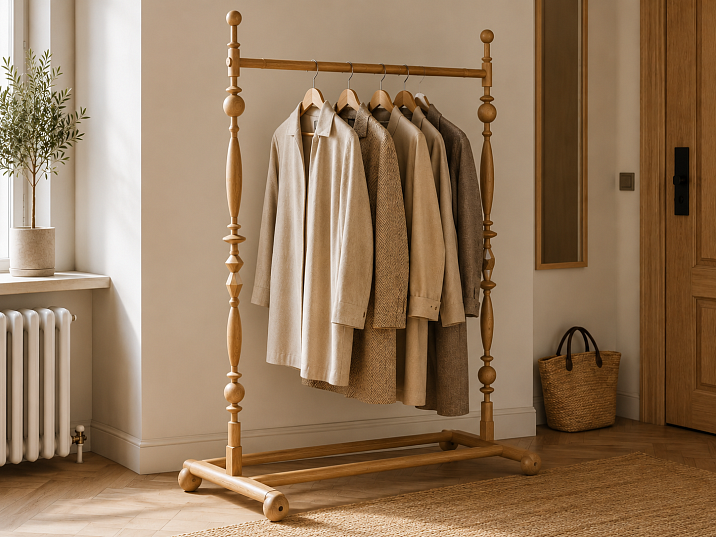
A wooden floor coat rack is a freestanding clothing stand that is not attached to the wall and must stay upright due to its own base. Unlike a wall-mounted bar with hooks, it functions as a piece of furniture. It can be placed in a hallway, bedroom, dressing room, study, guest room, lobby, salon, boutique, or fitting area. But precisely because of its independence, it has a main risk: stability.
The structure usually consists of several parts. At the bottom is the base: cross-shaped, round, square, wide, or weighted. In the center stands a vertical post. At the top are holders, crossbars, rods, or hooks for clothes and hangers. Between these functional nodes, there may be decorative elements: balls, bushings, washers, discs, cubes, cone-shaped parts. They should not interfere with clothing but help make the stand more expressive.
A good coat rack solves several practical tasks. It holds outerwear, does not fall under uneven load, does not scratch the floor, does not snag fabric, does not take up extra space, is suitable in height for adults and children, withstands daily use, and does not clash with the room's style. If it stands in the hallway, it has to work in an area of moisture, dirt, shoes, and frequent contact. If in the bedroom, it should be quieter in form and finish. If in a boutique, it should look presentable and withstand active use.
That is why the question «how to make a wooden floor coat rack» starts not with decoration, but with the structure. You cannot first choose a beautiful ball or finial and then wonder why the stand wobbles. First, determine the height, base, load, installation location, material, and method of fastening parts. And only then select decorative elements.
Our factory also produces:


What parts does a floor coat rack consist of
A floor coat rack doesn't have to be complicated, but each part must serve its purpose. Remove the base — the pole falls. Get the height wrong — clothes will drag or hang too high. Choose weak holders — the structure quickly becomes inconvenient. Forget about finishing — the wood will suffer from moisture and frequent contact.
| Part of the coat rack | What it's for | Which STAVROS products to look at | What to check before ordering |
|---|---|---|---|
| Base | Holds the entire structure and is responsible for stability | STAVROS furniture legs, solid wood products, moldings | Width, weight, connection method, floor protection |
| Central pole | Несёт верхние держатели и задаёт высоту | Pogonazh iz massiva, construction kit elements | Diameter, height, verticality, compatibility with decorative details |
| Decorative bushings | Cover technical transitions and joints | STAVROS construction kit elements | Mounting hole, shape, material |
| Washers and discs | Separate elements, create visual pauses | Construction kit elements | Diameter, height, role in composition |
| Spheres and cubes | Add a decorative accent | Construction kit elements | Scale, fit, style |
| Conical elements | Finish the top of the post or transition | Construction kit elements | Height, shape, edge safety |
| Rails or holders | Accommodate hangers, bags, scarves, clothes | Molding, furniture fittings, wooden parts | Length, attachment, distance between levels |
| Fastening | Connects the base, post, and holders | Furniture hardware | Load, material, compatibility |
| Finishing | Protects the wood and ties it to the interior | Mounting and finishing materials | Beech or oak finish, moisture protection, color |
Such a table has an important commercial meaning. The buyer does not need to look for "everything for a hanger" in one ready-made set, which may not exist. It is enough to understand the design and assemble the kit by product groups. Some elements are responsible for stability, others for shape, others for connection, and others for the final appearance.
Get Consultation
Which STAVROS products to use for a wooden hanger
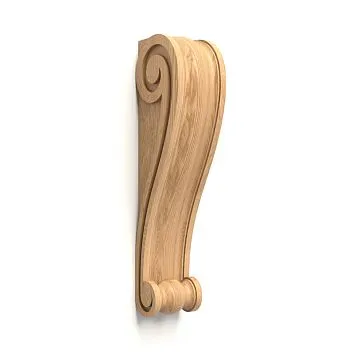
Constructor elements for the post and decorative nodes
The constructor section is the basis for the decorative part of the hanger. It features wooden parts with holes: balls, cubes, washers, bushings, discs, and other geometric shapes. For a hanger, they are useful where you need to design a vertical post, cover a joint, make a transition between the base and the axis, finish the top, or add an accent near the crossbars.
Before select STAVROS constructor elements, you need to know the diameter of the central post or rod. The mounting hole of the part must match the axis. If the hole is smaller, the element will not fit. If larger, there will be play, and the joint will look untidy. For a floor hanger, this is especially noticeable: the post stands vertically, all transitions are in plain sight.
A ball is well suited for a soft finish. A cube makes the design more graphic. A disc and washer help separate parts of the post. A bushing covers a technical transition. A cone finial can finish the top so that the post does not look cut off. But decorative parts should not interfere with clothing. Their place is at the base, in the middle part, at the top finish, or at points where there is no constant contact with the fabric.
Furniture legs for a stable base
The base is the most critical part. If it's too narrow, the coat rack will fall. If it's too light, it will be pulled by a winter coat or bag. If the legs are placed incorrectly, the stand will wobble. Therefore, for the lower part, you can choose STAVROS furniture legs and use them as decorative supports or part of a cross-shaped base.
Solid wood legs help make the coat rack resemble a piece of furniture. This is important for hallways and bedrooms, where the stand sits next to a nightstand, mirror, console, or wardrobe. If the base looks random, the entire coat rack loses its appearance. If it is assembled neatly and matches the furniture style, the structure is perceived as much more expensive and calm.
For heavy outerwear, the base should be wider and more stable. Furniture legs can be used not only for aesthetics but also for proper support area. The taller the stand, the more carefully you need to calculate the lower part.
Solid wood molding for the stand and crossbars
The central post, side holders, and top crossbar must be straight, sturdy, and have the right cross-section. For this, you can look at solid wood molding and select wooden elements for the future structure. Molding is useful where you need length, a straight line, and the ability to connect several parts into one shape.
Molding is especially important for a coat rack with hangers. If a horizontal crossbar is planned at the top, it must support the hangers without sagging. If side rods for scarves or bags are needed, their length and attachment must be thought out before assembly. A random thin slat may look nice but won't withstand daily use.
Fittings and fasteners
Even a wooden hanger doesn't hold only on wood. Connections are needed: base fastening, post fixation, crossbar attachment, possibly floor pads or protective elements for the floor. Therefore, it's worth selecting furniture fittings for the chosen design.
Fasteners cannot be chosen by eye. Clothing creates uneven load: today a coat hangs on one side, tomorrow a bag pulls the post in another direction, in winter a heavy jacket is added. A weak connection will start to loosen. Long side holders without sufficient fixation are especially dangerous.
Materials for finishing
A wooden hanger in the hallway constantly comes into contact with hands, wet clothes, an umbrella, bags, fabric, and dust. Therefore, it needs protection. For this, it's worth ordering materials for installation and finishing and planning the finish: oil, varnish, enamel, tinting, or another coating suitable for the chosen wood and interior.
Beech is often chosen for enamel and dense color. Oak is chosen for tinting, varnish, or oil while preserving the texture. If the hanger should match the furniture, it's better to select the color before assembly. If this issue is left for the end, you can get a beautiful structure that doesn't fit the interior.
How to choose a floor coat rack design
There is no single correct shape for all rooms. In the hallway, you need a rack for outerwear; in the bedroom, a lighter stand for a robe, suit, or tomorrow's clothes; in the dressing room, a functional structure for hangers; in a boutique, a display stand that showcases clothes beautifully.
| Design option | When it fits | What to use | Main risk |
|---|---|---|---|
| Single stand | Hallway, bedroom, guest room | Base, central post, decorative elements, top holders | Insufficient stability |
| Coat rack with hangers | Bedroom, dressing room, fitting room | Central post and top crossbar | Crossbar deflection and weak fastening |
| Multi-level coat rack | Hallway, family, guest hall | Stand, side bars, hooks, dividers | Clothing overload on one side |
| Coat rack with weighted base | Heavy outerwear | Wide base, legs, fasteners, decorative washers | Too heavy or bulky bottom |
| Classic style coat rack | Hall, home, boutique, office | Oak or beech, balls, cone elements, neat finish | Excess of decorative details |
| Modern graphic stand | Bedroom, studio, showroom | Cubes, discs, straight molding, matte enamel | Cold appearance without connection to furniture |
A single stand is the most compact option. It takes up little space but requires a good base. If only light clothing is hung on it, a more elegant shape can be made. If it will hold coats, bags, and several hangers, the base needs to be widened.
A hanger with a top bar is convenient for the bedroom and dressing room. You can hang hangers with shirts, jackets, dresses, and trousers on it. But the bar must be secured structurally, not decoratively. Beautiful wooden elements can decorate the joints but do not replace a strong connection.
A hanger with multiple levels is convenient for the hallway. The top holders are for outerwear, the side ones for scarves, bags, umbrellas, and children's items. But the more levels, the higher the risk of load imbalance. Therefore, the base should be even more stable.
How to choose the height of a floor coat rack
In a DIY assembly scheme, height is one of the first parameters. A guideline for a floor coat rack is approximately 160–180 cm. A lower stand may be inconvenient for long clothes, while a higher one can become visually too light and less stable, especially with a narrow base.
For a hallway, it's better to choose a height where coats and jackets don't touch the floor. At the same time, the top hooks or holders should remain easily accessible to an adult without effort. If there are children in the house, you can add a lower level so the child can hang their jacket themselves. This is more convenient than making the entire stand low.
For a bedroom, the height can be a bit more relaxed. There, you often hang a robe, shirt, suit, dress, or trousers on hangers. A too-tall stand will look out of place, especially near a bed or vanity table. It's better to make it neat and stable.
For a boutique or showroom, the height is chosen for displaying clothes. The rack should show items beautifully but not block the view. If it's a standalone stand in the center of the hall, it should be decorative from all sides. Here, the finish and neat joints are especially important.
How to make a stable base
The base is the main technical risk of a floor coat rack. You can pick beautiful balls, bushings, discs, make a neat top, paint the wood the desired color, but if the base is too narrow, the entire structure will be annoying every day. A rack that wobbles from a single jacket doesn't look high-quality.
The taller the stand, the wider the base should be. This is simple logic. A tall vertical creates leverage. If you hang a heavy jacket on the top holder, the load shifts to the side. A narrow base won't maintain balance. Therefore, for a 160–180 cm rack, the base must be designed with a margin, especially in a hallway.
A cross-shaped base distributes the load well in different directions. It suits a classic stand but must be wide enough. A round base looks softer but needs to be weighted or made sufficiently massive. A square base is easier to assemble and works well in modern interiors. A combined base with legs can look more furniture-like and neat.
Decorative details should not interfere with balance. For example, a large ball at the bottom can look nice, but if it sits too high and doesn't increase the support area, stability won't improve. A disc or washer can dress up a joint but won't replace a wide lower base. Furniture legs help widen the support and protect the floor if they are properly positioned.
Feet and protective pads are also important. The coat rack will be moved during cleaning, and it may stand on parquet, tiles, laminate, or wooden flooring. Without protection, the base can scratch the surface or slip. Therefore, the bottom part should not only be beautiful but also floor-friendly.
How to make a floor coat rack step by step without complex woodworking
It's best to start assembly with a sketch. You don't need to draw a professional blueprint, but you need a clear diagram: height, base width, placement of holders, decorative elements, top finish, and finishing. Without a diagram, it's easy to buy parts that look good individually but work poorly together.
First, determine the height. For an adult floor coat rack, the range is usually 160–180 cm. Then decide whether it will be a single pole, a pole with a top crossbar, a design with side holders, or a more complex coat rack for the hallway.
The next step is the base. You need to understand which shape suits: cross, circle, square, wide platform, or base on furniture legs. For heavy clothing, it's better to have a margin. If the coat rack will stand in the bedroom and hold light items, the design can be more elegant.
Then select the central pole. Its diameter and cross-section should match the decorative elements. If wooden balls, bushings, washers, and discs with holes are planned, you need to check the mounting diameter. You cannot buy parts that are 'approximately similar': wood does not adjust to the axis without modification.
After that, mark the holders. It's important not to place the crossbars too high. Clothes should be easy to take off. Side holders should be distributed so that the load does not constantly shift to one side. If there are multiple levels on the pole, the lower elements should not interfere with outerwear.
Decorative details are added after understanding the structure. Balls, bushings, washers, discs, and cones help to design the joints, but they should not be the first choice. First, stability and function, then decorative logic.
The final stage is finishing. Joints are sanded, the surface is prepared for the chosen coating, then enamel, varnish, oil, or tint is applied. In the hallway, the coating must withstand frequent contact, possible moisture, and contact with clothing. If the coat rack is in the bedroom, a more delicate appearance can be made, but wood protection still cannot be ignored.
How to choose a style: classic, Scandinavian, modern interior
Classic
For a classic coat rack, rounded elements work well: wooden balls, bushings, disks, and a cone-shaped finial. They make the stand softer and closer to traditional turned furniture. Tinted oak suits interiors with natural wood, parquet, warm walls, carved decor, and solid furniture. Beech under enamel is appropriate in neoclassicism, where the stand should be light, neat, and not overly textured.
A classic coat rack should not be overloaded. If the stand has many balls, disks, carved elements, and active hooks, it quickly starts to look heavy. It's better to choose one main decorative motif and repeat it moderately.
Scandinavian interior
For the Scandinavian style, calm geometry is more suitable. Light finish, beech under enamel, simple lines, minimal decor, neat disks or bushings — all this helps make a wooden stand light. In such a coat rack, decorative elements should not compete with simplicity but soften technical joints.
A Scandinavian coat rack is especially good for a bedroom, small hallway, or children's room. It should not be massive. The main goal is convenience, a light appearance, and a clean form.
Modern interior
In a modern interior, you can use cubes, disks, straight moldings, matte enamel, graphite, milky, sand, or deep colors. The form can be more architectural. Balls are also appropriate here, but it's better to combine them with straight elements so the stand doesn't lean too much into a classic look.
For a modern interior, precision is especially important. If the stand is next to a mirror, console, panels, slats, or furniture, its color and scale must be coordinated. A random wooden coat rack will look like a temporary item.
Boutique, showroom, lobby
In a commercial space, a coat rack works not only as a household item. It displays clothing, welcomes visitors, and supports the brand style. Here, neat joints, well-thought-out height, quality finish, and stability are important. Tinted oak can give a more prestigious look. Beech under enamel can match a brand color or a calm interior palette.
For a boutique or showroom, it is especially useful to assemble a coat rack from ready-made decorative elements rather than from a random furniture tube. Such a stand looks like part of the design, not like a storage structure.
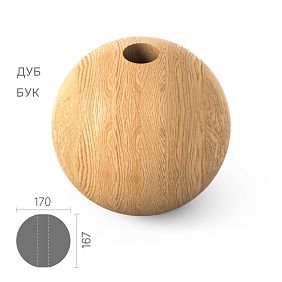
Beech or oak: what to choose for a wooden coat rack
The material affects the appearance, finish, and feel of quality. The constructor section features parts made of beech and oak. Beech is more often chosen for enamel and dense painting. Oak is better suited for tinting, oil, or varnish when you want to preserve the natural texture.
| Material | When to choose | How it looks on a hanger | What to Check |
|---|---|---|---|
| Beech | For enamel, dense color, calm interior | Provides a smooth shape without active texture | Preparation for painting, compatibility of all parts |
| Oak | For tinting, oil, varnish, natural texture | Looks warmer and more expressive | Texture direction, combination with furniture |
| Beech + matte enamel | Modern hallway, bedroom, children's room | Clean, calm stance | Coating touch resistance |
| Oak + oil or varnish | Office, hall, boutique, home | Furniture-specific appearance | Protection from moisture and dirt |
| Mixing of species | Only with intentional design | Can create contrast | Avoid accidental mismatch |
For a coat rack, it's better not to mix different wood species randomly. If the central post is made of one type of wood and the decorative elements of another, the difference may become more noticeable after finishing. This is less critical under enamel, but under varnish or oil, different species will look different.
In the hallway, the material must withstand real use. Wet jackets will be hung on the post, hands will touch it, and bags will brush against it. Therefore, the finish is no less important than the wood species. Untreated wood will quickly lose its neatness.
What to buy together for assembling a wooden coat rack
Buying one decorative detail won't solve the problem. For a floor-standing wooden coat rack, you need a set. It may differ in design, but the basic logic remains the same: base, post, holders, decorative elements, fasteners, finish, and floor protection.
| What to add to the purchase | Why this is needed | Which scenario it suits | Where to look |
|---|---|---|---|
| Construction kit elements | Finish the post, transitions, top, base | Custom wooden post, classic, modern interior | select STAVROS constructor elements |
| Furniture legs | Make a stable and furniture base | Floor coat rack for hallway, bedroom, boutique | choose STAVROS furniture legs |
| Solid wood products | Match wooden parts by material | When the coat rack should match the furniture | View solid wood products |
| Solid wood molding | Assemble the post, crossbar, straight sections | Coat rack stand, hanger bar for hangers | Buy solid wood molding |
| Furniture fittings | Connect the post, base, and holders | Any structure with load | selecting furniture fittings |
| Materials for installation and finishing | Protect the wood, prepare the assembly | Hallway, bedroom, commercial interior | ordering materials for installation and finishing |
| Carved decoration | Add expressiveness in a classic style | Hall, house, boutique, interior with decor | View carved decor STAVROS |
| Wooden brackets | Use as decorative side elements or supports in a complex structure | Custom stand, console area by the wall | Choose wooden brackets |
This set helps avoid buying parts chaotically. First, choose the structure, then the base, then the stand, holders, decorative elements, and finishing. If you go the other way, you may end up with a beautiful set that is difficult to assemble into a stable hanger.
How not to confuse a wooden coat rack with similar solutions
The query "buy wooden floor coat rack" can lead to different products. Some models are ready-made factory stands. Others are metal floor structures with wooden inserts. Third are wall panels with hooks. Fourth are wardrobe rails. The fifth group is self-assembly from wooden parts. For this article, the last scenario is important: an author's floor stand made from STAVROS elements.
A ready-made factory coat rack is convenient because you can buy it as a whole. But it limits the buyer in size, finish, shape, and style. If the interior is non-standard, the ready-made model may not match the furniture color, mirror height, hallway width, or the overall character of the room.
A metal stand is practical but gives a different look. It often appears lighter, more modern, but colder. If the interior has a lot of wood, carved decor, moldings, trim, or solid wood furniture, a wooden structure looks warmer.
A wall-mounted coat rack saves space but requires a wall. A floor stand is more mobile within the room; it can be moved, placed next to a bed, mirror, dresser, or entrance. But for mobility, it pays with the need for a stable base.
A wardrobe rail is convenient for a large amount of clothes on hangers. But it often looks like retail equipment. An author's wooden coat rack may have less capacity, but works better as an interior piece.
| Similar solution | When it fits | Why this is not the same |
|---|---|---|
| Ready-made factory coat rack | Need to quickly buy the item as a whole | Less freedom in style, finish, and details |
| Metal rail | Need a lightweight modern rail | Different material and a cooler look |
| Wall-mounted hanger | Need to free up floor space | Requires a wall and doesn't work as a standalone piece |
| Wardrobe rail | Lots of clothes on hangers | More like a utilitarian system |
| Homemade stand from boards | Temporary or simple solution | Often looks rough without decorative details |
| Hanger from STAVROS elements | Need a custom wooden stand | Can assemble a set to match the interior and finish |
Practical selection for different situations
Need a hanger for the hallway
For the hallway, stability, wood protection, and convenience are important. Here, the hanger takes outerwear, scarves, bags, umbrellas, and sometimes children's items. The base should be wide, holders spaced at different heights, and the finish resistant to frequent contact. A design with multiple levels works well: top for coats, side level for scarves, lower area for children's items or bags.
From product groups, look at construction kit elements, furniture legs, moldings, fittings, and finishing materials. Decorative details should be placed so they don't snag fabric.
Need a coat rack for the bedroom
In the bedroom, a stand usually holds less heavy clothing. Here, neatness and style are more important. You can make a more elegant base, a calm height, soft rounded elements, light enamel or natural finish. The coat rack should match the bed, nightstands, mirror, dresser, and textiles.
For the bedroom, a stand coat rack with a top bar for hangers works well. It's convenient for leaving clothes for the next day, a robe, jacket, dress, or shirt. The main thing is not to make the structure too massive.
Need a coat rack for the dressing room
The dressing room requires functionality. Hangers, bars, height, easy access, and stability are important here. The decor can be more restrained so it doesn't interfere with the clothes. If the coat rack will stand next to storage systems, it's better to make it match the color of the furniture or floor.
For the dressing room, moldings and fittings are especially important. Decorative elements can be used to finish the stand and cover joints, but not to overload them.
Need a stand for a boutique or showroom
In a boutique, the coat rack works as part of the presentation. It should be stable, beautiful from all sides, and neatly finished. Oak with tinting or beech in the brand color looks good here. The base should not interfere with the customer but must support the weight of the clothes.
Commercial interiors quickly reveal weak points: loose connections, scratches, unprotected surfaces, inconvenient height. Therefore, it's better to plan a more reliable structure and quality finish in advance.
What not to make from scratch if you have ready-made STAVROS elements
Self-assembly doesn't mean every part needs to be cut by hand. This is where ready-made elements help save time and achieve a cleaner result. The buyer doesn't need to turn a ball, make a bushing on a lathe, manually cut a conical finial, or search for random blanks of unknown diameter.
There's no need to create complex decor from scratch. Balls, cubes, discs, washers, and bushings already have a clear shape and are designed for use in furniture and interior structures. All that's left is to choose the fit, material, and placement on the stand.
There's no need to cover technical joints with random parts. If the transition between the base and the stand looks rough, it can be finished with a washer, disc, or bushing. If the top of the stand seems incomplete, a decorative finial can be chosen. If the central axis is too plain, it can be enlivened with a few elements.
There's no need to assemble the structure from mismatched materials. It's important that the wood, hardware, finish, and decorative elements work together. If some parts are bought randomly, you may end up with different colors, different diameters, different mounting holes, and an incompatible style.
The ready-made route looks like this: choose a coat rack idea, open the constructor section, select the base, stand, decorative elements, hardware, and finish, then check dimensions and compatibility before ordering. This path preserves the project's independence but removes the most labor-intensive part—making complex parts.
Mistakes when assembling a wooden floor coat rack
The first mistake is a base that is too narrow. A tall stand with a small support will fall or wobble. This is especially noticeable in the hallway, where clothes are heavy and often hang unevenly. The base should be wider than it seems in the first sketch.
The second mistake is not accounting for the weight of outerwear. A light shirt and a winter coat create different loads. If the coat rack is designed only for visual appeal, it will quickly become inconvenient. For a hallway, you need to build in a margin.
The third mistake is placing the crossbars too high. The coat rack should be convenient every day. If a person has to reach for hangers, the design will be annoying. For children's items, it's better to add a lower level.
The fourth mistake is not checking the diameter of the holes in decorative parts. Constructor elements with holes must match the stand or rod. An improper fit leads to play, misalignment, and sloppy joints.
The fifth mistake is mixing details without a unified style. A sphere, a cube, a carved element, a modern leg, and a random slat can clash with each other. It's better to choose one visual logic: classic, modern, calm Scandinavian, or expressive boutique-style.
The sixth mistake is not protecting the wood from moisture. The hallway is associated with wet clothes, umbrellas, snow, rain, and frequent contact. Without a coating, the wood gets dirty faster and loses its appearance.
The seventh mistake is using weak fasteners. The connection between the post and the base must withstand load and swaying. If the fasteners are weak, the coat rack will gradually loosen.
The eighth mistake is not checking the verticality of the post. A slight tilt is immediately noticeable. Additionally, a tilted post holds load worse. Verticality should be checked during assembly, not after finishing.
The ninth mistake is making the design beautiful but unstable. Decoration does not replace mechanics. Spheres, bushings, and discs adorn the post, but stability comes from the base, correct height, fasteners, and load distribution.
The tenth mistake is forgetting the final coating. Even a well-assembled wooden coat rack without finishing will look incomplete and suffer faster from use.
Who this coat rack suits and who should choose a different option
The author's wooden floor coat rack from STAVROS elements suits those who want an item tailored to their interior. It's a good option for a hallway in a house or apartment, bedroom, dressing room, guest room, study, boutique, showroom, salon, and lobby. This rack works especially well where wood is already present in the interior: in furniture, doors, baseboards, slats, panels, mirror frames, and staircase details.
This option suits those who don't want to buy a faceless ready-made model but aren't ready to carve all parts by hand. The buyer can determine the height, base, style, decorative elements, and finish themselves, while choosing ready-made complex shapes.
A coat rack made from ready-made parts is suitable for projects where neatness is important. For example, a rough homemade rack cannot be placed in a boutique because it would affect the perception of clothing. For a bedroom, a heavy utility structure is undesirable. For a hallway, stability and finishing are needed.
This approach is not suitable for those who want to buy a ready-made factory hanger as quickly as possible without selecting components. It is also not the best option if you don't want to think about the base, fasteners, finishing, and assembly. Self-assembly requires responsibility: parts can be selected on STAVROS, but the structure still needs to be calculated.
If you need a mobile metal rack on wheels for a large amount of clothing, it's better to look at wardrobe rails. If you need a wall-mounted system with hooks, a floor rack won't replace it. If you need a designer wooden hanger for a specific interior, the construction elements provide more freedom.
How to buy parts for a wooden hanger on STAVROS
It's better to start the purchase not with a single part, but with a short plan. First, determine the type of hanger: a single stand, a stand with hangers, a multi-level structure, a hanger for the hallway, bedroom, or commercial interior. Then decide on the height, base, and load. After that, proceed to select the parts.
The first section to view is STAVROS construction kit elements. Here you can select balls, cubes, bushings, washers, discs, and other parts with holes for posts and rods. In the cards, you need to check the size, mounting hole, material, and compatibility with your axis.
Next, you should look at STAVROS furniture legs, if the base should be more furniture-like and stable. For straight sections, you'll need Pogonazh iz massiva, and for connections — Furniture hardwareThe selection should be completed with a section. Mounting and finishing materialsso that the tree is protected and looks finished.
Before ordering, check not only the appearance but also the parameters. Dimensions, mounting holes, material, finish, and compatibility are more important than the photo. If the structure is tall, heavy, or will be used in a hallway, it is better to check with the STAVROS manager in advance which parts will suit your project and what needs to be checked before assembly.
FAQ
Does STAVROS have a ready-made floor coat rack?
This article is not about a ready-made factory coat rack, but about assembling a custom wooden stand from STAVROS product groups: construction kit elements, furniture legs, moldings, fittings, and finishing materials. Before ordering, you need to select parts for the specific structure.
How to make a wooden floor coat rack without complex carpentry?
You can use ready-made wooden elements: a post from moldings, decorative balls, bushings, washers, discs, cone parts, legs for the base, and fittings for connections. Then you don't need to manually turn complex elements, and the main work comes down to selection, assembly, and finishing.
What parts are needed for a wooden coat rack stand?
You need a base, a central post, holders or rails for clothes, decorative elements for joints, fasteners, protective glides, and a top coat. The specific set depends on whether it will be a stand for a hallway, bedroom, dressing room, or boutique.
Can a coat rack be assembled from STAVROS construction kit elements?
Yes, construction elements can be used for decorative stand nodes: balls, bushings, washers, discs, cubes, and cone adapters. The main thing is to match the mounting hole with the diameter of the stand or rod.
How to make a stable base?
The base should be wide and sturdy enough. The higher the stand and the heavier the clothes, the greater the stability margin needed. You can use a cross pattern, a round or square platform, furniture legs, and reliable fasteners.
What height should a floor coat rack be?
A guideline for an adult floor coat rack is approximately 160–180 cm. For a hallway, it's important that coats don't touch the floor and the top holders remain convenient. For children, you can add a lower level.
What to choose: oak or beech?
Beech is more often chosen for enamel and dense painting when a smooth surface is needed. Oak is better for tinting, varnish, or oil if it's important to preserve the natural wood texture. The choice depends on the interior and the future coating.
How to finish the top of the stand?
The top can be finished with a wooden ball, cone element, disc, or other decorative part from the construction set. The main thing is that the finial doesn't catch clothes and matches the style of the entire coat rack.
How to make a crossbar for hangers?
For the crossbar, you need a sturdy wooden element of suitable length and cross-section. It can be selected from solid wood linear molding. The fastening must support the weight of clothes and not loosen with daily use.
What to coat a wooden coat rack with?
To protect the wood, use oil, varnish, enamel, stain, or another suitable coating. In the hallway, resistance to moisture, touch, and dirt is especially important. It's better to choose the finish before assembly so that all parts match each other.
Can I make a coat rack to match the furniture color?
Yes. For painted interiors, it's convenient to choose beech under enamel. For natural furniture, it's better to consider oak under stain or a clear finish. Before ordering, it's worth checking the material of all parts so that the color and texture don't clash.
What to buy at STAVROS for assembling a wooden coat rack?
For the project, you should look at construction kit elements, furniture legs, solid wood products, linear molding, furniture fittings, and materials for installation and finishing. The specific set depends on the design, load, and installation location.
Result: a custom wooden coat rack starts with the right kit
A floor-standing wooden coat rack can be made not as a rough DIY project, but as a full-fledged interior item. To do this, you need to start not with a random board, but with the design: height, base, load, upright, holders, decorative elements, and finish. Then the coat rack will be not only beautiful but also stable, convenient, and durable.
STAVROS construction kit elements help assemble a wooden upright with neat transitions: balls, bushings, washers, discs, cubes, and cone-shaped parts. Furniture legs help shape the base, solid wood linear molding helps assemble the upright and crossbars, furniture fittings help connect the parts, and materials for installation and finishing help protect the wood and tie the product to the interior.
Before ordering, you should think about where the coat rack will stand: in the hallway, bedroom, dressing room, lobby, boutique, or showroom. After that, you need to choose the material, check the mounting holes, verify the dimensions, select the base and finish. This path turns the query "buy wooden floor coat rack" into a more precise solution: assemble a custom wooden coat rack from ready-made STAVROS parts and get an item that fits your interior exactly.