Article Contents:
- What a furniture maker calls a leg blank
- From furniture drawing to choosing the base: which dimensions to determine first
- Why size of a leg does not equal suitability for the structure
- “Standard” and “Prestige” — the difference in remaining work
- Threaded rod and threaded insert
- Mounting plate and angled installation
- Base plate and floor contact
- Stability depends not only on four supports
- When a clear finish complicates the work
- Why you shouldn't choose a cheap leg without assessing suitability
- How to calculate quantity and reserve
- Can a turned leg be used instead of a carved one?
- What to do if you need a height of 172 mm, but the catalog only has 180 mm?
- When is a plate for angled installation required?
- How can I tell if the chosen leg is suitable for a chest of drawers with heavy drawers?
- Can an adjustable glide be installed on a carved leg?
- What should I do if the four legs turned out to be slightly different heights after installation?
- Can I buy one leg first and then order the rest later?
- Is preparation "for tinting" needed if the oak will be coated with oil?
- What should I do if the required finish is temporarily unavailable?
- How can I repeat an order for legs several months later without mistakes?
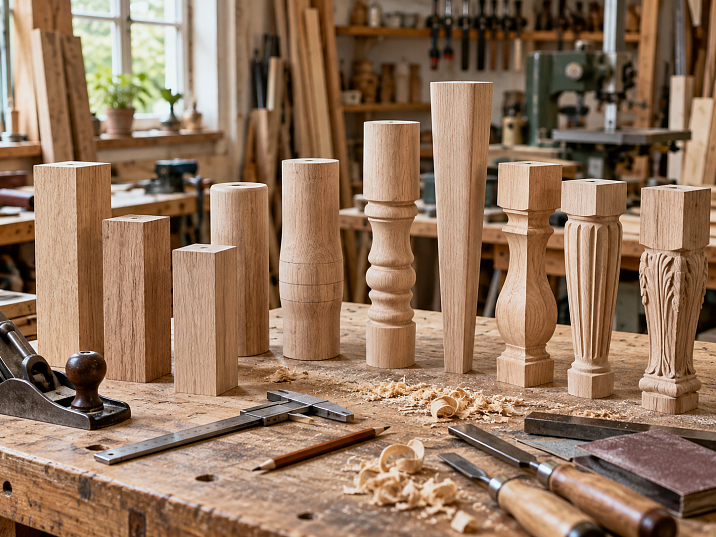
Four legs for a chest of drawers can be cut from timber, or they can be purchased already shaped, leaving you with only drilling for the fasteners, painting, and installation. The difference shows up not in a photo of the finished furniture, but in the workshop: in the first case, you will have to mark out the blanks, achieve identical geometry, set up the machine, and finish every surface. In the second, you need to make sure that the purchased shape really fits the carcass and that its permitted modification will not weaken the support.
Blanks for furniture legs should be chosen based on the amount of work that will remain after purchase. If the workshop can confidently handle milling but does not have a lathe, it makes sense to look for a turned base. If the project already includes a complex carved pattern, a separate carved leg can save on making tooling and working the relief. And for a chest of drawers to be painted with enamel, a shaped unfinished support is often enough, leaving only the fitting of a suitable fastener and finishing together with the carcass.
At the same time, a finished shape does not always allow reworking. A leg may have a narrow top plate, a small diameter in the area of the future hole, or a lower section that cannot be shortened without losing support. Therefore, the choice begins with the furniture drawing and the installation method, not with finding the cheapest part.




What a furniture maker calls a blank for a leg
In the conversation of carpenters, a "blank" does not necessarily mean a rectangular piece of raw solid wood. It can also refer to a part that has already been turned, milled, or decorated with carving, which is yet to become part of a specific product. For one workshop, a finished unpainted leg is the final component. For another, the same leg is a base in which a fitting for attachment must be made, the size adjusted, and its own color obtained.
It is more convenient to distinguish not the names, but the actual degree of readiness:
| What the workshop receives | Which operations have already been performed | What may remain in the workshop |
|---|---|---|
| Block or rough base | Material prepared | Cutting, calibration, profile forming, holes, sanding, finishing |
| Geometric blank | Main planes, cone, or other simple geometry formed | Local milling, fitting, fastening, finishing |
| Turned wooden blank | Rotation profile created | Fit check, holes or hardware, minor refinement, finishing |
| Carved blank | Complex shape and decorative relief completed | Assembly preparation, surface inspection, finishing |
| Finished unpainted furniture leg | Product geometry formed, surface prepared to the specified quality | Choosing the mount, test fitting, and final finish |
The last three options often overlap: a turned or carved leg may also be sold as a ready-made unfinished item. There is no need to look in the catalog for a special label "semi-finished product" if the workshop plans to use a standard part as the basis for its furniture.
But there is a fundamental boundary. An unfinished leg is not yet coated with enamel or varnish, but this does not mean it can be arbitrarily sanded down, shortened, and drilled. Changing the cross-section and mounting area can affect strength, stability, and appearance. The feasibility of such an operation is assessed separately.




From furniture drawing to choosing the base: which dimensions to determine first
Let's imagine a cabinet with a body height of 560 mm. According to the project, the total height to the top surface should be 740 mm. If the tabletop is already included in the body height, and the glides and mounting elements do not add height, 180 mm remains for the supports: 740 − 560 = 180 mm. But this is not yet a reason to immediately order legs 180 mm high.
First, the craftsman must determine whether the support will be installed directly to the bottom panel or through an intermediate mounting plate; whether there is a protrusion below the body; whether an adjustable glide is needed. If the fastener adds, for example, 8 mm to the height, the required height of the leg itself in this conditional calculation will decrease to 172 mm. Not every standard model is produced in such a size, and far from every longer support can be safely shortened.
The working drawing should specify:
- The height from the floor to the bottom of the body, including the mount and glide, and not just the length of the wooden part.
- The size of the upper support section: it must correspond to the intended mounting scheme and the geometry of the body.
- The maximum external dimensions of the leg and its protruding parts: they must not interfere with the fronts, plinth, runners, or adjacent parts.
- The point where forces are transferred from the cabinet to the leg and the presence of connections that prevent the furniture from wobbling.
- The position of the support relative to the corner of the cabinet: straight installation or angled installation requires different marking.
- The future finish: opaque enamel, tinting, oil, lacquer, and a combination of different colors.
Check not only the overall dimensions. Especially with shaped and carved supports, the protruding lower element may be wider than the upper part. In the drawing, find the widest section and see where it will end up when opening a drawer or placing the furniture near a wall.
Our factory also produces:



Why leg size does not equal suitability for a structure
Two wooden legs 350 mm high may look comparable in size, but serve different purposes. One has a wide upper part and simple geometry; the other has a thin turned neck. The first is designed for one type of fastening, the second for another. Even if the item can be installed physically, this does not prove that it is designed for the same load and lateral forces.
When choosing legs for a heavy cabinet, take into account the weight of the cabinet, its contents, the likely movement of the furniture, the operation of pull-out drawers, and the rigidity of the entire structure. For a table, horizontal forces are additionally significant: a person may lean on the edge of the tabletop or move the piece of furniture. It is not acceptable to distribute the total weight across four legs and declare the resulting number as the permissible load — forces are not always distributed equally, and the stability of the connections may turn out to be a more important limitation than the compressive strength of the wood.
Get Consultation
Geometric blank: when a workshop needs a simple shape with room for modification
A geometric base is suitable for projects where the leg should be visually calm: straight, conical, four-sided, or with distinct individual facets. The main shaping has already been done, but the craftsman still has freedom in choosing the fastening, shade, and sometimes local mounting points. This option is often convenient for modern chests of drawers, cabinets, benches, and small tables.
In the STAVROS catalog there is geometric unpainted legs. A telling example is Geometric furniture leg MN-146. It lists versions A × B 80 × 60, 120 × 60, 180 × 60, 250 × 60, 350 × 60, 430 × 60, 650 × 60, and 740 × 60 mm. These are not the dimensions of a single part that is offered to be cut to the desired length, but separate versions. The manufacturer also lists recommended mounting hardware options for this model.
For a workshop, the difference is significant. Suppose a support of about 180 mm is needed for a chest of drawers. It is far more sensible to first consider the 180 × 60 mm version than to order a longer leg only to trim it later. If you shorten a tapered part yourself, the lower cross-section will change, which means a different glide may be required and the external proportions may need to be reconsidered.
What modification is justified here? Usually the kind that does not destroy the geometry formed in advance: preparing the mounting provided by the manufacturer, minor surface finishing for the finish, and installing a suitable glide. An additional groove or milling of the upper part is possible only after checking the specific drawing and preserving a sufficient working cross-section. Treating an already finished leg as a free supply of wood is the wrong purchasing logic.
If, however, you need to independently build an unusual sequence of cubes, cylinders, or shapes on the central axis, the section is useful wooden construction set elements. This is a different technological scenario: the craftsman assembles the shape from individual parts rather than reworking the surface of a single finished leg.
Turned blank: when it is better to get a complex profile ready-made
Turning is justified in your own workshop if the lathe is used regularly, the profile is simple, and making several legs does not require significant readjustment. But a small production operation may present a different picture. You need four identical supports with rings, smooth transitions, and tapers, while lathe work is a rare operation for the workshop. Then the time spent on preparing the tool, template, and first test piece can prove disproportionate to the order volume.
In such cases, people look for unfinished turned furniture legs. The craftsman receives the formed profile and focuses on installation, compatibility with the cabinet, and finishing.
A concrete example — turned furniture leg MN-145. In the catalog, it is available in A × B variants from 100 × 44 to 750 × 44 mm, including 150 × 44, 200 × 44, and 350 × 44 mm. Thus, for furniture pieces of different heights, you can choose a version of the same SKU without trying to mechanically scale or cut the profile.
For this model, the manufacturer's limitation is especially telling: MN-145 is intended for light loads, and variants longer than 450 mm are recommended primarily for lightweight wall-mounted consoles and coffee tables. This is not a prohibition against using any size in another project, but it is a direct reason to coordinate the design and loads before purchase. One cannot assume that a tall turned support is automatically suitable for a massive dining table simply because its length matches the drawing.
With a turned leg, three things matter that are easy to underestimate in a photo.
The narrowest cross-section. A relief profile may have a thin neck. It is often this that limits the possibilities for subsequent drilling and installation of cross fasteners. The presence of a wider base does not compensate for an arbitrary hole in the thin part.
Repeatability of the profile. If a set of four identical legs is ordered, matching height alone is not enough. The rings, transitions, and narrowings must be located at the same marks. For a small furniture series, this is more important than subtle differences in wood texture.
Installation method. In the product page, MN-145 offers options for straight and angled mounting with suitable hardware. The height of the item after angled installation differs from the length of the leg along its longitudinal axis; in addition, the point of contact with the floor changes. The fastening and glide are therefore chosen as part of the whole construction, not as a random purchase after receiving the supports.
Carved blank: when it is more advantageous for a workshop not to reproduce a complex relief
With a carved leg, a significant share of the work is concentrated in the shape. If the project requires a curved support with floral ornament or expressive sculpting, making four identical parts in-house requires not only wood but also model preparation, complex processing, and careful hand finishing. In a small order, the preparatory operations can take more time than the final assembly of the furniture.
In the section carved furniture legs you can choose an already formed base for a classic chest of drawers, console, or cabinet. For example, Carved Furniture Leg MN-044 is available in variants A × B × D 140 × 57 × 36, 160 × 65 × 41, and 200 × 81 × 51 mm. In addition, for certain versions two levels of surface treatment are specified — "Standard" and "Prestige".
A buyer of a carved component is tempted to order a larger leg and then remove the "excess" height. Unlike a straight block, each part of it can be tied to the composition: the upper transition, the central motif, the lower termination. Shortening can disrupt the pattern, leave an unnatural break in the relief, or shift the support point. Even if technically part of it can be sawed off, the decorative result often turns out unsuccessful.
When selecting a carved base, first the drawing is checked against the installation location, then the remaining operations are assessed. If all that is required is to choose a fastener and paint the leg together with the fronts, buying a ready-made carved component makes clear sense. If the project involves deep rebating, changing the curve, or removing an entire section of the ornament, it is better to look for another model or have the component made specifically for the project.
The relief also complicates finishing. Sanding dust, primer, and excess paint can accumulate in the recesses. Because of this, a pattern that is clearly readable in the wood becomes less distinct after a thick opaque coating. A test coat for a carved leg is needed not as a formality: it shows whether the fine transitions between petals, scrolls, and the background will disappear.
Unpainted ready-made leg: when the shape no longer needs to be changed
In made-to-order furniture production, identical shapes of supports and different finishes are often required. For a white chest of drawers, the leg will be painted with enamel; for a dark blue cabinet, in the color of the fronts; for furniture with exposed wood, a suitable tint or clear coating will be selected. Making a new shape each time just for a different color is irrational if a suitable wooden support is already available in the catalog.
In this scenario, the following are useful unpainted solid wood furniture legs. The exact size, wood species, and quality of surface preparation are selected. Then a dry fit is performed, the connection to the carcass is checked, a test coat is applied, and only after that is the entire set finished.
The term "for painting" is sometimes misleading. It does not mean that the leg requires a full cycle of rough shaping. And it does not mean that any composition can be applied without preparation. Before priming, the surface is cleaned, and the roughness, machining marks, and wood absorption are assessed; the coating technology is selected according to the recommendations of the paint and varnish manufacturer.
“Standard” and “Prestige” — the difference in remaining work
When choosing a blank, the degree of surface preparation affects labor costs no less than its shape. In the description of STAVROS product quality two categories of finishing are given.
In the “Standard” finish, the product undergoes machine processing and sanding. Individual milling marks, roughness, and fuzz are allowed; before painting, the workshop may schedule additional refinement. For a large smooth leg, such work is relatively simple. For a relief one, it will require special attention in the recesses.
In the “Prestige” finish, in addition to machine processing, detailed hand sanding is provided. This reduces the amount of surface preparation before applying the coating, especially on complex transitions. But even such an element is checked in real light, and a test paint remains useful. It is important that one approved level of preparation is used across the entire batch, otherwise identical legs may look different after priming.
Check the available options directly in the selected product card. You cannot assume that any model is sold in both categories: for example, MN-146 and MN-145 in the verified options indicate “Prestige” sanding quality, while MN-044 offers both “Standard” and “Prestige.”
Which operations will actually remain after purchase
The difference between a block and an already formed leg becomes clear if you list the technological operations. The same finished part can almost completely eliminate work on a lathe, but it does not solve the task of fastening and adjusting furniture height.
| Operation | Block | Geometric base | Turned leg | Carved leg | Finished unfinished leg |
|---|---|---|---|---|---|
| Form the outer profile | Yes | Sometimes required locally | Usually not | Usually not | No, if the right size is selected |
| Create threading or complex relief | If necessary | If necessary | If necessary | No for a finished pattern | No for a finished pattern |
| Prepare the mounting point | Yes | By design | By design | By design | By design |
| Check height and fit | Yes | Yes | Yes | Yes | Yes |
| Level the surface | Fully | By condition | By sanding quality | By sanding quality and relief | By selected quality |
| Apply the finish coat | Yes | Yes | Yes | Yes | Yes |
The table does not promise that a finished leg is always supplied with a drilled hole or that hardware is already included in its price. Such details are verified for a specific item. "Geometry ready" and "mounting joint ready" are different states of a part.
When a workshop does not have the equipment for the required profile, buying a pre-shaped support eliminates an entire production stage. If, however, a simple four-sided leg is needed and the machine and tooling are already set up, in-house processing from a blank will sometimes be more efficient. To make a decision, it is necessary to take into account equipment utilization and the actual time for each operation.
Can a finished leg be shortened while preserving its functional properties?
The situation is familiar: the project specifies a support 180 mm high, but the leg that matches the style is 200 mm high. The difference is only 20 mm. On a rectangular wooden blank, it may seem insignificant. But a shaped support is not a straight strip from which any section can be cut off without consequences.
Before changing the length, check what exactly will be removed. If there is a thin rounding at the bottom, the intended contact point with the floor will disappear after trimming. If a taper begins above the cut line, the resulting support area will be wider than the original and may require a completely different glide. If the upper part carries the mounting, changing its height can destroy the fitting assembly.
The verification procedure is as follows:
- Draw the intended shortening line on the drawing, not directly on the wooden product.
- Compare the shape of the new end with the original: will a sufficiently flat and stable area remain?
- Check the distance from the cut line to all holes, weakened areas, thin necks, and glued joints.
- Clarify whether the required glide can be installed after trimming without drilling into the side surface.
- Evaluate the new proportion of the leg next to the facade, countertop, and other supports.
- If doubts remain about the mounting's functionality or strength, choose a different version or coordinate the design change with a specialist.
For legs with complex relief or a strongly varying cross-section, it is safer to choose the nearest suitable factory size. The length allowance cannot automatically be considered an allowance for trimming.
The sequence of operations must also be taken into account. If you have nevertheless provided for permissible end trimming in the project, first obtain the required geometry and prepare the fit, then perform the finishing treatment. Trimming an already painted leg means refinishing the exposed end, and sometimes the adjacent surfaces as well.
Mounting: the part of the project that cannot be chosen after purchase
The installation of a wooden furniture support depends on the design of the furniture item itself. For a low cabinet with a wide base, a tall wall-mounted console, and a freestanding table, the requirements differ. A leg that looks identical may work well in one item and be unsuitable in another.
В the hardware section for furniture legs studs, mounting kits, mounting plates, and glides are available. But matching threads do not mean automatic compatibility of the assembly: the size of the support pad, sufficient wood around the hole, the direction of forces, and the method of fixing the hardware to the body are checked.
Stud and threaded insert
This connection is convenient when the leg is attached to a node provided by the design and can be replaced without destroying the furniture body. However, drilling for the insert is performed strictly to the size of the fastener, with suitable depth and control of the hole direction. Too deep a recess in a narrow leg may come out through the side surface. Too close a location to the edge may lead to cracking of the wood during installation or under load.
In STAVROS product cards, for example, the FUR-001 kit and the FUR-012 kit are found. For a specific model, first check the manufacturer's recommendation and the assembly diagram, then select the hardware. The fastening solution from MN-146 cannot be transferred to any carved leg just because both are made of beech.
Mounting plate and angled installation
The plate creates a connection between the body and the leg; for angled installation, a product with a calculated angle is required. For MN-145, the manufacturer specifies the possibility of straight and angled mounting with the corresponding plates. But the angle affects the position of the lower support point, the overall support overhang, and the actual height of the furniture.
For example, if a wooden leg has an axial length of 350 mm, then when this axis deviates by 10° from the vertical, its vertical projection will be approximately 345 mm rather than 350 mm. This is a geometric example that does not account for the thickness of the plate itself or the shape of the glide. A difference of about 5 mm can be noticeable when installing four supports on a single cabinet. Therefore, the height and layout are checked on the assembled unit.
Base pad and floor contact
The glide protects the lower part of the leg and the floor covering, and an adjustable model can compensate for minor unevenness of the base. For a round turned leg and a four-sided geometric leg, the installation area differs. The size and shape of the glide must match the actual bottom cross-section, and the fastener must not split the wood.
If the furniture rests on narrow legs and is intended to be moved regularly, lateral forces should be assessed especially carefully. A sliding glide makes movement easier, but it does not replace the rigidity of the cabinet and does not turn an insufficiently strong joint into a reliable one.
Stability depends not only on four supports
For a chest of drawers with pull-out drawers, stability with a drawer open and the requirements for fastening the cabinet to the wall are checked separately. For a tall table, the ability of the frame to withstand lateral load without wobbling. For a bench, the forces that arise when a person sits down and shifts their weight. No photograph of a leg and no single figure for its height can automatically lead to a conclusion about the load-bearing capacity of the finished piece of furniture.
If the permissible load needs to be confirmed, one should refer to the specific technical documentation, calculation, and testing of the product. There is no universal value for “how many kilograms a wooden leg can withstand” for the entire category.
Beech or oak: how the material affects subsequent finishing
Choosing wood for a furniture leg is not limited to comparing the strength of species. In the workshop, what matters is how the material will be processed, how it will appear after staining, and how noticeable the glue lines are if the part is made from laminated solid wood.
Beech is often chosen for opaque finishes, when the grain of the wood itself should not become part of the design. After proper preparation, the surface can be coated with enamel in the color of the cabinet. This is a convenient option for furniture with painted fronts, especially if the leg is fairly complex in shape and the workshop wants to achieve a uniform color for the entire composition.
Oak is appropriate where the wood remains visible: under clear lacquer, oil, or tinting. However, the name of the species alone does not guarantee a uniform appearance of all parts in an order. The shade, direction of the grain, presence of areas of different density, and the pattern of the glue-up matter for the final result.
STAVROS separately describes two options for preparing the glued blank. The "for enamel" version allows selecting lamellas without matching color and texture: after a clear finish, the differences may become noticeable. The "for tinting" version involves selecting wood by color and grain for a semi-transparent finish. These are not interchangeable designations. Even an oak leg in the "for enamel" version will not necessarily give the desired look under colorless oil.
For a small batch, it is necessary to specify not only "beech" or "oak," but also the surface preparation option. Otherwise, the first batch of legs may be finished for a clear coating, while a repeat purchase with the same article number but a different glue-up will produce a noticeably different grain pattern.
When a clear finish complicates the work
Suppose a chest of drawers has four identical oak supports located next to dark-tinted fronts. Before applying the product, the legs may look fairly close in shade. After the oil, the difference between the lamellas becomes more noticeable, especially in side light. Therefore, for such a project, not only the geometry but also the appearance of the set after a trial finish is approved.
With enamel there is another problem: pronounced end-grain areas and pores can absorb primer differently and produce an uneven layer. Here, the right wood preparation system is what matters, not increasing the thickness of the final coat of paint. On carvings, excess primer can also smooth out fine ornamentation.
How to bring an unfinished leg to a finished support
For a workshop, the correct sequence matters. If you first paint all the legs and then discover that a different hole diameter is required for the chosen hanger bolt, the item will have to be reworked and the coating restored. It is much easier to check the mounting assembly before the finish.
First, a dry fit. Place the leg against the cabinet, check the dimensions and angles, the position of the fronts, the allowable gaps, and the space for the chosen fastener. For angled installation, it is useful to temporarily assemble the complete assembly with the mounting plate and glide.
Then, the permitted machining. Make the holes and seating points specified by the project. Secure the part reliably so that the tool does not slip onto the shaped surface; mark the drilling location in advance and verify it against the drawing. On a carved leg, it is necessary to preserve sufficient material thickness in the fastener area.
After that, surface inspection. Remove dust from the recesses, check the profile transitions by touch and under side lighting. If additional sanding is required, proceed without changing the pattern and shape of the leg. Finally, clean the relief of dust again.
Trial finishing. On a control piece, check the primer, color, coating transparency, and how the material behaves on end faces. Do not mix incompatible paint and varnish systems. Follow the coating manufacturer's instructions for surface preparation, intercoat waiting time, and drying.
Batch finishing. Coat all legs using the approved method. If necessary, protect metal mounting elements and threaded connections from paint ingress. After the coating has fully dried and developed the properties specified by the process, check fastener compatibility and perform final installation.
For a furniture series, it is advisable to have not only a signed color sample but also a brief operations sheet: which leg, which primer, which shade, how many coats, which areas are not painted, and when assembly is permitted. This eliminates discrepancies between the first furniture item and a repeat order.
Which is more cost-effective: turning the legs yourself or buying a ready-made shape
The cost of a wooden blank rarely gives the right answer to this question. When manufacturing in-house, the workshop incurs costs for preparing the drawing and program, tooling, machine operation, tools, hand finishing, checking the first piece, and possible defects. For a ready-made base, the costs are different: the price of the selected support, delivery, mounting hardware, any necessary local rework, and finishing. Some operations overlap — they cannot be counted twice as savings.
As an example, let's take an order for eight identical cabinets with four legs each. The requirement is 8 × 4 = 32 legs. Let's assume that independently machining a complex profile will require 90 minutes for the initial machine setup and another 28 minutes per leg, including finishing. This is not a standard or a characteristic of STAVROS, but a hypothetical situation for comparison.
Then in-house shaping will take 90 + 32 × 28 = 986 minutes, that is, 16 hours 26 minutes. If, in the same hypothetical workshop, a ready-formed base only needs to be prepared for installation and comparable operations performed at 8 minutes per piece, the labor input will be 32 × 8 = 256 minutes, or 4 hours 16 minutes.
The difference is 730 minutes, or 12 hours 10 minutes of work. But it is too early to declare the ready-made support cheaper. You need to multiply the saved time by the workshop's internal labor rate, then compare it with the difference in the purchase cost of the parts and delivery expenses. If the purchased leg is significantly more expensive than the prepared wooden blank, the time savings may not cover the difference. If the machine is occupied with more expensive orders, freeing up its time becomes a separate advantage.
A working comparison can be written without complex formulas:
In-house manufacturing = wood + cutting and preparation + setup + shaping + sanding + mounting preparation + finishing + defect rate.
Purchased pre-assembled support = price of the selected version + delivery + remaining mechanical work + fastening + finishing + required reserve.
In both cases, labor and materials for the same finishing operations are taken into account. If the batch is small and the profile is complex, production setup is spread over a small number of legs and makes in-house processing relatively expensive. If a workshop has been producing the same simple leg in dozens of sets for years, in-house manufacturing on a set-up line may prove more cost-effective than buying.
Why you shouldn't choose a cheap leg without assessing suitability
Suppose two models are sold at different prices, but the cheaper one will require creating a custom mounting plate, changing the drilling angle, and reworking the glide. The difference in purchase cost will quickly disappear in the rework. That is why you compare the cost of a part ready for installation in a specific piece of furniture, not two price tags from a catalog.
For custom furniture, a design component is added. Sometimes a slightly more expensive ready-made leg fully matches the approved silhouette and does not require coordinating changes with the client. A cheap base that still needs significant reworking creates the risk of missing the required proportions.
One trial leg before ordering a set or small batch
Buying a single unit is justified if the workshop has not yet worked with the selected article, wants to drill a custom fit, test a new fastening method, or is using a particular finishing system for the first time. Even an exact drawing does not answer the question of how convenient it is to bring the tool to a recessed relief and how the leg looks after painting next to a finished facade.
For a trial unit, the sequence should be as follows:
- Check the article and version. Write down all dimensions from the product card and the selected wood species, not just the name “leg for a cabinet.”
- Do a dry fit. Check the height, width, contact plane, glide position, and distances to moving parts of the cabinet.
- Check the fastening. Assemble the specified mounting assembly and verify there are no cracks, play, or skew.
- Assemble a control piece of furniture. For a functional check, it is not enough to hold the support in your hand: the entire frame, joints, and the furniture's behavior under operational loads matter.
- Apply a test finish. Evaluate the color under daylight and artificial lighting, the coating quality on edges and in recesses, and the cleanability of the texture.
- Record the result. Save photos, the date, fastening parameters, the finish, and the approved drawing version.
If the product must withstand significant loads or dynamic impact, perform the necessary check in accordance with the furniture's design and purpose. A simple test assembly without load does not replace calculation and testing.
Before the main purchase, you can review STAVROS product samples, but to confirm a specific fastening assembly, a full-size example of the selected leg is often needed, rather than a small sample of wood or finish.
How to record the selected leg in the production specification
A few months later, the workshop may receive another order for the same cabinet. If only a photograph is kept, you will have to search again for a similar leg, check the dimensions, and figure out which fastening was used last time. Repeatable production begins with recording the parameters of the approved part.
The bill of components may look like this. All entries in the table, except for the real article number given as an example, relate to a conditional training project and must be replaced with the parameters of the actually approved product.
| Specification field | What to record in the project |
|---|---|
| Furniture model | Cabinet, project T-08, revision 2 |
| Component name | Geometric wooden leg |
| Article number | MN-146 |
| Size version | A × B = 180 × 60 mm |
| Material | Beech — after sample approval |
| Surface preparation | According to the selected card and approved finish |
| Fastening | Approved set with its article number specified |
| Additional processing | Only the fitting operations specified by the project |
| Finish | Approved primer and enamel system, color code in the finish map |
| Quantity per product | 4 pieces |
| Quantity for 8 items | 32 pieces without a separately calculated reserve |
| Status | Sample approved, date and signature of the responsible person |
Next to the entry, it is necessary to save the card address of the selected MN-146 and a local copy of the approved drawing. When reordering, dimensions and available options are checked again against the current card: the assortment and finishes may change.
Do not combine the item code and size into one vague name. "MN-146, beech" is not enough if the model has several heights. "Carved leg 140 mm" is also not enough: besides the length, you need to know the other dimensions, the quality of sanding, and the selected type of solid wood preparation.
How to calculate quantity and reserve
The base quantity is determined by the design: eight cabinets with four legs each require 32 supports. Separately added to this are parts for trial processing, if after testing they cannot be used in the finished furniture, and the agreed technological reserve. The size of the reserve depends on the complexity of the remaining work, the experience of the workshop, the likelihood of damage, and the possibility of quickly purchasing the specific item.
It makes no sense to universally add 10% to all legs. If the finished leg only receives a coating and is installed with standard fasteners, the risk may be one thing. If the item is to be drilled at an unusual angle and a complex end is manually fitted, it is another. It is useful to calculate the reserve in pieces for a specific operation, rather than as an unconditional percentage of the order.
For repeat production, the approved hardware, drilling point, glide type, and height control scheme are also retained. A leg without an agreed mounting assembly is not yet a fully standardized furniture component.
Mistakes that make a purchased blank more expensive than making your own
Ordering legs that are too long "with extra margin." This works for a regular strip, but can be a mistake for a cone, turned profile, and carved element. After shortening, the cross-section and proportions change. Choosing a ready-made version according to the drawing and checking whether cutting to length is permissible before ordering helps prevent the problem.
Choosing a leg based only on its outward pattern. A suitable ornament does not yet mean a sufficient support area and suitability for the chosen fastening. All dimensions, the mounting zone, and the load-transfer scheme are needed. This especially applies to tall furniture and strongly curved supports.
Buying a "for enamel" version for a clear finish without checking. After applying oil or lacquer, differences between lamellas may become more noticeable. To avoid getting a non-uniform set, the quality of the gluing is agreed in advance and a test finish is done.
Assuming that any unpainted leg is already prepared in the same way. "Standard" and "Prestige" involve different amounts of surface treatment. For a workshop that plans to paint a large batch without additional hand finishing, this has direct implications for schedule and cost.
Drilling holes after painting. There is a risk of damaging the coating and discovering the wrong fastener size. First the mounting is checked, then the part is finished.
Failing to account for the installation angle. An angled leg changes the vertical dimension of the structure and the position of the lower support point. Checking only the length of the wooden part is not sufficient here.
Assuming that four legs guarantee the strength of the entire piece of furniture. The legs may be strong individually, but the connections to the carcass may not provide the required rigidity. Stability and load-bearing capacity are assessed as part of the assembled product.
Replacing a SKU in the middle of a series with an "almost identical" one. Even matching height does not guarantee the same shape, support area, and visual rhythm. Replacement is carried out through a new trial assembly and approval of the revised specification.
Where to buy blanks and wooden furniture legs
The starting point for selection is the STAVROS catalog of wooden furniture legs and supports. Here you can compare models for different types of furniture, choose an unfinished version, and go to a specific product drawing. If a workshop needs furniture legs for painting, it is useful to open the category of unfinished products right away and narrow the selection by geometry, height, and wood species.
For those looking for where to buy wooden furniture legs for subsequent finishing on their own, it is worth determining in advance: whether a already formed contour is needed or a blank for noticeable mechanical processing. In the first case, it is rational to choose a standard geometric, turned, or carved model. In the second, compare the possibilities of solid wood and components of the kit, and if necessary, consider custom manufacturing of the part according to your own drawing with a suitable contractor.
It is useful to place an order after checking three documents: the working drawing of the furniture, the card of the selected leg, and the bill of materials. For a production order, it is necessary to specify the item code, full size, material, processing quality, quantity, and the required surface condition. Information about cooperation with manufacturers is provided on the STAVROS page for furniture workshops; it states the possibility of shipping from one piece, so a trial purchase does not necessarily require ordering a large batch.
When choosing a model, real suitability is more important than the general phrase “buy solid wood furniture legs.” A short checklist before ordering is simple: the required height taking into account the mounting, sufficient installation area, suitable geometry, known wood species, agreed finish type, and a clear list of remaining operations. If at least one of these points is not confirmed, first clarify the parameters or order a trial sample.
Questions about furniture leg blanks
Can a turned leg be used instead of a carved one?
If the furniture drawing and design allow a simplified shape — yes, after checking dimensions, mounting, and structural strength. When the carving is part of the approved composition, the replacement changes the appearance of the product. Such a change is agreed upon before series production.
What should I do if I need a height of 172 mm, but the catalog only has 180 mm?
Don't rush to cut. First, clarify the final height together with the mounting unit and the glide; sometimes the mounting structure can be changed without altering the wood. If exactly 172 mm is required, check whether the specific profile can be safely trimmed, or look for another base. Don't replace a technical check with a calculation based only on the difference in length.
When is an angled mounting plate required?
When the drawing specifies support at a given angle, and the leg design allows such mounting. The plate should be selected together with the leg: the angle affects the furniture height, the offset of the lower end, and stability. A regular straight plate is not considered suitable just because its holes match the fasteners.
How can I tell whether the selected leg is suitable for a chest of drawers with heavy drawers?
They check not only the wood, but also the placement of the supports, the rigidity of the carcass, the operation of the drawers, and the stability of the furniture in use. The force required to open and the risk of tipping are important. The permissible load of a finished chest of drawers cannot be determined from the leg size; if necessary, a structural calculation and testing of the assembled product are required.
Can an adjustable glide be installed on a carved leg?
Sometimes it is possible if the lower cross-section is large enough, the drilling location does not intersect a thin section, and the fastener is compatible with the selected model. A small shaped support for the glide may not have enough material. Its mounting dimension is checked before machining, not after the hole has already been made.
What should I do if the four legs turned out to be slightly different in height after installation?
First, check the evenness of the floor and the cabinet, the correctness of installation, and the uniform seating of the fasteners. If the design provides adjustable glides, the height can be corrected within the permitted limits. You should not immediately trim the longest leg: the problem may lie in the mounting plate or the position of the threaded insert.
Can I buy one leg first and then order the rest?
On the STAVROS page for manufacturers, shipment from one piece is indicated. This allows you to test a specific version before the main batch. However, with a subsequent order, you need to reconfirm the item code, dimensions, material, processing quality, and expected lead times; the wood shade may differ between different batches.
Is preparation “for tinting” needed if the oak will be coated with oil?
If a semi-transparent finish with a visible wood pattern is intended, it is reasonable to choose the appropriate preparation option for the blank. The “for enamel” version does not involve selecting lamellas by color and texture. Oil may emphasize these differences, so the decision is checked by test-applying the selected product.
What should I do if the required version is temporarily unavailable?
Confirm the availability and production time of the selected item code. Replacing it with a visually similar leg will require rechecking the fastening, support area, height, and overall composition. For serial furniture, it is better to postpone the order or approve a new version of the part than to unnoticeably mix different versions in one set.
How can I repeat an order for legs after several months without mistakes?
Keep the exact product code, product link, selected dimensions, wood species, sanding and lamination quality, mounting scheme, glide and finish card. Before a new purchase, verify the details against the current product page. A photo of the finished cabinet does not replace the production specification.
Choose the blank so that after purchase only the truly necessary operations remain. For one workshop this will be a geometric blank for its own milling, for another — a ready-made turned or carved leg for painting. The decision is determined by the drawing, mounting, subsequent finishing and the total cost of bringing the part to installation in furniture.