


Article Contents:
- What to buy for finishing internal corners, panels, and niches
- Wooden elements
- Polyurethane Elements
- Consumables
- How corner layout differs from an external corner
- External corner: protection of the protruding edge
- Internal corner: beautiful assembly of the joint of two planes
- Why plastic corner is not suitable for classics
- Where to use corner wooden layout
- Decorative Niches
- Wall panels: frame structure and corner joints
- Furniture inserts and built-in furniture
- Portal structures
- Library and cabinet sections
- Wood and painted wall joint
- Where to use polyurethane in corner and niche decoration systems
- Moldings around a niche: external framing
- Polyurethane trim: architectural lines on the wall
- Overlays and decor: point accents
- Top panel line and baseboard finish
- Wall decor: expanding the composition
- Ready-made kits by task type
- Decorative niche: wooden layout inside, moldings outside
- Wall panel: wooden trim + polyurethane moldings
- Built-in furniture: layout in corners + facade moldings
- Fireplace and decorative portal
- Library and cabinet up to the ceiling
- What to buy together: full list in one order
- Proportions and scale: how to choose the width of layout and molding
- Ratio of layout width to niche or panel size
- Ratio of layout profile to molding
- Coordination with baseboards
- Working with non-standard angles
- Finish: surface unity as a goal
- Under a single enamel
- Under tinting or oil
- Sealant is the final point of any installation
- Mistakes when buying corner trim and moldings
- About the Company STAVROS
- FAQ: Answers to Popular Questions
- How to close the inner corner of a decorative panel?
- How is corner trim different from a regular corner?
- Can you combine wooden trim and polyurethane stucco?
- What to buy for a niche in a classic style?
- How not to overload a niche with decor?
- Do I need to prime wooden trim before installation?
- How to join vertical trim with baseboard?
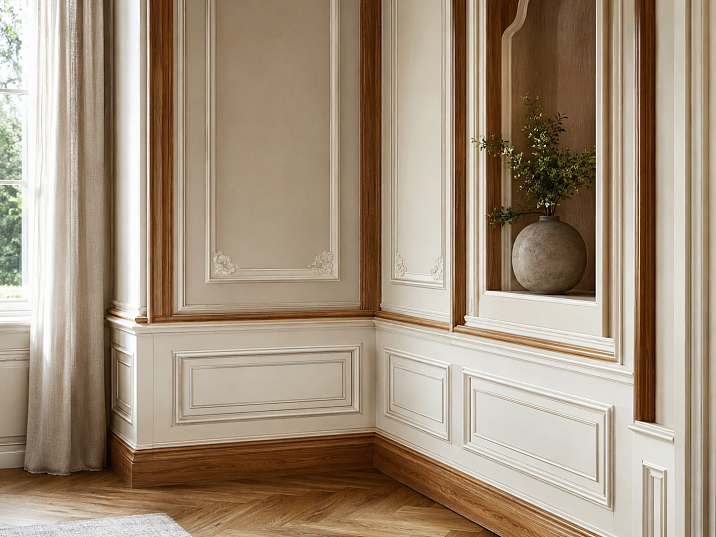
There is one detail in finishing that is almost always underestimated — the internal corner. From the outside, the renovation looks clean: walls are level, paint applies well, furniture is in place. But when the eye falls on the internal joint of two panels, on the corner of a niche, on the place where one surface meets another at a right angle inside — there is either a rough gap, a plastic corner, or simply an uncovered seam. This is not a disaster. But it is noticeable. And this is exactly what separates an amateur result from a professional one.
Angular wooden trim is a detail that solves the problem of an internal joint beautifully, durably, and stylistically accurately. Paired with polyurethane decor, it creates a complete, architecturally competent interior — whether it's a classic niche, wall panel, furniture insert, library section, or fireplace portal. This article is a practical guide: what to buy, where to apply, how not to make a mistake.


What to buy for finishing internal corners, panels, and niches
The task of "covering an internal corner" seems simple until you start calculating. In reality, it is a set of several items, each of which contributes to the final result.


Wooden elements
wooden floor — the main tool for working with internal joints and corner connections. These are profiled or flat strips made of solid wood that cover the meeting point of two planes, close the technological gap, and simultaneously form a decorative line on the visible surface. The width of the trim is selected depending on the depth of the joint and the stylistic solution: from 15 mm (for thin technical joints) to 60–80 mm (for decorative frame borders).
Angular wooden trim — a variety of the general molding family, oriented specifically towards internal corners. Its cross-section is usually asymmetrical: one shelf is wider, the other narrower, which allows covering an uneven joint and fixing both adjoining planes with one element. This is more convenient than cutting two separate strips at 45°, especially when the angle is not strictly right — which happens constantly in real construction.
wooden veneer with a decorative profile — a richer option with a profiled cross-section: rounding, fillet, or stepped relief. Such trim not only closes the joint but also forms a decorative molding — horizontal or vertical — which becomes part of the ornamental solution of the entire panel or niche.
Pogonazh iz massiva — for side, horizontal, and vertical binding strips inside a niche or along the perimeter of a panel. This is a broader concept, including wooden moldings, cornice strips, baseboard profiles, and facade binding. It is the molding that creates the architectural "skeleton" of the decorative structure.
Wooden decoration — applied carved or milled elements made of solid wood to enrich the surfaces of panels, posts, and corner areas. Used as point accents at line intersections or in the corners of frame borders.
Our factory also produces:


Polyurethane elements
Moldings made of polyurethane — for decorative framing of a niche from the outside, for horizontal lines above and below the panel, for frame structures on the walls next to the niche. Polyurethane molding takes on all the decorative relief where there is no load: it is lightweight, paints well, does not react to humidity, and can be cut without special tools.
Polyurethane trim — profile strips for wall lines, vertical rods on the sides of the niche, horizontal belts above decorative panels. This is an "architectural drawing" on the wall: lines that organize the surface and set the scale.
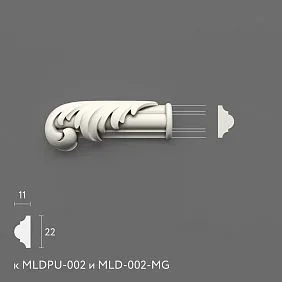
Polyurethane appliqués — corner elements, rosettes, decorative inserts at the intersection points of moldings and in the corners of frames. Decor for Molding — special elements: brackets, keystones, corner overlays with ornaments, which are installed at key points of the decorative composition.
Polyurethane moldings и Polyurethane wall decor — for decorating the wall plane around the niche: molding frames, pilaster overlays, horizontal cornice lines.
Get Consultation
Consumables
Glue for polyurethane (details on selection in the article what to glue polyurethane molding with). Finishing nails and self-tapping screws for wooden parts. Acrylic sealant for final sealing of all joints. Acrylic primer for both materials. Enamel, oil, or varnish — finishing coating depending on the style. Reserve for profiles — 10–15%.
How the corner layout differs from the external corner
This is a fundamental difference that is often confused. Understanding the difference means immediately choosing the right product.
External corner: protection of the protruding edge
An external corner is placed where an edge protrudes from a wall or furniture — for example, the corner of a wall column, the protruding end of a niche, or the corner of a countertop. Its task is to protect this edge from chips and mechanical damage. The external corner faces outward with its relief and is visible from two sides.
Internal corner: a beautiful assembly of the joint of two planes
Corner trim for internal corners solves a fundamentally different task. Two sheets of drywall, two wall panels, two planes of a furniture insert — they meet inside at a right angle. At this joint, either a bare seam remains, or it is covered. A wooden corner trim covers this joint, overlapping both planes with a fixed overlap. The result: the internal corner looks finished, neat, and styled — as if it was intended that way.
It is important to understand: an internal corner is not a mistake that needs to be fixed. It is a structural joint that needs to be styled. wooden floor for this — an organic and durable solution.
Why a plastic corner is not suitable for classic interiors
Plastic internal corners are a construction tool, not an interior one. Their profile is thin, often fades under paint, does not hold shape when heated, and creates a feeling of cheapness. In a classic interior with wooden panels and polyurethane molding, a plastic corner looks like a mistake. A wooden corner trim or solid wood trim is a different category: it can be painted, tinted, polished, and lasts for decades.
Where to use wooden corner trim
The list of applications is much broader than it seems. Wooden corner trim is a universal tool for all tasks where two wooden or finishing materials meet at an angle inside a structure.
Decorative niches
A niche in the wall is one of the most popular modern interior techniques. A lowered wall fragment, lighting, shelves, an accent color on the back plane. All this is beautiful — until your gaze hits the internal corners of the niche: four joints (two vertical, one horizontal at the top, one at the bottom), each requiring styling. Wooden corner trim covers each of them: vertical ones with a single piece from ceiling to floor or from shelf to shelf, horizontal ones with a precise 45° miter cut at the joints with the vertical ones.
In a classic niche, the layout is taken with a moderate relief — a semi-oval profile or with one or two pulls. In a minimalist niche, a flat layout with a chamfer on the visible edge is sufficient.
Wall panels: frame structure and corner joints
Wall panels in a classic interior are rectangular wooden or MDF inserts fixed on the wall with a gap from the floor and ceiling. They are framed with frame molding strips — and it is in the corners of these frames that internal joints are formed. The layout works here in two ways: technically it covers the gap between the panel and the wall around the perimeter, decoratively it creates the frame profile of the panel.
wooden veneer with a decorative profile for frame framing of panels — a particularly effective choice: its profiled section creates a play of shadows on the surface, which makes the panel "alive" and voluminous.
Furniture inserts and built-in furniture
In a built-in wardrobe, library shelving, a system of sliding wardrobes, or a kitchen set, internal corners — where the side walls of sections meet the back or where a horizontal partition enters a vertical one — always form a joint. In factory-made furniture, it is closed with a tongue-and-groove connection or special profile parts. In furniture made on site, this task is solved by Pogonazh iz massiva and corner layout.
Portal structures
A fireplace portal, a decorative TV portal, an architectural portal in an opening — all of them contain internal corners between the side posts and the horizontal lintel. It is here that the corner wooden layout works as a structural element: it fixes the junction of two parts, creates a clear transition line, and simultaneously serves as a decorative pull. The outside of the portal is decorated polyurethane moldings — more on the distribution of functions between wood and polyurethane below.
Library and cabinet sections
In a floor-to-ceiling library, every place where one section joins another, where a vertical upright meets a horizontal shelf, is a potential corner zone. The wooden trim here serves both a furniture and decorative function: it maintains the geometry of the joint, hides end cuts, and creates a vertical or horizontal decorative rhythm on the facade of the structure.
Joint of wood and painted wall
When a wooden panel, shelf, or furniture element directly adjoins a plastered or drywall wall, a joint inevitably forms at their boundary. The wooden trim covers this transition: one of its flanges rests on the wood, the other on the wall. Sealant along the line of contact with the wall fixes everything permanently, eliminating cracks due to temperature deformations.
Where to use polyurethane in the system of finishing corners and niches
polyurethane decor occupies a clearly defined place in this system: everything that is outside the zone of direct mechanical contact, that works purely visually, and that needs to be painted in a single color with the surrounding surfaces.
Moldings around a niche: external framing
Moldings made of polyurethane are mounted on the wall along the outer perimeter of the niche — they create a "frame" that visually integrates the niche into the architectural logic of the wall. This is the same technique as molding framing of a window opening or door portal: the frame turns a functional opening into a decorative object. The width of the molding is selected proportionally to the size of the niche: for a small niche of 40×40 cm, a profile with a height of 25–35 mm is suitable; for a large niche of 120×80 cm, 50–70 mm.
The technique of corner joints of moldings when installing a frame — at 45° with a miter cut or with corner caps — is discussed in detail in the article about installing polyurethane moldings.
Polyurethane trim: architectural lines on the wall
Polyurethane trim forms horizontal and vertical lines on the walls near a niche or panel. A horizontal belt at the height of the upper edge of the panel, extending beyond it, creates the feeling that the panel is part of the architectural horizontal division of the entire wall. Vertical rods on the sides of the niche set the rhythm of "pilasters" and connect the niche with the baseboard below and the cornice above.
Overlays and decor: point accents
Polyurethane appliqués и Decor for Molding are installed in the corners of molding frames around the niche, at the joints of horizontal and vertical profiles, in the center of the horizontal lintel above the niche (keystone). It is these details that distinguish a professionally designed niche from simply "glued moldings."
Upper line of the panel and baseboard finish
A horizontal cornice profile made of polyurethane along the upper line of the wall panel is a classic technique used in paneling systems since the Baroque era. It completes the panel from above, creates shadow and volume, and visually "closes" the entire vertical zone from the baseboard to the cornice. At the base of the panel is a polyurethane baseboard profile that echoes the overall baseboard of the room.
Wall decor: expanding the composition
Polyurethane wall decor are molding frames, pilaster elements, and decorative inserts that decorate the wall around a niche or panel. When a niche is surrounded by a molding frame, and the wall next to it is decorated with similar frames of a smaller scale, a paneling system is created, characteristic of an academic classical interior.
Ready-made kits by task type
Decorative niche: wooden layout inside, moldings outside
Inside the niche: corner wooden layout in all four internal corners, solid wood strips on horizontal and vertical surfaces of the slopes. Outside: a polyurethane molding frame around the perimeter of the niche with corner overlays. Sealant at all joints. Single enamel — the entire surface in one color.
This is the basic, most versatile option. It works in any style — from strict neoclassicism to modern classic.
Wall panel: wooden trim + polyurethane moldings
Wooden layout around the panel perimeter — a frame directly on the panel. Pogonazh iz massiva for horizontal and vertical binding strips. Polyurethane moldings — the second contour of framing on the wall, set back 30–50 mm from the wooden frame. Upper cornice profile made of polyurethane above the panel. Everything is painted in a single tone.
This set creates a "double" frame structure — wooden on the inside and polyurethane on the outside. This is a rich classic look with depth and volume.
Built-in furniture: corner layout + facade moldings
Corner wooden layout — in all internal corners of the built-in wardrobe or library: where side walls meet the back, where horizontal partitions enter vertical ones. Facade strips made of solid wood trim — on visible ends of shelves and partitions. Polyurethane appliqués — on door facades and at corner points of the decorative frame. Wooden handles — on doors of the lower part.
Result: the built-in wardrobe looks like handmade furniture, not a chipboard cabinet system.
Fireplace and decorative portal
A fireplace portal is a structure consisting of two vertical side panels and a horizontal shelf on top. The inner corners between the side panels and the horizontal shelf are the area for corner wooden trim: it secures the joint and creates a decorative line on the inner surface of the portal. The outer framing, decorative frame on the wall, cornice lines above the portal are the area moldings from polyurethane. The division of functions is clear: wood inside and at visible relief points of the structure, polyurethane outside and on the wall.
Library and ceiling-high cabinet
Corner wooden trim — along all internal joints of sections. Pogonazh iz massiva — on the ends of shelves and horizontal partitions. Moldings made of polyurethane — upper cornice profile across the entire width of the structure, decorative frames on adjacent wall sections. Decor for Molding — corner overlays at the intersection points of horizontal and vertical moldings. This set provides maximum saturation for the library area in a classic study.
What to buy together: complete list in one order
Practice shows: most projects require multiple trips to the store because they forgot trim strips, didn't buy enough linear molding, or didn't get corner overlays. Here is a complete list to check before placing an order:
Wooden items:
-
Corner wooden layout — accounting for all internal corners + 10–15% reserve
-
Solid wood trim — for frame bindings, shelf ends, horizontal lines
-
Decorative wooden layout — for frame framing of panels
-
Wooden decor — overlay elements for facades and corner areas
Polyurethane items: -
Polyurethane moldings — for frames around niches and panels
-
Polyurethane trim — for wall lines near niches
-
Polyurethane overlays — corner elements of frames
-
Decor for moldings — keystones, brackets, rosettes
-
Polyurethane stucco — additional wall decor around
Consumables: -
Glue / liquid nails for polyurethane
-
Finish nails and screws for wood
-
Acrylic sealant
-
Acrylic primer (for both materials)
-
Enamel or oil — finish coating
-
Profile margin of 10–15% of the calculated value
Proportions and scale: how to choose the width of the layout and molding
This is the question that is asked least often — and it affects the result the most. An incorrect profile scale can ruin even the most expensive finish.
Ratio of layout width to niche or panel size
For a small decorative niche 12–15 cm deep and up to 60 cm wide, a corner layout 20–30 mm wide looks organic: it covers the joint without overloading the space. For a niche 100–150 cm wide, a layout of 30–50 mm is optimal. For large portal structures 180–250 cm wide, the layout can be 60–80 mm: here it is already perceived as an independent decorative molding.
The rule is simple: the width of the corner layout should not exceed 1/10 of the niche width or 1/8 of the panel height. If this proportion is violated, the layout "eats up" the space and creates a feeling of tightness.
Ratio of layout profile to molding
A wooden corner layout and a polyurethane molding around the niche are two elements of one system. Their profiles must be coordinated in scale: if the layout has a relief height of 8–10 mm, the molding should not be wider than 40–50 mm — otherwise a disproportion is created. If the molding is large, with a relief of 30–40 mm, the layout inside should be of a corresponding scale — or deliberately restrained, creating a contrast of "rich outer contour — modest inner one."
Matching with baseboard
The vertical corner layout in a niche or panel goes down to the floor. Here it meets the baseboard. It is important: either the layout matches the baseboard in height (and the joint is horizontal and neat), or it goes behind the baseboard (and then a transition piece is needed). Simply "sticking" the vertical layout on top of the baseboard is a sloppy solution.
Working with non-standard angles
Real construction rarely gives perfect 90°. This is especially true for niches: the wall can "deviate" by 2–3° from a right angle, and then a standard layout will fit on one side but leave a gap on the other.
There are several solutions. The first is to adjust the layout to an indirect angle using a sealant-adhesive that fills the uneven gap. The second is to file the layout to the actual angle of the niche using a protractor. The third is to use a wider layout with an overlap margin in such corners, which covers irregularities with its width. For niches with a clearly "skewed" angle (deviation of more than 5°), it is sometimes better to use an elastic polyurethane profile: it flexibly presses against both planes.
Finishing: surface unity as a goal
One of the main tasks when working with wooden layouts and polyurethane decor is to achieve unity of the finished surface. This means: no visible boundaries between materials in the finished product.
Under a single enamel
This option is the most common in classic white or light interiors. Preparation scheme:
-
The wooden layout is sanded, dusted, and coated with acrylic primer in 2 layers.
-
Polyurethane profiles are wiped from dust, primed with the same acrylic compound.
-
All joints between wood and polyurethane, as well as between elements and the wall, are filled with acrylic sealant.
-
Apply the finishing enamel in 2 layers with intermediate drying.
Result: a monolithic surface where the boundary between wood and polyurethane visually disappears.
Under tint or oil
If the wood is coated with oil or tint that preserves the texture, the polyurethane profiles are still painted with enamel — either in a neutral tone close to the wall, or in a contrasting one. A classic combination: dark oiled oak + a white polyurethane frame around it. Here, the boundary between materials becomes part of the design, not a defect.
Sealant is the final point of any installation
Acrylic sealant is a mandatory final step. It is applied after installing all elements, before priming for final painting. It dries for 24–48 hours, then is sanded and painted over. Without sealant, the joints will open up within a few months due to seasonal humidity changes — especially in wooden elements that breathe.
Mistakes when buying corner trims and moldings
The collected experience of mistakes saves time and money for those who read about them in advance.
Using an external corner piece instead of an internal trim. This is the most common confusion. An external corner piece will not fit correctly in an internal corner: its shape is designed for a protruding edge, not an internal joint. Make sure the selected profile is intended specifically for an internal corner.
Not measuring the depth of the niche. The depth of the niche slopes determines the required width of the corner trim. If the trim is narrower than the slope depth, it won't fully cover the surface. If it's wider, it protrudes too much.
Not accounting for panel thickness. If the panels joining at the corner have different thicknesses (e.g., MDF 16 mm and drywall 12 mm), the corner trim profile must accommodate this difference. A symmetrical trim won't work here — an asymmetrical one with different flanges is needed.
Forgetting the finishing sealant. Installation without sealing is a joint that will open up in six months. Acrylic sealant is mandatory along all abutment lines.
Mixing different profiles without a common scheme. A wooden layout with a figured profile inside and a geometric polyurethane molding outside is a contrast that requires design awareness. Not a "random" mix, but a thoughtful combination. If you're unsure, choose both profiles in a simple flat version: it's harder to make a mistake.
Choosing a relief that is too large for a small niche. In a 40×40 cm niche, a molding with a 50 mm relief takes up half the visible surface of the slope. Choose proportionally.
Not checking how the profile joins with the baseboard. The vertical layout at the floor and the horizontal baseboard should meet cleanly. Either the profile ends at the height of the baseboard, or a special cut is made under it.
Not allowing extra material for cutting. Frame corners are cut at 45°. This requires additional material. For each joint, 5–7 cm extra. Total across all joints: 10–15% above the calculated length.
Buying a profile only by photo without dimensions. A profile that looks moderate in a photo may turn out to be massive in reality. Always check exact dimensions in millimeters: width, profile height, projection.
About the company STAVROS
Behind every detail—wooden layout, polyurethane molding, corner trim—there is a manufacturer who cares about the result. STAVROS began its history in St. Petersburg in 2002: two artists opened a workshop for carved solid oak products. Within a year, their works appeared in the interiors of the Konstantinovsky Palace, then in the Hermitage, the Alexander Palace, the Trinity-Izmailovsky Cathedral, and the Sheremetev Mansion. This experience with objects of the highest historical and artistic significance formed the quality standard that STAVROS maintains in every product—whether it is a palace cornice or a corner wooden layout for a home niche.
Today, STAVROS has its own production with 3D milling and manual finishing, a full line of solid oak and beech products, and a wide range of polyurethane stucco for interiors. Showrooms in St. Petersburg and Moscow, delivery throughout Russia, working with retail customers and designers. All links in this article lead to real STAVROS catalog pages with current items, stock, and prices.
FAQ: Answers to popular questions
How to cover the inner corner of a decorative panel?
The optimal option is a corner wooden floor made of solid beech or oak. It covers both adjacent planes, is durable, can be painted any color, and holds the joint for decades. If the area is not load-bearing and will be fully painted, you can use Polyurethane trim — it is easier to process, but less durable under mechanical contact.
How does an angular layout differ from a regular corner piece?
A regular construction corner piece covers the external protruding edge — it protects the corner from chipping. An angular wooden layout for internal corners covers the joint of two planes from the inside — where they meet at a right angle. The profile shape is fundamentally different: the external corner piece is symmetrical, while the internal layout is typically asymmetrical or has a special cross-section designed to cover the internal gap.
Can wooden layout and polyurethane molding be combined?
Not only can they — it is an optimal combination. Wooden angular layout works where strength and a precise clean edge are needed. Polyurethane moldings — for decorative relief on the outside, on the wall, in molding frames and overlay elements without load. Each material occupies its own functional niche.
What to buy for a niche in a classic style?
Angular wooden layout — for internal corners. Pogonazh iz massiva — for sloping planes. Moldings made of polyurethane — for the outer frame around the niche. Polyurethane appliqués — corner frame elements. Glue, fasteners, acrylic sealant, primer, finishing enamel. Reserve for all profiles — 10–15%.
How not to overload a niche with decor?
The golden rule: one main decorative element. Either an expressive wooden layout inside the niche with a rich profile — then the molding frame outside should be simple. Or an active polyurethane frame with ornamental overlays — then the wooden layout inside is taken with minimal relief. Two active elements simultaneously create overload in a small area.
Is it necessary to prime the wooden layout before installation?
If painting with enamel is planned — priming is mandatory. Scheme: sanding → dust removal → acrylic primer 2 coats → interlayer matting → 2 coats of finishing enamel. If the layout is coated with oil — primer is not used, but sanding and dust removal are not skipped.
How to join the vertical layout with the baseboard?
There are two professional options. First: the layout is cut exactly along the top edge of the baseboard, and the ends are butted together — for this, the baseboard must be installed before the layout. Second: the layout goes behind the baseboard from below, the baseboard is cut to fit it — then the baseboard 'encloses' the base of the layout. Both options give a neat result with precise measurement and trimming.


