


Article Contents:
- Philosophy of layering: why monotony is tiring
- Moldings: The Classical Language of Architecture
- Wall molding elements
- Molding materials: plaster vs. polyurethane
- Fluted panels: modern dynamics
- What are fluted panels
- Fluted panel materials
- Fluting options
- Combination principles: how to join molding and fluted panels
- First principle: space zoning
- Second principle: texture contrast
- Third principle: rhythm and repetition
- Fourth principle: balance of smooth and textured
- Ready combination schemes: from simple to complex
- Scheme 1: Panel zone with fluting
- Scheme 2: Accent wall with molding frame
- Scheme 3: Vertical sections
- Scheme 4: Horizontal division with cornice
- Scheme 5: Complex composition for high ceilings
- Installation technology: how to properly implement the combination
- Stage 1: Design and sketch
- Stage 2: Surface preparation
- Stage 3: Marking
- Stage 4: Fluted panel installation
- Stage 5: Molding installation
- Stage 6: Finishing
- Practical Tips: How to Avoid Mistakes
- Do not overload the space
- Observe proportions
- Choose quality materials
- Consider lighting
- Don't be afraid to experiment
- Stylistic solutions: From classic to modern
- Neoclassicism: balance of tradition and modernity
- Modern classic: elegance without pretension
- Art Deco: Geometry and Luxury
- Scandinavian style: minimalism and naturalness
- Contemporary: bold solutions
- Questions and Answers: Everything You Need to Know
- Can you combine molding and fluted panels in a small room?
- Which material is better for fluted panels — wood or polyurethane?
- How much does it cost to implement combined finishing?
- Can installation be done by oneself?
- How to care for the finish?
- Is such finishing suitable for a bathroom or kitchen?
- How to choose the right shade for panels?
- Can wallpaper be used together with molding and panels?
- What depth of fluting is optimal?
- Is Special Wall Preparation Needed?
- STAVROS: workshop of architectural beauty
Have you ever wondered why some interiors are memorable and others are not? Why do you want to stay longer in one space, but want to leave another as soon as possible? It's not about square footage or expensive furniture. It's about how the space is organized, what textures are used, how they interact with each other. And here the magical formula of modern interior design is born: the combination of smooth and textured relief, the play of planes and volumes, the dialogue of classical molding with modern fluted panels.
Wall Panels with expressive texture and Wall molding — these are two powerful tools that, when skillfully combined, create amazing effects. Smooth molding brings classical elegance, clarity of lines, architectural rigor. Fluted panels add dynamism, modern energy, tactile richness. Together they form a multi-layered composition where each element enhances the resonance of the other.


Philosophy of multi-layering: why monotony is tiring
Imagine a wall — just a flat painted surface. No protrusions, no recesses, no play of light. The eye glides over it and finds no point of support. Such a wall does not provoke emotions, does not create interest, does not hold attention. It is a background, and nothing more.
Now imagine the same wall, but with decorative elements on the wall — moldings creating frames, a cornice at the top, perhaps a few rosettes at key points. The eye begins to travel: follows the lines of the moldings, stops at the rosettes, reads the proportions of the frames. The wall becomes a composition.
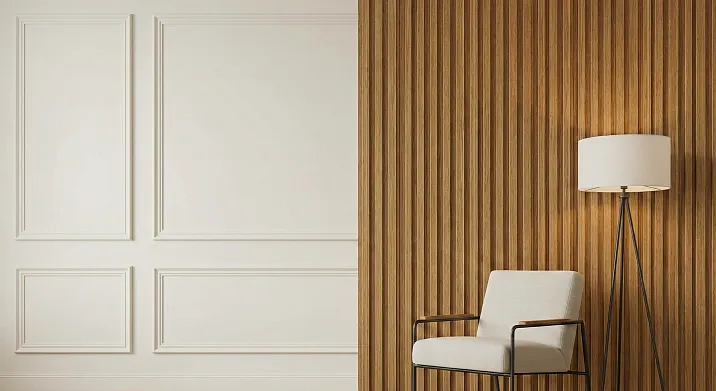
And now add contrast. Let part of the wall remain smooth with molding, and another part be decorated with fluted panels — vertical grooves creating a rhythmic relief. Smooth versus textured. Classical versus modern. Static versus dynamic. And suddenly the wall comes to life, begins to tell a story, becomes the main character of the interior.
Multi-layering is not complication for the sake of complication. It is the creation of depth of perception. The human eye is designed so that it is comfortable perceiving complex but organized structures. Monotony is tiring, chaos is irritating. And a harmonious combination of different textures — soothes and simultaneously invigorates.


Cornice: the classical language of architecture
Molding decor has existed for millennia. From ancient temples to Baroque palaces, from classicist mansions to 21st-century neoclassical apartments — wall moldingremains a tool for creating architectural expressiveness.
Our factory also produces:
Elements of wall molding
Moldings — narrow decorative strips with a shaped profile. They can be simple (one or two relief elements) or complex (multi-stage ornament). Moldings are used to create frames on walls, frame panels, zone space, mask joints.
Cornices — horizontal protruding profiles, usually located under the ceiling, creating a transition between the wall and the ceiling plane. Cornices can be simple (a smooth protrusion) and complex (with ornaments, brackets, dentils). They visually increase the height of a room, add monumentality.
Rosettes — round or oval decorative elements with ornamentation. Traditionally, rosettes were placed in the center of the ceiling around a chandelier, but today they are also used on walls as independent accents. A rosette can be simple (concentric circles) or complex (floral motifs, geometric patterns, figurative compositions).
Pilasters — vertical flat projections imitating columns. Pilasters divide the wall into sections, create rhythm, introduce classical architectural logic. They are topped with capitals — decorative tops.
Consoles and brackets — protruding elements that visually support cornices, shelves, arches. They add three-dimensionality, create a sense of constructiveness.
Get Consultation
Molding materials: plaster versus polyurethane
Traditional molding was made from plaster—a material that is easily shaped, captures the finest details, but is fragile and heavy. Plaster molding requires professional installation, reinforcement, and special fasteners.
Modern molding is more often made from polyurethane—a synthetic material that matches plaster in decorative qualities but surpasses it in practicality.Polyurethane Itemslightweight (10 times lighter than plaster), moisture-resistant, do not crack, do not crumble, and are easily installed with adhesive.
Polyurethane allows reproduction of the most complex ornaments through casting—what requires manual work by a master plasterer in plaster is achieved industrially with perfect repeatability in polyurethane. At the same time, the cost of polyurethane molding is several times lower than that of plaster.
Polyurethane molding can be painted in any colors, patinated, gilded, creating effects from strict classicism to luxurious Baroque. It is not afraid of temperature and humidity fluctuations, making it suitable even for bathrooms and kitchens—where using plaster is risky.
Fluted panels: modern dynamics
If molding is the language of classicism, then fluted panels are the vocabulary of modernity. Vertical, horizontal, and diagonal grooves create a rhythmic relief that works with linear perspective and chiaroscuro play.
What are fluted panels
Fluted panels for wallsare decorative elements with regularly repeating grooves or protrusions. Grooves can be narrow (5-10 mm) or wide (30-50 mm), deep (10-20 mm) or shallow (3-5 mm). The spacing between grooves determines the character of the relief: close spacing creates a delicate texture, while wide spacing creates a large graphic pattern.
Fluting serves not only a decorative but also a practical function. Vertical grooves visually elongate space, making ceilings appear higher. Horizontal ones widen walls, making narrow rooms feel more spacious. Diagonal ones introduce dynamics, movement, and modern energy.
Materials for fluted panels
Wood—wood wall panelswith milled grooves. This is an elite solution where the natural beauty of the material meets modern geometric relief. Wooden fluted panels are warm, tactilely pleasant, and eco-friendly. They suit interiors where naturalness and status are important.
MDF—medium-density fiberboard panels with milled fluting. MDF is more stable than solid wood, does not warp, and is easier to process. MDF panels can be painted with enamel, laminated with film, or veneered with natural veneer. This is a practical option for most living spaces.
Polyurethane—the most modern material for fluted panels. Polyurethane panels are lightweight, moisture-resistant, easy to install, and affordable. They can be cut with a regular saw, glued to walls without framing, and painted in any colors. The fluting is formed during casting, ensuring perfect repeatability and geometric clarity.
Fluting options
Vertical grooves—a classic option that elongates space upward. This solution is for rooms with low ceilings where creating the illusion of greater height is important. Vertical fluting is strict, graphic, and modern.
Horizontal grooves—widen walls, making narrow rooms visually broader. Horizontal fluting is calm, stable, and balanced. It suits elongated rooms—corridors, narrow bedrooms.
Diagonal and chevron patterns—create dynamics, movement, and visual energy. Diagonals attract attention and become an accent. Such fluting suits modern, bold interiors.
Combined fluting—a combination of grooves of different widths and depths, creating geometric patterns, modular compositions. This is an authorial solution where panels become an art object.
Principles of combining: how to unite molding and fluted panels
Combining molding and fluted panels requires an understanding of compositional principles. You cannot simply glue moldings on one wall and panels on another. A system, logic, and visual connection are needed.
First principle: zoning space
Use molding and fluted panels to divide a wall into zones. A classic scheme: the lower third of the wall (panel zone) is decorated with fluted panels, the upper two-thirds are smooth with molding. The boundary between zones is emphasized by a horizontal molding.
This scheme originates from the tradition of panel wall cladding (wainscoting), where the lower part was protected by wooden panels from damage, and the upper part was wallpapered or painted. Today, the functional necessity is gone, but the visual logic remains—such division creates stability, solidity, and classical harmony.
Alternative option: highlight an accent zone with fluted panels (e.g., the wall behind a bed headboard or behind a TV), and decorate the remaining walls with molding. Fluted panels are framed with moldings, creating a 'picture in a frame' composition.
Second principle: texture contrast
Smooth molding and textured panels should contrast but still be connected. The connection is created through color, proportions, and stylistic unity.
Color connection: if the molding is white, fluted panels can be in shades of gray, beige, pastel tones—close to white but distinct. Or vice versa—contrasting: dark blue, graphite, deep green. It is important that the contrast is intentional, not accidental.
Proportional relationship: the width of molding trim should correspond to the panel fluting pitch. If the moldings are wide (80-100 mm), the fluting can be large (pitch 50-60 mm). If the moldings are thin (40-50 mm), the fluting should be delicate (pitch 20-30 mm).
Stylistic relationship: classical molding with lush ornaments pairs better with wooden fluted panels that carry the warmth of natural material. Minimalist molding (simple profiles without ornaments) harmonizes with polyurethane panels and modern fluting geometry.
Third principle: rhythm and repetition
If one wall features a composition with molding and fluted panels, it is advisable to repeat this technique (fully or partially) on other walls in the room. Repetition creates rhythm, unity, and interior integrity.
Repetition does not mean copying. An accent wall can have a full composition (moldings + panels + cornice + rosettes), while side walls can have a simplified version (only moldings or only panels). The key is that the elements echo each other, forming visual connections.
Fourth principle: balance of smooth and textured
Do not overload the space with texture. If fluted panels cover a large area, the molding should be restrained—simple frames made of moldings without additional elements. If the molding is rich in details (pilasters, consoles, rosettes), fluted panels are best used locally, as an accent.
Rule: the more complex one texture is, the simpler the other should be. This creates balance and prevents visual overload.
Ready-made combination schemes: from simple to complex
Theory is good, but how to apply it in practice? Let's look at specific schemes that have proven their effectiveness.
Scheme 1: Panel zone with fluting
Description: the lower third of the wall (approximately 80-100 cm from the floor) is finished with vertically fluted panels. The upper border of the panels is emphasized by a horizontal molding of medium width (60-80 mm). Above the molding—a smooth painted wall. Under the ceiling—a cornice with a simple profile.
Effect: classic elegance with a modern accent. Fluted panels create a textured base, the molding clearly divides the wall, and the cornice completes the composition. The scheme is universal, suitable for living rooms, bedrooms, and studies.
Color solution: panels—1-2 shades darker than the walls. Molding and cornice—white or matching the wall color. The contrast is delicate, not sharp.
Materials: panels made of MDF or polyurethane, molding and cornice made of polyurethane.
Scheme 2: Accent wall with a molding frame
Description: one wall (accent) is fully finished with vertically fluted panels. The panels are framed around the perimeter with a wide profiled molding (80-100 mm), creating a picture-in-a-frame effect. At the corners of the frame—decorative corner elements (rosettes or overlays).
Effect: the wall becomes the central element of the interior, an art object. The fluting creates a dynamic background, the molding frame—a classic framing. The scheme is suitable for bedrooms (wall behind the headboard), living rooms (wall behind the sofa), dining rooms (wall behind the table).
Color solution: panels—contrasting (dark on a light background or colored on a neutral one). Molding—white or gold/silver to create a framing effect.
Materials: panels made of wood or polyurethane, molding made of polyurethane, corner elements carved from wood or cast from polyurethane.
Scheme 3: Vertical sections
Description: the wall is divided into vertical sections using vertical moldings (or pilasters). Inside some sections—a smooth painted surface, inside others—vertically fluted panels. The sections alternate: smooth-fluted-smooth-fluted.
Effect: a rhythmic composition where smooth and textured alternate, creating visual movement. Vertical lines elongate the space upward. The scheme is suitable for rooms with low ceilings, narrow corridors.
Color solution: smooth sections—light, fluted sections—one or two shades darker. Moldings—white, creating boundaries between sections.
Materials: panels made of polyurethane or MDF, moldings or pilasters made of polyurethane.
Scheme 4: Horizontal division with a cornice
Description: the wall is divided horizontally into two equal parts by a wide protruding cornice (100-120 mm). The lower part—smooth with frames made of thin moldings (40-50 mm). The upper part—horizontally fluted panels. Under the ceiling—an additional cornice.
Effect: an unusual solution where fluting is placed in the upper zone, creating visual expansion of space. Horizontal grooves guide the eye along the walls, making the room feel more spacious. The scheme is suitable for narrow elongated rooms, corridors.
Color solution: lower part—light, upper part with fluting—slightly darker. Cornices—white, emphasizing the division.
Materials: panels made of polyurethane, cornices and moldings made of polyurethane.
Scheme 5: Complex composition for high-ceiling rooms
Description: for rooms with ceiling heights from 3.2 m. The wall is divided into three zones. The lower zone (80-100 cm) features vertically fluted panels, finished with a horizontal molding. The middle zone is smooth with frames made of moldings; decorative overlays or paintings can be placed inside the frames. The upper zone is smooth with a cornice under the ceiling; between the cornice and the middle zone, there is a frieze with an ornament.
Effect: a multi-layered classical composition where each zone has its own role. The fluting creates a tactile base, the frames in the middle zone serve as compositional accents, and the cornice and frieze provide architectural completion. This scheme is suitable for formal interiors—representative living rooms, dining rooms, and halls.
Color scheme: the lower fluted zone is 2-3 tones darker than the rest. The middle zone is light, possibly with a subtle tint (ivory, soft beige). Moldings are white or gilded for a luxurious effect.
Materials: wooden panels (Boiserie), polyurethane moldings and cornices, decorative carved wooden overlays.
Installation technology: how to properly implement the combination
Installing combined finishes requires careful preparation and adherence to sequence.
Stage 1: Design and sketch
Before purchasing materials, create a detailed plan. Measure the walls, mark the locations of doors, windows, outlets, and switches. Draw a sketch of the future composition indicating the dimensions of all elements. This can be done manually on graph paper or in a graphic editor.
The sketch helps visualize the result, check proportions, and calculate material quantities. Show the sketch to friends or a designer—a fresh perspective may notice something you missed.
Stage 2: Surface preparation
Walls must be even, clean, and dry. Remove old wallpaper, peeling paint, and dust. Fill cracks and dents with putty. Check the verticality and horizontality of the walls with a level—if there are significant deviations, level them with plaster or drywall.
Prime the surface with deep-penetration acrylic primer. The primer strengthens the base, improves adhesive bonding, and reduces absorbency. Allow the primer to dry completely (usually 12-24 hours).
Stage 3: Marking
Transfer the sketch to the walls using a tape measure, level, and pencil. Mark the boundaries of the zones, the placement of moldings, the centers of frames, and the installation points for panels. Use painter's tape for temporary visualization—apply strips of tape along the future molding lines, evaluate the composition, and adjust if necessary.
Check all horizontal lines with a level and vertical lines with a plumb line. Even a slight tilt will be noticeable and spoil the impression.
Stage 4: Installation of fluted panels
Start with the fluted panels. Cut the panels to size according to the markings. For cutting, use a fine-toothed saw (for wood and MDF) or a jigsaw (for polyurethane).
Apply adhesive to the back of the panel. For wooden and MDF panels, use woodworking PVA or polyurethane adhesive. For polyurethane panels, use special polyurethane adhesive or high-quality liquid nails (such as 'Moment Montage').
Place the panel against the wall according to the markings and press firmly. Some panels require additional mechanical fastening—use finishing nails or screws with decorative caps. Joints between panels should be tight, without gaps.
For woodenFor boiserie wall panelsframe installation is often used—a wooden or metal frame is attached to the wall, to which the panels are screwed. This method is more reliable but more complex.
Stage 5: Installation of moldings
After installing the panels, proceed to the moldings. Start with cornices (if included in the composition)—they are installed first. Then mount vertical elements (pilasters, if provided). Finally, install the moldings that form the frames and zones.
Use a miter box to cut molding corners—it ensures precise 45-degree cuts, which is critical for tight joints. If the molding profile is complex, use special corner elements that simplify joining.
Apply adhesive for polyurethane moldings in a thin layer to the back of the element. Place the molding against the wall, press firmly, and secure with painter's tape until the adhesive dries. The adhesive setting time depends on the type—read the manufacturer's instructions (usually 12-24 hours).
After the adhesive dries, remove the tape. Check the joints—fill small gaps (up to 0.5 mm) with acrylic sealant, smooth with a wet finger, and remove excess.
Stage 6: Finishing
After installing all elements, proceed to finishing. If the panels and moldings are unpainted (or partially painted), do this now.
For painting, use high-quality interior paint — acrylic (water-based, odorless, dries quickly) or alkyd (more durable, but with odor). Apply paint in 2-3 thin coats with intermediate drying. Between coats, perform light sanding with fine sandpaper (P220-P320) for smoothness.
For fluted panels with deep relief, it is more convenient to use a paint sprayer — it evenly covers all recesses. If painting with a roller, use a roller with short or medium nap that penetrates into the grooves.
If you want to create a patina, gilding, or aging effect — this is done after the base painting. There are special compounds and techniques, but they require skill. For complex effects, it is better to invite a professional decorator.
Practical tips: how to avoid mistakes
Do not overcrowd the space
The combination of molding and fluted panels is already a complex multi-layered composition. Do not add unnecessary elements: an abundance of furniture, numerous textile details, excessive wall decor. Let the walls speak for themselves.
Maintain proportions
The width of moldings, the pitch of fluting, the height of the panel zone — everything should correlate with the room dimensions and ceiling height. In small rooms, use thin moldings (40-60 mm) and delicate fluting (pitch 20-30 mm). In spacious rooms, you can use wide moldings (80-120 mm) and large fluting (pitch 50-70 mm).
Choose quality materials
Cheap moldings with blurred relief, panels with uneven geometry, glue that does not hold — all this will lead to disappointment. Saving on materials kills the idea. Choose products from reputable manufacturers.
Consider lighting
Fluted panels come alive through the play of light and shadow. Think about lighting: side light emphasizes the relief, direct frontal light smooths it out. Use wall sconces, floor lamps, hidden lighting to create dramatic chiaroscuro.
Do not be afraid to experiment
Before installing on the entire wall, create a test section — install several panels and moldings, paint, evaluate the result. This will help ensure the correctness of the choice or adjust the decision in time.
Stylistic Solutions: From Classic to Modern
The combination of molding and fluted panels works in different stylistic contexts. Let's consider the main directions.
Neoclassicism: balance of tradition and modernity
Neoclassical style — a reinterpretation of classicism through the lens of modern aesthetics. Here, restrained molding (simple moldings, laconic cornices) combined with wooden or MDF fluted panels is appropriate. Colors — light pastels (ivory, soft gray, light beige). Fluting is vertical, delicate. Molding is white or matching the wall color.
Modern classic: elegance without pomp
A more accessible version of neoclassicism. Polyurethane molding of simple profiles is combined with polyurethane fluted panels. Everything is painted in light neutral tones. The composition is strict, geometric. Emphasis on purity of lines, proportions, visual balance.
Art Deco: geometry and luxury
Art Deco loves clear geometry, contrasting combinations, metallic accents. Molding can have geometric patterns, fluting — large, graphic. Colors are contrasting: dark blue with gold, black with silver, emerald with bronze. Moldings can be gilded or with metal inserts.
Scandinavian style: minimalism and naturalness
Minimal molding — only thin moldings to create frames. Fluted panels are wooden, light species (pine, ash), under clear oil or matte varnish. Colors — white, light gray, natural wood. No ornaments, maximum simplicity and functionality.
Contemporary: bold solutions
Modern style allows for experiments. Molding can be painted in bright colors (for example, frames of black moldings on a white wall). Fluting can be diagonal, combined, creating geometric patterns. Combination of materials — polyurethane with metal, MDF with acrylic, wood with plastic.
Questions and Answers: everything you need to know
Can molding and fluted panels be combined in a small room?
Yes, but with caution. Use thin moldings and delicate fluting. Avoid dark contrasting colors — better monochrome in light tones. Do not create complex multi-layered compositions — limit yourself to a simple scheme (for example, a panel zone with fluting + molding + smooth wall).
Which material is better for fluted panels — wood or polyurethane?
For prestigious interiors where naturalness and status are important — wood. For practical solutions, wet rooms, limited budget — polyurethane. MDF — a compromise between them.
How much does the implementation of combined finishing cost?
The cost depends on materials, complexity of the composition, area. Approximately: polyurethane materials — from 3000 to 8000 rubles per square meter of finished finishing (materials + labor). Wooden materials — from 10000 to 30000 rubles per square meter.
Can I install it myself?
Simple schemes (panel zone + molding) are accessible to a home craftsman with basic skills. Complex compositions (multi-layered, with pilasters, carved elements) are better entrusted to professionals.
How to care for the finish?
Regularly wipe surfaces with a soft dry or slightly damp cloth. To clean fluted panels, use a soft brush or a vacuum cleaner with a brush attachment. Do not use abrasive agents. Renew the paint every few years.
Is such finishing suitable for a bathroom or kitchen?
Yes, if using moisture-resistant materials. Polyurethane panels and moldings are not afraid of moisture, so they are suitable for bathrooms and kitchens. Wooden elements require high-quality moisture protection treatment.
How to choose the right shade for panels?
Start from the overall color scheme of the interior. If the walls are light, panels can be 1-3 tones darker. If you want contrast, choose saturated colors (blue, green, burgundy), but make sure they match the furniture and textiles.
Can wallpaper be used together with moldings and panels?
Yes, this is a common technique. Smooth areas between moldings can be covered with wallpaper — plain, with a delicate pattern, textured. Wallpaper adds softness, coziness, visual variety.
What is the optimal fluting depth?
For a delicate effect — 3-5 mm. For an expressive one — 10-15 mm. For a dramatic one — 20-25 mm. Deep fluting creates strong chiaroscuro but accumulates dust — consider this.
Is special wall preparation needed?
Walls should be relatively even, clean, dry. Minor unevenness is compensated by the adhesive layer. But if the walls are very crooked, they need to be leveled with plaster or drywall — otherwise panels and moldings will not fit tightly.
STAVROS: workshop of architectural beauty
When you face the task of creating an interior that will delight, inspire, and bring joy every day — the choice of materials becomes critically important. Cheap moldings with blurred relief, panels with imprecise geometry, low-quality glue — all this is doomed to disappointment. Beauty requires quality, and quality requires professionalism.
For over twenty years, STAVROS has been creating architectural decor elements that transform ordinary spaces into works of art.Wall panels made of solid wood, custom-made to individual sizes, are exclusive solutions for those who value naturalness, prestige, durability.
polyurethane moldings STAVROS is European quality at Russian prices. Moldings, cornices, rosettes, pilasters, consoles are manufactured by injection molding from primary polyurethane with a density of 280-320 kg/m³. This ensures clarity of relief even in the smallest details, geometric stability, and durability without deformation.
Each product undergoes strict multi-stage quality control. Dimensional deviation — no more than 0.5 mm per 2 meters of length. Ornament depth — up to 5 mm with perfect detailing. Surface — smooth, without cavities, blisters, or drips. Packaging — reliable, preventing damage during transportation.
STAVROS offers not just materials. It is a comprehensive approach to interior creation. Consultations with professional designers help choose the optimal composition, calculate the number of elements, and select a color scheme. Technical support at all stages — from planning to installation. Custom manufacturing of elements according to customer drawings — for implementing the boldest ideas.
Wooden wall panels boiserie STAVROS is premium-class piece products. Solid oak or beech of the highest selection, chamber drying to 8-10% moisture content, multi-stage processing on European equipment. Each panel is individually fitted, joined without visible seams, creating a monolithic surface.
Finishing options — from natural oil, emphasizing the wood texture, to multi-layer enamel with patina and gilding effects. Carved elements are handmade by craftsmen with years of experience. Brass inlays, relief 3D finishing, intarsia — any techniques for creating unique decor.
Full cycle of work — from on-site measurements to final installation and project handover. Own production facilities in the Moscow region with over 50 types of equipment. Painting workshop for finishing of any complexity. Installation teams with over 10 years of experience, working throughout Russia and CIS countries.
Showrooms in Moscow and St. Petersburg, where you can see material samples in person, touch them, assess quality, and receive professional consultation. A personal manager for each project, coordinating all stages, answering questions, and solving emerging tasks.
STAVROS works in any artistic style — from luxurious palace classicism of Baroque to ultra-modern minimalism. The photo gallery of completed projects demonstrates the diversity of possibilities and the highest quality of execution. Each project is a story of space transformation, a testament to craftsmanship, and a source of inspiration for new ideas.
By choosing STAVROS, you choose a partner who shares your passion for beauty and perfection. Who understands that an interior is not just wall finishing, but creating an environment for living, a space that inspires and gives energy. Who knows that details define the whole, and quality defines durability.
Let STAVROS turn your dreams of a beautiful interior into reality. Entrust the creation of walls with moldings and fluted panels to professionals who do it with love, skill, and impeccable quality. After all, beauty created by STAVROS stays with you for decades, bringing joy every day and evoking admiration from guests.


