Article Contents:
- Why you need a ceiling rosette: seven reasons they don't mention in stores
- How to choose the size of a ceiling rosette: precise guidelines
- Guideline 1: Chandelier diameter
- Guideline 2: Room area and ceiling height
- Guideline 3: Interior style
- Guideline 4: Wire opening
- Round, oval, or shaped: which form to choose
- Round ceiling rosette
- Oval ceiling rosette
- Figural and polygonal rosette
- Smooth or ornamental
- Polyurethane or plaster rosette: what's the real difference
- Polyurethane outlets
- Plaster rosettes
- Comparison table
- Chandelier rosette in the living room: center of attraction
- Why the rosette is especially important in the living room
- Choosing a rosette for a classic living room
- Choosing a rosette for a modern living room
- Chandelier rosette in the bedroom: delicacy first
- What is important for a bedroom
- Connection with cornices and moldings
- Socket in the hallway and study: nuances of less obvious spaces
- Entry Hall
- Office
- How to combine a socket with a ceiling cornice and moldings
- The principle of hierarchy
- Do not mix styles
- Distance from perimeter to center
- Installing a ceiling socket: what you need to know before buying
- What type of ceiling will the socket be on
- How to mark the center
- Installation Sequence
- Painting the socket
- Mistakes when choosing a ceiling rosette: what people do wrong
- What to check before buying: a complete checklist
- FAQ: answers to the most frequently asked questions
- What size ceiling rosette is needed for a chandelier?
- Can you install a ceiling rosette with a low ceiling?
- Which is better: polyurethane or plaster rosette?
- Do you need a rosette for a modern chandelier?
- Can you paint a ceiling rosette?
- How is a ceiling rosette attached?
- Can you install a rosette on a stretch ceiling?
- Do you need a rosette if I have recessed lights?
- About the Company STAVROS
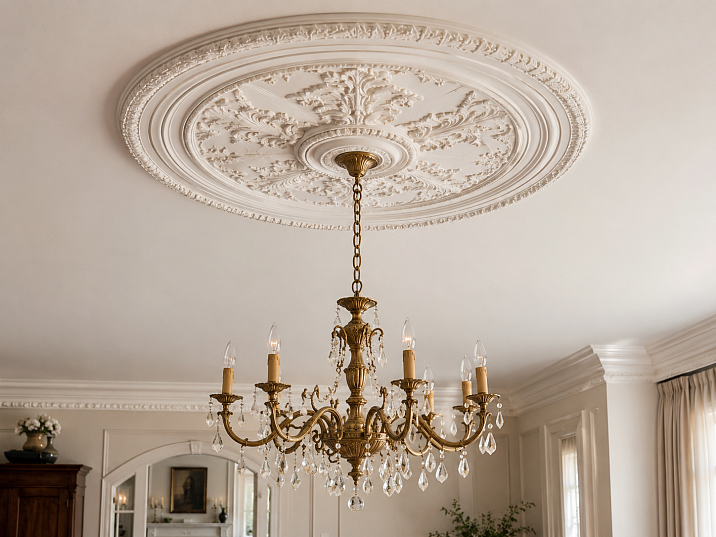
Imagine: the renovation is almost complete, the chandelier is chosen, the ceiling is painted in the perfect shade — and suddenly it turns out that in the very center of the ceiling a wire sticks out, and around it is an empty white spot. No completeness, no accent. It is at this moment that most people first seriously think about a ceiling rosette.
ceiling rose under the chandelier — it's not just a decorative detail. It is the architectural center of the ceiling, which organizes the space around the light fixture, makes the mounting point invisible, and adds character to the ceiling. A small but precise detail — and the room is transformed.
View ceiling rosettes and stucco decor STAVROS — round, oval, with and without ornament, made of polyurethane, for any style and ceiling height.


Why you need a ceiling rosette: seven reasons they don't talk about in stores
It would seem, a chandelier — and it looks fine without a rosette. Why complicate things? But let's be honest: a ceiling without a rosette under a chandelier is like a frame without a painting. Formally, everything is in place, but something is missing.
Here's what it actually does ceiling rosette for chandelier:
Conceals the mounting point. The wire outlet and hook attachment point is a technical node that should not be visible. The rosette elegantly solves this problem.
Creates a visual center of the room. A ceiling without a central accent is perceived as an empty plane. The rosette fixes the gaze, organizes the space, and gives the ceiling structure.
Connects the chandelier to the ceiling. Without a rosette, the chandelier 'hangs in the air' — it is not integrated into the ceiling, but simply attached to it. The rosette creates a transition, a frame, a border for the light fixture.
Coordinates the decor. If there is a ceiling cornice made of polyurethane or Moldings — a rosette made in the same style and material completes the ceiling composition as a whole.
Adds architectural feel. A ceiling with a rosette is a ceiling with history. It is finished. It has a solution. This is the feeling of architecturality that cannot be created with empty white space.
Increases the perceived cost of renovation. A small detail, but its presence or absence is immediately noticeable. An interior with well-thought-out details is perceived as more expensive.
Solves a practical problem during painting. The border between the rosette and the ceiling is a clear line. Painting around it is much more convenient than working with a brush around an arbitrary mounting point.


How to choose the size of a ceiling rosette: precise guidelines
This is the main question people come to the store with. And this is where mistakes are most often made — either they take a rosette that is too small, which gets lost under a large chandelier, or they choose one that is too large, overloading a small ceiling.
Let's break down all the selection parameters — sequentially and without unnecessary formulas.
Our factory also produces:


Guideline 1: Chandelier diameter
The first thing you need to know is the diameter or width of the chandelier itself. This is the starting point.
General rule: the ceiling rosette should be noticeably smaller than the chandelier — roughly 1.5–2 times. If the chandelier is 60 cm in diameter, a rosette of 30–40 cm will look correct. If the rosette is 55 cm with a 60 cm chandelier, they merge into a single spot without clear hierarchy.
However, there is also the opposite scenario: the rosette as an independent decorative accent. In a tall classic living room, the rosette can be noticeably larger than the chandelier's diameter — it works as an independent architectural ceiling element. In this case, a rosette diameter of 60–80 cm with a chandelier of 40–50 cm is a deliberate design choice.
Get Consultation
Guideline 2: Room area and ceiling height
Small room with low ceiling — modest rosette. Spacious living room with a ceiling of 3 m or higher — the rosette can be significantly more expressive.
Practical diameter guidelines:
| Room area | Ceiling Height | Recommended rosette diameter |
|---|---|---|
| Up to 12 sq. m | 2.4–2.6 m | 20–30 cm |
| 12–20 sq. m | 2.6–2.8 m | 30–45 cm |
| 20–30 sq. m | 2.8–3.0 m | 40–60 cm |
| More than 30 sq. m | 3.0 m and above | 55–80 cm and more |
These are recommendations, not strict norms. The interior style and the character of the chandelier can shift the range.
Guideline 3: Interior style
A classic interior with stucco molding, cornices, and high ceilings is a space for an expressive, richly ornamental rosette. Diameters of 50–80 cm with developed relief are appropriate here.
Modern neoclassicism or Scandinavian style — clean form, calm relief, diameter 25–40 cm. There is decor, but it does not overload.
Minimalism — the rosette is needed to cover the mounting point and provide a light accent. A smooth round shape without ornament, diameter 20–30 cm.
Provencal or country style — soft floral motifs, moderate expressiveness.
Guideline 4: Wire hole
The diameter of the central hole of the rosette is a technical parameter. It must be sufficient to pass the wire and allow reliable fastening of the hook or chandelier mounting element. The standard hole is from 25 to 60 mm depending on the model. For heavy chandeliers with a wide mounting flange, this parameter should be checked separately.
Detailed breakdown of sizes — in the article how to choose the size of the rosette for the chandelier.
Round, oval or shaped: which shape to choose
The shape of the rosette is not just about aesthetics. It's also about the shape of the room, the chandelier, and the role the rosette plays in the ceiling composition.
Round ceiling rosette
Round ceiling rosette is the most common and versatile option. A circle is a shape without direction, without an accentuated axis. It looks equally good in square, rectangular, and non-standard rooms.
A round rosette is the first choice for most chandeliers: both round, multi-tiered, and spotlights. It creates a soft framing around the light fixture without imposing a specific direction on the space.
The circle also works well in combination with square or rectangular ceiling moldings: the contrast of shapes creates an interesting visual tension.
Oval ceiling rosette
Oval ceiling rosette — a choice for elongated rooms or to emphasize the axis of the room. If the room is clearly elongated in length, an oval rosette supports this direction.
An oval shape is appropriate in narrow living rooms, elongated dining rooms, and hallways with a chandelier in the center. It creates a sense of movement and rhythm that a circle lacks.
Important: if a round chandelier is planned above an oval rosette, their axes must align. Otherwise, visual asymmetry will be irritating.
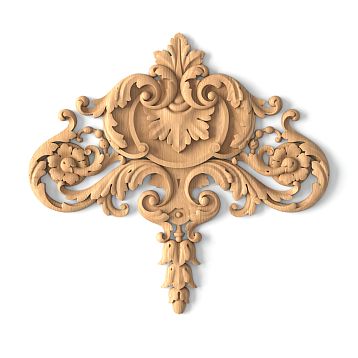
Figurative and polygonal rosette
Square, octagonal, with rays — figurative rosettes create a stronger decorative accent. They are appropriate in interiors with a pronounced stylistic character: Art Deco, classic Baroque, grand halls.
For Art Deco — an octagon with geometric ornament and clear edges.
For Baroque — a rounded shape with rich foliage relief.
For a modern eclectic interior — a square or hexagonal rosette with clean geometric ornament.
Smooth or ornamental
Smooth rosette without relief ornament — for modern minimalist and Scandinavian interiors. The shape speaks for itself, without embellishments.
Ornamental rosette features relief: leaves, volutes, meander, rosettes, palmettes, intertwined branches. The richer the ornament, the more ceremonial and historical the space appears.
Between these poles are rosettes with calm geometric relief: beads, flutes, simple diamonds. This is the middle path that works in a wide range of interiors.
Polyurethane or plaster rosette: what's the real difference
This question is asked often — and the answer matters not only for the budget but also for installation and durability.
Polyurethane rosettes
Polyurethane moldings — is a lightweight high-density foamed material that is molded in press forms with precise reproduction of the ornament. For ceiling rosettes, polyurethane is the optimal choice.
Weight. A polyurethane rosette with a diameter of 50 cm weighs 300–700 grams. An equivalent plaster one weighs 3–6 kg. For the ceiling, this is a fundamental difference: polyurethane is glued with mounting adhesive, while plaster often requires additional fastening with screws and anchors.
Installation. A polyurethane rosette is glued with liquid nails or special mounting adhesive. For an apartment, this is a one-hour job. Plaster requires mixing, leveling, holding until set, and often temporary fastening.
Durability. Polyurethane does not crumble from accidental impact, does not crack from building vibration, and does not react to humidity changes. Plaster is brittle: a corner, a sharp blow, building settlement — and a crack appears.
Painting. Both materials paint excellently. Polyurethane does not require special primer — regular acrylic paint applies evenly. Plaster needs to be primed.
Disadvantages of polyurethane. Polyurethane is sensitive to high temperatures — near very powerful halogen lights, it can deform. For ordinary LED chandeliers, this is not a problem. Also, polyurethane is less suitable for objects requiring "authentic" historical stucco: for restoration projects, gypsum or lime is preferred.
Gypsum rosettes
Gypsum stucco is a historically accurate material for classical and historical interiors. Heavy, requiring experience during installation, but with a genuine sense of antiquity.
For a modern apartment or country house, polyurethane is more practical. For the restoration of a historical mansion, gypsum is closer to the original.
Comparison table
| Parameter | Polyurethane | Gypsum |
|---|---|---|
| Weight (50 cm rosette) | 300–700 g | 3–6 kg |
| Installation | Glue, 1 hour | Mixing, fastening, drying |
| Fragility | Low | High |
| Reaction to moisture | Neutral | Requires protection |
| Painting | Without primer | With primer |
| Price | Affordable | Higher |
| Application | Apartments, houses, cottages | Restoration, historical interiors |
Ceiling rosette for chandelier in the living room: center of attraction
The living room is the most representative space. Here, the chandelier is often the main light fixture and the central visual accent of the room. And here, the ceiling rosette works at full capacity.
Why the rosette is especially important in the living room
In the living room, the guest's gaze first rises upward: high ceiling, chandelier, stucco. This "ceiling landscape" is read instantly and forms the first impression of the interior.
Ceiling rosette for chandelier in the living room — is an element that performs several tasks simultaneously. First, it completes the mounting point. Second, it creates a decorative accent in the center of the ceiling. Third, it coordinates the chandelier with polyurethane ceiling cornice along the perimeter.
Choosing a socket for a classic living room
A classic living room — high ceiling, grand chandelier with crystal or shades, stucco cornices. Here, an expressive ornamental Plaster rosette diameter 50–70 cm. The relief may include acanthus leaves, rosettes, beads, ionics — traditional elements of classical ornament.
Important: the ornament of the rosette must match the cornice in terms of 'vocabulary'. If Ceiling cornice contains beads and ionics — a rosette with the same elements will create a unified decorative ensemble.
Choosing a socket for a modern living room
A modern living room in a neoclassical or Scandinavian style — white walls, clean lines, a ball chandelier or a group of pendants. Here, the rosette works as a quiet accent: diameter 30–40 cm, calm relief without overloaded ornament.
A round rosette with a geometric bead rim or a light leaf motif is a detail that is noticed without knowing why the space looks complete.
Rosette under a chandelier in the bedroom: delicacy above all
The bedroom is a space of rest. There is no room for heavy decorative overload here. The ceiling in the bedroom is what a person sees last before sleep and first after waking up. It should be calm.
What is important for a bedroom
For a bedroom, choose sockets with a soft ornament: smooth leaf motifs, delicate relief, calm rhythm. Nothing heavy, nothing aggressively geometric.
The diameter is moderate: 25–45 cm depending on the area and ceiling height. For a standard bedroom of 14–16 sq. m with a ceiling of 2.7 m, a socket of 30–35 cm.
The color is usually white, matching the ceiling. Contrasting socket coloring in the bedroom only works in very deliberate design solutions.
Connection with cornices and moldings
If there are Moldings for the ceiling around the perimeter or frame moldings on the walls, the socket should support this style. It should not be richer than the moldings: the hierarchy rule works here too. The perimeter sets the theme, the center supports it.
Socket in the hallway and study: nuances of less obvious spaces
Entryway
The hallway is the first room a guest sees. Here it is important to make an impression from the first seconds. Even a small hallway with a chandelier and a ceiling rosette looks significantly more thoughtful than the same hallway without it.
In the hallway, the ceiling is often low — 2.4–2.6 m. Here, a thin rosette without too high a relief is important. The profile should not "lower" the ceiling further.
Office
In a study, a stricter form is appropriate: geometric ornament, clear lines, restrained relief. For a study with dark wood panels and baseboards, a white or cream rosette with a laconic ornament creates the right contrast.
How to combine a rosette with a ceiling cornice and moldings
The ceiling is a composition. It has a perimeter (cornice), possibly a middle layer (frame moldings or rods), and a center (rosette). When all these elements are made from the same material and in the same style, the ceiling becomes an architectural statement.
Principle of hierarchy
The cornice around the perimeter is the "frame" of the ceiling. It sets the overall scale and ornamental "vocabulary." The rosette in the center is the "heart" of the same composition. It should use the same ornamental motifs as the cornice but be more modest than it.
If ceiling cornice made of polyurethane rich, with acanthus leaves and an Ionic shelf — a rosette with a similar ornament but on a smaller scale. If the cornice is smooth and profiled, the rosette can be slightly more decorative, creating a focal accent.
Do not mix styles
A Baroque cornice with scrolls and rocailles — and a minimalist smooth rosette. This is a stylistic conflict that immediately catches the eye. Both elements are good on their own, but together they create a sense of disorder.
Rule: one stylistic source for all ceiling decor.
Distance from perimeter to center
If intermediate elements are planned between the cornice and the rosette — rods, frame moldings — they should also match in style. A ceiling rosette framed by a square molding from the same series moldings from polyurethane — this is already a true ceiling medallion. A strong design solution for a classic living room or study.
Installing a ceiling rosette: what you need to know before buying
Installation is not the end of the selection process, but it influences which rosette to choose. Before purchasing, it's important to clarify several technical issues.
What type of ceiling the rosette will be on
Concrete ceiling, painted or plastered. Installation using mounting adhesive (liquid nails, Moment Montage, or specialized compound). The surface must be degreased and lightly sanded for better adhesion.
Drywall ceiling. Installation is similar — adhesive on drywall. For heavy rosettes (unusual for polyurethane) — fastening to the frame profile with screws.
Stretch ceiling. This is a separate and complex issue. The rosette is not glued to the stretch fabric: the adhesive damages PVC. In this case, the rosette is attached either to the main ceiling before stretching, or to a special mounting platform fixed in the main ceiling.
More details in the article Polyurethane molding for chandeliers: types of rosettes and installation rules.
How to mark the center
Before installation, you need to accurately find the center — the point where the wire comes out. The socket is glued around it. Check if the central hole of the socket matches the wire exit point. If the wire is offset from the center of the room, this must be considered when choosing a model with a sufficient hole diameter.
Installation order
-
Check the ceiling surface — it should be smooth, without crumbling plaster
-
Degrease the installation area
-
Apply glue to the back surface of the socket along the edge and at several points in the center
-
Attach the socket to the ceiling, align it along the axis
-
Press firmly for 1–2 minutes
-
If necessary, secure with masking tape until the glue fully sets
-
After setting, fill the gap between the socket and the ceiling with acrylic sealant (if present)
-
Paint the socket to match the ceiling or in an accent color
Painting the socket
Polyurethane rosettes are supplied unpainted or in white primer. Painting is mandatory: it protects the material and creates the correct appearance.
Options:
-
Matching the ceiling — the rosette blends with the ceiling, working as an architectural accent without color emphasis.
-
White on white — a classic, always appropriate.
-
Lighter or darker than the ceiling — a very subtle tonal contrast.
-
Gilding of relief details — for classic and formal interiors, when you want to emphasize ornament details.
Acrylic paints for ceilings are suitable without additional priming of polyurethane.
Mistakes when choosing a ceiling rosette: what is done wrong.
These mistakes occur regularly — and most of them could have been avoided by knowing a few simple rules.
Mistake 1: choosing a rosette without considering the chandelier diameter. A small rosette under a large chandelier gets lost and looks random. A large rosette with a small spot light is excessive. A ratio of 1:1.5–2 (chandelier 1.5–2 times larger than the rosette) is a working guideline.
Mistake 2: choosing too expressive a relief for a low ceiling. A rosette with high relief in a room with a 2.4 m ceiling visually lowers it further. For low ceilings — thin flat rosettes with delicate patterns.
Error 3: choosing a rosette pattern separately from the cornice. If the room has Ceiling cornice — the rosette should be selected from the same series or with a coordinated ornamental motif. Mismatched styles ruin the unity of the ceiling.
Error 4: not checking the diameter of the central hole. The rosette hole must be sufficient for the wire and the chandelier's mounting element. A too-small hole will need to be drilled out — this is inconvenient and risky.
Error 5: mounting on a stretch ceiling without a special platform. Glue destroys the stretch fabric. A stretch ceiling requires a special installation technique — in advance, before installing the fabric.
Error 6: forgetting about painting. An unpainted or poorly painted rosette reveals the installation, not the decor. High-quality painting in the ceiling's tone completes the work.
Error 7: installing a heavy plaster rosette where a polyurethane one would suffice. Extra weight on the ceiling means additional fasteners, additional risk, and additional labor without real quality gain.
Error 8: choosing too shallow a relief for a high room. In a spacious living room with a 3 m ceiling, a rosette with a delicate fine pattern gets lost at a distance. The relief should be readable from floor level.
Error 9: not accounting for the wire exit point. The wire does not always exit exactly at the geometric center of the room. If the deviation is significant, a rosette with a larger central hole or a rosette with an asymmetrical hole placement is needed.
Error 10: buying the rosette separately from the mounting adhesive. The adhesive needs to be correct: construction-grade, solvent-free (solvents destroy polyurethane). Buying everything together saves time and nerves.
What to check before purchasing: a complete checklist
-
The chandelier diameter is the basis for selecting the rosette size
-
Room area — affects the allowable diameter
-
Ceiling height — determines the relief and size
-
Interior style — ornamental or smooth decor
-
Presence of a ceiling cornice — need to coordinate ornaments
-
Ceiling type — concrete, drywall, stretch
-
Diameter of the central hole — for wiring and chandelier mounting
-
Will there be painting — color matching the ceiling or accent
-
Weight of the rosette — for choosing glue and mounting method
-
Wire exit point — does it coincide with the geometric center
FAQ: answers to the most frequently asked questions
What size ceiling rosette is needed for the chandelier?
Focus on the ratio: the rosette should be 1.5–2 times smaller than the chandelier diameter. For a room of 20 sq. m with a 50 cm chandelier — a rosette of 25–35 cm. Detailed calculation in the article how to choose the size of the rosette for the chandelier.
Can a ceiling rosette be installed with a low ceiling?
Yes. Choose a thin model with a subtle relief — it won't visually lower the ceiling. Round ceiling rosettes of small diameter with a delicate pattern work great with ceilings of 2.4–2.6 m.
Which is better: polyurethane or plaster rosette?
For apartments and country houses — polyurethane. It is lighter, easier to install, does not crumble, and paints well. Polyurethane moldings — the optimal choice for modern renovation.
Is a rosette needed for a modern chandelier?
Yes. Even for a minimalist ball chandelier or a group of pendants, a smooth round ceiling rosette covers the mounting point and gives the ceiling a finished look.
Can I paint the ceiling rosette?
Yes. Polyurethane rosettes are painted with acrylic paint without prior priming. You can paint it to match the ceiling, create a slight tonal contrast, or gild the relief elements in classic interiors.
How is the ceiling rosette attached?
The polyurethane rosette is attached with solvent-free mounting adhesive (liquid nails, 'Moment Montazh'). On a cleaned, degreased surface — apply glue around the perimeter and in the central area, press for 1–2 minutes, and hold until set.
Can I install a rosette on a stretch ceiling?
Not on the fabric itself. Mounting adhesive destroys PVC. The rosette is attached to the main ceiling before installing the stretch ceiling or on a special mounting platform. More details in the article Polyurethane molding under the chandelier.
Do I need a rosette if I have recessed lights?
Recessed lights are a different scenario: a rosette is only needed if there is a central light fixture (chandelier or one large pendant). If there are only spotlights instead of a chandelier, a rosette is not needed.
About the company STAVROS
STAVROS is a Russian manufacturer of polyurethane and solid wood products for interior decor. The STAVROS catalog offers a full range ceiling rose: round, oval, ornamental and smooth. Also in the assortment — ceiling cornices and moldings made of polyurethane, the entire spectrum moldings from polyurethane for apartments, cottages, and public interiors.
STAVROS works with private clients, interior designers, and construction companies. All products are made from high-quality polyurethane with precise reproduction of the ornament, ready for installation and painting.
If you need buy a ceiling rosette for a chandelier — for the living room, bedroom, hallway, or study — the STAVROS catalog offers solutions that turn the center of the ceiling into an architectural accent, rather than a technical mounting point.