


Article Contents:
- Why are molding frames more than just decor?
- Psychology of perception: how frames change the feeling of space
- Historical roots: from Baroque palaces to modern lofts
- Anatomy of molding: what is it and how does it work?
- Construction and profile
- Material: why polyurethane?
- Impact resistance and durability
- Typology of frame compositions: from classic to avant-garde
- Classical panel division
- Full-size frames: wall as a gallery
- Rectangular grid: geometric rigor
- Asymmetric compositions: modern dynamics
- Central frame: emphasis on the main element
- Zoning accents
- Composition design: mathematics of beauty
- Golden ratio: mathematics of harmony
- Modular grid: order in chaos
- Symmetry and asymmetry: balance or dynamics?
- Rhythm and repetition: music for the eyes
- Mounting practice: from project to reality
- Surface Preparation: The Foundation of Success
- Marking: Precision — the Politeness of Kings
- Cutting moldings: angles matter
- Adhesive: chemistry of reliability
- Mounting and fixation: patience and precision
- Sealing joints: invisible work
- Painting and decorative finishing: final touches
- Monochrome painting: classic genre
- Contrast painting: highlighting details
- Gilding and metallization: luxury effect
- Patination: Noble Antiquity
- Color painting: modern approach
- Stylistic Interpretations: From Classic to Futurism
- Classical Interiors: Palace Elegance
- Neoclassicism: Lightened Tradition
- Modern Minimalism: Geometry Without Excess
- Scandinavian Style: Cozy Simplicity
- Loft and Industrial Style: Brutalist Aesthetics
- Design and Installation Mistakes: What to Avoid?
- Scale mismatch
- Incorrect Frame Proportions
- Asymmetry in Symmetrical Designs
- Visible Joints and Gaps
- Unsuitable Molding Style
- Overcrowding
- Frequently Asked Questions About Moldings and Wall Molding
- Can Moldings Be Glued to Wallpaper?
- How Long Does It Take to Install a Frame Composition?
- Can Moldings Be Installed on Curved Walls?
- How to Care for Moldings?
- Is polyurethane safe for health?
- Can Moldings Be Used in Wet Areas?
- How Much Do Moldings and Installation Cost?
- How to Choose the Right Molding Profile?
- STAVROS Company: Craftsmanship, Quality, Reliability
- Unsurpassed Product Quality
- Comprehensive Solutions for Frame Compositions
- Professional Consultations and Design
- Installation and Finishing Services
- Individual Approach to Each Project
- Quality Guarantee and Long-Term Support
In modern interiors, walls have long ceased to be mere vertical planes dividing a room. They have transformed into canvases where architects and designers create compositions that tell stories, set moods, and shape the character of a space. While this once required complex construction techniques, expensive materials, and months of work, today, polyurethane molding opens the way to creating exquisite interiors in just days. Polyurethane wall molding allows for the realization of the boldest design ideas without major renovations, astronomical budgets, or years of waiting for results.
What makes polyurethane molding such a versatile tool for transforming interiors? First and foremost, it combines the practicality of modern materials with the aesthetics of classical architectural molding. Polyurethane reproduces the finest details of historical samples, conveys the depth of relief, and maintains sharp lines for decades. At the same time, it is lightweight, durable, moisture-resistant, easy to install, and can be painted in any color. Wall molding made from this material is affordable, easy to maintain, and opens up limitless creative possibilities.


Why Are Molding Frames More Than Just Decor?
When it comes to frame compositions on walls, many imagine something ornate, suitable only for palace interiors or museum halls. This is a common misconception. Wall molding in the form of frames is an architectural technique that works in spaces of any style, size, and purpose. From strict minimalist living rooms to lavish classical studies, from cozy bedrooms to impressive halls—properly designed frame compositions transform a space at a fundamental level.


Psychology of Perception: How Frames Change the Sensation of Space
The human brain is wired to perceive ordered structures as more comfortable, safe, and aesthetically pleasing. A plain, smooth wall is read as a neutral background that attention simply ignores. Adding molding frames creates a visual structure that activates attention without overwhelming it. The wall gains rhythm, scale, and a hierarchy of elements.
A decorative wall element in the form of a frame works as a perception organizer. It creates focal zones—areas where the gaze naturally lingers. Inside the frame, you can place contrasting paint, patterned wallpaper, a painting, a mirror, or a light fixture—and this element automatically becomes an accent that attracts attention. The space outside the frames is perceived as background, creating visual depth and layering.
Our factory also produces:


Historical Roots: From Baroque Palaces to Modern Lofts
The tradition of decorating walls with frames dates back to the Renaissance and Baroque eras, when European palaces were adorned with intricate stucco compositions. Walls were divided into panels, each framed with moldings and filled with paintings, gilding, or fabric upholstery. This was a demonstration of the owner's status, taste, and cultural level.
French boiserie of the 18th century perfected this technique. Wooden panels with fine carvings and gilding covered walls from floor to ceiling, creating the effect of a precious jewelry box. Each panel was a work of art, and together they formed a unified, harmonious system.
Modern wall molding continues this tradition, adapting classical techniques to today's requirements. Instead of carved wood—lightweight polyurethane; instead of handcrafting—high-precision casting; instead of months-long installation—setup in a few days. But the aesthetic effect remains the same: walls turn into architectural works, and space gains nobility and character.
Get Consultation
Anatomy of Molding: What It Is and How It Works?
Before designing frame compositions, it's important to understand what polyurethane molding is as a material and an architectural element.
Construction and Profile
Molding is a decorative strip with a profiled cross-section. Unlike a flat batten, molding has relief that creates a play of light and shadow. The profile can be simple—one or two smooth curves—or complex, with multiple ledges, recesses, and decorative elements.
The width of the molding is measured from the wall to the most protruding point of the profile and varies from miniature 15-20 mm to massive 100-150 mm and more. Narrow moldings create elegant, delicate lines suitable for small rooms or modern minimalist interiors. Wide moldings form expressive, monumental compositions appropriate in spacious halls of classical or neoclassical style.
The height of the relief is another important parameter. Flat moldings (relief 2-5 mm) create a graphic, almost two-dimensional effect. Medium relief (5-15 mm) provides noticeable play of light and shadow. Deep relief (15-30 mm and more) turnsthe molding into a sculptural element, creating powerful visual accents.
Material: Why Polyurethane?
Historically, moldings were made from plaster or wood. Both materials have significant drawbacks. Plaster is heavy, fragile, moisture-sensitive, requires professional installation, and subsequent joint finishing. Wood is expensive, prone to warping from humidity, requires regular maintenance, and is difficult to process.
Polyurethane molding is free from these drawbacks. The material is produced by pressure casting from high-quality polyurethane with a density of 280-350 kg/m³. This density ensures strength, shape stability, and clarity of even the smallest relief details. Polyurethane does not absorb moisture, does not warp, does not crack, and maintains its geometry for decades.
The weight of polyurethane molding is 5-7 times less than its plaster counterpart. This radically simplifies installation: elements are attached with special adhesive without additional mechanical fasteners. The light weight reduces the load on walls, which is especially important for drywall partitions and old buildings.
Moisture resistance makes polyurethane wall molding suitable for any room, including bathrooms, kitchens, and unheated country houses. The material does not mold, does not swell, and does not lose shape even with direct contact with water.
Impact Resistance and Durability
Polyurethane has elasticity. Upon impact, the material slightly deforms, absorbing the impact, and then returns to its original state. This protects moldings and decorative elements from accidental damage—bumping with a chair, hitting with a vacuum cleaner, or catching on furniture during rearrangement. A plaster molding would chip in such situations, a wooden one would dent, but a polyurethane one remains intact.
The service life of high-quality polyurethane molding is 30-50 years without loss of appearance or functional properties. The material does not yellow, does not fade in the sun, and is not subject to biological degradation. The only thing that may be needed over time is repainting if the paint fades or is mechanically damaged. But the molding itself remains unchanged.
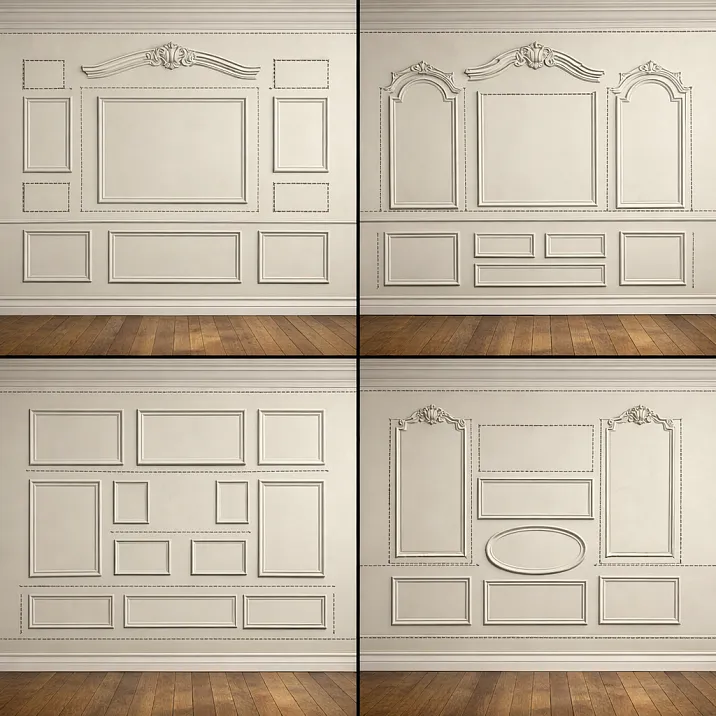
Typology of Frame Compositions: From Classic to Avant-Garde
There are many schemes for arranging frames on walls. The choice depends on the interior style, room dimensions, functional purpose of the space, and personal preferences.
Classical Panel Division
The most traditional scheme is the horizontal division of a wall into a panel and an upper section. Polyurethane molding is installed horizontally at a height of 90-120 cm from the floor (approximately one-third of the wall height). Below the molding is the panel zone; above is the main section.
The panel zone can be:
-
Painted in a color different from the upper part (classic—dark bottom, light top)
-
Covered with textured wallpaper or fabric upholstery
-
Finished with wooden panels or wood imitation
-
Decorated with additional smaller vertical frames
The upper part is usually painted in a light tone or covered with plain wallpaper. Such division visually expands the room, creates a sense of stability (dark bottom, light top) and historical continuity.
This technique is especially effective inclassical interiorsdining rooms, studies, libraries — spaces where solidity and tradition are valued.
Full-height frames: wall as a gallery
A more modern approach is creating a series of full-height frames covering the wall from the baseboard almost to the ceiling (or from panel molding to ceiling cornice). The frames are arranged vertically, creating a rhythmic structure.
Typical dimensions of such frames:
-
Height: 180-240 cm (depending on ceiling height)
-
Width: 50-80 cm for narrow vertical panels, 80-120 cm for medium, 120-180 cm for wide
Frames can be the same width, creating a regular rhythm, or vary, forming a more dynamic composition. The distance between frames is usually 10-30 cm, creating a clear visual structure without overload.
The interior space of the frames is decorated in various ways:
-
Contrast painting (e.g., frames white, inside — gray or colored background)
-
Wallpaper with pattern or texture (the rest of the wall is smooth)
-
Decorative plaster with effect (Venetian, concrete, silk)
-
Mirror inserts (visual expansion of space)
Such a scheme is suitable for living rooms, halls, corridors — spaces where walls play a representative role.
Rectangular grid: geometric rigor
If vertical frames intersect with horizontal moldings, a rectangular grid is formed. The wall is divided into rectangles of the same or different sizes, each framed by molding.
The classic version is a grid of 6-12 rectangles on one wall, arranged in 2-3 rows horizontally and 3-4 vertically. The proportions of the rectangles are usually close to the golden ratio (width to height ratio approximately 1:1.6), creating harmonious perception.
Inside each rectangle there can be:
-
Solid color painting, different from the moldings
-
Various shades of one color (gradient composition)
-
Wallpaper with a small regular pattern
-
Fabric covering (silk, linen, velvet)
Wall molding in the form of a rectangular grid creates a coffered ceiling effect — an architectural technique characteristic of classic European interiors. This solution is suitable for studies, libraries, meeting rooms — spaces where seriousness and solidity are valued.
Asymmetric compositions: modern dynamics
Modern design often moves away from strict symmetry in favor of dynamic, unpredictable compositions. Molding frames are arranged asymmetrically, vary in size, creating an irregular rhythm.
Such a scheme may include:
-
One large frame, offset from the center of the wall
-
A group of small frames balanced by one large one on the opposite side
-
Frames of varying heights creating a stepped composition
-
A combination of vertical and horizontal frames intersecting at different angles
Asymmetry requires more careful design. The composition should be visually balanced, though not symmetrical. The principle of visual weights is used: a large frame on the right is balanced by a group of small ones on the left, a dark color at the bottom is compensated by a light one at the top.
This approach is characteristic ofmodern interiors, lofts, studios — spaces where individuality and creative freedom are valued.
Central frame: emphasis on the main element
Sometimes a single large frame placed in the center of a wall is enough to create a powerful visual effect. Polyurethane molding forms a rectangle or square of significant size (e.g., 150×200 cm or 180×180 cm), which becomes the focal point of the room.
Inside such a frame, you can place:
-
A large mirror (visually expands the space, increases lighting)
-
A TV (the frame transforms it from a technical device into part of the architecture)
-
A painting or group of paintings (a miniature gallery wall)
-
Contrasting finish (wallpaper, decorative plaster, fabric upholstery)
-
Hidden perimeter lighting (creates a floating panel effect)
The central frame works as an architectural portal, creating visual depth. It is especially effective on anaccent wall— behind a sofa, bed, or dining table.
Framing functional zones
Moldings and decorative plasterwork can be used to visually highlight functional zones. For example, a home office area in a living room is framed with molding, which psychologically separates the workspace from the relaxation area, even if there is no physical partition.
Other examples:
-
Framing a fireplace (moldings create a portal that enhances the significance of the hearth)
-
Highlighting a TV zone (a frame integrates the television into the wall architecture)
-
Decorating library shelves (moldings create an architectural frame for books)
-
Visual zoning of a dining area in a kitchen-living room
In such cases, a decorative wall element serves not only an aesthetic but also a functional role: it structures the space, organizes perception, and creates psychological comfort.
Composition design: the mathematics of beauty
Creating a harmonious frame composition is not a random arrangement of moldings, but a precise calculation based on the laws of proportion, symmetry, and visual balance.
The Golden Ratio: the mathematics of harmony
The Golden Ratio (approximately 1:1.618) is a proportion perceived by the human eye as the most harmonious. If the frame height is 100 cm, the ideal width is about 62 cm (or vice versa: width 100 cm, height 162 cm).
Applying the Golden Ratio in molding layout:
-
Proportions of individual frames (width-to-height ratio)
-
Ratio of frame sizes to each other (larger frame is 1.618 times bigger than the smaller one)
-
Placement of the central frame on the wall (not strictly centered, but offset according to the golden ratio)
Using the golden ratio is not mandatory, but it helps create compositions that are perceived as 'correct,' even if the viewer cannot explain why.
Modular grid: order in chaos
Professional designers often use a modular grid—a system of horizontal and vertical lines that divide the wall into equal parts. All composition elements are aligned to this grid, creating visual order.
For example, a wall 270 cm high and 400 cm wide can be divided by a grid with a 30 cm step (9 modules in height, 13 in width). Molding frames are positioned so that their boundaries align with the grid lines: one frame occupies 2×3 modules (60×90 cm), another 3×5 modules (90×150 cm), and so on.
The modular system simplifies planning, especially for complex asymmetric compositions. It ensures that even with seemingly chaotic element placement, the composition remains ordered at a deeper level.
Symmetry and asymmetry: balance or dynamism?
Symmetrical compositions create a sense of order, stability, and classical beauty. Frames are arranged mirror-symmetrically relative to the wall's central vertical axis. This approach is typical for classical, neoclassical, and traditional interiors.
Asymmetric compositions are more dynamic, modern, and individual. But asymmetry does not mean chaos. The composition must be visually balanced: heavy elements on the right are compensated by a group of lighter ones on the left, dark at the bottom is balanced by light at the top.
Wall molding in an asymmetric composition requires a higher level of design skill, but the result is often more expressive and memorable.
Rhythm and repetition: music for the eyes
Rhythm in visual composition works like rhythm in music. Repeating elements create a regular rhythm (like a metronome), while alternating elements of different sizes create a syncopated rhythm (like a jazz improvisation).
Regular rhythm: three identical vertical frames placed at equal distances. A simple, clear, harmonious solution.
Syncopated rhythm: alternating wide and narrow frames (wide-narrow-wide-narrow) or frames of different heights, creating a wave-like composition.
Moldings and decorative plasterwork, through rhythm, transform a flat wall into a dynamic structure that holds attention without being tiring.
Installation practice: from project to reality
Theoretical planning is only half the journey. High-quality project implementation requires precision, care, and knowledge of technical nuances.
Surface preparation: the foundation of success
Polyurethane molding is glued directly onto the wall, so its condition is critical. The surface must be dry, clean, and sturdy. Peeling paint, crumbling plaster, dust—all of these reduce adhesive bonding and can cause elements to detach.
Preparation includes:
-
Removing old coatings that are poorly adhered
-
Filling cracks and potholes with putty
-
Sanding uneven areas (molding highlights all wall defects)
-
Priming the surface to improve adhesion
A perfectly flat wall is not mandatory (minor irregularities up to 3-5 mm are compensated by the adhesive), but significant deviations require leveling. Molding glued to a wavy wall will follow its curves, which looks unprofessional.
Marking: precision is the courtesy of kings
Before cutting moldings and applying adhesive, thorough marking is necessary. All frames are drawn on the wall with a pencil using a level, tape measure, and square.
Marking sequence:
-
Determining the central vertical axis of the wall (especially important for symmetrical compositions)
-
Marking horizontal lines (panel molding, top borders of frames)
-
Marking vertical lines (side borders of frames)
-
Checking rectangularity of each frame (diagonals must be equal)
-
Checking symmetry (distances from central axis to left and right elements must match)
Marking takes significant time (sometimes more than installation itself), but it's what guarantees composition accuracy. Marking errors during planning are easily corrected; after molding installation - practically impossible.
Cutting moldings: angles matter
For creating frames, moldings are cut at 45-degree angles to join at corners. Cutting precision is critical: even 1-2 degree deviation creates a visible gap at the joint.
Cutting tools:
-
Miter saw (optimal option) - provides perfectly straight cuts at specified angles
-
Miter box and handsaw (budget option) - requires skill but gives acceptable results
-
Jigsaw (for rough trimming) - less precise cuts, requires subsequent finishing
When cutting, it's important to consider that molding length is measured along the outer edge of the frame. For a frame with external dimensions 80×120 cm, segments needed are:
-
Two 80 cm pieces (top and bottom)
-
Two 120 cm pieces (sides)
But this is the outer edge length. The inner edge will be shorter by double the molding width. If molding width is 5 cm, internal frame dimensions will be 70×110 cm.
Adhesive: chemistry of reliability
Polyurethane moldingsare attached with special adhesive. Several types exist:
Water-based polymer adhesive - safe, odorless, long setting time (allows position adjustment), but requires element fixation for 10-20 minutes.
Solvent-based adhesive - fast setting (30-60 seconds), strong adhesion, but strong odor, requires ventilation.
Construction adhesive like 'liquid nails' - universal, fast setting, but may contain aggressive solvents that damage some polyurethane types.
Recommended to use adhesive specifically designed for polyurethane moldings. It provides optimal combination of adhesion, setting time and safety.
Adhesive is applied in zigzag pattern or dots across the entire back of molding. Don't skimp, but excess will squeeze out when pressed, creating mess. Optimal layer thickness - 3-5 mm.
Installation and fixation: patience and precision
Molding with applied adhesive is placed against wall according to markings, pressed with uniform pressure along entire length. Important not to shift element after pressing - this disrupts adhesive layer.
For fixation during adhesive setting time, used:
-
Painter's tape (attached to molding and wall, holding element)
-
Thin nails or pins (driven into inconspicuous places, removed after drying)
-
Support props from boards or strips (for long horizontal sections)
Setting time depends on adhesive type: from 30 minutes to 12 hours. Full polymerization takes 24-48 hours. Until then, elements cannot bear loads.
Sealing joints: invisible work
Even with perfect trimming, micro-gaps remain at molding joints. They are filled with acrylic sealant matching the molding color (usually white). The sealant is applied in a thin bead, excess is immediately removed with a damp cloth or finger, creating a smooth transition.
After the sealant dries (2-4 hours), the joints become practically invisible. If painting is planned, the sealant is painted along with the moldings, completely hiding the connection points.
High-quality joint sealing is a sign of professionalism. It requires care and patience, but it is precisely what distinguishes a master's work from amateur installation.
Painting and decorative finishing: the final touches
Polyurethane molding in its basic form is white or light beige. But the final finish opens up endless possibilities for creativity.
Monochrome painting: a classic approach
The most common approach is painting all moldings in one color. Usually white (if walls are white or light) or a color that harmonizes with the overall interior palette.
Paints for polyurethane:
-
Acrylic water-based — safe, odorless, dries quickly, good coverage
-
Latex — more wear-resistant, washable, suitable for wet areas
-
Alkyd enamels — very durable coating, but long drying time and odor
Painting process:
-
Priming moldings with acrylic primer (improves adhesion, evens out absorbency)
-
Drying 2-4 hours
-
First coat of paint (may apply unevenly — this is normal)
-
Drying according to manufacturer's instructions (usually 4-6 hours)
-
Light sanding with fine abrasive (removes micro-fuzz and unevenness)
-
Second coat of paint (ensures uniformity)
-
Third coat if necessary
Paint is applied with a brush for profiled moldings (the brush penetrates all recesses of the relief) or a roller for smooth ones. Spraying with a paint sprayer gives the most even result but requires protecting surrounding surfaces from splashes.
Contrast painting: highlighting details
A bolder solution is painting moldings in a color contrasting with the wall. White moldings on a dark blue wall, black on a light gray background, gold on burgundy — such combinations emphasize architectural graphics, making the composition more expressive.
The contrast does not have to be radical. A difference of a few tones is enough: light gray moldings on a white wall, cream on beige. Soft contrast creates a refined, delicate effect.
Molding on a wall of a contrasting color requires more careful installation and painting: any flaws will be more noticeable.
Gilding and metallization: a luxurious effect
For classic, Baroque, Art Deco interiors, the use of metallic effects is characteristic. Moldings are coated with gold, silver, bronze, or copper paint, creating a precious effect.
Metallization methods:
-
Full gilding — the entire molding is coated with metallic paint
-
Partial gilding — only the protruding elements of the relief are metallized, the base remains white or colored
-
Patination — metallic patina is applied to the painted molding, which is worked into the recesses, creating an antique effect
Modern metallic paints accurately imitate real metals. Imitation gold leaf (imitation of gold leaf) creates an effect visually indistinguishable from expensive gilding, but costs dozens of times less.
Patination: noble antiquity
Patina is an imitation of natural material changes over time. A dark paint (brown, black, green) is applied to the molding, forced into the recesses of the relief, and then partially wiped off the raised parts. This creates an effect of years of use, giving the decor a sense of history and depth.
Patination is especially effective on moldings with complex relief, where deep recesses create a strong contrast between dark hollows and light protrusions. Wall molding with patina looks antique, which is valued in interiors with historical styling.
Colored painting: a modern approach
Modern design is not limited to traditional white and gold. Moldings can be painted in any color from the RAL palette (over 200 shades). Blue, green, terracotta, lilac — the choice depends only on the interior concept.
It is important that the color of the moldings harmonizes with the overall color scheme and is supported by other elements — textiles, furniture, decor. An isolated colored molding can look out of place.
Stylistic interpretations: from classic to futurism
Polyurethane molding is a stylistically flexible element that adapts to any design concept.
Classical interiors: palatial elegance
Classical style uses moldings with rich relief — floral ornaments, fluting, beads, acanthus leaves. Frames are arranged symmetrically, often in combination with wall paneling.
Color solutions are traditional: white with gold, cream, ivory. The interior space of the frames is decorated with wallpaper featuring classic patterns (damask, stripes) or fabric upholstery.
Such wall molding creates an atmosphere of palatial luxury, suitable forformal living rooms, dining rooms, studies.
Neoclassicism: lightened tradition
Neoclassical style retains classical principles of symmetry and proportion but simplifies the decor. Moldings are more concise, relief is less deep, ornaments are more restrained.
Colors are neutral: gray tones, beige, white. Gilding is used sparingly, as an accent, not as a base. Frames are large, few in number, creating a graphic structure without being overloaded.
Neoclassicism is a compromise between a love for tradition and the demand for modern conciseness.
Modern minimalism: geometry without excess
Minimalist interiors use smooth moldings without ornament — simply profiled strips with simple geometric cross-sections. Frames are strict, rectangular, few in number.
Color is monochrome, often matching the wall color (moldings are perceived as part of the architecture, not as applied decor). Contrast is created not by color, but by relief and the play of light.
This approach turnsmoldings and plasterwork into architectural elements that structure the space without drawing excessive attention to themselves.
Scandinavian style: cozy simplicity
Scandinavian interiors value naturalness, simplicity, functionality. Moldings are used to create paneling or a few large frames. The profile is simple, the color is white or light gray.
Inside the frames — contrasting painting in natural tones (gray-blue, olive, terracotta) or wallpaper with geometric patterns. The overall effect is cozy, homely, not pretentious.
Loft and industrial style: brutal aesthetics
It might seem that moldings are incompatible with the industrial aesthetics of a loft. But that's not the case. In brutal interiors, simple, concise moldings are used, painted in dark colors — graphite, black, dark brown.
Frames are large, few in number, often asymmetrical. Inside — contrasting finishes: exposed brick, concrete, metal panels. Moldings create structure without conflicting with the brutality of the main finish.
This approach demonstrates that a decorative wall element can work in any style if the profile, color, and application method are chosen correctly.
Design and installation errors: what to avoid?
Even high-quality polyurethane molding and professional wall plasterwork can look unsuccessful if typical mistakes are made.
Mismatch in scale
Too wide moldings in a small room visually compress the space, creating a sense of clutter. Too narrow moldings in a spacious hall get lost and look insignificant. The width of the molding should correspond to the size of the room and the height of the ceilings.
Incorrect frame proportions
Frames that do not correspond to the golden ratio or other harmonious proportions are perceived as 'incorrect,' even if the viewer cannot explain why. Square frames often look static and boring, while overly elongated ones appear unnatural.
Asymmetry in a symmetrical concept
If the composition is intended to be symmetrical, any violation of symmetry immediately catches the eye and is perceived as an error. Frames should be identical in size, placed at equal distances, and aligned along a common axis.
Visible joints and gaps
Poorly trimmed corners, unsealed joints, gaps between the molding and the wall—all of these ruin the impression even of a correctly designed composition. The quality of installation is no less important than the quality of design.
Unsuitable molding style
Ornate Baroque moldings in a minimalist interior or simple smooth ones in a classic one—a stylistic dissonance that destroys the integrity of the space. Moldings should match the overall style.
Overload
Too many frames, overly complex relief, too contrasting colors—the composition becomes overloaded and tires the eye. It's better to have less but of higher quality than more but chaotic.
Frequently asked questions about moldings and wall plasterwork
Can moldings be glued onto wallpaper?
Theoretically yes, but it is not recommended. The molding holds due to the adhesive's adhesion to the wall. If glued onto wallpaper, the molding holds onto the wallpaper, not the wall, and the wallpaper may peel under the weight. For reliability, moldings are glued onto a bare wall (plaster, putty, painted surface), and the wallpaper is trimmed flush against the molding.
Exception—very light, narrow moldings on firmly glued non-woven wallpaper. But this is a compromise that reduces reliability.
How long does it take to install a frame composition?
Depends on the complexity. A simple composition of 3-4 frames on one wall—4-6 hours of work for an experienced craftsman (including marking, cutting, installation, sealing joints). A complex composition on all walls of a room with many elements—2-3 days.
Plus time for surface preparation (if required) and painting (another 1-2 days).
Can moldings be installed on curved walls?
Standard rigid moldings—no. But there are flexible polyurethane moldings that easily bend, following the radii of columns, arches, and bay windows. They are more expensive than regular ones but indispensable for non-standard architectural forms.
How to care for moldings?
Minimal care: periodic dry or wet cleaning with a soft cloth. Dust in the recesses of the relief is removed with a soft brush or a vacuum cleaner with a nozzle. If the coating is damaged, moldings can be easily repainted.
Is polyurethane safe for health?
High-quality polyurethane is absolutely safe. It does not emit harmful substances, does not cause allergies, and is approved for use in living spaces and children's rooms. It is important to buy products from trusted manufacturers with quality certificates.
Can moldings be used in damp rooms?
Yes, polyurethane is moisture-resistant and suitable for bathrooms, kitchens, and swimming pools. It is recommended to coat moldings with moisture-resistant paint for additional protection.
How much do moldings and installation cost?
The price of moldings varies from 200 to 2000 rubles per linear meter depending on width, complexity of relief, and manufacturer. Installation cost—from 300 to 1000 rubles per linear meter depending on the complexity of the composition. Painting—from 200 to 500 rubles per linear meter.
For a standard 20 m² room with a medium-complexity frame composition, the total cost of materials and labor will be 40,000 - 80,000 rubles.
How to choose the right molding profile?
The profile should match the interior style. For classic — rich relief with ornaments, for minimalism — smooth or simple geometric, for neoclassical — restrained profiled. The width of the molding should be proportional to the size of the room: narrow (2-4 cm) for small rooms, medium (5-8 cm) for standard rooms, wide (10-15 cm) for spacious ones.
STAVROS Company: craftsmanship, quality, reliability
When it comes to creating a dream interior, choosing a material supplier and project implementation partner is critically important. STAVROS Company is a recognized leader in the production and supply ofdecorative elements made of polyurethane, wood, and MDF for creating perfect interiors.
Unsurpassed product quality
STAVROS uses exclusively high-quality European raw materials for the production of polyurethane moldings and decorative elements. Material density of 280-350 kg/m³ ensures strength, geometric stability, and clarity of the smallest relief details. Each product undergoes multi-stage quality control before being shipped to the client.
The assortment includes over 200 molding profiles — from minimalist smooth ones 20 mm wide to monumental classic ones 150 mm wide, from simple geometric to lush Baroque with deep relief. Such variety allows for the implementation of projects of any style and complexity.
Comprehensive solutions for frame compositions
STAVROS offers not only moldings but also all necessary components: corner elements for flawless joints, specialized adhesive for reliable installation, primers and paints for finishing. This eliminates the need to source materials from different suppliers and guarantees their compatibility.
The catalog features ready-made collections where moldings, cornices,Baseboards, rosettes,appliqueare executed in a unified style. This simplifies element selection and guarantees harmonious results.
Professional consultations and design
STAVROS specialists are ready to assist at all stages of project implementation:
-
Selection of moldings matching the interior style
-
Development of frame layout schemes considering room proportions
-
Calculation of required materials
-
Recommendations for installation and finishing
-
Selection of color solutions
Professional consultation saves time, money, prevents mistakes, and guarantees results that meet expectations.
Installation and finishing services
STAVROS offers not only materials but also professional installation. Experienced craftsmen will perform:
-
Surface preparation
-
Precise composition marking
-
Installation of moldings with flawless joints
-
Seam filling and final finishing
-
Painting, patination, gilding according to client's choice
Professional installation guarantees quality unattainable with DIY installation. Perfectly straight lines, invisible joints, precise angles — a result that looks like part of the building's original architecture.
Individual approach to each project
STAVROS works with projects of any scale — from a single room in an apartment to comprehensive design of a country mansion. Individual approach, attention to detail, and readiness to implement non-standard solutions distinguish the company from mass suppliers.
For large projects, it is possible to manufacture moldings according to custom sketches, creating unique profiles not found in standard catalogs. This transforms the interior into an exclusive space without analogues.
Quality guarantee and long-term support
STAVROS provides a warranty on products and completed work. If questions or issues arise, the support service is always ready to help. This is not just the sale of materials and services — it is a partnership based on trust, professionalism, and a commitment to excellence.
Choosing STAVROS means choosing quality, proven by thousands of completed projects; professionalism, recognized by leading designers and architects; and confidence that your walls will become true works of art — elegant, harmonious, flawless. Polyurethane molding and wall moldings from STAVROS are an investment in beauty that will delight you for many years, creating an atmosphere of sophistication and comfort in your home.


