Article Contents:
- Why decorative plaster pairs well with stucco decor
- What combination options exist
- Plaster inside a molding frame
- Moldings over a textured wall
- Textured wall and moldings in matching color
- Contrasting moldings on a textured wall
- Panel made of moldings and decorative plaster
- What to choose: moldings, overlays, or a ready-made set
- Moldings
- Decorative appliqués
- Decor for moldings
- Ready-made sets
- What comes first: moldings or decorative plaster
- Where to use moldings and decorative plaster
- Wall behind the sofa
- TV Area
- Headboard wall
- Dining area
- Office
- Hallway and corridor
- Wall with mirror
- Commercial interior: salon, restaurant, showroom
- How to choose a style
- Neoclassicism
- Neoclassical Light
- Jatoba
- Art Deco
- Versailles Light
- Mistakes when combining plaster and stucco decor
- Gluing moldings onto too uneven texture
- Not considering the thickness of the decorative layer
- Using overly active plaster and complex ornamentation simultaneously
- Not planning the color of moldings in advance
- Not connecting the wall with the baseboard, doors, and cornice
- Creating many small frames on a textured surface
- Not considering light: texture and relief create strong shadows
- What to buy for a wall with decorative plaster
- Frequently asked questions
When a designer or homeowner decides on an expensive renovation without wallpaper, they face a question no less complex than choosing the wall color: what to fill the surface with? Bare paint is too simple. Wallpaper is no longer relevant. Decorative plaster is beautiful, expensive, and modern. But is one texture enough for a finished interior?
This is where the most interesting part begins.Stucco decor and decorative plasteris a duo where each participant enhances the other. Plaster provides depth, warmth, and a living surface—something no paint can replicate. Polyurethane moldings bring architecture: clear lines, rhythm, symmetry, frame systems, and zone boundaries. Together, they create a wall that looks like a work of art—not just a finish.
How does it work technically? What should be done first—moldings or plaster? What mistakes does a textured wall not forgive? All these questions get detailed, practical, and honest answers.


Why decorative plaster pairs well with stucco decor
There is nothing accidental here. Historical architecture has always been built on this combination: plastered walls and stucco profiles, frames, rosettes, and cornices. In the classical era, stucco was made from plaster by hand, and plaster was applied with natural compounds. Today, materials have changed—the principle remains.
Decorative plaster creates a textured background: a living, uneven surface with a play of light and shadow. It is richer than paint and does not require patterned wallpaper. But it has a peculiarity: without architectural structure, the wall remains a "canvas without a frame." A beautiful canvas—but unfinished.
Moldings on decorative plasterthey add exactly this structure. Frames set proportions and zone the wall. Vertical profiles create rhythm. Horizontal belts divide the wall into zones with different textures. Decorative overlays fix accent points. The result is a wall where texture and stucco relief work as a system, rather than competing with each other.
An important nuance: polyurethane moldings are the ideal partner specifically for decorative plaster, as they are easy to cut, not afraid of moisture in plaster solutions, and are easily painted with the same acrylic paints used for the wall's final coating.Polyurethane Items— monolithic, lightweight, with clear geometric shapes — organically complement any texture: from delicate silk to rough concrete.


What combination options exist
Our factory also produces:


Plaster inside a molding frame
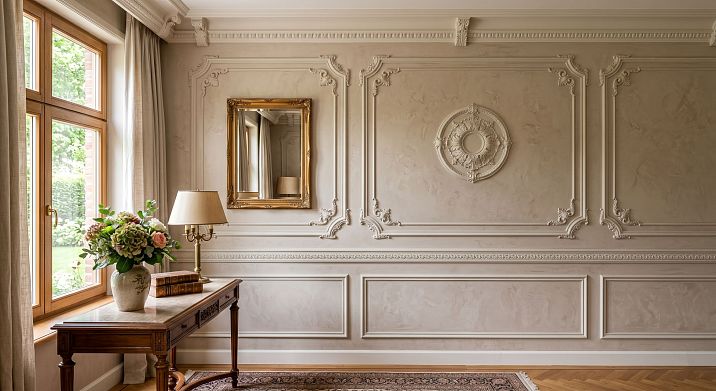
This is one of the most expressive and technically sound approaches. The wall is divided by moldings into zones — frames, panels, fields — and decorative plaster is applied only within these zones. Outside the frames, there is a smooth painted surface.
Result: the texture reads as an "insert" within an architectural framing. The molding becomes a frame for a living surface. The wall gains layering: smooth — the molding's relief — the plaster's texture. Three levels of texture on one plane.
This technique works well in neoclassicism, art deco, and modern style. In the living room — behind the sofa, in the bedroom — at the headboard, in the hallway — on the end wall.polyurethane wall decor behind the sofa— with an analysis of frame systems for accent zones.
In practice, it looks like this: first, moldings are mounted on the wall, forming frames. Then, decorative plaster is applied inside the frames — in a thin layer up to the level of the molding or slightly below it. The boundary between the textured insert and the smooth surface is clear — it is set by the profile itself.
Get Consultation
Moldings over a textured wall
The second option is to completely cover the wall with decorative plaster, let it dry, and then install moldings over the textured surface. This approach is technically more complex: the molding is glued to an uneven base, and the quality of the bond depends on the nature of the texture.
Decorative plaster with moldingsin this option requires considering the thickness of the plaster layer. Thin textured compounds (silk plaster, microcement, concrete effect) are ideal bases: smooth, with minimal relief height, ensuring good adhesive bonding. Rough textures (bark beetle, fur coat, travertine) are problematic: the large relief prevents the molding from fitting tightly to the surface, leaving gaps and voids that need to be filled with sealant.
For rough textures, the optimal solution is the first option: frames first, plaster inside.
Textured wall and moldings in color
A calm, intelligent solution for those who appreciate delicacy. The entire wall is in decorative plaster, with moldings painted exactly the same shade. No contrast: only the relief of the molding against the relief of the plaster.
This works because two reliefs of different natures — the geometric clarity of the molding and the organic, lively plaster — create a visual dialogue without competition. The wall looks unified but rich: from a distance, it's monochrome; up close, it's full of detail.
Wall decor with plaster in Japandi style— this is exactly the technique: neutral shades, moldings in tone, microcement or matte textured paint, silence and depth.stucco decor in the color of the wall or contrasting — with an analysis of both approaches and examples.
Contrasting moldings on a textured wall
A diametrically opposite approach: a dark textured wall — white or light moldings. Or a light texture — dark profiles. Contrast creates tension, expressiveness, and graphics.
Stucco wall decor in Art Deco style — an ideal environment for contrasting moldings. Dark microcement with gold or white geometric profiles is not just beautiful, it's conceptual. For a beauty salon, restaurant, showroom, or office with an author's interior.
Important: contrasting moldings on a textured wall require flawless installation. Every seam imperfection, every gap, every unevenness is visible.installing polyurethane molding — with instructions for clean corners and hidden joints.
Panel of moldings and decorative plaster
The most complex and most striking option. One wall or part of it turns into a decorative panel: frames of moldings of different sizes, textured inserts inside, decorative overlays at accent points, symmetry or deliberate asymmetry.
Decorative panel of stucco decor on the wall — a separate topic with principles of composition, scale selection, and accent placement. For large walls in a living room, dining area, or office — a panel of moldings and plaster is the level of an author's interior, achievable without a designer if you know the rules.
What to choose: moldings, overlays, or a ready-made set
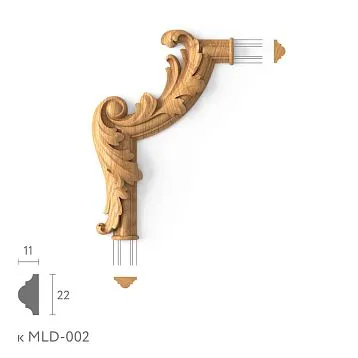
Moldings are linear profiles used to create framed compositions, zone walls, and frame openings. They come in various widths (from 20 to 150 mm) and relief complexity — from smooth to richly decorated.
Moldings and decorative plaster — the basis of any frame system. The linear profile is cut to the required size, allowing you to create frames of any configuration and adapt the system to specific wall parameters.
Choosing a profile for a textured wall:
-
Thin profiles 18–25 mm — for delicate textures (silk plaster, thin microcement, matte paint). Frames in the wall color, minimalism or Japandi.
-
Medium profiles 28–40 mm — a universal choice for most textures. Light neoclassicism, modern style.
-
Wide profiles 45–60 mm — for powerful accent walls, classic interiors, walls with Venetian plaster and rich texture.
| Type of plaster | Recommended profile | Molding color | Style |
|---|---|---|---|
| Microcement, thin layer | 20–30 mm | In tone or white | Japandi, minimalism |
| Silk, Venetian | 35–50 mm | Matching or gold | Neoclassical, Versailles Light |
| Textured concrete paint | 22–32 mm | Matching or dark | Modern, Art Deco |
| Bark beetle, travertine | Frames first, plaster inside | Matching | Any |
| Fine marble chips | 30–45 mm | White, cream | Neoclassical, classic |
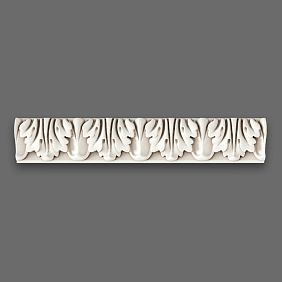
Decorative appliqués
Decorative overlays for textured wall— point accents. They are placed in the center of the frame, at the intersection of moldings, above the mirror, near the console, along the axis of symmetry above the sofa or bed. The overlay fixes the "center of gravity" of the decorative system.
On a textured wall, overlays work especially expressively: their clear relief contrasts with the lively surface of the plaster. But there is one condition: overlays should not be overloaded on a rich texture. One element per frame is the maximum. Otherwise, the wall starts to "scream."
Decor for moldings
Decor for moldings under plaster— corner inserts, rosettes, central frame elements. They are needed to complete frame systems in a classic style: the corners of the frame are not at 45°, but with a decorative insert in the form of a square with an ornament.
On textured walls, corner inserts are especially important: they visually "stabilize" the corner of the frame, hide possible joint inaccuracies, and add a detail that is noticed upon close inspection.
Ready-made kits
Ready-made molding frames for the wall— a quick solution when you don't want to select each element separately. For a wall with decorative plaster, a ready-made kit is suitable in two scenarios: either the entire wall is finished with neutral thin plaster and the kit is mounted on top of it; or the finished frame serves as a "stencil" for applying plaster inside — first installation, then texture.Polyurethane wall decor— a full catalog with options for any budget and style.
What comes first: moldings or decorative plaster
This question is one of the most common. And the answer is ambiguous: it all depends on what result you want to achieve.
Option A: First moldings, then plaster inside the frames. This is technically a more competent approach. The moldings are mounted on a smooth puttied wall, forming frames. Then decorative plaster is applied inside the frames. The boundary between the plaster and the molding is clear, without gaps or drips. After the plaster dries, the entire wall (moldings + base) is finished with paint in a single or two-tone color.
This approach is ideal for rough textures ("bark beetle", "lamb", "relief plaster") that cannot be applied evenly under the molding retroactively.
Option B: First plaster the entire wall, then apply moldings on top. Works for thin, almost smooth coatings: microcement, silk plaster, tinted matte compound. The molding is glued onto a thin texture with minimal relief — the adhesive bonds reliably, and the seam can be filled with sealant flush with the plaster surface.
Important rules for Option B:
-
The decorative layer must be completely dry and hard — at least 7–14 days for most compounds.
-
Before installing the molding, apply a strip of mounting adhesive to the textured surface — press the profile, let it set. Fill the gap between the molding and the texture with acrylic sealant, then paint.
-
For rough relief — make a test section: glue a 30–40 cm piece of molding, let it dry for 24 hours, try to tear it off. If it holds, you can work on the entire wall.
installation of polyurethane molding — a practical guide considering various types of substrates.
Color is a fundamental issue. If the moldings should match the plaster color — final painting is done after installing the moldings, with one coat over the entire wall. Then the color will be absolutely uniform. If the moldings are a contrasting color, they are painted separately after installation and drying of the sealant.
Where to use moldings and decorative plaster
Wall behind the sofa
A classic spot for a textured accent wall. The sofa is a large piece that requires a "dignified" backdrop: the lively surface of plaster framed by moldings is exactly what turns this wall into the center of the living room.polyurethane wall decor behind the sofa— with options for frame systems and scales for different wall formats.
Working scheme for a wall behind a sofa 3.5 m wide and 2.7 m high: three frames in a row, each 0.9–1 m wide, height from baseboard to 2.4 m. Inside the central frame — decorative plaster of a different shade or the same texture, but with an overlay along the central axis. Side frames — smooth, matching the main wall color.
TV area
Polyurethane TV zone decor— one of the most sought-after scenarios. A TV panel on the wall requires symmetrical framing that integrates it into the decorative system, rather than highlighting it as a "black rectangle on a white wall."
Vertical moldings on the sides of the TV panel, a horizontal strip above and below — and the panel becomes part of an architectural niche. Inside the zone — microcement in a dark shade or neutral textured paint. This is especially relevant in modern interiors where the TV is not "equipment" but a decorative element.
Wall at the head of the bed
The headboard is the most intimate zone of the bedroom. Here, delicate silk plaster within molding frames, microcement in a pastel tone, and "stone" with geometric profiles are all appropriate. The main thing is that the scale of the frame should be proportional to the bed size and ceiling height.
Stucco wall decor with backlighting— a special theme for the headboard: backlighting inside the molding frame on a textured wall creates an effect that earns designers awards. Warm light along the frame perimeter, soft texture inside — this is not just beautiful, it's therapeutic.
Dining area
Dining area in the living room or kitchen-living room — a place where a rich decorative system is appropriate. The wall behind the table can become the most expressive in the apartment. Venetian plaster in warm shades, framed by moldings with restrained ornament, sconces on the sides of the frame — this is a restaurant-level interior at home.
symmetric polyurethane wall decor— with an analysis of symmetry principles for the dining area.
Office
Study — a space of concentration and status. Textured wall with moldings in the study: strict texture (microcement, "concrete," matte dark plaster) and clear geometric profiles. No ornament, no "golden stucco." The molding relief is emphatically architectural and functional.
Vertical wall decor made of polyurethane— especially relevant for the study: vertical profiles from floor to ceiling create a sense of height and solidity.
Hallway and corridor
The hallway is the first thing a guest sees. And the last thing the owner sees when leaving home. This space should set the tone for the entire interior. Decorative plaster with moldings in the hallway is one of the most effective techniques: a small wall, a few hours of work, and the hallway transforms from a "technical gateway" into a full-fledged interior space.
stucco decor for niches, ledges, and piers — with an analysis of work in hallways and narrow corridors.
Wall with mirror
A mirror in a molding frame on a textured wall is a classic that never goes out of style. A molding around the mirror's perimeter with a 20–25 cm gap creates an "architectural frame"; inside is a smooth mirror, outside is a textured surface. The contrast of mirror smoothness and living plaster is one of the most winning visual techniques in interior design.
stucco decor in the color of the wall or contrasting — with options for mirror zones.
Commercial interior: salon, restaurant, showroom
For commercial spacesmoldings and microcement on the wall — one of the key tools for creating a "luxurious" atmosphere. A beauty salon, restaurant, boutique — everywhere where the interior works on brand perception, textured walls with decorative profiles create a sense of quality that transfers to services or products.
Commercial interior allows for bolder choices: brighter contrasts, more complex frame systems, more decorative overlays. The main thing is a unified concept.
How to choose a style
Neoclassicism
Moldings and plaster in neoclassicism— a historically justified combination. Venetian or silk plaster in pastel shades, moldings with a medium-width profile of 35–50 mm, corner inserts with a classic ornament. Symmetry is mandatory. Ceiling height — preferably from 2.7 m.
Color: white or cream moldings on a warm texture — the most convincing combination. Or moldings matching the plaster — for a more restrained option.
Neoclassicism Light
Light neoclassicism with a textured wall— for modern apartments with a ceiling of 2.5–2.7 m, where full neoclassicism would be overload. Thin profiles 22–32 mm, delicate texture (matte paint with a textile effect, thin microcement), frames without ornament, corner inserts — optional.
This is a style for most residential interiors. It does not require architectural height or expensive renovation — just properly selected proportions.
Japandi
Wall decor with plaster in Japandi style— this is minimalism where every detail is thought out. Microcement in shades of gray, beige, terracotta. Moldings — strictly matching the wall, without contrast. Profile — rectangular cross-section, without relief. Only the line.
For Japandi, it is important: no decorations on top of the molding. No ornamental overlays. Asceticism is not poverty, it is discipline.
Art Deco
Stucco wall decor in Art Deco styleon a textured wall — this is boldness and graphics. Dark microcement (anthracite, dark umber, black with gold) and contrasting white or gold moldings with a geometric cross-section. Symmetry, clarity, minimum organic forms.
Art Deco does not tolerate compromises: either the solution is fully implemented, or it looks like an unfinished attempt. But the result is one of the most spectacular in the line of modern interior styles.
Versailles Light
Classic wall with moldings and plaster— for interiors with a traditional character. More decorative than Neoclassical Light: expressive profiles with relief, overlays with classic ornament, and Venetian plaster with rich color are allowed. This is a style for a living-dining room, a formal bedroom, or a study in a traditional spirit.
Mistakes when combining plaster and stucco decor
Gluing moldings onto too uneven texture
This is a mistake almost everyone makes when working with a combination of textured plaster and moldings for the first time. A rough relief prevents the molding from fitting tightly against the wall: gaps of 2–4 mm form, which are noticeable under side lighting and create a feeling of sloppiness.
Solution: for rough textures — always 'frames first, plaster inside.' Or: before installing the molding, putty a strip 5–6 cm wide along the line of the future profile, let it dry, sand it — and glue the molding onto a smooth surface.
Not accounting for the thickness of the decorative layer
Decorative plaster has a thickness: from 0.5 mm for thin compounds to 5–8 mm for textured ones. If the molding is glued over a thick plaster layer, its lower plane ends up higher than the plane of the adjacent smooth surface — a 'step' appears at the border. This needs to be thought out in advance: either the entire wall is at one level, or the molding serves as a clear transition boundary.
Making both the plaster too active and the ornament too complex simultaneously
Rich texture (Venetian with mother-of-pearl, 'decorative oak bark,' 'antique,' 'stone') + decorative overlays with elaborate ornament = visual overload. Here the rule applies: if the texture is the main character, the moldings should be neutral. If the moldings are the main characters, the texture should be calm.
Never place two 'main characters' next to each other. One dominates — the other supports.
Not thinking through the color of the moldings in advance
Color is the final point that needs to be seen at the beginning. Moldings in the tone of the plaster or with contrast? This decision is made before purchasing the material, because the choice of profile, width, and presence or absence of ornament depends on it.
Stucco decor for painted wallsandStucco decor for walls for painting— with a detailed analysis of the logic of color solutions.
Not connecting the wall with the baseboard, doors, and cornice
A textured wall with moldings but with an unsuitable baseboard is like a beautiful suit with sneakers. Either a deliberate technique or an unconscious mistake. If the wall is Neoclassical, the baseboard should be high, with a profile. If Japandi, the baseboard is minimal or even hidden in the floor.how to combine stucco decor with baseboards and cornices— essential material for those creating a system, not just a separate wall.
Making many small frames on a textured surface
Small frames get lost on an active texture: the relief of the plaster 'eats' the thin profile. For textured walls, frames should be larger, moldings wider. The minimum profile width for working on textured plaster is 28–30 mm.
polyurethane wall moldings— with an analysis of profiles based on the character of the base surface.
Not considering light: texture and relief create strong shadows
This is a technical nuance that changes everything. Decorative plaster creates shadows under side lighting: they emphasize the texture. Moldings also cast shadows — their own, architectural ones. If there are many side light sources (sconces, floor lamps, directed spotlights), these shadows overlap and the wall "boils." If the lighting is uniform — no problems.
Stucco wall decor with backlighting — about proper lighting of textured walls with moldings.
What to buy for a wall with decorative plaster
Final list — what needs to be ordered before starting work:
-
Buy moldings for decorative plaster — linear profiles of the required width for frames, verticals, and horizontal belts.
-
Buy stucco decor for a textured wall — ready-made sets and individual elements for painting.
-
Buy decorative wall overlays — for point accents inside frames and in free zones.
-
corner elements for frames made of moldings — for classic systems with decorative corners.
-
The STAVROS collection«Neoclassic»— for classic and transitional interiors with Venetian or silk plaster.
-
The STAVROS collection"Neoclassic Light"— for most modern apartments with textured walls.
-
The STAVROS collection"Japandi"— for minimalist spaces with microcement.
-
The STAVROS collection"Versailles Light"— for rich classic texture.
-
Full catalogpolyurethane products— for systematic selection of elements.
Frequently Asked Questions
Can moldings be glued onto decorative plaster?
Yes, if the plaster layer is thin and smooth — microcement, silk plaster, thin textured paint. On rough textures ("bark beetle", "lamb"), moldings are installed in reverse order: first moldings, then plaster inside the frames.
What to do first: moldings or plaster?
Depends on the type of texture. For rough ones — first moldings, then plaster inside. For thin and almost smooth coatings — both options are possible. The most universal order: moldings on a puttied wall → plaster inside the frames → final painting of the entire wall.installing polyurethane molding— with step-by-step instructions.
Which moldings to choose for a textured wall?
Profiles 28–45 mm wide are wide enough to stand out against a textured surface. Thin profiles up to 20 mm get lost on active plaster. For minimalist textures (microcement), 22–28 mm is acceptable.
Can moldings and microcement be combined?
They combine perfectly. Microcement is a thin, almost smooth material with a soft texture close to matte paint. Moldings can be glued on top without issues. The best option is moldings in the tone of microcement or with a slight contrast.
What is better: moldings in the color of the wall or contrasting ones?
Moldings in color are for a delicate, restrained interior. Contrasting ones are for expressive, modern spaces.stucco decor in the color of the wall or contrasting — detailed analysis with examples.
Is decorative plaster with moldings suitable for a small room?
Yes, with the right approach. In a small room, one accent wall with texture and moldings, the rest neutral. The profile should be thin, in the color of the wall. Frames should be large (one or two), not many small ones.stucco decor for a small apartment — with principles for working in a limited space.
How to calculate moldings for a wall with textured finish?
Calculate the linear footage of frames using the formula: perimeter of each frame × number of frames + 15% allowance for trimming. Don't forget about corner inserts: 4 pieces for each full frame.how to calculate moldings and stucco decor for a wall— with ready-made formulas and online calculation examples.