Article Contents:
- Why walls deserve attention
- Vertical architecture: walls shape the space
- Hiding Flaws: Elegant Camouflage
- Zoning without partitions
- Wall protection: functional beauty
- Acoustics and warmth
- Polyurethane: the material of the 21st century for wall decoration
- Technical specifications: numbers and facts
- Comparison with traditional materials
- Types of wall decoration: elements for any style
- Moldings: Universal Decorative Strips
- Decorative appliqués: three-dimensional accents
- Panels: large decorative elements
- 3D panels: modern textured surfaces
- Pilasters and Half Columns: Vertical Architecture
- Friezes and sashings: classic above openings
- Casing and trim: frames for openings
- Selection rules: creating harmony
- Ceiling Height: Proportions Decide Everything
- Area and purpose of the room
- Interior Style: Harmony of Decor
- Installation of wall decoration: step-by-step technology
- Tools and Materials
- Wall Preparation
- Molding Installation
- Installation of appliqués and panels
- Installation of 3D panels
- Installation of pilasters and half-columns
- Sealing Joints and Final Finishing
- Design ideas: inspiration for creativity
- Classic molding frames (boiserie)
- Accent Wall with 3D Panels
- Modern minimalism with contrast
- Fireplace framing with pilasters
- Hall zoning with panels
- Art Deco symmetry
- Provence with floral motifs
- Care for Wall Decor
- Frequently Asked Questions
- Conclusion: walls as canvases for creativity
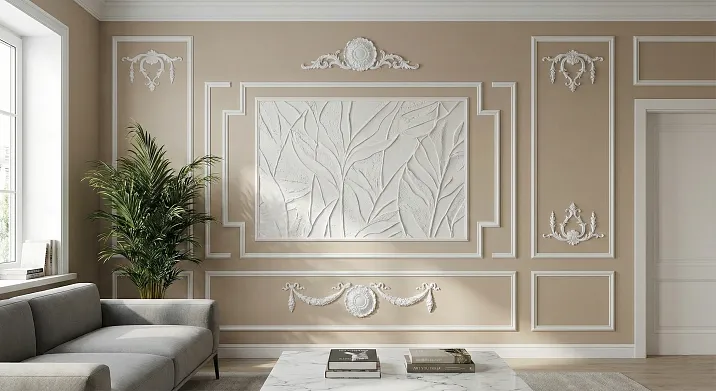
Walls are not just vertical surfaces dividing space. They are canvases on which the character of the interior is created, the story of the house is told, and the individuality of the owner is expressed. Imagine: you enter the living room, where the walls are adorned with elegant molding frames surrounding paintings and mirrors, where above the sofa there is an elegant panel with a botanical ornament, where door openings are framed by classic casings. This is not a palace, not a museum — it is a modern apartment in 2026, whereWall moldingit transforms a standard space into a unique piece of interior art.
Forget about plain painted or wallpapered walls. Forget about heavy plaster moldings that weigh as much as a car and require a team of professionals. Modern polyurethane molding has revolutionized wall decoration: lightweight (a 2-meter cornice weighs 1–2 kg compared to 15–20 kg of plaster), durable (does not crumble or crack), moisture-resistant (can be used in bathrooms and kitchens), affordable (3–5 times cheaper than plaster), and easy to install (can be glued in a weekend by yourself).
From classic molding frames creating a boiserie effect (wall panels of the 18th century) to modern 3D panels with geometric patterns, from carved baroque appliqués to minimalist Scandinavian trim — polyurethane opens up boundless creative possibilities. This article is your guide to creating luxurious walls. We will discuss types of wall decor, rules for selection, mounting secrets, stylistic solutions, and show you how to transform standard walls into architectural masterpieces.


Why walls deserve attention


Vertical architecture: walls define space
The ceiling creates height, the floor — the base, but it is precisely the walls that define the character of a room. Smooth white walls — minimalism, neutrality, modernity. Walls with molding frames — classicism, elegance, tradition. Walls with 3D panels — avant-garde, boldness, technology.
Molding on the WallCreates vertical architecture — structures space, divides into zones, creates rhythm and hierarchy. Molding divides the wall into proportional parts. Pilasters create vertical axes, visually increasing height. Appliqués add volume and depth.
Our factory also produces:


Hiding Flaws: Elegant Camouflage
Walls in standard houses are rarely perfectly flat. Cracks, level differences, traces of old repairs, outlets and switches — all of this requires masking. Molding covers seams between different types of wallpaper, boundaries of painted zones, transitions between materials. Appliqués mask outlets, switches, ventilation grilles. Panels divert attention from surface defects.
Get Consultation
Zoning without partitions
Wall decor allows you to visually zone space without building walls. Highlight the living room with molding frames and wallpaper inside, the dining area — with a smooth painted surface, the office — with 3D panels. Achieve logical division while preserving openness.
Wall protection: functional beauty
Molding at chair-back height (80–100 cm) protects walls from damage. Corner appliqués protect exterior corners from impacts during furniture movement. Panels in hallways protect the lower part of the wall from dirt, splashes, and abrasion.
Acoustics and thermal insulation
Relief elements on walls affect acoustics — they scatter sound, reduce echo, especially important in rooms with hard surfaces (tile, concrete). 3D panels create an air gap between the wall and decor, improving thermal insulation by 5–10%.
Polyurethane: the material of the 21st century for wall decor
Technical specifications: numbers and facts
Modern polyurethane molding is made from high-quality polyurethane with density 180–320 kg/m³. For comparison: gypsum has density 1200–1400 kg/m³, polystyrene — 25–35 kg/m³, wood — 400–800 kg/m³.
Weight: a molding 2 meters long and 10 cm wide weighs 800–1200 grams. A similar gypsum molding — 8–12 kg, wooden — 3–5 kg. The lightness of polyurethane simplifies transportation and installation, and does not create load on walls.
Strength: polyurethane is an elastic impact-resistant material. It withstands impacts without chips or cracks. You can accidentally bump into a molding with a chair, door, or hand — it will remain intact. Gypsum will crumble in such a situation, wood will be scratched.
Water resistance: polyurethane does not absorb water (water absorption less than 1%). You can install it in bathrooms, kitchens, humid areas, pools. It does not swell, does not mold, does not deform. Gypsum in a humid environment swells, develops mold, and deteriorates within 2–5 years.
Thermal stability: polyurethane retains its properties at temperatures from -60°C to +100°C. Thermal expansion coefficient 0.00007 per degree Celsius — when heated by 30°C, a 2-meter element expands only 0.4 mm, which is imperceptible and compensated by the elasticity of the adhesive joint.
Biological resistance: polyurethane does not create a nutrient environment for mold, fungi, bacteria, insects. It does not rot, does not decompose, remains inert for decades even at 90% humidity.
Durability: the service life of polyurethane molding is 30–50 years without loss of quality. It does not yellow (unlike polystyrene), does not age, does not lose shape, does not fade.
Ecological safety: quality polyurethane does not contain phenols, formaldehyde, or other toxic substances. Safe for residential spaces, children’s rooms, bedrooms.
Comparison with traditional materials
Gypsum: traditional molding, history, authenticity. But gypsum is heavy (10 times heavier than polyurethane), brittle (easily breaks under impact), hygroscopic (absorbs moisture, develops mold), expensive (5–7 times more expensive), difficult to install (requires professionals, metal fasteners).
Polystyrene (expanded polystyrene): cheap, lighter than polyurethane, easy to process. But brittle (breaks under light pressure), yellows after 5–10 years of sunlight exposure, looks cheap (coarse structure, unclear relief), flammable (emits toxic gases in case of fire).
Wood: natural beauty, tactile pleasure, tradition. But wood is heavy, expensive (especially valuable species), requires complex processing (carving, turning), afraid of moisture (swells, dries out, deforms), susceptible to rot and insect damage.
Polyurethane: combines the best qualities — the lightness of polystyrene, the strength of wood, the detail of gypsum, the water resistance of plastic, the accessibility of mass production.
Types of wall decor: elements for any style
Moldings: universal decorative strips
Molding — narrow decorative strips 2–15 cm wide, 2–2.4 meters long. They are universal: framing walls, doors, windows, mirrors, creating frames, dividing zones, transitions between materials.
Simple moldings: smooth rectangular or with one or two recesses. Width 2–5 cm. Ideal for minimalist, Scandinavian, modern interiors. Create neat framing without excessive ornamentation.
Classic moldings: with relief ornaments — beads (rows of small spherical elements), Ionic (rows of egg-shaped elements), meanders (geometric Greek patterns), acanthus leaves, palmettes. Width 5–10 cm. Characteristic of classical, neoclassical, Empire interiors.
Baroque moldings: ornate with scrolls, shells, garlands, complex compositions. Width 10–15 centimeters. Suitable for palace, baroque, rococo interiors.
Corner moldings: special elements for external and internal corners. Simplify installation, create neat joints without the need for precise 45-degree trimming.
Flexible moldings: made of elastic polyurethane, bendable to any radius. Used for framing arches, round columns, curved elements, niches.
Functional applications of moldings:
-
Molding frames (boiserie): creating rectangular or square frames on walls using moldings. Inside the frames — wallpaper, contrasting paint, fabric, mirrors. Effect of classic wall panels from the 18th–19th centuries.
-
Zone division: a horizontal molding at 100–120 centimeters height divides the wall into upper and lower parts. The lower part (panel) is painted dark or covered with panels, the upper part — light or wallpapered. Classic technique of English interiors.
-
Door and window framing: moldings instead of standard casings create individuality, emphasize architectural openings.
-
Transition between materials: molding covers the joint between tile and paint (e.g., in bathrooms), wallpaper and paint, wall panels and plaster.
Decorative appliqués: volumetric accents
Decorative appliqués — volumetric elements sized 5×5 to 50×50 centimeters with relief patterns. Installed on walls as standalone accents or in compositions.
Rosettes: round or polygonal elements with diameter 10–50 centimeters. Originally used on ceilings, but now popular on walls as decorative panels. Installed above commodes, sofas, or centered within molding frames.
Corner appliqués: elements for decorating internal and external wall corners. Size 15×15, 20×20, 30×30 centimeters. Protect corners from damage and add decorative appeal. Especially popular in classical and baroque interiors.
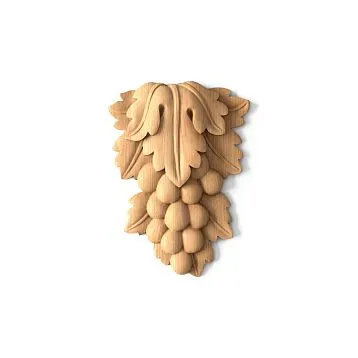
Ornamental appliqués: small elements with botanical motifs (leaves, flowers, grapevines), geometric patterns, scrolls. Size 10×10, 15×20 centimeters. Used to decorate corner joints of molding frames, molding junctions, or as standalone accents.
Medallion appliqués: oval or round elements with portraits, coats of arms, complex compositions. Size 20×30, 30×40 centimeters. Characteristic of Empire, classical, and historical interiors.
Brackets and consoles: elements shaped like the letter L or S, imitating decorative supports. Size 15×10, 30×20 centimeters. Installed under shelves, countertops, creating the illusion that furniture is supported by brackets (though actually held by hidden fasteners).
Panels: large decorative elements
Panels — flat or relief decorative panels sized 30×30, 60×60, 80×80, 100×150 centimeters and larger, with patterns, ornaments, narrative compositions.
Classical panels: with botanical motifs (acanthus leaves, grapevines, roses, lilies), geometric ornaments (meanders, rosettes), mythological scenes. Installed above fireplaces, sofas, or centered on walls as accent elements.
Baroque panels: with ornate compositions — angels, garlands, shells, complex scrolls. Size 80×100, 100×150 centimeters. Characteristic of palace, luxurious interiors.
Geometric panels: with abstract patterns, circles, squares, lines. Suitable for modern, minimalist interiors.
Narrative panels: with relief depictions of landscapes, still lifes, historical scenes. Size 60×80, 80×100 centimeters. Used as art objects.
3D panels: modern volumetric texture
3D panels — relief panels sized 50×50, 60×60 centimeters with volumetric geometric patterns (waves, cubes, pyramids, honeycombs, hexagons, abstract compositions). Mounted on walls to create volumetric texture, play of light and shadow.
Geometric 3D panels: waves (horizontal, vertical, diagonal), cubes (projecting, recessed), pyramids, rhombuses. Create strict geometry, technological feel.
Organic 3D panels: imitation of natural textures — tree bark, stone, bamboo, honeycombs, water ripples. Add naturalness, tactile quality.
Abstract 3D panels: chaotic or ordered compositions without an explicit narrative. Art, avant-garde, individuality.
Applications of 3D panels:
-
Accent wall — fully covered with panels, becomes the focal point.
-
Zoning — panels define TV zones, headboards, office areas.
-
Decorative inserts — several panels on a smooth wall create a visual accent.
-
Hallways and entryways — panels on the lower part of the wall (height 100–120 cm) protect against dirt and wear, adding volume to narrow spaces.
Pilasters and half-columns: vertical architecture
Pilasters — vertical flat elements imitating columns, protruding from the wall by 2–5 cm. Height 1.5–3 meters, width 10–30 cm. Composed of base (foundation), shaft (body), and capital (top).
Half-columns — volumetric elements protruding from the wall by half their diameter. Diameter 15–40 cm, height 1.5–3 meters.
Functions of pilasters and half-columns:
-
Visual zoning — a pair of pilasters on either side of an area creates an architectural frame.
-
Doorway framing — pilasters on both sides + pediment on top = classic portal.
-
Fireplace framing — pilasters on both sides of the fireplace + shelf on top = architectural composition.
-
Vertical axes — several pilasters along a long wall create rhythm and visually increase height.
-
Symmetrical compositions — a pair of pilasters with a mirror, painting, or panel between them.
Pediments and sashings: classical elements above openings
Pediments (sashings) — triangular or arched elements installed above door and window openings. Width 50–150 cm, height 15–50 cm.
Straight pediments: triangular, imitating pediments of ancient temples. Rigidity, monumentality, classicism.
Arch pediments: arched, with soft curved lines. Elegance, baroque, rococo.
Broken pediments: with a break at the top, where a vase, urn, or rosette is installed. Baroque, neoclassical, theatrical.
Casings and frames: frames for openings
Casings — decorative frames around door and window openings. Width 5–15 cm, thickness 1–3 cm.
Simple casings: smooth rectangular. Minimalism, modernity.
Classic casings: with relief profiles and ornamentation. Classicism, neoclassicism.
Carved casings: with rich decoration, scrolls, plant motifs. Baroque, rococo, Russian style.
Selection rules: creating harmony
Low ceilings (2.5–2.7 meters): use thin cornices 3–6 cm high, simple moldings 2–4 cm wide, small rosettes 20–40 cm in diameter. Large elements visually 'lower' the ceiling, making the room feel cramped.
Low ceilings (2.5–2.7 meters): use thin moldings 3–6 cm wide, small appliqués 10×10, 15×15 cm. Avoid pilasters and bulky elements (they visually lower the ceiling).
Medium ceilings (2.8–3.2 meters): universal height, suitable moldings 5–10 cm wide, appliqués 15×20, 20×30 cm, panels 60×80 cm, pilasters up to 2.5 meters high.
High ceilings (3.3 meters and above): boldly use wide moldings 10–15 cm, large panels 80×100, 100×150 cm, pilasters and half-columns full height of the wall.
Room area and purpose
Small rooms (up to 12 m²): minimal decoration — thin moldings for framing mirrors and doors. Excess molding will overload the space.
Medium rooms (12–25 m²): medium elements, molding frames on one or two walls, panels above the sofa.
Large rooms (25+ m²): large elements, complex compositions, accent walls with 3D panels, several pilasters, coffered frames on multiple walls.
Purpose:
-
Living room — the most decorated space. Molding frames, panels, 3D panels, pilasters.
-
Bedroom — moderate decoration. Molding frame behind the headboard, mirror framing.
-
Office — strict classic. Molded frames, pilasters, classical appliqués.
-
Entryway — functional decor. 3D panels in the lower part (dirt protection), mirror framing.
-
Children's room — minimal decor. Simple moldings, bright colors.
-
Bathroom and kitchen — moisture-resistant elements. Moldings for zone separation, mirror framing.
Interior style: harmony of decor
Classic: molded frames with classical ornaments, pilasters with capitals, pediments above doors, classical panels with floral motifs. Color — white, cream, with gold or silver patina.
Neoclassicism: simplified classical elements, more laconic and strict. Moldings with minimal relief, small appliqués, simple pilasters. Color — white, gray, beige.
Baroque and Rococo: ornate moldings with scrolls, large panels with angels, carved appliqués, half-columns with rich capitals. Color — white with gold, cream, pastel tones with gilding.
Empire: strict molded frames, pilasters with Doric or Ionic capitals, pediments, appliqués with military motifs (laurel wreaths, swords, shields). Color — white with gold, red wood with gold.
Minimalism: simple smooth moldings 3–5 cm wide, without appliqués or panels. Color — white, gray, matching wall color.
Scandinavian: simple white moldings for zone framing, without additional decor. Create neat framing without overloading.
Loft: minimal molding. Can use simple moldings to frame brick or concrete inserts, 3D panels with industrial texture.
Provence: medium-sized moldings with floral ornament, appliqués with floral motifs, panels with pastoral scenes. Color — white with aging effect, lavender, mint, with patina.
Art Deco: moldings and panels with geometric ornaments — zigzags, fans, stepped profiles, hexagons. Color — white, black, gold, silver, contrasting combinations.
Modern: 3D panels with geometric patterns, simple moldings for zoning. Color — any, often contrasting (black on white, graphite on gray).
Wall decor installation: step-by-step technology
Tools and materials
Tools: circular saw (or metal hacksaw with stop block), office knife, tape measure, pencil, laser level (or water level), ladder, putty knife, sandpaper (120–180), brushes or roller.
Materials:Decorative stucco(moldings, appliqués, panels, 3D panels), mounting polyurethane adhesive (e.g., 'Moment Montazh', 'Titan', specialized polyurethane), white acrylic sealant, putty (if needed), primer, paint (if planning to paint).
Wall Preparation
Cleaning: walls must be clean, dry, and degreased. Remove dust, dirt, grease stains, remnants of old wallpaper, peeling paint. If the wall is painted with glossy paint, lightly sand it to improve adhesive bond.
Leveling: polyurethane is flexible and follows minor irregularities (up to 3–5 mm). But significant unevenness should be leveled with putty. Otherwise, moldings will appear visually crooked.
Priming: apply deep-penetration acrylic primer to the wall. This improves adhesive bond, prevents peeling, and reduces base absorbency.
Marking: measure the wall, draw a pencil sketch of element placement. Use a laser level for horizontal and vertical lines. For molding frames, draw rectangles; for pilasters, draw vertical axes.
Molding installation
Cutting straight sections: measure required length, cut molding with hacksaw or circular saw. Cut edge must be straight and perpendicular.
Cutting corners: for butt joints at right angles (frame creation), cut each element at 45 degrees. Use stop block or circular saw with angle adjustment. Practice on scrap piece — precise cutting is critical for neat joints.
Applying adhesive: apply adhesive to the back of molding in zigzag or dots. Don’t be stingy with adhesive — excess will squeeze out and be cleaned later. Insufficient adhesive will cause peeling.
Adhering: press molding to wall, aligning with marking. Press evenly along entire length with hands or roller. Hold 30–60 seconds (depends on adhesive type and temperature).
Removing excess: immediately wipe away excess adhesive squeezed out from under the element using a damp cloth or putty knife.
Fixation: if molding is long or heavy, temporarily fix with painter’s tape or small nails (remove later, patch holes with putty).
Corner joints: two moldings, cut at 45 degrees, join at frame corner. Joint must be tight, no gaps. Apply adhesive to ends of both elements before joining.
Installing appliqués and panels
Marking: mark center of installation location with pencil (e.g., center of wall above sofa, corner of molding frame).
Mock-up: Attach the element to the wall without adhesive, check its position and symmetry.
Adhesive application: Apply adhesive to the back of the applique or panel along the perimeter and center (if the element is large).
Adhering: Press the element onto the wall, aligning it with the marking. Hold for 60–120 seconds (appliques are heavier than moldings).
Fixation: Large panels and heavy appliques require additional fixation. Use painter’s tape (strips from element to wall) or temporary supports until the adhesive dries (12–24 hours).
Installation of 3D panels
Marking: Draw a grid on the wall where the panels will be installed. Use a laser level for accuracy. Start from the center of the wall (or from the corner if the wall begins with a full panel).
Adhesive application: Apply adhesive to the back of the panel along the perimeter and center.
Adhering: Press the panel onto the wall, aligning it with the marking. Adjacent panels must fit tightly without gaps. Press evenly, checking levelness.
Sequence: Install panels row by row, from bottom to top or from center to edges (depending on the pattern).
Installation of pilasters and half-columns
Vertical marking: Draw a vertical line on the wall using a laser level — the pilaster’s axis.
Height trimming: If the ceiling height is not a multiple of the element’s height, trim the pilaster from the bottom (base) or in the middle of the shaft (less noticeable).
Adhesive application: Apply adhesive to the entire back surface (pilasters have a larger contact area).
Adhering: Press the pilaster onto the wall, aligning it with the vertical line. Check verticality with a level. Hold for 2–3 minutes.
Fixation: Pilasters are tall and heavy, requiring additional fixation. Use painter’s tape or temporarily nail them from top and bottom.
Joint sealing and final finishing
Sealant: After the adhesive dries (12–24 hours), inspect the joints. Fill small gaps (up to 2 mm) with white acrylic sealant. Extrude sealant into the gap from the tube, smooth with a wet finger or putty knife, and wipe excess with a damp cloth.
Spackling: Fill large gaps (if the wall is uneven or the cut is inaccurate) with acrylic spackling compound. After drying, sand with fine grit (180–220).
Painting: If the elements are white and you want another color, paint them with acrylic paint. Apply with brush, roller, or spray in 1–2 coats. For contrast, paint the molding in a color different from the wall (white molding on gray, black on white).
Patina: For a luxurious effect, apply gold, silver, or bronze patina to raised parts of the relief. Apply base coat paint (white, cream, gray), then patina with dry brush or sponge.
Designer ideas: Inspiration for creativity
Classic molding frames (boiserie)
Divide the wall into rectangular or square sections using 8 cm wide moldings. For a 4×3 meter wall, create 6 frames (3 rows of 2 frames). Paint the interior of the frames with a tone darker than the base color or cover with subtle patterned wallpaper. Paint the moldings white. This creates the effect of classic panels. Hang a large painting or mirror in the central frame above the sofa.
Accent wall with 3D panels
In the bedroom, cover the wall behind the headboard with 3D panels featuring a wavy pattern. Paint the panels deep blue, emerald, or graphite. Add side lighting (wall sconces or LED strip at the bottom). The textured surface will create visual depth and make the wall the focal point.
Modern minimalism with contrast
On light gray walls, install simple white moldings to create 4 large frames (2×2). Leave the interior of the frames gray. The moldings will create a light structure without overwhelming the space. Hang a black-and-white photo in one frame, and a mirror in another.
Fireplace framing with pilasters
Install two pilasters 2.5 meters high with classic capitals on either side of the fireplace. Lay a horizontal shelf-cornice 15 cm wide (can be made of MDF or wood, styled to resemble molding) on top. Install a pediment or panel above the shelf. This creates a classic portal.
Hallway zoning with panels
In the hallway, install 3D panels or molding frames on the lower part of the wall (height 100–120 cm). Paint the panels dark gray, and the upper part of the wall light gray or white. The panels will protect the wall from dirt and visually divide the space.
Art Deco symmetry
Dramatic contrast
Provence with floral motifs
Install a molding frame 120×150 cm above the headboard. Molding with botanical ornament. Paste floral wallpaper (roses, lavender) inside the frame. Paint moldings and surrounding wall white with slight patina (aged effect). Install decorative rose outlets at the corners of the frame.
Care for wall decor
Regular cleaning: wipe stucco with a dry soft cloth or vacuum with a soft brush every 1–2 months (depending on dustiness). Dust accumulates in relief, dulling elements.
Wet cleaning: every 3–6 months wipe with a damp cloth and mild detergent (liquid soap, dishwashing liquid). Avoid abrasives, aggressive chemicals, solvents.
Care for 3D panels: wipe with a dry cloth or vacuum. Do not use stiff brushes (may scratch surface).
Paint refresh: after 5–10 years paint may fade or get dirty. Lightly sand with fine grit (220–320), prime, repaint.
Repair damage: sand and repaint scratches to match. Fill dents with acrylic spackle, sand, repaint. If element has detached, apply fresh adhesive, press down, secure with tape until dry.
Frequently asked questions
Can polyurethane stucco be glued to wallpaper?
Yes, but better on primed walls. If wallpaper is thin and paper-based, it may peel under weight of stucco. Fleece and vinyl wallpapers hold better.
How long does it take to install molding frames?
One 100×150 cm frame — 30–40 minutes (cutting + gluing). Six frames on a wall — 3–4 hours.
Can polyurethane molding be painted?
Any water-based paint (acrylic, latex).
How long does polyurethane stucco last on walls?
30–50 years with proper installation and maintenance.
Can it be installed in bathrooms and kitchens?
Yes, polyurethane is completely moisture-resistant.
Is special adhesive needed?
Preferred: polyurethane adhesive or universal mounting polymer ("Moment Mounting", "Titan").
How to calculate the amount of molding for frames?
Measure perimeter of each frame, sum, add 10–15% for trimming and reserve.
Conclusion: walls as canvases for creativity
From classic molding frames to avant-garde 3D panels, from baroque panels to minimalist strips — choice is limitless. You can create palace luxury, Scandinavian simplicity, Provence romance, Art Deco elegance — it all depends only on your imagination and boldness.
Lightweight, strong, moisture-resistant, long-lasting, affordable — polyurethane stucco is the choice for those who value beauty, quality, practicality. It’s an investment in the uniqueness of your home, paid back every day when you look at walls and see not blank surfaces, but works of art.
STAVROS offers a professional collection of polyurethane wall decor: over 150 molding models (simple smooth 2–5 cm wide for minimalism, classic with ornament 5–10 cm, baroque with ornate decoration 10–15 cm, flexible for curved surfaces, corner elements for simplified installation), over 100 decorative overlays (outlets 10–50 cm diameter, corner overlays 15×15, 20×20, 30×30 cm, botanical and geometric motifs, brackets and consoles for decorative supports), over 60 panel models 30×30, 60×80, 80×100, 100×150 cm (classic with botanical motifs, baroque with angels and garlands, geometric, narrative), over 40 3D panel models 50×50, 60×60 cm (horizontal and vertical waves, cubes, pyramids, honeycombs, hexagons, organic textures, abstract compositions), pilasters and half-columns 1.5–3 meters high with bases and capitals of different orders (Doric, Ionic, Corinthian), pediments and sashings 50–150 cm wide (straight, arched, broken), door and window casings 5–15 cm wide. Each element is made of high-quality polyurethane with density 180–320 kg/m³, ensuring maximum strength, sharpness of the finest relief details, durability without deformation or yellowing. All elements are primed with white primer and ready for installation or painting. STAVROS offers color matching to any RAL catalog shade (over 200 shades), patina (gold, silver, bronze, copper, aged effects), decorative finishes (Venetian plaster, marble, pearl on stucco). Comprehensive solutions: we will select all elements for your wall decoration (molding for frames + overlays for corners + panels for accents + adhesive + sealant + paint) in a unified style, considering your preferences and budget. Professional consultations: our specialists with 30 years of experience in decorative design will create a wall stucco design project, calculate exact element quantities based on room dimensions, create 3D visualizations of your walls with selected elements (see results before purchase), provide detailed recommendations for installation, painting, and care. Own warehouse in Russia, fast delivery nationwide via transport companies with packaging that prevents damage, flexible discount system for designers, construction companies, regular clients, wholesale buyers. Quality guarantee: all elements undergo multi-stage quality control for defects, warping, uneven relief, scratches. If you find a defect, we will replace the element free of charge with shipping compensation. Visit STAVROS showrooms in Moscow and St. Petersburg to see assembled wall compositions in different styles (classic, neoclassic, baroque, minimalism, Provence, Art Deco, modern), touch elements, evaluate relief quality, material density, ornament sharpness, select ideal elements to create walls of your dreams. Exhibited walls are fully decorated — you will see how molding frames look with different fillings, accent walls with 3D panels, pilaster and pediment framing of openings, decorative compositions with panels and overlays. STAVROS — European-level quality at Russian prices, individual approach to each client, professional support at every stage from idea to implementation, honest prices without hidden markups, transparent working conditions. Create walls that tell stories, reflect character, become works of art. Transform standard apartments into unique spaces with individuality, style, soul. With STAVROS polyurethane stucco, beauty becomes accessible, and dreams of luxurious interiors — reality.
STAVROS offers a professional collection of polyurethane wall decor: moldings over 150 models (simple smooth ones 2–5 cm wide for minimalism, classical ones with ornaments 5–10 cm, baroque ones with lavish decoration 10–15 cm, flexible ones for curved surfaces, corner elements for easier installation), decorative appliqués over 100 models (sockets 10–50 cm in diameter, corner appliqués 15×15, 20×20, 30×30 cm, ornaments with floral and geometric motifs, brackets and consoles for decorative supports), panels over 60 models in sizes 30×30, 60×80, 80×100, 100×150 cm (classical with floral motifs, baroque with angels and garlands, geometric, narrative), 3D panels over 40 models in sizes 50×50, 60×60 cm (horizontal and vertical waves, cubes, pyramids, honeycombs, hexagons, organic textures, abstract compositions), pilasters and half-columns 1.5–3 meters high with bases and capitals of different orders (Doric, Ionic, Corinthian), gables and sashings 50–150 cm wide (straight, arched, broken), door and window casings 5–15 cm wide. Each element is made of high-quality polyurethane with density 180–320 kg/m³, ensuring maximum strength, sharpness of the finest relief details, durability without deformation or yellowing. All elements are primed with white primer and ready for installation or painting. STAVROS offers color matching in any RAL catalog shade (over 200 shades), patination (gold, silver, bronze, copper, aged effects), decorative finishes (Venetian plaster, marble, pearl on stucco). Comprehensive solutions: we will select all elements for your wall decoration (moldings for frames + appliqués for corners + panels for accents + adhesive + sealant + paint) in a unified style, taking into account your preferences and budget. Professional consultations: our specialists with 30 years of experience in decorative design will create a wall stucco design project, calculate the exact quantity of elements based on room dimensions, create a 3D visualization of your walls with selected elements (see the result before purchase), provide detailed recommendations for installation, painting, and maintenance. Own warehouse in Russia, fast delivery across the country via transport companies with packaging that prevents damage, flexible discount system for designers, construction companies, regular customers, wholesale buyers. Quality guarantee: all elements undergo multi-stage quality control for defects, warping, uneven relief, scratches. If you find a defect, we will replace the element free of charge with shipping compensation. Visit STAVROS showroom rooms in Moscow and St. Petersburg to see assembled wall compositions in different styles (classical, neoclassical, baroque, minimalism, Provence, art deco, modern), touch the elements, evaluate the relief quality, material density, ornament sharpness, and choose the perfect elements to create the walls of your dreams. On exhibition stands, fully decorated walls are presented — you will see how molding frames with different fillings look, accent walls with 3D panels, door and window openings framed with pilasters and gables, decorative compositions with panels and appliqués. STAVROS — European-level quality at Russian prices, individual approach to each client, professional support at every stage from idea to implementation, honest prices without hidden markup, transparent working conditions. Create walls that tell stories, reflect character, become works of art. Transform standard apartments into unique spaces with individuality, style, soul. With STAVROS polyurethane stucco, beauty becomes accessible, and dreams of luxurious interiors — reality.