Article Contents:
- Why polyurethane has become a working tool in modern decor
- What is polyurethane decor and why is it winning
- What polyurethane decor can do that other materials cannot
- How two languages connect: slat and texture
- Three models of interaction
- Which polyurethane decor elements suit a slatted wall
- Moldings: the primary tool
- Ceiling cornices: the transition between wall and ceiling
- Baseboards: bottom framing
- Decorative frames: structuring a smooth surface next to the batten
- Capitals and pilasters: large-scale accent
- How to design accent and background zones
- Accent wall: maximum concentration of solutions
- Background walls: neutrality as an active position
- Ceiling: completing the architectural perimeter
- Color: when panel and decor are in the same tone, and when they are not
- Monotone: surface unity
- Contrast: decor as a highlighted detail
- Accent gilding or bronze
- Room by room: how to apply the combination of slatted panels and polyurethane decor
- Living Room
- Bedroom
- Hallway and corridor
- Office
- How not to cross the line between depth and overload
- Rule of three levels of decor
- Rule of one accent relief
- Rule of scale correspondence
- Installation: technical aspects of combining two materials
- Sequence of work
- Mounting polyurethane moldings
- Painting: single layer or separate work
- Common mistakes in profile selection
- First mistake: overly ornate molding against a slatted wall
- Second Mistake: Scale Mismatch
- Third mistake: different tones of molding and slatted panel without a system
- Fourth mistake: decor on every wall when there is a slatted panel
- Fifth mistake: cold light that kills the relief
- Sixth mistake: polyurethane decor without painting or with poor preparation
- FAQ: answers to the most common questions
- About the Company STAVROS

A wall in a modern interior is not just a limiting plane. It is a surface that either works for the space or subtly destroys it. A flat painted wall is neutral but dead. A wall overloaded with decor is alive but aggressive. Between these poles exists a thin, precisely calibrated zone where the surface gains both depth and character while remaining unobtrusive. It is in this zone that the combination ofof slatted panelsandpolyurethane wall decor.
works. This is not a random juxtaposition of two popular materials. It is a thoughtful architectural union in which the linear rhythm of wood and the plastic relief of polyurethane mutually complement and limit each other. The slat disciplines the decor, the decor animates the slat. The task is to understand the principles of this interaction before proceeding with implementation.


Why polyurethane became a working tool of modern decor
About thirty years ago, any discussion about stucco in a residential interior inevitably ran into two obstacles: plaster stucco — heavy, expensive, difficult to install. Wood carving — even heavier and more expensive. Polyurethane radically changed this situation, and we are not just talking about replacing a material — we are talking about a fundamentally different logic of working with decor.


What is polyurethane decor and why it wins
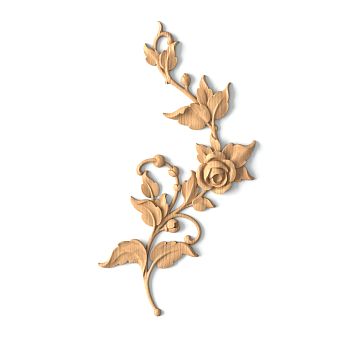
Polyurethane decor for interiors— these are cast products made of rigid foamed polyurethane: moldings, cornices, pilasters, rosettes, capitals, decorative panels, corners, medallions. The material reproduces the most complex reliefs with precision unattainable by hand plaster molding, weighs 5–8 times less than its plaster counterpart, is absolutely moisture-resistant, and does not require special adhesive or complex surface preparation.
But the main advantage of polyurethane decor is not the technical parameters themselves. The main thing is the freedom of application. Lightweight, precise, affordable, easily painted in any color —molded decoration made of polyurethane— has ceased to be a privilege of expensive classical projects and has entered the arsenal of modern design as an everyday tool.
Today, polyurethane moldings and cornices are used not only in Baroque mansions but also in apartments in the style of modern classicism, neo-art, Japanese minimalism with a historical detail, Scandinavian interior with a warm accent. Polyurethane has adapted to the times — and that is why its combination with slatted panels looks organic, not anachronistic.
Our factory also produces:


What polyurethane decor can do that other materials cannot
Let's list specifically:
-
Weightless relief. Polyurethane molding creates shadow and volume — visual effects that are many times richer than a flat painted surface — with its own weight that does not require reinforcement of the load-bearing structure.
-
Precise reproduction of the pattern.Polyurethane Items— are cast using precise molds with repeatability of every curl and profile — this is impossible with hand plaster molding.
-
Moisture resistance. Unlike gypsum, polyurethane does not crack with changes in humidity and does not require a protective layer in bathrooms or kitchens.
-
Paintability. The surface accepts any color—from white to deep anthracite, from gold paint to matte black.
-
Easy installation. Adhesive on a polyurethane or acrylic base, precise trimming to fit the corner—and the decorative element is on the wall.
Get Consultation
How two languages connect: slat and relief
Slat panel and polyurethane decor are visually opposite tools. The slat works through line and repetition: horizontal or vertical, uniform spacing, predictable geometry. Polyurethane decor works through curve and relief: scroll, profile, acanthus leaf, egg-and-dart, simple or complex molding.
They seem like incompatible languages. But it is precisely this incompatibility that makes their combination interesting. The silence of the slat makes the relief of the decor audible. The relief of the decor gives meaning to the silence of the slat, making it not empty.
This principle can be formulated briefly: the slat is the architectural background, the decor is the architectural detail. The first creates the surface, the second completes it.
Three interaction models
First model: framing a slat panel with molding. An accent slat wall is bordered with polyurethane molding around the perimeter—top, bottom, and sides. The molding creates a 'frame' that turns the slat surface from mere finishing into an architectural object—a panel, an insert, a standalone element. This is the most concise and convincing option.
Second model: cornice and baseboard as transitional elements. The slat panel runs from floor to ceiling; at the top, it meets a polyurethane ceiling cornice, and at the bottom, a profiled baseboard. The cornice and baseboard create completeness: the wall does not 'end' at the ceiling and floor but smoothly transitions into architectural framing. This is a classic technique that makes any interior visually cohesive.
Model three: surface separation. The slatted panel occupies part of the wall — for example, the lower two-thirds. The upper third is a smooth painted or plastered surface with polyurethane moldings in the form of decorative frames or a horizontal frieze. A horizontal molding at the level of the transition from the slats to the smooth surface makes this separation intentional and architecturally justified.
Which polyurethane decorative elements are suitable for a slatted wall?
Not every polyurethane profile works equally well in combination with slatted panels. The selection logic is based on matching scale, pattern complexity, and tone.
Moldings: the main tool
A molding is a profiled strip that creates transitions and divisions on walls and ceilings. In combination with a slatted panel, polyurethane molding serves as framing and finishing. Selection rules:
-
The scale of the molding corresponds to the width of the slat. If the slat width is 30 mm, a molding with a projection of 40–60 mm is the correct scale. A massive molding 150 mm wide against a background of narrow slats looks out of place.
-
Pattern complexity is inversely proportional to background complexity. A slatted panel is already a complex, rhythmic surface. The molding next to it should be restrained: a simple quarter-round, a rectangular profile with a single fillet, an uncomplicated 'egg and dart'. A rich ornamental molding against a slatted wall creates a visual conflict.
-
Uniform tone. Molding and slatted panel in the same color create a unity of surface, where the decor works as an architectural detail, not as an added ornament. Contrasting tones are permissible but require precise calculation.
Ceiling cornices: transition between wall and ceiling
A polyurethane ceiling cornice is a traditional element of classical interior that, in combination with a slatted wall, takes on new meaning. Where a bare painted wall without a cornice merges continuously into a white ceiling, a slatted panel with a cornice creates a clear, architecturally finished boundary.
Cornice paired with a slatted wall: a simple profile (100–150 mm) in the color of the ceiling or slatted panel. An elaborately ornamented cornice is acceptable with wide slat spacing and a large room scale (ceilings from 2.8 m, area from 20 m²).
molded decoration made of polyurethaneIn the form of a ceiling cornice, it is one of the most in-demand elements, and paired with a slatted wall, it works especially convincingly, covering the upper joint of the slatted panel with the ceiling and creating completeness in the architectural perimeter.
Baseboards: lower framing
A wide polyurethane baseboard (80–120 mm) with a simple profile serves as the lower finishing of the slatted panel. In classic interiors, a wide baseboard emphasizes the significance of the wall; in modern ones, it serves as a concise transition between the panel and the floor.
Paired with a slatted wall, the baseboard should be in the same tone as the panel: a white baseboard for a white slatted wall, a dark baseboard for a dark slatted wall. A contrasting baseboard accentuates the transition—this is a solution for those who consciously want to highlight the lower zone of the space.
Decorative frames: structuring a smooth surface next to the slat
Polyurethane frames—rectangular or arched contours made of profiled molding—are elements that work not on the slatted wall but next to it: on the smooth part of the adjacent wall. Polyurethane frames create division on the smooth surface, visually rhyming with the rhythm of the slatted panel.
For example: a slatted wall in the living room behind the sofa, the adjacent wall is smooth with two decorative polyurethane frames in the tone of the panel. The frames do not copy the slat—they respond to it in a different language of the same theme.
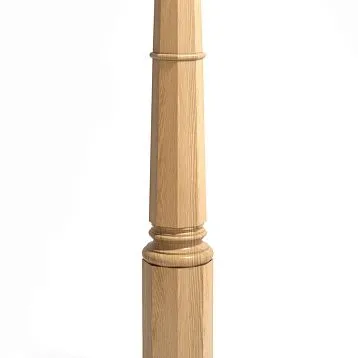
Capitals and pilasters: a large-scale accent
Polyurethane pilasters on the side edges of the slatted panel—this is an architectural technique that transforms the slatted surface into something resembling a niche or portal. A pilaster at the beginning and end of the slatted field, an entablature on top—and the slatted panel gains the status of an independent architectural object embedded in the wall.
This solution is suitable for high ceilings (from 2.8 m) and large spaces. In small rooms, pilasters can create a sense of overload.
How to design accent and background zones
When working with slatted panels and polyurethane decor, it is critically important to distinguish between accent and background zones. Overload occurs precisely when this distinction is absent—when decor is present uniformly on all surfaces without hierarchy.
Accent wall: maximum concentration of solutions
One wall in the room is the accent wall. Here, the slatted panel is placed, here there can be molding framing, here accent lighting is directed. This wall is the main character of the space.
For an accent wall, the following is acceptable:
-
Slatted panel from floor to ceiling or in a 'frame' format
-
Molding around the perimeter of the slatted surface
-
Ceiling cornice on top
-
Baseboard at the bottom with a unified tone
-
Spot lighting directed at the surface
For an accent wall, the following are unacceptable:
-
Additional decorative frames within the slatted field
-
Ornamental moldings over slatted battens
-
A second decorative system competing with the slats
Background walls: neutrality as an active position
The remaining three walls (or two if the room is corner) are background. Their task is not to distract attention from the accent wall, but also not to be completely empty.
Options for decorating background walls:
-
Solid-color painting in the same or a similar tone to the slatted panel
-
A simple polyurethane cornice around the perimeter of the ceiling — uniform for all walls
-
Decorative molding frames of moderate size — no more than two per wall
What not to do on accent walls:
-
A second slatted panel — only if it is in a different tone and clearly plays a supporting role
-
Rich ornamental decor that competes with the accent wall
Ceiling: completing the architectural perimeter
Ceiling in an interior with slatted walls and polyurethane decor — a surface that should complete, not continue. A white or neutral ceiling with a polyurethane ceiling cornice around the perimeter is a universal solution. A slatted ceiling in the same tone as the wall panels is a stronger solution for those who want to create a voluminous 'cocoon' of slatted texture.
Color: when the panel and decor are in the same tone, and when they are not
Color scheme for combining slatted panels and polyurethane decor is a key issue that determines the final character of the space.
Monotone: unity of surface
Slatted panel and polyurethane decor in a single tone — this is the principle of a monotone interior, where color works as an architectural material. The entire wall is one color: slats, moldings, cornice, baseboard. Deep green, anthracite, warm white — the surface becomes a single volume, in which decorative details are read only through relief and shadow, not through color difference.
This solution is maximally contemporary and maximally demanding of execution quality: every joint irregularity, every surface variation is visible in the monotone.
Contrast: decor as an accentuated detail
A slatted panel in a dark tone, moldings in white or gold. Or vice versa: white slats, a cornice with gilding. This approach returns us to classical aesthetics, where decorative elements stood out in tone relative to the background.
Works with a clear understanding of hierarchy: what is more important—the slat or the decor? If the slat—the decor is slightly quieter, closer to the panel's tone, but not identical. If the decor—the slat is more neutral, the decor is brighter.
Accent gilding or bronze
A thin gilded strip of molding against a dark slatted wall is one of the most luxurious and restrained techniques simultaneously. Gold doesn't shout if there's little of it. A narrow gilded molding framing a slatted panel on a deep green or anthracite background is elegance without theatricality.
Room by room: how to apply the combination of slatted panels and polyurethane decor
Living Room
Slatted panels in the living room interior— an accent wall behind the sofa or TV area. Framing the slatted panel with a profile molding made of polyurethane around the perimeter. A ceiling cornice uniform around the entire perimeter of the room. The three background walls are monochromatic with decorative frames made of molding or simply with a cornice.
Option for a high living room: a slatted panel on the lower part of the wall (up to a height of 1.8–2.0 m), above—a smooth surface with a decorative polyurethane frieze and a ceiling cornice. A horizontal molding at the transition from the slats to the smooth surface creates a 'belt' that runs around the entire perimeter.
Bedroom
slatted panels in the bedroomat the headboard—an accent niche framed with polyurethane molding. The ceiling cornice is uniform, of a simple profile. On the side walls—smooth surfaces with two decorative frames in the same tone.
In the bedroom, softness of decor is especially important: molding projection no more than 50–60 mm, pattern — the simplest. A quiet room does not tolerate aggressive relief.
Hallway and corridor
Slatted panels in the hallway— one of the most convincing scenarios for using decorative polyurethane as a finishing touch. A narrow corridor with slatted panels along its entire length, a polyurethane ceiling cornice, a wide baseboard — and a long space turns into an architecturally complete volume.
A decorative frame at the end of the corridor around a mirror or console — another technique that creates an illusion of depth and visually elongates the space.
Office
Slatted panels for the studyin a dark tone with profile moldings made of polyurethane in the same tone — this is a space with weight and intellectual seriousness. The ceiling cornice is slightly more complex than in the bedroom — a profile with two or three elements. Pilasters at the edges of the slatted panel, if the ceilings allow, will complete the image of a study-library.
How not to cross the line between depth and overload
This is the most practically important section. Theoretically, one can understand the principles of combination, but in practice, crossing the boundary happens imperceptibly — detail by detail, element by element, until the space finds itself on the other shore.
The rule of three levels of decor
In one space, there should not be more than three levels of decorative complexity simultaneously. The levels are:
-
Background — painted surface, uniform structure, nothing requiring attention.
-
Structural — slatted panel, creating rhythm and texture.
-
Accent — molding, cornice, baseboard, frame.
If a fourth level is added — an ornamental pattern in the molding, an additional frieze, a second framing system — the space becomes overloaded. Three levels are the maximum.
Rule of one accent relief
Only one element of polyurethane decor in a space can have a complex ornamental pattern. If it's a ceiling cornice with an acanthus frieze — the wall molding should be simple. If it's a decorative frame with a complex profile — the cornice is simplified. Competition between two ornamental elements creates visual noise.
Rule of scale correspondence
The scale of polyurethane decor must correspond to the scale of the room and the slatted panel:
| Ceiling height | Recommended cornice size | Molding | Skirting board |
|---|---|---|---|
| 2.4–2.5 m | 80–100 mm | 30–50 mm | 60–80 mm |
| 2.6–2.8 m | 100–130 mm | 40–70 mm | 80–100 mm |
| 2.9–3.2 m | 130–180 mm | 50–90 mm | 100–130 mm |
| from 3.2 m | 180–250 mm | 70–120 mm | 130–160 mm |
Installation: technical aspects of joining two materials
Work sequence
The correct installation sequence is critical for the cleanliness of the final result:
-
Wall leveling and preparation — plaster, primer.
-
Installation of electrical wiring and embedded elements for mounting heavy components.
-
Installation of slatted panels.
-
Installation of polyurethane decor — cornices, moldings, baseboards, frames.
-
Final painting — joint painting of the slatted surface and polyurethane decor in a single tone (for a monochrome option) or separate painting (for a contrasting one).
installation of slatted panelsis performed before the installation of polyurethane decor: the molding is attached over the installed panel, covering its top or side edge.
Installation of polyurethane moldings
Polyurethane decor is attached with special polyurethane adhesive or liquid nails. Corner joints — at 45 degrees, cut precisely with a miter box or miter saw. Polyurethane is easily worked with standard woodworking tools.
After installation, joints are filled with acrylic putty, sanded, and primed before painting. This stage determines whether the decor will look monolithic or if seams will be visible.
Painting: single layer or separate work
In the monotone option (slat and decor in the same tone), final painting is done in one pass: first the slatted surface, then the moldings, then a joint corrective pass. This ensures tonal unity without differences in shade.
In the contrast option, surfaces are masked with tape along the joint line and painted separately. The precision of masking at the joint between the slatted panel and molding is a key factor in the quality of the final result.
Common mistakes in profile selection
Practice shows that most mistakes in working with slatted panels and polyurethane decor are typical. Let's examine each one.
First mistake: overly ornate molding against a slatted wall
Complex ornamental molding with acanthus leaves, shells, and fillets—next to a slatted panel, this creates competition between two intricate systems. The result: neither the slats nor the decor stand out. The space becomes cluttered and tiresome.
Solution: choose a molding with a simple profile for framing the slatted panel — no more than two or three fillet elements.
Second mistake: scale mismatch
A wide cornice (200 mm) in a room with a 2.5 m ceiling and a narrow slatted panel—a scale disaster. The cornice occupies almost 10% of the wall height, making the slats appear like miniature details under monumental framing.
Solution: refer to the scale correspondence table above and strictly adhere to the proportions.
Third mistake: different tones of molding and slatted panel without a system
Beige slatted panel plus white cornice plus gray baseboard plus cream molding—four different tones of 'neutral' colors that together create a chaotic, unsystematic mess. Each alone seems neutral, but together they appear uncoordinated.
Solution: choose one base tone for all decorative framing. The slatted panel can be in a different tone—but the cornice, molding, and baseboard should be identical or from a clearly defined palette with a difference of no more than two to three units on the brightness scale.
Fourth mistake: decor on every wall when there is a slatted panel
Decorative frames on all four walls plus a slatted panel on one wall—this is no longer 'three levels of decor,' it's five or six. Background walls with frames stop being a background and turn into accents competing with the slatted panel.
Solution: polyurethane frames—only on a maximum of two walls, and only if they are significantly simpler and smaller in scale than the framing of the slatted panel.
Fifth mistake: cold light that kills the relief
Polyurethane decor thrives in shadow. Its relief creates expressiveness precisely because light falls at an angle and creates shadows in the recesses. Cold overhead light from ceiling LEDs with a color temperature of 4000+ K flattens the relief, makes it look flat—and all the effort put into selecting the decor is wasted.
Solution: warm light 2700–3000 K, directional light fixtures angled toward decorative surfaces.
Sixth mistake: polyurethane decor without painting or with poor preparation
Untreated polyurethane has a matte, porous surface that looks sloppy next to smooth painted surfaces. Before painting, polyurethane decor is primed with a special adhesion primer—only then does the paint apply evenly and adhere firmly.
Skipping the priming step leads to uneven tone, paint peeling in the recesses of the relief, and rapid loss of appearance.
FAQ: answers to the most common questions
Can MDF slatted panels and polyurethane decor be combined in a bathroom?
MDF slatted panels in the bathroom are undesirable without special moisture-resistant coating, as MDF is sensitive to constant moisture.Polyurethane wall decorIn the bathroom, on the contrary, it is completely organic: polyurethane is moisture-resistant by the nature of the material. In the bathroom, it is better to use oak slatted panels with a varnish finish or MDF with moisture-resistant enamel, paired with polyurethane molding in a matching tone.
Is professional installation necessary for polyurethane decor?
Installation of mostpolyurethane productsis available for DIY execution with basic construction skills. Glue, a miter box for corner cutting, acrylic putty for joints — that's the entire necessary toolkit. Professional installation is recommended for complex profiles, large scale, and high requirements for joint quality.
Oak or MDF slatted panels — which is better paired with polyurethane decor?
Both options work. Oak slats with tinting require polyurethane decor painted in a similar wood tone or a contrasting neutral one—white or gold. MDF for painting allows both the slat and the decor to be painted in a unified tone—a monochromatic solution that looks maximally modern.
Can polyurethane decor be used as a standalone solution without slatted panels?
Yes, and this is a classic scenario. But paired with slatted panels, polyurethane decor gains an architectural context that makes its presence in a modern interior logical and justified, not just a tribute to tradition.
How to determine if the space is not overloaded with decor?
Simple test: enter a finished room and ask yourself — what catches the eye first? If the answer is clear (an accent slatted wall, or a sofa, or a work of art), — the space is not overloaded. If your gaze wanders, finding no focal point — there is too much decor.
What adhesive should be used for installing polyurethane decor next to slatted panels?
Specialized polyurethane adhesive or solvent-free acrylic-based liquid nails. Important: solvent-based adhesives (some types of liquid nails) can deform the polyurethane surface.
About the company STAVROS
The combination of slatted panels and polyurethane decor is a professional toolkit that, in skilled hands, creates spaces that are memorable for years. Both require production quality that is visible not in a brochure, but in the joint, the profile, the precision of dimensions.
STAVROS is a manufacturer where both of these tools are housed under one roof.slatted panels made of MDF and solid oakare manufactured with geometric precision ensuring seamless joining of modules into a single continuous surface.molded decoration made of polyurethane— moldings, cornices, baseboards, rosettes, capitals, pilasters — are cast from European-produced material with detailed relief work and stable geometry, critical for precise corner joints.
STAVROS doesn't just sell two types of products — here they understand how they work together. This allows for a comprehensive interior solution: slatted panels and decorative profiles coordinated in tone, scale, and material, creating a finished space, not a set of separate solutions.