Article Contents:
- What is Ceiling Molding and What Problems Does It Solve in Interior Design
- Decorative function
- Visual Zoning of Space
- Emphasizing Interior Style
- Masking Joints, Transitions and Technical Units
- Types of Ceiling Molding
- Ceiling Cornices
- Ceiling Moldings
- Ceiling Rosettes
- Corner and decorative elements
- Complex Decorative Compositions
- Ceiling Molding in Interior Design: Where and How It Looks Best
- Ceiling molding in the living room
- Ceiling molding in the bedroom
- Ceiling molding in the kitchen-dining room
- Ceiling molding in the hallway and foyer
- Ceiling molding in the study
- Ceiling molding in various interior styles
- Classic
- Neoclassicism
- Modern style
- Art Deco
- Eclecticism
- Why polyurethane ceiling molding is a practical solution
- Lightweight and easy installation
- Clear geometry and neat relief
- Resistance to moisture and changing conditions
- Suitable for painting
- Durability and Ease of Maintenance
- How to choose ceiling molding: what to look for before buying
- Ceiling height
- Room area
- Interior style
- Size and relief of elements
- Compatibility with lighting
- Color scheme and subsequent painting
- How to decorate a ceiling with molding: practical ideas for different rooms
- Minimalist ceiling with a thin cornice
- Ceiling with a central rosette for a chandelier
- Ceiling with moldings in the form of symmetrical frames
- Multi-level decorative design
- Accent ceiling in neoclassical style
- Contrasting molding after painting
- Installing molding on the ceiling: key steps
- Foundation Preparation
- Ceiling marking
- Fitting Elements
- Applying adhesive
- Fixation and joining
- Joint treatment
- Painting after installation
- Common mistakes when decorating a ceiling with molding
- Too massive decor for low ceilings
- Mismatch with room scale
- Random ornament selection
- Overloading with decorative elements
- Errors in layout and joining
- Ignoring the overall room style
- What to combine ceiling molding with
- With wall moldings
- With decorative rosettes
- With lighting
- With classic and modern chandeliers
- With painted walls and panels
- Ceiling molding care
- Who ceiling molding is suitable for
- For apartment owners with high ceilings
- For those decorating in classic or neoclassical style
- For those wanting to add architectural expressiveness
- For those seeking a neat decorative accent without heavy materials
- Frequently asked questions about ceiling molding
- Is ceiling molding suitable for a modern apartment?
- Can ceiling molding be used in rooms with low ceilings?
- What is better for ceilings: plaster or polyurethane?
- Can ceiling molding be painted?
- Is it difficult to install ceiling molding yourself?
- What elements of molding are most commonly used for ceilings?
- Conclusion

There are interior details that never go out of style—they merely change context. Ceiling molding is one of them: it was in 19th-century noble mansions, it exists in modern apartments in 2026, and it will be in projects that are yet to be created. This is not a capricious fashion or a retro wave. It is an architectural language that works in different eras because it appeals to something enduring—to human perception of space, rhythm, and beauty.
Today, ceiling molding is experiencing a confident renaissance. Designers choose it not because it's customary, but because it solves specific problems: it structures the ceiling plane, highlights zones, creates a sense of height and completeness. At the same time, modern ceiling decoration with molding is not at all obliged to be heavy, ornate, or historically literal. Thin moldings, a concise rosette for the chandelier, a neat cornice at the wall junction—and the space acquires a completely different quality.
Material played a key role in this return.Polyurethane moldingsmade the decoration accessible, lightweight, and technological. Restorative plasterers and gypsum dust are no longer needed. Professional results became achievable with DIY installation—and it was this that opened the doors of molding decoration to thousands of apartments that previously simply did not consider such an option.
In this article, we will cover everything: types, styles, rooms, mistakes, installation, and selection criteria. No fluff—only what you really need to know before making a decision about ceiling design.


What is ceiling molding and what tasks does it solve in the interior
Ceiling molding is three-dimensional decorative elements that are attached to the ceiling surface or at the junction of the wall and ceiling. Historically, molding was made from gypsum, alabaster, or cement. Today, polyurethane, expanded polystyrene, and other lightweight synthetic materials with similar relief plasticity have taken their place.
Ceiling molding is not just decoration. It is a functional tool that, in skilled hands, solves several design tasks at once.


Decorative function
The main and obvious one. Ceiling decoration with molding visually enriches a surface that in most apartments remains empty and unexpressive. Relief ornamentation, the geometry of moldings, the plasticity of a rosette—all this transforms a neutral ceiling into an independent element of the interior. Decorating a ceiling with molding elevates the perception of space from the level of 'just a renovation' to the level of 'a thoughtful interior'.
Our factory also produces:


Visual zoning of space
Decorative ceiling molding allows dividing a large room into functional zones without walls or partitions. A molding frame above the dining area, a rosette in the center of the living room, a cornice around the perimeter — each element marks a zone, forms its boundaries, and gives it completeness. This is especially valuable in studio apartments and open layouts, where ceiling zoning becomes one of the designer's main tools.
Get Consultation
Emphasizing interior style
Ceiling plaster decor is one of the most accurate style markers. Baroque, neoclassicism, art deco, empire — each direction has its own ornamental forms, its own plasticity and rhythm. But even modern minimalism is not alien to plasterwork: here it looks like a clear geometric line, a restrained detail, an architectural accent without excess.
Masking joints, transitions, and technical units
The practical task solved by ceiling cornices and moldings is to hide the transition between the wall and the ceiling. Even a perfectly executed repair settles, resulting in small cracks and gaps. The cornice covers this joint once and for all, giving the corner clarity and neatness. Additionally, wide cornice profiles can mask cable channels, lighting wires, and mounting seams of stretch ceilings.
What types of ceiling molding are there
This is one of the key sections for those just entering the topic. Molding is not a single product, but an entire system of decorative elements with different functions and application logic. Understanding this system is the first step to properly decorating a ceiling.
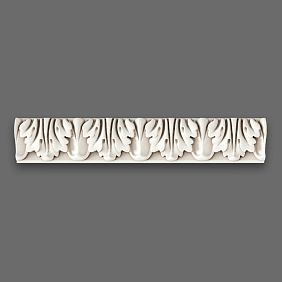
Ceiling Cornices
Cornices are the most common type of ceiling molding. They are mounted around the perimeter of the room at the line where the wall meets the ceiling and solve two tasks at once: decorative and constructive. Decorative ceiling cornices come in simple profile (smooth strip with minimal relief) and ornamental (with leaves, curls, geometric repeats).
The width of the cornice is selected depending on the height of the room: the higher the ceiling — the more massive and elaborate the cornice can be. For standard ceilings of 2.5–2.7 m, cornices 5–10 cm wide are optimal. For high rooms (from 3 m), profiles up to 15–20 cm and higher are appropriate.
The cornice also forms the design of the wall-ceiling junction—one of those elements that in a finished interior is usually simply overlooked, but whose absence immediately catches the eye.
Ceiling moldings
Ceiling moldings are flat or semi-volumetric strips with a profiled cross-section. They are used to create geometric frames on the ceiling, imitate coffered ceilings, and divide the plane into symmetrical sections.
A ceiling with molding frames looks architectural—it appears taller, more structured, and more expensive. This technique is often used in classic living rooms and bedrooms where one wants to achieve a mansion-like feel without actual construction. Moldings can be placed along the perimeter of the room, creating one large field, or divide the ceiling into several symmetrical sections.
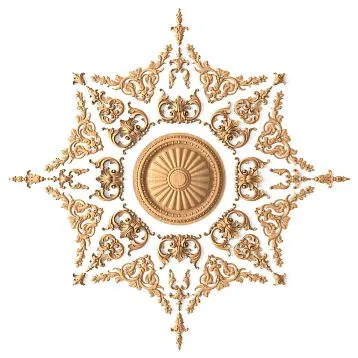
Ceiling Rosettes
Ceiling rosettes are round or polygonal decorative elements installed in the center of a room or at a chandelier suspension point. Their main role is to frame the light source, giving the central axis of the room an accentuated significance.
The rosette unites the chandelier and the ceiling into a single composition, eliminating the feeling of the light fixture being randomly attached to an empty surface. The diameter of the rosette varies from 15 to 80 cm and more. The choice depends on the size of the room, the scale of the chandelier, and the interior style.
Corner and decorative elements
Corner inserts, medallions, overlay rosettes, decorative belts—these are auxiliary elements used to enhance the ornament or create complex compositions. They are rarely used independently, more often as additions to cornices and moldings. Corner elements are especially important where a cornice or molding meets at a right angle: they cover the joints and give the corner transitions a jewel-like neatness.
Complex decorative compositions
The most expressive result is achieved by combining several types of stucco in a single system. Perimeter cornice + molding frames + central rosette—this is classic ceiling architecture that transforms an ordinary floor slab into a full-fledged architectural element. This approach is used in neoclassicism, art deco, and palace style, but its elements work perfectly in modern spaces as well.
Polyurethane ceiling decorationallows you to implement any of these schemes—from a minimalist cornice to a multi-level ornamental system—without complex equipment and expensive craftsmen.
Ceiling molding in interior design: where and how it looks best
Ceiling decoration with molding works in any room — the question is only in scale, shape, and character of the elements. Each room sets its own conditions, and competent decor selection takes them into account.
Ceiling molding in the living room
The living room is the main stage in the house, and it is here that ceiling molding in the interior unfolds to its full potential. A tall rosette under the chandelier, a cornice with an ornament, molding frames—all this creates a sense of formality and architectural completeness. In spacious living rooms, multi-element solutions are appropriate: a contour cornice plus a medallion in the center plus symmetrical molding frames across the entire ceiling plane.
In living rooms with moderate height — from 2.7 to 3 m — a cornice and a central rosette are enough: this already radically changes the perception of the space without overloading it.
Ceiling molding in the bedroom
In the bedroom, molding works differently — not for formality, but for coziness and light solemnity. Thin molding frames above the bed create an accent zone for the headboard, a rosette above the nightlights or central light fixture adds a soft architectural focus. It is important not to overdo it here: the bedroom requires a calm atmosphere, and too saturated an ornament will disrupt it.
The optimal choice for a bedroom is smooth or weakly ornamented cornices, geometric moldings without baroque opulence.
Ceiling molding in the kitchen-dining room
The kitchen is a less obvious space for stucco decor, but here it works perfectly in the dining area. A molding frame or rosette above the dining table highlights the dining zone, giving it a formal status. A cornice along the perimeter of the kitchen area visually raises the ceiling and adds clarity to a room with rich functional content.
Here, the moisture resistance of the material is important—and that is exactly what makes polyurethane molding the preferred choice for kitchen spaces.
Ceiling molding in the hallway and foyer
The hallway sets the first impression of the entire interior. Even a small cornice in the hallway signals: everything here is well thought out. In halls with high ceilings, more representative molding is appropriate—voluminous cornices, corner rosettes, decorative belts. In narrow hallways, a thin ceiling cornice and neat joining of corner elements are sufficient.
Ceiling molding in the study
The study is a space of concentration and status. Ceiling molding here works as an element of representativeness: strict geometric moldings, a restrained rosette, clear cornices without excessive ornamentation. Such a ceiling forms the right psychological environment—structured, serious, commanding respect.
Ceiling molding in different interior styles
One of the most frequent questions is whether molding is compatible with a particular style? The answer is almost always: yes, if the right elements and the right scale are chosen.
Classic
Classical interior—the historical habitat of molding. Here it looks organic and essential: rich ornamental cornices, multi-level frames made of moldings, lush rosettes with acanthus leaves and scrolls. The color scheme is typically white or slightly creamy—matching the ceiling surface. Molding in a classical interior creates a sense of authenticity and historical depth.
Neoclassicism
Neoclassicism—a modern interpretation of classical forms. Here, the molding is more restrained: profiles are cleaner, ornaments are more concise, proportions are stricter. Moldings without complex ornamentation, cornices with geometric relief, rosettes with minimalist radial patterns—all of this fits perfectly into a neoclassical interior. It is neoclassicism that is today the most active consumer of ceiling molding decor.
Modern style
Ceiling molding in a modern interior is not an anachronism or a stylistic mistake. It is an architectural tool used intentionally and precisely. A thin straight-line cornice, a clean geometric molding frame, a restrained central rosette—in a modern interior, these details are read as a conscious design decision, not as a reference to the past.
The key condition is minimal ornamentation or its complete absence. Ceiling stucco in a modern style should be geometric, precise, without floral swirls and historical motifs.
Art Deco
Art Deco and stucco are a match made for each other. This style loves symmetry, geometric patterns, contrast, and decorative richness. Molding frames with corner inserts, polygonal rosettes, serrated cornice profiles—all of this is perfectly in the spirit of Art Deco. Often, the stucco here is painted in a contrasting color: gold, anthracite, bronze.
Eclecticism
Eclecticism is the freest style in terms of stucco decoration. Here, mixing historical ornaments with modern geometric forms is acceptable, combining a Baroque rosette with minimalist moldings. The main requirement is thoughtfulness and internal logic in the combination. A random set of decor in eclecticism looks like a mistake, not a style.
Why polyurethane stucco for the ceiling is a practical solution
The conversation about ceiling stucco decoration today inevitably leads to polyurethane. This is not a marketing choice—it is an objective suitability of the material for the task.
Light weight and ease of installation
Polyurethane elements are 10–15 times lighter than gypsum counterparts of similar size. This is fundamentally important: heavy gypsum stucco required mechanical fastening, special dowels, and sometimes a reinforcing frame. Polyurethane decor is attached with adhesive—and that's it. No special tools, no anchors, no risk to the ceiling structure.
Clear geometry and neat relief
Polyurethane products are manufactured using precise casting, ensuring perfect repeatability of shape. Each element is an exact copy of the previous one. This is critically important when installing long cornices and molding frames: the geometry remains flawless throughout.
Resistance to moisture and changing conditions
Polyurethane moldingsIt is not afraid of humidity—it does not swell, crack from condensation, or deteriorate due to temperature fluctuations. That is why polyurethane decor is used in kitchens, bathrooms, hallways, and other spaces with variable microclimates—where plaster behaves unpredictably.
Suitable for painting
The surface of polyurethane products accepts any water-based paints. After painting, the decor looks indistinguishable from natural stucco. If desired, it can be repainted—without dismantling, simply by preparing the surface and applying a new layer. This provides complete freedom when changing the interior concept.
Durability and ease of care
Polyurethane does not age like plaster: it does not yellow on its own, crumble at the edges, or react to household chemicals. Care is reduced to wiping with a soft, damp cloth. No restoration, no complex procedures—the decor maintains its appearance for years with minimal attention.
How to choose ceiling stucco: what to look for before buying
Choosing decorative elements for the ceiling is not an intuitive decision but the result of analyzing several parameters. Let's consider each of them.
Ceiling height
This is the first and most important criterion. For rooms with a height of up to 2.6 m, only thin cornices and light moldings are suitable—bulky decor will feel oppressive and visually reduce the space. With a height of 2.7–3 m, the choice expands significantly: medium-width cornices, molding frames, and small rosettes can be used. For heights over 3 m—complete freedom, including voluminous ornamental compositions.
Room area
A small room requires a delicate approach: a large rosette or wide moldings in a 12–15 sq. m room will look overloaded. Here, thin profiles and minimal ornamentation work. In large spaces, on the contrary, small decor gets lost and is not noticeable—larger, more substantial forms are needed.
Interior style
Decorative elements made of polyurethane should match the style of the room. Floral Baroque ornaments are out of place in a Scandinavian interior. Strict geometric cornices look cold in a classic living room. Before choosing, clearly define the style and select stucco from its characteristic ornamental vocabulary.
Size and Relief of Elements
The depth of relief affects the perception of decor depending on lighting. With directional light, deep relief creates expressive shadows and looks rich. With diffused light, high relief can 'get lost.' For rooms with predominantly diffused lighting, it's better to choose elements with moderate but clear relief.
Compatibility with Lighting
Moldings and lighting are inseparable allies. A ceiling medallion for a chandelier looks complete precisely when the chandelier is chosen to match its scale. Molding frames with built-in lighting create an accent ceiling effect. A cornice with a niche for LED strip provides soft contour lighting that emphasizes the relief. When planning moldings, it's worth thinking about the lighting scenario right away.
Color Scheme and Subsequent Painting
Most polyurethane products are produced in white—for painting or ready-made. White is a universal choice that works in any interior. For Art Deco and eclectic styles, painting to resemble metal is appropriate: gold, bronze, platinum. Contrast painting—dark molding on a light ceiling or light on dark—creates a designer effect that requires confidence and precise intent.
How to Decorate a Ceiling with Moldings: Practical Ideas for Different Rooms
This isn't theory—here are specific scenarios you can take as a guide to action.
Minimalist Ceiling with a Thin Cornice
The simplest and most versatile solution. A thin cornice around the perimeter—5–7 cm, smooth profile without ornament—covers the joint, adds a frame to the space, and gives the ceiling a finished look. Works in any style, in any room, with any ceiling height. This is the minimum that already changes the perception.
Ceiling with a central medallion for a chandelier
A medallion with a diameter of 30–50 cm is installed in the center of the ceiling for a chandelier. This technique is essential for living rooms and dining rooms—it transforms the chandelier from a functional element into a decorative accent. Combining the medallion with a cornice around the perimeter creates a complete system.
Ceiling with moldings in the form of symmetrical frames
Moldings form one or several rectangular frames on the ceiling plane. Inside the frame is a smooth painted surface, outside is white molding. The effect of a coffered ceiling is achieved without complex construction. It looks especially impressive in living rooms with high ceilings.
Multi-level decorative design
Cornice around the perimeter + molding frames + medallion in the center—this is a three-level system that turns the ceiling into an architectural object. This approach is characteristic of neoclassicism and formal interiors. It requires precise marking and careful installation, but the result fully justifies the time invested.
Accent ceiling in neoclassical style
The central area of the ceiling is painted in a contrasting color—soft gray, dusty blue, warm beige—and is bordered by a molding frame. The perimeter remains white. A plaster cornice defines the color boundary. This technique makes the ceiling the main visual accent of the room.
Contrasting plasterwork after painting
White plasterwork on a dark ceiling is a bold but effective solution for interiors in Art Deco or modern eclectic styles. A medallion, moldings, and cornice painted white against an anthracite or deep blue ceiling background create a contrast that reads as a thoughtful designer accent.
Ceiling Molding Installation: Main Stages
Ceiling molding installation is a job that a person without special training can handle if they proceed methodically. Let's break down the process step by step.
Foundation Preparation
The ceiling surface must be dry, clean, and strong. Old paint, crumbling plaster, grease stains—all of this must be removed. If the surface is loose or porous, it should be primed—this improves the adhesive's adhesion. Concrete slabs, drywall, plastered surfaces—all are suitable. The main requirement is a stable, non-dusting base.
Ceiling Marking
Before applying adhesive, the ceiling is marked. For a cornice—draw a line parallel to the wall at the required distance from the edge. For molding frames—determine the center of the room and arrange the frame symmetrically. For a rosette—find the geometric center of the ceiling or the center of the intended chandelier. Precise marking is the key to ensuring everything looks symmetrical and professional in the end.
Fitting the elements
Cornices and moldings are cut to length. At corners, they are joined at a 45° angle—for this, a miter box or corner template is used. Polyurethane corner inserts make this operation easier: they don't need to be cut—just insert the ready-made corner element. Cutting is done with a fine-toothed saw or a sharp utility knife.
Applying adhesive
Mounting adhesive (acrylic or PVA-based) is applied to the back of the element in a zigzag pattern or in dots. On cornices—along the entire length with a spacing of 15–20 cm. The adhesive should set quickly but allow time for adjusting the position. Avoid using liquid nails with aggressive solvents—they can deform polyurethane.
Fixation and Joining
The element is pressed against the surface and held for 30–60 seconds. If necessary, it is secured with painter's tape until the adhesive fully cures. Adjacent elements are joined butt-to-butt—the seam should be minimal. If a gap forms, it is filled with acrylic sealant.
Seam Treatment
After the glue dries, all joints and seams are filled with acrylic or latex sealant. Excess is removed with a wet finger or spatula. The seam surface should be smooth and inconspicuous. It is the quality of seam finishing that distinguishes amateur installation from professional work.
Painting after installation
After the sealant has completely dried (24 hours), the molding is painted. Water-based or acrylic paint is used for this. A brush is for textured areas, a small roller is for smooth areas. Two thin coats are better than one thick one. After painting, the decor looks monolithic—like a single whole with the ceiling.
Common mistakes when decorating a ceiling with molding
Knowing the mistakes is the best prevention of disappointment. Here are the most common ones.
Too massive decor for low ceilings
A wide cornice with deep relief on a 2.4 m ceiling visually 'eats up' height, making the space oppressive. The rule is simple: the lower the ceiling, the more modest the decor. A thin profile cornice of 4–5 cm is the maximum for low rooms.
Mismatch with the scale of the room
A small rosette with a diameter of 15 cm in a spacious living room looks like a random detail. A large 60 cm rosette in a small room feels oppressive and disrupts proportions. The scale of the decor should match the scale of the space.
Random choice of ornament
A Baroque ornament with grapevines in a minimalist interior is a stylistic error that is difficult to fix without replacing the decor. The ornament should be a continuation of the interior's language, not contradict it.
Overloading with decorative elements
Cornice + moldings + rosette + corner inserts + decorative belts — all at once in one room. The result is visual chaos instead of architectural order. Moldings require restraint and editing. Sometimes one correct element is enough.
Errors in marking and joining
A crookedly installed cornice or asymmetrical molding frames are immediately noticeable — and correcting this after the glue dries is significantly more difficult. Marking must be precise, joints must be neat, corners must be correct.
Ignoring the overall style of the room
Moldings are not a self-sufficient object, but part of the overall space. They should work in conjunction with furniture, lighting, textiles, and color scheme. The chosen decor should be evaluated not on its own, but in the context of the entire interior.
What to combine ceiling moldings with
Ceiling molding decor reveals its full potential when integrated into the overall finishing and decor system.
With wall moldings
Ceiling cornices and moldings naturally extend onto the walls in the form of wall moldings, frames, pilasters. This creates a unified architectural shell of the room — when the space's decor looks like a single whole, not a set of random details.
With decorative rosettes
A ceiling rosette looks great paired with decorative elements on the walls — medallions, corner inserts, wall frames. This creates a rhythmic decorative system that reads as a cohesive design.
With lighting
One of the most striking combinations is a molded cornice with a niche for LED strip lighting. Soft contour lighting accentuates the relief, casts shadows at the base of the decor, and visually raises the ceiling. Molded frames with lighting create the effect of coffers with internal illumination.
With classic and modern chandeliers
The rosette forms a 'setting' for the chandelier. A classic crystal chandelier with a lush Baroque rosette is a canonical choice. But a modern geometric light fixture with a sleek polygonal rosette also looks thoughtful and appropriate. The key is proportionality.
With painted walls and panels
Ceiling molding and wall panels are an ideal pair for neoclassical and modern classic styles. Panels structure the wall, molding structures the ceiling. The unified rhythm of these elements creates an interior with architectural logic.
Caring for ceiling molding
One of the most common fears before installing ceiling decor is the complexity of maintenance. In practice, caring for polyurethane molding is minimal.
Dust on relief elements is removed with a soft brush or a vacuum cleaner with a soft brush attachment. Grease stains in the kitchen are cleaned with a mild soap solution. No chemicals with aggressive solvents — only neutral agents. If necessary, the molding can be repainted — the surface is sanded with fine sandpaper and coated with a new layer of paint. This completely refreshes the appearance of the decor without dismantling.
Polyurethane products do not absorb moisture, do not yellow over time on their own, and do not crumble under light mechanical contact. This is what makes them the optimal material for long-term ceiling decor.
Who is ceiling molding suitable for?
Before making a decision, it's useful to understand — is this your story?
For apartment owners with high ceilings
A high ceiling is a resource that is a sin not to use. Without decor, it looks empty and unfinished. Molding scales it, giving it architectural dimension.
For those decorating their interior in classic or neoclassical style
Here, molding is not an option — it's a necessary element. An interior in a classic style without ceiling decor looks unfinished.
For those who want to add architectural expressiveness
If the interior seems flat and unexpressive — despite good furniture and the right colors — often the problem is precisely the ceiling. Molding solves this.
For those seeking a neat decorative accent without heavy materials
If you want to add a detail without overloading the space — a thin cornice or a modest polyurethane rosette is exactly what you need. Lightweight material, simple installation, delicate result.
Frequently asked questions about ceiling molding
Is ceiling molding suitable for a modern apartment?
Yes, with the right choice of elements. For a modern style, laconic profiles without historical ornamentation are suitable — straight cornices, geometric moldings, minimalist rosettes. Such details are perceived as an architectural accent, not as a historical quote.
Can ceiling molding be used in a room with low ceilings?
Yes, but with limitations. For heights up to 2.5 m, choose only thin cornices 4–6 cm wide without volumetric relief. It's better to avoid molding frames and large rosettes — they will visually lower the ceiling even more.
What is better for the ceiling: plaster or polyurethane?
For most modern situations, polyurethane is preferable. It is lighter, cheaper, does not require professional installation, and is resistant to moisture. Plaster has historical value in restoration projects, but in modern renovation practice, it is an unnecessary complexity without advantages.
Can ceiling molding be painted?
Yes, this is one of the key advantages of polyurethane. Any water-based paint applies evenly and lasts a long time. Molding can be painted to match the ceiling color (for invisible decor), white (classic), metallic, or a contrasting shade.
Is it difficult to install ceiling molding yourself?
No, if you work methodically. The main tools are mounting adhesive, a miter box for angled cuts, acrylic sealant, and painter's tape. Installing a cornice around the perimeter of a standard room takes 3–5 hours. A rosette takes 30–40 minutes.
Which molding elements are most commonly used for ceilings?
The most in-demand are cornices (for perimeter framing), moldings (for creating frames and geometric patterns), and rosettes (for framing the chandelier area). These three categories form the basis of most ceiling solutions.
Conclusion
Ceiling molding is not a historical relic or a sign of ostentatious taste. It is a mature design tool that, when applied correctly, transforms an ordinary apartment into a thoughtful, cohesive, and visually rich space. It sets rhythm, structures the plane, adds depth and architectural logic—exactly what is often missing even in the most expensive renovations.
Modern materials have made this decor accessible, practical, and technologically advanced. Polyurethane molding offers precise form, easy installation, environmental resistance, and freedom in painting. Nothing superfluous—just results.
If you are seriously considering ceiling design and want to select elements that will organically fit your project, take a look at the catalog ofPolyurethane Itemsthe STAVROS company. It features the full range of ceiling molding decor: cornices, moldings, rosettes, corner elements—everything needed to create an architecturally expressive ceiling in any style and scale.
STAVROS offers European-quality material, meticulously detailed reliefs, and a wide selection of forms for interiors of any complexity. The company works for those who understand the difference between renovation and design—and choose the latter.