


Article Contents:
- What is a coffered ceiling and why it is bought in parts
- Why polyurethane is the modern answer to the question of ceiling architecture
- What elements a coffered ceiling is assembled from
- Cornice around the perimeter
- Moldings for ceiling grid
- Decor for moldings: corners, connections, nodes
- PU overlays: accents inside coffers
- Decor for walls: connecting the ceiling with the interior
- Coffered ceiling schemes: how to choose the right one
- How to calculate the size of coffers and the number of moldings
- Coffered ceiling for living room, study, and hall
- Coffered ceiling in the living room
- Coffered ceiling in the study
- Coffered ceiling in the hall and entryway
- Coffered ceiling and room height: when it works, when it doesn't
- Cornice, molding, and wall decor: how to connect the ceiling with the walls
- Installation of a polyurethane coffered ceiling: key steps
- Mistakes when buying elements for a coffered ceiling
- What to buy with a coffered ceiling: complete set
- Where to buy a coffered ceiling by elements: choosing STAVROS
- Coffered ceiling and pricing: what affects the final amount
- FAQ: answers to popular questions about coffered ceilings
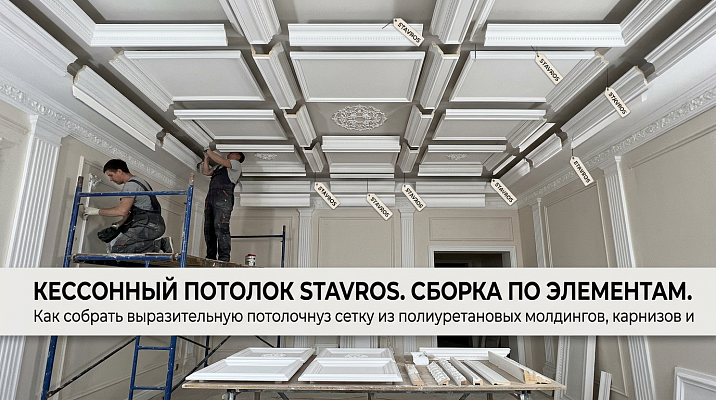
When a person searches for "buy coffered ceiling," they most often imagine a single finished product — as if some architectural "ceiling" is packed in a box and waiting in a warehouse. In reality, it's more interesting, precise, and variable: a coffered ceiling is a system, a kit, an architectural idea realized through moldings, cornices, decorative inserts, corner elements, and installation solutions. This is the approach that Moldings STAVROS: not one product — but a set of elements from which ceiling architecture is born.


What is a coffered ceiling and why it is bought in parts
A coffered ceiling is a decorative ceiling plane divided into repeating cells: squares, rectangles, or more complex geometric shapes. Each cell — a coffer — is framed by molding, with a smooth inter-frame field between them. The entire structure creates an effect of volume, architectural depth, and ornamental rhythm, turning a flat ceiling into a focal element of the interior.
In classical architecture, coffers were carved into wooden ceilings or cast from concrete — it was heavy, expensive, and technically complex work. Today, coffered ceiling architecture is implemented fundamentally differently: through lightweight decorative elements made of polyurethane, which are mounted onto an existing ceiling without reinforcing the floors, without scaffolding, and without specialized crews.
That is why it is impossible to buy a coffered ceiling as a single product — and that is perfectly normal. The buyer purchases a set: profile moldings of the required width and profile height, perimeter cornices, decorative corner and connecting elements, overlays for accents inside the cells, and installation materials. From this set, any layout can be assembled — from a strict square grid to a grand central composition with a rosette for a chandelier.


Why polyurethane is the modern answer to the question of ceiling architecture
Before analyzing specific elements and schemes, it is worth understanding why buying a polyurethane coffered ceiling today is a conscious, almost flawless solution for an apartment, country house, and any residential or administrative space.
Polyurethane Items combine several key properties that make them an ideal material for ceiling architecture:
Light weight. Polyurethane molding weighs several times less than a gypsum counterpart of the same width and profile height. This means the load on the main ceiling is minimal, and installation is possible without anchor fastening — using special mounting adhesive.
Geometric precision. Polyurethane products are manufactured by pressing in precise molds, ensuring perfect cross-section repeatability along the entire length. This is critically important for a coffered grid: if the molding warps in profile, the joints will not align, and the grid will lose its rhythm.
Compatibility with any paint. Polyurethane accepts acrylic and alkyd paints well — a decorator can achieve the finest nuances: warm ivory, cool anthracite, soft dusty green, or classic white. Under paint, a coffered ceiling becomes truly custom.
Resistance to temperature and humidity fluctuations. Unlike gypsum, polyurethane does not crumble under micro-impacts, does not absorb moisture when air humidity is above normal, and does not react to seasonal changes in indoor microclimate.
Durability without restoration. With proper installation and painting, a ceiling grid made of polyurethane moldings requires no repair for decades — only periodic wet cleaning and, if desired, repainting.
Our factory also produces:


What elements make up a coffered ceiling
This is the main practical question from which any complete order begins. Let's consider the composition of the ceiling system sequentially — from the perimeter to the center.
Get Consultation
Cornice around the perimeter
The perimeter cornice is a frame element that runs along the entire perimeter of the ceiling and visually separates it from the walls. The cornice performs several functions at once: it forms the beginning of the coffered zone, hides the technical gap between the ceiling and the wall, and sets the horizontal line from which the entire grid is built.
The width and height of the cornice profile should match the scale of the room. In a room with a ceiling height of 2.7 m, a cornice with a projection of 60–80 mm is appropriate. In tall rooms — from 3 m and above — more expressive profiles with shaped shelves and heels can be used.
Moldings for ceiling grid
Moldings made of polyurethane — the basis of coffered architecture. They form the grid itself: straight slats of the required profile are mounted on the ceiling in perpendicular rows, creating cells of the desired size.
For a coffered ceiling grid, moldings with a rectangular or shaped cross-section are used. The width depends on the cell scale: for coffers of 50–60 cm, a molding width of 30–50 mm is appropriate; for large cells of 80–100 cm — 50–80 mm. The profile height (relief above the ceiling surface) determines the visual "depth" of the coffer: the higher the profile, the more expressive the shadow and volume of the grid.
Important: all moldings within a single project must be of the same article — otherwise the cross-section will differ slightly, which is noticeable at joints under any angled lighting.
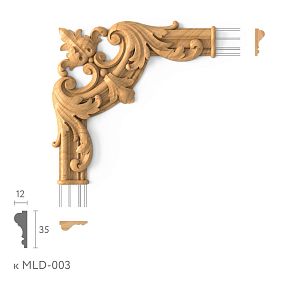
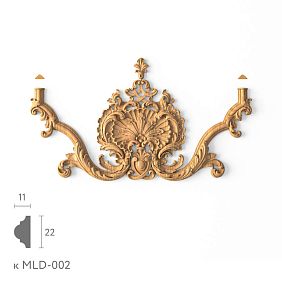
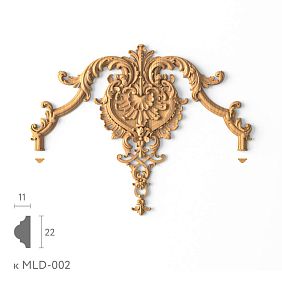
Decor for moldings: corners, connections, nodes
In any coffered grid, there are nodes — intersection points of horizontal and vertical moldings. This is where problems most often arise: the angle is cut inaccurately, the end does not meet, the seam is visible under side light. A professional solution is to use special Decor for Molding: ready-made corner elements, T-shaped connectors, and decorative overlays at intersections.
This is not just a technical solution — it is a way to turn a node into an artistic accent. A decorative insert at the intersection of four moldings can look like a miniature rosette, an ornamental overlay, or a geometric figure — depending on the interior style.
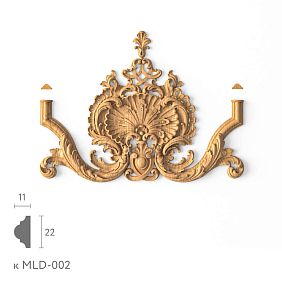
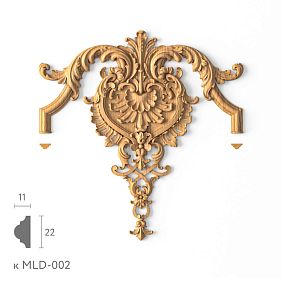
PU overlays: accents inside coffers
Inside each cell of a coffered ceiling, you can leave a flat ceiling field — and that alone will look beautiful. But if you want to enhance the architectural effect, decorative elements are installed in the center of the cell PU overlays: rosettes, diamonds, stucco inserts, acanthus overlays. This is especially appropriate in a living room, formal hall, or study, where the ceiling should function as a full-fledged element of architectural expression.
An overlay in the center of a coffered ceiling is both a visual focal point and additional detailing that, under side lighting, creates a subtle play of light and shadow.
Wall decor: connecting the ceiling with the interior
A coffered ceiling should not 'hang' in the air — an architecturally sound solution implies its visual connection with the walls. Polyurethane wall decor — wall moldings, frame panels, friezes, and borders — continue the grid theme downward onto the walls, creating a cohesive decorative system for the room.
In classic interiors, this looks as follows: the coffered grid on the ceiling echoes the wall frame panels that divide the wall plane into fields. The cornice acts as a transition zone. As a result, the room gains architectural volume, noticeable even with minimalist furniture.
Coffered ceiling layouts: how to choose the right one
There are several basic layouts for arranging a coffered grid. The choice depends on the shape and size of the room, the location of the chandelier, windows, and furniture.
Square uniform grid. The most common option — identical square cells evenly covering the entire ceiling. Suitable for square and nearly square rooms. The cell should divide both dimensions of the ceiling into a whole number — otherwise, the edge strips will be cut off, which looks unprofessional.
Rectangular grid. In elongated rectangular rooms (large corridors, dining rooms with a long table), coffers are made rectangular — the long side along the room, the short side across. This visually balances the proportions.
Central composition. A central large cell with a decorative rosette under the chandelier, surrounded by a ring of smaller coffers, and a wide cornice along the perimeter. This option is typical for formal living rooms and halls.
Perimeter coffers. The grid runs only along the perimeter, in two or three rows from the cornice, while the center of the ceiling remains open. Effective for low ceilings: the center is not overloaded with decor, the perimeter adds architectural character.
Combined scheme with a chandelier accent. The grid is oriented to the chandelier's location: cells evenly radiate from it in all directions. This requires precise calculation, but the result looks like it was designed by an architect.
How to calculate the size of coffers and the number of moldings
Calculating a coffered ceiling is a specific task and quite doable without special programs. You just need to follow a sequential logic.
Step 1. Measure the ceiling. Take the room dimensions along the ceiling with centimeter accuracy: length and width. Consider that if a cornice, for example, 80 mm wide, runs along the perimeter on each side, the working area of the coffer grid will decrease by 160 mm for each measurement.
Step 2. Determine the desired cell size. The standard range is from 40 to 90 cm on the larger side. For a room up to 20 m², cells of 45–55 cm are optimal. For rooms over 30 m², 60–80 cm. Important: the cell size is the internal field, i.e., the distance between the inner edges of the moldings.
Step 3. Choose a size that divides the ceiling without remainder. This is a key point: subtract the molding width (multiplied by the number of seams) from the working area and ensure the remaining field is divisible by a whole number of cells. Small adjustments within 2–3 cm are acceptable and unnoticeable.
Step 4. Calculate the number of moldings. Moldings are sold by linear meters or in pieces of a certain length (standard is 2 meters). Sum the length of all grid rows in both directions, add 10–15% margin for cutting corners and joints.
Step 5. Count decorative nodes. The number of intersection points of moldings in the grid equals the product of the number of vertical and horizontal lines. For each node — one decorative overlay or corner element.
How not to lower the ceiling with coffers? Main rule: the sum of the height of the cornice profile and molding should not exceed 3–4% of the ceiling height. With a ceiling of 2.7 m, the maximum total projection of decor is about 8 cm. If the ceiling is lower than 2.6 m, it is better to use thin flat moldings and a minimal cornice.
Coffered ceiling for living room, study, and hall
Three spaces where coffered architecture works most convincingly are the living room, study, and formal hall. Each requires its own approach.
Coffered ceiling in the living room
The living room is a place to showcase taste and create comfortable grandeur. A coffered ceiling in a classic living room interior is always a grid of medium cells (55–70 cm), a wide shaped cornice around the perimeter, and at least one decorative rosette in the center under the chandelier.
In neoclassicism and modern classicism, thin moldings with an elegant profile are appropriate — without excessive baroque relief. Art Deco style allows geometric moldings with clear rectangular sections. In Empire and Classicism — enriched profiles with a cyma, shelf, and fillet.
Tip: if a colored ceiling (gray, olive, blue) is planned in the living room, the coffered grid will enhance this effect many times over — the cells will create depth that cannot be achieved with a flat paint finish.
Coffered ceiling in the study
The study requires strictness and concentration. Here, coffered architecture works through rhythm and symmetry, not through decorative richness. The optimal scheme is a square or rectangular grid without overlays inside the cells, a thin molding of 30–40 mm, and a minimalist cornice.
The color scheme — dark shades of the ceiling (anthracite, dark blue, bottle green) combined with white or cream moldings create the effect of an "English library" that cannot be confused with any other style.
Coffered ceiling in the hall and entryway
The hall is the first impression. Here, the coffered ceiling in neoclassical style serves as a business card: it sets the tone for the entire interior. With a small hall area (12–20 m²), it is better to use a central composition — one large cell with a rosette and a perimeter strip of moldings framing it.
In a country house with a high ceiling, the hall allows for a larger coffered grid with large profiles, overlays in the cells, and a rich cornice — here architectural depth only enhances the image.
Coffered ceiling and room height: when it is possible, when it is not
The issue of ceiling height is one of the key factors when designing a coffered grid.
Ceilings from 3 m. Complete freedom of choice. Expressive cornices, wide moldings, overlays in cells, multi-level profiles are appropriate. The coffered ceiling here looks organic and luxurious.
Ceilings 2.7–3 m. Optimal zone for most apartment and country projects. Molding — 30–50 mm wide, profile height — no more than 15–20 mm. Cornice — without excessive overhang. Medium-sized cells (45–65 cm).
Ceilings 2.5–2.7 m. Caution is required. Flat thin moldings are used — essentially a decorative "drawing" of the grid without volume. The cornice is minimal or replaced by a simple baseboard. Cells can be large (60–80 cm) to avoid "fragmenting" the ceiling.
Ceilings below 2.5 m. A coffered grid is highly undesirable: any protruding molding psychologically lowers the space. The exception is a very thin graphic molding, literally "painted" on the ceiling.
Cornice, molding, and wall decor: how to connect the ceiling with the walls
A common mistake many buyers make is focusing only on the ceiling and forgetting about the transition to the walls. As a result, the coffered grid looks "glued on top" rather than as part of an architectural whole.
The professional solution is built as follows: the ceiling cornice completes the grid around the perimeter and simultaneously serves as a wall element — it is installed in the ceiling-wall corner. Below the cornice on the wall, the decorative theme can be continued: apply wall molding frames that mirror the rhythm of the ceiling cells.
Polyurethane wall decor allows you to create a cohesive decorative system "ceiling — cornice — wall." This technique is especially effective in the living room and study: walls divided into fields by molding frames visually "extend" the ceiling architecture downward — the room gains a spatial integrity that cannot be achieved with any other finish except stucco decor.
Installation of a polyurethane coffered ceiling: key stages
Proper installation is half the result. Even the most accurately designed coffered grid can be ruined by careless installation.
The preparatory stage is described in the article installation of polyurethane molding: the ceiling must be leveled, primed, free of grease stains and dust. Any surface difference exceeding 3 mm will cause the molding to fit with a gap — this is visible under side lighting.
Marking is a critical stage. The center of the ceiling is marked first: from it, the grid axes are laid out in both directions. Marking is done with a pencil along a chalk line. All intersections are rechecked diagonally.
Gluing of moldings is done using mounting adhesive for polyurethane. The adhesive is applied in a zigzag pattern along the entire length of the back side of the molding, the element is pressed against the marking line and held for 60–90 seconds. Detailed techniques for working with joints and corners are described in the article installing polyurethane molding: there is also information about hidden joints, proper 45° cutting, and painting after installation.
The joints of the moldings are filled with elastic putty or acrylic sealant, after which the entire surface is sanded and painted in one or two coats. Painting unifies the entire system visually: the moldings, cornice, overlays, and ceiling field become a single architectural whole.
Mistakes when purchasing elements for a coffered ceiling
Experience shows that most mistakes are made not during installation, but when selecting and ordering elements. Let's look at the most common ones.
Mistake 1. Buying molding without a diagram. The most common: a person buys 'molding for a coffered ceiling' without calculating the grid, without considering the cell sizes and number of lines. As a result, there is not enough footage, or conversely, half of the order remains.
Mistake 2. Not accounting for cutting allowance. Any coffered grid requires cutting the ends of the moldings — especially in corner and perimeter areas. The minimum allowance is 10%, the optimal is 15%.
Mistake 3. Choosing a profile that is too wide. A molding 80 mm wide with a 50 cm cell will result in a ceiling where the moldings take up more area than the coffers themselves. Visually, this looks like an overloaded grid rather than an elegant architectural lattice. Rule: the width of the molding should not exceed 15–20% of the cell size.
Mistake 4. Not planning for the chandelier. If the chandelier does not fall into the center of the central cell, the grid looks shifted and random. The location of the chandelier should be the starting point when constructing the diagram.
Mistake 5. Forgetting about decor for moldings. Intersections of moldings without decorative inserts look technically crude — the ends meet at a point that cannot be hidden without a special element.
Mistake 6. Not checking installation recommendations. Many install polyurethane moldings using the same techniques as MDF baseboards — and end up with delamination, warping, and cracks at the joints. The installation technique for polyurethane is specific: study it before starting work.
Error 7. Choose different molding SKUs for the same grid. Even a slight profile discrepancy (1–2 mm) makes the grid visually uneven under any lighting.
What to buy with a coffered ceiling: complete set
A well-planned order for coffered ceiling architecture includes not only moldings and cornices. The complete set looks like this:
-
Polyurethane moldings of the required profile and cross-section — to form the grid
-
Perimeter cornice — to finish the ceiling area and transition to the walls
-
Decor for moldings — overlays at grid line intersections, corner elements
-
PU overlays — decorative accents inside cells (rosettes, stucco inserts)
-
Wall decor — molding frames to continue the ceiling theme on the walls
-
Installation adhesive for polyurethane — specialized compound, not universal
-
Elastic acrylic sealant — for sealing joints and intersections
-
Primer — for surface preparation
-
Finishing putty — for leveling the ceiling before installation
-
Paint — acrylic matte, compatible with polyurethane
Proper kit assembly allows you to cover the 'coffered ceiling turnkey' task with one order — without additional trips searching for missing elements.
Where to buy a coffered ceiling by components: STAVROS choice
Buying a coffered ceiling literally means buying a system of well-thought-out elements that, when properly assembled, delivers an architectural result. STAVROS offers exactly such a system.
The catalog logic is built so that the buyer can sequentially assemble the entire set: moldings — cornices — molding decor — overlays — wall elements. Each category has SKUs with clear dimensional characteristics, allowing for precise calculation even before placing an order.
This is especially important for the project buyer: a designer, architect, or homeowner who wants not just a 'beautiful ceiling' but a specific scheme with specific dimensions and a specific budget. Where to buy a coffered ceiling and be confident in the result? Where you can choose elements systematically, with calculation, with an understanding of each component — that's exactly how STAVROS works.
Buying a suspended coffered ceiling at STAVROS means getting not only physical elements but also the assembly logic, support in selecting SKUs, and the ability to form a kit for any scheme and any interior — from a modest city apartment to a country house with ceilings over four meters.
Coffered ceiling and pricing: what affects the final amount
The cost of a coffered ceiling system consists of several components that are important to understand when planning a budget.
Molding footage. The main expense item. The price per linear meter depends on the width and height of the profile, article number, material (standard polyurethane or premium). For a room of 20 m² with a 60 cm cell, approximately 40–60 linear meters of molding will be required — depending on the layout.
Cornice. The length of the cornice equals the perimeter of the room plus a margin for cutting corners (45°). The cost of the cornice depends on the width of the profile: the more expressive the cornice, the higher the price.
Decorative elements. Overlays at intersections, rosettes, corner elements — this is a relatively small part of the budget, but it creates a sense of refinement and completeness.
Installation materials. Glue, sealant, paint — this is 10–15% of the total cost of decorative elements.
Buying a cheap coffered ceiling in the sense of saving on the quality of moldings means getting a grid that will start to separate at the joints within a year. Reasonable savings lie in simplifying the layout (fewer cells, thinner profile), but not in replacing articles with cheap analogues.
FAQ: answers to popular questions about coffered ceilings
Can I buy a ready-made coffered ceiling as a single product?
No — and this is not a drawback, but an architectural logic. A coffered ceiling is individual: it is created for specific dimensions, layout, style, and room height. The buyer selects a set of elements — moldings, cornices, decor for moldings, overlays — and assembles a unique ceiling architecture from them.
What is better for a coffered ceiling — wood or polyurethane?
For most residential spaces, polyurethane is preferable: it is significantly lighter, easier to install, takes paint well, and does not deform with changes in humidity. Wooden coffered ceilings are justified in projects with a brutal country character — in houses with open beams, in hunting studies, and in bathroom rooms.
What moldings are needed for a coffered ceiling?
Straight moldings with shaped or rectangular cross-section, width from 30 to 80 mm depending on cell size. All moldings in one project must be of the same article number.
How to calculate a coffered ceiling?
Measure the ceiling → determine the working area minus the cornice → select the cell size → choose the number of grid lines without remainder → calculate the length of moldings and the number of decorative nodes → add 10–15% margin.
What to buy together with moldings?
Cornices, decor for moldings at intersections, PU overlays inside cells, decor for walls to connect with the ceiling, mounting adhesive, sealant, paint.
Can I install the coffered grid myself?
Yes, with basic installation skills, proper tools, and adherence to the technology. Key stages are precise marking and correct cutting of joints at 45°. Technical details of installing polyurethane products are described in detail in STAVROS materials.
How not to lower the ceiling with coffers?
Rule: the total projection of the cornice and molding should not exceed 8–9 cm with a ceiling height of 2.7 m. For lower ceilings, use thin flat moldings.
Is a coffered ceiling trendy or outdated?
Coffered architecture is a classic that isn't tied to trends. It's relevant in neoclassical, modern classic, art deco, Scandinavian style with classic elements, and even in modern minimalist interiors when using thin geometric molding.
STAVROS is a company with many years of experience in the production and supply of decorative polyurethane elements for residential and commercial interiors. The range includes moldings, cornices, stucco, overlays, molding decor, and decorative wall elements — everything needed to create expressive coffered ceiling architecture. The STAVROS catalog allows you to assemble a complete set for any project: from a small city apartment to a large country mansion. Choose elements systematically, calculate accurately, install using the proper technology — and your coffered ceiling will become the main architectural accent of the interior.


