Article Contents:
- Solution in a minute: three panels or four
- PAN-007 is not individual slats, but a ready-made flexible module
- Why the usual formula "wall width ÷ panel width" only gives the beginning of the answer
- First level — arithmetic
- Second level — compositional
- When 85 mm margins look intentional
- When 85 mm turn into random gaps
- What is included in the order for the first scheme
- Who is the three-module scheme suitable for
- Commercial output
- Why symmetrical trimming looks calmer
- The number 590 mm is the calculated width, not the finished cut line
- What happens to the cut-off parts
- What to order for continuous cladding
- When four panels justify the higher cost
- Why the scheme looks weaker
- When a 170 mm extension is acceptable
- Where to place a narrow strip
- Why the third option cannot be called the most economical
- Measure the wall at three levels
- Check the verticality of the corners
- Do not automatically consider the width behind furniture as useful
- Account for trim and slopes
- Take measurements after rough leveling
- Length 950 mm
- MDF with a length of 2670 mm
- Beech and oak with a length of 2400 mm
- PAN-007 made of MDF
- PAN-007 made of beech
- PAN-007 made of oak
- Material selection table
- Apply the sample not only to the center of the wall
- Check the sample in daylight and artificial lighting
- Do a test paint-out
- When more than one sample is needed
- Why you can't leave half of a narrow slat
- The fabric backing also participates in the cutting
- Make the left and right edges a pair
- Full-size layout before cutting
- Edge next to a painted wall
- Edge at the inner corner
- Edge at the trim
- Edge near furniture
- Molding as a decorative border
- Fix the center and full dimensions
- Match with the rhythm of the slats
- Do not place a module joint through a group of sockets without reason
- Moving a point is sometimes cheaper than complex cutting
- Three panels as a central backdrop
- Four panels from corner to corner
- Cables and mounting
- Flexible base follows a large irregularity
- Wall color may be visible in the gaps
- Marking starts with the axis
- MDF is painted after installation
- MDF is painted before installation
- Wood is finished before installation
- Wood is finished after installation
- With separate interior slats
- With a rigid panel on a solid substrate
- With PAN-005
- With a panel 1000 mm wide
- With wooden lining
- With an acoustic panel with the stated characteristics
- With a pre-painted panel
- Mistake 1. Buying three panels, expecting a continuous covering
- Mistake 2. Adding a 170 mm strip on the visible side
- Mistake 3. Considering 590 mm as an exact cut line without a sample
- Mistake 4. Measuring the wall only at the floor
- Mistake 5. Not checking the verticality of corners
- Mistake 6. Considering the size based on the rough wall
- Mistake 7. Subtracting furniture without a working drawing
- Mistake 8. Adding molding after purchase
- Error 9. Not accounting for the 8 mm thickness
- Error 10. Choosing material only by photo
- Error 11. Ordering oak 2670 mm long
- Error 12. Assuming all PAN-007 are the same length
- Error 13. Promising floor-to-ceiling cladding without measuring height
- Error 14. Not accounting for the baseboard
- Error 15. Not accounting for the ceiling profile
- Error 16. Centering based on the first module
- Error 17. Trimming only the right panel at open corners
- Error 18. Cutting left and right panels independently
- Error 19. Do not number modules
- Error 20. Mix materials in one wall
- Error 21. Order oak later
- Error 22. Do not perform trial finishing
- Error 23. Place socket after layout
- Error 24. Count only the center of the socket
- Error 25. Align panel joint with TV bracket
- Error 26. Do not check cable outlets
- Error 27. Use narrow extension near the door
- Error 28. Consider large leftover as guaranteed usable
- Error 29. Discard trimmed sections
- Error 30. Glue onto unstable paint
- Error 31. Consider flexibility a substitute for leveling
- Error 32. Not checking the wall color between slats
- Error 33. Buying universal glue without testing
- Error 34. Painting only the front protrusions
- Error 35. Damaging the finished surface during cutting
- Error 36. Not measuring the insertion path
- Error 37. Storing long panels with a bend
- Error 38. Laying oak without matching the shade
- Error 39. Not accounting for lighting direction
- Error 40. Buying panels only by price per piece
- Error 41. Choosing three panels to save money, although closed corners are needed
- Error 42. Buying four panels, although a central insert is needed
- Error 43. Not checking future furniture
- Error 44. Leaving an edge without a solution
- Error 45. Ordering panels without an article number
- Option A: central insert
- Option B: solid symmetrical wall
- Option C: hidden one-sided extension
- Select composition
- Take control measurements
- Select material
- Match the length
- Order a sample
- Prepare the layout
- Calculate the quantity
- Assemble the set
- Confirm leftovers and deadlines
- How many PAN-007 panels are needed for a 3200 mm wall?
- How much will remain after three panels?
- How to divide the remainder symmetrically?
- How much do four panels cover?
- How much needs to be removed from four modules?
- How to make the edges identical?
- What width will the outer panels get?
- Why does it say "about 590 mm"?
- Is it possible to install three full panels and a 170 mm strip?
- How many panels are needed for a 170 mm strip?
- What to do with the remainder of the fourth panel?
- Which layout is the most symmetrical?
- Which layout covers the entire wall?
- Which layout is cheaper in terms of the main product?
- Do we need to account for the cost of margin finishing?
- What is the width of PAN-007?
- What is the thickness of the panel?
- What is the size of the batten?
- What is the shape of the profile?
- What are the slats attached to?
- Can PAN-007 be used on a curved wall?
- Can a column be finished?
- Is PAN-007 available in MDF?
- Is PAN-007 available in beech?
- Is PAN-007 available in oak?
- What sizes are available in MDF?
- What sizes are available in beech?
- What sizes are available in oak?
- Can oak be ordered in 2670 mm length?
- Can I order MDF with a length of 2400 mm?
- Which panel should I choose for a wall with a height of 2600 mm?
- Will an oak panel cover a wall with a height of 2600 mm?
- What is a panel with a length of 950 mm used for?
- Do I need to buy a sample?
- What is the article number of the sample?
- Can the sample be painted?
- Do I need to buy a sample of the same material?
- Can I order several samples?
- How do I determine the cutting line?
- Can the panel be cut exactly in half?
- Do both edge modules need to be trimmed equally?
- Can the width of 590 mm be slightly adjusted?
- Does the curvature of the wall need to be taken into account?
- How to measure the width?
- Which value should be used if the measurements differ?
- Is it necessary to level the wall?
- Can the panel be glued over old paint?
- What Adhesive to Use?
- Is glue included in the kit?
- Do outlets need to be taken into account?
- Can a hole be cut after installation?
- Can the panel joint be placed across an outlet?
- How to place panels behind the TV?
- Can three panels be used behind the bed?
- Do panels need to be brought down to the floor?
- Can a baseboard be installed over the panel?
- How to finish the side edge?
- Can molding be purchased after installation?
- Do panels need to be finished before installation?
- Can MDF be painted after installation?
- Can oak be tinted after installation?
- Do panels need to be purchased in one batch?
- Can I order one oak panel later?
- How can I check the color of four oak panels?
- How much does PAN-007 cost?
- Is there Contact us to confirm shipping to your destination.?
- How should I prepare for delivery?
- Can the panel be bent for carrying in?
- What to check upon receipt?
- Where can I see application examples?
- Where can I find installation and finishing rules?
- What should I write in the order?
- Which option should I choose for a regular open wall of 3.2 m?
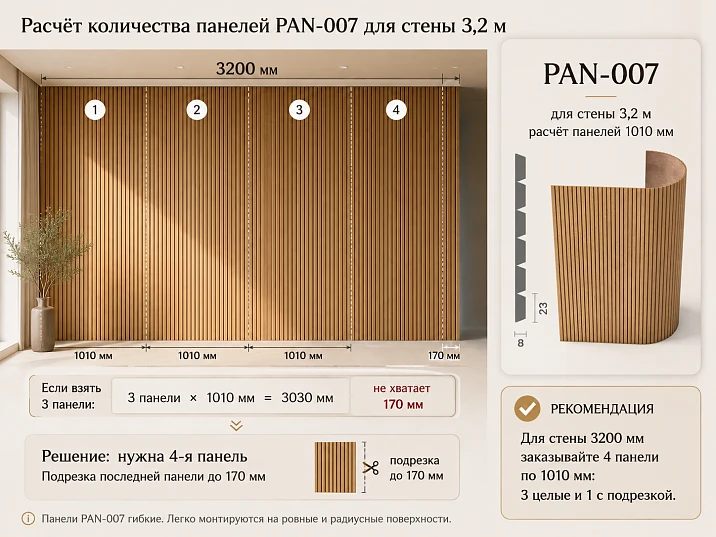
The wall width is known — 3200 mm. The width of one PAN-007 is 1010 mm. It would seem that all that remains is to divide one number by another, round the result, and buy slat panels. But it is precisely this simplification that leads to an unfortunate edge: three modules do not cover the entire plane, and the fourth has to be trimmed. If you place the remaining strip on only one side, the wall gets a noticeable narrow filler piece 170 mm wide. It looks not like part of the composition, but like a trace of a calculation error.
The task has three working solutions. You can order three panels and leave 85 mm of exposed wall on each side. You can buy four PAN-007 and symmetrically trim the outer modules to about 590 mm in width. You can use three full panels and a one-sided strip of 170 mm, but the latter scheme is justified only when the narrow section is hidden by furniture, a curtain, or an adjoining element.
The numbers are simple. The complexity begins later. The module width does not show where exactly the cut will run relative to the slats and the fabric backing. The material is tied to the panel height: the long MDF version has a length of 2670 mm, while beech and oak panels are 2400 mm. In addition, the actual wall may be wider at the floor and narrower at the ceiling, and may have outlets, a door slope, baseboard, an uneven corner, or a built-in wardrobe.
Therefore, before buy a slat panel PAN-007 with a width of 1010 mm, you need to make four decisions at once:
-
whether the panel will be a central decorative insert or a full cladding;
-
how to distribute the trimming across the wall width;
-
what length and what material fit the height;
-
how to finish the open edges, adjoining areas, and cutouts.
Let's examine each option not as abstract geometry, but as a specific order: how many PAN-007 to put in the cart, where to place the remainder, when an OPAN-007 sample is needed, and why the fourth panel is sometimes more advantageous than three, even though more material is purchased.
Solution in a minute: three panels or four
For a wall 3200 mm wide, the calculation looks like this:
1010 × 3 = 3030 mm.
After installing three full modules, the remainder is:
3200 − 3030 = 170 mm.
If you divide the free space equally:
170 ÷ 2 = 85 mm.
This gives a central insert:
85 + 1010 + 1010 + 1010 + 85 = 3200 mm.
If a continuous cladding is needed, four panels will be required:
1010 × 4 = 4040 mm.
Extra width:
4040 − 3200 = 840 mm.
With symmetrical trimming of the two outer modules:
840 ÷ 2 = 420 mm.
Each outer module is reduced by 420 mm, and its calculated width becomes:
1010 − 420 = 590 mm.
Summary:
590 + 1010 + 1010 + 590 = 3200 mm.
| Task | What to order | Width layout | Main result |
|---|---|---|---|
| Central decorative insert | 3 panels | 85 + 1010 + 1010 + 1010 + 85 mm | Equal open margins remain on the edges |
| Solid symmetrical cladding | 4 panels | 590 + 1010 + 1010 + 590 mm | Wall is fully covered, edges are equal |
| Three full modules and one extension | 4 panels | 1010 + 1010 + 1010 + 170 mm | Narrow strip on one side only |
| Panels between furniture or niches | 3 or 4 panels | Based on actual net width | Calculation is done between the limiters |
For a wall without open side fields, the second option looks most assembled: four panels with identical trimming on the left and right. The first option is more economical and can look no less convincing, but only when the 85 mm strips are designed as an intentional frame, not left randomly.




PAN-007 is not individual slats, but a ready-made flexible module
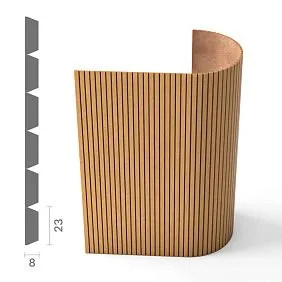
PAN-007 consists of trapezoidal profile slats 23 × 8 mm, fixed on a flexible fabric base. The full width of the module is 1010 mm, thickness — 8 mm. The panel can be used on straight walls, columns, curved surfaces, and furniture facades.
The buyer receives an already assembled rhythm. There is no need to independently set each slat by level, maintain the same distance between elements, and transfer the layout to the entire wall. But the ready-made module cannot be perceived as a faceless sheet 1010 mm wide: its edge is determined by the actual arrangement of slats and gaps between them.
| Characteristic | Confirmed value | What to check before ordering |
|---|---|---|
| Article number | PAN-007 | Do not confuse with other panels about 1010 mm wide |
| Construction | Flexible slat panel on fabric base | Is the flexibility of the selected surface suitable |
| Module width | 1010 мм | How many modules are required based on the clean wall width |
| Thickness | 8 мм | How the panel joins with the baseboard, trim, and furniture |
| Slat profile | Trapezoidal, 23 × 8 mm | What the rhythm looks like under frontal and side lighting |
| Materials | MDF, beech, oak | What finish is required |
| Short format | 1010 × 8 × 950 mm | Is it suitable for a local decorative zone |
| Long MDF | 1010 × 8 × 2670 mm | Is the height from the lower to the upper junction sufficient |
| Long beech | 1010 × 8 × 2400 mm | How to design the area above the panel |
| Long oak | 1010 × 8 × 2400 mm | Is a visible natural texture needed |
| Base | Fabric | Where is the cutting line allowed |
| Supply | In modules | Trimming and cutouts are done according to the project |
| Price | Depends on the material and size | Checked after configuration selection |
| Delivery | Possible within Russia | Need to account for packaging length and lifting |
After selecting the material, you can find the current price of PAN-007 directly in the card. Comparing cost only by the number of panels is incorrect: three modules with decorative preparation of side fields and four modules for continuous cladding create projects with different compositions.
Our factory also produces:




Why the simple formula “wall width ÷ panel width” only gives the beginning of the answer
Division shows the minimum number of modules, but does not show the quality of the future layout.
For a wall of 3200 mm:
3200 ÷ 1010 ≈ 3,17.
Rounding up gives four panels. Formally, everything is correct. But the result does not clarify:
-
what width will the outer modules get;
-
is it necessary to trim one panel or two;
-
where will the narrow strip end up;
-
will the rhythm of the slats be preserved;
-
how to finish the open edge;
-
is it possible to leave part of the wall without a panel;
-
where the outlets are;
-
what clear width remains after furniture installation;
-
are the wall dimensions the same at the bottom and top;
-
is the panel length sufficient for the height.
A correct calculation consists of two levels.
Get Consultation
The first level is arithmetic
The number of full modules and the total surplus or deficit are determined.
The second level is compositional
It is decided how to distribute the remaining width so that the edges do not look random.
When purchasing wall slat panels, the second level is no less important than the first. The panel creates a repeating vertical rhythm, so any disruption at the edge is more noticeable than on a smooth cladding.
Scheme one: three PAN-007 and 85 mm margins
Three panels occupy 3030 mm. A wall 3200 mm wide leaves 170 mm of free space. If the modules are centered, 85 mm remains on each side.
Scheme:
85 | 1010 | 1010 | 1010 | 85
This option is often perceived as "the wall was not enough to cover." This is only true when the side margins are not styled in any way. If they are included in the project, three panels turn into a central architectural canvas.
When 85 mm margins look intentional
The composition works if on the left and right:
-
a uniformly painted strip remains;
-
a thin molding runs through;
-
a shadow gap is provided;
-
the panel is located between two identical pilasters;
-
there are symmetrical side sections of the wall;
-
the edges coincide with furniture boundaries;
-
the panel forms a backdrop for a bed, sofa, or console;
-
the open strips are painted in the color of the fabric base or slats;
-
the light fixtures are arranged symmetrically;
-
85 mm is repeated in other wall details.
In this case, the unclad zone works like a mat around a painting. It separates the relief from adjacent walls and makes the central insert lighter.
When 85 mm turn into random gaps
Margins look like a mistake when:
-
the left corner is hidden by furniture, and the right one is completely open;
-
there is a door trim on the right, and an empty wall on the left;
-
one strip has an outlet;
-
the baseboard and ceiling junction do not support the frame;
-
the wall width changes with height;
-
the paint sharply contrasts with the panel without a design intent;
-
the edge of the fabric base remains visible;
-
the side strip ends with a curved inner corner;
-
the 85 mm distance is not repeated in any other element.
Three modules save the cost of a fourth panel, but may require additional edge preparation and painting of side areas. Therefore, options should be compared based on the full estimate.
What is included in the order for the first scheme
Minimum set:
-
3 panels PAN-007 of the selected material and length;
-
a sample to check the profile and color;
-
mounting compound;
-
material for finishing the panels;
-
paint for the side fields;
-
if necessary, two moldings or two wooden trims;
-
tools and consumables for trimming to height;
-
Delivery.
Who is the three-module scheme suitable for
It is especially appropriate for:
-
wall behind the headboard;
-
panels behind the sofa;
-
central area of the office;
-
background behind the console;
-
decorative insert in the hallway;
-
wall between two wardrobes;
-
niche 3200 mm wide;
-
composition with side sconces;
-
of a project where the relief should not reach the corners.
Commercial conclusion
Three panels are not an "insufficient" order. This is a complete solution if the client initially wants a central insert 3030 mm wide and equal margins of 85 mm each. Buying a fourth module just to cover every millimeter strip is not necessary.
Scheme two: four panels and symmetrical trimming to 590 mm
Four modules give a total width of 4040 mm. For a wall of 3200 mm, 840 mm needs to be removed.
If all the excess is removed from one side, you get three whole panels and a 170 mm strip. It is much neater to divide the trimming equally:
840 ÷ 2 = 420 mm.
Approximately 420 mm is removed from each outer module:
1010 − 420 = 590 mm.
Scheme:
590 | 1010 | 1010 | 590
The two central modules remain whole, and the edges get equal width. The wall is completely covered.
Why symmetrical trimming looks calmer
The human eye quickly reads the center. When equal sections are located on both sides of two whole modules, the composition is perceived as designed.
Symmetry helps:
-
hide inevitable trimming;
-
keep the central axis;
-
style both inner corners identically;
-
distribute the outer battens;
-
connect the panel with the furniture in the center;
-
place the TV, bed, or console;
-
avoid a single narrow strip;
-
repeat the same junction at the baseboard and ceiling.
The number 590 mm is the calculated width, not the final cut line
You cannot take a tape measure, measure exactly 590 mm on the front side, and immediately cut. First, you need to see the actual rhythm of PAN-007.
The panel consists of slats and gaps on a fabric base. The edge after cutting should finish neatly. Depending on the actual arrangement of elements, the line may require slight compositional adjustment.
Before cutting, check:
-
where the outermost slat is;
-
whether the module can be ended at a gap;
-
whether too narrow a profile fragment will remain;
-
whether the left and right sections will finish identically;
-
what will cover the end;
-
how the fabric base approaches the corner;
-
whether molding is required;
-
whether the actual net width of the wall matches 3200 mm.
If it is necessary to change the width of the outermost section for a neat finish, the adjustment is distributed symmetrically. You cannot make 580 mm on the left and 600 mm on the right without checking the entire axis.
What happens to the cut-off parts
Nominally, 420 mm is removed from each of the two outermost panels. These parts do not necessarily become useless.
The remnants can be considered for:
-
finishing a narrow wall section;
-
a furniture facade;
-
a cabinet side panel;
-
a small niche;
-
a sample of the finish;
-
decorating a column;
-
repairs in the future;
-
color matching on site.
Usage depends on the actual cut line and the condition of the fabric backing. Do not include the remainder in another project in advance until cutting is completed.
What to order for full coverage
Main set:
-
4 panels PAN-007;
-
1 sample OPAN-007 before a large purchase;
-
mounting materials;
-
finish for MDF, beech, or oak;
-
two elements for side joints, if needed;
-
extra material for complex cutouts;
-
Delivery in one batch.
When four panels justify the higher cost
This option is worth choosing if:
-
a continuous wall without painted fields is needed;
-
corners should look the same;
-
the panel serves as full cladding, not an insert;
-
the wall is opposite the entrance;
-
both edges are clearly visible;
-
furniture is placed in the center;
-
the rhythm should continue from corner to corner;
-
the project has no molding frame;
-
the leftovers can be used in other areas;
-
the cost of a visual error is higher than the cost of the fourth module.
Scheme three: three full panels and an add-on of 170 mm
Arithmetic:
1010 + 1010 + 1010 + 170 = 3200 mm.
For this layout, you still need to order a fourth panel, since the 170 mm strip is cut from a separate module.
It turns out that the buyer pays for four panels, but uses most of the fourth only as a source of a narrow add-on.
Why the scheme looks weaker
A one-sided strip disrupts the balance. On one side, the wall ends with a full module, on the other — with a narrow section. The difference is especially noticeable if:
-
both corners are open;
-
the panel is evenly illuminated;
-
the furniture is placed in the center;
-
the rhythm is visible from a great distance;
-
the outermost strip contains only a few slats;
-
the end is not closed;
-
the extension is located next to the door;
-
an outlet is installed on the narrow section.
When an extension of 170 mm is acceptable
The layout can be rational if the strip:
-
completely closed by a built-in wardrobe;
-
goes behind the curtain;
-
located in a deep niche;
-
hidden by the refrigerator;
-
blocked by a furniture side panel;
-
falls into an inconspicuous inner corner;
-
used behind the door leaf;
-
coincides with a narrow architectural pier;
-
needed for a technical cutout.
Then the asymmetry is not noticeable, and the remaining part of the fourth panel can be useful in another area.
Where to place the narrow strip
It is better to direct the extension piece toward a less noticeable side. The decision is made based on the room plan:
-
from the entrance;
-
away from the main light source;
-
away from the long-viewing area;
-
away from the center of the furniture composition;
-
away from the TV;
-
away from the headboard;
-
away from the mirror;
-
away from the passageway.
But "less noticeable side" does not mean that the edge can be ignored. Even a hidden extension piece must be secured and finished according to the general technology.
Why the third option cannot be called the most economical
The number of main panels is the same as in the second scheme: four. Savings only occur when the large remainder of the fourth module is actually used elsewhere. If it remains in stock without a purpose, symmetric trimming usually gives a more cohesive result for the same purchase.
Three schemes in one table
| Criterion | Three panels and fields | Four with symmetric trimming | Three whole and an add-on of 170 mm |
|---|---|---|---|
| Quantity of PAN-007 | 3 | 4 | 4 |
| The wall is completely covered | No | Yes | Yes |
| Open fields | 85 mm each | No | No |
| Width of outer panels | 1010 мм | About 590 mm | 1010 and 170 mm |
| Symmetry | High | High | Low |
| Trim volume | Minimum by width | Two outer modules | One narrow extension |
| Remains | No large side leftovers | Two leftovers of about 420 mm each | One large leftover of about 840 mm |
| Edge finishing | Need to consider margins | Need to consider end caps at corners | The narrow edge is especially important |
| Main Scenario | Decorative insert | Solid cladding | Extension piece is hidden by furniture |
| Commercial sense | Minimum panels | Most seamless wall | Beneficial when using leftover material |
The choice is not limited to "three is cheaper than four." Different results are compared. In the first case, the buyer acquires a central panel composition. In the second, a solid cladding. In the third, a technical scheme for a wall with a partially hidden edge.
The actual wall width may not be 3200 mm
The size in the plan and the size on site often differ. For a layout with symmetrical edges, even a difference of a few millimeters is noticeable.
Measure the wall at three levels
Take the width:
-
at the floor;
-
approximately in the middle;
-
at the upper edge of the future panel.
If the values differ, you cannot rely on only one. You need to determine how the base will be prepared and where the extreme lines will be.
Check the verticality of the corners
The inner corner may deviate to the side. Then the edge module with a width of 590 mm will be the same by calculation, but will actually get a wedge-shaped cut.
Do not automatically consider the width behind the furniture as useful
If a cabinet with a depth of 600 mm is installed on the right, it does not mean that the panel can be brought behind it without checking. You need to know:
-
whether the cabinet will be removable;
-
whether the edge is visible from the side;
-
whether a ventilation gap is required;
-
how the baseboard runs;
-
where the socket is located;
-
whether the furniture reaches the ceiling;
-
whether a technological seam remains.
Take into account trim and slopes
The distance between the corner and the door trim may be less than the total wall. The clean decorative width is calculated to the actual panel boundary.
Take measurements after rough leveling
Plaster, drywall, or additional cladding changes the width. Buying panels based on measurements taken before wall preparation is risky.
Clean decorative width: what to subtract from 3200 mm
Sometimes PAN-007 should not occupy the entire wall, but only a section between elements.
Formula:
Wclean = Wwall − Wleft − Wright − Ztech,
Where:
-
Wclean — width of the panel zone;
-
Wwall — total width;
-
Wleft — left adjacency, furniture, or molding;
-
Wright — right adjacency;
-
Ztech — technological zones provided by the project.
For example, on a 3200 mm wall, two side moldings of 40 mm each are planned. Clean zone:
3200 − 40 − 40 = 3120 mm.
Three PAN-007 panels take up 3030 mm. Remaining:
3120 − 3030 = 90 mm,
that is, 45 mm between panels and moldings with symmetry.
The original 85 mm scheme no longer applies. Any addition of a frame requires a new calculation.
The panel height is chosen separately from the layout width.
PAN-007 has a constant width of 1010 mm, but several length options.
| Material | Short length | Long length | Typical task |
|---|---|---|---|
| MDF | 950 мм | 2670 мм | Painted decorative zone or high panel |
| Beech | 950 мм | 2400 мм | Wooden panel for selected finish |
| Oak | 950 мм | 2400 мм | Panel with pronounced natural texture |
You cannot write in the order “PAN-007, 2670 mm, oak” if such a combination is not available in the confirmed size range. First select the material, then the available length for it.
Length 950 mm
Short module is suitable for:
-
lower part of the wall;
-
area above the cabinet;
-
a furniture facade;
-
bar counter;
-
headboard;
-
decorative panel between moldings;
-
low partition wall;
-
local relief accent.
This format does not have to start from the floor. It can be included in a horizontal composition, but the height and junctions must be shown on the elevation.
MDF length 2670 mm
This option is suitable for a tall wall when, after accounting for the floor, baseboard, and ceiling junction, the length is sufficient.
With a room height of 2700 mm, a 2670 mm panel does not necessarily become a ready-made floor-to-ceiling solution. You need to consider:
-
the clear height after floor finishing;
-
skirting board size;
-
ceiling profile;
-
possible shadow gap;
-
ceiling unevenness;
-
need for trimming;
-
installation order.
Beech and oak 2400 mm long
On a wall 2700 mm high, a section will remain at the top or bottom. It can be included in the project:
-
install a tall skirting board;
-
add a top molding;
-
leave a painted strip;
-
install the panel above low furniture;
-
form a horizontal boundary;
-
use a cornice;
-
place panels from the specified mark.
You cannot promise the customer a continuous covering from floor to ceiling without calculating the height.
MDF, beech, or oak: the material changes not only the price
PAN-007 made of MDF
MDF is chosen when a specific color and opaque covering are needed. The panel can be white, graphite, green, terracotta, or match the color of the wall and furniture.
Practical advantages for the project:
-
the relief can be included in the overall color plane;
-
The long format of 2670 mm is suitable for high walls;
-
It is not required to preserve the natural texture;
-
The sample is convenient to use for test painting;
-
The color connects the panel with doors, baseboard, or furniture.
But MDF should not be purchased as a "ready-made colored panel" if the card offers a blank for subsequent finishing. The finish is included in a separate estimate.
PAN-007 made of beech
Beech is suitable when a wooden base with a calmer pattern is needed. It can be considered for opaque finishing or coordinated tinting.
In a wall layout of 3200 mm, beech requires a separate length check: the long format is 2400 mm. If the wall is higher, the upper zone is finished additionally.
PAN-007 made of oak
Oak is chosen for its visible texture. Vertical slats emphasize the direction of the fibers and create a more natural surface.
When ordering four panels for tinting, you should:
-
buy modules from the same batch;
-
lay out the panels before installation;
-
distribute the shades;
-
check the pattern of adjacent modules;
-
perform a test tinting on OPAN-007;
-
agree on exposed edges;
-
keep the leftovers after trimming.
Material selection table
| Task | MDF | Beech | Oak |
|---|---|---|---|
| Opaque painting | Main Scenario | Possible per project | Possible, but the texture is covered |
| Visible texture | No | Calmer | Most pronounced |
| Long format | 2670 мм | 2400 мм | 2400 мм |
| Short format | 950 мм | 950 мм | 950 мм |
| Wall above 2400 mm | More convenient at height up to available length | Need upper or lower zone | Need upper or lower zone |
| Shade selection | Through paint-out | Through finish sample | Especially important |
| Four panels from one batch | preferably | preferably | Highly recommended |
| Main reason for purchase | Color and length | Wooden base | Natural oak texture |
More details on differences in blanks and surface preparation can be found in the section on materials and finishing quality.
Why the OPAN-007 sample is needed before ordering three or four panels
On screen, the 23 × 8 mm profile looks compact. On a wall 3200 mm wide, it creates a large vertical rhythm. The scale error repeats across the entire surface.
Before the main order, it is useful to Buy a sample of the slat panel OPAN-007.
The sample helps to check:
-
the width of the slat;
-
height of the relief;
-
the trapezoidal profile;
-
the gaps;
-
the fabric base;
-
the possible trimming line;
-
the view of the open edge;
-
the color after painting;
-
the shade of oak or beech;
-
the combination with the floor covering;
-
reaction to side light;
-
scale next to furniture;
-
ease of cleaning;
-
compatibility with molding;
-
quality of corner joint.
Apply the sample not only to the center of the wall
Check it:
-
at the left corner;
-
at the right corner;
-
near the baseboard;
-
near the ceiling;
-
near the socket;
-
next to the trim;
-
behind the TV;
-
next to the lamp;
-
near the furniture side panel.
The central part rarely causes a problem. Errors occur at the edges.
Check the sample in daylight and artificial lighting
The trapezoidal profile creates chiaroscuro. In the morning, the relief may look softer; in the evening, with side sconce lighting, it appears deeper and more contrasting.
Perform a test paint application
For MDF, apply the selected system to a sample. For beech or oak, do a test finish. Evaluating color against a flat catalog paint sample is not enough: recesses and protrusions reflect light differently.
When more than one sample is needed
Multiple samples are useful if:
-
MDF, beech, and oak are compared;
-
different colors are being selected;
-
panels are shown to the client;
-
angle needs to be assembled;
-
the radius is being checked;
-
one part is sent to the finisher;
-
the other stays on site.
The full range of samples is available in the section where you can order wall panel samples before purchasing.
The cut line needs to be tied to the actual rhythm of the slats
The calculation of 590 mm for the end module shows the required width of the wall section. It does not assign the exact cut location without inspecting the panel.
Why you cannot leave half of a narrow slat
An accidentally trimmed profile may look broken. The edge should appear finished.
The fabric backing also participates in the cutting
After removing part of the module, the remaining section must maintain a stable connection of the slats. You cannot separate elements without checking so that the outermost slat is held unreliably.
The left and right edges are made as a pair
For a symmetrical layout, the two end modules are marked mirror-wise. You cannot trim each independently "on site" without comparing the final pattern.
Full-size layout before cutting
Lay out the four modules on the floor or on a temporary surface. Mark:
-
central axis;
-
wall boundaries;
-
cut lines;
-
outer slats;
-
position of electrical outlets;
-
top and bottom;
-
panel numbers;
-
material and shade.
Only after this proceed to the final cutting.
Open edge: leave, paint, or cover with molding
The central insert has two open edges. For a solid facing, the edges meet corners, doors, or furniture. Each case requires its own finish.
Edge next to a painted wall
The transition can be left open if:
-
The line is straight;
-
The fabric base is not visible;
-
The edge batten looks finished;
-
The wall color is consistent;
-
There is no mechanical load;
-
The joint is provided for by the project.
Edge at the internal corner
The panel is trimmed according to the actual geometry. If the corner is uneven, additional wall preparation or a covering profile may be needed.
Edge at the trim
The panel thickness of 8 mm must align with the trim protrusion. The panel must not accidentally overlap its face.
Edge near furniture
It is necessary to leave the possibility of installing and dismantling furniture. The panel should not be accidentally pinched between the wall and the cabinet.
Molding as a decorative border
For an expressive frame, you can buy moldings to decorate the edges of the panel. The profile is chosen after checking:
-
width;
-
height;
-
material;
-
lengths;
-
finishing method;
-
combination with PAN-007;
-
position of the baseboard;
-
top finishing.
Molding cannot be added after calculation without revising the width. If two side profiles take up part of the wall, the layout changes.
Sockets, switches, and outlets: first coordinates, then panels
On a 3200 mm wall, electrical points may be located. You cannot simply distribute four modules and then cut holes wherever they end up.
Fix the center and the full overall dimension
For each point, record:
-
distance from the left corner;
-
height from the finished floor;
-
frame size;
-
direction of the group;
-
depth;
-
number of mechanisms;
-
cable position;
-
decorative trim protrusion.
Align with the rhythm of the slats
The socket may fall:
-
into the gap;
-
onto one slat;
-
onto two slats at once;
-
at the module joint;
-
into the edge trimmed section.
The best option is determined by the specific product and installation scheme. It cannot be stated in advance that any hole is convenient to make between the slats.
Do not place a module joint through a group of sockets without a reason
Such a node complicates the cut and visually draws attention to the joint.
Moving a point is sometimes cheaper than complex cutting.
If the electrical work is not yet complete, a slight adjustment of coordinates can preserve a solid rail and a neat panel. The decision is made by the project specialist.
TV wall: the center of the furniture and the center of the layout must coincide.
PAN-007 is often used behind the TV. For a 3200 mm wall, it is especially important to determine what the symmetry is based on.
Three axes are possible:
-
the geometric center of the wall;
-
center of the TV;
-
the center of the furniture cabinet.
They must either coincide or diverge deliberately.
Three panels as a central background
The insert width of 3030 mm leaves 85 mm on each side. The TV and cabinet are centered. This option creates a thin frame around the relief.
Four panels from corner to corner
The two central modules remain intact, the two outer ones are trimmed to 590 mm. The center of the wall runs along the joint of the middle modules or at another point depending on the panel structure. This needs to be checked before mounting the bracket.
Cables and mounting
The TV mounting points relate to the wall or prepared structure, not determined solely by the decorative panel. It needs to be shown in advance:
-
bracket;
-
sockets;
-
cable outlets;
-
the cabinet;
-
the acoustics;
-
lighting;
-
the ventilation of the equipment.
Wall behind the bed: three panels can be more expressive than four
For the headboard, a solid cladding is not always necessary. A central insert 3030 mm wide suits a wide bed and a pair of nightstands, while the 85 mm margins can create a thin frame.
Check:
-
the total width of the bed;
-
width of the bedside tables;
-
position of sconces;
-
height of the panels;
-
sockets;
-
switches;
-
a soft headboard;
-
baseboard;
-
Ceiling cornice.
If the bed and bedside tables take up almost the entire wall, a fourth panel may not provide a noticeable advantage. Three modules will create a standalone composition
Wall preparation: a beautiful layout won't save a poor base
Panel flexibility helps work with complex geometry, but does not mean the wall can be left unprepared.
Check:
- base strength;
- absence of peeling paint;
- cleanliness;
- dryness;
- geometry;
- internal corners;
- protruding defects;
- the position of electrical outlets;
- floor readiness;
- ceiling readiness;
- routes of hidden communications;
- ability of the base to hold the selected mounting compound.
Flexible base follows a large unevenness
If there is a pronounced bump on the wall, vertical slats will show it with light and shadow. The fabric does not turn a curved surface into a flat one.
Wall color may be visible in the gaps
Before installation, you need to understand whether the base is visible between the slats in the chosen finish. The color of the substrate and wall affects the final perception.
Marking starts from the axis
For a symmetrical layout, first mark the center of the wall, then the boundaries of the two middle modules and the edge sections. Starting from a random corner is dangerous: all the error will end up on the opposite side.
Installation route without substituting an article for instructions
This publication is dedicated to calculating the purchase, so it does not replace the technical data sheet. The general sequence is as follows:
- finish preparing the wall;
- re-measure the clear width and height;
- lay out the panels without fixing;
- number the modules;
- check the material and pattern;
- mark the axis;
- perform a test cut on a sample or offcut;
- prepare the edge panels;
- make the cutouts;
- check the dry layout;
- apply the recommended adhesive;
- secure the panels;
- finish the edges;
- perform or complete the final finishing according to the chosen system.
Detailed recommendations are available in the section of tips for installing wall panels. The specific order of finishing before or after installation is determined by the material and the project.
Before or after installation: when to do the finish
MDF is painted after installation
This scenario helps achieve a uniform color surface. Joints need to be carefully processed and adjacent elements protected.
MDF is painted before installation
Panels are easier to finish on a horizontal surface, but installation must not damage the finished coating. After cutting, new edges appear.
Wood is finished before installation
This way, relief and edges can be treated. However, joints and trimmed areas require special attention.
Wood is finished after installation
Panels get a uniform tone on the wall, but work in recesses is more difficult. First, a test is done on OPAN-007.
There is no universal answer. The decision is made after choosing the material, coating, cutting method, and edge finishing.
How not to confuse PAN-007 with similar products
With individual interior slats
Individual slats are mounted one by one. PAN-007 is already assembled on a fabric base and has a set rhythm.
With a rigid panel on a solid substrate
PAN-007 is flexible. This affects curved surfaces and base preparation.
With PAN-005
Another article has a different profile shape and visual rhythm. You cannot transfer the cutting layout from a photo of another panel to PAN-007.
With a panel 1000 mm wide
PAN-007 has a width of 1010 mm. The 10 mm difference across four modules gives 40 mm, which noticeably affects the layout.
With wooden lining
The lining is joined according to its own system and creates a different plane. PAN-007 is a decorative slat module.
With an acoustic panel with stated characteristics
The fabric base and relief themselves do not confirm a specific acoustic class. Unverified sound absorption ratings cannot be attributed to PAN-007.
With pre-painted panel
The material may require finishing. The specific execution is checked in the product card.
To compare models, you can buy flexible slat panels for walls after reviewing the cross-section, materials, and available length.
If the slat rhythm is not suitable, in the general catalog you can select and buy wall panels of a different type.
Practical mistakes when laying out a 3200 mm wall
Mistake 1. Buying three panels, expecting a continuous covering
Three modules cover 3030 mm, not 3200 mm.
Solution: accept fields of 85 mm or order a fourth panel.
Error 2. Add a 170 mm strip on the visible side
A narrow extension breaks the rhythm.
Solution: symmetrically trim the two outer modules.
Error 3. Treating 590 mm as an exact cut line without a sample
The edge may pass through an unfavorable part of the profile.
Solution: compare the calculation with actual slats.
Error 4. Measuring the wall only at the floor
The width at the top may differ.
Solution: three measurement levels.
Error 5. Not checking the verticality of corners
The outermost module gets a wedge shape.
Solution: unfolding and preparing the base.
Error 6. Measuring based on the rough wall
After finishing, the width changes.
Solution: control measurement before ordering or cutting.
Error 7. Subtracting furniture without a working drawing
After installation, a visible unclad area remains.
Solution: determine the clean decorative width.
Error 8. Adding molding after purchase
Fields and edge panels no longer match the calculation.
Solution: enable the profile before layout.
Error 9. Do not account for the 8 mm thickness
The panel protrudes relative to the trim or baseboard.
Solution: side cut.
Error 10. Choose material only by photo
On site, the texture and shading look different.
Solution: OPAN-007.
Error 11. Order oak 2670 mm long
The confirmed long oak format is 2400 mm.
Solution: check material and length together.
Error 12. Consider all PAN-007 panels to be the same length
MDF and solid wood have different long formats.
Solution: table of specific configuration.
Error 13. Promise floor-to-ceiling cladding without measuring height
The panel may turn out to be shorter.
Solution: calculate junctions.
Error 14. Not taking into account the baseboard
The bottom line looks random or interferes with installation.
Solution: choose the sequence in advance.
Error 15. Do not account for the ceiling profile
A narrow unintended strip remains at the top.
Solution: vertical layout.
Error 16. Center based on the first module
The error shifts to the right edge.
Solution: start from the wall axis.
Error 17. Trim only the right panel at open corners
The composition becomes asymmetric.
Solution: two equal edges.
Error 18. Cut the left and right panels independently
The outer slats look different.
Solution: mirror layout.
Error 19. Do not number modules
Panels swap places after shade matching.
Solution: mark before installation.
Error 20. Mix materials in one wall
MDF, beech, and oak have different visual results.
Solution: one agreed configuration.
Error 21. Order oak later
A new batch may differ in tone.
Solution: buy the entire volume and reserve at the same time.
Error 22. Not performing a trial finish
The color on the relief differs from the flat sample.
Solution: paint out OPAN-007.
Error 23. Placing the socket after the layout
The hole falls on an inconvenient part of the rail.
Solution: coordinates before purchase.
Error 24. Counting only the center of the socket
The full frame is wider.
Solution: apply the entire dimension.
Error 25. Align the panel joint with the TV bracket
The assembly becomes more complex.
Solution: general layout of equipment and cladding.
Error 26. Not checking cable outlets
After installation, the panel has to be removed.
Solution: electrical work before fixing.
Error 27. Using a narrow trim piece next to the door
It is constantly visible upon entry.
Solution: move the trim piece to a hidden area or choose symmetry.
Error 28. Assuming a large leftover is guaranteed usable
After cutting, its shape may not fit.
Solution: evaluate the remainder after the actual cut.
Error 29. Discard trimmed sections
Later there is nothing to replace the damaged edge with.
Solution: keep a marked reserve.
Error 30. Glue onto unstable paint
The panel comes off together with the base layer.
Solution: check the wall's adhesion.
Error 31. Consider flexibility as a substitute for leveling
The relief repeats the bump.
Solution: prepare the surface.
Error 32. Not checking the wall color between the slats
The base creates unwanted contrast.
Solution: test area.
Error 33. Buying universal adhesive without testing
The composition may not suit the base.
Solution: select an installation system.
Error 34. Painting only the front protrusions
The recesses remain uneven.
Solution: check the coating on a sample.
Error 35. Damaging the finished edge during cutting
The edge has to be redone.
Solution: determine the sequence of operations.
Error 36. Not measuring the path for carrying in
The panel does not fit into the elevator or corridor.
Solution: check the packaging dimensions.
Error 37. Storing long panels with a bend
Before installation, the shape of the base changes or the slats get damaged.
Solution: even support.
Error 38. Laying out oak without matching the shade
Adjacent modules differ sharply.
Solution: dry lay out the entire batch.
Error 39. Not accounting for the direction of lighting
One edge looks darker than the other.
Solution: check the sample with the lights on.
Error 40. Buying panels only by price per piece
The sample, finish, adhesive, moldings, and delivery are not taken into account.
Solution: calculate the full set.
Error 41. Choosing three panels to save money, although closed corners are needed
Margins of 85 mm do not match the design intent.
Solution: determine the composition type before the basket.
Error 42. Buy four panels, although a central insert is needed.
An extra module does not improve the project.
Solution: do not confuse solid cladding with an accent.
Error 43. Not checking future furniture.
The cabinet overlaps half of the outermost module.
Solution: overlay furniture on the layout.
Error 44. Leaving the edge without a solution.
Fabric or end looks unfinished.
Solution: open slats, corner, or molding must be approved.
Error 45. Order panels without article number
A different profile arrives.
Solution: specify PAN-007 and full size.
Who suits the layout of three panels
Three modules should be chosen if:
- a central insert is needed;
- 85 mm margins look like part of the composition;
- the wall is painted around the panel;
- the relief should not reach the corners;
- identical moldings are placed along the edges;
- the panel serves as a backdrop for a bed or sofa;
- the budget does not include the fourth module;
- the edges can be neatly finished;
- an open wall area is needed for outlets or wall lamps;
- a width of 3030 mm matches the furniture.
Who suits a solid layout of four panels
Four modules are needed if:
- the entire wall should be slatted;
- both corners are visible;
- symmetry is required;
- furniture is installed in the center;
- a narrow one-sided insert is not allowed;
- leftovers can be used;
- the relief should work as a full-fledged cladding;
- the project does not provide for painted fields;
- the wall is opposite the entrance;
- the client wants a single material from edge to edge.
When PAN-007 is better to replace with another solution
The model may not be suitable if:
- the 23 × 8 mm profile looks too large;
- a more frequent rhythm is required;
- the wall does not allow for quality preparation;
- lengths of 2400 or 2670 mm do not fit into the vertical design;
- a rigid module on a different base is needed;
- a confirmed acoustic system is required;
- open edges cannot be finished;
- outlets and equipment excessively fragment the surface;
- the radius does not match the capabilities of the selected panel;
- the client is not ready to perform the finishing work;
- a width of 1010 mm creates an unfavorable cut on other walls of the room.
In that case, it's worth compare prices for MDF and wood slat panels and select a different profile or construction.
Ready specification for a 3200 mm wall
Option A: central insert
Slat panel PAN-007 — 3 pcs.
- wall width: 3200 mm;
- panel insert width: 3030 mm;
- side margins: 85 mm each;
- material: MDF, beech or oak;
- length: according to the vertical project;
- slat profile: 23 × 8 mm;
- panel thickness: 8 mm;
- sample OPAN-007: 1 pc.;
- installation compound: according to wall material;
- finish: according to approved sample;
- side field design: specify;
- baseboard and top junction: specify;
- delivery: in one batch.
Option B: solid symmetrical wall
Slat panel PAN-007 — 4 pcs.
- wall width: 3200 mm;
- two central modules: 1010 mm each;
- Edge sections: calculated at 590 mm;
- Symmetric trimming: on both sides;
- Exact cut line: after fitting the actual profile;
- Material: one for the entire wall;
- Length: by height;
- OPAN-007: 1 pc.;
- Remaining edge panels: keep;
- Installation materials: as separate items;
- Finishing: with one system;
- Delivery: as a full batch.
Option B: hidden one-sided extension
Slat panel PAN-007 — 4 pcs.
- three full modules: 3030 mm;
- extension: calculated 170 mm;
- extension side: specify;
- reason for asymmetry: cabinet, curtain, niche, or other confirmed overlap;
- large remainder of the fourth panel: specify purpose;
- open edges: check;
- material and length: uniform.
How to place an order for STAVROS
Choose the composition
Decide whether a central insert or a solid wall is needed.
Take control measurements
Measure the width at three levels and the height at several points.
Choose the material
MDF — to match the color; beech — wooden base with a calm texture; oak — for a pronounced natural grain.
Compare the length
MDF: 950 or 2670 mm. Beech and oak: 950 or 2400 mm.
Order a sample
Check the profile, light and shadow, cut line, and finish.
Prepare the layout
Show sockets, furniture, baseboard, ceiling, and open edges.
Calculate the quantity
Three PAN-007 — for a 3030 mm insert. Four — for a solid wall or extension.
Assemble the kit
Add glue, finishing materials, moldings, and delivery.
Confirm stock and timelines
Check the current availability of the selected configuration.
For a complex wall with niches, radius, built-in furniture, or multiple materials, you can order a wall finishing design projectdownload the catalog and drawings of slat panels order PAN-007 for a 3.2 m wall.
After the scheme is approved, you can in quantities of three or four modules. in quantities of three or four modules.
Frequently asked questions about PAN-007 and a 3.2 m wide wall
How many PAN-007 panels are needed for a 3200 mm wall?
Three panels fit the central insert with a width of 3030 mm. For a solid covering, four panels are required.
How much will remain after three panels?
170 mm across the entire wall width.
How to divide the remainder symmetrically?
Leave 85 mm on the left and right.
How much do four panels cover?
4040 mm before trimming.
How much needs to be removed from four modules?
The total surplus is 840 mm.
How to make the edges equal?
Trim the two outer modules by calculation to 420 mm each.
What width will the outer panels get?
About 590 mm each.
Why does it say "about 590 mm"?
The net width is determined by arithmetic, but the exact cut line must account for the actual rhythm of the slats and the geometry of the wall.
Is it possible to install three full panels and a 170 mm strip?
It is possible if the narrow strip is hidden by furniture or is in a low-visibility area.
How many panels are needed for a 170 mm strip?
Four. The cutout is made from the fourth module.
What to do with the remainder of the fourth panel?
Save it for another wall, niche, facade, finish sample, or future renovation.
Which layout is the most symmetrical?
Three panels with 85 mm margins, or four panels with 590 mm edge sections.
Which layout covers the entire wall?
Four panels with symmetrical trimming.
Which layout is cheaper in terms of the main product?
Three panels and two open fields.
Should the cost of finishing the fields be taken into account?
Yes. Paint, moldings, and wall preparation are included in the full budget.
What is the width of PAN-007?
1010 mm.
What is the thickness of the panel?
8 mm.
What is the size of the batten?
The batten profile is 23 × 8 mm.
What is the shape of the profile?
Trapezoidal.
What base are the battens attached to?
On a flexible fabric base.
Can PAN-007 be used on a curved wall?
The flexible design is intended for curved surfaces as well, but the radius and cutting pattern need to be checked against the project.
Can a column be finished?
Yes, after calculating the development length along the circumference.
Is there a PAN-007 made of MDF?
Yes.
Is there a PAN-007 made of beech?
Yes.
Is there a PAN-007 made of oak?
Yes.
What sizes are available in MDF?
1010 × 8 × 950 and 1010 × 8 × 2670 mm.
What sizes are available in beech?
1010 × 8 × 950 and 1010 × 8 × 2400 mm.
What sizes are available in oak?
1010 × 8 × 950 and 1010 × 8 × 2400 mm.
Can I order oak in 2670 mm length?
This option is not listed in the confirmed size range. The long oak module has a length of 2400 mm.
Can I order MDF in 2400 mm length?
Confirmed MDF options are 950 and 2670 mm. Another combination cannot be promised without separate confirmation.
Which panel should I choose for a wall height of 2600 mm?
MDF of 2670 mm length may fit after accounting for floor, baseboard, ceiling junction, and trimming.
Will an oak panel cover a wall height of 2600 mm?
The long oak option has a length of 2400 mm, so the top or bottom zone will need to be designed.
What is a 950 mm long panel for?
For a low decorative zone, furniture facades, lower wall band, headboard, or local insert.
Do I need to buy a sample?
Before ordering three or four panels, a sample helps to check the scale, material, texture, and color.
What is the article number of the sample?
OPAN-007.
Can the sample be painted?
Yes, it is used for trial finishing according to the selected system.
Do I need to buy a sample of the same material?
Yes, if you want to evaluate a specific material and finish.
Can I order several samples?
Yes, when comparing materials or finishing options.
How to determine the trim line?
Lay out the actual panels, mark the calculated width, and choose a neat finish relative to the slats and fabric backing.
Can the panel be cut exactly in half?
Only if such a line matches the project and the actual rhythm. For a 3200 mm wall, halves do not solve the calculated task.
Do both edge modules need to be trimmed equally?
For a symmetrical layout — yes.
Can the 590 mm width be slightly changed?
Only with mirror adjustment of both edges and maintaining the total width of 3200 mm.
Do I need to account for wall curvature?
Absolutely.
How to measure the width?
At the floor, in the middle, and at the top of the future cladding.
What value should be taken if the dimensions differ?
The solution depends on the wall preparation and the method of finishing the edges. You cannot choose one number without a drawing.
Is it necessary to level the wall?
The base must be strong and prepared. Pronounced irregularities will be noticeable in the vertical rhythm.
Can the panel be glued onto old paint?
Only after checking the strength of the layer and the compatibility of the mounting compound.
Which glue should I use?
The compound is selected based on the wall base and the panel material. A universal recommendation cannot be given without this data.
Is adhesive included in the kit?
It is ordered separately if the configuration card does not indicate otherwise.
Do sockets need to be taken into account?
Yes. Their coordinates are marked before laying out the panels.
Can a hole be cut after installation?
This order increases the risk of damage. Cutouts are better prepared according to precise markings.
Can a panel joint be placed through an outlet?
Technically, the joint requires separate verification; combining them without a project is not recommended.
How to place panels behind a TV?
Build a common axis for the wall, TV, and cabinet, then mark the bracket and cable outlets.
Can three panels be used behind a bed?
Yes. An insert of 3030 mm with 85 mm margins can become a standalone composition.
Do panels need to reach the floor?
Not necessarily. Installation above the baseboard or within a specified decorative zone is possible.
Can a skirting board be installed over the panel?
The joint depends on the thicknesses and the chosen system. It needs to be shown in cross-section before installation.
How to finish the side edge?
With an open end rail, molding, wooden trim, or a designed shadow gap.
Can molding be purchased after installation?
Yes, but its width may change the composition. It's better to choose the profile in advance.
Do panels need to be finished before installation?
The order depends on the material and coating. The solution is tested on a sample.
Can MDF be painted after installation?
Yes, if the technology allows for overall painting and protection of adjacent surfaces.
Can oak be tinted after installation?
It depends on the finishing system and access to the entire surface.
Do I need to buy panels from the same batch?
It is advisable, especially for beech and oak with visible texture.
Can I order one additional oak panel later?
Yes, but the shade and pattern of the new batch may differ.
How to check the color of four oak panels?
Lay out the entire batch before installation and distribute the modules by shade.
How much does PAN-007 cost?
The current price depends on the material and length and is checked on the product page.
Is there Contact us to confirm shipping to your destination.?
Yes. Conditions depend on size, quantity, and address.
How to prepare for delivery?
Measure the openings, elevator, staircase, corridors, and storage space.
Can the panel be bent for carrying in?
Flexibility does not mean the product can be folded or bent arbitrarily. Transportation is carried out while preserving the integrity of the slats and the base.
What to check upon receipt?
Article number, material, size, quantity, surface, fabric base, slats, and packaging.
Where can I see examples of use?
You can view ready-made ideas for wall panels and then adapt the composition to your own dimensions.
Where can I find the rules for installation and finishing?
In the STAVROS tips section and in the cards of selected materials.
What to write in the order?
Article PAN-007, material, length, quantity, purpose, layout scheme, and delivery address.
Which option to choose for a regular open wall of 3.2 m?
For solid cladding — four panels with symmetrical trimming. For a central accent — three panels and margins of 85 mm.
Three or four PAN-007: the decision must be made before payment.
A wall 3200 mm wide is not divisible by PAN-007 modules without a remainder. But the remainder is not a problem if its role is assigned in advance.
Three panels occupy 3030 mm. They are suitable for a central insert with equal margins of 85 mm. This composition is more economical in terms of the number of modules and works well behind a bed, sofa, console, or TV.
Four panels provide solid cladding. To avoid getting a 170 mm strip on one side, the two outer modules are trimmed symmetrically to a calculated width of about 590 mm. The exact line is determined after fitting the actual PAN-007 and checking the rhythm of the 23 × 8 mm profile.
A one-sided 170 mm extension is justified only when it is hidden by furniture or another element. In all other cases, equal edges look more convincing.
Before ordering, check:
- actual wall width at three levels;
- position of furniture, sockets, and appliances;
- material and available panel length;
- finishing of side and vertical junctions;
- real profile on sample OPAN-007;
- complete set of mounting and finishing materials.
STAVROS company allows you to assemble the project sequentially: order a sample, choose PAN-007 from MDF, beech, or oak, select materials for installation, moldings for edges, view ready-made ideas, and arrange delivery of PAN-007 across Russia. This approach saves the wall from an accidental narrow strip and turns trimming from a forced operation into part of a precise symmetrical layout.