


Article Contents:
- Buy ready-made slatted wall panels: types, price and quick selection for interior
- What are ready-made slatted panels and how they differ from individual slats
- Individual slat vs. ready-made panel: what's the difference
- Modularity: why it matters
- When ready-made panels are better than individual slats: an honest comparison
- A ready-made panel wins when:
- When individual slats may be appropriate:
- Types of ready-made slatted panels: breakdown by material
- Ready-made MDF slatted panels
- Ready-made wood-effect slatted panels
- Ready-made slatted panels for painting
- Ready-made wooden slatted panels
- Decorative relief ready-made panels
- Comparison table of types of ready-made slatted panels
- Where to use ready-made slatted wall panels
- Ready-made panels for TV area
- Ready-made panels for hallway
- Ready-made panels for bedroom
- Ready-made panels for home office
- Ready-made panels for commercial interiors
- Ready-made panels in interiors of different styles
- Modern minimalism
- Japandi and Scandinavian style
- Modern classicism
- Loft and Industrial
- Lighting of ready-made slatted panels: how light makes the wall voluminous
- Directional spotlights: basic technique
- Hidden LED strip behind the molding
- LED in the grooves of the slats
- Dimmer: atmosphere control
- What affects the price of ready-made slatted wall panels
- Material and its quality
- Slat width and profile depth
- Panel size and non-standard formats
- Order volume
- Cutting allowance
- Trim elements
- Delivery
- Installation
- How to calculate the real budget
- How to calculate the number of finished slat panels: a step-by-step method
- Step 1: Determine the area and take measurements
- Step 2: Subtract openings
- Step 3: Calculate the net area
- Step 4: Find out the exact panel size
- Step 5: Calculate the number of panels
- Step 6: Add a margin
- Step 7: Calculate additional elements
- Practical example
- Mistakes when buying finished slat panels: what most often goes wrong
- Where to buy finished slat panels for walls
- About the Company STAVROS
- FAQ: вопросы и честные ответы


Готовые реечные панели для стен купить: виды, цена и быстрый выбор для интерьера
Есть момент в каждом ремонте, когда хочется — нет, не «поразмышлять над вариантами» — а просто взять и сделать. Выбрать, заказать, установить. Получить результат. Без погружения в производственные детали, без самостоятельной сборки реек, без мучительного подбора шага и ширины паза вручную.
Именно для этого существуют готовые реечные панели для стен — изделия с продуманной геометрией, заданным ритмом, с покрытием под конкретную интерьерную задачу. Хотите готовые реечные панели для стен купить — разберём всё по существу: что это такое, чем они отличаются от отдельных реек, какие виды существуют, что влияет на цену и как сделать выбор без ошибок.
Это статья не для тех, кто «ещё думает». Это для тех, кто уже решил — осталось понять детали.


What are ready-made slatted panels and how they differ from individual slats
Прежде чем говорить о том, где купить готовые реечные панели для стен, стоит разобраться: что стоит за словом «готовые»? Это не маркетинговый термин, а принципиальное качество изделия.
Our factory also produces:


Отдельная рейка и готовая панель: в чём разница
Отдельная рейка — это одна полоса профилированного материала. Несколько реек монтируются на стену последовательно с заданным шагом. Всё — разметка, соблюдение зазоров, контроль вертикали каждой рейки — на совести мастера. Это гибкий, но трудоёмкий подход.
Готовая реечная панель — это изделие с фиксированной шириной, включающее несколько реек и пазов в одном модуле. Ритм реек задан на производстве: ширина рейки, глубина и ширина паза между ними — всё это определено заранее и воспроизводится с точностью фрезерного станка. Монтируется панель целиком — как единый элемент.
Что это даёт практически:
-
Predictable rhythm across the entire finishing area — no variation in batten spacing
-
Fast installation — less marking, fewer intermediate operations
-
Easy calculation — panel count is based on module size, not the number of individual battens
-
Compatibility with system trim elements — moldings, baseboards, decorative inlays
For accent areas that need precise and quick finishing — TV wall, hallway, bed headboard — a ready-made panel outperforms a set of battens across all parameters.
Get Consultation
Modularity: why it matters
The modular principle of ready-made slatted panels allows you to calculate in advance exactly how the panels will fit on the wall. Knowing the module width and the finishing area width, you get the exact number of panels — without approximate calculations.
During installation, this means: each subsequent module adjoins the previous one, maintaining a uniform rhythm. There is no need to re-check the spacing after each batten. Slatted wall panels with a defined geometry — this is manufacturing precision in your interior.
When ready-made panels are better than individual slats: an honest comparison
A ready-made panel is not always the best choice. There are scenarios where a set of individual slats is justified. But there are also scenarios where a ready-made panel is the only reasonable option. Let's break it down.
A ready-made panel wins when:
Speed is needed. If there's a deadline for installation and the project must be completed by a certain date, a ready-made panel is installed much faster than a set of individual slats.
An even rhythm is important. In a TV area or behind a bed headboard, any unevenness in spacing is immediately visible. A ready-made panel with factory spacing guarantees an even rhythm without manual adjustment.
No experience with layout. Installing ready-made panels is simpler: each module is a unit with clear edges. Individual slats require precise spacing layout and vertical control of each element.
A clear calculation is needed. For a ready-made panel, the quantity calculation is straightforward: zone width ÷ module width. For a set of slats, there are additional iterations with spacing, gaps, and number of slats per meter.
The task is an accent area, not full coverage. A ready-made panel is ideal for limited areas: a niche, a partition, a wall fragment. It provides a finished look even with a small area.
System compatibility is needed. For the STAVROS ready-made panel, there are system Moldings и decorative elementsthat work as a single system.
When individual slats may be appropriate:
Non-standard wall format with many bypasses, complex geometry with diagonal installation, individual rhythm designed by the designer specifically for a particular project. In other cases, a ready-made panel is more practical.
Types of ready-made slat panels: breakdown by materials
The market offers several categories of ready-made slat panels. Each has its own characteristics, scope of application, and price point.
Ready-made MDF slat panels
MDF (Medium Density Fiberboard) is the base for most ready-made wall slat panels. High-density pressed wood fibers (720–880 kg/m³) ensure stable geometry, clean milled profiles, and predictable behavior under humidity changes.
Why MDF dominates this category:
-
Material uniformity — no knots, cracks, or density variations
-
Clear milled profile along the entire length of the panel
-
Resistance to humidity fluctuations — especially important in apartments with central heating
-
Wide selection of coatings: primer, double primer "Prestige", decorative wood-like, tinted series
-
Versatility of use: living room, hallway, bedroom, study, commercial spaces
For most tasks, buying ready-made slatted MDF panels is the optimal solution in terms of quality, stability, and price.
Ready-made wood-like slatted panels
wood-look slatted panels — MDF base with a decorative coating that imitates wood texture. The embossing reproduces the pore pattern, multi-layer tinting creates a natural tonal transition — all without the instability of natural solid wood.
Application area: TV zones, headboards, studies, hallways, reception areas in commercial spaces. Where a natural warm tone is needed — without the maintenance difficulties of solid wood.
Tones: light ash, warm oak, stained oak — basic positions covering most interior concepts.
Important advantage: in the Russian climate with sharp humidity fluctuations between the heating and non-heating seasons, MDF imitating wood is significantly more stable than solid wood. The panel does not "move", warp, or crack.
Ready-made slatted panels for painting
Ready-made slatted panels for painting — This is MDF with a double layer of primer and manual sanding "Prestige". An ideal base for acrylic enamel of any color from any catalog.
This is a designer's tool. Because ready-made decorative coatings are always limited by the manufacturer's line. A panel for painting removes this limitation: you paint in the exact shade — not "similar", but exactly the one you need.
Where they are especially in demand:
-
Design projects with custom color solutions
-
Monochrome interiors (panel in the color of the wall — the relief is readable, the color is uniform)
-
Offices with corporate color
-
Commercial spaces with brand tone
Ready-made wooden slatted panels
wooden lath panels made of solid wood — the highest price and aesthetic category. The living unique pattern of each board, natural tactility, the aroma of wood — all this is unattainable in imitations.
For whom: country houses, premium city apartments, designer interiors where the naturalness of the material is not an option, but a concept.
Requirements: acclimatization for 48–72 hours before installation in the room where it is being installed; stable humidity 40–60% during operation; care with oil or wax.
Species: oak, ash, walnut, pine — each with its own character of tone and grain.
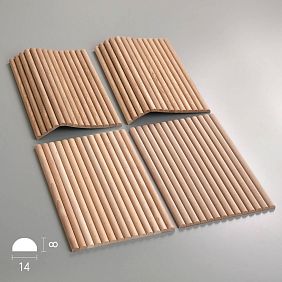
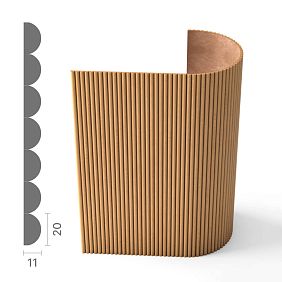
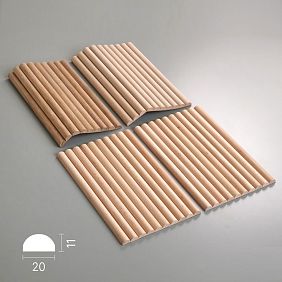
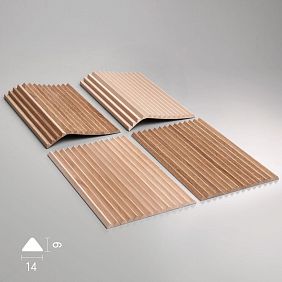
Decorative relief ready-made panels
Ready-made decorative wall panels with accent relief — for interiors where the wall surface should work with shadow. The deep profile creates a pronounced play of light under side or directional lighting. Especially impressive in TV zones with LED backlighting.
Comparison table of types of ready-made slatted panels
| Panel type | Material | Application | Stability | Care | Price level |
|---|---|---|---|---|---|
| MDF (base primer) | MDF 720–880 kg/m³ | Universal | High | Minimal | Base |
| Wood-look MDF | MDF + decorative coating | TV zone, bedroom, study | High | Minimal | Medium |
| MDF for painting | MDF + double primer | Design projects | High | After painting | Medium |
| Wooden | Solid wood (oak, ash, walnut) | Premium, countryside | Requires maintenance | Oil/wax | High |
| Decorative relief | High-density MDF | Accent walls | High | Minimal | Medium/high |
Where to use ready-made slatted wall panels
Ready-made slatted panels are equally organic in residential and commercial spaces. Let's break down the key scenarios — not formally, but with an understanding of what exactly the panel does to each space.
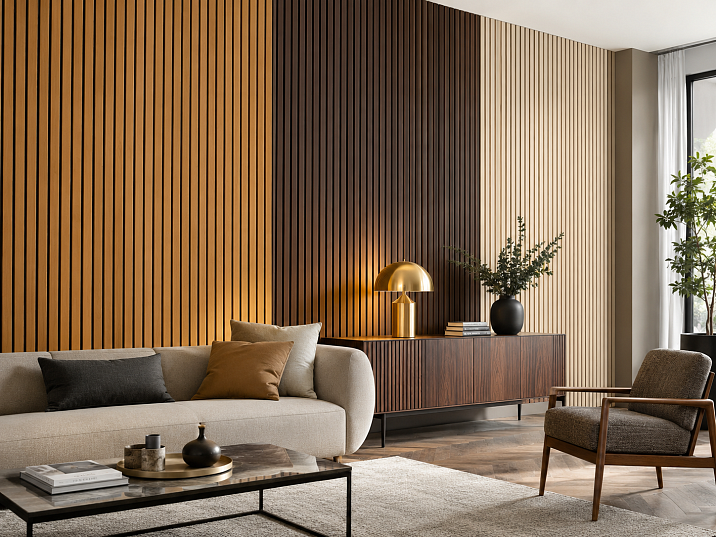
Ready-made panels for TV zone
TV zone — the first and most obvious scenario. Why?
Because a TV on a white wall is an unfinished space. The screen 'hangs' — without context, without a frame, without connection to the rest of the interior. Slatted panel on the wall under the TV turns the wall into an architectural element: the screen becomes part of the composition, not just a technical point on the surface.
Zone width. From the width of the TV bracket + 200–400 mm on each side. Or — the entire width of the wall from corner to corner. The second option works better in spacious living rooms.
Color. A neutral tone is the best choice. An overly active tone competes with the image on the screen. Warm ash, smoked oak, neutral beige — foolproof solutions for a TV wall.
Lighting. LED strip behind the top molding or directly in the grooves of the slats (with sufficient profile depth). Warm light 2700K, dimmable. The evening viewing atmosphere is created by this element.
TV bracket. Attached through the panel into the wall with dowels — a standard solution that requires no special preparation. The weight of the TV is on the dowel connection to the wall, not on the panel.
Ready-made panels for hallway
The hallway is the space of first impressions. What the guest sees in the first seconds shapes the perception of the entire house or apartment. A slatted panel in the hallway makes this impression manageable.
What does a finished slatted panel provide in the hallway:
The vertical rhythm of the slats visually stretches the space upward and widens the corridor — especially in narrow hallways 90–120 cm wide. This is not an optical illusion in the trivial sense — it's working with perspective.
Practical surface: MDF with a lacquer or enamel coating — resistant to touch, easy to clean, does not lose its appearance during use. In the hallway, this is critical: walls are touched, leaned against, and supported on.
Panel height: full height from floor to ceiling — maximum visual effect. From floor to 1200–1500 mm mark — a "panel zone" in the lower part with a practical protective function.
Finished slatted panels for the hallway with a high baseboard in matching color and molding along the top edge — a complete system that, with a minimal budget, maximally transforms the space.
Finished panels for the bedroom
The bedroom is a space that should rest. Not in the sense that it should be boring — in the sense that it should not be overwhelming. A slatted panel in the bedroom creates a background: structural, but unobtrusive.
Headboard of the bed. The most popular scenario in the bedroom. A finished slatted panel behind the bed creates an architectural headboard without bulky furniture. Width — matching the bed or slightly wider. Height — from floor to ceiling or up to 1400–1600 mm mark.
Ready-made wood-look slat panels in the bedroom — one of the most harmonious options. The warm tone of light ash or oak creates a natural warmth that is especially valuable in the conditions of the Russian winter.
Hidden LED strip 2700K behind the upper headboard molding — evening atmosphere without wall sconces. A dimmer is mandatory.
Ready-made panels for the study
The study is a functional and at the same time representative space. The wall behind the workspace speaks about the owner before they utter the first word.
Ready-made slatted panels for painting in a neutral tone behind the desk — relief without color pressure. A professional, restrained, structural background.
Polyurethane decorative appliques in combination with the slat background — pilasters, frames — give the study architectural scale. Molding frame around the perimeter of the slat zone — completion of the system.
For video conferences. A slat panel in a neutral tone — an ideal background for online meetings. Structural, professional, without unnecessary details.
Ready-made panels for commercial interiors
Office, reception, meeting room, waiting area — spaces where the interior works as a brand communication tool.
Reception. Ready-made slatted panel behind the counter — the client's first visual contact with the company. Neutral tone, professional coating, systematic decorative elements.
Meeting room. Wall behind the lead negotiator. Restrained relief, neutral tone, good lighting. Working atmosphere without pressure.
Waiting area. Slatted panel plus soft furniture plus warm backlighting — an atmosphere that reduces waiting anxiety. Medical centers, legal offices, financial companies — works everywhere.
Ready-made panels in interiors of different styles
Modern minimalism
Ready-made slatted panels for painting in the tone of the wall. The relief is visible — the color is uniform. Monochrome volume. Thin or absent moldings. Hidden lighting. The result is a wall that is present, not shouting.
Japandi and Scandinavian style
Ready-made wood-look slat panels in tones of light ash or birch. Wide slats, moderate relief. Naturalness without excess. Warm light, natural textiles nearby.
Modern classic
Ready-made slatted panels in a warm neutral tone + molding frames around the perimeter made of polyurethane + Corner decorative elements. Multi-level system with architectural depth.
Loft and industrial
Dark ready-made decorative slatted panels — anthracite, stained oak, deep green. Contrast with brick or concrete. Track lighting. No stucco — only straight technological profiles.
Lighting of finished slatted panels: how light makes a wall three-dimensional
A slatted panel without proper lighting is 50% of its potential. The relief exists physically, but for it to work visually, a shadow is needed. And a shadow appears only with directional light.
Directional spotlights: basic technique
Built-in or track spotlights at an angle of 30–45° to the panel surface. Light hits the edges of the slats, the shadow goes into the grooves — the relief becomes readable. This is the minimal and most affordable technique.
Installation practice. The track light is positioned parallel to the slatted wall, at a distance of 300–500 mm from it. The heads are directed at the desired angle. The track is a flexible solution: you can adjust the position without rewiring.
Hidden LED strip behind the molding
The strip in the niche of the upper molding above the slatted area. Light goes from top to bottom along the surface — a soft wash that creates depth and volume. Especially impressive in the evening, with the main lighting turned off.
Technical condition: the molding niche must be at least 20 mm deep for hidden strip installation. Clarify this when choosing the molding.
LED in the grooves of the slats
With sufficient groove depth, the LED strip can be laid in the groove itself between the slats. Linear glow along the verticals — an effect especially noticeable in TV areas with a home theater and in bedrooms.
Dimmer: atmosphere control
All lighting options come with dimmable control. Maximum brightness for active use, minimum for atmospheric evening lighting. Smart lighting control allows you to set scenarios: "cinema", "dinner", "morning" — with automatic adjustment of the slatted zone backlight.
What affects the price of finished slatted wall panels
The price is not a random number. It is the result of specific parameters. Let's break down each one so you can form a budget without illusions and without unpleasant surprises.
Material and its quality
High-density MDF 880 kg/m³ is more expensive than standard 720 kg/m³. Solid wood is 2–4 times more expensive than MDF depending on the species. Coating: base primer → double "Prestige" primer → decorative wood finish → factory painting — each level increases the cost.
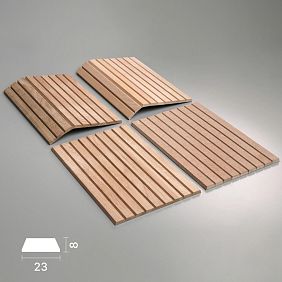
Slat width and profile depth
There is no rule that "narrow is cheaper". Narrow slats mean more milling passes per unit area = more machine time. Wide slats mean fewer passes. Deep profile is slower, more precise, more expensive. Always calculate in rubles per m².
Panel size and custom formats
Standard length 2700 mm is optimal in price. Non-standard length (for non-standard ceiling height or niche width) means custom production with a markup. Clarify the terms in advance.
Order volume
One accent panel (3–5 m²) per unit is more expensive than ordering several zones (15–25 m²). If possible, plan all finishing zones at once.
Margin for trimming
12–20% of the calculated quantity. This is not overspending — it is a mandatory buffer. Include it in the budget immediately.
Fitting elements
Moldings made of polyurethane, decorative corner elements, overlays and wall decor — a mandatory budget item. In projects with a molding system, it can account for 25–40% of the panel cost.
Delivery
Long-length items require special packaging and careful transportation. The cost depends on the region and order volume.
Installation
Adhesive installation on a flat, prepared surface is cheaper. Frame installation with leveling is more expensive but necessary for significant wall irregularities.
How to calculate the real budget
The formula is simple: panels + moldings + baseboards + decorative elements + installation + delivery + 12–20% reserve. Only this sum is the budget for a finished wall. Comparing only panel prices is like evaluating a renovation by the cost of paint.
How to calculate the quantity of finished slat panels: a step-by-step method
Calculation is not difficult if you follow the steps in order. Skipping any step risks shortage or overpayment.
Step 1: Determine the area and take measurements
Each finishing zone separately. Width × height. In millimeters, with a tape measure. If the wall is uneven, measure at several points and take the maximum.
A hallway 1200 mm wide and 2700 mm high is one zone. The wall behind the sofa 3400 × 2700 mm is another zone. Work with each separately.
Step 2: Subtract openings
Doors, windows, niches — everything not covered by panels. Standard door 900 × 2100 mm = 1.89 m². Window 1200 × 1400 mm = 1.68 m². Record each opening.
If you plan to finish slopes, include them as a separate zone.
Step 3: Calculate the net area
Sum of all zones minus all openings = net finishing area.
Step 4: Find the exact panel size
For ready-made slatted panels STAVROS — specify the width of a specific module in the catalog. Area of one panel = width × length.
Step 5: Calculate the number of panels
Net area ÷ area of one panel = quantity (round up).
Step 6: Add a reserve
-
Straight area without openings → +12%
-
Openings, slopes, niches → +15%
-
Complex geometry → +20%
Round up to the nearest whole number.
Step 7: Calculate additional elements
-
Top molding: length of top edge × 1.10
-
Bottom baseboard: length of bottom edge × 1.10
-
Side moldings: height × 2 × 1.10 (if frame system is present)
-
Corner decorative elements: by number of intersections
Practical example
Living room TV niche: 1600 × 2700 mm. No openings.
Net area: 1.6 × 2.7 = 4.32 m².
Panel 2700 × 120 mm = 0.324 m².
Quantity: 4.32 ÷ 0.324 = 13.3 → 14 panels.
12% reserve: 14 × 1.12 = 15.7 → 16 panels.
Upper molding: 1.6 × 1.10 = 1.76 m.
Lower baseboard: 1.6 × 1.10 = 1.76 m.
Side moldings: 2.7 × 2 × 1.10 = 5.94 m.
Mistakes when buying ready-made slatted panels: what most often goes wrong
Each of these mistakes occurs regularly. Read and do not repeat them.
Mistake 1: buying without measuring the wall.
“I’ll take the panels, then figure out the size later.” Later is when the panels are already delivered and don’t fit in width or height. Always measure first.
Mistake 2: not accounting for the baseboard height.
Baseboard 80 mm or 120 mm — different working wall height. This affects the calculation of panel length and the height of the slatted zone.
Mistake 3: not checking the joints between modules.
Finished panels are mounted flush: the rhythm pattern of the slats must continue seamlessly at each joint. If the panel ends do not match geometrically, the joint is visible.
Mistake 4: not allowing for extra material.
It would seem — ready-made modules, everything is calculated. But trimming for height, bypassing sockets, fitting near the wall — all of this consumes material. At least +12%.
Mistake 5: choosing a shade from a photo without a sample.
The monitor does not convey the real shade. The same "warm oak" looks different under northern lighting and in a sunny room. A sample is the only reliable method.
Mistake 6: not coordinating the color with doors and flooring.
A finished slat panel is a neighbor to your floor and doors. If the shade conflicts, it is immediately and always visible. Check compatibility in advance.
Mistake 7: not planning for sockets and lighting.
Electrical work — before panel installation, not after. Moving a socket afterward means dismantling an already installed panel.
Mistake 8: comparing only the panel price, without calculating the cost of the entire system.
A panel without molding, baseboard, and installation is an incomplete system. Comparing only the price of panels from different manufacturers without considering the compatibility of additional elements means comparing the incomparable.
Where to buy ready-made slatted wall panels
If you want to buy ready-made wall slatted panels with confidence in quality and system compatibility — start with the STAVROS catalog.
Rafter panels STAVROS — several series for different tasks and budgets:
-
Panels for painting — for design projects with precise color matching
-
wood-look panels — for a natural visual effect without the whims of solid wood
-
Solid wood panels — for projects where naturalness is the concept
Complete system of additional elements for the panels:
All elements are geometrically compatible and consistent in tone.
About the company STAVROS
STAVROS is a manufacturer of decorative interior products, founded in 2002 in Saint Petersburg. The historical starting point is the restoration of the interiors of the Hermitage, Konstantinovsky and Alexander Palaces. It was from these projects that the standards were formed: geometric precision, coating quality, architectural system.
Today STAVROS offers ready-made wall solutions for any scale. Ready-made slatted wall panels of several series, a complete system of moldings and decorative elements, samples for preliminary evaluation, calculation based on your measurements for free.
Production is in Saint Petersburg. Delivery across Russia. Want to buy ready-made slatted wall panels with St. Petersburg quality and a systematic approach? Open the STAVROS catalog and start with an accurate selection.
FAQ: questions and honest answers
Which ready-made slatted wall panels to buy?
The choice depends on the task. For a TV area and hallway — MDF with a durable coating. For a bedroom — wood-like in a warm tone. For design projects — paintable. For naturalness — solid wood panels.
How are ready-made slatted panels different from individual slats?
A finished panel is a pre-formed module with a set slat rhythm. It is installed as a whole, without manual step marking. Calculation by module size is simpler, installation is faster, and the joint is more predictable.
What affects the price of finished slat panels?
Material and its density, type of coating, panel size, relief depth, order volume, additional elements, installation, and delivery. Calculate the cost of the finished wall — not just the panels.
Are finished slat panels suitable for a TV zone?
This is one of the best scenarios. A finished panel quickly creates an even background for the TV, is easily calculated for the width of the zone, and is compatible with LED backlighting.
How to calculate the number of finished panels?
Area of the finishing zone ÷ area of one module = quantity (round up). Add 12–20% reserve. Separately — moldings and baseboards along the perimeter of the zone.
Are moldings needed for finished slat panels?
Absolutely. A molding at the top and a baseboard at the bottom are the minimum system for a finished look. Without them, the slat zone looks incomplete regardless of the quality of the panels themselves.
Can I get samples before ordering?
Yes. STAVROS provides samples for preliminary evaluation of tone, texture, and relief. This is the only reliable way to make a decision with confidence — especially if the wall has specific lighting.


