Article Contents:
- Why Wood Baseboards and Wall Molding Belong in One Plan
- The difference between baseboard, panel molding, and chair rail
- A coordinated system does not mean identical profiles
- Solid oak, solid beech, or MDF: decide by finish and conditions
- Baseboard height for 8-, 9-, and 10-foot ceilings
- Compare real STAVROS baseboard profiles
- Four actual polyurethane profiles and their scale
- Avoid competing shadows and unrelated ornament
- When to consider a separate chair rail
- Scheme A: stain-grade wood baseboard with painted wall frames
- Scheme B: all-painted appearance with mixed materials
- Scheme C: wood baseboard with contrasting lower-wall paint
- Measure the usable wall, not the advertised room size
- Panel spacing: why equal margins matter more than equal widths
- Allow space for outlets, registers, and wall controls
- Plinth blocks versus direct butt joints
- Three ways to finish a visible baseboard end
- Match horizontal wall frames to nearby casing
- Example: a 12-by-14-foot room with two doorways
- Example: six applied-frame wall panels
- What to include in the takeoff
- Step 1: inspect floors and walls
- Step 2: prepare and install the wood baseboard
- Step 3: transfer the wall-frame layout
- Step 4: cut and dry-fit polyurethane molding
- Step 5: bond, support, and finish the wall molding
- Option 1: paint both systems the same color
- Option 2: keep natural wood below a painted wall
- Option 3: contrast the wall frames while keeping the baseboard quiet
- Living room: a wood base with a measured frame rhythm
- Dining room: panel molding with a considered horizontal rail
- Hallway: durability and consistent doorway transitions
- Home office: precise geometry rather than excessive relief
- Bedroom: less contrast, more space around furnishings
- A tall baseboard leaves too little room for the lower panels
- Molding seams run through prominent parts of a frame
- The stained baseboard looks unrelated to the painted walls
- MDF and solid wood versions are treated as interchangeable
- A beautiful wall pattern conflicts with a doorway
- Can wood baseboards and polyurethane wall molding be combined?
- Is polyurethane wall molding suitable as a floor baseboard?
- What baseboard height looks right with an 8-foot ceiling?
- Should the polyurethane molding be painted the same color as the wall?
- Can I paint oak or beech baseboards the same color as polyurethane molding?
- How much extra molding should I buy for cutting waste?
- What should happen where the baseboard reaches a door casing?
- Can I use a 2,600 mm polyurethane strip as a full-height vertical frame side?
- Do these materials require different adhesives or fasteners?
- Does STAVROS ship these profiles to every US address?
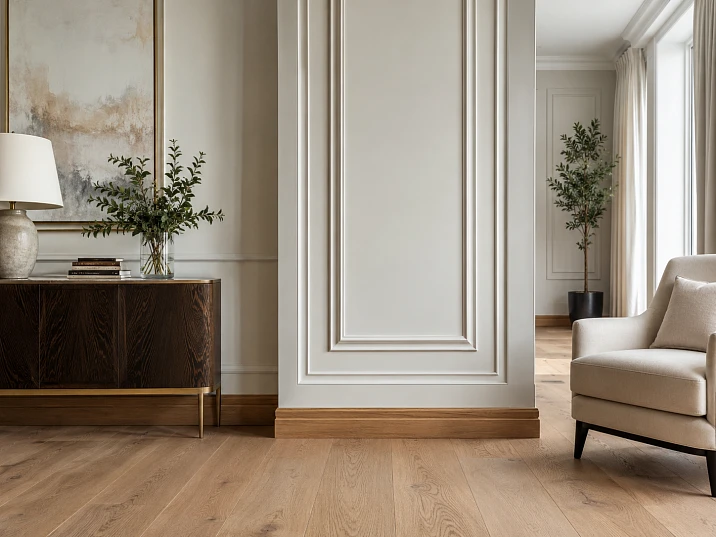
A room can have beautiful flooring and perfectly painted walls yet still feel unfinished when its trim was selected one piece at a time. A low baseboard may look disconnected from an elaborate wall treatment. Wide decorative frames can crowd a narrow door casing. Natural oak at floor level may fight against bright white molding unless the relationship is intentional. The solution is not to make every surface from the same material. It is to design wood baseboards and polyurethane wall molding as one architectural system, with a clear hierarchy, coordinated dimensions, and predictable joints.
This guide translates that idea into practical American residential projects. You will learn how to select a wooden baseboard, where to place polyurethane molding above it, how to combine both with chair rails or wainscoting, how to measure linear feet without confusing material lengths, and how to detail doors, corners, and transitions. The examples use inches and feet, with actual STAVROS model dimensions in millimeters where useful. The methods apply to existing homes and new interiors; always account for the condition of the wall and floor before purchasing trim.




Why Wood Baseboards and Wall Molding Belong in One Plan
In U.S. product listings, wood baseboard molding normally refers to the trim that finishes the lower edge of the wall, not to the decorative rectangular frames above it. A baseboard is more than a strip covering the joint between the floor and wall. It defines the lower boundary of the room, helps protect painted drywall from routine scuffs, and creates a transition between flooring and vertical surfaces. Decorative wall molding does a different job. It establishes rhythm, divides wall areas into panels, and creates shallow shadows that make otherwise flat drywall feel considered. When those two systems are coordinated, the eye reads the wall from the floor to the ceiling without stumbling over mismatched dimensions.
Think of trim in three layers. The base layer is the wood baseboard at the floor. The middle layer is the polyurethane molding that forms frames, a picture-frame grid, or a horizontal rail. The upper layer, when present, is a ceiling transition such as crown molding. Each layer can use a different material while sharing a similar visual vocabulary: restrained curves, square shoulders, consistent projections, or an intentionally repeated profile detail.
The strongest layouts normally establish one dominant element and let the others support it. A tall, richly profiled baseboard already gives the room a substantial lower edge. Paired with delicate wall molding, it needs more breathing room than a simple flat baseboard would. Conversely, a narrow baseboard can work well with a larger wall-panel treatment if the panel bottoms sit at a considered height and the two lines do not appear accidentally disconnected.




The difference between baseboard, panel molding, and chair rail
These terms are not interchangeable. Baseboard molding is installed where the wall meets the floor. Panel molding is applied to the face of a wall in rectangular or other geometric layouts. A chair rail is a horizontal trim detail that typically divides the wall into an upper and lower zone; its actual height should be determined by the room's proportions rather than by a single universal rule. Wainscoting describes the entire lower-wall treatment, which may include panels, stiles, rails, cap molding, and baseboard. Decorative applied-frame wainscoting is one version, not the only version.
That distinction matters at checkout. A profile designed for an applied wall frame is not automatically a suitable baseboard: it may be too shallow or delicate for floor-level abuse and may not cover the intended expansion gap. Similarly, a wooden baseboard should not be treated as a replacement for every purpose-made crown or chair-rail profile. Begin with the intended location and then choose the appropriate product category.
Наша фабрика также производит:
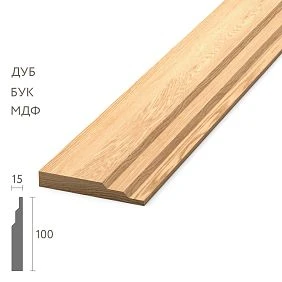
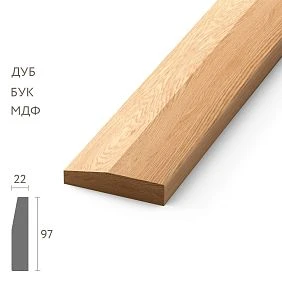
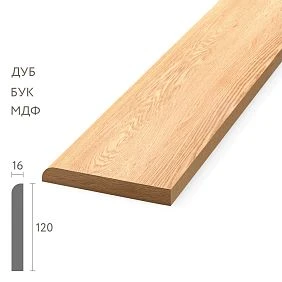


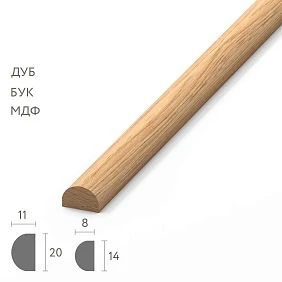
Смотреть весь Каталог продукции
A coordinated system does not mean identical profiles
Matching everything too literally can look heavy. Instead, match the profile's character. A crisp, flat wood baseboard pairs naturally with simple polyurethane rectangles. A traditional baseboard with rounded transitions may call for a gently rounded wall molding rather than a sharply geometric strip. Finish also affects the relationship: a painted wood baseboard and painted polyurethane frames can appear unified when the paint color and sheen align, whereas stained oak at the floor can establish a deliberate material contrast.
Before buying, tape out one complete wall section. Include the height of the baseboard, the gap to the lowest wall-frame molding, the width of the molding itself, and the placement of furniture. A successful layout should read well from the doorway, not merely look symmetrical on a drawing.
Получить консультацию
Choosing the Wood Baseboard First
Start with the STAVROS wood and MDF baseboard collection and identify a profile that suits the floor, doors, and ceiling height. This is the structural decision for the visible lower edge. After it is settled, the polyurethane lines above can be scaled to it. Reversing that order often creates trouble: wall frames are marked, then a taller baseboard is selected and the frame clearance becomes too tight.
Solid oak, solid beech, or MDF: decide by finish and conditions
Solid wood and MDF can both work in a painted interior, but they are not identical. Oak has a pronounced grain and offers a strong argument for a clear or tinted finish. Beech has a different, typically more even appearance and may suit projects where wood itself remains visible. MDF provides a consistent manufactured surface for paint in appropriate dry interior conditions. Moisture-resistant MDF is a separate catalog variant; the label does not make unfinished edges waterproof or eliminate the need for suitable detailing.
If the design uses stained natural wood below painted polyurethane molding, select a wood specimen and a paint sample together. Warm oak against cool blue-white wall trim can be striking but also appear accidental. Look at the samples beside the actual flooring, the door casing, and the evening lighting. The stain color in a product photograph is not a reliable substitute for an on-site sample.
In kitchens, entryways, and spaces exposed to wet cleaning, consider water exposure at the bottom edge, cleaning methods, and finish compatibility. Do not assume wood can be placed against recurrent dampness without appropriate protection. If flooring is floating, the baseboard typically covers its designed expansion clearance but should not lock the floating floor in place. Follow the flooring manufacturer's installation requirements.
Baseboard height for 8-, 9-, and 10-foot ceilings
There is no binding design code that assigns a particular baseboard height to a ceiling. The following ranges are visual starting points, not manufacturer specifications. Actual door casing width, ceiling crown, flooring pattern, and the height of the applied wall frames may justify a different choice.
| Ceiling height | Baseboard planning range | Wall-panel implication |
|---|---|---|
| About 8 ft (96 in) | Roughly 3–4 in for a restrained scheme; 4–5 in for a pronounced lower edge | Keep lower frames clear of furniture and outlets; avoid stacking too many heavy horizontal lines |
| About 9 ft (108 in) | Roughly 4–5 in; taller profiles can work with generous wall spacing | A simple lower panel zone can support more substantial baseboard |
| About 10 ft (120 in) | Roughly 4–6 in depending on architecture | Larger frame fields and taller casing can balance the greater wall height |
| 11 ft and higher | Evaluate larger mockups rather than selecting by height alone | Consider full wall elevations, door head heights, and sightlines before ordering |
A 4-inch baseboard can look substantial in an apartment with low doors and minimal furniture. The same baseboard may appear understated in a tall formal living room. Keep the dimensions of doors and window trim in the same drawing; otherwise the room can acquire three unrelated visual scales.
Compare real STAVROS baseboard profiles
Several STAVROS profiles include multiple material variants and different supplied plank lengths, so the code alone is not a complete purchasing specification. The table below gives selected published sizes. Dimensions shown in inches are rounded conversions, and material options should be confirmed for the chosen variant before ordering.
| STAVROS profile | Height and thickness | Selected supplied length | Design use |
|---|---|---|---|
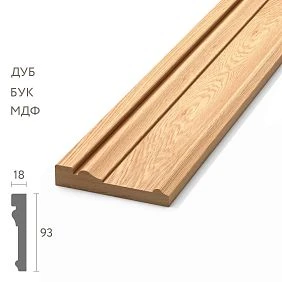
| PLT-006, beech or oak | 100 × 15 mm (3.94 × 0.59 in) | 2,400 mm (94.49 in) | Versatile wood baseboard with enough presence for many painted or stained interiors |
| PLT-006, regular or moisture-resistant MDF | 100 × 16 mm (3.94 × 0.63 in) | 2,600 mm (102.36 in) | Comparable face height for a painted scheme; different thickness and cutting stock |
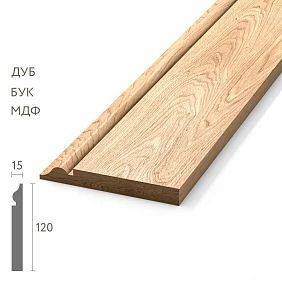
| PLT-005, oak or beech | 120 × 16 mm (4.72 × 0.63 in) | 2,400 mm (94.49 in) | Taller lower line suited to more traditional proportions |
| PLT-007, selected variants | 97 × 22 mm (3.82 × 0.87 in) | Varies by material, 2,400 or 2,600 mm | Deeper profile; verify projection beside furniture and casing |
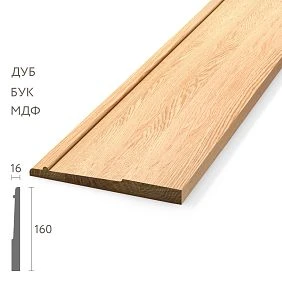
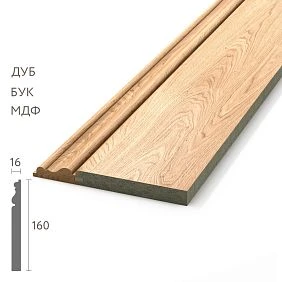
| PLT-003, selected variants | 160 × 16 mm (6.30 × 0.63 in) | Varies by material, 2,400 or 2,600 mm | Statement baseboard for spacious rooms or formal interiors |
For a balanced starting point, compare the specific PLT-006 wooden baseboard against the room's actual door trim. If your scheme needs a stronger lower border, inspect PLT-005 at 120 mm. A deeper alternative is PLT-007, while PLT-003 requires particular attention to scale because of its 160 mm height. Never assume one stock length or one material applies to every version of a model.
Choosing Polyurethane Molding to Work Above the Baseboard
Polyurethane wall molding is useful when the desired effect comes from applied decoration rather than complete replacement of the wall surface. It can create rectangular frames on painted drywall, define a lower-wall panel area, or establish a narrow horizontal transition. Its main benefit in this specific design is control over proportion: the baseboard carries the strong line at the floor while the wall molding can be selected independently for a lighter or more detailed visual rhythm.
Explore the STAVROS polyurethane molding category as a source of decorative profiles. Check the actual cross-section and the product's intended application. A wall bead and a projection-heavy frame can produce very different shadows even when both are described as molding. On a small wall, that shadow may be more important than the absolute profile width.
Four actual polyurethane profiles and their scale
The following models are published as polyurethane decorative molding, supplied in 2,600 mm (approximately 102.36 in or 8.53 ft) lengths in the cited configurations. Treat width and projection as different dimensions: a 35 mm face does not project 35 mm from the drywall.
| Product code | Face width × projection | Inch equivalent | Planning role |
|---|---|---|---|
| MLDPU-001 | 10 × 6 mm | 0.39 × 0.24 in | Fine rounded bead for subtle applied frames |
| MLDPU-004 | 15 × 8 mm | 0.59 × 0.31 in | Compact line with a little more definition |
| MLDPU-002 | 22 × 11 mm | 0.87 × 0.43 in | Medium-width trim for visible panels |
| MLDPU-003 | 35 × 12 mm | 1.38 × 0.47 in | Broad decorative frame with stronger shadow |
For a delicate wall grid, look at MLDPU-001 rather than assuming a large profile is necessary. Where a moderate contour is needed, MLDPU-004 is worth comparing. For panels visible from across a living room, MLDPU-002 offers a more apparent line; MLDPU-003 creates a broader border. These are decorative wall profiles, not automatically baseboards, crown molding, or flexible profiles.
Avoid competing shadows and unrelated ornament
Place samples together at the planned heights. A baseboard with a deep ogee curve can overpower a broad, flat wall trim or clash with an aggressively stepped panel molding. Likewise, two highly elaborate profiles can produce a busy lower wall. Try three decisions in sequence: establish the baseboard's top edge; select whether the panel molding is delicate, medium, or dominant; and then choose the paint or stain contrast.
The easiest way to achieve balance is to make only one profile highly ornamental. Let the second profile be quieter but related. On traditional paneling, the baseboard can be detailed while the applied panels remain simple. On a contemporary accent wall, a flat baseboard can support stronger rectangular molding with fewer competing curves.
When to consider a separate chair rail
A chair rail introduces another horizontal boundary. It is useful when the lower wall is meant to read as a separate field, perhaps in a dining room or entryway. But it is not mandatory for decorative wall frames. Adding a chair rail merely because a search result mentions wainscoting can overload a modest room. Evaluate the distance between the top of the baseboard, the bottom and top of the applied frames, and any horizontal rail.
For an 8-foot room, a lower-zone top somewhere around one-third of wall height may be a useful first sketch, but furniture and architecture govern the final choice. In a room with tall windows or a raised hearth, forcing the rail to a textbook height can create awkward interruptions. The most reliable approach is to mark proposed heights with removable tape and observe the result from different positions.
Three Coordinated Design Approaches
The following three approaches use the same two basic materials but produce distinct interiors. They demonstrate why mixing wood and polyurethane can work better than using one material everywhere.
Scheme A: stain-grade wood baseboard with painted wall frames
Use a real wood baseboard, possibly oak or beech, with a clear or tinted finish. Above it, place restrained polyurethane frames painted the same color as the wall. The texture of the wood becomes the warmer horizontal anchor; the raised panels add visual architecture without imitating wood. This strategy works in a living room with wood floors and furniture that already exposes natural grain.
Control the transition carefully. Do not assume the wood should be a contrasting dark brown; a muted medium tone may be more cohesive with pale oak flooring. The paint's sheen matters too: semigloss white frames on matte walls create a different result from satin-on-satin molding. If trim sits over wallpaper, confirm adhesion to the actual substrate and consider whether the wallpaper should be removed in bonding areas.
At the doorway, determine whether the baseboard should terminate cleanly at a plinth block or transition directly to a similarly stained casing. When the casing is white and the baseboard is stained, the boundary will be highly visible. Make that junction intentional, perhaps by using a simple square plinth block in a finish that resolves the two colors.
Scheme B: all-painted appearance with mixed materials
A wood or MDF baseboard and polyurethane wall frames can be painted the same color, creating a uniform built-in look. This does not mean the prep is identical. Wood may need filling, sanding, and an appropriate primer. Factory-coated or otherwise prepared polyurethane requires the paint system specified for that product; test adhesion rather than assuming every coating behaves identically on all plastics.
Use one sheen and one verified color formula across a mockup before painting the room. Different primers and substrates can influence the final appearance of the same paint. If the finish varies at the joint, the entire reason for choosing an all-painted scheme may be undermined. The solution is a sample board with actual pieces of wood, polyurethane, and the wall finish under the room's lighting.
This design is effective for a classic yet restrained hallway or a modern transitional dining room. The baseboard provides a practical surface near the floor. The applied molding defines quiet rectangular frames. The combination can feel like custom millwork without requiring full-thickness wood panels over every square foot of wall.
Scheme C: wood baseboard with contrasting lower-wall paint
In a two-tone room, let the baseboard match either the lower painted field or the natural wood elements in the architecture. A horizontal polyurethane strip or chair rail can separate the colors. Alternatively, applied-frame molding can be painted with the lower wall for a softer wainscoting effect. Both are legitimate approaches; they communicate different degrees of visual contrast.
The challenge is stopping the color in the right place. If the rail is narrow and the upper paint color visually cuts through the center of its relief, the finish may appear uneven. Decide whether the entire rail belongs to the upper or lower color, then mark and paint accordingly. On complex profiles with deep grooves, use good lighting during cutting-in and let the appropriate layers cure before applying masking tape.
For related proportion questions involving baseboards, door casing, and other wood profiles, the STAVROS guide to classic trim sets is a useful companion. The point is not to copy a palace interior into a small apartment; it is to see the relationship among the parts.
Plan the Lower-Wall Layout Before You Buy
A wall-panel pattern should relate to the baseboard, openings, and principal furniture. Measure and draw the complete elevation; don't begin by drawing identical rectangles on the floor with no reference to the wall. Applied molding can disguise ordinary flat drywall as paneled millwork, but it cannot rescue poor alignments without additional work.
Measure the usable wall, not the advertised room size
Room dimensions are often approximate. Measure each wall at the installation height, and identify doors, fixed cabinetry, fireplaces, radiators, or other interruptions. On old walls, the width near the floor may differ slightly from the width at chair-rail height. Also check whether the corner is square and whether the wall is sufficiently flat for the selected profile.
For the baseboard, record individual continuous runs and door openings. For the wall frames, record the clear field between casing edges, corners, or other boundaries. A 14-foot wall with a centered door cannot be treated as one uninterrupted 14-foot piece for either material. Draw every stop, return, and exposed end.
A simple plan includes room dimensions, ceiling height, casing width, baseboard height, expected gaps, the selected molding section, and a separate drawing for each wall. Number the profile runs so a cutting list can be reconciled with the finished composition later.
Panel spacing: why equal margins matter more than equal widths
Suppose a 12-foot wall is completely clear. The designer wants three equal vertical frames. Rather than guessing the width of a single frame, set the outer margins and the gaps first. For example, if the left and right margins are 10 inches and two intermediate gaps are each 6 inches, the remaining width is 144 - 20 - 12 = 112 inches. Dividing by three yields approximately 37.33 inches of outer frame width. This is the width of each rectangle at the chosen measurement reference; whether your measurements refer to outer profile edges or frame centerlines must be declared on the drawing.
Repeat the calculation for the vertical placement. If the baseboard rises 4 inches from the floor and the lowest frame begins 5 inches above it, the bottom of the frame begins 9 inches above the floor. A horizontal rail at 38 inches changes the maximum available frame height. With a chair rail, leave deliberate clearance between the top frame and rail so their moldings do not touch or merge unexpectedly.
This layout need not become a formula for every room. If a sofa or sideboard hides the center of the wall, a perfectly mathematical grid can still look wrong. The frame rhythm should acknowledge sightlines and major furniture positions.
Allow space for outlets, registers, and wall controls
Mark switches, electrical outlets, thermostats, wall lights, and air grilles before finalizing the frames. A decorative rectangle that crosses an outlet plate is difficult to finish cleanly and may interfere with necessary access. Move the layout where feasible rather than trimming the plate around the molding. Never bury electrical devices behind permanent decoration or create an obstruction to safe access.
For drywall with existing repairs, the applied molding should be installed on a sound surface after repair and priming as required. Moldings do not correct water damage, loose paint, or cracked plaster. If a crack is still moving or the substrate is damp, resolve that issue before decorative work begins.
How Wood Baseboards Meet Door Casings
The meeting point between baseboard and casing is one of the most visible details in a room. A baseboard can be beautifully made and still look improvised if its top profile is taller than the edge of the casing and no termination detail was planned.
Plinth blocks versus direct butt joints
A plinth block is a deliberately sized block at the foot of the door casing. It can provide a clean meeting surface for the baseboard and may help resolve differences between baseboard thickness and casing projection. It is especially useful in traditional interiors. But a block is not required in every project: a clean direct junction often suits simpler trim.
Check dimensions in elevation and in plan. If the baseboard projects farther than the casing, a direct butt joint can form an awkward ledge. A plinth block can address the transition, provided its dimensions are chosen to make sense rather than simply added as decoration. If the casing projects farther than the baseboard, a direct junction may look natural. Measure actual product sections: catalog names do not convey every edge detail.
Three ways to finish a visible baseboard end
A run may stop at a doorway, an open arch, a cabinet side, or a change of wall finish. A clean squared end can be suitable if the profile is designed to be seen from that direction and is properly finished. A small mitered return can turn a shaped face neatly back to the wall, hiding the exposed profile end. At a casing, a planned butt joint may be simplest. Choose the method according to profile depth and finish; an intricate baseboard needs more attention at the cut face than a flat board.
For solid wood, seal or finish exposed end grain with the system specified for the wood. For painted versions, fill and prime cut faces appropriately. Do not build the entire design around thick caulk to cover inaccurate cuts; caulk is a finishing material, not a substitute for measurement or a mechanical joint.
Match horizontal wall frames to nearby casing
Panel molding can be aligned with door head casing or used to frame the space around a doorway. If a lower-panel grid stops just short of the casing, maintain a consistent margin. A narrow frame that almost touches casing on one side but has a large gap on the other often appears unplanned. It may be better to have fewer frames with generous margins than additional frames squeezed into awkward leftover spaces.
An internal doorway may divide a long wall into two unequal fields. Symmetry within each field can be more successful than forcing one continuous grid across the opening. Test the relationship on the full elevation before laying out individual cut pieces.
Calculate Linear Feet and a Real Cutting List
Total linear footage is the starting point, not the finished order. A trim order must also account for stock length, miters, room shape, and visible joints. This is especially important here because a solid-wood baseboard may be supplied in 2,400 mm pieces while decorative polyurethane trim may arrive in 2,600 mm pieces. A leftover piece from one category cannot replace a missing piece from the other.
Example: a 12-by-14-foot room with two doorways
Consider a rectangular room measuring 12 by 14 feet, with two 3-foot-wide door openings where baseboard does not run across the doorway. The room perimeter is 2 × (12 + 14) = 52 linear feet. Subtract the two openings: 52 - 6 = 46 linear feet of nominal baseboard. A 15% planning allowance gives 46 × 1.15 = 52.9 linear feet. That is an estimated purchasing length, not a guarantee of a workable cut schedule.
For the oak or beech variant of PLT-006, each plank is approximately 7.87 feet long. Dividing 52.9 by 7.87 suggests seven planks as a mathematical lower bound. But if the room has long uninterrupted runs, a seven-plank purchase may create too many short leftovers, visible seams, or a shortage after mitering. Draw each wall segment individually and allocate full-length boards to those segments before deciding the order quantity. A practical plan could require more than the theoretical minimum. For a deeper look at why the same profile cannot be ordered for floor, door, and ceiling using one simple perimeter figure, consult the PLT-006 three-zone measuring guide.
Use a spreadsheet or simple list with columns for wall identifier, clear length, left-end treatment, right-end treatment, stock code, nominal cut length, and remainder. Keep pieces with different material variants in separate lists. Do not add polyurethane's 102.36-inch stock to a wood cutting plan that assumes 94.49-inch boards.
Example: six applied-frame wall panels
Suppose the wall design includes six rectangular frames, each approximately 30 inches wide by 52 inches tall, measured consistently to the intended miter reference. One frame needs two 30-inch sections and two 52-inch sections: 164 inches, or about 13.67 linear feet. Six frames therefore require 984 inches = 82 linear feet of decorative molding, excluding kerf and errors.
With 2,600 mm polyurethane molding, each strip is approximately 102.36 inches long. Two 52-inch side pieces will not fit into one strip: their combined length is 104 inches even before saw kerf. A workable initial cutting strategy is to take one 52-inch side and one 30-inch top or bottom piece from each of 12 strips. That gives all 24 required segments while leaving roughly 20 inches per strip. A simple footage-only calculation might suggest fewer than 12 strips and fail in practice.
Before committing, verify which measurement line governs each mitered piece. The visible outer length of a 45-degree-cut molding can be greater than the inner clear opening, depending on profile width. Also check whether the dimensions used above are outer rectangle dimensions or centerline dimensions. Build one sample rectangle, check the fit, and then finalize the production cut list.
What to include in the takeoff
| Item | Measure | Include in the allowance |
|---|---|---|
| Wooden baseboard | Each wall run excluding actual door openings | Miters, returns, end-finishing, stock-length constraints, damage contingency |
| Polyurethane frame molding | Every side of every frame, by reference dimension | Miter kerf, profile-width effects, rejected cuts, sample frame |
| Chair rail, if selected | Continuous wall runs with actual stops | Corners, terminations at casing, long straight joints |
| Plinth or corner blocks | Count at each planned location | Shape, projection, finish compatibility; don't convert pieces into linear feet |
| Adhesive and paint | Coverage and surface area per manufacturer's instructions | Substrate preparation, working time, multiple coats when specified |
Do not order solely by a generic “add 10 percent” recommendation. Short rooms with many doorways, strong profile relief, and symmetrical frame layouts can produce more waste than open rooms with long straight runs. Save useful offcuts for small sections, mockups, or future repairs, but don't count them twice in the final order. See the related wood trim linear-footage guide for tracking actual material consumption by length.
Installation Sequence: Floor Edge First, Decorative Frames Second
Installation is easier when one dimensionally stable reference has already been established. Finish the floor and wall preparation required by the selected system, then determine the baseboard top line and the panel-frame layout. This order reduces the chance of an attractive wall grid ending too close to a baseboard that was installed afterward.
Step 1: inspect floors and walls
Check for loose gypsum board paper, flaking paint, moisture staining, uneven plaster, and long-term building movement. A decorative coating cannot repair those conditions. If the house predates 1978 and old paint will be disturbed, determine the applicable lead-safe renovation requirements before scraping, sanding, or sawing painted surfaces. Follow qualified professional guidance where needed.
Measure the finished floor line, not an assumed level line based on one corner. Older wood floors can slope or vary over short distances. A rigid baseboard cannot automatically follow dramatic changes without creating visible gaps or stressing the board. Choose scribing, shoe molding, or other approved detailing when appropriate for the flooring and baseboard profile. Do not fill every large floor gap with caulk; the floor's movement and type matter.
Step 2: prepare and install the wood baseboard
Dry-fit the baseboard against actual corners and casing. Check the manufacturer's recommended fastening method for the selected wood or MDF product and wall construction. Depending on the assembly, finish nails into suitable framing and/or compatible construction adhesive may be used. An adhesive-only installation is not automatically appropriate for every solid-wood plank. Do not fasten through a floating floor in a way that restrains its intended movement.
Keep visible seams away from the strongest sightlines where practical. On a long straight wall, plan seams with stock length rather than hiding a shortage in a prominent area. When nailing, set fasteners without crushing the profile. Fill holes with material suitable for the intended painted or transparent finish. On stain-grade wood, filler color and grain may remain visible, so choose joint locations more carefully.
Step 3: transfer the wall-frame layout
Once the baseboard top is established, mark a level reference at the planned clearance for the applied frames. Use a laser level or reliable level and confirm the corners with a tape measure. Lay out the top, bottom, and side positions of every rectangle. Mark which dimension is being measured: inner opening, molding centerline, or outer edge. Keep that convention consistent through cutting and installation.
Check the framing against the door casing, baseboard, and ceiling before adhesive is applied. Stand at the room entrance and examine the pattern as a whole. Then check from seated eye level, especially in living rooms. Decorative frames should not appear accidentally cut off by the back of a sofa or the top of a dining buffet.
Step 4: cut and dry-fit polyurethane molding
The selected polyurethane profile determines the cutting tool, blade choice, and quality of the finished edge. Follow the manufacturer's instructions for the exact product. Support the strip on a stable surface and ensure the profile sits in the correct orientation. Cut a test pair of miters and assemble the corner before cutting a complete room's supply. A small angular error repeated across 24 frame sections can create a disappointing amount of joint repair.
For four-sided frames, label every piece with its panel number and orientation. On shaped profiles, flipping a section can reverse a bead or contour and make a good miter appear mismatched. Keep the profile's decorative face oriented consistently. If the wall is curved, do not assume the standard rigid polyurethane models listed above are bendable; seek a product specifically rated for the required radius.
Step 5: bond, support, and finish the wall molding
Choose an adhesive specifically compatible with the polyurethane product and wall substrate. Follow the adhesive manufacturer's instructions for surface preparation, bead size, working time, clamp time, temperature, and final cure. The published STAVROS decorative wall profiles are not structural; do not use them as handles, shelves, mounting rails, or a cover for a hazardous substrate. Temporary painter's tape or another approved support may help keep pieces aligned while the adhesive cures.
Fill small joints and paint transitions using an approved filler or sealant for the materials involved. The goal is a clean visual transition, not a thick rubbery band that disguises a miscut frame. Sand or smooth only where permitted by the product and finish system. Test the finish on an offcut: solvent-heavy coatings, aggressive cleaning agents, and incompatible primers can damage or weaken some decorative polymer surfaces.
Paint and Stain: How to Make Two Materials Look Intentional
Wood and polyurethane react differently to primers, finishes, and seasonal conditions. The fact that both can be painted does not mean that one preparation method will suit every surface. An all-white room is particularly unforgiving because inconsistent sheen, visible nail holes, and imperfect joint filler are easy to notice in side lighting.
Option 1: paint both systems the same color
This approach creates a coherent lower-to-middle wall transition. Choose the desired sheen, then prepare separate samples on real wood, polyurethane, and painted drywall. For another material combination involving walls and the lower contour, review the MDF baseboard and polyurethane decor article. If an opaque finish is chosen for oak or beech, confirm whether the wood's grain will telegraph through the paint. A grain-filling preparation may be appropriate when a completely smooth painted look is required; it is an additional finishing decision, not an automatic property of solid wood.
Apply the necessary primer to each material according to the finishing system. Check adhesion after the recommended curing interval, not while the film is still soft. Paint the molding and wall in a sequence that keeps edges clean and minimizes repeated masking. Consistent color can make different materials read as a continuous millwork composition, but only if joints and final texture are also controlled.
Option 2: keep natural wood below a painted wall
A visible-grain oak or beech baseboard can create a strong and tactile lower boundary. The polyurethane frames above then become part of the painted wall rather than pretending to be wood. Keep the wall-molding color close to the wall for restrained architecture, or use a controlled contrast for a more decorative effect. At the junction, use a clean paint line and avoid stains that bleed onto the painted surface.
Match the wooden baseboard with at least one other natural-wood element if the room otherwise has no warm material: door casing, a window bench, built-in shelving, or nearby furniture can create the connection. However, “matching” does not require identical wood species in every item. It requires a plausible relationship in undertone, grain density, and overall scale.
Option 3: contrast the wall frames while keeping the baseboard quiet
For an accent wall, you can use a neutral wood or painted baseboard and finish the applied rectangles in a contrasting shade. This works best when the composition has a clear focal role, such as behind a sofa or in a formal dining room. Consider the effect under natural light and at night; deep shadows within a broader profile become pronounced when the trim is darker than the wall.
Avoid changing both the baseboard and frames to saturated colors unless the room's architecture supports that approach. A strongly colored baseboard can visually shorten an already low wall. A restrained baseboard with moderately contrasting frames often makes the accent wall easier to live with over time.
Room-by-Room Design Scenarios
Material coordination works differently in each room because furniture, traffic, moisture, and sightlines vary. The profiles themselves do not dictate a single style. Use the following scenarios as examples to test, not as rigid templates.
Living room: a wood base with a measured frame rhythm
In a living room with oak flooring and an upholstered sofa, the baseboard can carry the wood tone into the wall composition. Use narrower polyurethane wall frames around the sofa zone or along the whole room, depending on furniture placement. Avoid dividing the wall behind the sofa into so many rectangles that only fragments remain visible. A good frame scheme should still be readable after lamps, artwork, and furniture are installed.
For a 9-foot ceiling, a roughly 4-inch baseboard and a compact polyurethane frame are a plausible starting point. The actual dimensions should be adjusted to door casing height and wall width. At corners, decide whether the panel grid continues around the room or terminates at the accent wall. Neither is always correct: continuation creates a formal, unified language; termination can strengthen one focal wall.
Dining room: panel molding with a considered horizontal rail
A dining room often benefits from a visually structured lower wall because furniture is placed against the perimeter. A horizontal chair rail can define a lower decorative zone, while applied rectangles create the appearance of shallow paneling. Start with the top of the dining chairs and buffet, then set rail and frame heights so the proportions look deliberate. Do not place the rail solely at the traditional “chair-back” level without checking modern furniture dimensions.
With a richly profiled wood baseboard, keep the lower panels relatively quiet. A medium polyurethane wall molding may be enough; using the broadest profile plus an ornate chair rail can crowd a wall under 9 feet tall. If the chairs actually contact the wall, select a detail and finish that will withstand routine use rather than relying on decorative molding to absorb impact.
Hallway: durability and consistent doorway transitions
Hallways are often narrow, full of doors, and viewed under strongly directional light. Their primary trim challenge is not panel symmetry alone but repeated transitions into casing. Consider a moderate wood baseboard with subtle polyurethane rectangles or a single horizontal division line. Keep exposed molding projections limited in tight circulation areas so they do not become unnecessary snag points.
When several doors occur along one wall, treat each wall field separately and align common top or bottom frame lines across the hall. The visual result can be continuous even when panel widths vary. Use durable, cleanable paint appropriate for the substrate and expected traffic, while avoiding unverified claims that any decorative profile is impact-proof.
Home office: precise geometry rather than excessive relief
For a home office with built-in bookcases, let the wooden baseboard connect the cabinetry and the room's other trim. The polyurethane frames can occupy the blank wall behind a desk or the wall opposite shelving. A simple two-panel composition may be more useful than a full-room grid when the bookshelves already supply rhythm and texture.
Check the height of wall outlets, cable management, and desk backboards. A molding frame should never prevent access to needed electrical connections or conflict with a planned wall-mounted monitor. A calm monochrome finish often gives the room a composed backdrop for screens and task lighting.
Bedroom: less contrast, more space around furnishings
In a bedroom, low-contrast wall molding adds texture without demanding attention. A stained wood baseboard can relate to the floor or bed frame, while polyurethane outlines near the headboard create a subtle architectural feature. Measure against the actual headboard and bedside lamps; decorative frames that are mostly hidden behind furniture waste material and complicate installation.
A simple design may use one larger frame above the bed or a pair of vertical panels flanking it. Treat the baseboard as a room-wide continuous system, even if the wall frames appear only on the headboard wall. This provides a visual connection without forcing every wall to repeat the same pattern.
Common Problems and Their Better Solutions
Most trim problems are visible long before painting. Mockups, measured elevations, and clear material specifications resolve many of them at the design stage.
A tall baseboard leaves too little room for the lower panels
If the baseboard reaches 6 inches high and the intended lower frame begins only an inch above it, the two elements may visually collide. Increase the space, reduce the panel height, simplify the molding, or reconsider the baseboard profile. Do not force the layout because the material has already been purchased.
Molding seams run through prominent parts of a frame
A continuous run may be longer than the stock length. Place any unavoidable straight splices in carefully chosen locations, not at the most visible central point of a room whenever an alternative cut plan exists. Follow the adhesive and joint instructions for the product. Do not rely on thick filler to make a structurally poor splice disappear.
The stained baseboard looks unrelated to the painted walls
Before replacing the material, check whether the problem is undertone, sheen, or scale. A warm wood baseboard beneath a cool paint color may need one bridge element in the same wood family or a warmer wall color. A broad stained profile combined with tiny wall rectangles may instead be a proportional issue. Correct the actual mismatch rather than introducing more ornament.
MDF and solid wood versions are treated as interchangeable
They may share a product name but differ in thickness, length, finish preparation, and material behavior. PLT-006 is a clear example: the published oak and beech option is not the same plank length as the MDF option. Label each line of the purchase specification with material, code, cross-section, and stock length. Maintain separate cutting lists and verify the chosen stock before the order is finalized.
A beautiful wall pattern conflicts with a doorway
If frames crowd the casing, give the doorway more margin and reduce the number of panels. Wall-panel layouts are not judged by how many rectangles can fit. They are judged by rhythm, balance, and clean transitions. A narrow remainder near a door often looks more deliberate left blank than filled with a tiny squeezed panel.
Buying Checklist: Specify the Parts as a System
When it is time to buy, prepare one schedule for wooden baseboards and one for the decorative polyurethane molding. Use the manufacturer pages as product references, but keep installation and finish questions separate from stock and shipping questions.
- Record the wood baseboard model, exact species or MDF version, finish, cross-section, and plank length.
- Identify the polyurethane wall-molding code and confirm whether it is intended for straight painted wall applications.
- Record the finished floor condition and any expansion clearance required by the flooring system.
- Draw each wall elevation with door and window casing, furniture, outlets, and the intended panel layout.
- Create a cut list based on actual stock lengths and each required piece, not just a total footage number.
- Plan end returns, interior and exterior corners, casing transitions, and whether plinth blocks are needed.
- Test stain, primer, paint color, and sheen on actual samples before finishing the full room.
- Confirm adhesive, fastener, filler, and sealant compatibility for each material and substrate.
- Confirm current product availability, delivery feasibility to your location, fees, and lead times directly with the supplier.
- Save a labeled offcut from each profile for future paint or repair work.
For corner-specific wood detailing, see the actual UG-001 wooden exterior corner as one catalog example; do not assume it is necessary or suitable for every baseboard section. For broader period-style references, the STAVROS classic wooden baseboard guide discusses how taller, shaped bases change a room's proportions.
Frequently Asked Questions
Can wood baseboards and polyurethane wall molding be combined?
Yes. The materials serve different purposes: wood baseboard finishes and protects the wall-to-floor transition, while polyurethane wall molding adds decorative structure above. Coordinate scale, profile character, finish, and casing junctions. A unified appearance depends on those choices rather than on all pieces having identical material composition.
Is polyurethane wall molding suitable as a floor baseboard?
Do not make that substitution automatically. A decorative wall-frame strip may be too shallow, too narrow, or not specified for floor-level use. It may also fail to cover flooring clearances adequately. Select a profile specifically designated for the intended installation location and verify the product's current specifications.
What baseboard height looks right with an 8-foot ceiling?
Start by testing a restrained 3- to 5-inch range against the door casing and room style, then adjust. A simple 4-inch baseboard can work well in many 8-foot rooms, but it is not a universal standard. More important is the clearance above the baseboard and the visual balance of the applied wall frames.
Should the polyurethane molding be painted the same color as the wall?
That is often an effective choice when the goal is a subtle architectural texture. A contrasting color emphasizes the individual frames and may suit an accent wall. Both options can work; evaluate the room's light, furniture, profile depth, and the visual role of any stained wood baseboard before choosing.
Can I paint oak or beech baseboards the same color as polyurethane molding?
Yes, with proper preparation and a compatible finish system for each substrate. Wood grain may remain visible unless additional surface preparation is used. Test the primer and paint on actual material samples. One paint color can still appear different over different undercoats or textures, so inspect the results under the room's real lighting.
How much extra molding should I buy for cutting waste?
A small allowance, such as 10–15%, may be a planning starting point, but it is not a substitute for a piece-by-piece cut list. Two long segments may not fit into one stock strip even if their total footage seems close. Count miters, kerf, stock lengths, and the number of repeated frame segments before finalizing the quantity.
What should happen where the baseboard reaches a door casing?
Choose an intentional end condition: a clean butt joint, a finished return, or a properly proportioned plinth block. The decision depends on the baseboard's thickness, profile, and how far the casing projects from the wall. A sample joint should be checked before cutting every doorway in the room.
Can I use a 2,600 mm polyurethane strip as a full-height vertical frame side?
A 2,600 mm strip is approximately 102.36 inches long. Whether it works depends on the panel height and required miters, not the ceiling height alone. For tall vertical runs, allow for joint placement, trimming loss, and the final clearance above the baseboard. Do not assume the strip is bendable because it is polyurethane.
Do these materials require different adhesives or fasteners?
Often, yes. Wood baseboards can require mechanical fixing appropriate to the wall construction. Decorative polyurethane is commonly attached with adhesive compatible with the exact product and substrate. Follow product instructions for both. Never fasten a floating floor in a manner that prevents its required movement, and never rely on decorative trim for structural support.
Does STAVROS ship these profiles to every US address?
The English-language catalog is a useful place to compare product codes, dimensions, and material versions, but the existence of a USD price or English page does not establish universal US shipping or current stock availability. Contact STAVROS with the destination, quantities, and selected products to confirm what can actually be supplied and delivered before budgeting the project.
Final Recommendation: Design the Whole Lower Wall, Not a Single Strip
The most successful combination begins with a clear sequence: choose the wood baseboard that makes sense for the floor and doors; establish its finished height and projection; select a complementary polyurethane profile; lay out the wall panels around actual openings and furniture; and produce separate cutting lists for each material. Only then select the finish system and schedule the installation. This avoids costly changes caused by buying an attractive molding before knowing where it will fit.
A solid-wood baseboard with delicate painted frames can add warmth and architectural structure. A painted wood or MDF base with matching polyurethane panels can produce a composed built-in appearance. A contrasting two-tone treatment can make the lower wall a focal feature. None requires decoration in every available space. Careful spacing, credible product specifications, accurate cutting, and clean transitions do more for the finished room than adding another layer of trim without a plan.