Article Contents:
- What is a fillet: explanation without construction jargon
- Fillet, baseboard, corner piece, batten: what is the fundamental difference
- Where wooden fillet is used: a complete overview of application scenarios
- Wall and ceiling joint: the main scenario
- Clapboard in corners: specifics of the task
- Wooden wall and slatted panels
- Furniture and built-in wardrobes
- Wooden houses and saunas
- Decorative portals and interior accents
- Wooden ceiling fillet: when and why it is the best solution
- Fillet for paneling: why this profile solves the problem
- Fillet for bath and sauna
- How to choose the size of a wooden fillet: precise guidelines
- Small fillets: 10×10 — 20×20 mm
- Medium fillets: 20×20 — 30×30 mm
- Large fillets: 30×30 — 50×50 mm and more
- Practical rule for choosing the size
- Material and wood species: what affects the result
- Oak
- Oak
- Spruce
- Larch
- Solid Wood vs. MDF
- Installation of wooden fillet: from fitting to final fastening
- Preparation and fitting
- Cutting in corners
- Fastening
- Joints on long sections
- Painting and Final Finishing
- Wooden slats and planks as an alternative: when fillet is not the only option
- How to choose a fillet to match the finish: three strategies
- Fillet in the color of the main finish
- Fillet in the color of the ceiling
- Fillet as an accent element
- Wooden fillet and all moldings as a system
- Common mistakes when choosing and installing a fillet
- FAQ: answers to popular questions about wooden fillet
- What is a fillet?
- How does coving differ from baseboard?
- How is a fillet different from a corner piece?
- Where is wooden fillet used?
- Can wooden fillet be painted?
- How to cut a fillet at corners?
- Fillet for a stretch ceiling — how to attach?
- Is a fillet needed in a sauna?
- What size of fillet to choose for a standard room?
- About the Company STAVROS
There is one aspect of renovation that annoys professionals and baffles beginners: beautifully laid paneling, neatly installed wall panels, a smooth ceiling — and then a gap gapes in the corner. Not catastrophic, not noticeable from three meters away, but visible. And all the satisfaction from the work is ruined. It is for such situations that there exists Wooden crown molding — a decorative profile that covers the internal joint between two planes softly, neatly, and beautifully.
A wooden cove molding is not a baseboard, not a corner piece, not a batten. It has its own character, its own shape, and its own irreplaceable role in wooden finishing. If you are looking for something to cover the joint between a wall and ceiling, how to neatly finish paneling in a corner, how to design the transition between wooden panels — then you are looking for it.
View wooden cove moldings, baseboards, and moldings STAVROS →


What is a cove molding: an explanation without construction jargon
The word "cove molding" in construction means a profile with a concave rounded cross-section — like a small concave arc that "receives" the internal angle between two planes. It is the concavity that distinguishes a cove molding from a straight corner piece: it does not cut the transition with a sharp line, but makes it soft, smooth, and visually calm.
If you look at the cross-section of a wooden cove molding, you will see a quarter circle or a shape close to it. Two straight edges fit against two surfaces, and the concave arc between them creates that very smooth transition that looks so good in a finished interior.
In construction practice, a cove molding is used where two planes meet at an angle — usually a right angle — and where it is necessary to close a gap, hide an uneven joint, or simply create a decorative finishing element. This could be the angle between a wall and ceiling, between paneling and the ceiling plane, between wooden panels in a cabinet or built-in furniture, between the floor and wall — anywhere a clean, neat transition is required.
Why specifically wood? In natural wooden finishing — paneling, wall panels, wooden houses, baths, studies — the logic of the material requires that all finishing elements be made of the same or similar material. A polyurethane or polystyrene cove molding in such a context looks like a compromise. A wooden one looks like an organic part of the system.


Cove molding, baseboard, corner piece, batten: what is the fundamental difference
This is perhaps the most important section for those who are just getting to grips with linear profiles and trying to understand exactly what they need. Mixing up these four elements is a common mistake that leads to incorrect ordering and disappointment on the construction site.
A baseboard is a profile that covers the joint line between the wall and the floor, or less commonly, the ceiling. It typically has a more complex profile with several ledges and chamfers. Wooden Skirting Boards more often mounted horizontally around the perimeter of the room at the bottom or top. A baseboard is more about the perimeter than the corner.
A corner profile is a profile with two straight flat edges that form an angle. It can be external or internal. Wooden Miter for Finishing rigidly covers the corner joint, creating a clear, straight line. It is good where a strict geometric transition is needed, but in natural wood finishes it sometimes looks too mechanical.
A cover strip is a flat, usually straight plank that covers a gap with its surface rather than its profile. Wooden cover strip for joints covers the joint of panels or boards by overlaying it flat on top. Its role is to hide the seam, not to create a decorative transition.
A cove is the only one of the four that has a concave rounded cross-section. It is this profile that creates a soft, architecturally refined transition in an internal corner. Where a corner profile cuts the corner with a straight line, and a cover strip covers the gap flat, a cove 'envelops' the corner with a smooth arc.
How to best understand the difference? Imagine an internal corner between a wall and a ceiling lined with clapboard. A corner profile here would create an angular rigid joint. A cover strip would create a flat strip across the corner. A cove would create a soft arc that draws the eye away from the corner, smooths the transition, and makes the surface visually unified.
| Element | Cross-section shape | Purpose | Typical application |
|---|---|---|---|
| Baseboard | Profiled with ledges | Close the perimeter at the bottom or top of the wall | Floor-wall, wall-ceiling along the perimeter |
| Corner piece | Two straight wings at an angle | Close the corner joint rigidly | External and internal corners |
| Cover strip | Flat strip | Cover the gap with a surface | Panel joints, board connections |
| Cove molding | Concave arc | Make a smooth transition in the inner corner | Wall—ceiling, lining, panels, furniture |
Having understood this difference, article about types of wooden skirting boards: shaped, flat, corner, fillet, euro may be a useful addition — the difference between profiles is explained in more detail there.
Our factory also produces:


Where wooden fillet is used: a complete overview of application scenarios
Get Consultation
Wall and ceiling joint: the main scenario
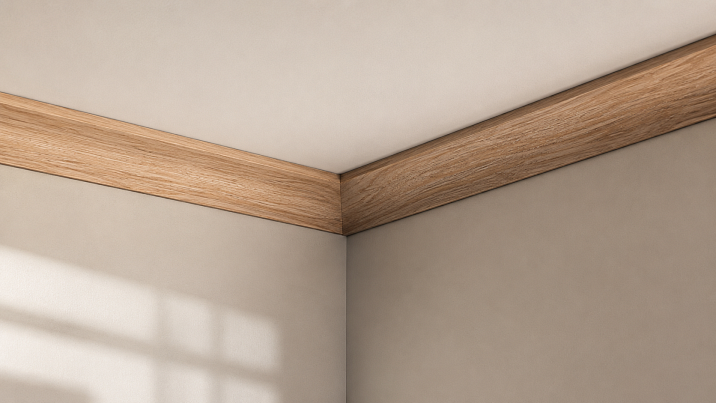
This is the most obvious and most common use ceiling filletIn rooms with wooden finishes — wooden houses, baths, studies, attics, country interiors — the ceiling and walls are often lined with paneling, slats, or wooden panels. Their meeting point — the inner corner at ceiling level — almost never turns out perfectly straight. The wood "moves" slightly, a working gap remains, and visually this feels like incompleteness.
Wooden ceiling cove molding solves this problem in one action: the profile covers the joint, creates a soft finishing line around the perimeter, and visually "closes" the interior from above. This is what turns "done" into "done beautifully."
Paneling in corners: specifics of the task
Paneling is perhaps the most "cove molding-friendly" material in construction. It is installed horizontally or vertically, trimmed at corners, and no craftsman can guarantee a perfect fit in every corner of every room. Gaps, uneven ends, small spaces — this is not a defect, it is a property of a living material.
Cove molding for paneling in this context becomes an indispensable element. It covers all irregularities of the corner joint, provides a neat arc along the entire length of the seam, and simultaneously serves as a decorative finish. In a bathhouse, sauna, or wooden house, this solution works especially organically: a wooden cove molding matching the color of the paneling looks like part of a unified design, not like a "patch."
An important nuance for wet rooms: in a bathhouse and sauna, wood constantly changes size — expands when heated and moistened, contracts when cooled. This means gaps are inevitable, and they should be covered with a linear profile, not with sealant or putty. solid wood millwork behaves similarly to the main covering, so the joint remains clean under any changes in temperature and humidity.
Wooden wall and slat panels
Slat and wall panels are one of the main interior trends of recent years. Vertical or horizontal slats on the wall create rhythm and texture, while wood trim adds warmth and character to the room. But how do you finish such a panel at the ceiling or in a corner? Simply cutting the slat at an angle is not ideal. Leaving the end exposed is crude.
Cove molding for wall panels here it acts as a connecting element: it covers the top or corner joint of the panels, gives completeness to the entire structure, and aligns the panel plane with the ceiling or adjacent wall. The profile is selected by width and height of the cross-section so that it overlaps the end of the panels and simultaneously fits against the ceiling.
For slat panels, the accuracy of the cove molding size is especially important: a profile that is too small will not cover the ends of the slats, while one that is too large will look disproportionate. More on this in the section on choosing the size.
Furniture and built-in cabinets
In case furniture — especially in built-in wardrobes, libraries, sideboards, kitchen sets in a wooden style — internal corners require a neat solution. Where a wooden side panel meets a top shelf or ceiling overlay, an internal corner is formed that, without a decorative element, looks like a raw technological joint.
Wooden cove molding for furniture is a compact profile of small cross-section that is installed along the internal corner of the furniture body. It hides gaps, fitting irregularities, and creates a neat finishing line. This is especially important in a classic style, where every joint should read as a thoughtful detail, not a random connection.
in combination with wooden overlays and decor for furniture the cove molding becomes part of the finishing system: together they turn a functional body into an architectural object.
Wooden houses and saunas
In hand-hewn log houses or timber houses, all corners and joints are living geometry that constantly changes as the house settles. Gaps in corners are not a defect, but the physics of the material. The task of finishing is to hide these gaps so that they do not affect the appearance, while the profile itself can move freely with the wood.
Wooden Crown Moldings In wooden houses and baths, they are installed without rigid fixation along the entire length — so that the profile can move slightly when the geometry changes. This is a fundamental difference from installation in a stone or concrete house, where the walls are stable and the profile can be glued.
Decorative portals and interior accents
A fillet is used not only as a functional closing element, but also as a decorative one. As part of a door or fireplace portal, a small fillet profile can serve as a transition element between a large cornice and the wall plane. This creates additional light relief and enriches the overall plasticity of the portal composition.
Wooden ceiling fillet: when and why it is the best solution
The question "how to close the joint between the wall and ceiling" is one of the most popular in construction searches. The answer depends on the type of finish. If the ceiling and walls are drywall or plaster, polyurethane or plaster ceiling moldings are used. If the finish is wooden, the logic is different.
In a wooden interior ceiling fillet for paneling provides three results simultaneously. First — functional: it covers the working gap that is inevitable between two wooden planes. Second — decorative: the concave profile creates a smooth architectural line around the perimeter of the ceiling. Third — systemic: a fillet made of the same material as the paneling makes the entire finish unified.
The size of the ceiling fillet is selected based on the room height, the size of the working gap, and the thickness of the paneling. A typical range for ceiling use is from 20×20 mm to 40×40 mm. In rooms with high ceilings and large paneling, profiles up to 50×50 mm are acceptable.
An important aesthetic point: a ceiling cove creates a horizontal shadow line along the entire perimeter of the room. This is not just decor — it is an architectural technique that visually levels the ceiling and makes the space more "readable." In baths and saunas with paneling, such a line also hides the difference in the installation direction of the paneling on the wall and ceiling.
Ceiling cove for paneling: why this particular profile solves the problem
An experienced craftsman who has paneled at least a few objects knows: the corner is always a headache. Especially the internal one. The paneling is cut to length, the end goes into the corner, and it is almost impossible to perfectly close this joint without an additional element.
You can try to cut the paneling at 45 degrees and join it with a miter — it's beautiful but requires precision and takes time. You can install a wooden corner — it's simple but rigid. Or you can install a wooden ceiling cove for paneling — and get a result that looks like a deliberate architectural solution, not an attempt to hide a mistake.
Why does the cove work better than the corner in this scenario? Because the concave profile visually "guides" the gaze away from the corner. The corner, on the other hand, accentuates the corner line — it becomes noticeable. The cove smooths the transition, and the gaze glides over the surface without lingering on the joint. This is a subtle but important optical effect that experienced finishers know and use.
Ceiling cove for bath and sauna
Special attention should be paid to its use in baths and saunas. These rooms are the most "alive" in terms of wood behavior. Temperature fluctuations from +5°C in winter to +90°C in the steam room, constant moisture, condensation — all this makes the wood work more actively than ever. Gaps and cracks in the corners are especially noticeable here.
For a bath, it is important to choose a cove made from moisture-resistant wood species: primarily linden and aspen (traditional bath species), as well as larch, which is practically not afraid of water. The coating should be either a special bath oil or none at all for the first while, so the wood "gets used" to the conditions. solid wood millwork for a bathhouse, it must be well-dried — only then it won't deform upon first heating.
How to choose the size of a wooden fillet: precise guidelines
Size is the parameter that is most often chosen incorrectly. People tend to either take a larger one "just in case" or choose the smallest one so that it "won't be noticeable." Both are mistakes.
Small fillets: 10×10 — 20×20 mm
The most compact profiles. Suitable for thin finishes, furniture joints, small rooms with low ceilings (up to 2.4 m), and slatted panels with thin slats. The main task of such fillets is to close the technological gap without drawing attention to themselves. This is a detail that goes unnoticed — and that's exactly what is needed.
The weak point of a small profile: it covers a maximum of 8–10 mm of the gap. If the gap is wider, a small fillet won't close it, and you'll have to take a larger size.
Medium fillets: 20×20 — 30×30 mm
A universal range for most tasks. Suitable for paneling, wall panels, standard rooms with a height of 2.5–3.0 m. Large enough to cover typical gaps in wooden finishes, yet small enough not to look bulky. This is the "workhorse" among wooden fillets — this is the size most often ordered.
Large fillets: 30×30 — 50×50 mm and larger
For high ceilings of 3.0 m and above, for wooden houses with large paneling, for decorative applications where the fillet should be a noticeable element, not just functional. In bathhouses with a voluminous log or timber interior, a large fillet looks organic and proportionate.
It's important to remember: in a small room, a large crown molding visually lowers the ceiling. If the height is 2.4–2.5 m, a crown molding 40×40 mm or larger will create a feeling of pressure from above. In such cases, it's better to limit yourself to 20–25 mm.
Practical rule for choosing the size
Measure the maximum gap that needs to be covered. Add 5–8 mm on each side for reliable coverage. This is the minimum width of the crown molding wing. The final cross-section size will be exactly in the range needed for your task.
For rooms with non-standard angles (not exactly 90°) — and there are many such in real construction — choose a profile with a small margin in wing width: it more easily covers deviations from a right angle.
Material and wood species: what affects the result
Not all wooden crown moldings are the same — and it's not just about size. The wood species and processing method directly determine how the crown molding will look in the finished interior.
Oak
Oak is a dense, heavy species with expressive texture. A crown molding made of oak under varnish or tinting looks significantly more expensive than the same profile made of pine. Oak holds the cutting profile well and does not 'fuzz' at the ends. It is optimal for studies, living rooms, library areas, classic interiors — in short, where the natural wood texture works for aesthetics. wooden millwork is made of oak in the interior — it's always about quality and durability.
Beech
Beech is a homogeneous, medium-density species with a fine, almost neutral texture. Its main advantage for crown molding is an ideal surface for painting. Beech sands well, primes well, and provides a smooth varnish or enamel coating without raising the grain. If you need a crown molding for painting to match the ceiling or wall color — beech is the right choice.
Spruce
Pine is the most accessible species for molding production. Light, quite soft, and easy to work with. Pine fillet behaves excellently in baths and wooden houses made of the same pine — both in color and in behavior during humidity changes. For open natural finishing, pine is good under oil or wax coating. Under enamel — slightly worse than beech, because pine resin can cause stains.
Larch
For bath rooms and wet areas, larch is one of the best options. High resin content makes it almost insensitive to water. Larch fillet in a bath does not swell or deform like pine or beech. It costs more, but in the long term — it is justified.
Solid wood vs. MDF
Solid wood and MDF are two fundamentally different approaches. MDF fillet is well suited for painting and provides a smooth surface without knots or texture. But in a wooden interior, especially in a bath or wooden house, MDF does not match the logic of the material: it is afraid of moisture, does not "breathe" with the wood, and when the coating is damaged, it begins to swell. Solid wood in such a context is not a whim, but a necessity.
Installation of wooden fillet: from fitting to final fastening
Preparation and fitting
Before installing any molding profile — and fillet in particular — it is important to do a fitting without fastening. Apply the profile to the corner joint, check how tightly both wings fit, whether there are gaps, whether the profile overlaps the protrusions of the lining or panels. Only after making sure of the correct fit in cross-section, proceed to working with the length.
Cutting corners
This is the most technically challenging moment of fillet installation. Interior corners of rooms are rarely exactly 90 degrees — a deviation of 1–3 degrees in typical construction is normal. For a neat joint of two fillets in a corner, you either need to measure the actual angle and cut the profile in half (at half of that angle), or cut each plank at 45 degrees and adjust it in place.
The best tool for cutting is a miter saw with a rotating table. It allows you to accurately set the desired angle and make a clean cut. A miter box is a simpler option, but it only works with angles of 45° and 90°, which does not always match the actual geometry of the room. How to properly cut wooden profiles in corners — a detailed breakdown of this topic will help avoid common mistakes.
For an internal corner of a fillet, the so-called "cable" method is used — when the end of one strip is cut straight, and the end of the second is cut at an angle so that it fits against the side surface of the first. This is a neater method than a symmetrical 45° cut, and it forgives small deviations of the angle from 90°.
Fastening
The method of attaching a wooden fillet depends on the base and operating conditions.
With glue — suitable for stable bases: drywall, plywood, chipboard, wood panels. Use special wood mounting glue or PVA carpenter's glue. Glue provides a reliable connection but makes dismantling difficult.
With finishing nails or pins — a classic method for wooden bases. Thin finishing nails (1.4–1.6 mm) leave almost no marks. The heads are slightly countersunk and puttied before painting. This method is optimal for paneling, wood trim, and wooden houses.
With countersunk screws — for a stronger hold, especially in baths and damp rooms. Holes for screws are pre-drilled to avoid splitting the profile.
In wooden houses, where wood "moves" during shrinkage, it is not recommended to rigidly attach the fillet along its entire length. It is better to use nails every 50–60 cm, without driving them all the way in — the profile should have minimal freedom of movement.
Joints on long sections
On long walls, the fillet inevitably consists of several segments. Joints are best made at a 45° angle — this hides the seam much better than a straight end. It is important to align the joints along the length so that they do not fall on visually prominent areas — for example, directly above a door or in the center of a wall.
If the finish is planned for painting, the joints can be puttied with finishing acrylic putty and sanded. For natural tinting or oil, it is better to fit the ends as precisely as possible, because the putty will be visible under a transparent coating.
Painting and final finish
An important question: paint the fillet before or after installation? Professionals most often choose a combined option: apply a base coat before installation (this simplifies processing the back side and ends), and the final coat after, in place. This provides good coverage on the entire surface and a clean line around the perimeter without drips or gaps.
for fillet for painting for beech or pine, use acrylic enamels — they apply well to wood, do not yellow, and are easy to refresh. For a fillet under a natural coating — oil with wax or oil with hard wax — provides protection and highlights the wood texture.
Wooden slats and planks as an alternative: when a fillet is not the only option
Sometimes the task of closing a corner joint is solved not with a fillet, but with other molding profiles. This depends on the interior style, room dimensions, and the nature of the finish.
Wooden slats and strips — rectangular profiles without a shaped cross-section — are sometimes used as a replacement for a fillet where a more laconic, "technical" joint without rounding is needed. In modern interiors, where paneling or slats are installed in a minimalist style, a straight plank may look more appropriate than a concave arc.
However, for a classic or eco-friendly interior, for a bathhouse, a wooden house, or an office with natural wood, a concave fillet remains a more organic solution. It softens the transition and works with the wood, not against it.
How to choose a fillet to match the finish color: three strategies
Fillet in the tone of the main finish
The most harmonious approach. If the lining is pine, take a fillet from pine, coat it with the same oil or varnish. If the wall panels are oak, the fillet should also be oak. This creates a monolithic feel: all finishing elements read as a single whole, and the corner line becomes unnoticeable.
Fillet in the color of the ceiling
A commonly used technique: the fillet is painted white — the color of the ceiling. This visually "raises" the ceiling and hides the transition between the wooden wall and the white ceiling plane. Works well where walls are paneled with dark lining and the ceiling is light.
Fillet as an accent element
A bolder option: a fillet in a contrasting or accent color. For example, a dark fillet made of stained oak on light lining creates an expressive corner line and gives the interior architectural rhythm. This requires confidence in the stylistic solution, but when applied correctly, it looks impressive.
Wooden fillet and all trim as a system
A well-designed interior made of natural wood is always a system of trim elements, not a set of random details. The fillet covers the internal corner joint. Wooden baseboard — the bottom line of the wall. Cornices and moldings — horizontal divisions and upper perimeters. Wooden Miter for Finishing — external corner connections.
When all these elements are selected from the same wood species and in the same stylistic key, the interior acquires that very completeness that distinguishes professional work from a conscientious but unrefined renovation.
That's why it's worth initially thinking about wooden moldings as a system: choose all elements at once, from one catalog, from one manufacturer — this guarantees compatibility in size, wood species, and finish.
The entire set solid wood products — pilasters, cornices, moldings, casings, battens, baseboards, coving — with a systematic approach turns into a full-fledged wooden interior architecture.
Common mistakes when choosing and installing coving
Some mistakes occur so often that they are worth listing separately — not to scare, but to warn.
Choosing coving "as leftover" — whatever you find, you take. The profile size should match the task. Too small won't cover the gap. Too large will look disproportionate and visually lower the ceiling.
Not considering the wood species of the main finish. Pine coving on oak paneling means different textures and different rates of color change under the same finish. After a few years, the difference may become noticeable.
Cutting all corners at 45 degrees without measuring. Real room corners differ from geometric ones. An angle of 89° or 91° is normal. Cutting at standard 45° will leave a gap in such a corner. Measuring the actual angle and precise cutting is a mandatory step.
Painting coving only on the outside. If the back side and ends are left unprotected, when humidity changes, the wood may warp or darken on the "invisible" side, which over time will affect the geometry.
Mount in the bathhouse using rigid adhesive. In the steam room, wood actively works. A rigid adhesive joint restricts this movement and causes cracks — both in the fillet and in the base.
Do not join at an angle on long runs. Straight end joints are visible even under paint. A 45° miter joint is almost invisible.
Ignore the final treatment of ends. Open wood ends actively absorb moisture. In bathhouses and damp rooms, ends must be coated with the same compound as the face surface.
FAQ: answers to popular questions about wooden fillet
What is a fillet?
A fillet is a decorative linear profile with a concave rounded cross-section, used for neat finishing of the internal angle between two planes: wall and ceiling, paneling and ceiling plane, wooden panels, furniture parts. The concave arc of the fillet creates a smooth transition, unlike a sharp right angle.
What is the difference between a cove molding and a baseboard?
A baseboard is a profile that covers the perimeter of the wall at the bottom (or top). Its cross-section is usually more complex: several steps, chamfers, sometimes a decorative profile. Difference between a fillet and a baseboard — in the cross-section shape and in the task: the baseboard finishes the wall, the fillet smooths the corner joint.
How is a fillet different from a corner piece?
A corner has two straight wings forming a right or acute angle. Its junction with the surface is rigid and straight. A fillet is concave, creating a smooth transition. Where a corner gives a geometric line, a fillet gives an architectural arc. For natural wood trim, a fillet usually looks more organic.
Where is wooden fillet used?
In wooden houses, baths, saunas, attics, living rooms and studies with wood trim, when decorating ceilings made of lining, wall and slatted panels, built-in wardrobes, furniture bodies, decorative portals. Everywhere there is an internal corner joint of wooden surfaces.
Can wooden fillet be painted?
Yes, wooden fillet can be painted with acrylic or alkyd enamel, tinted with stains, coated with varnish, oil or wax compounds. For baths, special bath oils are used. Painting is best done in two stages: a base coat before installation, a final coat after.
How to cut fillet in corners?
The best tool is a miter saw with a rotating table. Measure the actual angle of the room, divide by two — this is the cut angle for each plank. For internal corners, use the "cable" method: the end of one plank is straight, the end of the second is cut at the required angle so that it fits against the side surface of the first. More details in the article How to properly cut wooden profiles in corners.
Fillet for stretch ceiling — how to attach?
With stretch ceilings, the fillet is attached to the wall, not touching the stretch ceiling fabric. The plane of the stretch ceiling is installed after mounting the baguette, and the fillet should cover the gap between the wall and the fabric. The profile is attached to the wall base — to lining, panel or plaster — with finishing nails or mounting adhesive.
Is fillet needed in a bath?
It's not just needed — it's practically mandatory here. In a bathhouse, gaps in the corners are inevitable due to active wood movement during temperature and humidity changes. The fillet covers these gaps, allowing the wood to "breathe," while also protecting the corner joint from condensation. Choose a profile made from moisture-resistant species: larch, linden, aspen.
What size fillet should I choose for a standard room?
For rooms with ceilings of 2.5–3.0 m, a profile of 20×20 — 30×30 mm is optimal. This is a universal range that covers typical gaps in paneling and panels without overloading the transition. For rooms with ceilings above 3.0 m and large paneling — up to 40×40 mm.
About the company STAVROS
STAVROS is a Russian manufacturer of wooden molding products, architectural decor, and interior elements made from solid wood. The company's assortment includes fillets, baseboards, corner pieces, cover strips, moldings, cornices, slats, architraves, pilasters, capitals, and the entire range of wooden moldings for residential and commercial projects.
STAVROS works with designers, builders, furniture makers, and private clients. Products are made from select solid oak, beech, pine, larch, and other species. All profiles undergo precise machine processing, additional sanding, and geometry control — ensuring accurate cutting and clean installation without adjustments.
Buy wooden fillet, Wooden trim and the entire range solid wood products from STAVROS means getting elements compatible in size and species, ready for installation in a unified wooden finishing system.