Article Contents:
- Why a horizontal accent above the cue rack makes more sense than another vertical line
- First determine not the overlay height, but the working space for the cue
- What movements need to be checked
- Why you cannot assign a universal safe clearance in millimeters
- How to do the mock-up correctly
- Scenario 1. The cue rack is symmetrical and stands on a separate smooth field
- Scenario 2. The cue rack is mounted on a slat wall but is offset due to furniture or a walkway
- Scenario 3. Next to the rack there is a wall lamp, a scoreboard, or a shelf
- Mounting on a provided smooth surface
- Attempting to glue the NPU-125 directly onto the slats
- Test from a distance
- Coloring in the color of a smooth field
- Contrasting Accent
- There is no smooth or reliable mounting area
- The overlay falls into the cue trajectory
- The cue rack itself is richly decorated
- The slat wall is already the main decorative dominant
- There is already a functional object above the rack
- The template looks too small
- There is a safe place, but it is visually too far from the counter
- Mistake: only checked the empty rack
- Error: only checked removal, but not return
- Error: used only a flat template
- Error: centered on the wall, not on the cue rack
- Error: decided that any slatted surface is suitable for glue
- Error: bought the overlay only because it is inexpensive relative to the renovation
- Error: added a few more elements to the NPU-125 so that it doesn't get lost
- Can the NPU-125 be glued on after the slat wall and cue rack are already fully installed?
- Do I need to remove the cue rack while installing the overlay?
- Can the NPU-125 be turned vertically if there is little width above the rack?
- Do I need to make a molding frame around the NPU-125?
- What to do if the cue does not touch the template but passes very close?
- Can the NPU-125 be placed higher to reliably stay away from the cues?
- Do I need two overlays on the sides instead of one on top?
- Can the NPU-125 be painted to match the wood-colored slats?
- What to do if the rack was replaced with a model of a different height after installation?
- Will the solution work for a rack that stores not only cues but also balls or accessories?
- Is it necessary to attach the overlay to the center of the billiard table?
- Can NPU-125 be placed on the adjacent smooth field if it interferes directly above the cue rack?
- How to understand that the overlay looks too small?
- What is more profitable: to order NPU-125 right away or to make a mockup first?
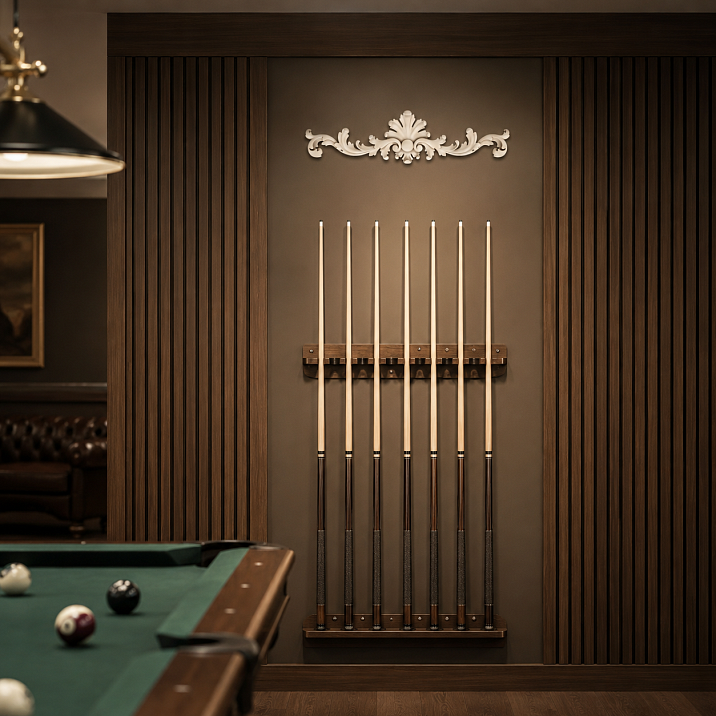
The slat wall and wall-mounted cue rack already create a strong vertical composition in the billiard room. The slats repeat from the floor upward, the cues stand almost parallel to them, and the cue rack itself gathers several long objects into one noticeable block. Therefore, adding another vertically elongated element above the rack is usually unnecessary. A small decorative overlay NPU-125 in the selected size of 250 × 65 × 9 mm solves the task differently: it can be viewed as a horizontal accent that visually "closes" the top of the composition but does not turn the wall into a heavy stucco portal.
The main limitation here is not decorative but operational. The overlay must not fall into the space through which the upper end of the cue passes when the cue is removed from the rack and returned back. Therefore, the answer to the question "will NPU-125 fit above the cue rack" cannot be obtained only from a photo of the wall. First, you need to check the actual trajectory of the longest cue used, the extreme positions in the rack, the usual removal technique, and the presence of a flat mounting area. Only after this check does it make sense to order the decor.
For the scenario in question, one NPU-125 250 × 65 × 9 mm is needed. At the time of preparing the material, the price of the selected option in the STAVROS product card is 1,290 ₽ per piece. This is a decorative polyurethane overlay for walls, doors, and furniture; it is not part of the cue rack, does not reinforce its mounting, and should not bear the load from cues. Before placing an order, it is better to check the current price and availability directly in the product card: buy stucco decor NPU-125 250 × 65 mm.

What exactly are we considering: only NPU-125 250 × 65 × 9 mm
In this article, the size selection has already been made. We are not comparing multiple versions and not turning a practical question about a billiard room into another "bigger or smaller" table. Specific parameters are fixed for the project:
| Parameter | Value for the project |
|---|---|
| Article number | NPU-125 |
| Product type | Decorative overlay |
| Material | Polyurethane |
| Width A | 250 мм |
| Height B | 65 мм |
| Thickness C | 9 мм |
| Orientation in the project | Horizontal |
| Base quantity | 1 pc. |
| Price at the time of preparation | 1,290 ₽/pc. |
| Function | Decorative only |
Dimensions matter along all three axes. The width of 250 mm determines how far the overlay extends to the right and left from the chosen axis. The height of 65 mm shows the vertical section of the wall the decor will occupy. The thickness of 9 mm means that when assessing cue movement, you cannot look only at the flat paper outline: the actual product protrudes from the wall. If the cue passes almost flush with the installation spot during removal, these 9 mm become part of the working geometry.
For the composition itself, NPU-125 is interesting precisely as a small horizontal element. It does not try to repeat the vertical pattern of slats and cues. On the contrary, its task is to place a short transverse "point" above the vertical block and give the eye a place to rest. This logic is especially useful in a billiard room, where there are already enough long straight lines without molding: cues, slats, table rails, lights, and sometimes ceiling panels already form pronounced geometry.




Why a horizontal accent above the cue rack is more logical than another vertical
When a wall-mounted cue rack is on a slatted wall, the interior works on several scales at once. The largest is the wall plane. The medium is the vertical group of cues. The small is the details of the rack itself: holders, shelves, clips, decorative ends. The mistake begins when all these scales are styled with the same technique. If you place an elongated vertical overlay next to vertical slats, then add a vertical sconce and further emphasize the side edges with moldings, the wall loses hierarchy: every element tries to be the main one.
NPU-125 in a horizontal position can work as a sign with the opposite direction. With a width of 250 mm and a height of 65 mm, it is perceived not as a new "column" but as local completeness above the rack. Such an element is especially appropriate if the cue rack itself is relatively laconic, and the rest of the billiard room already has classic details—for example, a cornice, framed panels, decorative door elements, or calm molding on adjacent walls. The overlay helps connect the modern slatted surface with the classic vocabulary of the interior, but it does so with a single detail rather than a complete wall redesign.
At the same time, horizontal orientation is not an automatic permission for installation. Even a small overlay can be unnecessary if there is no visually free field above the cue rack. For example, directly above the rack there may already be a scoreboard, sconce, ventilation grille, acoustic element, TV, shelf with balls, or an active light line. In such a case, the NPU-125 will compete not with the rails, but with another functional object. The right question is not "do 250 × 65 mm fit physically," but "does a readable composition remain after installation."
It is useful to separate two independent checks:
-
Compositional: does one horizontal element look appropriate specifically above the rack.
-
Operational: does it intersect the trajectory of removing and returning the cue.
If at least one check gives a negative result, buying the NPU-125 just because "it's empty above the rack" is not worth it. An empty space in a billiard room can be a full part of the composition, especially next to active rails.
Our factory also produces:




First determine not the height of the overlay, but the working space for the cue
The most common mistake when designing the area above a cue rack is to start with a decorative gap: "let's leave 100 mm above the rack and glue the element." This approach does not account for the fact that the top point of the cue during removal does not move along a single vertical line. Depending on the rack design, the cue may first be lifted, then tilted toward the person, shifted sideways, or exit the top retainer along an arc. When returning, the movement is sometimes even wider, because the user looks for the slot or clip and does not hold the cue strictly in one plane.
Therefore, above the cue rack, you need to determine the working volume of movement, and only then look for a place for decor. This is not a conditional rectangle above the rack, but the actual zone occupied by different cues during different operations.
For the check, use a real rack in its installed position. If the cue rack is not yet mounted, it is better to first complete its installation or at least make an accurate layout of the holder positions. A "by eye" check based on a catalog image is weaker, because the trajectory depends on several variables that the photo does not show.
Get Consultation
Which movements need to be checked
Don't limit yourself to one convenient central cue. The minimum practical test includes:
-
the longest cue that will actually be stored on this rack;
-
the far left slot;
-
the far right slot;
-
the central slot;
-
removing the cue with the user's usual hand;
-
removing the cue with the other hand, if different people use the billiard table;
-
returning the cue to its place;
-
movement when the rack is completely full, when neighboring cues restrict maneuver;
-
the case when a person stands slightly to the left or right of the rack's axis;
-
a case where the cue is taken quickly, not slowly and perfectly vertically.
It is precisely the extreme positions that often reveal a conflict that is not visible when working with the central cue. In the central slot, the top end can go almost directly away from the wall, while in the extreme one, it can describe a diagonal through the assumed overlay zone.
Why you cannot assign a universal safe margin in millimeters
There is no single correct number for this task that can be written without knowing the specific rack. The cue rack design can hold the cue from above with a rigid clip, a free groove, a ring, or another method. The distance from the wall to the cue axis also varies. The height of the top holder, cue length, rack width, user height, and the usual removal angle all change. Therefore, the advice "leave N millimeters and everything will be fine" creates false precision.
It is more reliable to obtain the dimension experimentally. First, outline the working trajectory, then place the NPU-125 template outside this zone. If there is no intersection, add a reasonable operational margin: the cue should not pass tangentially to the relief. The margin is chosen not for aesthetics, but for cases of inaccurate hand movement, returning the cue at an angle, and slight changes in the position of the rack or user.
Paper template 250 × 65 mm — a mandatory fitting before purchase
For NPU-125, you do not need a complex 3D mockup to understand the basic scale. It is enough to cut out a rectangle of 250 × 65 mm from thick paper or thin cardboard and draw an axial line on it. Such a template solves four tasks at once: shows the real size, helps find the center, allows checking the intersection with the cue trajectory, and reveals the scale problem before purchase.
It is important to understand the template's limitation: it is flat, while the real overlay has a thickness of 9 mm and a relief. Therefore, the paper fitting is a first filter, not a final proof of safety. If the cue passes close to the wall plane, make a volumetric imitation: add a spacer to the cardboard about the thickness of the actual product protrusion or attach the template on distance pieces. The task is not artistic accuracy, but to physically represent the object protruding from the wall.
How to do the fitting correctly
-
Cut out the template 250 × 65 mm.
-
Draw a vertical axis in the middle of its width — at the 125 mm mark from either side edge.
-
Mark the axis of the cue rack itself on the wall, not automatically the center of the entire slat wall.
-
Secure the template with painter's tape so that its axis aligns with the chosen rack axis.
-
Look at the wall from the main viewpoint: from the entrance, from the lounge area, from the billiard table.
-
Remove and return each characteristic cue, including the extreme positions.
-
Check whether the top end of the cue approaches the edges of the template.
-
Repeat the test with a 3D simulation of the 9 mm protrusion if the movement passes close to the wall.
-
Leave the template for several hours or until the next day. A brief fitting often does not show that the element visually "sticks" to the rack or conflicts with the light fixture.
-
Only after this make a decision about the purchase.
This order is more useful than measuring the wall with a tape measure by itself. The tape measure answers whether the rectangle fits. The template shows whether this rectangle is needed in the composition and whether the rack can be safely used after installation.
Center by the rack, by the group of cues, or by the wall: which axis to choose
In a real interior, the three centers may not coincide. The center of the slat panel may be tied to the wall's architecture. The center of the wall-mounted rack may be tied to storage convenience. And the visual center of the cue group may shift due to varying fullness, the width of the end holders, or adjacent items. If you thoughtlessly place the NPU-125 at the center of the entire wall, it may end up tens of centimeters away from the cue rack and look like a random ornament.
For this theme, the base is the axis of the functional object—the cue rack. The overlay completes this local composition, so it's logical to first align it with the center of the rack. But then the position needs to be visually checked relative to the slats and neighboring equipment.
There are three scenarios.
Scenario 1. The cue rack is symmetrical and stands on a separate smooth field
This is the simplest case. The axis of the rack, the axis of the cue group, and the center of the smooth field all coincide. The NPU-125 template is placed along this axis, and only the vertical position is adjusted. If the cue movement is free, the composition reads calmly.
Scenario 2. The cue rack stands on a slat wall but is offset due to furniture or a walkway
Here, using the center of the wall is risky. The overlay must be tied to the rack, otherwise a visual gap appears between the decor and the cues. If the rack's offset is too noticeable and there's no dedicated "field" above it, it's sometimes better to forgo the NPU-125 than to try to compensate for the asymmetry with additional elements.
Scenario 3. There's a sconce, scoreboard, or shelf next to the rack
In this case, the system already consists of multiple objects. Mechanically centering on the cue rack may place the overlay too close to the light fixture. First, preserve a safe working zone for the cues, then assess the visual intervals between objects. If you have to move the NPU-125 so far from the rack's axis that the connection between them disappears, it's wiser to leave the top without molding.
The principle is simple: decor should not make a functional object look incorrectly installed. If, for the sake of the NPU-125, you have to "explain" to the viewer why it doesn't align with either the rack or the slat rhythm, the solution is already too complex for one small overlay.
How to determine the height of the NPU-125 above the rack without a made-up universal offset
The installation height depends on two independent factors: the working trajectory of the cue and the visual distance between the cue rack and the overlay. The first factor is addressed first. Only after the space into which the cue does not enter during removal and return is found, can the exact gap be chosen based on composition.
An overlay that is too low looks as if it is part of the rack, although structurally it is not. Besides visual confusion, this increases the risk of accidental contact with the cue. One that is too high, on the contrary, loses its connection with the cue rack and begins to be perceived as a separate decorative spot on the wall.
Therefore, use not a fixed number, but the following algorithm:
-
Determine the upper boundary of the installed cue rack.
-
Perform a full test of cue movement and mark the upper boundary of the actual working zone.
-
Above this zone, find a position where the template is still perceived as a completion of the rack, not as an independent ornament.
-
Check this position from the distance from which a person usually sees the wall as a whole.
-
Look at the overlay while sitting and standing: in a billiard room, viewpoints differ greatly.
-
Assess whether a "narrow gap" arises between the rack and the decor, which looks random.
-
If the safe position has to be raised so high that the decorative connection is lost, abandon the NPU-125.
Here, a photograph of the wall with the template is especially useful. The shot reduces the interior to a flat plane and reveals proportion imbalances faster than looking at the room in person. Take the shot strictly head-on, then another from the main diagonal viewpoint. Do not rely solely on wide-angle distortion as a guide: it can visually stretch distances.
A slat wall is not always a ready-made base for an overlay
NPU-125 is intended for decorative use on walls, doors, and furniture, but this does not mean that any relief automatically serves as a good adhesive base. A slat panel is a non-uniform surface: protruding slats alternate with recesses. If the rear plane of the overlay touches only a few narrow peaks, the actual contact area may be significantly smaller than on a smooth wall.
Here, two design scenarios need to be distinguished.
Mounting on a designated smooth field
This is the most manageable option. In the slat composition, a small flat area is left in advance above the cue rest. NPU-125 receives a proper base, its outline is fully readable, and the ornament does not conflict with the shadows from the slats. The smooth field can be made in the color of the slats, the wall, or another decorative block—the decision depends on the project.
The advantage is not only in installation. The flat background separates the ornament from the vertical pattern. The relief of the overlay has its own chiaroscuro; on a deeply slatted surface, this chiaroscuro overlaps with another relief, and fine details may be visually lost.
Attempting to glue NPU-125 directly over the slats
This option cannot be assessed solely on the principle of "polyurethane is light, so it will stick." First, you need to examine the rear support surface of the product and the actual geometry of the panels. If the overlay crosses several slats, voids remain between them. This changes the contact pattern, and the protrusion of the product relative to the wall increases by the height of the slat relief itself.
Additionally, mounting over the slats affects the cue clearance check. The working thickness is no longer just the 9 mm of the NPU-125 itself: the protrusion of the slat surface relative to the base wall is added to it. If the cue movement passes close by, this combined geometry must be modeled in practice.
Therefore, for the task in question, it is more practical to provide a smooth mounting surface in advance or use a structural solution that creates a full plane for the decor. If there is no such surface and you don't want to redo an already finished slat wall, the absence of molding may be a neater solution than an overlay lying like a 'bridge' on the tops of the slats.
If you need a different format or shape of decorative accent, it makes sense to go to the catalog and Buy decorative polyurethane overlays only after you have determined the allowable width, height, and mounting surface.
How to check the scale of 250 × 65 mm specifically in your billiard room
The size on the product card does not indicate whether the element will look 'sufficient' on a specific wall. 250 mm may be perceived as noticeable above a narrow compact rack and almost disappear above a wide cue holder against a large slat plane. The scale is determined not by the room area as such, but by neighboring objects and viewing distance.
It is better to compare the overlay with four things:
-
the width of the wall rack;
-
the width of the visual group of cues;
-
the width of the smooth field, if provided;
-
the size of other decorative elements on the same wall.
None of these ratios require a universal "ideal proportion." What matters is that the NPU-125 reads as an intentional accent. If the 250 × 65 mm template looks like a random small patch, you don't need to compensate with a frame of extra moldings just to use an already selected article. In that case, the correct commercial outcome for the item is not to buy the NPU-125 for that spot, but to choose a different element or leave the top free.
The opposite mistake is trying to make a small overlay play the role of a large pediment. The NPU-125 can complete a local composition, but it should not "hold" the entire wall on its own. If the slatted surface spans several meters, the cue rack is just one object within it. The decor should be evaluated at the scale of the rack, not the whole room.
Test from a distance
Conduct three viewings:
-
From a close distance, where the user picks up the cue. Here, the relief, the quality of the joint with the base, and the absence of contact with the hand or cue are important.
-
From a working distance, such as from the billiard table. Here, you can see whether the NPU-125 is tied into the rack as one composition.
-
From a far point, usually from the entrance. Here, you check whether the overlay turns into a lonely spot and whether it conflicts with the overall rhythm of the wall.
If the solution works only in one of the three modes, it needs to be reconsidered. A commercial billiard room, a home game room, and a separate club room may have different viewing distances, so the template is much more valuable than an abstract rule.
Light, shadow, and slatted relief: why the overlay needs to be checked with the lighting on
In a billiard room, light is rarely uniform. There is often a separate light fixture above the table, wall sconces, local sources, or backlighting along the walls. The slatted surface actively creates vertical shadows, and the carved overlay adds its own fine chiaroscuro. With good lighting, the horizontal decor becomes a precise accent. With poor lighting, it visually breaks apart into a set of shadows or, conversely, looks too contrasty.
Check the template and the intended installation area in real modes:
-
main light above the table is on;
-
only wall sconces;
-
evening scenario;
-
decorative lighting, if used;
-
daylight, if the room has windows.
If the sconce is placed to the side of the rack, a strong side shadow can visually shift the NPU-125 relative to the axis. This is not a physical shift, but the eye perceives the relief together with the shadow. It is especially noticeable on contrasting colors.
Do not use the overlay as a base for the lamp, a hidden cable duct, or a technical cover. In this article, NPU-125 is considered only as a decorative element. Electrical wiring, sconce mounting, and any load-bearing tasks must be handled independently.
In wall color or contrast: how not to turn small decor into an extra center of attention
In combination with slatted panels, NPU-125 has two working color approaches.
Coloring in the color of a smooth field
This is the calmest option. The ornament is read through light and shadow, not through color contrast. This technique is useful if the slat wall itself is active in texture or has a pronounced wood grain. The overlay becomes an architectural detail rather than a separate object.
If the smooth field is painted in a dark shade, it is important to check the relief under evening lighting. On a dark surface, fine relief may become less noticeable, but this is not necessarily a drawback: for a billiard room with an intimate atmosphere, soft readability may be more appropriate than bright white decor.
Contrast accent
Contrast increases the visibility of the 250-millimeter element and can tie it to other details — the mirror frame, ceiling cornice, light fixtures, door trim. But the margin for error here is higher. A small light overlay on a dark slat wall becomes an optical focal point and can draw attention away from the rack and the billiard table itself.
Contrast is justified if it is already present in the interior as a recurring system. If the NPU-125 is the only white molding detail on a large dark wall, first check the color on a template: attach paper of the desired shade and view it from a distance.
Before painting and installation, follow the manufacturer's recommendations for polyurethane preparation and compatible materials. You can select adhesive, primer, and related items in the section materials for installing stucco decor.
Slat panels and NPU-125 should look like one system, not like two random catalog items
The combination of slats and molding works when the materials play different roles. The slat surface creates the background and rhythm, while the carved overlay sets a local accent. If both layers try to be the main decor at the same time, visual noise occurs.
For a billiard room, the following hierarchy is useful:
first level — the billiard table and playing area; second — the cue rack as a functional vertical; third — the slat wall as an architectural background; fourth — NPU-125 as a small finishing touch.
The order can be changed in a specific project, but a 250 × 65 mm overlay should rarely become the main dominant of the room. Its strength lies in its precise position.
If you are only designing the wall and have not yet chosen the slats themselves, first determine the material, spacing, structure, and the area for the cue rack, and then buy wall slat panels you can proceed based on the finished layout. This reduces the risk of a situation where, after installing the panels, only an awkward textured area remains for the decorative overlay.
For a more general understanding of combining textures, a separate article is useful wood-look slat panels and polyurethane stucco decor. In the current material, the task is already narrower: not the entire room, but one specific area above the wall-mounted cue rack.
What to do if the rack is already installed directly on the finished slats
A finished interior requires more cautious logic, because you cannot endlessly redo the wall for the sake of one decorative detail. If the cue rack is already hanging, start not with dismantling, but with diagnostics.
First, photograph the wall frontally. Mark a 250 × 65 mm rectangle above the rack in the photo. If even a flat model looks overloaded, further work is unnecessary — the NPU-125 does not solve the problem here. If the scale looks convincing, move on to a real fitting.
Then find areas where you can create a flat base without disrupting the entire panel. Sometimes the architecture of the slat wall already contains a gap, a vertical insert, or an upper smooth band. If there is no such place, assess how justified a local change in the finish is. For an element costing 1,290 ₽, there is no point in starting a complex rework if its result will not noticeably improve the interior.
After this, perform a cue movement test. In an already assembled rack, this is especially simple: you see the actual offset from the wall and the familiar mechanics. Mark with painter's tape the zone that the top end of the most inconvenient cue crosses. Any intended decor must be outside this zone with a margin.
If the only safe spot turns out to be too high or shifted to the side, do not try to "stretch" the composition with additional details. The absence of NPU-125 in this case is not a flaw, but a correct operational decision.
When it's better not to buy NPU-125 above a cue rack
A commercial article is useful not when any scenario ends with a "buy" button, but when it helps avoid ordering an unsuitable item. For NPU-125 above a cue rack, there are several situations where refusing the purchase would be a more professional decision.
No smooth or reliable mounting area
If the overlay can only rest on individual peaks of deep slats, and creating a flat field under it is not planned, first resolve the base issue. The decorative element should not rely on a random contact pattern. It is especially undesirable to glue it "as it happens" and then mask gaps with a thick layer of sealant: this will worsen the geometry and make the small decor visually heavy.
The overlay falls into the cue's trajectory
This is an absolute rejection. It doesn't matter how beautiful the pattern looks in photos. If the top end of the cue crosses the intended decor zone when removing or returning it, the element will interfere with operation and will eventually get hit. Moving the cue rack for a small overlay is also not always rational: a functional object in a billiard room should stand where it is convenient to use.
The cue rack itself is richly decorated
A carved wooden rack with a crown, figured side panels, complex carvings, and a decorative shelf already has its own top point. NPU-125 can turn it into a composition of two competing ornaments. In this case, an empty wall section often better highlights the cue rack itself.
The slat wall is already the main decorative dominant
If the slats have a complex profile, contrasting color, backlighting, shaped ends, or are combined with stone and metal, additional molding may not add value. Having free 250 × 65 mm does not mean there is a compositional need.
There is already a functional object above the counter
Sconces, meters, displays, screens, shelves, ventilation systems, or acoustic modules take priority. The overlay should not compress the intervals between them and turn the work wall into an exhibition of small details.
The template looks too small
If 250 × 65 mm gets lost against a wide counter and a large wall, do not buy NPU-125 hoping that the real relief will make it look bigger. The relief will add plasticity but will not change the base scale. It is better to switch to another decorative overlay that matches the found field.
There is a safe place, but it is visually too far from the counter
Sometimes the trajectory of the cues forces the decor to be placed so high that the connection with the counter disappears. This results in two separate objects: the cue rack below and a small overlay somewhere above. In such a situation, the problem is not the product but the chosen location.
If NPU-125 is not suitable: what alternative to look for
Rejecting a specific overlay does not mean rejecting the decoration of the entire wall. The alternative should address the reason for rejection, not just replace the article number.
If the problem is in the cue trajectory, look for decor outside the work zone: on the sides of the rack, on an adjacent smooth field, or on another part of the wall. Don't replace a small overlay with a large one in the same spot — the conflict will only become stronger.
If the problem is in scale, first measure the allowable field and only then choose another element. Record the maximum width, height, and protrusion from the wall. Then the catalog will stop being a set of beautiful shapes and become a tool for specific geometry.
If the problem is in the relief base, the solution may be a smooth insert, a separate panel, or abandoning molding directly on the slatted part. Not every decorative element must be on the same surface as the cue rack.
If the problem is visual overload, the best alternative is to add nothing. The slatted wall, vertical cues, and a neat rack already form a complete composition. Additional decor is needed only when it improves hierarchy, not when it fills emptiness.
If the NPU-125 shape doesn't fit, but the idea of a polyurethane accent itself works, you can Buy Polyurethane Molded Decoration after real size and position constraints have been determined. This is an important order: first measurement and operational check, then the catalog, not the other way around.
Installing NPU-125: what to prepare before applying glue
When the position is confirmed with a template and a cue test, installation becomes a routine finishing operation, but here too there are several control points.
First, the base must be ready specifically for the decorative element. If it's a smooth painted insert, check the strength of the coating. The glue doesn't hold to "the wall in general," but to the layer it actually adheres to. Weak paint, dust, peeling putty, or an unstable coating can become a weak link regardless of the overlay's weight.
Second, before installation, transfer the axis and corner positions of the template to the wall. Don't mark only the top edge: a small angular error on an element 250 mm wide is noticeable next to vertical slats, because they act as a ready-made ruler. The slatted background is especially unforgiving to misalignment.
Thirdly, do a test placement of the product itself without glue. The paper template confirms the size, but the actual ornament may have a visual center that is perceived slightly differently than a geometric rectangle. At this stage, you can adjust the millimeter position without disturbing the cue's working area.
Fourthly, re-remove the outermost cue while the pad is only applied to the wall. This is the last check before irreversible fixation.
For glue, primer, sealant, and finishing materials, use solutions compatible with polyurethane decor and follow the manufacturer's instructions for the specific compound. Do not replace the design check with the phrase "glue it on with something strong": excessive glue strength will not fix a poor base or incorrect positioning.
Why NPU-125 cannot be used as part of the cue rack mounting
Externally, the pad may end up close to the top of the stand, and this creates a temptation to "combine" the parts: press the fastener with it, cover the mounting plate, use it as a decorative stop. For this task, this is incorrect logic.
A cue rack is functional equipment. It bears the weight of stored items, the load from removing and returning cues, and accidental touches. Its mounting must be calculated and performed independently. NPU-125 is a decorative polyurethane element. Its role is limited to surface decoration.
This separation is also useful for maintenance. If the stand needs to be removed, moved, or replaced, the decorative pad should not hold its structure. Conversely, repairing the cue rack should not require destroying the molding element.
Separate systems are easier to maintain, repaint, and upgrade. In the interior, they may look like a single composition, but structurally they remain independent.
Practical algorithm before ordering: from the wall to the "buy" button
Below is a sequence that allows you to make a decision without guesswork.
-
Record the actual position of the cue rack. If it is already installed, measure its width, height, and offset from the wall. If it is only planned, first determine the exact location.
-
Check the slat surface. Is there a smooth area above the rack or the possibility to create one without complex rework?
-
Make a template 250 × 65 mm. Do not reduce it by eye and do not print it without checking the scale.
-
Align the template axis with the rack axis. This is the basic starting point.
-
Check the composition. Look from close, medium, and far distances.
-
Take the longest cue actually used. Do not rely on an average size from the internet if you already have specific equipment.
-
Remove the cue from the central and edge positions. Mark the actual movement contour.
-
Repeat the return. The return often gives a different trajectory than the removal.
-
Consider the 9 mm thickness and the base offset. If necessary, make a volumetric mockup.
-
Check the lighting. Daylight, evening, wall sconce, light above the table.
-
Check adjacent items. The overlay should not crowd the display, sconce, shelf, or other elements.
-
Resolve the color issue. Match the background or contrast — better to understand before installation.
-
Select mounting materials. The base and adhesive must be compatible.
-
Do a final fitting of the actual product. Check the axis and level.
-
Only after this place the order and installation. If any critical point fails, return to the alternative.
This algorithm is useful because each step can end in rejection. There is no point in buying a decorative part at the first step if at the eighth it turns out that the cue inevitably hits it.
Decision table: buy NPU-125 or leave the top of the stand free
| Situation | Solution | Why |
| There is a smooth field, the pattern looks appropriate, the cue trajectories do not intersect | NPU-125 is suitable | Both decorative and operational conditions are met |
| The template is beautiful, but the farthest cue passes through its zone | Do not buy for this location | Function is more important than decor |
| The trajectory is clear, but the element gets lost on the large wall | Look for a different scale | 250 × 65 mm does not fulfill the compositional task |
The overlay fits only directly on the cueHow to avoid mistakes with quantityFor the described scenario, the quantity is simple: one NPU-125 overlay above one wall-mounted cue rack. There is no linear footage, repeating pattern, or paired corners that need to be calculated by perimeter. There is no need to buy a second one "just in case" only because the decor is small. A spare makes sense when there is an objective risk of damage during cutting or when the project requires a symmetrical pair. In our scheme, the product is not cut and is used as a finished central element. If a billiard room has two identical cue racks on different walls, that is a different compositional scenario. Do not automatically place an NPU-125 above each one. Check each wall separately: one may have an open field, the other may have a sconce or other equipment. Symmetry of purchase is not more important than the logic of the interior. The base cost of the decorative part for one seat at the time of writing the article is 1 × 1,290 ₽ = 1,290 ₽, excluding glue, primer, paint, surface preparation, and possible work. Always check the current price on the product page before payment. What changes if the billiard room is commercial rather than homeIn a club, bar, hotel, or public billiard room, different people approach the cue storage area. They have different heights, different movement techniques; some remove a cue carefully in two motions, others in one quick motion. Therefore, the check of the working trajectory must be stricter than in a home room, where only a few familiar people use the rack. In a commercial space, you should test not the "ideal user" but the variability of actions. Ask several people to remove the outermost cues. Observe how widely the trajectories diverge. If the NPU-125 is at the edge of this zone, it is better to abandon the decorative solution or raise/move it so that the clearance is obvious. The second feature is cleaning. The relief decor above the rack will collect dust, like any carved surface. If the area is located high and is hard to reach, this must be considered during maintenance. The overlay should not cover the rack's fasteners or hinder its removal for repair. The third feature is possible rearrangement of equipment. In a commercial billiard room, racks, advertising screens, and lighting may change. The more structurally independent the NPU-125 is from the cue rack, the easier future modernization will be. What changes if the cue rack has not been purchased yetIf the project is created from scratch, you have more freedom. But this is not a reason to select molding first. The functional sequence remains the same: wall → cue rack → equipment → working trajectory → decorative accent. First, determine how many cues need to be stored and which rack is suitable. After choosing a specific design, the actual geometry of the top holders and the offset from the wall becomes known. Then you can check whether there is a convenient space above the rack for the NPU-125. Designing "from the overlay" can lead to a strange result: a beautiful spot for 250 × 65 mm will be saved, but the cue rack will have to be lowered or moved to where it is inconvenient to use. In a billiard room, equipment takes priority over decorative additions. If the slat wall is also only being designed, this is the ideal moment to provide a smooth insert. Then you won't have to decide after renovation how to glue a relief element to the tops of the slats. The field size is better chosen not exactly to the NPU-125 dimensions, but as part of the overall composition with a margin of visual air. The margin itself is determined by the wall layout, not by a universal number. Mistakes that look harmless on a sketch but interfere in a real billiard roomMistake: only checked the empty rackOn an empty cue rack, nothing moves, and the area above it seems completely free. After filling, it turns out that the outermost cue, when removed, passes exactly where the overlay is glued. How to avoid: test with real cues and in real slots. Mistake: only checked removal, but not returnWhen removing, a person knows the direction of movement. When returning, they may guide the cue along a wider arc, especially if the top fixator is small. How to avoid: perform both actions several times. Mistake: used only a flat templateThe paper does not show the overlay protruding from the wall. If the cue passes close to the surface, after installation the 9-millimeter relief unexpectedly falls into the path. How to avoid: with a small gap, make a volumetric mockup. Mistake: centered on the wall, not on the cue rack.On the plan this looks mathematically neat, but in the interior the decor appears visually detached from the stand. How to avoid: take the base axis from the functional composition and only then align it with the wall architecture. Mistake: decided that any slatted surface is suitable for glue.After installation, gaps are visible, the element rests on several slats, and the background relief prevents reading the ornament. How to avoid: assess the actual support surface in advance and, if necessary, create a smooth field. Mistake: bought the overlay only because it is inexpensive relative to the renovation.A low price does not make extra decor useful. An unsuitable element still requires installation, preparation, painting, and then visually irritates. How to avoid: first the template, then the purchase. Mistake: added a few more elements to the NPU-125 so it wouldn't "get lost"If a single overlay doesn't hold the scale, surrounding it with moldings and extra outlets often only increases the overload. How to avoid: admit that the specific size doesn't fit, and choose a different scale or leave the wall free. How to incorporate stucco molding into a billiard room without turning it into a themed decorationA billiard interior is easily overloaded with literal symbols: balls, cue silhouettes, green accents, vintage signs, carved frames. NPU-125 is useful because it doesn't have to depict a billiard theme. It can work as an ordinary architectural detail and support the room's style through form, relief, and color. If the interior is modern, the overlay can be made close in tone to the wall so it reads through light and shadow. If the setting is more classic, it can be tied to the cornice, door decor, or furniture details. But the connection must be systematic: the same painting principle, similar plasticity, repeated material or color. There's no need to try to repeat the overlay's ornament on every free section. One element above the cue rack is enough if it truly completes the composition. A repeat can appear on another wall only for its own reason—for example, above a mirror or in a molding panel. Then the interior gets a language, not a stamp. Can the NPU-125 be placed directly above the center of the cue group if the rack itself is widerYes, if the visual group of cues and the center of the cue rack coincide and the movement test confirms safety. In this case, you don't need to require the overlay to match the entire width of the rack. Its function is an accent, not a trim or cornice. But if the rack has a pronounced top shelf or a wide decorative frieze, the small NPU-125 may look like a secondary element, accidentally placed on top of an already finished form. Then the template will show the problem faster than any rules. Focus on the meaning of the composition: the eye should understand that the overlay belongs to the rack but is not its structural part. Can an overlay be placed between the top ends of cues if they diverge in width?This is a risky scenario. Even if there is free space between the cues in a static position, they may tilt inward when removed. Decor placed inside the potential fan of movement will interfere. The correct check is not done by a photo of the filled rack, but by dynamics. If any cue in use passes through the intended rectangle of 250 × 65 mm or close to its volumetric zone, the NPU-125 should not be placed there. What is more important: symmetry relative to the slats or ease of using the cues?Ease and safety of cue movement are more important. The slatted surface creates a strong grid, so the shift of the decorative element is indeed noticeable. But correcting decorative asymmetry at the expense of an inconvenient cue rack is wrong. If the functionally correct position of the rack does not allow a beautiful placement of the NPU-125, it is better to abandon the overlay or move the decor to another area of the wall. This is more honest than making a beautiful photo at the cost of constant inconvenience. Why does empty space above the cue rack sometimes look more expensive than additional molding?Emptiness is an interval that helps distinguish elements. In a slatted billiard room, there is already texture, lines, and equipment. A free area above the rack can give the whole group the necessary "air". If you add NPU-125 only because the space seems unfilled, the eye will get another stopping point. In a small room this is especially noticeable. Therefore, the template should be evaluated not only by the question "does it look beautiful with it," but also by the comparison "has it become better than without it." Take two photos from the same point: one without the template, the second with it. Compare not the overlay itself, but the entire wall. If without the decor the composition is calmer and more premium in perception, that is a full-fledged test result. Bottom line: when NPU-125 is actually worth buying for the area above the cue rackNPU-125 250 × 65 × 9 mm is suitable for this task not because it is a small polyurethane overlay and there are physically free centimeters above the rack. It is suitable when several conditions are met at the same time. First, what is needed is precisely a small horizontal accent that balances the vertical slats and cues. Second, above the rack there is a full-fledged visual field, not a leftover between the sconce, the scoreboard, and the ceiling. Third, the base allows the decorative element to be mounted correctly. Fourth, the actual trajectory of the longest cue and the extreme positions does not intersect the volume of the overlay. Fifth, the 250 × 65 mm template looks intentional, not too small or accidental. If all checks are passed, the basic setup is simple: 1 NPU-125 250 × 65 × 9 mm. Then you can go to the product page and order the NPU-125 decorative overlay. If at least one critical point does not pass, there is no need to force the interior to fit the product. First change the position, the base, or the choice of decor itself. It is exactly this order that keeps the billiard room convenient. The slatted wall remains an architectural backdrop, the cue rack remains working equipment, and the molding remains a neat addition that does not interfere with taking a cue when it is needed. FAQCan NPU-125 be glued on after the slatted wall and cue rack have already been fully installed?Such installation can be considered if a suitable base remains after repairs and the working area of the cues is free. First, make a template 250 × 65 mm, check the trajectory of all characteristic cues, and only then decide on the mounting method. If the overlay has to rest on several separate tops of the slats, the base scheme needs to be assessed separately. Is it necessary to remove the cue rack during installation of the overlay?Not necessarily, if there is normal access to the installation site and the rack does not interfere with base preparation. Moreover, an installed cue rack is useful for precise axis marking and final trajectory verification. It makes sense to remove it only when required by the wall preparation technology or access to the surface. Can the NPU-125 be rotated vertically if there is little width above the rack?This article considers horizontal installation because it solves a specific task — contrasting a short horizontal accent with the vertical rhythm of the slats and cues. If the available geometry requires vertical orientation, that is a different compositional scheme that needs to be re-evaluated, not considered equivalent. Is it necessary to make a molding frame around the NPU-125?No, a frame is not required for the basic scenario. Moreover, an additional contour will increase the occupied area and may approach the working trajectory of the cues. If a single NPU-125 does not look convincing enough, first ask whether its scale is appropriate at all, rather than automatically adding a frame. What to do if the cue does not touch the template but passes very close?Flat absence of contact is not enough. Take into account the product thickness of 9 mm and the actual protrusion of the mounting surface. Then repeat the movement with a volumetric mock-up. In the operational zone, a margin for imperfect movement is needed, not passing "by a hair's breadth." Can the NPU-125 be placed higher to reliably stay away from the cues?Physically, yes, if space allows. But after moving it, check the composition. A pad placed too high may lose its connection with the cue rack and look like a separate random element. Safety is mandatory, but by itself it does not guarantee good design. Are two pads on the sides needed instead of one on top?That is a different composition. Two side elements may interfere with the movements of the outer cues or expand the decorative zone. The base scenario of this article is one horizontal NPU-125 above the rack. Any paired scheme needs to be re-checked for trajectory and visual balance. Can the NPU-125 be painted to match the color of wood slats?Painting is possible, but imitation of wood texture and compatibility of the specific coating system need to be evaluated separately. Often it is more logical to tie the polyurethane decor to the color of the smooth field, wall, cornice, or other molding, rather than trying to literally copy wood. Before finishing, use appropriate surface preparation. What to do if the rack is replaced with a model of a different height after installation?The trajectory needs to be re-checked. The new cue rack may change the position of the top holder and the angle of cue removal. Decor that was safe with the old rack does not automatically become safe with the new one. Will the solution work for a rack that stores not only cues but also balls or accessories?Possibly, but the composition becomes more complex. The top shelf, score counters, triangle, brushes, and other accessories create additional visual and operational zones. The NPU-125 must remain out of reach of these items and not compete with the already formed top of the rack. Is it necessary to align the pad with the center of the billiard table?No. It belongs to the local wall composition, so the original axis is the cue rack. Coinciding with the table axis can be a pleasant bonus in a strictly symmetrical interior, but it should not force shifting functional equipment. Can the NPU-125 be placed on the adjacent smooth field if it interferes directly above the cue rack?Yes, but then it is no longer a "rack completion" but an independent decorative accent. Check whether the new position has its own compositional reason. Moving it just to keep the purchase is not necessary. How to understand that the overlay looks too small?Use the template and photos from several distances. If the eye does not connect 250 × 65 mm with the rack, the element gets lost against the slat wall or seems like a random mark, the scale does not work. There is no single coefficient that would replace this check for all interiors. What is more advantageous: to order the NPU-125 right away or to make a mockup first?First, the mockup. A paper rectangle costs almost nothing and allows checking the size, axis, height, and cue movement. It is cheaper and faster than buying the product, preparing the base, mounting, and then finding out that the composition or operation does not work. |