


Article Contents:
- Why the passage area is the most challenging point in interior design
- Types of passage areas: not all arches are the same
- Classic arch with a rounded top
- Wide rectangular opening without a door
- Wide opening with a wall section on the sides
- Narrowing-widening: corridor transitions into the hall
- Wooden slats on the sides of the arch: five ways to use
- Slats on the side edges of the opening: edge finishing
- Slats on adjacent walls: symmetrical framing
- Slats from floor to ceiling: wall as an extension
- Slats in only one room: accent approach
- Slats for zoning without a physical partition
- Which slats to choose for a passage area: parameters and tinting
- Stucco decor and moldings for an arch: from a thin outline to a portal
- Molding outline along the perimeter of the opening
- Moldings on side walls: vertical pilasters
- Stucco frame around the arch: architectural portal
- Horizontal band above the opening
- Decor above the arch: keystone and voussoirs
- Slats and stucco on the wall simultaneously
- How to design the upper zone of the arch and the ceiling transition
- Continuous cornice through the opening
- Cornice ending at the edges of the opening
- Cornice only above the arch: accent horizontal
- Decorative molding as the top profile
- Baseboard at the arch: the most complex finishing joint
- How the baseboard 'goes around' the side edge of the opening
- Which baseboard to choose for a walk-through area
- How to join baseboards from different rooms at the opening
- Moldings, corners and bars: a system of parts for a neat arch
- Wooden corner on all open ends
- Wooden bar as a load-bearing frame for slats
- Molding profiles for side edges of the opening
- Systematic approach: unified tinting
- Ready-made designs for arch and passage area
- Scheme 1: Modern minimalism — slats, MDF baseboard, thin molding
- Scheme 2: Neoclassicism — stucco portal, wide baseboard, cornice around the perimeter
- Scheme 3: Japandi — natural slats, minimal baseboard, no moldings
- Scheme 4: Country house — wooden baseboard, wooden cornice, linear molding along edges
- Scheme 5: Commercial zone — slats for zoning, linear molding, moldings on adjacent walls
- Typical mistakes when designing an arch: an honest and detailed analysis
- What is important to know about installation: technical aspects
- How slats are attached to the piers near the arch
- How moldings are attached around the perimeter of the opening
- FAQ: answers to real questions about arch design
- STAVROS: everything for a beautiful transition — from slats to cornice
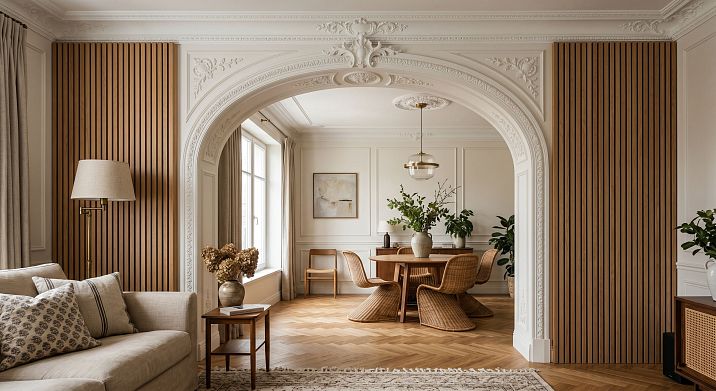
An arch is not just a hole in the wall. It is a spatial event. The moment when one room ends and another begins, when the air changes, the scale changes, the mood changes. That is why an arch and a wide opening without a door require the same attention as a wall, ceiling, or floor.
Designing an arch correctly means connecting two different spaces into a single story. So thatwooden slats for the archflowed from one room to another, moldings created a portal, and the baseboard did not abruptly end at the side edge of the opening.
This is not a designer's task — it is the task of someone who understands how space works. And this article is precisely about that understanding.


Why the passage area is the most challenging point in interior design
Ask any designer what is the hardest to resolve in a layout — and most will say: transitions. Junctions of rooms. Boundaries of zones. Places where one thing ends and another begins.
In an apartment with a single open space, there is no problem. But as soon as an arch, a wide opening without a door, or simply an open passage between the hallway and the living room appears — the decorator has to answer a whole range of questions. How does the baseboard behave at the side edge of the opening? Where does the cornice go when crossing the opening? How do the slats on the wall 'end' at the arch — or do they continue? How do the moldings of two different rooms align at the transition point?
It is this complexity that makes the topic of the arch and passage area a separate discussion. Here, simply 'hanging a molding' is not enough. Here, a system is needed: fromthe wooden baseboard at the basetothe cornice above the arch—the trim along the edges of the openingtowooden slats on the sides.


Types of passage zones: not all arches are the same
Before choosing decor, you need to understand what type of opening you are working with. This directly affects the choice of moldings, slats, baseboards, and trim.
Our factory also produces:


Classic arch with a radius top
A semicircular or parabolic opening is a classic that is especially common in Soviet-era houses, country houses, and classic-style apartments.stucco decor for an archit can be either a radius frame along the arch or a rectangular portal that 'cuts into' the lower part of the arch.
For a classic arch, the following work: a molding portal with pilasters on the sides, a keystone above the vault, a horizontal cornice-entablature. This is an architecturally precise solution requiring stylistic consistency.
Get Consultation
Wide rectangular opening without a door
The most modern and common scenario. The wall is partially removed, the opening is rectangular, without a door. This could be a transition between the kitchen and living room, between the hallway and hall, between the corridor and work area.
For such an openingwooden slats for the passage areaon the sides create an architectural accent without intrusive pomp. A molding frame around the perimeter adds completeness.MDF Skirting Boardwith a transition through the side edge — solves the junction point.
Wide opening with a pier on the sides
When there are piers on both sides of the opening — the decor becomes voluminous.Rafter panelson the piers on both sides of the passage create a "frame" of wood texture. Moldings or baseboards unite the piers and side edges of the opening into a single architectural object.
Narrowing-expansion: corridor transitions into hall
When a narrow corridor opens into a wide space — this is an architectural task of scale change.vertical wooden slatsat the transition point (on the first 50–80 cm of the hall wall from the opening) create a visual "gateway" — a transition zone that prepares perception for the new scale.
Wooden slats on the sides of the arch: five ways of application
Wooden slats around the arch — not the only, but one of the most effective tools for framing a transition. It's important to understand that the slats here are not just decor — they create spatial landmarks, fix the gaze, and set the direction of movement.
Slats on the side faces of the opening: end finishing
The side faces of a wide rectangular opening are horizontal strips visible from both sides. They can be designed as wooden slats for a wide opening, assembled vertically along the wall depth, or as molding profile, covering the face as a single element.
For a wall thickness of 200–250 mm, the optimal option is slat cladding on the side face with wooden corner piece at the joints. This turns the functional end surface into a decorative element.
Slats on adjacent walls: symmetrical framing
If there are walls on either side of the opening with a width of 30–40 cm,wooden slats on the sides of the archare mounted symmetrically on these walls — creating a portal framing. The gaze of the person entering registers: here is the frame, here is the space inside the frame. This is an architectural invitation to enter.
Slats on the walls are mounted onwooden barsas a load-bearing base, withwith corner pieceson all ends.
Slats from floor to ceiling: the wall as an extension
When in one of the rooms (for example, the living room) the wall is finished withplank panels, the slats can "enter" the opening, transitioning to the side edge and part of the wall of the second room. This creates the feeling that the wooden surface "flows" from one space to another.
Technically, this requires precise marking: the slats in both rooms must align vertically at the opening level.Wooden plankwith a constant cross-section and spacing ensures such consistency.
Slats in only one of the rooms: accent approach
If the decor of the two rooms is different — for example, a hallway with slats transitions into a living room with molding panels — the slats "end" at the opening with a neat end, covered bywooden corner piece. On the side edges of the opening — a linear profile or molding coordinated with the living room decor.
Slats for zoning without a physical partition
In open spaces without an arch — simply a kitchen-living room or living-dining room without walls —vertical wooden slatson a ceiling beam or on a freestanding frame create an "airy" partition. This is zoning without closing off the space — dividing into zones through rhythm and texture.
Which slats to choose for a passage area: parameters and tinting
| Interior type | Batten width | Step | Tinting | Species |
|---|---|---|---|---|
| Modern minimalism | 25–35 mm | 15–25 mm | White, neutral | MDF or ash |
| Japandi | 30–40 mm | 20–30 mm | Light oak, bamboo | Oak, ash |
| Neoclassical | 40–60 mm | 25–40 mm | Walnut, dark oak | Oak, walnut |
| Scandinavian style | 20–30 mm | 15–20 mm | Bleached oak, white | Ash, birch |
| Suburban house | 35–55 mm | 20–35 mm | Natural wood | Pine, oak |
| Loft | 40–60 mm | 30–45 mm | Dark, brushed | Brushed oak |
Stucco decor and moldings for an arch: from a thin contour to a portal
stucco decor for an arch— this is a wide range of possibilities. At one end is a light contour molding, barely outlining the shape of the opening. At the other is a full architectural portal with pilasters, entablature, and a keystone. Between these extremes are dozens of solutions, each finding its own interior.
Contour molding around the perimeter of the opening
The simplest and at the same time very effective technique:Polyurethane molding20–35 mm thick along the inner perimeter of the opening. It's like a picture frame — only here the picture is the space beyond the opening.
The molding is glued in the wall color — then it creates a relief contour without a color accent. Or in a contrasting color — then the arch becomes an independent decorative statement.
Moldings on side walls: vertical pilasters
Decorative wooden moldingson the side walls flanking the opening create the effect of pilasters — vertical supports that the upper part of the opening 'rests' on. This is an architecturally authentic solution: this is exactly how classical portals are constructed.
For a modern interior, pilaster moldings are chosen with a minimalist profile without ornamentation. For classic or neoclassical styles — with a more complex relief.
Stucco frame around the arch: architectural portal
Polyurethane wall decorin the form of a full frame around the arched opening — this is already an architectural statement. The frame includes: vertical elements on the sides, a horizontal element above the opening (or a radiused one for a classic arch), and corner blocks at transition points.
For a modern interior, such a frame is made strict and rectilinear — almost like a door casing, but wider and more expressive. For a classic one — with profile enrichment, pilaster capitals, and a keystone at the arch's apex.
Horizontal belt above the opening
A horizontal molding belt above the opening, running the full width of the wall — this is a solution that 'integrates' the opening into the overall architectural scheme of the wall. The molding runs continuously along the wall; above the opening it either breaks with neat ends or jumps over it — depending on the design intent.
Moldings made of polyurethanefor the horizontal belt — the optimal material: they are easy to cut, joined at 45° at corner points, and glued without special tools.
Decor above the arch: keystone and wedges
In a classic arched opening above the central point of the vault — a keystone. This is a small decorative element made ofpolyurethane molding decoration, which emphasizes the top of the arch and gives it architectural completeness. For modern arches, the keystone can be simplified to a rectangular block with a slight relief.
Slats and stucco on the wall simultaneously
Combinationof slats and stucco on the wallnear the opening — an advanced solution. Principle: slats — in the lower or side part of the wall, moldings — in the upper zone or as a frame around the slatted section. Slats and moldings do not compete if their scale is coordinated: the width of the molding should not be less than the width of the slat.
How to design the upper zone of the arch and the ceiling transition
The top of the opening is where the ceiling and wall of two different rooms meet. A visual conflict often arises here: the cornice of one room "breaks off" at the opening, while the other room has its own line. How to solve this?
Continuous cornice through the opening
The perfect solution for open spaces like a kitchen-living room or living-dining room:wooden corniceruns along the entire perimeter of the combined space without breaks. The transition through the point of the "former wall" is not marked — the space is perceived as a single whole.
A cornice ending at the edges of the opening
When the cornice runs along the walls of two different rooms, it should neatly end at the side edges of the opening.Wooden beamsare cut at 90° and closed with an end block orwooden corner piece. On the side edges of the opening — a cornice profile that aligns the two lines.
Cornice only above the arch: accent horizontal
ThinPolyurethane ceiling decorationabove the opening — like a horizontal frame at the top. This "cap" cornice marks the upper boundary of the portal. Below it is the opening decor, above it is the ceiling. This works as a concentrated accent that does not extend to all walls.
Decorative baguette as the upper profile
Wooden Picture Framewith a moderate profile — a horizontal element exactly along the top edge of the rectangular opening. It creates a clear upper line of the portal — expressive but not bulky. For modern interiors — a concise rectangular profile. For classic styles — a profile with a chamfer or stepped cross-section.
Baseboard at the arch: the most complex finishing node
If wooden slats on the sides of the arch are a matter of taste, then the baseboard at the arch is a technical challenge. This is where errors most often occur, spoiling the overall appearance even with beautiful main decor.
How the baseboard 'goes around' the side edge of the opening
A straight floor baseboard, reaching the side edge of the opening, must somehow end. Options:
Corner transition.Wooden baseboardorMDF Skirting Boardwhen approaching the side edge, it ends with a 45° cut. On the side edge, there is a matching baseboard profile, also cut at 45°. The joint point is an internal corner.Wooden anglecovers this joint if the geometry is not ideal.
End cap. The baseboard ends at the side edge of the opening with a straight end, closed by an end cap orwooden corner piecea vertical finish. This is a more modern solution that does not require complex cutting.
The baseboard goes onto the side edge. If the edge is wide enough (from 20 cm), the baseboard can run along the perimeter of the opening — along the side edges and along the upper horizontal plane. This turns the baseboard into a decorative linear element that 'frames' the opening from below and on the sides.
Which skirting board to choose for a walk-through area
Choosing a skirting board for an arch and walk-through area depends on two factors: the presence of wooden elements in the interior and the desired look of the bottom line.
— is a horizontal element that frames the room at the bottom of the walls where the wall meets the floor. Skirting boards perform several functions: they hide the technological gap between the wall and floor covering (necessary for thermal expansion), protect the lower part of the wall from mechanical damage, create visual completion, and may conceal wiring. — for interiors where the bottom line should be as calm as possible. It is painted in the color of the wall — and the lower edge of the space "dissolves." Ideal for minimalist walk-through areas.
White MDF Skirting Board — for light neutral interiors. A clear white bottom line structures the space without wooden accents.
to buy wooden baseboard — made of oak or ash — if the interior has wooden slats, a wooden door, parquet, or wooden furniture. A skirting board matching the wood tone creates a unified system — from floor to ceiling, everything "wooden" is coordinated.
Wide Wooden Skirting Board — from 80–100 mm — for classic arches, country houses, halls with high ceilings. A wide skirting board near the arch adds monumentality and creates the feel of an architectural project, not just a renovation.
How to join skirting boards from different rooms at the opening
If the hallway and living room have different skirting boards (e.g., wooden and MDF of different profiles), the transition point should be clearly marked.Wooden angle — or a vertical trim profile on the side edge of the opening — a "seam" that separates two different skirting board solutions and makes their transition appear intentional, not accidental.
Trim, corners, and strips: a system of details for a neat arch
At the arch and wide opening, there are many complex points. Each of them requires the correct element fromwood trim.
A wooden corner piece on all open ends
Every open end of a wooden element — slat, baseboard, molding — at the opening needs finishing.Wooden anglefrom the same wood species and tint covers the end and protects it from delamination upon impact.
At the meeting point of the baseboard and the side edge of the opening —Wooden angleas a vertical finisher. On the side ends of the slatted panel — the same corner piece as horizontal protection.
A wooden block as a supporting frame for the slats
Wooden block— the base onto which the slats are mounted on the wall sections on the sides of the opening. The block is attached to the wall, the slats to the block. This design ensures the precise plane of the slats and the required distance from the wall (for shadow and relief).
The block is also used as a supporting element for a horizontal shelf above the opening — if a light cornice or decorative detail is planned there.
Linear profiles for the side edges of the opening
Trimming Items— these are vertical and horizontal profiles that cover the side edges of the opening and create a neat transition between the wall and the end. Application options:
-
Flat linear profile as a "casing" around the perimeter of the opening
-
Corner profile at the junction of the wall and the side edge
-
Horizontal profile along the top edge of a rectangular opening
-
DecorativeWooden Picture Frameas a contour element
Systematic approach: unified tinting
A principle that cannot be violated: all wooden elements near the opening — slats, baseboard, cornice, corners, bars, linear moldings — must be from the same wood species and with the same tint. Only then is the arch perceived as an architectural object, not as a set of parts assembled from different sources.
Ready-made design schemes for arches and passage areas
Five scenarios — for five different situations.
Scheme 1: Modern minimalism — slats, MDF baseboard, thin molding
For whom: studio apartment, open plan, modern or Scandinavian style.
Opening: wide rectangular, between the living room and kitchen.
-
On the sides of the opening on the piers:Wooden planksash wood in light tint — vertical rhythm of the framing
-
Side edges of the opening:a linear profilematching the slats
-
Top of the opening: thinPolyurethane molding— horizontal 'cap' in the color of the ceiling
-
Skirting board:— is a horizontal element that frames the room at the bottom of the walls where the wall meets the floor. Skirting boards perform several functions: they hide the technological gap between the wall and floor covering (necessary for thermal expansion), protect the lower part of the wall from mechanical damage, create visual completion, and may conceal wiring.matching the walls — invisible bottom line
-
Slat ends:Wooden angleon all exposed edges
Result: a concise, clean transition. Slats mark the opening, molding finishes it from above, baseboard blends into the background.
Scheme 2: Neoclassical — stucco portal, wide baseboard, perimeter cornice
For whom: classic-style apartment, country house, high-ceiling apartment.
Opening: classic arch with a radius top.
-
On the sides of the arch:Decorative wooden moldingsas pilasters — vertical supports of the portal
-
Along the arch curve:molded decoration made of polyurethane— radius molding along the arch curve
-
Keystone: elementpolyurethane wall decorat the top of the arch
-
Baseboard: widewith a classic profile creates a sense of solidity, reliability.made of oak, from 80–100 mm
-
Crown molding:wooden cornicearound the perimeter of both rooms in a single tint with the baseboard
Result: a full-fledged architectural portal where the arch is not just an opening, but a spatial accent.
Scheme 3: Japandi — natural slats, minimal baseboard, no moldings
For whom: interior in Japandi style, minimalist oriental, eco-friendly.
Opening: wide rectangular, without partitions — just an open passage.
-
Side edges of the opening:Rafter panelsmade of light ash — upholstery with vertical slats at the ends
-
On the wall behind the opening: continuation of the same slatted panel — material continuity through the opening
-
Moldings: absent — clean joints without ornament
-
Skirting board:Wooden baseboardmade of ash with a low profile (40–50 mm) — a narrow bottom line in tone with the slats
-
Joints and ends:Wooden anglein tone — neat but unobtrusive finish
Result: quiet, organic transition. Rails flow through the space without interruption, minimal decorative details.
Scheme 4: Country house — wooden baseboard, wooden cornice, molding along edges
For whom: country house, dacha with renovation, interior in warm wood tones.
Opening: wide rectangular or low arch, side walls.
-
Side walls at the opening:Wooden planksmade of pine or oak in natural stain — rustic warm rhythm
-
Side edges of the opening:wood trim items— flat profile around the perimeter
-
Top of the opening:Buy wooden crownwith moderate profile — horizontal "beam" above the passage
-
Skirting board:Wooden baseboardin tone with the slats, transitioning through the side edges
-
Ends and corners:Wooden corner piecesat all joints
Result: a warm, wooden, "breathing" transition. A feeling of home, assembled with care for details.
Scheme 5: Commercial zone — slats for zoning, linear elements, moldings on adjacent walls
For whom: reception and waiting area, cafe with open kitchen, store with zonal division.
Opening: wide, from 200 cm, without piers — transition between functional zones.
-
On the ceiling beam in the opening: verticalWooden planksfrom beam to floor — "air partition"
-
On the walls on the sides:Polyurethane wall decorin the form of molding frames
-
Skirting board:MDF Skirting Boardwith a protective coating — a practical choice for commercial areas
-
Ends of the slatted "partition":Wooden angle + Blockas a load-bearing element
-
Cornice: thinPolyurethane ceiling decoration around the perimeter
Result: functional and decorative zoning without walls — the space is divided but remains unified.
Typical mistakes in arch design: an honest and detailed breakdown
Slats end abruptly at the opening without finishing. The slatted panel on the wall approaches the opening and ends with an exposed cut. This is a carelessness that is immediately noticeable. Solution:Wooden angleon the side edge of the slatted section.
The baseboard is not joined with the side face. The baseboard approaches the opening and is simply cut off — without transitioning to the side face. The face remains unfinished: the wall, floor, and opening are three different planes without connection.a linear profileon the side face andAngleat the junction — the solution to this problem.
The cornice ends abruptly above the passage. The ceiling cornice of one room ends at the edge of the opening with a cut end. This is especially noticeable when the cornice is massive. Solution: the cornice ends with a decorative end piece or is aligned with the cornice of the second room through the side edge.
Moldings conflict with the shape of the arch. A straight molding on a radius arch is either too small for the scale of the arch or too wide. The molding must match the scale of the arch: for a wide opening — molding from 40 mm, for a narrow one — 20–30 mm.
The ends of wooden elements are not covered. An open end of a slat or baseboard near the opening is an area of delamination and chipping during household contact.Wooden corner piecescover every open end.
Too massive stucco in a narrow passage. A stucco portal with large pilasters, a wide entablature, and complex ornamentation in a narrow passage (60–80 cm) feels oppressive and creates a sense of tightness. In a narrow passage — a light molding contour or no stucco at all.
Different shades of wood for slats, baseboard, and cornice. Dark baseboard, light slats, and neutral cornice — three wooden stories without connection. A single species and tint for all wooden elements near the opening is a mandatory condition.
No unified logic between two rooms. In the hallway — slats, in the living room — moldings. If a logical transition through the arch is not created between them, two different decors conflict at the junction. Solution: a transition zone near the opening that takes an element from both rooms and unites them.
What is important to know about installation: technical aspects
How slats are attached to the piers near the arch
Buy oak wooden planks for walls is the first step. The second is proper installation. On the walls adjacent to the opening:
-
wooden beams are attached to the wall horizontally at different heights (at least three horizontal guides: near the floor, in the middle, and near the ceiling).
-
Vertical slats are fixed to the bars at equal intervals.
-
The side ends of the slatted section are covered withwooden corner pieces.
The distance from the wall to the plane of the slats is determined by the thickness of the bar — usually 20–30 mm. This distance creates a shadow behind the slats, giving the wall depth.
How to attach moldings around the perimeter of the opening
Moldings made of polyurethane are glued using liquid nails or special polyurethane adhesive. Before installation, the surface is degreased, and the centerline of the molding is marked. Corner joints of moldings are cut at 45° with precise fitting.
Decorative wooden moldings are attached with liquid nails or concealed fasteners (self-tapping screws through the molding body with subsequent hole filling). After installation — puttying joints, priming, painting.
FAQ: answers to real questions about arch design
Is it necessary to decorate the arch with stucco molding, or can slats suffice?
No, not necessarily.wooden slats on the sides of the archAnd neat trim along the perimeter already creates a complete solution without stucco. Moldings add a classic architectural note — and they are not appropriate in all styles. In a minimalist interior or Japandi, stucco decor around the arch would be superfluous.
How to design an arch if the walls of two rooms are different colors?
The side edges of the arch are a neutral zone that can be painted in a third neutral color that reconciles both. Or — cover witha wooden trim profile, which visually separates both colors and makes the transition intentional.A molding frame around the perimeterin a neutral tone also works as a "buffer" between the two color zones.
Is a baseboard needed on the side edges of the opening?
If the edge of the opening is narrow (up to 15 cm) — a baseboard on it is technically difficult. Here you needWooden angleat the junction of the baseboard and the edge. If the edge is wide (from 20 cm), the baseboard extends onto the side edge of the opening, creating a neat lower perimeter for the entire portal.
How not to overload the arch with stucco molding?
Scale rule: the molding should not occupy more than 15–20% of the visible width of the opening. For an arch 120 cm wide, a molding from 20 to 25 cm on each side is the limit. If you want more volume, focus not on the width of the molding but on the relief of the profile: a deep relief gives more 'weight' with less width.
Can wooden slats and stucco molding be combined on one arch?
Yes — if scale consistency is maintained. Slats on the piers + a molding frame around the perimeter of the opening above them. Or molding pilasters on the sides + a slatted section between them and the wall. Key rule: slats and moldings should not 'compete' on the same plane — their zones must be clearly separated.
How to properly join an MDF baseboard with a wooden baseboard at an arch?
These are different materials — precise end-to-end joining is not recommended. The correct solution: separate the arch zones by using one type of baseboard along the entire perimeter of the passage area. If one room has an MDF baseboard and another has a wooden one, the transition point is fixed with a verticalwooden corner pieceon the side edge of the opening — as a spatial 'boundary'.
What to do with the baseboard at a classic arch with a radius transition?
At the point where the vertical wall transitions into the arch radius, the baseboard ends. Here — a vertical post made of molding orlinear profile, which denotes the lower base of the arch. The side face of the arch itself is not covered with a plinth — only with decor along the arc.
STAVROS: everything for a beautiful transition — from batten to cornice
An arch is not one material or one solution. It is a system where each element works towards the overall result.Wooden planks on the sides of the opening,Moldings made of polyurethanearound the perimeter,Wooden baseboard with a proper transition through the side face,wooden corniceabove the opening,linear corners and bars at all joints — this is not a set of parts, but a single decorative organism.
STAVROS produces a full range of products for designing arches and passage areas — wooden and polyurethane, in coordinated tints and profiles:
-
Wooden planks — for pro


