Article Contents:
- Can stucco decor be used on the ceiling in the bathroom: an honest answer
- Why polyurethane is the best choice for stucco decor in the bathroom
- Closed-cell structure: moisture does not penetrate inside
- Lightweight: does not overload the ceiling
- Workability: ready for painting, easy to cut, does not crumble
- Resistance to temperature changes
- Antibacterial surface
- Which stucco decor elements are suitable for the bathroom ceiling
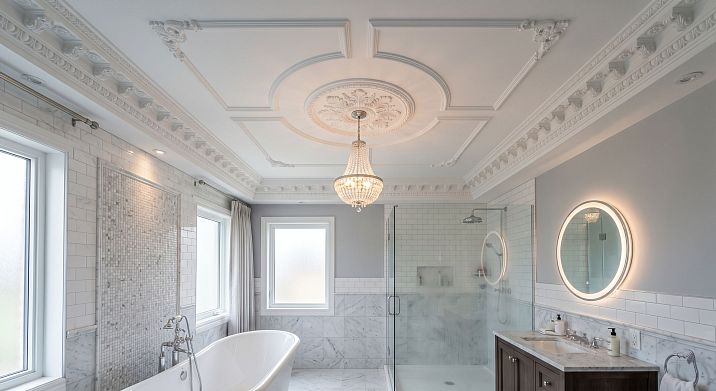
- Ceiling Cornice
- Molding for ceiling plane design
- Ceiling rosette for light fixture
- Minimalist decorative overlays
- Cornice for bathroom: how to design a problematic wall-ceiling joint
- Cornice as a 'lid' over tiles
- Cornice at the wall-ceiling junction
- Cornice color in the bathroom
- Moldings on the bathroom ceiling: how to use without overloading
- Molding as an additional horizontal line
- Molding frame on the ceiling
- Molding as a "frame" for a mirror with ceiling decor
- Ceiling rosette in the bathroom: when it's appropriate and how to choose
- When a rosette in the bathroom is justified
- Which rosette to choose for the bathroom
- Color and painting of stucco in the bathroom: a detailed breakdown
- Monochrome: decor in the color of the ceiling
- Decor in the color of the wall
- When contrast is acceptable
- Which paint to use
- Joint sealing
- Stucco in the bathroom in different styles: from classic to modern minimalism
- Classic and Neoclassical in the Bathroom
- Modern Neoclassicism
- Minimalist Bathroom
- Art Deco Bathroom
- Mistakes in Choosing and Installing Molded Decor in the Bathroom
- Mistake 1. Choosing Gypsum Moldings for a Damp Room
- Mistake 2. Too Massive Cornice in a Small Bathroom
- Mistake 3. Poor Sealing of Joints
- Mistake 4. Installing Decor Before Completing Base Preparation
- Mistake 5. Contrasting Paint with a Low Ceiling
- Mistake 6. Overloaded Ceiling in a Small Bathroom
- Error 7. Violation of installation order: decor before tiles
- Step-by-step algorithm: how to properly design a ceiling in a bathroom with stucco decor
- How to choose ceiling decor for a bathroom in the STAVROS catalog
- About the Company STAVROS
- Frequently Asked Questions
A bathroom is a space that deserves a special discussion. Standard interior scenarios don't work here because aesthetics are joined by another parameter: humidity. Steam, condensation, temperature changes, direct splashes in the shower area — all of this imposes specific requirements on materials. And when someone asks, "Can stucco be used in a bathroom?" — they mean exactly these conditions.
The answer is yes, it can. But only if you choose the right material, install it correctly, and paint it correctly. Polyurethane stucco decor for bathroom ceilings has long ceased to be exotic. It is a practical, durable, and visually strong solution for those who want to turn a bathroom from a functional "wet area" into a full-fledged interior space with its own character.
This article is a detailed practical analysis: which decor is suitable for wet rooms, how to choose it, how to apply it without mistakes, and what solutions you will find in the catalogfor polyurethane ceiling decor STAVROS.


Can stucco decor be used on the ceiling in a bathroom: an honest answer
Let's start with the main thing. Stucco in a bathroom is not a designer provocation, not an adventure, and not an attempt to make it "like in a palace." It is a completely common practice for classic, neoclassical, and modern bathroom interiors worldwide. The only question is the material.
Traditional gypsum stucco in a wet room is a bad idea. Gypsum absorbs moisture, gradually deteriorates from humidity changes, can crumble and darken. Wooden moldings under regular steam exposure are also not the best choice: wood swells, warps, and loses shape. Cement and stone elements are too heavy and require specialized installation.
Polyurethane stucco for a bathroom is a fundamentally different story. Polyurethane is inherently a closed-cell material, meaning it has no through pores through which moisture could penetrate inside. It is chemically inert, not afraid of temperature changes, does not swell upon contact with steam, and does not create conditions for the development of fungi or mold — provided proper installation and painting.
Polyurethane stucco for wet roomslasts just as long as in dry areas — the only requirements: moisture-resistant mounting adhesive and moisture-resistant finish paint. These two conditions fully address the durability issue.


Why polyurethane is the best choice for stucco decor in the bathroom
Not every material can withstand a humid environment. Let's break down point by point why polyurethane has become the standard for decor in bathrooms, toilets, kitchens, and other rooms with unstable microclimates.
Our factory also produces:


Closed-cell structure: moisture does not penetrate inside
Polyurethane is produced using high-density closed-cell foam technology. This means each cell of the material is isolated — there are no interconnected pores through which moisture could migrate. Water and steam are not absorbed into the material but remain on the surface and are easily removed.
This is a fundamental difference from porous materials — gypsum, untreated concrete, some types of polystyrene. Those, under constant exposure to moisture, deteriorate from within: absorbed water expands when freezing, evaporates when heated — and this gradually destroys the structure. With polyurethane, such a destruction mechanism is simply impossible.
Get Consultation
Lightweight: does not overload the ceiling
Ceiling decor for the bathroom should be lightweight. The bathroom ceiling is typically a floor slab, a plastered surface, or a stretch ceiling. Heavy decor on the bathroom ceiling not only creates additional load on the base but also requires mechanical fastening — which compromises the integrity of the finish.
Polyurethane moldings and cornicesweigh 5–7 times less than gypsum counterparts of similar profile. A 2-meter long cornice with a 50 mm profile weighs 150–250 grams. It is mounted exclusively with acrylic glue without dowels, without drilling, without damaging the finish. This is important both for sealing and for ease of installation.
Manufacturability: ready for painting, easy to cut, does not crumble
Polyurethane is cut with a regular hacksaw or jigsaw. Corner joints are made with a miter saw at 45°. The surface does not crumble when cutting, leaves no dust, and requires no special tools.
After installationPolyurethane Itemsare primed and painted with any acrylic paints. For the bathroom — with moisture-resistant acrylic paint for wet rooms. The coating creates an additional barrier against moisture and ensures a neat, even surface without visible seams or joints.
Resistance to temperature fluctuations
A bathroom does not have a stable microclimate. A hot shower raises temperature and humidity. Afterwards, the room cools down. This cycle repeats daily. Polyurethane is resistant to a temperature range from −40°C to +80°C, does not deform, and does not lose shape during thermal expansion and contraction.
Antibacterial surface
A closed, non-porous surface is not a breeding ground for microorganisms. Painted polyurethane decor in the bathroom does not accumulate fungus or mold — provided there is normal ventilation and no constant direct contact with water.
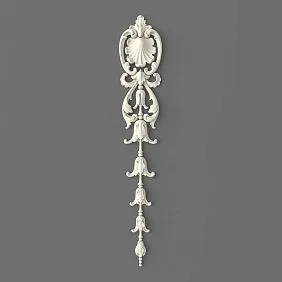
Which stucco decor elements are suitable for the bathroom ceiling
The bathroom ceiling is a special context. The room area is usually small — from 3 to 10 m². The ceiling height is 2.4–2.7 m, sometimes up to 3 m. The goal of decor: to create a sense of a complete, well-thought-out space. Not to overload. Not to "wall in." But to give the ceiling character.
Four types of elements work well for the bathroom and toilet:
Ceiling cornice
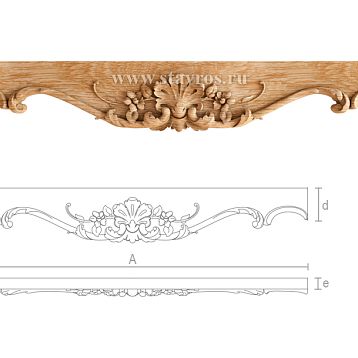
Ceiling cornice for the bathroom — the main and most versatile element. It performs three functions at once: it covers the transition between the wall and the ceiling (often a problem area with unevenness or a gap), creates a horizontal line that organizes the space around the perimeter, and marks the visual boundary between zones — tiles and painted ceiling.
For the bathroom, it is better to choose cornices with a profile of 40–70 mm. A cornice 40–50 mm wide is light, delicate, takes up almost no visual space, but creates a clear architectural line. A cornice 60–70 mm is more expressive, suitable for bathrooms with a ceiling of 2.7–2.8 m and a classic or neoclassical aesthetic.
For a small bathroom of 3–4 m² with a ceiling of 2.5 m — a cornice no wider than 40–50 mm, in the color of the ceiling, without ornament or with a minimal profile. For a spacious bathroom of 7–10 m² with a ceiling of 2.7 m and a classic design — a cornice of 70–80 mm with a moderate profile is acceptable.
Molding for ceiling plane design
Ceiling moldings for the bathroom — the second important tool. In the bathroom, moldings are used in two scenarios.
The first is a molding as an additional horizontal line at the junction of tiles and painted wall, where the tiles do not reach the ceiling. This solution helps to "cover" the uneven or unsightly top edge of the tiles, give completeness to this transition zone, and add an architectural level to the interior.
The second scenario is a molding frame on the ceiling. A rectangular or square contour made of thin molding (12–20 mm) in the central zone of the ceiling creates a visual "center" in the room — especially relevant for bathrooms with a pendant chandelier or decorative light fixture.
Ceiling rosette for a light fixture
Polyurethane ceiling decorationin the form of a rosette — an element that, with the right diameter and profile, turns the light fixture mounting point into an architectural accent.
In the bathroom, a rosette is especially appropriate in two situations:
-
Above the bathtub or in the center of the ceiling, if there is a decorative light fixture or a small chandelier hanging there (in bathrooms away from mirrors, where there is no risk of direct water splashes)
-
As an independent decorative accent in the center of the ceiling without a light fixture — simply as an ornamental spot fixing the geometric center of the room
Rosette for the bathroom — diameter 100–200 mm, relief 8–15 mm, in the color of the ceiling. Voluminous multi-level acanthus rosettes with a diameter of 500 mm are not needed — they are as inappropriate in a compact bathroom as a crystal chandelier in a gym locker room.
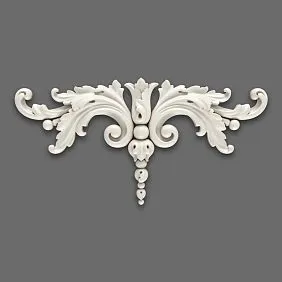
Laconic decorative overlays
Small ornamental polyurethane overlays — corner elements, rosette medallions, decorative frieze strips — allow creating subtle accents without cluttering with massive elements. For a classic-style bathroom, several corner overlays at the intersection points of moldings with the cornice can completely change the perception of the ceiling.
Cornice for the bathroom: how to design the problematic joint between the wall and ceiling
The transition between the wall and ceiling in the bathroom is one of the main pain points in any renovation. There is almost always one of the following problems: the tiles on the walls do not reach the ceiling and end at a visible height with an ugly edge; a gap or rough joint has formed between the tiles and the painted ceiling; the ceiling plaster has developed small cracks precisely along the perimeter; or simply the transition is too abrupt and unfinished.
A ceiling cornice for the bathroom is an elegant and reliable solution for all these situations.
Cornice as a "cap" over the tile
When the tile ends, for example, at a height of 2.1 m, and the ceiling is at 2.6 m, the remaining 50 cm of the wall is usually painted or plastered. The joint between the tile and the plaster is a visible horizontal "seam" that is very difficult to make neat without additional decoration.
A cornice mounted directly above the top edge of the tile covers this seam and creates a horizontal architectural line — like a "top bar" of a frame that builders intentionally left. Visual result: instead of an ugly joint, there is an expressive transition with a classic profile.
Important nuance: the cornice is mounted not on the tile, but on the plastered surface above the tile — at a distance of 3–5 mm from the top edge of the tile. Between the lower edge of the cornice and the tile, there is a minimal gap that is sealed with waterproof silicone sealant. This ensures protection against water seeping into the gap when washing the walls.
Cornice at the joint of wall and ceiling
The second scenario is a cornice directly at the joint of the wall and ceiling, as in any other room. Here it hides possible cracks, compensates for irregularities in the geometry of corners, and creates a clear horizontal line that "completes" the bathroom space from above.
It is important to choose the right profile. In a bathroom with a height of 2.5 m, a cornice of 40–55 mm is optimal. In a bathroom of 2.7 m — up to 70 mm. A wider cornice is only for spacious bathrooms with high ceilings and a clear classic concept.
Color of the cornice in the bathroom
In a bathroom with a white ceiling — a white cornice. This is an unconditional rule. A monochrome solution does not fix the gaze on the joint of the wall and ceiling, but creates a feeling of a continuous surface. The ceiling "flows" out of the walls and is perceived as part of a single volume.
The exception is a dark bathroom in noir aesthetics or a bathroom with a rich wall color, where a contrasting cornice serves as a clear geometric frame. But this is a conscious design decision, not a universal recommendation.
Moldings on the bathroom ceiling: how to use without overloading
Moldings in the bathroom are a topic that raises doubts. It seems that in a 4-meter bathroom any molding will look ridiculous. But this is not the case — you just need to know how molding works in a small space.
Molding as an additional horizontal line
In a bathroom where the tiles do not reach the ceiling, the vertical plane of the wall is divided into two parts: the lower (tiles) and the upper (paint or decorative plaster). A molding at the junction of these two zones is a horizontal line that 'reads' this boundary as a deliberate design solution.
A thin molding 12–18 mm without a pronounced ornament, in the color of the wall or in the color of the ceiling — and the transition from the tiled zone to the painted one turns from a forced limitation into an architectural element. This is roughly the same logic as working withstucco decor for a low-height ceiling — a line instead of mass, geometry instead of volume.
Molding frame on the ceiling
In spacious bathrooms of 6–10 m² with a ceiling of 2.7 m, a molding frame in the central zone of the ceiling is a full-fledged decorative technique. A rectangular contour made of molding 15–20 mm, occupying 50–60% of the ceiling plane, creates a visual center. If there is a light fixture or a small decorative chandelier in the center of the frame (in bathrooms remote from the shower area), the frame enhances this light accent.
The frame is painted the same color as the ceiling. No contrast — only a subtle play of geometry and shadows.
Molding as a "frame" for a mirror with ceiling decor
Another non-obvious technique is to connect ceiling molding with a mirror or mirrored cabinet. Molding along the ceiling perimeter and a molding frame around the mirror in the same series visually link the ceiling and the vertical wall plane, creating a sense of a systematic, well-thought-out interior.
For this, you need the same molding: a thin profile of 12–22 mm, one series, one paint job. This technique works flawlessly in bathrooms styled as modern classic or neoclassical.
Ceiling rosette in the bathroom: when it is appropriate and how to choose one
A ceiling rosette in the bathroom is a topic that sparks the most debate. "A rosette in the bathroom is not serious." This is a prejudice. In a well-designed interior, a rosette on the bathroom ceiling is exactly the same element as a cornice: no more, no less.
When a rosette in the bathroom is justified
Decorative chandelier or pendant light. If a decorative light fixture is used in the bathroom (in the bathtub area or in the center of the room, away from the shower area), a rosette underneath it creates an architectural frame. Without a rosette, the light on the ceiling looks like a "screwed-in light bulb." With a rosette, it looks like a designed lighting accent.
As an independent decorative accent. In a bathroom with a clean white ceiling and neoclassical aesthetics, a small rosette with a diameter of 150–200 mm in the geometric center of the ceiling is simply beautiful. Not for a light fixture, but as an ornamental point in the center of the plane.
Zoning in a spacious bathroom. In bathrooms with a separate shower area and bathtub area, two small rosettes (one above each area) create visual rhythm and ceiling zoning.
Which rosette to choose for a bathroom
For bathrooms and toilets — rosettes with a diameter of 100–220 mm, with a relief no deeper than 15–20 mm. The ornament is calm: a light floral motif, geometric acanthus, a relief circular contour. Heavy voluminous rosettes with a relief of 40–60 mm are for formal halls and lobbies, but not for a bathroom.
The rosette is mounted on moisture-resistant acrylic adhesive, puttied with finishing putty around the perimeter, and painted with moisture-resistant paint in the color of the ceiling. With proper installation, the joint between the rosette and the ceiling is completely invisible — the decor becomes part of the surface.
Color and painting of stucco in the bathroom: a detailed breakdown
Proper painting is half the success of stucco decor in the bathroom. Even the most delicate and proportional cornice can 'break' the interior if painted incorrectly. Let's break it down by scenarios.
Monochrome: decor in the color of the ceiling
The safest solution is to paint the cornice, moldings, and rosette with the same paint as the ceiling. White ceiling — white decor. Milky ceiling — milky decor.
Monochrome painting removes contrast at the most vulnerable point — the junction of the wall and ceiling. The eye does not fixate on the cornice as a separate object: it sees a finished surface with architectural structure. The bathroom then feels not like a 'plastered cube', but like a designed space.
Decor in the color of the wall
In bathrooms with painted walls (without tiles, or where tiles only cover the lower half of the wall), the molding at the junction of zones can be painted the same color as the wall. This creates a smooth transition and makes the molding part of the wall plane, rather than a "ceiling" element.
When contrast is acceptable
Contrast painting — a dark cornice on a light ceiling or decor matching the furniture color — is acceptable in stylistically coherent interiors. A bathroom in a dark green palette with white cornices and gold fittings is a very specific architectural image. But this is a deliberate decision with a concrete visual goal, not a random choice.
It is strongly not recommended: a dark brown cornice on a white ceiling with a height of 2.5 m. This is a visual "cage" — a rigid horizontal boundary that makes an already low ceiling feel even more oppressive.
Which paint to use
For polyurethane stucco decor in the bathroom — moisture-resistant acrylic paint for wet rooms. The marking is usually indicated on the packaging: "for kitchen and bathroom", "moisture-resistant", "for wet rooms".
Application technique: two to three coats with a thin roller or brush, with intermediate drying of each coat. The decor is painted in the same system as the ceiling — one batch of paint, without interruption. This ensures monochrome and a uniform surface texture.
Joint sealing
Joints between decorative molding and the ceiling and wall surfaces in the bathroom must be sealed. For this, acrylic or silicone sealant for wet rooms is used (not mounting foam — it does not provide a neat appearance). The sealant is applied in a thin layer around the perimeter of the decor, smoothed with a finger or spatula, then sanded and painted. After painting, the joint is completely invisible.
Special attention — the lower joint of the cornice with the tiles. Here, only sanitary silicone sealant is used, which remains elastic under temperature fluctuations and is resistant to constant contact with a wet surface.
The complete installation technology is described in the articleinstallation of polyurethane molding— a practical guide covering all stages from surface preparation to final painting.
Stucco in the bathroom in different styles: from classic to modern minimalism
Ceiling decor for the bathroom is not exclusively a "palace" tool. Polyurethanemolded decoration made of polyurethaneworks organically in different style concepts.
Classic and neoclassical in the bathroom
A classic-style bathroom is marble or "marble-like", white or cream tones, gold accents, a large framed mirror, a freestanding bathtub, chrome plumbing fixtures. In such an interior, a cornice at the junction of the wall and ceiling is a mandatory element. It is not a decoration, it is an architectural requirement. A cornice with a moderate profile of 60–70 mm, a molding frame on the ceiling, a small rosette under a chandelier or pendant light — all this works as a single system that turns the bathroom into a space with status.
Modern neoclassicism
Light walls, minimal ornamentation, clean lines, but with clear architectural logic—this is modern neoclassicism. In such a bathroom, a thin cornice of 40–50 mm without ornamentation, matching the ceiling color, is an ideal solution. It creates a "frame" for the room without disrupting the purity of the space. Molding is thin—12–15 mm, if needed at all. A rosette is only necessary if there is a decorative light fixture, and only a small one: 150–180 mm.
Minimalist bathroom
In minimalism, stucco is an atypical but completely working technique. A thin molding of 10 mm around the perimeter of the ceiling, strictly horizontal, matching the white ceiling — this is not "decoration for decoration's sake". It is a visual tool that creates a difference between "just a white ceiling" and "a white ceiling with architectural meaning". The difference is invisible but felt instantly.
Bathroom in Art Deco style
Geometry, gold, mirrors, black-and-white graphics — in Art Deco, stucco becomes an ornamental tool. Strict molding frames on the ceiling, contrasting paint of the decor (gold or black on white), geometric accent rosettes. But this is already the territory of complex design solutions requiring a full calculation of the color and form scheme.
Mistakes when choosing and installing stucco decor in the bathroom
There are no small mistakes here — in a small space, errors are fully visible. Let's review the most common ones.
Mistake 1. Choosing gypsum stucco for a wet room
Gypsum in a wet area is a matter of time. Even with moisture-resistant paint and proper installation, gypsum gradually degrades under constant exposure to steam. It yellows, crumbles at the edges, darkens at the joints. For the bathroom — only polyurethane or dense polystyrene.
Mistake 2. Too massive cornice in a small bathroom
A 100 mm cornice in a 4 m² bathroom with a 2.5 m ceiling is an architectural disaster. It literally 'eats' a quarter of the visible height and makes the space claustrophobically oppressive. Rule: cornice no wider than 50 mm for rooms up to 6 m² with ceilings up to 2.6 m.
Mistake 3. Poor sealing of joints
An unsealed joint between the cornice and the ceiling or wall surface is a gap into which steam will penetrate with every hot shower. Over time, condensation forms there, and mold is possible. Proper sealing is a mandatory step that does not take much time but is fundamentally important for durability.
Mistake 4. Installing decor before completing base preparation
Molding decor is installed only on a prepared, leveled, primed base. If you install a cornice on uneven plaster, there will be gaps that cannot be neatly filled. If you install it before applying the finish coat, repainting will be required, risking damage to joints and sealing.
Error 5. Contrast painting with a low ceiling
Dark decor on a white bathroom ceiling with a height of 2.5 m is a rigid horizontal line that splits the space and creates a visual "lower ceiling" than it actually is. For heights up to 2.7 m — only monochrome.
Error 6. Overloaded ceiling in a small bathroom
Cornice + three molding contours + a large rosette in a 3 m² bathroom is an aesthetic overload. A bathroom is not a restaurant hall. One cornice around the perimeter plus, if desired, a small rosette is enough for any bathroom up to 6 m².
Error 7. Violation of installation order: decor before tiles
Tiles are laid before installing the ceiling cornice. The cornice covers the top tile joint — that is its function. If done in reverse, you will either have to cut the tiles under the installed cornice (which is extremely inconvenient) or leave a gap.
Step-by-step algorithm: how to properly decorate a bathroom ceiling with stucco decor
Let's break down the sequence of actions from idea to result.
Step 1. Determine the style and task. What exactly is needed: hide a tile joint, create an architectural transition, design a central light fixture, add a classic accent? A clear understanding of the task determines which elements are needed.
Step 2. Measure the room. Perimeter (for the cornice), ceiling area (for the molding frame), ceiling height (for choosing the cornice profile).
Step 3. Select the elements. Based on dimensions and style: cornice 40–70 mm, molding 12–20 mm, rosette 150–200 mm. For the bathroom — onlyPolyurethane moldings and cornices.
Step 4. Prepare the base. The surface is clean, dust-free, and primed.
Step 5. Apply markings. Horizontal line for the cornice — strictly according to the laser level.
Step 6. Install the cornice. Moisture-resistant acrylic adhesive applied in a "zigzag" pattern along the entire length of the product. Press against the surface, secure with painter's tape for 30–40 minutes until the adhesive sets.
Step 7. Fill the joints. Use acrylic sealant for joints with the ceiling and wall. Use silicone sanitary sealant for the joint with the tile.
Step 8. Apply putty. Use finishing putty on the joints, then sand after drying.
Step 9. Paint. Two to three coats of moisture-resistant acrylic paint, a unified system with the ceiling.
How to choose ceiling decor for the bathroom in the STAVROS catalog
In the STAVROS catalog, the following sections and product types are suitable for the bathroom and toilet:
Ceiling stucco decor— ceiling rosettes, decorative accents, ready-made kits. For the bathroom, small diameter rosettes (100–220 mm) with moderate relief are suitable.
Polyurethane moldings and cornices — the main category for the bathroom. Cornices with profiles of 22–80 mm, moldings of 10–30 mm, and corner elements. Minimal and medium profiles are relevant for the bathroom.
The HIWOOD line in the STAVROS catalog includes profiles LB32 (32.5 × 24 mm for hidden LED lighting), D10 (10 mm), TR10, D22, LD20, D30 — this range meets the requirements for stucco decor in a bathroom with a low ceiling.
When choosing, you need to focus on two parameters:
-
Cornice profile height: up to 50 mm — for ceilings 2.5 m and small bathrooms; 50–70 mm — for bathrooms 2.6–2.7 m; 70–80 mm — for spacious bathrooms with a ceiling 2.7–2.8 m
-
Presence of a groove for LED strip: a cornice with a groove creates a contour lighting effect — especially valuable in the bathroom, where lighting has strong functional and aesthetic significance
polyurethane interior items— cover the full range of decor: moldings, cornices, rosettes, overlays, decorative elements. All of this is suitable for installation in wet rooms if the technology is followed: moisture-resistant glue, sealing of joints, moisture-resistant painting.
About the company STAVROS
STAVROS is a Russian manufacturer of decorative products made of polyurethane and dense polystyrene for interiors and facades. The company produces a full range of stucco decor: moldings, cornices, ceiling rosettes, ornamental overlays, ready-made ceiling decor kits of the CPU-P1–CPU-P6 series.
All STAVROS products are made of closed-cell polyurethane, resistant to moisture and temperature changes. The material does not absorb water, does not swell, and does not deform. With proper installation and moisture-resistant painting, STAVROS products last in bathrooms, toilets, and kitchens as long as in living rooms.
The STAVROS catalog includes profiles of various widths (from 10 to 180 mm), ready-made CPU sets for ceilings of any height, as well as individual elements for independent selection of a decorative system. All decor is ready for painting in any color with acrylic water-based paints.
Frequently asked questions
Can stucco be used in a bathroom?
Yes, provided the material is chosen correctly. Polyurethane stucco is suitable for bathrooms and toilets: it does not absorb moisture, is resistant to steam and temperature changes. The only requirements are moisture-resistant mounting glue, sealing of joints, and moisture-resistant painting.
Which stucco molding is suitable for a bathroom?
Polyurethane stucco molding is made of closed-cell material, resistant to humid environments. Gypsum stucco molding is not suitable for a bathroom: it absorbs moisture and deteriorates over time.
What paint to use for stucco molding in a bathroom?
Moisture-resistant acrylic paint for wet rooms ("for kitchen and bathroom"). Apply in 2–3 layers to a pre-primed surface of the decor. The paint is the same as for the ceiling — one batch, a unified surface.
What adhesive to use for stucco molding in a bathroom?
Moisture-resistant acrylic mounting adhesive. Not mounting foam (creates unsightly seams) and not regular PVA (insufficient adhesion in a humid environment). Additionally — silicone sanitary sealant for joints with tiles.
Can moldings be glued to the ceiling in a bathroom?
Yes. Polyurethane moldings are installed using moisture-resistant acrylic adhesive without mechanical fasteners. After installation, the joints are sealed, puttied, and painted.
What size cornice should I choose for a bathroom?
For a bathroom up to 6 m² with a ceiling of 2.5 m — a cornice of 40–50 mm. For a bathroom of 6–10 m² with a ceiling of 2.7 m — 60–70 mm. Wider cornices are for spacious bathrooms with a ceiling of 2.8 m and a classic concept.
Which ceiling rose should I choose for a bathroom?
A socket with a diameter of 100–200 mm and a relief no deeper than 15–20 mm. Paint it to match the ceiling color. Large sockets with deep relief (diameter from 400 mm) are not suitable for the bathroom.
Mistakes when installing stucco molding in the bathroom — what to avoid?
Main mistakes: choosing gypsum stucco molding, too massive cornice in a small bathroom, poor sealing of joints, installation before final preparation of walls and ceiling, contrasting paint with a low ceiling.