Article Contents:
- Why use stucco decor on the ceiling in a studio
- What ceiling decor gives in a studio
- Which zones in a studio can be highlighted with ceiling decor
- Kitchen area
- Living room and lounge area
- Sleeping niche
- Dining group
- Workspace
- Moldings on the ceiling for zoning: technique and details
- Rectangular frames: basic technique
- Parallel lines: dynamics and rhythm
- Concentric frames: focus on the center
- Frame around the perimeter of the lighting zone
- Molding as a "dividing line" between zones
- Cornices around the studio perimeter: how to tie the interior together
- Why a perimeter cornice
- Which cornice to choose for a studio
- Cornice with lighting as a zoning tool
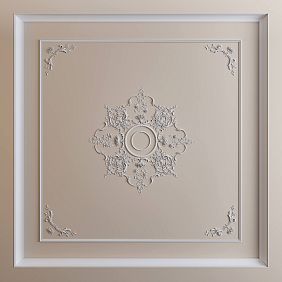
- Ceiling rosette in a studio: focal point
- Socket above the living room
- Socket above the dining table
- Socket above the bed: a delicate accent
- When a socket in the studio is not needed
- How not to overload a small space: rules for working with stucco decor in a studio
- The rule of a thin profile
- The rule of monochrome
- The rule of one level
- The rule of frame proportions
- The rule of maximum two frames
- Zoning a studio with ceiling decor: three real scenarios
- Scenario 1. Studio 28 m², ceiling 2.6 m, "kitchen + living room"
- Scenario 2. Studio 22 m², ceiling 2.5 m, "bedroom + everything else"
- Scenario 3. Elongated studio 35 m², ceiling 2.7 m, three zones
- Ready-made ceiling decor sets for a studio: when it's the right choice
- When to choose a ready-made set
- When it's better to assemble the system yourself
- Installing stucco decor in a studio: what you need to know
- Marking: first on paper, then on the ceiling
- Installation Sequence
- Glue and sealant
- Painting
- Stucco decor in a modern studio: not a palace, but intelligent design
- Mistakes when choosing stucco decor for a studio
- Too large a cornice in a small studio
- Frames that don't match the furniture
- Too many frames
- Different series of moldings in one interior
- Installation without a laser level
- What to choose from the STAVROS catalog for ceiling zoning in a studio
- About the Company STAVROS
- Frequently Asked Questions
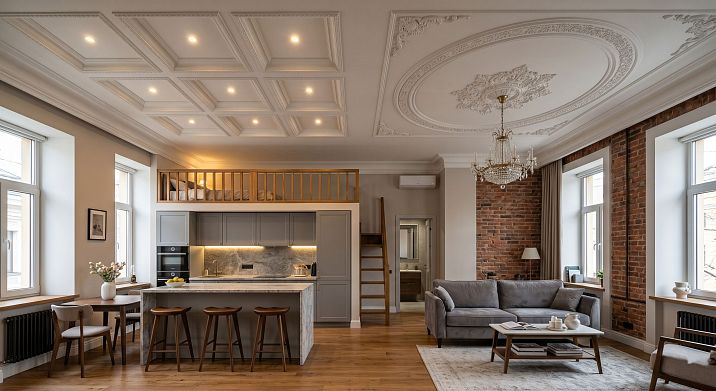
Ceiling decor in a studio apartment is not just decoration. It is an architectural tool for soft zoning that does not physically close the space but clearly delineates it visually. A molding frame above the sofa group, a cornice along the perimeter of the kitchen area, a small rosette under the dining light — each of these elements works as a "mark" on the ceiling map of the apartment. A mark that says: "here is its own territory."
Stucco decor for the ceiling in a studio made of polyurethane is a real, technological, and affordable way to create the feeling of several rooms in one space, without investing money in partitions and without losing a single centimeter of area.


Why use stucco decor on the ceiling in a studio
Before moving on to specific elements, let's understand the logic. Why the ceiling? Why stucco?
The ceiling in a studio is the only plane that belongs to the entire space simultaneously. The floor is divided into zones using carpets, furniture, textures. The walls also partially "belong" to specific zones: one wall by the kitchen, another by the sofa, a third by the bed. The ceiling is above everything. That is why its "markup" is perceived by the brain as a plan of the space: a glance from bottom to top reads molding frames as zone contours, and decorative rosettes as centers of attraction.
Another nuance is important:molded decoration made of polyurethanedoes not block the light flow, does not obstruct windows, does not reduce the physical volume of space. Unlike any physical zoning, it creates a division solely through visual perception. This is an ideal tool for a studio where every square meter counts.


What ceiling decor gives in a studio
-
Zones the space without partitions and curtains — light and air remain free
-
Creates the feeling of 'separate rooms' without physical boundaries between them
-
Organizes the interior visually: the eye finds anchor points, the space ceases to seem like a single formless 'box'
-
Adds architectural completeness — distinguishes a well-thought-out interior from furniture simply placed in a room
-
Enhances lighting scenarios: a molding frame above the dining area + a pendant light = a complete kitchen 'niche' without a single wall
Our factory also produces:


Which zones in a studio can be highlighted with ceiling decor
A studio is not a chaotic open space. It is several functional zones combined in one area. Let's talk about each.
Get Consultation
Kitchen zone
The kitchen in a studio is the most "object-filled" zone: it has a set of cabinets, appliances, a dining table or a bar counter. Its outline is already defined by the furniture. Ceiling decor enhances this outline: a molding frame that repeats the perimeter of the kitchen island or dining group turns the kitchen area from "just this part of the room" into a separate culinary territory.
For the kitchen area in a studio — a rectangular molding frame above the dining table or work surface. Molding 15–20 mm, smooth or with a minimal profile. Above — a pendant light over the table that "falls" into the center of the frame. This works flawlessly: the frame creates a "frame," the light fixture its center, the table the base of the entire composition.
Living room and sofa area
The sofa is the center of the living room in any studio. A molding frame above the sofa group designates the "living room" without a single wall. A rectangular molding contour that matches or slightly exceeds the dimensions of the sofa with a coffee table — this is a clear "map" of the relaxation zone on the ceiling.
If there is a chandelier or pendant light above the living room, add a small ceiling rosette in the center of the frame. A rosette with a diameter of 180–250 mm, matching the ceiling color, with moderate ornamentation — this is an architectural accent that fixes the center of the living room zone and simultaneously creates a decorative meaning for the central point of the ceiling.
Sleeping alcove
The sleeping area in a studio is the most "intimate" zone, the hardest to separate without a physical partition. A molding frame above the bed creates a visual "canopy": it designates the "bedroom ceiling" even where there are no bedroom walls. This is a powerful psychological technique — the head "reads" the frame above the bed as a signal "here you can relax."
If height allows, a small rosette in the center of the frame above the bed + a spot light or a small pendant create a complete bedroom atmosphere — delicate, intimate, separate from the rest of the space.
Dining group
Even if the dining table is combined with the kitchen, a separate molding frame specifically above the dining group creates the feeling of a "dining zone." This is especially relevant for studios where the kitchen-living room is combined: the molding above the table visually highlights it as an independent functional center.
Workplace
The work area in a studio is a zone of increased visual "noise." Computer, monitors, books, documents — all of this competes for attention with relaxation and eating in the same space. A small molding frame above the desk "anchors" the work area on the ceiling map of the studio and creates a psychological boundary: "here I work, here is a different space."
Ceiling moldings for zoning: technique and details
Moldings made of polyurethane— the main tool for ceiling zoning in a studio. They are lightweight, technologically advanced, mounted with acrylic glue, cut at any angle, and ready to be painted any color. But how exactly to use them?
Rectangular frames: basic technique
A rectangular molding frame is the most common and most effective technique for ceiling zoning. The logic is simple: a frame above a specific furniture group creates a "roof" for that zone. The gaze from bottom to top reads the frame as a contour, and everything inside that contour feels like a single territory.
Technically: molding with a profile of 15–22 mm, right angles at 45°, strictly horizontal installation (laser level is mandatory). The frame is a rectangle, 10–20% larger than the furniture group above which it is located. If the sofa is 2.2 × 0.9 m with a coffee table 1.2 × 0.6 m, the frame is approximately 2.8 × 2.0 m.
Parallel lines: dynamics and rhythm
Two parallel moldings along the entire length of the ceiling is a technique that works well in elongated studios. Two lines at a distance of 1.2–1.5 m form a "path" on the ceiling, visually stretching the space in length and creating a sense of a corridor between zones. This is not zoning in the direct sense — it is rhythmization of space.
The molding for such lines is the thinnest: 10–15 mm, without ornament, strictly smooth.
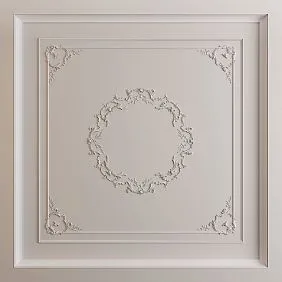
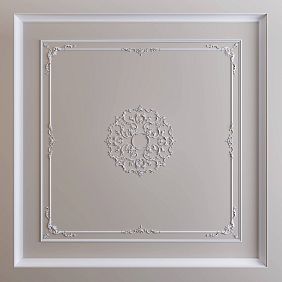
Concentric frames: accent on the center
In square studios — two frames, nested one inside the other, above the central furniture group. The outer frame occupies 70–80% of the ceiling plane, the inner one 40–50%. A rosette in the center. This is a classic ceiling composition adapted for a small space — it creates an architectural center around which everything else is organized.
Frame around the perimeter of the lighting zone
Another strong technique is a frame whose outline matches the lighting zone of a specific furniture group. If there are three pendant lights above the dining table spaced 50 cm apart, the molding frame unites them into a single light 'chandelier'. Instead of three separate points, there is a unified light accent within the decorative outline.
Molding as a 'dividing line' between zones
A single molding running across the ceiling from wall to wall is a visible boundary between two zones. For example: living room on the left, bedroom on the right. The molding in the middle clearly divides the space into two parts without a single wall.
This technique works best in elongated rectangular studios where the 'left-right' or 'near-far' division is physically justified by the layout.
Cornices around the perimeter of the studio: how to bring the interior together
If molding frames create 'islands' on the ceiling, then a cornice around the entire perimeter of the studio is the 'shore' that unites them all into a single system. Ceilingcornice for a studio apartmentis the basic element from which any ceiling design begins.
Why a perimeter cornice
The cornice around the perimeter of the studio performs several tasks simultaneously:
-
It covers the transition between the wall and ceiling — the most problematic area in any renovation
-
It creates a horizontal line that 'tightens' the perimeter of the room and makes it readable as a single space
-
It forms the visual base for the entire ceiling system: molding frames 'grow' from the perimeter cornice, creating a sense of unified architectural logic
-
With a low ceiling height, it organizes the space without reducing it
Which cornice to choose for a studio
For a studio with a ceiling height of 2.5–2.7 m —Polyurethane cornices and moldingswith a profile of 40–60 mm. This is the range where the cornice creates an expressive horizontal line around the perimeter but does not 'eat up' the visible height of the room.
The cornice profile — without heavy ornamentation. Smooth or with a slight stepped bevel. In a studio, the cornice is an architectural base, not a decorative accent. Its task is to structure, not to decorate.
Painting — strictly in the color of the ceiling. A monochrome cornice ceases to be a 'separate object' and becomes part of the ceiling plane — this is exactly what needs to be achieved in a small studio space.
Illuminated cornice as a zoning tool
A cornice with a groove for an LED strip is a special case. A light cornice around the perimeter creates contour ceiling lighting that acts as a lower "outline" of the ceiling plane. In the evening, with the lighting on, the perimeter of the studio turns into a light frame — and each internal molding frame is perceived particularly vividly.
With different lighting scenarios (bright light for the kitchen, soft contour light for the living room), a cornice with LED lighting enhances zoning with light — a tool that works in parallel with the geometry of the moldings.
Ceiling rosette in a studio: a focal point
Polyurethane ceiling decorationincludes rosettes of different diameters and reliefs. In a studio, a rosette is not a "mandatory element" but a tool for focusing attention. It is needed precisely when you need to designate the "center" of a specific zone.
Rosette above the living room
If the living room area of the studio has a pendant chandelier or decorative light fixture, a small rosette with a diameter of 200–280 mm around the mounting point creates an architectural accent. The rosette plus the molding frame around it form a complete ceiling composition for the living room area.
Rosette above the dining table
Above the dining table with a single pendant light — a rosette with a diameter of 150–200 mm. This is a small but expressive element that "reads" as the center of the dining area. Without a rosette, the pendant on the ceiling looks like just a wire coming out of a hole. With a rosette, it looks like a designed lighting solution.
Rosette above the bed: a delicate accent
In the sleeping area of the studio, the rosette — if appropriate — should be no more than 180–200 mm in diameter, with minimal relief. The ornament should be calm, without bulky curls. The color should match the ceiling. This is a delicate accent that creates a "center" for the sleeping space without overloading it.
When a rosette is not needed in a studio
In a small studio (up to 25 m²) with spot lighting and no decorative pendant light fixture — a rosette may be unnecessary. It makes sense where there is a semantic center: a chandelier, a pendant light, a large decorative accent. Without a central light fixture, the rosette becomes just a "stucco detail" without an architectural function.
How not to overload a small space: rules for working with stucco decor in a studio
A studio is not a formal living room or a restaurant hall. Here, the principles of delicacy and proportionality apply.Stucco ceiling decor in a small studio apartmentshould zone without overloading. How to achieve this?
The thin profile rule
For a studio — moldings no thicker than 22 mm. Ideally, 12–18 mm. These are "thread-like" lines on the ceiling that create geometry without volume. A thin profile in the color of a white ceiling is not perceived as "stucco" in the usual sense — it is perceived as an architectural surface structure, like lines in glass or seams in marble.
The monochrome rule
In the studio, the decor is strictly in the color of the ceiling. White ceiling = white moldings = white cornice = white rosette. A monochrome system does not attract attention — it simply structures the space. The eye sees geometry, not color. This is exactly what is needed in zoning.
Contrasting decor (dark moldings on a white ceiling) in the studio disrupts the perception of space: instead of quiet zoning, an active ornamental pattern is created, which visually reduces the room.
Rule of one level
In the studio — no more than one cornice (around the perimeter) and one level of moldings (frames). No two or three nested frames with a ceiling height of 2.6 m. No cornices + moldings + more moldings + cornices. One level of horizontal lines — maximum.
Rule of frame proportions
The molding frame should be 15–25% larger than the furniture group above which it is located, but should not occupy more than 60–65% of the ceiling plane overall. A frame that occupies 80% of the ceiling ceases to be an "accent" and simply becomes an "ornament of the entire ceiling." The meaning of zoning is lost — there is only ornament.
Rule of maximum two frames
In the studio — no more than two molding frames on the ceiling at the same time. One frame above the living room, one above the dining table — enough. Adding a third frame above the sleeping niche can only be justified with very clear zoning of areas and a ceiling height of at least 2.7 m. Otherwise, the ceiling turns into a checkerboard of moldings — the effect is opposite to what is desired.
Zoning a studio with ceiling decor: three real scenarios
Theory is good. But it's better to analyze specific examples.
Scenario 1. Studio 28 m², ceiling 2.6 m, "kitchen + living room"
Layout: rectangular studio, kitchen by the window, living room in the center and along the opposite wall. Task: separate the kitchen and living room without partitions.
Solution:
-
Cornice 50 mm around the entire perimeter, matching the ceiling color
-
Molding frame 15 mm above the dining table near the kitchen: 1.8 × 1.2 m, center of the frame above the center of the table
-
Molding frame 15 mm above the sofa group: 3.0 × 2.0 m
-
Two rosettes: a small one (180 mm) above the dining table and a slightly larger one (220 mm) above the center of the living room
Result: two distinct "islands" on the ceiling — kitchen and living room. The same molding, the same paint create a unified system. The cornice around the perimeter ties everything together.
Scenario 2. Studio 22 m², ceiling 2.5 m, "bedroom + everything else"
Layout: square studio, sleeping area in the corner, everything else — work area, kitchen, sofa — in the remaining space. Task: highlight the sleeping area without curtains or partitions.
Solution:
-
Cornice 40 mm around the entire perimeter, matching the white ceiling color
-
Molding frame 12 mm above the bed: 2.4 × 2.0 m, directly above the bed and nightstands
-
No additional frames — a 2.5 m ceiling does not allow two levels in such a space
Result: the sleeping area is subtly highlighted. The frame above the bed creates a 'canopy' without fabric or structures. The cornice around the perimeter provides a unified architectural context.
Scenario 3. Elongated studio 35 m², ceiling 2.7 m, three zones
Layout: elongated rectangle, three zones along the length — kitchen, living room, bedroom. Task: separate all three zones.
Solution:
-
Cornice 60 mm around the perimeter, matching the ceiling color
-
Molding 18 mm across the ceiling: two 'transverse' lines — between the kitchen and living room, between the living room and bedroom. Lines from wall to wall.
-
Molding frame 18 mm above the sofa group in the center — the 'island' of the living room
-
Small rosette 200 mm above the center of the living room
Result: three zones are clearly separated by transverse lines. The central living room — with a frame and rosette — feels like the 'core' of the apartment. The kitchen and bedroom — as its 'wings'.
Ready-made ceiling decor kits for studios: when it's the right choice
The STAVROS line includes six ready-made sets of the CPU series: from CPU-P1 to CPU-P6. Each set includes a cornice, moldings, corner and ornamental accents, a central element — all in a single proportional and stylistic system.
For a studio apartment from this series, CPU-P1 and CPU-P2 are most suitable — concise systems with a minimal set of decorative accents. CPU-P1 is a basic three-contour set, ideal for highlighting one zone in a studio: above the sofa group or dining table. CPU-P2 is a slightly richer system with additional corner accents.
When it's better to choose a ready-made set
Ready-madeceiling decor for a studio apartmentin a set format makes sense when:
-
You need to decorate one entire zone: a living room, dining area, or sleeping niche
-
You don't want to select matching moldings, cornices, and corner elements yourself
-
Scale consistency is important: all elements of the CPU kit are proportional to each other in size, ornament, and plasticity
-
You have no experience with stucco decor: the kit provides a clear installation plan and eliminates selection errors
When it's better to assemble the system yourself
If the zoning task concerns the entire studio — several zones with different frames — a ready-made kit may be insufficient. In this case, it's better to choose individual elements: a cornice along the perimeter from the section molding and cornices, molding for frames of one type in the required number of linear meters, rosettes from the ceiling decor section. The main thing is to maintain series consistency: cornice, moldings, and rosettes from the same line, with the same profile style and ornament.
Installation of stucco decoration in the studio: what you need to know
Proper installation is half the result.installation of polyurethane molding in a studio has its own features that are important to consider.
Marking: first on paper, then on the ceiling
Before starting installation, draw a ceiling plan to scale. Mark the location of each frame, cornice, and rosette. Check against the furniture layout: frames should align with furniture groups. Transfer the markings to the ceiling using a laser level and painter's tape.
Markup error in the studio — frame offset relative to furniture. If the frame above the sofa has shifted by 15 cm, it's immediately noticeable. Correcting installed molding involves removal, re-gluing, and puttying. It's better to do the markup accurately from the start.
Installation order
-
Cornice around the perimeter — first: it sets the horizontal baseline
-
Corner elements of the cornice — at the intersection points of lines
-
Molding frames — from the center to the perimeter
-
Corner frame elements — if provided
-
Rosettes — last
Glue and sealant
For installingpolyurethane products — acrylic mounting adhesive. Apply in a zigzag pattern along the entire length of the element. Secure with painter's tape for 30–40 minutes. Joints — finishing putty, sanding after drying.
Painting
After installation and puttying — primer + two coats of acrylic water-based paint from the same batch as the ceiling. Decor and ceiling — a single surface. No different shades, no different textures.
Stucco decor in a modern studio: not a palace, but intelligent design
There is a common misconception: stucco is about palaces, baroque, and heavy interiors with gilding. This has nothing to do with polyurethane moldings on a white ceiling in a modern studio.
A thin white line of 12 mm on a white ceiling of a minimalist studio is not "stucco in a palace style." It is an architectural tool that creates structure where there is none. It is closer to Scandinavian architecture with its attention to detail than to Versailles halls.
This is precisely the meaning of modern applicationpolyurethane ceiling molding: not to decorate for decoration's sake, but to create architectural meaning where there was none. In a studio, this is especially important — a space without structure feels cheaper and smaller than it actually is.
Mistakes when choosing stucco decor for a studio
Let's break down the most common mistakes that negate the entire effect.
Too large a cornice in a small studio
A cornice of 100–120 mm around the perimeter of a 25 m² studio with a 2.5 m ceiling is a disaster. It takes up 10–12 cm of visible height around the entire perimeter and creates the feeling that "the ceiling has dropped." Rule: the cornice should be no wider than 50 mm with a ceiling up to 2.6 m in a room up to 35 m².
Frames that don't align with furniture
A molding frame that is offset from the furniture group by 30–40 cm loses its zoning purpose. The eye doesn't connect the frame with the sofa — it just sees a "strange rectangle on the ceiling." The frame must be clearly tied to the furniture: geometrically precise, without random shifts.
Too many frames
Four molding frames on the ceiling of a 30 m² studio is chaos. The ceiling turns into a labyrinth of rectangles that doesn't zone but disorients. Maximum for a studio: one or two frames plus a cornice around the perimeter.
Different series of moldings in one interior
A cornice with acanthus ornament + molding frames with geometric profile + a rosette in the Baroque style are three different "languages" in one ceiling. They do not unify but conflict. Everything should be from the same series: one style of profile, one ornamental code, one paint finish.
Installation without a laser level
A crooked molding line on a white ceiling is an absolutely obvious defect. With a ceiling height of 2.6 m, horizontal lines are in direct line of sight. A shift of 5 mm is noticeable from a distance of 4 meters. A laser level is not an option but a mandatory tool.
What to choose from the STAVROS catalog for ceiling zoning in a studio
For a studio, the following from the STAVROS catalog are suitable:
For the perimeter cornice —Cornices and moldings made of polyurethane: profiles 40–60 mm, smooth or with minimal ornament. For ceilings 2.5–2.6 m — profiles in the lower part of the range.
For molding frames — thin moldings with a profile of 10–22 mm from the same line. One type of molding for all frames in the apartment is fundamentally important for system unity.
For rosettes —Ceiling stucco decor from the ceiling rosettes section: diameter 150–250 mm, relief 10–20 mm, moderate ornament.
For a ready-made solution over one zone — CPU-P1 or CPU-P2 kits from the ceiling decor section.
Allpolyurethane products from STAVROSready for painting, require no special tools for installation, and can be cut with a standard miter saw.
About the company STAVROS
STAVROS is a Russian manufacturer of decorative polyurethane products for interiors and facades. The company produces a full range of stucco decor elements: moldings, cornices, ceiling rosettes, decorative overlays, and ready-made ceiling kits from the CPU series.
All STAVROS products are made from high-density closed-cell polyurethane — a lightweight material resistant to moisture and temperature changes, ready for painting with acrylic paints. They are mounted with acrylic glue without mechanical fastening.
The STAVROS range covers the needs of apartments with any layout: from compact studios to spacious living rooms and grand halls. Six ready-made CPU-P1–CPU-P6 kits, dozens of moldings with different profiles, cornices from 22 to 180 mm, rosettes from 100 to 800 mm in diameter — all this allows you to choose a system for any task.
Frequently asked questions
Can stucco decor be used in a small studio apartment?
Yes, with the right choice of scale. Thin moldings of 12–18 mm in the color of the ceiling and a laconic cornice of 40–50 mm do not reduce the space but create an architectural structure within it.
How to zone a studio with ceiling decor?
Molding frames above furniture groups (sofa, dining table, bed) mark functional 'islands' on the ceiling. A cornice around the perimeter unifies the system. One or two such 'islands' are enough for most studios.
Which stucco decor to choose for a studio with a low ceiling?
Moldings no thicker than 22 mm, cornice no wider than 50 mm, rosette no larger than 200 mm. Painting strictly in the color of the ceiling — a monochrome system. No ornamental cornices with deep relief and no multi-level systems.
How to separate the kitchen from the living room with ceiling decor?
A molding frame above the dining group and a separate frame above the sofa group create two visual "islands." Or — one transverse molding from wall to wall between the kitchen and living area.
How many molding frames can be made on the ceiling of a studio?
No more than two with a ceiling up to 2.7 m and an area up to 35 m². Three frames are acceptable in elongated studios with clearly demarcated zones and a ceiling of 2.7 m or higher.
What is better — a ready-made set or individual elements?
For decorating one zone — a ready-made set CPU-P1 or CPU-P2. For several zones throughout the studio — individual elements of one series: cornice + moldings + rosettes in a unified style.
Is a rosette needed in a studio?
Only if there is a decorative pendant light or chandelier. Without a central light fixture, the rosette loses its functional meaning and becomes just a detail without context.