Article Contents:
- Why a mirror wall needs framing: understanding the physics of perception
- Three main tasks of framing a mirror wall
- Where a mirror wall with slats and stucco decor is appropriate
- Hallway: first impression and practicality
- Walk-in closet: the mirror as a functional element
- Bedroom: softness and architectural elegance
- Hall of a representative house or apartment
- Commercial interior: salon, showroom, reception
- Wooden slats next to a mirror: five working techniques
- First technique: slats on both sides of the mirror as pilasters
- Second technique: slatted wall with a mirror insert
- Third technique: slats as a transition from mirror to wall
- Fourth technique: vertical slats behind the mirror
- Fifth technique: slats in the lower zone, mirror in the upper zone
- What's important: slats should not compete with the mirror
- Moldings and stucco decor around the mirror: from frame to portal
- Simple molding frame: minimum, maximum effect
- Polyurethane decor in wall color: architecture without noise
- Wooden moldings matching the slats: unity of material
- Stucco decor on the walls near the mirror
- Full architectural portal around the mirror panel
- Molding as a horizontal divider
- How to design the bottom of a mirror wall: baseboard as a foundation
- Technique for joining baseboard to mirror
- MDF baseboard for a mirror wall
- Wooden baseboard: when wood is nearby
- Wide baseboard for classic and country interiors
- How to design the top of a mirror wall: cornice and ceiling decor
- Ceiling cornice as the finish of the mirror area
- Polyurethane ceiling decor above the mirror
- Wooden cornice for architectural accent
- Minimalist solution: offset without cornice
- Molding for mirror wall: corners, bars, system solutions
- Wooden corner for slat ends
- Wooden bar as load-bearing base
- Wooden baguette as horizontal divider
- System approach: everything from one source
- Ready-made schemes for mirror wall design
- Scheme 1: Hallway — mirror with slats and MDF baseboard
- Scheme 2: Dressing room — mirror in a wooden batten system
- Scheme 3: Bedroom — mirror in a molding frame, decor in wall color
- Scheme 4: Hall — grand mirrored wall with a portal
- Scheme 5: Commercial interior — beauty salon or showroom
- Material combinations: what works with what
- Mistakes when designing a mirrored wall
- FAQ: answers to popular questions about mirrored walls
- STAVROS: full range for mirrored walls
There is one object in the interior that simultaneously expands the space, adds light, and demands more attention than any other finishing detail. This is a full-length mirror — or a floor-to-ceiling mirror panel. Place it on a wall without a thoughtful frame, and instead of an elegant solution, you get a mirror sheet that stands alone, unconnected to anything. Add the right Wooden planks, moldings, ceiling cornice, and baseboard — and the mirror becomes an architectural accent around which the entire interior starts to work.
This article is exactly about that. Not about how to hang a mirror. About how to make a mirror wall part of a decorative system — through moldings, stucco decor, slats, and properly selected baseboards.


Why a mirror wall needs framing: understanding the physics of perception
A mirror reflects everything. Literally. It doubles the space, doubles the light, doubles the interior details. And if there is something next to the mirror that looks unfinished — the mirror will double that too.
That is why a mirror wall requires even more careful finishing than a regular one. A careless joint between a baseboard and the mirror panel will be visible not once — but as many times as the mirror creates reflections. The end of wooden slats without a corner piece next to a mirror is a mistake multiplied by two.
On the other hand, beautiful framing also multiplies. An elegantmolding frame around the mirror, wooden slats on the sides, a clean line of baseboard at the bottom, a thin cornice at the top — all of this in the reflection creates a sense of depth and architectural refinement that cannot be achieved by any other means.


Three main tasks of framing a mirror wall
Let's honestly list what exactly the decor around the mirror should solve:
Cover the ends. The mirror panel has an end — a cut of the glass. This cut must either be hidden in a frame, covered with a molding profile, or neatly joined with a slat or molding. A bare glass end is unacceptable.
Create transitions. At the bottom, the mirror meets the baseboard. At the top, it meets the ceiling or cornice. On the sides, it meets the wall, slats, or moldings. Each of these transitions requires a solution.
Give the mirror architectural context. A mirror without a frame and without framing is just a piece of glass. A mirror with a molding frame, with slats on the sides, with a cornice above it, is an architectural volume, part of the interior.
Our factory also produces:


Where a mirror wall with slats and stucco decor is appropriate
Before discussing materials, let's define the territory. A full-length mirror and a floor-to-ceiling mirror panel are appropriate in a variety of scenarios — and each requires its own approach to framing.
Get Consultation
Hallway: First impression and practicality
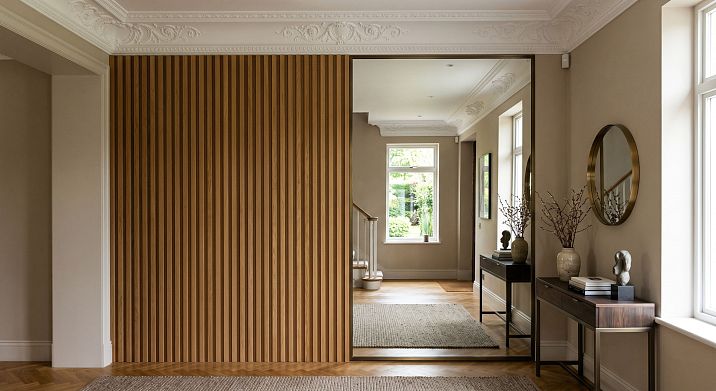
The hallway is a classic place for a full-length mirror. Here it works on two levels: practical (check yourself before leaving) and visual (enlarge a small space).Wooden slats around the mirrorin the hallway — a vertical accent on the sides of the mirror panel — create a warm wooden contrast with the cold glass.
An important nuance: the hallway has high foot traffic. The baseboard at the mirror should be durable —MDF Skirting Boardit withstands accidental impacts well and is easily restored with paint.
Dressing room: mirror as a working element
In the dressing room, a floor-to-ceiling mirror is a functional tool. It should be integrated into the system: slats or moldings on the sides,Wooden baseboard matching the furniture below, a ceiling cornice connecting the mirror section to the ceiling. The dressing room is a place where everything should work as a unified furniture system, and the mirror is no exception.
Bedroom: softness and architectural elegance
In the bedroom, a full-length mirror requires the most delicate framing. There is no need for the architectural strictness of the hallway or the functionality of the dressing room. What is needed isMoldings made of polyurethane in the color of the wall — they create a frame around the mirror without color contrast. Or thin wooden slats — in a neutral, calm tone.
Hall of a representative house or apartment
A spacious hall is a place where a mirror wall works most effectively. A wide mirror panel withstucco decor around the mirror, with wooden pilasters on the sides, with a widefloor baseboard and a ceiling cornice — this is a full-fledged architectural statement.
Commercial interior: salon, showroom, reception
In a beauty salon, boutique, or showroom, a mirrored wall is a brand's working tool. It must look professional and striking at the same time.Wooden slats for a mirrored wall with lighting,wood trim items for covering the ends — this is a system that creates a signature visual style.
Wooden slats next to a mirror: five working techniques
Wooden boards in interior next to a mirror is not just framing. It's a dialogue between the living texture of wood and the cold mirrored surface. Such contrast is always a win — warmth against coolness, matte against glossy, natural against man-made.
Technique one: slats on both sides of the mirror as pilasters
Vertical slats on the left and right edges of the mirror panel are a classic technique. They visually "hold" the mirror on both sides, creating the impression that it is built into an architectural portal.Wooden plank for this, it is chosen wide enough — from 40 mm — to be noticeable next to a large mirrored surface.
In the reflection, the slats double — and this creates the illusion of an endless corridor of wooden verticals. It looks especially beautiful with side lighting.
Technique two: slatted wall with a mirror insert
Rafter panelsoccupy the entire wall from floor to ceiling, with a mirror insert in the center, integrated into the slat rhythm. The width of the mirror is a multiple of the slat pitch — or equal to several sections. This is a complex but very effective technique: the mirror is perceived as a "window" in the slatted wall.
For this solution, precise planning is critical. The slats along the edges of the mirror must be flush with its end — or cover it. No gaps and no overlapping transitions.
Technique three: slats as a transition from mirror to wall
If the mirror panel does not occupy the entire wall but only a part of it, slats can serve as a decorative transition from the mirror to a painted or wallpapered wall. A slatted section 30–50 cm wide on both sides of the mirror creates a buffer zone that "softens" the transition between the mirror surface and the regular wall.
Technique four: vertical slats behind the mirror
If the mirror is mounted to the wall with a small gap — on hidden brackets — you can placevertical wooden slatsdirectly on the wall under the mirror. They will be visible in the mirror — and create depth behind it. The feeling is like a mirror in the forest. A rare but memorable technique.
Technique five: slats in the lower zone, mirror in the upper zone
The wall is divided horizontally: the lower part (up to a height of 100–120 cm) — wooden slats for wall finishing or a slatted panel, the upper part is mirrored. A molding belt or Wooden Picture Frame along the horizontal border separates the zones. This is a retro technique from classic interiors, reinterpreted in a modern key.
What's important: the slats should not compete with the mirror
A mirror itself is an active element. It reflects, shimmers, doubles. Therefore, the slats next to it should be calm: a neutral or warm tone, moderate spacing, without a complex profile. If the slats are too active — dark, large, frequent — the interior around the mirror turns into visual noise.
Moldings and stucco decor around the mirror: from frame to portal
Stucco decor around the mirror — a separate topic that leads from a simple frame to a full-fledged architectural portal. Let's consider the entire range.
Simple molding frame: minimum, maximum effect
The most accessible and always working technique: Wall wood molding — horizontal arrangement that can run at the level of a chair back, window sill, or mid-wall. Molding divides walls into horizontal zones, creates rhythm, and structures space.orPolyurethane molding is mounted around the perimeter of the mirror panel — forming a visible frame. This turns the mirror from a "piece of glass on the wall" into an architectural object.
Important: the frame is mounted on the wall around the mirror, not over it. It should slightly overlap the mirror edge — 5–10 mm — to cover the glass cut. This nuance requires precise calculation before installing the mirror.
Polyurethane decor in wall color: architecture without noise
For delicate interiors — especially bedrooms and living rooms —Moldings made of polyurethaneare painted the same color as the wall. The frame around the mirror exists — it creates relief and volume — but does not attract attention with color. This is exactly the technique that distinguishes professional design from amateur: the feeling is there, the source of the feeling is invisible.
Wooden moldings matching the slats: material unity
If the slats next to the mirror are made of oak with a specific tint —Decorative wooden moldingsthe mirror frame should be made of the same oak, with the same tint. Material unity creates a sense of system: the slats and frame speak one language, the mirror is an insert in that system.
Stucco decor on walls next to the mirror
The wall sections on both sides of the mirror or above it are a place for. Clear lines, created using modern technologies, emphasize the strict aesthetics of the room. Each decorative element harmoniously fits into the overall concept, creating a sense of order and thoughtfulness.. Molding panels-boiserie, decorative frames, horizontal bands — all of this creates an architectural context in which the mirror is perceived as an element of a thoughtful design, not a random object.
Full architectural portal around the mirror panel
For halls and grand spaces — the maximum option. The mirror panel is framed by a full architectural portal:
-
Vertical pilasters made ofwooden moldings or slats on the sides
-
Horizontal architrave made of wooden cornice above the mirror
-
polyurethane ceiling decor around the perimeter of the zone
-
WideWooden baseboard at the base
Such a portal turns the mirror into an architectural object, equal in importance to a fireplace or a library niche.
Molding as a horizontal divider
If the mirror occupies the upper part of the wall and the lower part is a slatted panel or a painted surface, a horizontal molding at the boundary is a mandatory element. It fixes the transition line, making it intentional rather than accidental.Moldings made of polyurethanewooden ones are preferable here: they allow perfect horizontal installation without warping.
How to design the bottom of a mirror wall: baseboard as a foundation
The bottom line of a mirror wall is one of the most important and most complex nodes. Three elements meet here: the floor, the wall, and the mirror. And all three must converge at a neat horizontal point.
Technique for joining the baseboard to the mirror
The baseboard cannot simply 'go' under the mirror or break off in front of it. There are three correct options:
The mirror sits on the baseboard. If the baseboard is installed first, the mirror is placed on it — resting on its bottom edge. The end of the glass is then hidden from below by the baseboard. This is the cleanest option — no gaps or complex joints.
The mirror is mounted above the baseboard. The baseboard runs continuously, and the mirror starts above it — by a few centimeters. This gap between the bottom edge of the mirror and the top edge of the baseboard needs to be covered with a decorative profile or molding. Or — left as a deliberate gap if it aligns with the overall design.
The mirror goes from the floor without a baseboard. The baseboard breaks off before the mirror area, and the mirror stands from floor level. The end of the glass is covered from below with a special U-shaped profile ora wooden block.
MDF baseboard for a mirror wall
MDF Skirting Board— a universal choice for mirrored walls in modern interiors. The smooth paintable surface allows you to paint it to match the wall or in neutral white.White MDF Skirting Boardnext to the mirror creates a clean bottom line that does not draw attention away.
— is a horizontal element that frames the room at the bottom of the walls where the wall meets the floor. Skirting boards perform several functions: they hide the technological gap between the wall and floor covering (necessary for thermal expansion), protect the lower part of the wall from mechanical damage, create visual completion, and may conceal wiring.— especially good when you need to blend the baseboard with the wall: paint it the same color. Then the lower edge of the mirrored wall is perceived as a monolithic horizontal plane.
Wooden baseboard: when there is wood nearby
If the mirror slats are wooden, the floor is parquet, the furniture is made of natural wood —to buy wooden baseboardfrom the same species is the only logical solution. Material unity is a principle that works flawlessly.
WideWooden baseboardfrom 80 mm near a mirrored wall in a hall or bedroom creates a monumental bottom line. A mirror above a wide wooden baseboard is perceived as a built-in architectural element, not as a hanging object.
Wide baseboard for classic and country interiors
For a country house, classic bedroom, or library hall — a wide baseboard from 100 mm, made of oak, ash, or pine, with a profile, creates the right scale. It matches the ceiling height and mirror size. A narrow baseboard under a large mirror looks disproportionate.
How to design the top of a mirrored wall: cornice and ceiling decor
The upper edge of the mirror is the transition to the ceiling. Without a well-thought-out solution, an awkward zone forms here: the mirror ends, the ceiling begins, and between them there is emptiness or a rough glass edge.
Ceiling cornice as the completion of the mirror zone
wooden corniceorWooden beamsAlong the top edge of the mirror — a horizontal profile that covers the upper end of the mirror panel and creates a clear finishing line. The cornice is mounted directly above the mirror — like the architrave of a portal.
For a full-length mirror, when the top edge reaches the ceiling, the cornice is combined with the ceiling molding — they become a single element.
Polyurethane ceiling decor above the mirror
polyurethane ceiling decorAround the perimeter of the area above the mirror — an elegant and practical solution. Polyurethane is not afraid of moisture, weighs very little, and can be painted any color. A thin profile on the ceiling in the mirror area creates a horizontal finishing line without heaviness.
Wooden cornice for an architectural accent
For a hall, study, or classic bedroomBuy wooden crownWith a profile — the right choice. A profile cornice above the mirror creates a horizontal finish with volume and shadow. This adds architectural value to the mirror portal.
Minimalist solution: indentation without a cornice
In modern or Japandi interiors, a small gap of 3–5 cm is sometimes intentionally left between the top edge of the mirror and the ceiling. This becomes a deliberate air gap. But it must be intentional: uniform across the entire width of the mirror, with a neat top edge of the glass in the profile.
Linear elements for a mirror wall: corner pieces, bars, system solutions
Trimming Itemsfor the mirror area is what turns a set of beautiful elements into a system. Without them, every joint will look like a random abutment.
Wooden corner piece for the ends of slats
The slats next to the mirror have ends — horizontal and vertical.Wooden anglecovers each of them. This is a small element that costs minimal — but its absence costs a lot in terms of impression.
The corner piece is matched to the tone of the slats. If the slats are made of dark oak, the corner piece is made of dark oak. If the slats are painted white, the corner piece is also white.
Wooden bar as a supporting base
Wooden blockis used as a hidden supporting structure: a horizontal support for the bottom edge of the mirror, a vertical guide for the slatted section next to the mirror, a frame for a molding portal. The bar is the invisible hero of the mirror area.
Wooden baguette as a horizontal divider
Wooden Picture Framewith a light profile — a horizontal line at the border of zones. At a height of, for example, 120 cm from the floor: below — a slatted panel, above — a mirror. The baguette fixes this border, making it intentional and precise.
Systematic approach: everything from one source
Main rulewood trimfor the mirror zone — unity. The slats, baseboard, cornice, corners, and bars must be from the same wood, the same tint, the same supplier. Only then do they form a system — not a set of similar but different elements.
Ready-made schemes for decorating a mirror wall
Theory is good. But specific schemes are better. Let's break down five real scenarios.
Scheme 1: Hallway — mirror with slats and MDF baseboard
Situation: a small hallway of 3–4 sq.m., ceiling 2.5–2.7 m.
-
Full-length mirror 60–80 cm wide, from baseboard to ceiling molding
-
On the sides —Wooden planks30–40 mm wide, vertical, in a neutral light tone
-
Bottom —White MDF Skirting Board60–80 mm, continuous along the entire wall
-
On top — a thin polyurethane molding along the ceiling, matching the wall color
-
The ends of the slats at the baseboard and at the ceiling profile —Wooden anglematching the slats
Result: a light, modern mirror area that visually enlarges the hallway without overwhelming it.
Scheme 2: Walk-in closet — mirror in a wooden slat system
Situation: a walk-in closet with built-in cabinets, the mirror is a separate section between the cabinets.
-
The mirror is built into the niche between the cabinets; the mirror ends are covered by the cabinet sides
-
Bottom —Wooden baseboardmatching the color of the walk-in closet furniture
-
On top —wooden corniceof the same profile as the cornice of the upper cabinets
-
wood trim itemsfor neat transitions between the mirror section and cabinets
Result: the mirror is integrated into the wardrobe furniture system — it looks like part of the furniture, not a separate object.
Scheme 3: Bedroom — mirror in a molding frame, decor in wall color
Situation: bedroom in neutral tones, mirror as an accent on the end wall.
-
Mirror 80–100 cm wide, in a molding frame made ofof polyurethane moldings, painted in wall color
-
Polyurethane wall decoron the side panels — frame moldings in wall color
-
Bottom —— is a horizontal element that frames the room at the bottom of the walls where the wall meets the floor. Skirting boards perform several functions: they hide the technological gap between the wall and floor covering (necessary for thermal expansion), protect the lower part of the wall from mechanical damage, create visual completion, and may conceal wiring.in wall color, clean bottom line
-
On top — a thinpolyurethane ceiling decoralong the ceiling of the zone
Result: architectural zone without color noise — relief is present, color contrast is absent.
Scheme 4: Hall — grand mirrored wall with portal
Situation: spacious hall with ceiling 3 m or higher, mirror panel as the main accent.
-
Wide mirror panel 120–150 cm, from wide baseboard to wooden cornice
-
On the sides — molding pilasters made ofof wooden moldingswith profile, height from floor to cornice
-
Above the mirror —Buy wooden crownwith profile, as a horizontal architrave
-
Below — wideWooden baseboardfrom 100 mm, made of solid wood
-
Polyurethane wall decoron the side walls of the hall, framed panels
Result: a grand mirror portal — the main architectural accent of the hall.
Scheme 5: Commercial interior — beauty salon or showroom
Situation: a working mirror area for clients, practicality and impressiveness are needed.
-
Rafter panelsalong the entire wall, the mirror is an insert into the slatted rhythm
-
Along the edges of the mirror —Wooden angleto cover the ends of the glass and slatted sections
-
Bottom —MDF Skirting Boardwith embossing for painting, practical and easily refreshed
-
Lighting — built into the slatted structure, not conflicting with the mirror
-
Trimming Itemsfor all ends and junctions
Result: a professional, branded mirror zone with a high margin of wear resistance.
Material combinations: what works with what
Designing a mirror wall is also about material management. A few working combinations:
| Slat / trim material | Skirting board | Crown Molding | Moldings | Style |
|---|---|---|---|---|
| Oak, light tone | Wooden baseboardlight | Wooden, lightweight profile | Polyurethane in wall color | Japandi, Scandinavian |
| Oak, dark tone | Wooden baseboarddark | Wooden, massive profile | Wooden moldings to match | Classic, neoclassic |
| MDF for painting, white | White MDF Skirting Board | Polyurethane, thin | White polyurethane | Modern minimalism |
| Slats without paint, natural wood | Wooden baseboardnatural | wooden cornice | Wooden | Country house, eco |
Mistakes when designing a mirror wall
This section is not to scare, but to warn. Each of the listed mistakes occurs regularly — and each could have been avoided by reading this article.
The mirror rests against the baseboard without a neat joint. The bottom edge of the mirror touches the top edge of the baseboard, with a gap between them. Solution: design the joint before installation, choose one of the three options described above.
The slats end near the mirror without a profile. The end of the slatted section near the mirror is not covered.Wooden angle — a mandatory element at each such end.
The glass ends are not covered. The ends of the mirror panel — the glass cut — must either be hidden in a frame or covered with a profile. An open glass end looks unfinished and unsafe.
The cornice is too massive for a narrow mirror zone. A wide profile cornice above a narrow mirror creates a visual disproportion. The scale of the cornice should match the width of the mirror.
The baseboard, slats, and furniture are different shades of wood. Three different wood tones in one zone create chaos. Either everything in a single tone, or a clearly defined contrast.
Moldings conflict with the mirror frame. If the mirror already has a decorative frame, an additional molding frame on the wall around it creates double framing — visual overload. Either the frame or the wall moldings — not both elements at once.
The mirror is overloaded with slats, stucco, and active lighting simultaneously. The mirror itself is an active element. Adding several competing accents to it — slats, stucco, and bright lighting — is a recipe for visual chaos. One main accent, the rest is background.
Different profiles for the baseboard in the mirror zone and the rest of the room. The baseboard in the mirror zone should be the same profile and height as everywhere else in the room. A difference in profile is perceived as a mistake.
FAQ: answers to popular questions about a mirror wall
How to properly close the end of a mirror panel at the baseboard?
There are several options: place the mirror on the baseboard (it covers the bottom end), close the end with a molding profile attached to the wall, or use a special U-shaped aluminum or wooden profile. The last option gives the neatest result.
Is a cornice needed above the mirror if the mirror reaches the ceiling?
If the mirror reaches the ceiling, the cornice can be combined with a ceiling molding — it will run along the ceiling above the mirror, covering the top joint. If the mirror does not reach the ceiling by 15–20 cm, either a cornice or a horizontal molding band is needed above it.
Can wooden slats be used next to a mirror in a bathroom or toilet?
Solid wood slats without special treatment are not recommended in the bathroom: wood reacts to humidity. For wet rooms, slats with moisture-resistant multi-layer varnish or MDF panels with water-repellent impregnation are suitable. The ends of the slats and all joints must be sealed.
How many slats should be placed on the sides of the mirror?
It depends on the width of the slats and the width of the wall section. For narrow wall sections (up to 30 cm) — 2–3 slats with a spacing of 5–8 cm. For wide ones — a slatted section with a rhythmic spacing harmonious with the mirror format. The main rule: the slats on both sides must be symmetrical.
How to combine moldings around the mirror with door trims in the same room?
The moldings around the mirror and the door trims should be of the same profile or from the same series. This creates a unified decorative system for the room. If the trims are wooden, the moldings should also be wooden or painted to match the wood.
Do I need to close the molding installation when adjusting?
Read the article on how to properly install polyurethane moldings — with clean corners, hidden joints, and correct painting.installing polyurethane moldingIt covers all technical nuances in detail.
How to choose the width of a wooden baseboard for a full-length mirror?
The proportion is simple: the taller the mirror and the higher the ceiling, the wider the baseboard should be. For a 2.5 m ceiling — baseboard 60–80 mm. For a 3 m ceiling or higher — 80–120 mm. A narrow baseboard under a tall mirror looks disproportionate.
STAVROS: complete range for a mirror wall
A mirror wall requires a systematic approach — and the decor manufacturer must provide the entire system, not individual elements.
STAVROS is a Russian manufacturer of solid wood and polyurethane products. Everything needed for designing a mirror area — wooden slats, moldings, baseboards, cornices, linear profiles, corners, and bars — is produced at one facility, with coordinated tints and profiles.
This means: when you take a slat, baseboard, and cornice from STAVROS — they belong to one system. No need to match, guess, or modify. Everything is already coordinated.
Complete range for a mirror wall:
-
Wooden planks— vertical accents near the mirror
-
Wooden plank— a single slat with precise geometry
-
Rafter panels— for walls with built-in mirror
-
Decorative wooden moldings— for frames and pilasters around the mirror
-
Moldings made of polyurethane— for delicate framing in the color of the wall
-
Polyurethane wall decor— frame panels and accents near the mirror
-
polyurethane ceiling decor— cornices above the mirror area
-
wooden corniceandWooden beams— for architectural finishing at the top
-
Wooden baseboard— for the bottom line of the mirror wall
-
MDF Skirting Board— universal solution for painting
-
Wooden angle— for ends of slats and junction corners
-
Wooden block— load-bearing structures of the mirror area
-
wood trim items— system solutions for all joints
-
Polyurethane Items— full range of stucco decor
A full-length mirror is not just an object for reflections. It is an architectural element that can transform the feel of an entire room. Give it the right framing, and it will repay you tenfold, literally multiplying the beauty of your interior.