
























Article Contents:
- What is a Polyurethane Bracket
- Where to Use Decorative Polyurethane Brackets
- Under Shelves
- Under Cornices
- In a Door Portal
- In a Fireplace Area
- On Facades and Walls
- STAVROS Brackets: Specific Models for Specific Tasks
- KRPU-026 — large architectural console
- KRPU-010 — medium-sized universal decorative console
- KRPU-033 — compact bracket for delicate tasks
- KRPU.VRS-013 — carved bracket for walls, ceilings, and furniture
- How to choose the size of a bracket
- Bracket, capital, or pilaster — what to choose
- How to combine brackets with other decor
- Styles and relief character: what to choose for your interior
- Installation: how to properly mount a bracket
- Brackets for facades: selection features
- How to assemble a set before purchase
- Mistakes when choosing decorative brackets
- FAQ: Answers to Popular Questions
- About the company
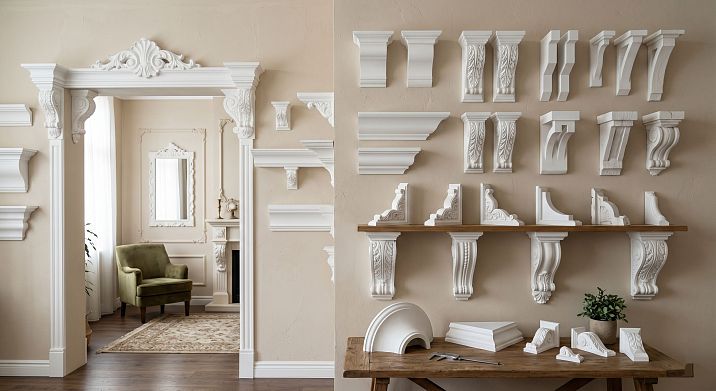
Polyurethane brackets are decorative consoles that turn an ordinary wall into an architectural statement. They are installed under shelves, cornices, in door and fireplace portals, on facades, in niches, classic wall compositions, and commercial interiors. Unlike technical metal fasteners, a polyurethane stucco bracket works as a visible decorative element: it emphasizes style, creates visual support, and connects moldings, pilasters, cornices, and PU overlays into a unified ornamental system. To make the bracket look appropriate and professional, it is selected based on size, projection depth, relief, style, installation location, and adjacent decorative elements.



What is a polyurethane bracket
The word "bracket" entered the interior lexicon from architecture: in classical buildings, it is a protruding stone or plaster element that visually supports a cornice, balcony, portico, or architectural shelf. In modern interiors, a polyurethane bracket serves the same role — only lighter, easier to install, and more affordable.
Polyurethane as a material has radically changed the situation with decorative consoles. A plaster bracket weighs significantly more, requires special installation and additional wall reinforcement. A wooden one is expensive to manufacture and poorly tolerates moisture. A polyurethane one is lightweight, moisture-resistant, retains its shape during temperature fluctuations, reproduces the finest relief details, and after painting is almost indistinguishable from plaster or stone. Moreover, it is mounted with acrylic glue without complex fasteners or special tools.
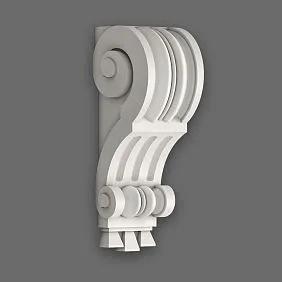
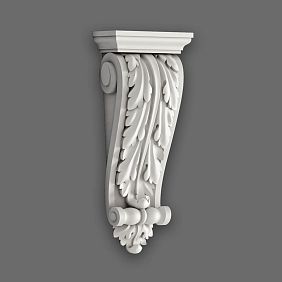
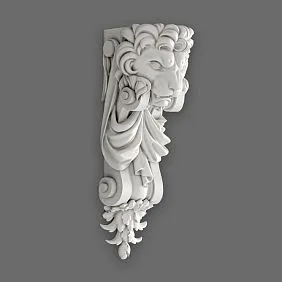
A decorative polyurethane console can be smooth — with a clean geometric profile — or ornamental: with acanthus leaves, volutes, scrolls, shell decor, or plant relief. The choice of ornament determines the style: Baroque, Empire, Neoclassicism, modern classic, or a more restrained architectural line.
The architectural function of a bracket is to create a sense of support. Even if there is no real load on the bracket under a shelf or cornice, its presence creates a psychologically weighty interior: the space is perceived as thoughtful and architecturally meaningful. This is an important principle of classical and neoclassical aesthetics — every element should look functionally justified, even if it performs a purely decorative task.




Where to use decorative polyurethane brackets
Our factory also produces:



Under shelves
A decorative shelf without consoles is just a horizontal plane on the wall. Add a pair of polyurethane brackets underneath, and the shelf turns into an architectural element. This works especially expressively in a living room above a fireplace, in a study with classic shelving, in a hallway above a console table, or in a restaurant interior with high ceilings.
For decorative shelves, brackets are chosen based on the depth of the projection: it should be proportional to the depth of the shelf itself. A bracket that is too short under a wide shelf looks thin and fragile. One that is too long overloads the space and creates a feeling of overhang. The optimal proportion: the bracket should visually "hold" the shelf, with its horizontal plane matching the bottom surface of the shelf board or slab.
Brackets under shelves are installed in pairs. For long shelves (over 100–120 cm), a third, central bracket may be needed — especially if the shelf bears a real decorative or functional load.
Get Consultation
Under cornices
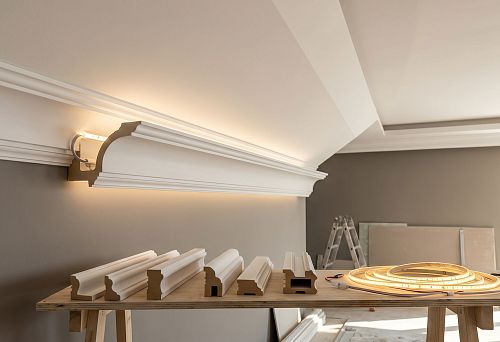
A ceiling or wall cornice with brackets looks much richer. The brackets are placed at equal intervals along the length of the cornice, creating a rhythmic ornamental band. In classical architecture, this technique is called "mutules" or "modillions" — it is one of the main elements of the order system.
In interiors, brackets under the cornice are appropriate in living rooms with ceilings of 3 m and higher, in halls, studies, bedrooms in the neoclassical style, as well as in commercial spaces — restaurants, hotels, showrooms. The spacing of the brackets depends on the scale of the cornice and the height of the room. In spacious rooms — every 50–80 cm. In more intimate ones — every 30–50 cm.
In a door portal
Brackets as an element of a door portal are a more complex system. They are placed at the junction points of vertical pilasters with a horizontal lintel, enhancing the architectural character of the entire structure. In this role, the bracket does not work as a support under a shelf, but as a decorative transition element between the vertical and horizontal parts of the portal.
For door portals, medium and large-sized brackets are chosen — proportionate to the height and width of the opening. They must be compatible in style with the pilasters and moldings of the portal. Stylistic inconsistency in the details of the portal is one of the most noticeable mistakes in interior decor.
In the fireplace area
A fireplace mantel on brackets is a classic technique. Two large decorative brackets on the sides of the firebox create visual "supports" for the mantel and organize the entire fireplace area as an architectural system. The brackets here are selected according to the height of the fireplace portal: their top plane should coincide with the bottom surface of the mantel.
Brackets by the fireplace bear not only a decorative but also a semantic load: it is they that create the feeling of "support" for the shelf. Therefore, elements with a more expressive relief are chosen here — with volutes, acanthus, or floral ornament. This is one of the places where an ornamental console is appropriate even in restrained neoclassical interiors.
On facades and walls
In the STAVROS catalog Polyurethane brackets described as elements for shelves, cornices, windows, and facades. This allows them to be used not only indoors but also outdoors — under canopies, on facade cornices, under window sandriks.
On walls, brackets can work within a system of wall decorative panels: they are placed under horizontal molding belts, adding architectural depth to the entire system. In niches — under decorative shelf elements or sculptural inserts. In a hallway or entryway — under mirror shelves or console tables.
STAVROS brackets: specific models for specific tasks
KRPU-026 — a large architectural console
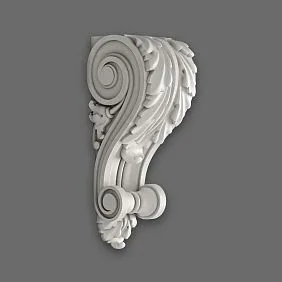
Bracket KRPU-026 is a large carved decorative bracket measuring 312 mm. A serious element for serious interiors: a grand hall, a spacious living room with high ceilings, an executive office, a restaurant, a hotel. The 312 mm size means this bracket is readable from a distance and becomes an independent architectural accent — not just a detail, but a visible decorative focal point.
KRPU-026 is suitable for large fireplace areas, wide shelves, decorative niches with a full architectural system. The relief detailing of the element creates an active play of shadows — especially noticeable under accent lighting. In a classic or Empire-style interior, such a bracket carries as much ornamental weight as a capital or corner element.
When choosing KRPU-026, it is important to immediately consider adjacent elements: it works with large Moldings made of polyurethane proportionate profiles, developed cornices, and expressive Polyurethane wall decor. Inserting a large bracket into a minimalist setting means creating a stylistic conflict.
KRPU-010 — universal decorative medium-scale console
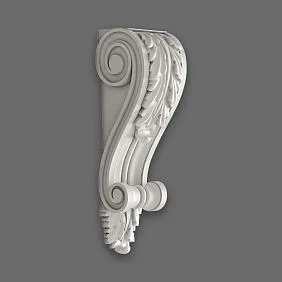
Bracket KRPU-010 — 243 mm is the workhorse among decorative consoles. Noticeable enough to read as an architectural element, and versatile enough to work in a wide range of tasks: under a cornice in the living room, by a door portal, in a fireplace area, in a niche, by a console table in the hallway.
The 243 mm size fits well into rooms with ceilings of 2.8–3.5 m — exactly where most interior projects in modern classic and neoclassical styles are. KRPU-010 is proportionate to standard fireplace mantels and decorative shelves in the living room. For restaurants and halls with higher ceilings, it can work in pairs with the larger KRPU-026 — in different zones, within a unified style system.
KRPU-033 — compact bracket for delicate tasks
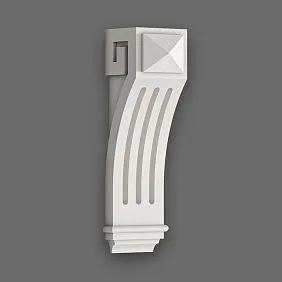
Bracket KRPU-033 — 157 mm is the choice for intimate and delicate tasks. A small decorative shelf in the bedroom, a neat cornice band in a study with a 2.7 m ceiling, furniture facade decor, a narrow space between a door and a corner — everywhere where an ornamental accent is needed, but a large console would look excessive.
KRPU-033 is also appropriate in furniture decor systems: on cabinets, sideboards, library shelves, chests of drawers with decorative shelves. The compact 157 mm size does not overload the furniture facade and provides the desired classic accent without architectural heaviness.
KRPU.VRS-013 — carved bracket for walls, ceilings, and furniture
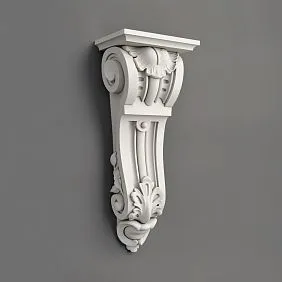
Carved bracket KRPU.VRS-013 — a universal interior console used on walls, ceilings, and furniture. It is not just a support element — it is an ornamental detail with a pronounced relief, used as an independent decorative accent.
KRPU.VRS-013 opens up additional application scenarios. On the ceiling near the cornice belt, it works as a corner or rhythmic ornamental element. On furniture — as a decorative console under a buffet shelf or at the base of a mirror frame. On the wall — as an independent relief element in a decorative wall panel system. This is a case where one element from the catalog polyurethane molding decoration solves several tasks at once.
How to choose the size of the bracket
Choosing the size is not a matter of taste. It is the mathematics of proportions and the physics of space. The wrong bracket size turns expensive decor into a cheap mistake.
Wall height and ceiling. The first reference point is the room height. With a ceiling of 2.5–2.7 m, a large 312 mm bracket creates a feeling of pressure. With a ceiling of 3.5 m and higher, a compact 157 mm bracket gets lost and does not create the desired rhythm. Rule: bracket height — 8–12% of wall height. With a 3 m ceiling — a 240–360 mm bracket fits organically.
Shelf width and depth. The horizontal plane of the bracket should align with the bottom surface of the shelf or be slightly shorter. A bracket protruding beyond the shelf plane looks absurd. A bracket significantly smaller than the shelf depth creates a feeling of a thin, unreliable support.
Scale of the portal or fireplace area. The bracket for a door or fireplace portal is chosen in proportion to the height of the pilasters and the width of the opening. Standard proportion: bracket height — 15–20% of the portal pilaster height. For a portal with 2000 mm pilasters — a 300–400 mm bracket.
Distance to adjacent elements. The bracket should not 'merge' with the capital, casing, or other element. The gap between the bracket and the adjacent decorative element — at least 30–50 mm. Otherwise, the reliefs overlap each other and create visual chaos.
One or a pair. Under a shelf up to 80 cm long — two brackets. Under a shelf 80–150 cm — two to three. Under a cornice — according to the spacing step. In a door portal — always a symmetrical pair. At a fireplace — always two.
Relief and projection from the wall. A large relief creates an active play of shadows — this is an advantage with accent lighting and a disadvantage with uniform lighting. In intimate rooms with soft light, deep relief reads better; in brightly lit halls, it may seem excessive. The relief projection from the wall — 30–50 mm for most brackets. Check clearances to furniture and fittings.
Main accent or supporting detail? If the bracket is the main ornamental element of the composition, choose a large one with a developed relief. If the bracket only supports the system without drawing attention, choose a compact and restrained one.
Bracket, capital, or pilaster — what to choose
Many buyers get confused with terms and don't understand the difference between a bracket, capital, and pilaster. These are fundamentally different elements with different functions.
| Task | What to choose |
|---|---|
| Decorative support under a shelf | bracket |
| Finish the top of a pilaster or column | Capital |
| Decorate the vertical of the wall | Pilaster |
| Enhance a portal with an architectural accent | bracket + moldings |
| Design a fireplace shelf | pair of brackets |
| Classic interior, active relief | ornate relief bracket |
| Neoclassical, moderate accent | restrained console without overload |
| Furniture decor | compact bracket 157–243 mm |
| Commercial interior, grand lobby | large representative bracket |
| Decor for painting | polyurethane of any size |
Bracket — horizontal visual support. Capital — vertical completion. Pilaster — vertical architectural line. They can work together: Polyurethane pilasters and capitals They create the side posts of the portal, the bracket reinforces the transition zone between the vertical and the horizontal cornice. This is a full-fledged order system — only in polyurethane and with DIY installation.
How to combine brackets with other decor
A bracket all alone on a bare wall looks strange. It reveals itself within a system. Let's look at each combination separately.
Bracket + cornice. The most classic pair. The cornice creates a horizontal architectural band, brackets are placed under it at equal intervals, giving the entire band vertical rhythm. Choose brackets proportionate to the cornice height: if the cornice is 80 mm — a bracket of 150–200 mm. If the cornice is 150–200 mm — a bracket of 250–350 mm.
Bracket + moldings. Moldings made of polyurethane They form horizontal bands or frame systems. Brackets under a molding band add volume and architectural weight to the system. Stylistic rule: the ornament of the moldings and the relief of the brackets should belong to the same stylistic tradition.
Bracket + pilaster. The pilaster sets the vertical, the bracket works at its base or in the capital area as a transition element. This is a paired architectural technique: vertical + horizontal, support + reinforcement. Especially appropriate in fireplace areas, where pilasters stand on either side of the firebox block, and brackets support the mantelpiece.
Bracket + capital. The capital completes the top of the pilaster, the bracket can be placed next to the capital, at the transition level to the cornice. This is a full-fledged order vertical: base → pilaster shaft → capital → bracket → cornice.
Bracket + portal. In a door or fireplace portal, the bracket is installed at the corner points of the transition from vertical posts to the horizontal lintel. It enhances the architectural character of the portal and adds an additional ornamental accent exactly where the eye first falls.
Bracket + PU overlays. PU overlays — ornamental inserts placed in the fields of wall frames or between brackets. Brackets set the rhythm, overlays fill the fields with ornament. This is a classic system of decorative filling: vertical accents alternate with ornamental inserts.
Bracket + ceiling decor. In spacious rooms with high ceilings, brackets can be part of a unified system that includes polyurethane ceiling decor. A cornice with brackets on the wall and a ceiling rosette or frieze at the top is an architectural program where each element plays its role.
Bracket + wall panel. Wall decorative panels made of molding frames, overlays, and wall decor gain additional architectural depth when brackets are placed along the upper horizontal molding belt of the panel. This is especially expressive in long corridors and halls where the wall panel stretches along the entire space.
Styles and relief character: what to choose for your interior
A polyurethane bracket is a stylistically defined element. Its relief, plasticity, and ornament immediately signal belonging to a specific interior program.
Baroque and Empire style. Maximally developed relief: acanthus, volutes, mascaron, shell decor, garlands, scrolls. The bracket in these styles is an ornamental statement. The largest and most detailed elements are appropriate here — KRPU-026 and similar.
Classicism. Ornament is present but more restrained: clear geometric shapes with neat plant decor. The bracket reads as an architectural detail rather than an ornamental accent. Sizes are medium — KRPU-010.
Neoclassicism. Modern interpretation of classics: ornament is present but concise. The bracket should define the architectural character of the interior without overloading it with details. Medium and compact sizes — KRPU-010, KRPU-033.
Modern classic. Minimal relief or smooth console. The bracket here is a geometric element that creates visual support without ornamental load. Compact and medium sizes.
Commercial interior. Restaurants, hotels, spas, executive offices. Here scale is more important than style: brackets should be readable from any point in the room. Large elements with developed relief are chosen — they create the necessary "weight" of the interior without excessive costs.
Installation: how to properly install a bracket
Installing a polyurethane bracket is not a complicated operation, but requires care and the correct sequence.
Surface preparation. The wall under the bracket must be dry, level, and dust-free. Old paint or wallpaper in the installation area must be removed. Porous bases — plastered walls, brick, aerated concrete — are pre-primed.
Marking. Before applying glue, be sure to dry-fit the bracket. Mark its position with a pencil. If brackets are installed in a row, use a level and tape measure for precise spacing.
Glue. Acrylic construction adhesive or special glue for polyurethane products. Apply glue to the back of the bracket in a "snake" pattern or dots — depending on the shape of the support surface. If the surface is small, apply a thin, even layer.
Fixation. Press the bracket against the wall with force for 1–2 minutes. If the glue has not yet set, temporarily secure it with masking tape. Full curing time for acrylic glue is 6–24 hours, depending on the composition and conditions.
For heavy brackets. Large elements weighing more than 0.5 kg are recommended to be additionally secured with dowels or self-tapping screws through the back surface. This is especially important if a real shelf with load is installed under the bracket.
Puttying and painting. After installation, gaps between the bracket and the wall are filled with putty or acrylic sealant. After drying — primer, then final painting in the color of the wall or a selected accent color.
Brackets for facades: selection features
Polyurethane brackets are used not only indoors but also on building facades. STAVROS positions its products as durable and strong elements suitable for facade use.
Additional characteristics are important for the facade. Polyurethane's moisture resistance is high: the material does not absorb moisture and does not crack when water freezes. However, for facade use, weather-resistant paint with UV protection should be used, which prevents fading and destruction of the surface layer under the influence of solar radiation.
Installation of facade brackets — using special polymer adhesive for outdoor work and mechanical fastening with dowels. Adhesive alone for facade use is insufficient — temperature fluctuations create deformation loads that gradually peel off adhesive-only mounting.
The size of the facade bracket is selected based on the fact that it will be visible from street level — from a distance of 5–15 meters. Therefore, only large elements with developed relief are suitable for the facade: KRPU-026 and similar.
How to assemble a kit before purchase
Impulsive purchase of a bracket without a system is a path to rework. The correct sequence of assembling the kit takes 15–20 minutes but saves money and time.
Step 1. Determine the location and task: shelf, cornice, portal, fireplace, niche, wall panel, facade.
Step 2. Measure the height and width of the installation area. Record the dimensions: wall height, shelf or cornice width, opening size.
Step 3. Select the bracket size using the formula: bracket height — 8–12% of wall height, or 15–20% of portal pilaster height.
Step 4. Decide: one bracket or a pair. In almost all interior tasks, it's always a pair.
Step 5. Check the projection from the wall: the bracket should not conflict with door frames, furniture, architraves, or hardware.
Step 6. Select adjacent elements: moldings, cornice, PU overlays, pilasters. Ensure they belong to the same style register and are compatible in scale.
Step 7. Consider the coloring: in the wall color (relief is read through the play of shadows), in white on a colored wall (contrast), in the color of the moldings (system). One of the three is always correct. Two different colors of the bracket and molding in one system is almost always a mistake.
Step 8. Check the mounting base. Plaster, drywall, brick, concrete — each base has its own requirements for adhesive and fasteners.
Step 9. Choose the adhesive and fasteners for the task. A lightweight interior bracket on a strong plaster wall — acrylic adhesive is sufficient. A heavy facade element or a shelf with real load — adhesive plus mechanical fastening.
Step 10. Order everything as a set at once: brackets, moldings, cornice, overlays — one batch, uniform material tone, guaranteed compatibility.
Mistakes when choosing decorative brackets
Each of these mistakes is real experience from customers who later reworked the decor.
They buy a bracket only by photo, without checking the dimensions. A photo of a bracket without a scale reference is deceptive. Always look at the specified dimensions in millimeters — height and depth of the projection.
They take a console that is too large for a small shelf. A 312 mm bracket under a 200 mm wide shelf is architectural absurdity. The bracket should be proportional to the shelf and the entire space.
They use one bracket where a symmetrical pair is needed. A single bracket under a shelf or near a portal looks unfinished. The only exception is a decorative element near a niche on one side.
They don't account for the actual load. A polyurethane bracket on glue can handle decorative loads. If heavy items will be placed on the shelf, mechanical fastening through the bracket or a separate hidden metal fastener is needed.
They mix brackets with moldings of a different style. An ornate bracket in a Baroque style and a smooth, minimalist molding create a stylistic disconnect. All elements of the decorative system should be from the same ornamental vocabulary.
They don't plan the color before installation. Painting an installed bracket is significantly more difficult than doing it before installation. In both cases, final painting after installation and joint puttying is mandatory, but preliminary base painting simplifies the work.
They place a relief bracket too close to trim or furniture. A gap of less than 30 mm between the bracket's relief and an adjacent element creates a feeling of accidental crowding. Check gaps physically before installation.
They don't check how the bracket combines with the cornice. The height and relief of the bracket should be proportionate to the height of the cornice. A small bracket under a large cornice looks random.
They choose a facade scenario without considering operating conditions. For the facade, weather-resistant paint and the correct glue are needed. Without this, elements will delaminate or fade within a few seasons.
They install without preliminary marking. Mark all installation points with a pencil and level. Give yourself time to visually check the layout before applying glue.
FAQ: Answers to popular questions
What is a polyurethane bracket?
This is a decorative console made of lightweight, moisture-resistant polyurethane that imitates a classic architectural support. It is used for the visual support of shelves, cornices, portals, and wall decorative systems. It does not create a load on the wall and is mounted with glue.
Where are decorative brackets used in interiors?
Under decorative shelves in the living room, bedroom, study, hallway. Under ceiling and wall cornices. In door and fireplace portals. In niches near mirrors. In commercial interiors — restaurants, hotels, lobbies. On facades under cornice belts and window sandriks.
Can a polyurethane bracket be used under a shelf with real weight?
For a purely decorative shelf with light items — yes, adhesive mounting is sufficient. For a shelf with real functional load — mechanical fastening through the bracket body or a separate hidden metal holder is necessary.
Is a polyurethane bracket suitable for a cornice?
Yes. This is one of the main application scenarios. Brackets are placed at equal intervals under the cornice and create a classic architectural belt. The spacing interval is 30–80 cm depending on the room scale.
How is a bracket different from a capital?
A bracket is a horizontal visual support element that holds a shelf, cornice, or horizontal part of a portal. A capital is the upper decorative finish of a pilaster or column. These are different architectural roles, although in complex systems they work together.
How to choose the size of a decorative console?
The height of the bracket is 8–12% of the wall height. The depth of the projection is proportional to the depth of the shelf. For portals — 15–20% of the pilaster height. For cornices — proportional to the height of the cornice profile.
Do you need one or two brackets?
Almost always two. For a shelf up to 80 cm long — two, evenly at the edges. Longer than 100–120 cm — three. For a portal and fireplace — always a symmetrical pair.
Can polyurethane brackets be painted?
Yes. Polyurethane accepts acrylic, alkyd, and water-based paint. Optimal sequence: installation → filling gaps → primer → final painting.
How to combine brackets with moldings and pilasters?
A unified style register: the ornament of the bracket, molding, and pilaster must belong to the same architectural tradition. All elements are painted in one color — or in a consistent combination. The scale of adjacent elements should be proportionate.
Where to buy decorative polyurethane brackets?
In the STAVROS catalog: Polyurethane brackets — KRPU-026, KRPU-010, KRPU-033, KRPU.VRS-013 and other models. A full selection of decorative consoles for any task — from compact furniture decor to a large representative bracket for a portal or facade.
About the Company
STAVROS — Russian manufacturer and supplier polyurethane molding decoration: brackets, consoles, moldings, cornices, pilasters, capitals, overlays, and decorative elements for walls, ceilings, portals, furniture, and facades. In the catalog STAVROS polyurethane brackets — a wide selection of sizes and styles: from the compact KRPU-033 for delicate interior tasks to the representative KRPU-026 for large architectural projects. If you are planning a decorative system with brackets, moldings, pilasters, and cornices — choose the entire set in the STAVROS catalog and order it in one batch. This guarantees a uniform material tone, compatibility of elements, and stylistic integrity of the entire decorative program.