Article Contents:
- What are mirror slat panels: construction and material characteristics
- Three structural types
- Physics of the mirror slat surface
- Where mirror slat panels are appropriate: spatial logic
- Hallway and foyer: the first theatrical impact
- Living room: accent behind the sofa or by the fireplace
- Bedroom: caution, mirror by the bed
- Kitchen: an unexpected and effective context
- Polyurethane decor next to mirror slats: the rules of the game
- Molding as a frame: architectural framing of the mirror zone
- Pilasters as vertical accents: a rhythmic dialogue
- Cornice with a niche for lighting: light as the third participant
- Which polyurethane decor absolutely does not go with mirror slats
- Managing reflection: what the mirror slat panel shows
- What should be reflected: strong scenarios
- What should not be reflected: dangerous scenarios
- Risks of visual overload: how not to turn the interior into an attraction
- First risk: mirror slats on multiple surfaces
- Risk two: too high a percentage of mirror in the slat system
- Risk three: too bright or multidirectional light
- Risk four: mirror slats in a small room with a low ceiling
- Stylistic scenarios: how the combination works in different interior concepts
- Modern classicism: framed mirror
- Modern minimalism: borderless mirror
- Art Deco: mirror as luxury
- Scandinavian minimalism: mirror as function
- Technical aspects of installation: what to know before starting work
- Base preparation: absolute priority
- Mirror inserts: material requirements
- Mounting mirror elements: not construction adhesive
- Care for mirror slat panels
- Practical scenarios: hallway, living room, commercial space
- First scenario: hallway 4×1.4 m, ceiling 2.7 m
- Second scenario: living room 30 m², accent wall 4 m × 2.8 m
- Third scenario: boutique hotel, reception area
- Slat panels for walls and mirror: selecting the format for the task
- Mirror color: the nuance that changes everything
- STAVROS: a systematic approach to mirror and decorative solutions
- FAQ: Answers to Popular Questions About Mirror Slat Panels
Mirror slat panels are not just a beautiful material. They are a physical and psychological phenomenon. Reflection lives by its own laws, which do not coincide with the laws of an ordinary surface. And whenpolyurethane decor—relief cornices, moldings, ornamental overlays—appear next to the mirror slat rhythm, a complex system of interactions arises: form, light, reflection of form, reflection of light. All of this either coalesces into harmony or explodes into visual chaos.
This article is about how to manage this system. How to think of a mirror slat surface as an architectural statement, not as an attempt to 'make it look nice'. Howpolyurethane wall decorbecomes an ally of the mirror rhythm—or its destroyer. And most importantly: where the line lies between a strong solution and interior hysteria.


What Are Mirror Slat Panels: Construction and Material Character
Before discussing application, it's necessary to understand the construction. A mirror slat panel is not a monolithic mirror sheet cut into strips. It is a system where the slat structure and the mirror material work together.


Three Structural Types
Type one: wooden slats with mirror inserts between them. A classic slat structure made of solid wood or MDF, with mirror strips installed in the inter-slat spaces. The wooden slats protrude forward, the mirror recedes inward. The result is an alternation: warm matte slat—cold shiny mirror—slat—mirror. This is the most organic and architecturally rich option.
Type two: mirror slats on a dark background. The slats themselves are made of mirror or mirror-lacquered material, the background between them is dark: black, anthracite, dark brown. The effect is reversed: shiny verticals on a dark background. Perceived as a more graphic, more aggressive solution. Requires more space for organic existence.
Type three: mirror slats on a mirror background. Everything is mirrored — both the slats and the background, but with different reflection directions: some surfaces are horizontally mirrored, others are vertically mirrored. This is the most complex and most risky option. Creates a sense of infinite replication of space. Application — exclusively in specific commercial contexts.
For residential spaces, the first type is most appropriate. It is the one that creates a balance between warm material (wood) and cold immaterial (reflection).Wooden slat panelswith mirror inserts — it is a synthesis of natural texture and optical illusion that doesn't shout but is memorable.
Our factory also produces:


Physics of the mirror slat surface
A mirror strip in a slat system does not work like a regular mirror — it does not provide a complete reflection of the space. A narrow mirror insert 20–60 mm wide reflects only that strip of space that falls within its angle of view. At a certain angle — it's a fragment of the ceiling, at another — a fragment of the opposite wall, at a third — a reflection of an adjacent slat.
This is a shimmering, fragmentary, changing reflection. It creates a sense of depth and movement without complete mirror duplication. Unlike a large mirror, which shows everything — and therefore requires absolute order in the interior — a mirror slat panel shows fragments, hints, rather than reveals.
This is a fundamentally important property for understanding the application.Mirror slat panelsdo not require perfect space — they forgive imperfections because they do not reflect them completely. This is their advantage over a monolithic mirror.
Get Consultation
Where Mirror Slat Panels Are Appropriate: Spatial Logic
Any material that multiplies light streams and creates an illusion of depth has its optimal and suboptimal zones of application. Mirror slat surfaces are no exception.
Entryway and Hall: The First Theatrical Impact
This is perhaps the most advantageous zone for mirror slat panels. The entryway serves as the first declaration: it is here that the space announces its character. And it is here that the mirror effect is most productive — because the actual area of the entryway is almost always smaller than desired.
Mirror slat panels on the end wall of the entryway visually 'punch through' the wall, creating an illusion of spatial continuation. The slats, meanwhile, preserve the physical tangibility of the surface: a person does not 'fall into' the mirror, does not lose orientation. They see depth — but feel the boundary.
Slatted panels in the hallway interiorThey solve several tasks simultaneously: visual expansion, character, organization of the perception of the entrance space. Adding mirror inserts to the slat system enhances all three effects.
Limitation: in a very narrow corridor (less than 1.2 m wide), mirror slat panels on the side walls create an effect of an endless tunnel, which is psychologically uncomfortable. A mirror slat surface here is permissible only on the end wall.
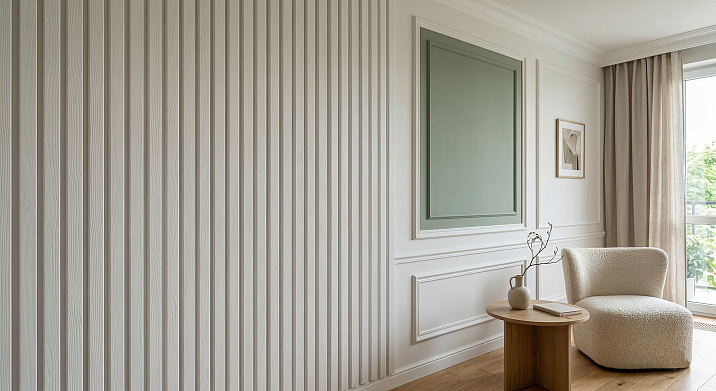
Living Room: Accent Behind the Sofa or by the Fireplace
In the living room, a mirror slat panel is most effective as an accent surface — that one wall which sets the tone for the entire space. The optimal position: the wall behind the sofa or the wall opposite the window.
Mirror inserts in the slat system on the wall opposite the window softly redistribute daylight: reflected fragments of the sky and street scenery create a feeling of greater glazing area. This is especially valuable in apartments with limited natural lighting.
Slatted panels in the living room interiorwith mirror inserts — a solution that works both day and night. In the evening — when artificial light sources begin to reflect in the mirror strips, creating a shimmer characteristic of expensive interiors.
Bedroom: caution, mirror by the bed
In the bedroom, mirror slatted panels require special caution. Psychologists and designers have long formulated a rule: a mirror reflecting the bed is undesirable — it disrupts the feeling of security and peace in the sleeping space.
A mirror slatted panel on the wall parallel to the bed — with a direct reflection of the sleeper — is a violation of this rule. However, a mirror slatted surface on the wall at the foot of the bed, where the mirror strips reflect not people, but the ceiling and the opposite part of the room, is quite acceptable.
slatted panels in the bedroomwith mirror inserts on the far wall, beyond the foot of the bed, create visual depth without disrupting the feeling of shelter in the sleeping area. This is a subtle balance that requires planning before installation begins.
Kitchen: an unexpected and effective context
Mirror slatted panels in the kitchen are rarely discussed — and in vain. A backsplash made of mirror slatted panels or an accent mirror slatted surface in the dining area solves several tasks at once: it multiplies the light flow (which is especially valuable in kitchens without a window or with a northern orientation), creates a feeling of expanded space.
Limitation: the kitchen area with a stove is not a place for a mirror coating. Grease condensation and temperature fluctuations in the cooking area destroy the mirror coating.Slatted panels in the kitchenwith mirror inserts are used only in the dining area or in the storage area — not near the stove.
Polyurethane decor next to mirror slats: the rules of the game
This is the central question of the topic, and the answer to it is ambiguous.polyurethane decor— moldings, cornices, pilasters, ornamental overlays — are by their nature relief, matte, architectural. A mirrored slatted surface is by its nature shiny, reflective, optical. They are fundamentally different in their physical characteristics. How can they work together?
Through the principle of complementing opposites.
Molding as a frame: architectural framing of a mirror zone
The most organic applicationdecorative elements made of polyurethanenext to mirrored slatted panels is creating a frame. A molding, cornice, or simple frame made of polyurethane elements outlines the mirrored slatted surface, gives it a boundary, and transforms it from a 'part of the wall' into an 'architectural element.'
A mirrored slatted panel without framing is an unfinished construction. Its edges simply 'break off' on the wall, creating a sense of incompleteness. A molding around the perimeter of the mirrored slatted zone solves this problem: it tells the observer, 'here begins a special element, and here it ends.'
Technically: the molding is mounted flush with the front surface of the slats or with a slight protrusion (5–10 mm) — so that it covers the gap between the slatted system and the wall. It is cut at a 45° angle at the corners. Painted to match the color of the slats or in a contrasting color — depending on the design task.
Pilasters as vertical accents: rhythmic dialogue
decorative polyurethane elementsin the form of pilasters — vertical flat columns — create an interesting dialogue with the vertical rhythm of the slats. Pilasters are spaced with a large step (e.g., every 60–80 cm), slats — with a small step (e.g., every 40–60 mm). The large rhythm of the pilasters organizes the fine rhythm of the slats, creating a hierarchy: a large structure and detailing within it.
This is a technique from classical architecture, transferred into a modern interior. Polyurethane pilasters flank the slatted area on the left and right—acting as architectural supports between which a mirrored slatted screen is stretched. The substantial framing makes the light, mirrored space even more striking by contrast.
An important nuance: the pilasters must be sufficiently large to stand out against the mirror shine. A thin 20×10 mm molding next to the mirror slats will simply get lost. Pilasters with a profile height of at least 40 mm are needed.
Cornice with a niche for lighting: light as the third participant
A polyurethane cornice with a shelf—a niche for an LED strip—positioned above the mirrored slatted panel creates a powerful lighting effect. The LED strip in the cornice niche directs light downward along the mirrored slatted inserts. The light glides over the mirrored strips, reflects, and multiplies. The surface begins to glow from within.
Slatted panels with lightingIn the version with mirrored inserts, they turn this principle into a maximally effective solution: wooden slats in warm light, with mirrored inserts multiplying this glow. The polyurethane cornice simultaneously serves both a decorative and a technical function: it conceals the light source and creates an architectural upper boundary for the system.
Technically important: the distance from the LED strip to the surface of the mirror slats must be sufficient for the light to distribute evenly — at least 8–10 cm. If the strip is placed too close, spotty light patches will appear on the mirror inserts instead of uniform illumination.
Which polyurethane decor absolutely does not go with mirror slats
There are situations where using polyurethane decor next to mirrored slatted panels creates an irresolvable conflict:
Rich ornamental molding against a mirror background. Ornamental polyurethane overlays—leaves, flowers, intricate arabesques—on a wall next to a mirrored slatted surface create a triple conflict: a conflict of textures (matte ornament vs. mirror shine), a conflict of styles (classical molding vs. modern slatted rhythm), and a conflict of scales (large ornament vs. fine slatted detail). All three conflicts at once—this is no longer design, it's a catastrophe.
Polyurethane overlays directly on the mirror surface. Some try to glue decorative polyurethane overlays directly onto the mirrored inserts—to 'enrich' the decor. This disrupts the integrity of the mirror effect, creating a strange visual hybrid. The mirror surface should remain clean.
A cornice that is too high above low slats. If a 150 mm high polyurethane cornice is hung above 800 mm high slatted panels, the proportions are disrupted. The cornice 'overpowers' the slatted system, making it look grounded. The height of the cornice should not exceed 1/7 to 1/6 of the height of the slatted field.
Managing reflection: what a mirrored slatted panel shows
A mirror shows what is opposite it. This is a banal truth—but it defines the main rule for using mirrored slatted panels: before installing a mirrored slatted surface, you need to look at the opposite wall and ask yourself: 'Do I want this to be reflected?'
What should be reflected: strong scenarios
A window or glazed door. A mirrored slatted panel opposite a window softly replicates natural light and the outdoor view. The fragmented reflection of the sky and greenery through the mirrored strips creates a lively, changing image. This is a strong scenario—the space 'breathes.'
A neutral light-colored wall. If opposite a mirrored slatted panel is a light-colored painted wall without visual 'clutter,' the mirror reflects pure color and volume. The space visually expands without creating informational overload.
An elegant light fixture or decorative object. A deliberately placed beautiful item opposite a mirrored slatted system 'doubles' in reflection—and becomes part of the overall composition. This is a thoughtful designer move.
What should not be reflected: dangerous scenarios
A cluttered surface. A shelf with randomly placed items, a cluttered countertop—any 'informational noise' opposite a mirrored slatted panel is doubled. Instead of expanding the space, you get a duplication of disorder.
Another mirrored surface. Two mirrors opposite each other—a classic 'infinite corridor' trap. Mirrored slatted panels opposite a regular mirror create infinite replication. Psychologically, this is unsettling; visually, it is tiring.
Electrical cables, meters, utility lines. Any uncovered technical elements on the wall opposite the mirror slat system will constantly be present in the space in duplicate.
A simple rule: before deciding to install mirror slat panels, stand at the intended installation wall and look directly opposite. What you see will be reflected. If you like what you see, the mirror slat surface will enhance it. If not, either change the opposite wall first, or choose a different location for the mirror slats.
Risks of visual overload: how not to turn the interior into an attraction
A mirror is a powerful tool, and like any powerful tool, it is dangerous when misused. Let's examine specific risks.
First risk: mirror slats on multiple surfaces
Mirror slat panels on two or more walls create multiple mutual reflections. The space begins to 'break'—a person loses the sense of the room's real boundaries. This is appropriate only in a few specific commercial scenarios—a dance hall, a fitness studio. In a residential space, it is almost always overkill.
Rule: mirror slat panels—only on one surface in a room.
Second risk: too high a percentage of mirror in the slat system
If mirror inserts occupy more than 50–60% of the slat system's area, the effect of the slat rhythm is lost. The surface is perceived as a mirror with wooden strips, not as a slat panel with mirror accents. Psychologically—too much reflection, too little materiality.
Optimal ratio: 30–40% mirror, 60–70% slat. With this ratio, the slat panel remains a slat panel—with a mirror character, but not a mirror nature.
Risk three: too bright or multidirectional light
Mirror surfaces under bright directional light create glare—sharp spots of reflected light. If there are several directional light sources from different sides in a room, the mirrored slatted surface turns into a flickering screen: numerous glares that change with every movement. This is tiring.
Solution: soft diffused light or directional light, but from one side.Slatted panels with lightingshould have a diffuser in the area of mirror inserts.
Risk four: mirror slats in a small room with a low ceiling
In a room with a 2.4 m ceiling, vertical mirrored slatted panels create an illusion of height—but only if they stretch from floor to ceiling. If the panel ends at a height of 1.5–1.8 m, the cut-off boundary is perceived in the reflection as a horizontal 'step'—an unclean, uncomfortable image.
In rooms with low ceilings: either mirrored slatted panels at full height, or horizontal orientation of the slats (they visually widen, rather than raise, the space).
Stylistic scenarios: how the combination works in different interior concepts
There is no universal recipe—there is a stylistic context. Let's examine the main scenarios for using mirrored slatted panels and polyurethane decor in different interior styles.
Modern classicism: mirror in a frame
A style that combines modern materials and classical architectural elements. The mirror slat panel in this context is a 'modern mirror' in a classical polyurethane frame. Wooden slats in warm tones (oak, walnut), mirror inserts in metallic colors (bronze, champagne, gold), polyurethane molding around the perimeter with a classical profile.
decorative polyurethane elementsIn this scenario: a rectangular frame made of molding with a profile height of 30–50 mm, corner rosettes at the junctions of horizontal and vertical elements. Pilasters on the sides of the slat zone — only if the ceiling height allows (from 2.8 m).
Color solution: all polyurethane elements in the color of the slats — warm white or ivory. Not a contrasting option — otherwise the frame will 'overpower' the mirror center.
Modern minimalism: mirror without borders
In a minimalist interior, polyurethane decor is minimal or absent. Mirror slat panels exist as an independent, pure element — without framing, without ornament. Slats and mirror in the same color field: black slats and mirror inserts tinted black. Or white slats and clear mirror.
The only permissible polyurethane element: a thin baseboard and ceiling cornice of a minimalist profile. Not for decoration — for architectural completion.
slatted wall panels for interior finishingIn this scenario, they must be maximally precise in geometry: not a single millimeter of misalignment, perfectly even ends, flawless installation. Minimalism is ruthless to errors.
Art Deco: mirror as luxury
Art Deco is a style in which mirror is one of the key materials. Mirror slat panels are completely in their place here. MDF slats with lacquered finish in ebony or rosewood color, mirror inserts in tinted colors — bronze mirror, gray-smoky, gold.
Polyurethane decor in Art Deco: geometric moldings with broken lines characteristic of this style. No sheet ornament — only geometry: trapezoids, zigzags, stepped profiles. Pilasters with a geometric capital.
Color palette: black, gold, bronze, ivory.polyurethane wall decorIn this combination, it is painted gold or bronze — chrome is too cold for Art Deco.
Scandinavian minimalism: mirror as function
In Scandinavian interiors, the mirror is primarily a functional element, not a decorative one. Mirror slat panels here are used with wooden slats in natural light tones (birch, ash, light oak) and transparent mirror inserts.
Polyurethane decor: only the simplest wooden or polyurethane skirting board with a clean profile. No ornaments — this contradicts the ideology of the style.Wooden slat panelsIn natural finishes and clean mirror inserts — they are a sufficient statement in themselves.
Technical aspects of installation: what you need to know before starting work
A beautiful solution is ruined by technical errors. Mirror slat panels are technically more complex than regular ones — and mistakes here are more painful.
Base preparation: absolute priority
Mirror inserts mercilessly reflect any unevenness of the base. If the wall is crooked — in the mirror strips this will be visible as a distorted reflection. The wall for the mirror slat system must be perfectly even: permissible deviation — no more than 1–2 mm over 2 m.
If the wall is uneven — leveling is mandatory: plastering or installing battens leveled to a plane.installation of slatted panelsMounting on battens — a more labor-intensive but more reliable method for mirrored surfaces: battens allow compensation for wall irregularities.
Mirrored inserts: material requirements
Mirrors for slat inserts must be safe — with a film backing on the rear side. If broken, they do not shatter into sharp fragments. Mirror element thickness: 3–4 mm for narrow inserts up to 60 mm, 4–6 mm for wider ones.
Tinted mirrors (bronze, graphite, champagne) are visually less aggressive than clear ones: they provide a softer, muted reflection. This is especially important for living spaces where the reflection should not be too bright.
Mounting mirror elements: not construction adhesive
A common mistake is mounting mirrors with regular mounting adhesive or 'liquid nails.' These compounds contain solvents that destroy the mirror's amalgam on the back side: within 3–6 months, the mirror darkens at the edges, and 'gray spots' appear. For mirrors — only special mirror adhesive without aggressive components.
How to install slatted panelsMounting to the wall correctly — this is a topic covered in a separate comprehensive guide. But mounting mirror elements within a slat system requires even greater attention.
Care for mirrored slat panels
Mirrored inserts in a slat system require regular care — unlike regular slat panels. Dust accumulates in the space between the slats and is visible in the reflection. Care: soft cloth without abrasive particles, special ammonia-free mirror cleaner (ammonia destroys the amalgam). Do not use vacuum brush attachments — they scratch the mirror surface.
Practical scenarios: hallway, living room, commercial space
Theory becomes concrete through scenarios.
Scenario one: hallway 4×1.4 m, ceiling 2.7 m
The end wall (1.4 m wide) is decorated with a full-height mirror slat system. Slats are made of MDF, painted dark gray. Mirror inserts are tinted, graphite, 30 mm wide. Slat/mirror ratio: approximately 65/35.
Around the perimeter of the mirror slat zone —polyurethane wall decor— as a flat molding 30×10 mm, painted the same dark gray. The molding creates a clear boundary and visually 'hangs' the slat system like a painting.
Side walls are smooth, light gray. Ceiling is white. Opposite the slat zone are clothing hooks and a minimalist console. Reflection: light wall and neat objects.
Effect: the corridor visually 'recedes' into depth through the mirror strips, appearing twice as long as it actually is.
Scenario two: living room 30 m², accent wall 4 m × 2.8 m
Accent wall behind the sofa. Mirror slat panels made of solid oak in a natural tone with clear mirror inserts 40 mm wide. Slats 60 mm wide. Panel height 2.2 m — not full height, leaving 60 cm of neutral space to the ceiling.
Along the top line of the panel is a polyurethane cornice with a niche for an LED strip. A warm white 2700K LED strip is directed downward along the mirror inserts. On the sides are 80 mm high polyurethane pilasters, painted in ivory.
Opposite is a window. Daylight from the window reflects in the mirror inserts, softly illuminating the space above the sofa.
Effect: the wall behind the sofa lives in two registers — warm wood and shimmering mirror. In the evening, the LED lighting creates a theatrical image.
Scenario three: boutique hotel, reception area
The wall behind the reception desk is 6 m × 3.2 m. Mirror slatted MDF panels in matte black finish with bronze mirror inserts. The slats are wide — 80 mm, the inserts — 50 mm. Ratio 60/40.
Along the top line is a massive 120 mm high polyurethane cornice, painted in matte gold. On the sides are pilasters with an art deco geometric capital. Built-in spotlights on the sides of the slatted panel are directed at a 30° angle — creating a grazing light that emphasizes the bronze reflections.
Opposite is a minimalist dark stone reception desk and several tall plants. Reflection: the strict horizon of the dark table, the verticals of the plants, fragments of lighting.
Effect: the reception space is perceived as deep and status-worthy. The mirror inserts create a sense of expensive material without excess.
slatted panels for wallsand mirror: selecting the format for the task
Different formats and types of slatted panels yield different results when introducing mirror elements. Knowing this, you can more precisely select a construction for a specific task.
| Batten panel format | Optimal mirror insert width | Reflection character | Recommended zone |
|---|---|---|---|
| Narrow battens 20–30 mm | 15–25 mm | Flickering, fragmented | Hallway, foyer |
| Medium battens 40–60 mm | 30–50 mm | Balanced, rhythmic | Living room, bedroom |
| Wide battens 80–120 mm | 50–80 mm | Large, expressive | Commercial projects |
| Modular panels | Full modular mirror sections | Geometric, structural | Public spaces |
slatted modular wall panelwith mirror sections is a separate format requiring special design. Here, the mirror is not a strip between slats, but a whole module. The effect is architectural, large-scale, suitable for large spaces.
Mirror color: the nuance that changes everything
Clear mirror is not the only option. Tinted mirrors radically change the character of mirror slat panels.
-
Bronze mirror—a warm, 'aged' tone. Softens the reflection, gives the interior a patina of time. Perfect for classic and art deco scenarios.
-
Graphite mirror—a cool dark tone. The reflection is almost unreadable—more of a hint of it. Suitable for modern minimalism and loft.
-
Champagne — a neutral warm tone between transparent and bronze. A versatile option that works in most styles.
-
Silver (standard transparent) — maximum clarity of reflection. Suitable for Scandinavian and contemporary styles, requires perfect order in the interior.
The color of mirror inserts should correspond to the metallic accents in the room: bronze mirror — to bronze hardware, graphite — to black details, champagne — to gold.
STAVROS: a systematic approach to mirror and decorative solutions
Working with mirror slat panels and polyurethane decor requires precision at every stage: from material selection to final installation. STAVROS is a manufacturer that understands this system as a whole.
slatted panels for wallsSTAVROS products are available in a wide range of formats — from narrow 20 mm to wide 120 mm slats — allowing you to select the optimal scale for introducing mirror inserts for any task and any space. The precise geometry of the products ensures a perfect seam between the slat and the mirror insert.
Product linepolyurethane decorThe STAVROS line covers the entire spectrum of architectural elements: from thin geometric moldings for framing mirror zones to cornices with a shelf for hidden lighting.decorative polyurethane elementsSTAVROS products are manufactured with precise dimensions and a perfectly smooth surface for painting — which is critically important when creating a system where polyurethane decor interacts with mirror surfaces.
STAVROS is not just a catalog of materials. It is an opportunity to design interiors systematically: choose slats, decor, and fasteners from a single manufacturer who understands how all elements work together. When a mirror reflects quality and relief emphasizes architecture — that is the result created with STAVROS.
FAQ: Answers to Popular Questions About Mirror Slat Panels
Can mirror slat panels be used in a bathroom?
Yes, provided that a special moisture-resistant mirror with edge protection against moisture penetration is used. The slats should be made of moisture-resistant MDF or PVC. Wooden slats are not used in bathrooms without special treatment.
How long will the mirror inserts in a slat system last?
With proper installation (special mirror adhesive without solvents) and regular care — 15–20 years or more. The main enemies of the mirror amalgam are aggressive solvents during installation and ammonia-based cleaning products during maintenance.
How to properly match the color of mirror slat panels and polyurethane molding?
The main rule: the molding is painted to match the color of the slats, not the mirror. This creates visual unity between the frame and the slat field, while the mirror inserts 'shine' against this background as an independent accent.
Is special lighting required for mirror slat panels?
Not mandatory, but desirable. Directed side lighting from a single source reveals the play of reflections in the mirror inserts. Diffused general lighting provides a calmer, less theatrical effect. The choice depends on the goal: a theatrical accent or a subtle expansion of space.
What is the optimal height for a slat panel with mirror inserts for a 2.7 m ceiling?
For a 2.7 m ceiling, the optimal height for the slatted zone is 2.2–2.4 m. The remaining space up to the ceiling (30–50 cm) is filled with a neutral surface or a polyurethane cornice. A full-height panel up to the ceiling is acceptable in a minimalist style, provided there is a clear finishing cornice.
Are mirror slatted panels difficult to install yourself?
The slatted part is installed in the same way as regular panels—this is described in detail in the guide on that,How to install slatted panels. Mirror inserts require care when applying special adhesive and precise trimming. With basic construction skills, it is feasible to do it yourself. If you lack experience working with glass materials, it is recommended to hire a specialist to install the mirror elements.