


Article Contents:
- Why verticality works on height perception: physiology and architecture
- How the gaze moves along the vertical
- Architectural principle: the column as a metaphor for height
- The number of verticals matters
- Where to best use vertical panels: rules for placing accents
- Accent wall in the living room
- Bedroom headboard wall
- Hallway and corridor
- Office and work area
- Fireplace or hearth area
- How polyurethane wall moldings define the structure of a plane
- What is 'plane structure' and why it is important
- Ceiling cornice: the top point of the system
- Horizontal molding belt: a horizontal that does not interfere with the vertical
- Vertical pilasters as a rhythmic accent
- Baseboard: the bottom point of the system
- Combination in modern and neoclassical interiors
- Modern interior: geometry and precision
- Neoclassical interior: slat as an architectural element of classical tradition
- Intermediate register: modern classic
- Approach for low ceilings: special rules
- Rules for selecting slats for low ceilings
- Special technique: ceiling lighting through a cornice
- Monochromatic solution for maximum effect
- How to avoid overdoing vertical graphics
- First mistake: battens on all four walls in a small room
- Second mistake: too large battens with a low ceiling
- Third mistake: moldings that are too large in scale
- Fourth mistake: vertical battens without horizontal boundaries
- Fifth mistake: inconsistent molding style
- Sixth mistake: lack of expansion gap at the ceiling and floor
- Technical parameters for installing vertical batten panels
- Frame for vertical slatted panels
- Panel installation: sequence
- Polyurethane molding installation: work order
- Material Calculation
- Comparison table: parameters for different rooms
- About the Company STAVROS
- FAQ: Answers to Popular Questions
There is one question that arises in every second residential interior project: how to visually raise the ceiling? The standard height of 2.5 m is a given for most Russian apartments, and this given must be worked with. Not to accept, not to mask—but to actually work: with smart architectural solutions that change the perception of space without a single extra centimeter.Vertical slatted panels—one of the most effective tools for this task. Combined with properly selectedpolyurethane wall moldingsthey create a vertical wall architecture that literally lifts the gaze—and thus lifts the ceiling. Let's explore exactly how this works and how to achieve maximum effect.


Why verticality works for height perception: physiology and architecture
Before discussing specific materials and techniques, it's necessary to understand the principle. Why do vertical lines on a wall create a sense of greater height? This is not magic or a subjective impression—it's the physiology of human vision.


How the gaze moves along the vertical
When a person sees a vertical line, the gaze involuntarily moves along it—from bottom to top. This is a reflexive eye movement: the vertical sets the direction, and the gaze follows it. Upon reaching the top point of the vertical line (the ceiling), the gaze 'fixates' this height—and the brain perceives it as greater than when scanning the wall horizontally.
Horizontal lines work exactly the opposite: the gaze moves along the wall, tracing its width—and the brain compares the room's height to its width. In narrow spaces, this comparison is always 'to the detriment' of height. In wide spaces—it's neutral or even enhances the sense of spaciousness, but not height.
Vertical slatted panels use this property of vision directly. Each slat is a vertical line. Their repetition creates a rhythm of vertical impulses that guide the gaze upward again and again. The result: the ceiling is perceived as higher than it actually is.
Our factory also produces:


Architectural principle: the column as a metaphor for height
This principle has been known to architects for millennia. The colonnades of Greek temples, Gothic naves with vertical ribs, Renaissance pilasters on palace facades—all these are vertical elements that visually 'lift' the structure. Modern vertical slatted panels are the same architectural idea adapted for contemporary residential interiors.
The difference is only in scale and material. But the principle remains unchanged: the vertical lifts.
Get Consultation
The number of verticals matters
One important nuance: the effect of vertical elongation depends on the number of vertical lines and their rhythmic consistency. One wide vertical stripe on a wall is an accent, but not a rhythm. Rhythm is created by repetition: 10, 15, 20 slats on a wall—this is already a system that works at the pattern level.
The optimal number of vertical slats on a 3 m wide wall with 60 mm slats and a 12 mm gap is about 21 slats. This is a frequent enough rhythm to create a textural effect and direct the gaze upward.
Where to best use vertical panels: rules for placing accents
Vertical slatted panelsdo not work the same everywhere. Proper placement is half the success.
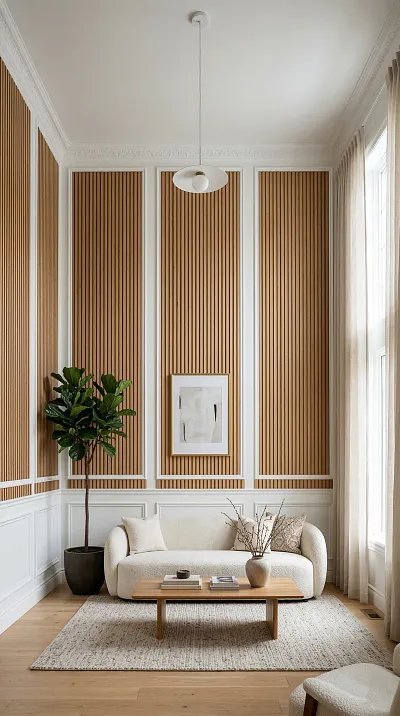
Accent Wall in Living Room
The most common application. An accent wall is the wall seen first upon entering a room. Typically, this is the wall behind the sofa, the wall with the TV, or the wall opposite the entrance.
Vertical slats on a full-height accent wall create a 'deep' background—the wall ceases to be a flat plane and becomes an architectural object. With proper side lighting, shadows in the gaps between the slats give the surface liveliness and volume.
Slat size for an accent wall in a living room with a ceiling height of 2.5–2.7 m: width 50–80 mm, gap 10–15 mm. This is a balanced ratio—large enough to read as an architectural element, yet delicate enough not to feel oppressive.
Bedroom headboard wall
The bedroom is an intimate space, and the accent wall here should be especially delicate. Vertical slats behind the bed headboard create a background that 'hugs' the sleeping area. Neutral tones (whitewashed wood, light gray, soft warm beige) combined with thin slats of 30–50 mm create a textile-like, soft, and cozy rhythm.
In the bedroom, the effect of vertical elongation is less important than in other rooms. Here, vertical slats primarily work as a decorative background that creates atmosphere. But an additional visual 'lift' of the ceiling is never superfluous.
Hallway and corridor
Already discussed in detail in the context of hallways—here we will just remind you of the principle.Wall-mounted slatted panelsVertical orientation in a corridor is a mandatory solution for ceilings up to 2.7 m. The narrow space of the corridor with vertical slats 'opens up' upward, and the tight passage stops feeling oppressive.
Office and work area
A study with vertical slats on one or two walls is an environment for concentration. The vertical rhythm creates a sense of order, structure, and focus. Dark-toned slats (graphite, wenge, dark oak) in the study create a business-like atmosphere without aggression. Acoustic slatted panels work especially well for a study—they solve the problem of echo in a confined workspace.
Fireplace or hearth area
A wall around a fireplace clad with vertical slats is a powerful architectural technique. Slats on the sides of the fireplace create a vertical 'portal' that directs the gaze upward from the fire. This same solution works for areas with a TV, built-in cabinets, or niche shelves.
How polyurethane wall moldings define the structure of a plane
A slatted panel creates rhythm. A molding creates structure. These are two different tools that work in tandem.
What 'plane structure' is and why it's important
A wall without structure is a surface. A wall with structure is an architectural element. Structure means: there is an upper boundary (cornice), a lower boundary (baseboard), and possibly horizontal divisions (belts) and vertical divisions (pilasters). Each element creates order and hierarchy—and the eye understands 'what's happening here.'
Preciselypolyurethane decorative moldingsThey serve as structural elements of the wall. They transform a set of slats into a complete architectural composition.
Ceiling cornice: the top point of the system
The cornice conceals the wall-ceiling transition and creates a visual frame for the vertical slats. Psychologically, the cornice 'holds' the vertical lines of the slats—it sets their upper limit, emphasizing the endpoint of each vertical. Without a cornice, the slats 'run into the ceiling' and lose their sense of completion.
The width of the cornice for vertical slat panels is selected according to the rule of proportional correspondence: 70–120% of the slat width. For 60 mm slats—a 50–80 mm cornice. For 80 mm slats—a 60–100 mm cornice.
The cornice profile is determined by the interior style. For minimalism and contemporary style—a rectangular profile with a thin bevel or neutral slope. For modern classic—a profile with a roundover and a shelf. For neoclassical—a more complex relief with several setbacks.
Horizontal molding belt: a horizontal element that does not interfere with the vertical
At first glance, it seems paradoxical: if the goal is to create a vertical effect, why add a horizontal molding? The answer lies in architectural logic: a horizontal belt at a height of 1.0–1.2 m divides the wall into two registers, and each register is perceived as an independent vertical plane. Two short 'columns' appear visually taller than one tall one—because the height-to-width ratio in each register is more 'dynamic'.
This is a technique used by Renaissance architects: no classical wall was continuous from floor to ceiling—there was always a belt dividing the lower zone (the plinth) and the upper zone (the main wall field).
Vertical pilasters as a rhythmic accent
Vertical molding pilasters on a slatted wall reinforce the vertical principle. A pilaster is a wider and more relief vertical element compared to a slat. It sits 'on top' of the slatted rhythm as an architectural accent, creating a pause in the rhythm of the slats and establishing a scale reference.
A polyurethane pilaster 60–80 mm wide with moderate relief is installed on the sides of the slatted field (as framing) or at equal intervals, dividing a long wall into architectural sections. This transforms the wall into a 'gallery'—each section between pilasters is perceived as an independent rectangle with slatted infill.
Baseboard: the lowest point of the system
Baseboard is the lower boundary of the wall system. When installing vertical slatted panels, the baseboard must account for the thickness of the underlayment: if the panel protrudes from the wall, the baseboard covers the lower end of the panel without a gap. A visible gap between the baseboard and the lower end of the panel is an unfinished installation that immediately catches the eye.
Baseboard height for vertical slatted panels: 60–100 mm. A taller baseboard (100–120 mm) is permissible in rooms with ceilings from 2.8 m — it adds significance to the lower zone without lowering the overall space.
Combination in modern and neoclassical interiors
Vertical slatted panels and polyurethane moldings are a universal system. But it looks fundamentally different depending on the style. Let's consider two key registers.
Modern interior: geometry and precision
In a modern, minimalist, or Scandinavian interior, vertical slats are pure geometry. No ornaments, no decorative 'noise.' Slats made of MDF or bleached oak, painted in a neutral tone (white, light gray, warm beige). The gap is minimal — 8–12 mm. The cornice is rectangular, profile 50–70 mm without relief. The baseboard is laconic.
All the power lies in rhythm and proportions. This is an interior where decor exists through relationships, not through adornment.Polyurethane wall decorHere — not acanthus and not volute, but a clear profile with a fine bevel. Simplicity as an architectural statement.
Neoclassical interior: slat as an architectural element of the classical tradition
In neoclassicism, everything is different. Here, slatted panels work in tandem with more complex polyurethane profiles: cornices with twists and protrusions, horizontal belts with relief, corner blocks, decorative overlays. Slats made of natural wood—oak, ash—with oil or varnish. The gap is slightly larger: 15–20 mm. The color of the slats is a warm natural tone or classic white coating.
Vertical slats in neoclassicism function as a modern interpretation of column fluting—decorative grooves that adorned ancient columns. This is a cultural reference, understood on an intuitive level, even if the viewer doesn't know its historical source.
Intermediate register: modern classic
Most real projects lie between minimalism and classicism—in the zone of 'modern classicism'. Here, vertical slats 60–80 mm wide made of MDF or solid wood in neutral tones are combined with cornices of moderate profile (80–100 mm), horizontal belts, and delicate pilasters.
This is the most commercially in-demand register: expressive enough to look professional, neutral enough not to become 'outdated' in 5–7 years.
Approach for low ceilings: special rules
Rooms with ceilings 2.5 m and lower require a special tactic. The principle of 'less, higher' applies here.
Rules for selecting slats for low ceilings
Narrow slats are a priority. Width 30–60 mm. A narrow slat creates a frequent, 'dynamic' vertical rhythm that draws the eye upward faster than a wide rhythm. Compare: 15 slats 50 mm wide on a 3 m wall and 10 slats 80 mm wide on the same wall. The first option is more dynamic—the eye 'runs' along the verticals more frequently, the sense of height is stronger.
Full panel height. Vertical slats from floor to ceiling—without horizontal divisions within the slatted area itself. If a horizontal belt is used—only outside the slatted field (for example, on an adjacent non-slatted wall).
Light tones. White or light gray battens in a room with a low ceiling maximize light reflection. This is not only a visual but also a physical effect: more reflected light creates a greater sense of air and volume.
Cornice — minimal. With a 2.5 m ceiling, a cornice wider than 80 mm begins to visually lower the ceiling. Optimum: 50–70 mm in a simple profile.
Special technique: ceiling lighting through the cornice
One of the most powerful techniques for low ceilings is an LED strip behind the ceiling cornice, directed at the ceiling. The diffused light flowing from behind the cornice onto the ceiling plane creates a 'floating' ceiling effect: the boundary between the wall and ceiling blurs, making the ceiling appear farther away. Combined with vertical battens, this technique radically changes the perception of space.
Technically, this is not difficult: a warm or neutral white LED strip (3000–4000 K) is installed behind a polyurethane cornice. The cornice must have a reverse cavity of sufficient depth — at least 20–25 mm — to accommodate the strip and create the required diffusion angle.
Monochromatic solution for maximum effect
With a low ceiling, a monochromatic solution works especially well. When the battens, moldings, and ceiling are painted in a single color — all transitions are erased. The wall becomes a sculptural surface with a relief of shadows, not a set of disparate elements. The ceiling boundary 'dissolves' — and the ceiling is perceived as higher.
Classic monochrome for this technique: white or light gray (RAL 9003, RAL 7047). Warm option: 'ivory' tone (RAL 1013) or 'cashmere' (RAL 9001).
How not to overdo it with vertical graphics
Vertical battens are a powerful tool. Like any powerful tool, when applied incorrectly, it produces the opposite effect. Let's consider the boundaries of what is acceptable.
First mistake: slats on all four walls in a small room
When all walls of a small room (10–14 sq.m.) are covered with vertical slats, the space turns into a cage. The eye finds no 'exit'—a neutral surface to 'rest' on. Rule: maximum two walls with slats in one room. Preferably, one accent slatted wall and three neutral ones.
Second mistake: slats that are too wide for a low ceiling
Slats 120 mm wide or more with a 2.5 m ceiling create a monumental but oppressive rhythm. Wide slats are suitable for large rooms with ceilings from 3 m. In standard apartments—only narrow and medium formats.
Third mistake: moldings that are too large in scale
A massive 150 mm cornice over delicate 40 mm narrow slats—a mismatch in scale. The cornice 'presses down' the slats, destroying their vertical impulse. Moldings should be proportionate to the slats: no larger or smaller than 30–40% relative to the slat width.
Fourth mistake: vertical slats without horizontal boundaries
Slats without a cornice and baseboard look unfinished. The eye moves up the slat—and 'gets lost' at the unfinished joint with the ceiling. Cornice and baseboard are mandatory finishing elements of a vertical slat system. Without them, the wall is construction material, not design.
Fifth mistake: uncoordinated molding style
A Baroque cornice with acanthus leaves over modern minimalist slats is not a 'rich contrast.' It's a stylistic error. The molding should belong to the same architectural language as the slats. In a modern interior—simple profiles. In classic—relief ones. In neoclassicism—moderate profiles with traditional elements.
Mistake six: lack of expansion gap at ceiling and floor
When installing vertical slatted panels, an expansion gap at the ceiling and floor is mandatory: 5–10 mm. During thermal expansion (seasonal changes in humidity and temperature), the slats lengthen — and without a gap, they press against the ceiling, causing buckling across the entire surface. This gap is covered by the cornice and baseboard.
Technical parameters for installing vertical slatted panels
This section is for those who want to understand not only the design but also the technology.
Frame for vertical slatted panels
With vertical orientation of the slats, the frame guides are positioned horizontally. This is fundamental: the slat must be secured at several points along its height — meaning horizontal guides intersect it along its entire length.
Spacing of horizontal guides for vertical MDF slatted panels: 400–500 mm. This means that on a wall 2.5 m high, there will be 5–6 horizontal profiles.
The frame is attached to the wall using direct hangers: hanger spacing along the horizontal — 500–600 mm. Cross-section of the guide profile — CD 60/27 or equivalent.
Panel installation: sequence
Installation of vertical slatted panels starts from one corner and proceeds in one direction. Fastening is concealed, either via clips in the grooves of the backing, or through the backing with screws in the area hidden by the slats.
Check verticality with a level every 3–4 panels. Even a slight deviation in one panel accumulates and becomes noticeable by the end wall.
Detailed installation technology is described in the manualDIY Batten Panels— all nuances from base preparation to finishing are explained step by step.
Installation of polyurethane moldings: work sequence
Sequence: first vertical slatted panels, then moldings. Never the reverse.
-
Install slatted panels with expansion gaps.
-
Dry-fit and trim the cornice, horizontal belts, and pilasters.
-
Install the ceiling cornice with adhesive (with an open time of 2–3 minutes).
-
Install horizontal belts (if used).
-
Install vertical pilasters.
-
Install the skirting board last.
-
Seal all joints with acrylic putty.
-
Sand, prime, paint.
Material calculation
For calculationslatted wall panels for vertical installation: wall width / (slat width + gap) × wall height + 10% margin.
For moldings: room perimeter (for cornice and skirting) + total length of all horizontal belts and vertical pilasters + 15% margin for mitering corner joints.
Comparison table: parameters for different rooms
| Room | Ceiling Height | Batten width | Gap | Crown Molding | Skirting board |
|---|---|---|---|---|---|
| Corridor/entryway | Up to 2.5 m | 30–50 mm | 8–12 mm | 50–60 mm | 60 мм |
| Bedroom | 2.5–2.7 m | 40–60 mm | 10–14 mm | 60–80 mm | 70–80 mm |
| Living room | 2.5–2.7 m | 60–90 mm | 12–18 mm | 70–100 mm | 80–100 mm |
| High-ceiling living room | 2.8–3.2 m | 80–120 mm | 15–25 mm | 100–130 mm | 100–120 mm |
| Office | 2.5–3 m | 50–80 mm | 10–15 mm | 70–90 mm | 80 мм |
| Hall/vestibule | 3 m+ | 100–160 mm | 20–35 mm | 120–160 mm | 100–130 mm |
About the company STAVROS
Ceiling height is a given. But the perception of height is a choice. STAVROS produces vertical slatted panels from solid wood and MDF in the full range of widths: from delicate narrow slats for corridors and bedrooms to large architectural formats for tall, representative spaces. Each panel is precise geometry, stable coating, ready for installation on a frame or directly on the substrate.
In the STAVROS assortment—polyurethane wall moldingsOver 200 profiles for all styles and scales: from minimalist rectangular to complex classical with multi-step relief. Each profile has precise dimensions, a basic white coating, and is ready for painting in any color.
STAVROS is not just a material. It is a system where slats and moldings are designed as a unified architectural solution. The company's specialists help select proportions, coordinate styles, and calculate the amount of material—so the result is exactly as envisioned. Because an interior where everything is in its place starts with the right components.
FAQ: Answers to popular questions
How realistic is it to raise the ceiling with vertical slats?
The visual effect is 15–25% of the actual height. With a 2.5 m ceiling, properly selected vertical slats, light tones, and cornice lighting—the perceived height corresponds to an actual ceiling of 2.8–3 m. This is a measurable, reproducible effect, not a subjective 'it seems.'
On which wall is it better to mount vertical slatted panels?
Priority is the accent wall: the wall seen first upon entering the room, or the wall opposite the main light source. Second priority is the wall behind the sofa (in the living room) or the headboard wall (in the bedroom).
Can vertical slats be combined with horizontal ones in the same interior?
Yes, but in different zones. Vertical slats on the accent wall, horizontal on the adjacent one — this is the 'rhythm change' design technique. Both types on one wall create a grid (sometimes an intentional technique in expressive projects), but require professional calculation.
Is a frame needed for mounting vertical slatted panels on a flat wall?
With wall irregularities up to 3–5 mm — direct mounting is acceptable for lightweight panels. With larger irregularities, when it's necessary to hide utilities, in wet rooms — a frame is mandatory.
What adhesive to use for polyurethane moldings?
Acrylic mounting adhesive (like 'liquid nails') or specialized adhesive for polyurethane. An open exposure of 2–3 minutes after applying the adhesive, before pressing to the base, is mandatory.
Can wooden slats and polyurethane moldings be painted the same color?
Yes. Wooden slats are painted with acrylic enamel or special paint for wood (over primer). Polyurethane moldings — with acrylic paint over a base coat. With the correct colorant selection in one batch — the color matches perfectly, creating a monochrome system.
How to calculate how many slats are needed for a wall?
Formula: wall width (mm) / (slat width + gap) = number of slats + 10% reserve. For a 3000 mm wall, 60 mm slat, 12 mm gap: 3000 / 72 ≈ 41 slats + 4 slats reserve = 45 slats. Multiply by the wall height — you get the linear footage.


