Article Contents:
- Direct answer: wood and metal belt are first agreed upon, then finished and assembled
- What is selected directly for MN-149
- When a separate insert becomes a problem
- Leg height is not equal to the height of finished furniture
- When tilted, vertical height and external overhang change
- Full height record
- Beech for opaque coating
- Oak for preserving wood grain
- Oak under enamel and beech under transparent coating
- Brass finish
- Stainless steel finish
- Can two metals be mixed in one set
- What to compare before choosing
- Risk of enamel getting on the metal
- Risk of damaging the insert during sanding
- Risk of seating change due to coating
- Risk of different results on four legs
- When metal is installed after finishing
- When trial assembly is performed
- Mandatory data
- What questions should the painter ask before starting work
- Test paint on the actual shape
- Same color for the entire set
- Quantity and numbering
- Direct or inclined position
- Metal insert
- Check before final assembly
- FUR-001
- FUR-012
- How many sets to order
- Direct mounting does not cancel stability checks
- FUR-017 at a 10-degree angle
- FUR-020
- Why inclination affects the metal belt
- Direction of inclination
- FUR-029
- FUR-019
- Why the support foot affects the finish
- Adjustment does not fix incorrect geometry
- What should match
- What may differ even within the same batch
- Assembly list of four MN-149
- Round table
- Console
- Under the nightstand body
- Under a sofa or armchair
- Under a dresser
- Under the bed
- Ready-made support
- MN-149 as an adjustable kit
- Why you cannot transfer instructions from another leg
- Prepare a clean surface
- Inspect the kit
- Connect without irreversible fixation
- Look at the transition
- Measure the final height
- Disassemble and label
- What can damage the insert
- Why regular tape may not be enough
- Protective film after assembly
- For beech
- For oak
- For fixing the insert
- Expense
- To the furniture maker
- To the painter
- To the assembler
- Why verbal description is worse
- Example for an oak table
- Example for a painted console
- Invalid entry
- Main product
- Finishing
- Fastening
- Lower support
- Logistics
- Error 1. Assuming the insert is glued at the factory
- Error 2. Giving the painter only a photo
- Error 3. Assembling the leg before a test paint sample
- Error 4. Painting wood with the insert installed without confirmed protection
- Error 5. Applying a thick layer of paint to the seating area
- Error 6. Sanding the finished fit near the metal
- Mistake 7. Using random universal glue
- Mistake 8. Not accounting for joint curing time
- Mistake 9. Mixing brass and steel inserts
- Mistake 10. Choosing metal separately from other fittings
- Mistake 11. Ordering MN-149 without height
- Mistake 12. Mixing different heights in one set
- Mistake 13. Adding a leg to a tabletop without mounting and a foot cap
- Mistake 14. Choosing tilt based on a photo
- Mistake 15. Buying FUR-017 without calculating overhang
- Mistake 16. Buying FUR-020 without checking completeness
- Error 17. Consider FUR-001 and FUR-012 fully interchangeable
- Error 18. Add glides after painting
- Error 19. Use a glide to fix uneven length
- Error 20. Do not mark inserts
- Error 21. Paint four legs on different days without control
- Error 22. Approve color based on screen
- Error 23. Consider clear coating colorless
- Error 24. Choose oak and expect identical grain
- Error 25. Do not check metal in evening light
- Error 26. Order fasteners from another contractor after furniture production
- Error 27. Not accounting for tool access
- Error 28. Removing protection from metal too early
- Error 29. Not accepting the kit before painting
- Error 30. Ordering legs one at a time
- Error 31. Not saving the color recipe
- Error 32. Leaving the assembly technology choice to the installer on site
- Error 33. Not checking B and C against the drawing
- Error 34. Considering the metal insert as structural reinforcement
- Error 35. Considering MN-149 as finished furniture
- First, open the product card
- Then, select the wooden base
- Build the furniture completely
- Assemble the hardware
- Approve the finish
- Do a trial assembly
- Arrange a single delivery
- What is MN-149?
- Is the metal insert glued to the leg?
- Do I need to install the insert myself?
- Is the insert included in the product configuration?
- What wood is MN-149 made from?
- What metal options are available?
- What heights are available for MN-149?
- What do B = 45 mm and C = 24 mm mean?
- Can B be considered the diameter of the upper part?
- Can MN-149 be painted with the insert installed?
- Why is it better to do a fitting first?
- Do I need to remove the insert before painting?
- Can I cover the metal with masking tape?
- What happens if enamel gets on the insert?
- Can the metal be cleaned after painting?
- What glue should be used to fix the insert?
- Can any glue for wood and metal be used?
- Is it necessary to degrease the metal?
- How long should the joint be held?
- Can furniture be assembled immediately after gluing the insert?
- What to choose for enamel — beech or oak?
- When to choose oak?
- Can oak be painted with enamel?
- Can beech be left under a clear coating?
- Do all four legs need to be painted at the same time?
- Can I order two legs now and two later?
- Is a spare MN-149 needed?
- Which metal should I choose for a warm interior?
- Will stainless steel match kitchen appliances?
- Can I mix brass and stainless steel on the same table?
- What height is suitable for a table?
- Can I use MN-149 with a height of 700 mm for a dining table?
- Can I use a height of 100 mm for a cabinet?
- Is MN-149 suitable for a console?
- Can I place MN-149 under a sofa?
- Which fasteners are suitable for direct installation?
- How to choose between FUR-001 and FUR-012?
- Which brackets are intended for angled installation?
- What is the angle of FUR-017?
- Can I rotate a regular straight bracket to achieve an angle?
- What changes when tilted?
- Are glides needed?
- Can I order glides after assembly?
- What is FUR-029?
- Will FUR-029 fit all heights of MN-149?
- Can I level legs of different heights with a glide?
- How many fasteners are needed for four legs?
- Is the fastener included with MN-149?
- Where can I see other legs?
- Where can I see only unpainted legs?
- Where can I find table legs?
- Can I order one sample of MN-149?
- What to check upon receipt?
- Do I need to collect all legs at once?
- How to mark the parts?
- Can I swap inserts after fitting?
- When should I make holes for mounting?
- Do I need to consider coating thickness during assembly?
- Can I fix a tight fit by sanding after painting?
- Can I fill the gap with a thick layer of glue?
- How should I store metal inserts before assembly?
- How should I store painted legs?
- Do I need to remove protection from metal immediately after assembly?
- How to order the MN-149 set without errors?
- What is the main question to ask the manager?
- What question to ask a painter?
- What question to ask an assembler?
- What question to ask a designer?
- What question to ask a designer?
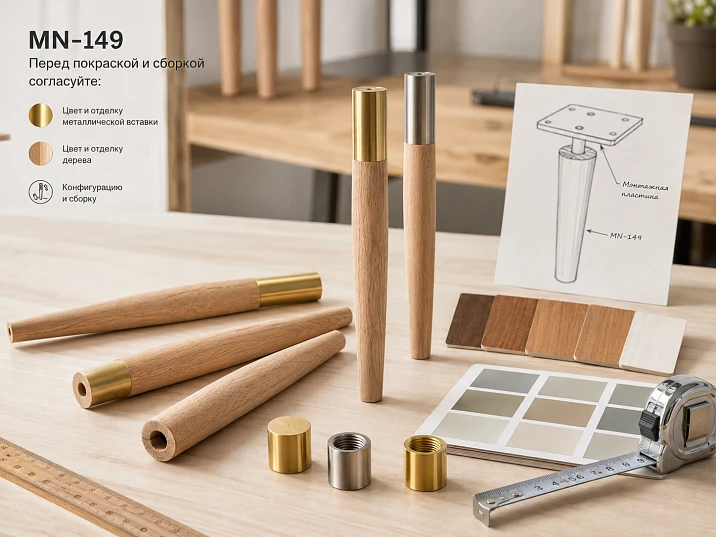
In the photo, MN-149 looks like a finished furniture leg: a turned wooden shape is divided by a neat metal belt, proportions are precise, and the two materials are perceived as a single product. It is this finished look that often misleads the buyer. It seems that it is enough to choose the height, beech or oak, the shade of the metal part, and after delivery, immediately install the legs under the tabletop, console, or furniture body.
But the metal insert of MN-149 is supplied separately from the wooden part and is not pre-glued to it. This is not a minor component that can be left for the last day. Separate delivery affects the painting sequence, metal protection, coating thickness in the seating area, control assembly, choice of fixation technology, and responsibility among the painter, furniture maker, and assembler.
If the painter thinks the insert will be installed after finishing, and the assembler expects to receive already assembled legs, work stops. If the metal belt is placed before applying enamel, it will need careful protection. If the seating area is painted with too thick a layer, the joint geometry may change. If four legs are processed on different days, the wood or metal inserts may be perceived inconsistently. If fastening to furniture is chosen only after painting, it may turn out that different components are needed for straight and angled installation.
Therefore, the request to buy MN-149 cannot be reduced to choosing a beautiful combination of wood and metal. A complete order must answer seven questions:
-
What height does the project need?
-
Is beech or oak selected?
-
Should the metal insert look like brass or stainless steel?
-
What will be the finish of the wooden part?
-
At what stage is the metal decor installed?
-
Are the legs attached straight or at an angle?
-
Are mounting kits and adjustable floor glides needed?
Only after this can you buy furniture leg MN-149 with metal insert as part of a clear furniture system, not as a beautiful blank whose fate contractors will decide on site.
Direct answer: the wood and metal band are first coordinated, then finished and assembled
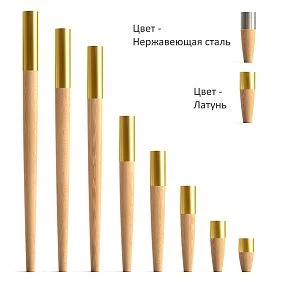
MN-149 is a turned wooden furniture leg with a separate decorative metal insert. Beech and oak are available for the wooden part. The metal finish is chosen in brass or stainless steel. Eight heights are available: 100, 150, 250, 350, 450, 650, 700, and 750 mm.
The technical table also specifies parameters B = 45 mm and C = 24 mm. Their exact position must be checked on the drawing. You cannot independently declare B as the diameter of the top platform and C as the size of the metal band seat if the technical diagram does not confirm this.
The main rule for working with a separate insert is simple:
The wooden part and metal cannot be treated as an already assembled component without approval. Before painting, the trial fit, coating application areas, finishing sequence, fixation method, and the moment of final assembly must be approved.
The card confirms the fact of separate delivery of the insert but does not specify a universal adhesive, metal preparation method, adhesive layer thickness, or curing time. These parameters are agreed upon with the manufacturer, technologist, or responsible assembler. Choosing a compound independently based on the principle "suitable for wood and metal" is risky: the joint depends not only on the material names but also on the fit shape, future load, and specific finishing system.




What is selected specifically for MN-149
| Parameter | Confirmed options | What to write in the order |
|---|---|---|
| Article number | MN-149 | Full designation without abbreviations |
| Type | Turned wooden furniture leg with metal decor | Purpose in the specific product |
| Wood | Beech or oak | One wood species for the entire set |
| Metal insert | Finish in brass or stainless steel | Selected option for the entire group |
| Height | 100, 150, 250, 350, 450, 650, 700, or 750 mm | Exact height of each position |
| Parameter B | 45 мм | Check position against the drawing |
| Parameter C | 24 мм | Check position against the drawing |
| Insert state | Supplied separately, not glued to the wood | Order of fitting and assembly |
| Direct mounting | FUR-001 or FUR-012 | Selected set and quantity |
| Angled mounting | FUR-017 or FUR-020 | Plate article number and layout diagram |
| Adjustment | FUR-019 or FUR-029 | Need and number of support pads |
| Wood finish | Determined by the project | Color, transparency, gloss, sample |
| Insert fixation | Requires separate approval | Responsible person and approved technology |
The table shows why the line "MN-149, oak, four pieces" is insufficient. It lacks height, metal variant, finish, mounting, glides, and assembly sequence.
Our factory also produces:

A separate metal insert is not a drawback, but an opportunity to control the finish
The customer may ask: why isn't the metal belt glued on right away? Wouldn't a ready-made assembly be more convenient?
The separate state gives the project several advantages.
First, the wooden part can be processed without the risk of accidentally covering the metal with primer, enamel, varnish, or tinting compound. The painter gets free access to the turned shape and can work with the wood as an independent part.
Second, the metal insert is easier to preserve in its original decorative finish. There is no need to clean it from paint materials or protect it with complex masking for a long time.
Thirdly, the fit can be checked before final assembly. If the joint requires adjustment, the issue is resolved before the final coating is applied and before the leg is installed on the furniture.
Fourthly, the same wooden silhouette can be paired with different interior metals. A brass finish supports warm hardware, lighting fixtures, frames, and decorative accents. A stainless steel option interacts with cold metal details, appliances, chrome, or steel elements.
But freedom of choice only works with discipline. A separate insert requires determining in advance:
-
who is responsible for its safekeeping;
-
who conducts the test fit;
-
before or after which layer it is installed;
-
which wood surfaces cannot be thickened with coating;
-
whether protection of the metal part is needed;
-
how four, six, or eight identical sets are marked;
-
who confirms readiness for final assembly.
Get Consultation
When a separate insert becomes a problem
The problem arises not from the design, but from the lack of a unified specification.
A typical situation looks like this. The client chooses oak MN-149 with a metal belt under brass. The wooden parts are handed to the painter, the inserts remain with the furniture maker. The painter tints the legs without knowing which zones are involved in the fit. After receiving, the furniture maker tries to install the decor, but the finish layer has changed the fit. The assembler suggests cleaning the surface directly on the finished leg. As a result, the coating is damaged, and the four parts begin to differ from each other.
This can be avoided with a single document — a finishing and assembly map.
It specifies:
-
image of MN-149;
-
height;
-
wood species;
-
metal option;
-
color of the wooden part;
-
exact zone of the insert location;
-
surfaces that are covered;
-
surfaces, the processing of which is determined by the technologist;
-
control fitting stage;
-
final installation stage;
-
approved fixation method;
-
number of each leg;
-
leg position in the furniture.
Eight heights of MN-149: one article number does not mean the same part
MN-149 is available in eight heights. This expands the scope of application, but creates an additional risk when issuing an invoice. In conversation, all variants are called the same: "leg MN-149". If the height is not written next to each item, it is easy to mix up the versions in production and in the order.
| Execution | Height, mm | What to check before ordering |
|---|---|---|
| MN-149 | 100 | The final height of the furniture and access to the fastening |
| MN-149 | 150 | The gap under the body and the position of the metal belt |
| MN-149 | 250 | Body proportions, number of supports, mounting assembly |
| MN-149 | 350 | Overall stability and location of attachment points |
| MN-149 | 450 | Height of the finished product with body or tabletop |
| MN-149 | 650 | Diagram of a table, console, or other tall furniture |
| MN-149 | 700 | Final working height and straight or tilted position |
| MN-149 | 750 | Overall dimension, stability, hardware, and floor glides |
The table intentionally does not assign specific furniture to each height. The leg height alone does not prove suitability for a stool, table, cabinet, or console. The finished size depends on the thickness of the tabletop, body, apron, mounting plate, floor glide, and the chosen installation angle.
Leg height is not equal to the height of the finished furniture
For a preliminary check, the principle is used:
Final furniture height = MN-149 height + thickness of the upper structure + height of the mounting assembly + adjustable addition of the floor glide, if provided by the project.
The top structure can be:
-
countertop;
-
cabinet body;
-
sofa box;
-
seat;
-
console base;
-
furniture frame;
-
Table base.
You cannot take MN-149 with a height of 700 mm and automatically declare the finished table to be 700 mm. The tabletop and mounting will increase the overall dimension.
When tilted, the vertical height and external overhang change
If a leg is installed at an angle, its nominal length is preserved, but the vertical projection and footprint differ from a straight configuration. The bottom point shifts outward, the furniture becomes wider on the floor, and the contact point with the base moves relative to the top mounting point.
Therefore, the 700 mm option with straight mounting and the same option with an angled plate cannot be considered geometrically identical.
Before ordering an inclined scheme, you need to determine:
-
angle;
-
direction of inclination;
-
offset of each leg;
-
overall footprint on the floor;
-
position of the foot pad;
-
distance from the edge of the tabletop;
-
possibility to place furniture against the wall;
-
legroom;
-
symmetry of all supports.
Full height record
Correct:
MN-149, height 700 mm, oak, metal insert for stainless steel — 4 pcs.
Not enough:
MN-149 — set.
The word "set" does not indicate height, quantity, or material.
In the card, you can select MN-149 height from 100 to 750 mm and then transfer the full version to the furniture specification.
Beech under enamel or oak under transparent finish: material is chosen before metal and color
MN-149 is available in beech and oak. The choice of wood species affects the visual result, preparation, color approval method, and the relationship of the wooden part to the metal belt.
Beech for opaque coating
Beech is often considered when legs need an opaque color:
-
white;
-
graphite;
-
green;
-
blue;
-
beige;
-
burgundy;
-
furniture body color;
-
shade of the countertop or facade.
Covering enamel allows combining the turned shape with a painted body and keeping the metal insert as an independent accent.
But the phrase "beech under enamel" does not mean that any coating can be applied without a technological map. It is necessary to agree on:
-
wood preparation;
-
primer;
-
number of operations;
-
coating thickness;
-
gloss level;
-
reference sample;
-
areas related to the metal insert;
-
final holding time before assembly.
Oak to preserve the wood grain
Oak is chosen when the texture should remain visible. A transparent, tinted, or oil finish highlights the fibers, while a metal belt creates contrast between the natural surface and the even gloss or satin character of the metal.
Such an MN-149 can be paired with:
-
an oak tabletop;
-
a veneered body;
-
wooden fronts;
-
open shelves;
-
slat panels;
-
parquet;
-
other turned details.
A perfect match with existing oak cannot be guaranteed by the species name. The shade is affected by the specific blank, grain direction, finish, and lighting. For four or six legs, a single test stain is needed.
Oak under enamel and beech under transparent coating
These options are not automatically prohibited. Oak can be painted with an opaque system if the project requires it. Beech can remain visible under a transparent finish if its calm texture suits the furniture.
But the choice must make sense. If the oak texture is completely covered by enamel, the buyer must understand the reason for choosing oak. If beech remains transparent, its visual character must be accepted in advance.
On the quality page, you can to choose beech for enamel or oak for tinting and separate the concept of wood species from the concept of finished coating.
Brass or stainless steel: the metal insert must support the entire interior
In the MN-149 card, the metal part is presented in two directions: brass and stainless steel. This is not a neutral strip that can be chosen separately from the furniture. It is on each leg and repeats several times, so the metal forms a rhythm.
Brass finish
A warm metallic accent can be linked to:
-
furniture handles;
-
lighting fixtures;
-
frames;
-
decorative profiles;
-
showcase fittings;
-
chair parts;
-
legs of adjacent furniture;
-
warm shade of wood.
The brass belt is especially expressive on dark enamel, deep oak tinting, or a calm light body.
But you cannot choose it just from a photo. On screen, the shade depends on color rendering. There may already be several metals in one room that look similar but differ in warmth and shine. Physical comparison helps avoid accidental proximity.
Stainless steel finish
The cold metallic option interacts with:
-
kitchen appliances;
-
steel lighting fixtures;
-
chrome hardware;
-
glass;
-
gray and graphite finishes;
-
modern countertops;
-
neutral interiors.
On light oak, such a belt emphasizes the structure. On black or gray enamel, it creates a clear separation of form.
Can you mix two metals in one set
For four legs of one table, mixing usually requires a special design intent. A random combination of two brass and two steel inserts will look like a mistake.
In the specification, the metal is indicated for the entire group:
Insert MN-149 — brass version, 4 pcs.
Or:
Insert MN-149 — stainless steel version, 4 pcs.
What to compare before choosing
Place a physical sample next to:
-
the handle;
-
a hinge;
-
the lamp base;
-
a chair leg;
-
a metal edge of the tabletop;
-
appliances;
-
mirror frame;
-
other elements of the room.
The comparison is made under the lighting that will be used in the interior. One metal may look neutral during the day and noticeably warm in the evening.
Painting MN-149: why the metal insert cannot simply be left in place
At first glance, the fastest way is to assemble the leg, tape off the metal band with painter's tape, and paint the wood. Sometimes such a technique may be developed by a professional. But it cannot be accepted as universal.
Risk of enamel getting on the metal
The turned shape creates transitions near which it is difficult to form a perfectly even boundary. The paint can:
-
seep under the protective tape;
-
create a thickened edge;
-
leave an uneven line;
-
to hit the metal when removing the masking;
-
to form a visible step.
After drying, removing enamel from the decorative coating is dangerous: you can scratch the surface or change the gloss.
Risk of damaging the insert during sanding
Interlayer treatment of wood is performed with a tool or abrasive. The installed metal belt restricts access and can get scratched.
Even if the insert is protected, the edge of the protective material interferes with even work directly next to the metal.
Risk of fit change due to coating
If the seating area of the wood receives primer and several layers of finish, its dimensions may change. A slight thickening on an open surface is almost unnoticeable, but in a precise joint it can affect the fit.
This does not mean that the seating area should always be left untreated. The decision depends on the design and technology. The main conclusion is different: the painter should not independently choose the coating boundary.
Risk of different results on four legs
If each insert is masked manually, the border may differ. On one leg the metal is fully exposed, on another part of the belt is covered with enamel. When the supports stand side by side, the difference becomes noticeable.
When metal is installed after finishing
This order seems the most clear: first prepare the wood, then add the insert. But it also requires verification.
Need to ensure:
-
that the finished coating does not interfere with fitting;
-
that during installation the metal does not scratch the finish;
-
that the chosen fixing method is compatible with the coating;
-
that assembly tools do not damage the wood;
-
that the technology does not require access to an area already covered by the finish;
-
that the connection can be made identically across the entire batch.
When a trial assembly is conducted
Before applying the final coating, the wooden part and the insert are joined without irreversible operations, if the design allows it. The fitting shows:
-
whether the geometry matches;
-
which side the belt is installed on;
-
whether there is a gap;
-
how the transition looks;
-
which zones are involved in the connection;
-
whether the parts can be safely disassembled;
-
where the coating should or should not be applied.
After checking, each pair is marked.
What to pass to the painter: not a photo, but a finishing map
A photo of the finished MN-149 shows the desired look but does not explain the technology. The painter must receive a document with no disputed areas.
Mandatory data
Item number: MN-149.
Quantity: exact number of legs.
Height: one of eight confirmed options.
Material: beech or oak.
Finish: opaque or transparent per the approved sample.
Color: physical reference or agreed designation.
Gloss level: confirmed option.
Metal: brass or stainless steel.
Insertion stage: before, during, or after finishing — per the approved technology.
Seating area: shown on the diagram.
Trial coating: provided or explicitly excluded.
Marking: each leg is assigned a number.
What questions should the painter ask before starting work?
-
Are the inserts with him or with the assembler?
-
Is a preliminary fitting required?
-
Which surfaces are involved in fixation?
-
Does the metal part need to be protected?
-
How is the color of the entire batch checked?
-
When is the coating considered ready for assembly?
-
Who accepts the control sample?
-
Can you place legs on the end grain during drying?
-
How to store processed parts?
-
Who fixes the defect if the metal is damaged during finishing?
Answers are recorded before launch, not after the first painted leg.
Test paint on a real shape
A flat board does not show how the color works on a turned profile. On convex areas, light makes the shade lighter, in transitions — deeper. The metal belt additionally enhances contrast.
For a responsible project, it is useful to process one control MN-149 or a special sample of the same wood species and shape.
It is evaluated:
-
in daylight;
-
under evening lighting;
-
next to the countertop;
-
near the metal insert;
-
on the floor or background where the furniture will stand;
-
after full technological curing.
The same color of the entire set
Four legs of one piece of furniture are considered simultaneously. Even a slight difference in shade or gloss becomes noticeable, especially if the supports are exposed.
Therefore, it is recommended:
-
order wood in one batch;
-
process parts in one cycle;
-
use one approved sample;
-
do not mix different formulations;
-
do not transfer half of the kit to another contractor;
-
mark the control and spare parts.
What to pass to the assembler: leg position, fastening, and the order of metal installation
The assembler is responsible not only for screwing supports to furniture. He must receive a complete structural scheme.
Quantity and numbering
For standard four-support furniture, legs can be designated as:
-
MN-149-LP — left front;
-
MN-149-RP — right front;
-
MN-149-LR — left rear;
-
MN-149-RR — right rear.
With six or eight supports, the scheme expands.
Marking is especially needed for inclined installation. The direction of each leg is related to a specific location.
Direct or inclined position
The assembler should not determine the angle from a photo of the finished table. The specification specifies:
-
installation type;
-
mounting article;
-
direction;
-
distance from edges;
-
axes;
-
allowable overhang;
-
thrust bearing;
-
tightening sequence.
Metal insert
Need to record:
-
is the insert installed before mounting the leg to the furniture;
-
which side it is oriented;
-
has it passed the trial fitting;
-
which fixation technology is approved;
-
how long the connection was held;
-
can load be applied;
-
how the finished finish is protected during assembly.
Check before general assembly
First, one control position is assembled. After it, check:
-
appearance of the wood-metal transition;
-
absence of scratches;
-
same height;
-
position of the mounting plate;
-
thrust bearing;
-
stability;
-
conformity to the drawing;
-
repeatability of the operation.
Only after the first leg is approved do they proceed to the rest.
Direct mounting MN-149: FUR-001 or FUR-012 is selected in advance
The MN-149 card indicates two solutions for direct mounting: FUR-001 and FUR-012. The presence of two options does not mean that the buyer can choose any set only by price or appearance.
Each mounting has its own design and completeness, so compatibility with specific furniture is checked against the card and drawing.
FUR-001
For direct installation, you can buy the FUR-001 mounting kitBefore ordering, specify:
-
kit contents;
-
sizes;
-
method of connection with MN-149;
-
furniture base;
-
thickness of the structural part;
-
number of sets per leg;
-
tool access;
-
possibility of disassembly.
It is not allowed to write without confirmation that one FUR-001 fits all heights and all types of tabletops equally. The MN-149 card allows this option as a compatible direction, but the specific node requires verification.
FUR-012
Alternatively, you can buy a set of FUR-012 fittings. It is also considered for direct mounting.
The choice between FUR-001 and FUR-012 is made based on the furniture design, not on the assembler's preference to use a familiar part.
How many sets to order
The quantity is related to the number of supports and the configuration of a specific set. You should not automatically write "four legs — four boxes" until you have checked how many legs one product item is designed for.
Correct entry:
Mounting for MN-149 — FUR-001 or FUR-012, quantity according to the confirmed card configuration and the number of supports.
Direct mounting does not cancel the stability check
The vertical leg transfers the load through the mounting assembly. Reliability depends on:
-
the material of the tabletop or base;
-
thicknesses;
-
the distance from the edge;
-
fastener locations;
-
number of legs;
-
presence of a stretcher or frame;
-
furniture size;
-
load distribution;
-
assembly quality.
The article about the decorative insert should not replace the structural calculation of the furniture.
Angled installation: FUR-017 and FUR-020 change the silhouette of the entire furniture
Angled legs are perceived as lighter and more dynamic, but they cannot be obtained by simply rotating a straight mounting part.
For MN-149, FUR-017 and FUR-020 are specified.
FUR-017 at a 10-degree angle
You can buy mounting plate FUR-017 at a 10° angle for the aligned inclined node.
The confirmed angle helps the designer build the geometry, but does not automatically answer questions of stability and placement.
Before ordering, the following are calculated:
-
vertical height;
-
offset of the lower point;
-
distance between thrust bearings;
-
overall furniture outline;
-
intersection with the crossbar;
-
position relative to the edge of the tabletop;
-
direction of all four supports.
FUR-020
The second option is buy the mounting plate FUR-020The SEO diagram notes that the plate can be used for two furniture supports, but the exact kit contents and design should be checked in the product card.
The website already has a separate article about FUR-020, so here the main point is enough: this item is for angled installation and should appear in the specification together with MN-149, not after the tabletop has been manufactured.
Why the tilt affects the metal belt
The metal insert is on a turned leg and changes its position relative to the floor and tabletop when tilted. In a straight layout, all belts form a horizontally perceived rhythm. In an angled one, they rotate together with the legs.
Check:
-
are the inserts oriented the same way;
-
do the reflections create a chaotic pattern;
-
does the belt height visually match;
-
does one leg look turned;
-
is the metal damaged during angled installation.
Tilt direction
Four legs can spread outward, work in pairs, or follow another pattern. The direction cannot be determined after drilling.
Each support is marked with arrows on the drawing.
Feet FUR-019 and FUR-029: adjustment cannot be added at the last moment
For MN-149, adjustable feet FUR-019 or FUR-029 can be used. They help correct the position of the furniture, but affect the lower assembly and the final height.
FUR-029
You can buy adjustable foot pad FUR-029. In the card, it is marked as an adjustable support with a diameter of 25 mm.
Before ordering, check:
-
compatibility with the selected height of MN-149;
-
lower geometry of the leg;
-
installation method;
-
adjustment range;
-
impact on the overall size;
-
visibility after assembly;
-
floor material;
-
number of feet.
FUR-019
The second option is buy the adjustable foot FUR-019It is also considered for furniture legs, including inclined configurations, after separate confirmation.
Why the glider affects the finish
The lower part of the leg may require preparation before applying the finish. If a hole or other mounting element is made after painting, there is a risk of surface damage.
Therefore, gliders are selected before handing the set over to the painter.
Adjustment does not fix incorrect geometry
The glider can compensate for minor differences in the floor or the position of supports within its design. It should not be used to correct:
-
different leg heights;
-
incorrect angle;
-
skewed mounting plate;
-
incorrect placement of the fastener;
-
deformed tabletop;
-
markup errors.
What to buy together with MN-149
MN-149 becomes a ready-made furniture support only within a complete order.
| Position | What it's for | When to choose |
|---|---|---|
| MN-149 of selected height | Main wooden support | After calculating the finished furniture |
| Metal insert | Decorative belt for brass or stainless steel | Simultaneously with wood and color |
| FUR-001 | One of the direct mounting options | After checking the furniture structure |
| FUR-012 | Alternative direct mounting | By card and drawing |
| FUR-017 | Inclined plate 10° | For the approved inclined scheme |
| FUR-020 | Mounting plate for inclined legs | By selected node |
| FUR-019 | Adjustable furniture foot | When compatibility is confirmed |
| FUR-029 | Adjustable foot pad with diameter of 25 mm | According to the lower support design |
| Finishing materials | Enamel, transparent or tinted system | After selecting beech or oak |
| Agreed material for insert fixation | Connection of metal to wooden part | After approval of the technology |
| Trial leg or sample | Check of color, metal, and assembly | For a responsible or serial order |
| Drawing | Control of dimensions, fastening, and height | Before furniture production |
| Layout template | Repeatable position of supports | Before drilling |
| Protective packaging | Preservation of finish and metal | After finishing |
In the catalog you can Buy hardware for furniture legs and assemble mounting positions with one specification. This is more convenient than buying legs separately and then looking for unknown fasteners from another supplier.
For the finishing stage, you can buy finishing materials MN-149, but the specific composition is chosen based on the wood species and technology. You cannot consider any glue or any oil from the category as automatically suitable for the selected joint.
Set of four legs: the same article number does not yet create identical furniture
A table, console, or cabinet on four supports requires not just four MN-149s, but four identically prepared items.
What must match
-
height;
-
wood species;
-
processing pattern;
-
metal insert option;
-
color of the wooden part;
-
gloss level;
-
assembly order;
-
mounting;
-
thrust bearing;
-
angle;
-
direction;
-
final length.
What may differ even within one batch
Wood has a natural pattern. This is especially noticeable on oak under a clear finish. There will be no complete fiber identity, but the parts can be arranged so that the front legs look consistent.
Metal surfaces are also evaluated together, not separately. It is important to check the overall shade and reflection.
Assembly list for four MN-149
| Position | Height | Wood | Metal | Mounting | Thrust Bearing | Place |
|---|---|---|---|---|---|---|
| MN-149-1 | 700 мм | Oak | For stainless steel | FUR-001 | FUR-029 | Left front |
| MN-149-2 | 700 мм | Oak | For stainless steel | FUR-001 | FUR-029 | Right front |
| MN-149-3 | 700 мм | Oak | For stainless steel | FUR-001 | FUR-029 |
Left rearRound tableFour angled legs under a round tabletop create a different outer contour than straight ones. Check that the feet do not extend beyond the comfortable zone and do not interfere with chairs. ConsoleFor a narrow console, the tabletop depth is limited. An angled leg may extend beyond its projection and prevent the furniture from being placed against the wall. In the category you can order wooden legs for console, but the MN-149 scheme needs to be built in side projection. Low MN-149 for cabinet, sofa, or nightstand: metal belt changes the scaleVersions 100, 150, 250, and 350 mm are visually closer to cabinet and upholstered furniture, but the specific purpose is not confirmed by height alone. Under the cabinet baseCheck:
If the belt is too close to the body or floor, the intended decorative effect may be lost. Under a sofa or armchairThe leg is part of the upholstered furniture structure. It must be coordinated with the frame, load, and mounting point. Decorative appeal does not replace frame calculation. Under a dresserFour MN-149 can change the proportions of a heavy body. Tall supports make furniture visually lighter but increase requirements for stability and fastening. Under a bedThe quantity, position, and allowable load are determined by the base structure. Standard supports cannot be replaced with decorative ones without calculation. How not to confuse MN-149 with a ready-made leg where metal is already installedPhotos of different furniture legs may look equally finished. The buyer sees a wooden shape and metal decor, so assumes identical configuration. Before purchasing, ask four questions:
For MN-149, it is confirmed that the insert is not glued to the wooden part. Mounting hardware is selected separately from the specified options. Finished legA fully assembled and finished leg requires fewer operations after receipt, but offers less freedom for custom painting. MN-149 as a customizable kitHere, the buyer chooses the wood, metal, height, finish, attachment, and floor glide. This requires more coordination but allows the leg to be matched to specific furniture. Why the instructions from another leg cannot be transferredEven a similar metal belt may have a different fit and fastening method. The universal technique "how we glued the previous model" does not replace confirmation for MN-149. Control fitting before paintingFitting is not needed out of curiosity. It determines the boundaries of finishing and the assembly order. Prepare a clean surfaceWood and metal must not get scratches or contamination. Use a soft backing and clean gloves if the nature of the metal surface requires it. Inspect the setCheck:
Connect without irreversible fixationOnly if the design allows such an operation. Do not use random glue "for testing." Look at the transitionThe belt should occupy its intended place, and the wood should continue the shape without visual distortion. Measure the final heightA test assembly helps to see whether the insert affects the overall size and position of parts. Disassemble and markLeg No. 1 remains with insert No. 1 if actual fitting matters. Protection of the metal insert during finishingWhen technology requires working with metal near painted wood, the protection method is agreed upon in advance. What can damage the insert
Why regular tape may not be enoughIt must:
A universal type of tape cannot be specified in the article. Protective film after assemblyAfter installation, the finished legs may need temporary protection until furniture assembly is complete. The protection must not leave marks on wood or metal. Finishing materials: buy after approving the system, not earlierThe materials category is useful only after the wood species and desired result are known. For beechCovering system materials may be required if the project involves enamel. But specific items, application order, and consumption are determined by the technologist. For oakTransparent or tinted coatings can be considered. The choice depends on shade, tactility, gloss, and usage conditions. For fixing the insertThe SEO scheme allows the commercial transition "buy glue after agreeing on assembly technology." This is an important clarification. First, the technology is confirmed, then the composition is purchased. You cannot act the other way around: buy the first universal glue, and then force the structure to conform to its instructions. ConsumptionExact coating consumption depends on:
The article should not invent the number of cans or milliliters. Drawing MN-149 must be handed over to three peopleA technical drawing is needed not only by a furniture maker. You can download the current drawing MN-149 and include it in the project package. For the furniture makerHe checks:
For the painterHe sees:
To the assemblerHe receives:
Why verbal description is worseThe phrase "the metal ring is placed approximately in the middle" is not an instruction. The exact zone is determined by the part's design. Full specification MN-149A good specification leaves no decisions to the object. Example for an oak tableFurniture leg MN-149 — 4 pcs.
Example for painted consoleMN-149 — 4 pcs.
Invalid entryMN-149, brass, four pieces, paint to match the table color. It lacks height, wood species, mounting, glides, assembly order, and a physical color sample. Commercial verification of the invoice before paymentBefore paying, find each of the following lines in the document. Main item
Finishing
Mounting
Lower support
Logistics
After checking, you can order MN-149 with Contact us to confirm shipping to your destination., combining legs, fasteners, and glides in one shipment. Mistakes that cause the metal belt to ruin the finished legMistake 1. Assuming the insert is glued at the factoryAfter delivery, the buyer finds separate parts. Fix: pre-record the assembly stage. Mistake 2. Give the painter only a photographHe doesn't know which zones are involved in the fit. Fix: attach a drawing and a finishing map. Mistake 3. Assemble the leg before a test coatThe metal has to be protected during all subsequent operations. Fix: approve the sequence in advance. Mistake 4. Paint wood with an installed insert without confirmed protectionEnamel marks remain on the metal. Fix: agree on a masking method or separate finishing. Error 5. Paint the landing zone with a thick layerThe connection changes geometry. Fix: the technologist determines the coating boundaries. Error 6. Clean the finished landing near metalThe belt gets scratches. Fix: perform a test assembly before finishing. Error 7. Use random universal glueIts properties are not related to the specific landing. Fix: confirm the composition with the technologist. Error 8. Do not consider the connection holding timeThe leg is installed on the furniture immediately after fixing the insert. Fix: follow the confirmed technology. Mistake 9. Mix brass and steel insertsThe set looks random. Fix: check each part upon receipt. Mistake 10. Choose metal separately from other hardwareThe shades conflict. Fix: compare physical samples. Mistake 11. Order MN-149 without heightThe wrong modification appears in the invoice. Fix: write the full string. Error 12. Mix different heights in one setThe furniture cannot be leveled with leveling feet. Fix: recalculate parts before finishing. Error 13. Add a leg to the tabletop without fastening and leveling footThe final height turns out to be different. Fix: calculate the entire structure. Error 14. Choose the tilt based on a photoThe lower points go beyond the allowed contour. Fix: build a side projection. Error 15. Buy FUR-017 without calculating the overhangFurniture does not fit against the wall. Fix: check the footprint on the floor. Error 16. Buy FUR-020 without checking the completenessThe number of product items does not match the number of legs. Fix: read the product card. Error 17. Consider FUR-001 and FUR-012 fully interchangeableThe furniture design requires a specific component. Fix: select according to the drawing. Error 18. Add glides after paintingThe lower part has to be refined on the finished surface. Fix: align before painting works. Error 19. Use a foot plate to correct different lengthsAdjustment goes beyond a reasonable task. Fix: check the legs themselves and the fastenings. Error 20. Do not mark insertsAfter fitting, parts get mixed up. Fix: assign numbers. Error 21. Paint four legs on different days without controlA shade difference appears. Fix: single cycle. Error 22. Asserting color by screenReal beech or oak looks different. Fix: physical paint-out. Error 23. Considering transparent coating colorlessWood changes depth and tone. Fix: check sample after drying. Error 24. Choosing oak and expecting identical grainNatural pattern varies. Fix: distribute legs along furniture sides. Error 25. Not checking metal in evening lightThe finish looks warmer or colder than expected. Fix: evaluate in the interior. Error 26. Ordering fasteners from another contractor after furniture productionThe dimensions of the joint do not match. Fix: assemble the kit in advance. Error 27. Not considering tool accessAfter assembling the body, the fastening is inaccessible. Fix: approve the installation sequence. Error 28. Removing protection from metal too earlyThe belt is damaged during final assembly. Fix: determine the removal point. Error 29. Do not accept the kit before paintingThe missing insert is detected too late. Fix: recalculate all positions. Error 30. Order legs individuallyThe wood batch and finish differ. Fix: full set in one delivery. Error 31. Do not save the color recipeThe spare leg cannot be replicated. Fix: store the specification. Error 32. Leave the choice of technology to the builder on site.He has no time for testing. Fix: conduct a trial assembly in advance. Error 33. Not checking B and C against the drawing.Incorrect functions are assigned to the letters. Fix: do not rename dimensions on your own. Error 34. Considering the metal insert as structural reinforcement.Its confirmed role is decorative. Fix: calculate the load based on the furniture structure. Error 35. Treating MN-149 as finished furnitureThe leg requires a tabletop, fasteners, assembly, and finishing. Fix: configure the system. Who MN-149 is suitable forThis model should be considered when:
When it's better to choose a different legAnother model will be more practical if:
In the general catalog you can choose legs of a different size and compare the supports by height, shape, and mounting method. How to order MN-149 on STAVROS without a gap between purchase and assemblyFirst, open the product cardCheck the available options and check the price of MN-149 in beech or oak. The current price, availability, and delivery times are checked for the selected modification. Then choose the wooden baseIn this section you can Buy wooden furniture legs and make sure that MN-149 truly matches the project, not just chosen because of the metal belt. Build the furniture entirelyYou need to know the tabletop, cabinet, height, number of legs, angle, and mounting. For complex geometry, you can order a table or console project and approve MN-149 before drilling and painting. Assemble the hardwareChoose straight or angled mounting and glides. Check the number of product kits. Approve the finishMake a sample on beech or oak and compare with the metal insert. Conduct a trial assemblyJoin wood and metal according to the approved scheme without damaging the finish. Arrange one deliveryLegs, inserts, hardware, and glides must arrive at the same project stage. Frequently asked questions about MN-149What is MN-149?This is a turned wooden furniture leg with a separate decorative metal insert. Is the metal insert glued to the leg?No. It is supplied separately from the wooden part. Do I need to install the insert myself?The assembly order must be coordinated with the manufacturer, technologist, or responsible furniture maker. Is the insert included in the product configuration?The MN-149 card includes a metal decorative part. The exact composition of the invoice is checked before payment. What wood is MN-149 made from?in beech or oak. What metal options are available?Execution in brass or stainless steel. What heights are available for MN-149?100, 150, 250, 350, 450, 650, 700, and 750 mm. What do B = 45 mm and C = 24 mm mean?These are parameters of the technical diagram. Their position and purpose should be checked on the drawing. Can B be considered the diameter of the upper part?Without the drawing, it cannot be determined. Letters should not be assigned functions on your own. Can MN-149 be painted together with the installed insert?Only if such a procedure is confirmed by the technology. There is no universal permission. Why is it better to do a fitting first?It shows the fit, orientation, and finish boundaries before the final coat is applied. Do I need to remove the insert before painting?The decision depends on the approved technology. The key is to agree on it in advance. Can I cover the metal with painter's tape?The specific protection method must be compatible with the metal finish and finishing materials. What happens if enamel gets on the insert?Cleaning may be required, which could damage the appearance of the metal. Therefore, the risk is prevented in advance. Can the metal be cleaned after painting?Such an action may leave scratches or change the shine. The correction method should be agreed with a specialist. What adhesive should be used to secure the insert?The card does not assign a universal composition. The adhesive is selected after confirming the assembly technology. Can any adhesive be used for wood and metal?No. A general label on the packaging does not prove suitability for the specific MN-149 assembly. Is it necessary to degrease the metal?The preparation method depends on the insert coating and the chosen technology. The operation cannot be assigned independently. How long should the joint be held?According to the instructions of the approved composition and the process sheet. Can furniture be assembled immediately after gluing the insert?Only after the specified holding time. What to choose under enamel — beech or oak?Beech is often considered for opaque painting. But the decision depends on the project and the confirmed finishing system. When to choose oak?When it is necessary to preserve or emphasize the wood grain, or use oak for other project reasons. Can oak be painted with enamel?Yes, if it is provided for by the technology, but you need to understand why a species with a pronounced texture was chosen. Can beech be left under a transparent coating?This option is possible if its texture matches the design. A sample is needed. Do all four legs need to be painted at the same time?For a uniform shade and gloss, this is preferable. Can I order two legs now and two later?Yes, but the risk of differences in wood and finish increases. Is a spare MN-149 needed?It can be useful for individual tinting, a large project, or future repairs. Which metal should you choose for a warm interior?A brass finish can be considered alongside warm hardware, but the decision is confirmed by physical comparison. Will stainless steel suit kitchen appliances?Such a combination is possible, but the shade and shine are compared on samples. Can you mix brass and stainless steel on the same table?Only as a deliberate design choice. For a regular set, one option is selected. What height is suitable for a table?It depends on the thickness of the tabletop, the mounting, and the required final height. One MN-149 number is not enough. Can MN-149 with a height of 700 mm be used for a dining table?This option needs to be checked in the full furniture calculation. Can a height of 100 mm be used for the cabinet?The possibility depends on the body, load, mounting, and required clearance. Is MN-149 suitable for a console?It can be considered if the height, depth, stability, and mounting are confirmed by the project. Can MN-149 be placed under a sofa?Only after coordination with the frame structure and load. Which fasteners are suitable for direct installation?FUR-001 or FUR-012. How to choose between FUR-001 and FUR-012?By furniture design, dimensions, and card completeness. Which fasteners are intended for angled installation?FUR-017 or FUR-020. What is the angle of FUR-017?The card name confirms a 10-degree angle. Can a regular straight fastener be rotated to achieve an angle?No. For angled installation, the provided joint is used. What changes when tilted?The vertical projection, the offset of the bottom point, and the overall furniture footprint on the floor. Are floor glides needed?According to the project, FUR-019 or FUR-029 may be used. Can I order glides after assembly?It's better to determine them in advance, since the lower part of the leg and the final height are related to installation. What is FUR-029?Adjustable glide with a diameter of 25 mm. Will FUR-029 fit all heights of MN-149?Compatibility needs to be checked for the selected modification and assembly. Can the glide be used to level legs of different heights?The glide is not intended to correct an incorrect configuration. How many fasteners are needed for four legs?The quantity depends on the configuration of the selected FUR product. Check the product page. Is the mounting included in MN-149?Fittings should be selected and added separately according to the project. Where can I see other legs?In the general catalog of furniture supports. Where can I see only unpainted legs?In the category of unpainted wooden legs. Where can I find legs for a table?In a separate selection of table supports. Can I order one sample of MN-149?The control sample is useful for checking height, color, metal, and assembly. What to check upon receipt?Article number, height, wood species, number of wooden parts, inserts, metal option, and surface condition. Do all legs need to be assembled at once?First, one control piece is approved, then the operation is repeated on the batch. How to mark the parts?Assign a number to each wooden part, insert, and installation location. Can inserts be swapped after fitting?It is better to keep pairs if the fit was checked individually. When should holes for fastening be made?According to the drawing and the agreed sequence, before operations that could damage the finish. Should coating thickness be considered during assembly?Yes, especially in the area of precise wood-to-metal connection. Can a tight fit be corrected by sanding after painting?This risks damaging the coating. Geometry is checked before finishing. Can the gap be filled with a thick layer of glue?Without technology confirmation — no. Glue should not replace a precise fit. How to store metal inserts before assembly?In protected, labeled packaging, avoiding scratches and mixing. How to store painted legs?According to the finishing system's recommendations, with surface protection and sufficient curing time. Should the protection be removed from the metal immediately after assembly?The timing is determined by the overall installation process. How to order the MN-149 kit without mistakes?Specify the height, wood species, metal, quantity, finish, mounting, glides, and the installation technology of the insert. What is the main question to ask the manager?"Confirm the MN-149 configuration, the metal insert option, and the list of items to be included in my invoice." What question to ask the painter?"Which areas need to be covered and at what stage should the metal belt be installed to avoid changing the fit and damaging the metal?" What question should you ask the assembler?"Which mounting, glide, and method of fixing the insert are specified in the approved specification?" What question should you ask the designer?"How is the brass or steel belt connected to other hardware, and how visible will it be at the selected height?" What question should be asked to the designer?"Do the height, angle, number of supports, and mounting kit match the load and dimensions of the furniture?" A strong MN-149 order starts with separating wood, metal, and mountingThe photo shows MN-149 as a solid furniture leg. The order should be read differently: the turned wooden part, a separate metal insert, the finish system, mounting hardware, and the glide form several interconnected stages. First, one of eight heights is selected. Then beech or oak is fixed, and the metal execution is chosen for brass or stainless steel. After that, a trial fit, finishing zones, and the order of final insert installation are approved. In parallel, the designer determines direct or angled mounting, the FUR article number, and the need for adjustment. The legs cannot be given to the painter until it is known where the coating ends. Adhesive cannot be purchased until the technology is approved. Furniture cannot be drilled until the plates are selected. Floor glides cannot be ordered after the lower part has already been painted. And four identical article numbers cannot be considered a ready set until they have received one height, one wood species, one metal, one finish, and one assembly scheme. STAVROS company combines in one route the MN-149 card, a catalog of wooden furniture legs, direct and angled mounts, adjustable floor glides, finishing materials, technical drawings, and delivery. The buyer only needs to link these items with one specification. Then the metal belt will not become an unexpected separate part, but will take exactly the place for which MN-149 was chosen. |