Article Contents:
- Philosophy of two-layer design: why one layer isn't enough
- First layer: structure and background
- Second layer: detailing and accents
- Why wallpaper falls short
- Types of panels for the first layer: from minimalism to baroque
- Geometric relief panels: order and rhythm
- Organic reliefs: nature on the wall
- Artistic panels: abstraction and art
- Smooth panels: background for molding
- Second layer molding: functions and types of elements
- Framing moldings: creating panels within panels
- Central overlays: accent points
- Corner elements: finishing joints
- Vertical and horizontal dividers
- Color schemes for two-layer compositions
- Monochromatic depth: gradations of one color
- Contrast drama: dark on light, light on dark
- Accent polychromy: color bursts
- Patinated antiquity: artificial aging
- Installation technology for two-layer system
- Stage 1: Wall preparation
- Stage 2: Installation of background panels
- Stage 3: Panel painting (if required)
- Stage 4: Marking second layer molding
- Stage 5: Installation of moldings
- Stage 6: Installation of overlays and corner elements
- Stage 7: Final painting (if required)
- Practical compositions: solution examples
- Accent wall in the living room: geometry plus classic
- Bed headboard in the bedroom: organic plus minimalism
- TV zone: artistic panels plus modern molding
- Design and installation errors of two-layer systems
- Frequently asked questions about two-layer systems
- Conclusion: relief as a new reality

Wallpaper is outdated. Not as a technology — but as a philosophy of relating to walls. A flat picture glued to a surface no longer satisfies those who understand: a wall is not just a vertical plane, but an architectural object capable of shaping space. Two-layer relief changes the rules of the game: a base layer of textured panels creates structure, the second layer ofstucco decorationadds detailing, accents, artistry. The result — the wall transforms from a background into the main character of the interior. Let's understand how this technology works, which materials to choose and whypolyurethane wall panelsbecome the foundation of the new finishing standard in 2026.


Philosophy of two-layer systems: why one layer isn't enough
The traditional approach to wall decor is single-layer. Either wallpaper, or paint, or panels, or molding. You choose one thing and live with it. The two-layer method breaks these limitations.


First layer: structure and background
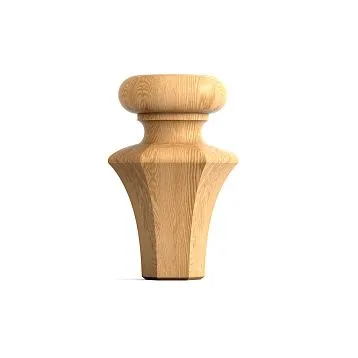
The base layer forms the overall plasticity of the wall. These can bePolyurethane wall panelswith geometric relief, creating a rhythmic texture. Or smooth panels painted in a base color, upon which a secondary composition will be built.
The task of the first layer is to create a structured surface instead of a flat wall. Even if the relief is shallow (5-15 mm), it already works: light and shadow play appears, the wall gains volume, the space begins to breathe.
Panels are mounted on the entire wall or part of it (accent zone, TV wall, bed headboard). They form the field upon which the second story unfolds.
Our factory also produces:


Second layer: detailing and accents
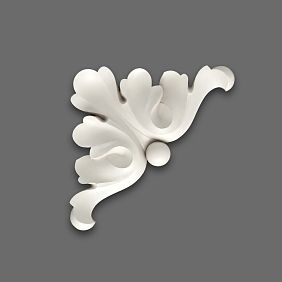
Molded decor — overlays, moldings, rosettes, ornamental elements — is mounted over the panel structure. They don't cover the panels completely, but place accents: frame boundaries, emphasize the center, create compositional nodes.
The second layer works like jewelry faceting. Panels are the stone, molding is the facets that make it sparkle. Without the first layer, molding can look flat; without the second, panels remain impersonal.
The interaction of layers creates visual depth. The eye perceives not one plane with a pattern (like wallpaper), but a multi-level space with several planes. This is architectural thinking transferred to the wall.
Get Consultation
Why wallpaper loses
Wallpaper is an illusion of volume drawn on a plane. You can print imitations of molding, brick, wood, but it remains a two-dimensional image. No matter how high-quality the printing is, under side lighting the deception is revealed: shadows are fake, there's no volume.
Two-layer relief is real volume. Light falls on panels and molding, casting real shadows. These shadows change throughout the day — morning, afternoon, evening — the wall looks different. Wallpaper is always static.
Tactility is another argument. You want to touch a relief wall. Touching wallpaper is boring — flat paper or vinyl. Tactile experience is important: a person perceives the quality of space not only with their eyes but also with their skin.
Types of panels for the first layer: from minimalism to baroque
Panels determine the character of the entire composition. Choosing the type of panels is choosing a stylistic paradigm.
Geometric relief panels: order and rhythm
Squares, rhombuses, hexagons, waves — repeating geometric shapes forming a regular pattern. The relief is shallow (8-20 mm), but sufficient to create texture.
Such panels are universal. Suitable for modern styles (minimalism, Scandinavian, contemporary), neoclassicism, art deco. Geometry creates a sense of order, control, stability.
Panel sizes: standard 500×500 mm, 600×600 mm, 1000×500 mm. Installation is done like tiles — according to markings, with minimal seams. The wall is covered evenly, creating a seamless textured surface.
Color treatment: most often monochrome (one color), less often bicolor (two colors — background and protruding relief elements in different tones). Monochrome emphasizes the relief through light play, bicolor enhances graphic quality.
Organic reliefs: nature on the wall
Imitation of natural textures — wood, stone, bark, water, clouds. The relief is irregular, asymmetrical, lively. Each panel is unique or has several variations to avoid noticeable repetitions during installation.
Organic panels create an atmosphere of closeness to nature. Suitable for eco-styles, ethnic interiors, rustic aesthetics, boho. They soften the space, making it less urban.
Relief depth varies from 10 to 40 mm — organic designs require expressiveness. Flat relief will not convey the character of natural texture.
Coloring: natural colors (gray, beige, brown, green) or white with dark shade patination in recesses to enhance volume.
Artistic panels: abstraction and art
Reliefs without obvious logic — abstract forms creating visual complexity. Convexities and concavities do not form recognizable patterns but create expressive plasticity.
Such panels turn the wall into an art object. Suitable for authorial interiors, galleries, creative spaces, homes of people who appreciate contemporary art.
Panels can be modular (assembled into a large panel from several elements) or individual (each panel is an independent work).
Coloring: any options — from classic white to bright accent colors, gradients, metallics. Artistic panels allow for experimentation.
Smooth panels: background for moldings
Panels without relief or with minimal texture. Their task is not to create their own plasticity, but to serve as a neutral background on which the second-layer moldings will look maximally expressive.
Smooth panels are used when the accent is planned to be on the molded decor, not on the background texture. Classical interiors, where ornament detailing is important, prefer this option.
Panels are painted in the base wall color (often light — white, cream, light gray), and the moldings either remain white (contrast) or are painted in an accent color (drama).
Second-layer moldings: functions and types of elements
The second layer is not just decoration. It is a functional system that structures the composition.
Framing moldings: creating panels within panels
Moldings are mounted on top of background panels, forming frames — rectangular or square. Inside each frame is a section of the background panel, possibly painted in a different tone or left as is.
This is a classic technique, known for centuries, but on a relief base it acquires a new sound. A molding frame on a flat wall is one thing; the same frame on a textured panel is quite another. The background texture shows through the composition, adding a level of complexity.
Molding width for framing: 4-8 cm. Narrower — the frame gets lost against the background; wider — it dominates the content. The molding's relief should be more expressive than the background panels' relief, otherwise it will visually blend.
Central overlays: accent points
Overlays — decorative elements with ornamentation (floral, geometric, classical). Placed in the center of frames, at composition corners, at molding intersections — anywhere a visual accent is needed.
Overlay sizes correlate with panel scale. Panels 600×600 mm — overlay 20-30 cm. Larger panels — larger overlays. A small overlay on a large panel will get lost.
Overlays can be symmetrical (identical across the wall) or hierarchical (central large, peripheral small). Symmetry creates order, hierarchy creates dynamics.
Corner elements: completeness of joints
At molding joints (frame corners), special corner overlays are installed. They not only cover the joint (technically) but also make it a decorative accent.
Corner elements can be simple (repeat the molding profile, simply cover the corner) or decorative (have additional ornamentation — rosette, scroll, leaf).
Using corner elements eliminates the need for precise 45-degree miter cuts on moldings — elements butt-join with the corner overlay, which forgives small inaccuracies.
Vertical and horizontal dividers
Long moldings or pilasters running from floor to ceiling (vertical) or along the wall (horizontal) divide the space into zones. They do not form closed frames but create division lines.
Vertical dividers visually raise the ceiling. Horizontal ones expand the wall. The choice of direction depends on the room's proportions: narrow and tall — horizontal, low and wide — vertical.
Color schemes for two-layer compositions
Color determines emotional impact. Relief creates structure, color gives it meaning.
Monochromatic depth: gradations of one color
Background panels and moldings are painted in shades of one color with a difference of 2-4 tones. Panels are darker, moldings are lighter — or vice versa.
Example: panels — graphite (dark gray), molding — light gray. Or panels — cream, molding — white. The difference is sufficient for elements to be read separately but not enough for contrast.
Monochrome creates refined restraint. This is the choice of connoisseurs of subtlety who dislike flashy effects. The relief is read through light and tonal difference.
Contrast drama: dark on light, light on dark
Maximum color difference. Panels black — molding white. Panels dark blue — molding gold. Panels white — molding black.
Contrast creates graphic clarity, sharpness, theatricality. This is the choice of bold individuals who love expressive interiors. Every molding element becomes noticeable; even small details do not get lost.
The risk of contrast is overload. Too many contrasting elements on a wall turn the composition into visual noise. A contrast scheme requires restraint in the amount of molding: better less, but each element is clearly read.
Accent polychromy: color splashes
Panels and main molding in neutral colors (white, gray, beige), but individual elements — overlays, corner details — are painted in a bright accent color (emerald, burgundy, indigo, mustard).
Accents attract the eye, creating focal points. This is a way to control attention: you decide where the viewer looks by highlighting desired elements with color.
The number of accents is limited: 3-7 elements per wall. More — the accent becomes diluted; fewer — may look accidental. Accent elements should be thoughtfully placed: either symmetrically or according to the golden ratio rule.
Patinated antiquity: artificial aging
Base color (white, cream, gray) plus dark patina (brown, black, green) in the recesses of the panel and molding relief. Creates an effect of noble antiquity, as if the wall has stood for a century and acquired a patina of time.
Patination enhances relief: dark color in recesses makes them visually deeper, light protrusions appear even more voluminous. This is a technique beloved by classical interiors.
Patinating is applied after base painting: base color — drying — patinating compound with a brush in recesses — blending — fixing with varnish (if durability is needed).
Installation technology for a two-layer system
Two-layer construction requires precise sequence of actions. Violating the order will lead to rework.
Stage 1: Wall preparation
The wall must be level (deviations no more than 3-5 mm per meter), dry, and sturdy.decorative elementsare attached with adhesive that requires good adhesion.
If the wall is painted with glossy paint — sand with P80 sandpaper to create roughness. If wallpaper — remove completely. Crumbling plaster — reinforce with deep-penetration primer.
Marking: mark with a pencil the boundaries of the area where panels will be placed. If panels cover not the entire wall but only a part (e.g., a 2×1.5 m bed headboard area) — clearly delineate this zone.
Stage 2: Installation of background panels
Panels are glued with special mounting adhesive for polyurethane or universal polymer adhesive (Moment Montage, Titan, Orac Decofix). Adhesive is applied in dots along the panel perimeter and in a zigzag pattern in the center.
Start installation from the bottom (from the floor or the border of the area) and work your way up, row by row. Press the panels against the wall for 20-30 seconds for initial adhesion. Immediately wipe away any excess adhesive with a damp sponge.
Joints between panels should be minimal (up to 1 mm). If gaps form, fill them with acrylic sealant matching the panel color and smooth with a wet finger.
Drying: 24 hours for the adhesive to fully set. Only after this can you proceed to install the second layer.
Step 3: Painting the panels (if required)
If panels are supplied unpainted or a specific color is needed, paint before installing the moldings. Use acrylic or latex paint, matte or semi-matte.
Paint smooth areas with a roller, recesses in the relief with a brush. Apply two to three thin coats with intermediate drying of 4-6 hours. The final coat must dry completely (12-24 hours) before installing the moldings.
If a monochrome scheme is planned (panels and moldings the same color), you can install the moldings first, then paint everything together. This is simpler but less flexible: color differences cannot be made.
Step 4: Marking the second layer of moldings
Mark the installation locations for moldings, overlays, and corner elements on the panels with a pencil. Use a level to check horizontals and verticals—crooked lines will ruin the entire composition.
If creating frames from moldings, draw full rectangles on the wall. Check the diagonals: if they are equal, the rectangle is even. Unequal diagonals indicate an error somewhere; correct it.
Mark the placement of overlays with crosses. The center of the overlay should align with the cross.
Step 5: Installing the moldings
Moldings are glued with the same adhesive as the panels. Apply adhesive in a zigzag pattern on the back of the molding. Press the element against the wall (on top of the panels) along the marked line and hold for 20-30 seconds.
Joints of moldings (corners, end connections) should be tight. If using ready-made corner elements, cut the moldings exactly at 90 degrees and join them with the corner element. If cutting at 45 degrees, use a miter box for accuracy.
Fill gaps in joints with acrylic sealant and smooth them. After drying and painting, the joints become invisible.
Step 6: Installing overlays and corner elements
Overlays are glued to the marked locations. Apply adhesive in dots on the back (5-7 dots for small overlays, a continuous layer for large ones). Press the overlay, align the center with the mark, and hold for 20-30 seconds.
Large, heavy overlays (over 500 grams) may require temporary support—prop them from below (with a stand, a stack of books) for a day until the adhesive fully sets.
Corner elements are installed last, covering the molding joints. They should fit snugly against both sides of the corner.
Step 7: Final painting (if required)
If the moldings were installed unpainted, paint after the adhesive has fully dried (24 hours). If the moldings should be a different color than the panels, protect the panels with painter's tape and paint the moldings with a brush.
If the entire composition is one color, you can paint everything together with a roller (smooth areas) and a brush (relief).
Patination, gilding, and other decorative effects are applied after the base coat on a completely dry surface.
Practical compositions: example solutions
Theory finds meaning in specifics.
Accent wall in the living room: geometry plus classic
Wall behind the sofa, 4×2.8 meters. Cover with panels featuring geometric relief (600×600 mm squares, 12 mm relief). Paint the panels gray (RAL 7035).
On top of the panels, install a composition of moldings: three vertical rectangles 1.2×2.2 m. Moldings are white, 6 cm wide, with a classic relief (fluting).
In the center of each rectangle—an overlay with a floral ornament, 25×30 cm, white. Corners of the rectangles—decorative corner elements with scrolls.
Result: a structured wall with clear architectural logic. The geometry of the panels creates a modern feel, while the classic moldings add respectability. The gray-white palette is universal and suits any furniture.
Bed headboard in the bedroom: organic plus minimalism
Zone 2.0×1.5 meters behind the bed. Panels with organic relief (imitation of tree bark, 18 mm relief). Panels painted in warm beige.
Over the panels — one large frame made of a concise molding (width 4 cm, profile simple rectangular). The molding is white. Inside the frame — nothing, just a framed area of the panels.
In the center of the frame (at pillow level) — one large rosette overlay with a diameter of 40 cm, white, with a geometric pattern (concentric circles).
Result: a calm, relaxing composition. The organic panels create a natural feel, the minimalist molding does not overload. Perfect for a bedroom where a restful atmosphere is needed.
TV zone: artistic panels plus modern molding
Wall with television, 3.5×2.7 meters. Panels with abstract relief (random waves and convexities, 25 mm relief). Panels painted in dark blue (deep, almost black blue).
Over the panels — an asymmetrical composition of thin moldings (width 3 cm, geometric profile). Moldings form several rectangles of different sizes, arranged asymmetrically. Moldings painted in brass metallic (metal imitation).
Overlays are absent — emphasis on the play of molding lines and panel relief. In one of the rectangles (not in the center, shifted to the right and up) — a built-in television.
Result: a modern, bold composition. The dark color creates intimacy, the metallic accent adds luxury. The television is integrated into the composition, not hanging separately.
Design and installation errors of two-layer systems
The path from idea to implementation is strewn with pitfalls.
Error 1: Overloading with elements
There's a desire to use everything at once — both textured panels, and many moldings, and an abundance of overlays. The result is a visual mess where nothing is legible.
Solution: the principle of minimalism even in complex compositions. If panels have expressive relief — molding should be more laconic. If molding is complex — panels should be more neutral. Balance is key.
Error 2: Scale mismatch
Large panels (800×800 mm) and thin molding (2-3 cm). Or small panels (300×300 mm) and massive molding (width 10 cm). Scale dissonance.
Solution: the size of the molding should be proportional to the size of the panels. Panels 600×600 mm — molding 5-7 cm. Panels 400×400 mm — molding 3-5 cm.
Error 3: Installing molding before panels are dry
Panels were glued and molding was immediately started. Panels haven't fully set yet, they shift under pressure. The composition has drifted.
Solution: strictly maintain 24 hours between panel and molding installation. Patience is the key to quality.
Error 4: Painting without primer
Polyurethane without primer can yellow over time under UV exposure. Paint without primer applies unevenly, consumption increases.
Solution: mandatory priming with acrylic primer before painting. One coat, drying 2-4 hours, then paint.
Error 5: Ignoring lighting
Relief works through shadows. If lighting is incorrect (only top flat light) — the relief is not legible, the wall looks flat.
Solution: plan lighting considering the relief. Side lighting (sconces, floor lamps, directional spotlights) creates expressive shadows. Light incidence angle of 30-60 degrees to the wall is optimal.
Frequently asked questions about two-layer systems
Can it be installed on uneven walls?
Panels with a thickness of 10-20 mm partially compensate for irregularities up to 5 mm. But serious deviations (more than 10 mm per meter) need to be leveled. Otherwise, panels will adhere with gaps, and the composition will deform.
How much does a square meter of a two-layer system weigh?
Panels — 2-5 kg/sq.m (depends on material thickness and density). Molding — 0.5-2 kg/sq.m (depends on the number of elements). Total 2.5-7 kg/sq.m. This is 5-10 times lighter than plaster molding of similar complexity.
Can it be used in a bathroom?
Polyurethane is completely moisture-resistant. In bathrooms, saunas, kitchens — no problem. The only condition is that the adhesive must also be moisture-resistant (polyurethane or MS-polymer).
How to care for it?
Wipe with a dry or slightly damp cloth as dust accumulates (every 2-3 months). If the surface is painted with washable paint — you can use a damp sponge with mild detergent. Do not use abrasives.
Can it be repainted a different color?
Yes, any number of times. The surface is sanded with fine sandpaper, degreased, primed, and painted with the new color.
How much does the material cost for a 10 sq.m wall?
Panels: 2,000-8,000 rub/sq.m (depends on material and relief complexity). For 10 sq.m — 20,000-80,000 rubles. Second-layer molding: 5,000-20,000 rubles per composition (depends on the number of elements). Adhesive, primer, paint: 3,000-5,000 rubles. Total materials: 28,000-105,000 rubles. Installation (if hiring a professional): +30-50% of the material cost.
Can it be dismantled without damaging the wall?
Polyurethane elements can be dismantled, but the adhesive will remain on the wall. Surface cleaning and preparation will be required before new finishing. The elements themselves may be damaged during dismantling — reuse is unlikely.
Conclusion: Relief as a New Reality
Wallpaper was a compromise of an era when three-dimensional decor seemed inaccessible, labor-intensive, and expensive. Polyurethane has broken down the barriers. Today, creatingstucco on walls a two-layer relief is possible for everyone — without special skills, without months of work, without astronomical budgets.
Two-layer design opens up space for creativity. You are not limited to ready-made wallpaper patterns. You combine panels and molding, creating a unique composition that no one else has. Scale, proportions, colors, density of decor — everything is under your control.
Tactility and the variability of light transform the wall from a static background into a living element of the interior. In the morning it is one way, in the evening with side lighting — completely different. Every day you discover new details you didn't notice yesterday.
The company STAVROS has specialized in materials for three-dimensional wall decor for twenty years. The assortment includes hundreds of polyurethane panel models — from laconic geometric to complex artistic reliefs. Dozens of molding collections in all styles: classic, neoclassical, baroque, art deco, minimalism, contemporary.
All STAVROS elements are made from high-density polyurethane (300-350 kg/m³) of European quality. Pressure casting technology ensures filigree detailing of the relief — every line, every curve is reproduced with absolute precision. The surface is perfectly smooth, ready for painting without additional processing.
STAVROS offers not just the sale of elements, but comprehensive solutions. Professional designers will help design a two-layer composition for a specific room, taking into account style, budget, and desired complexity. Accurate calculation of the number of panels and molding will prevent shortages or excess.
For those who value uniqueness, STAVROS offers the production of panels and molding based on custom sketches. Any relief shapes, sizes, and patterns can be realized in polyurethane. Create decor that exists nowhere else.
The stock program allows shipping popular items on the day of order. Custom orders are produced in 4-8 weeks. Delivery is organized across Russia and CIS countries with guaranteed safety — multi-layer packaging protects the relief from damage.
STAVROS product warranty — 2 years. If an element has a manufacturing defect — free replacement. Consultative support is available at all stages: from selection to operation of the finished decor.
The technical library on the company's website contains detailed instructions for installing panels and molding, recommendations for adhesive selection, painting and patination techniques. Video tutorials show the installation process step-by-step — even a beginner can handle it.
By turning to STAVROS, you gain a partner in creating walls that cease to be a background and become a work of art. European-level material quality, variety of choice, professional support, respect for your project — this is what distinguishes the company's work.
Your walls can tell three-dimensional stories. The tools for this — polyurethane panels and molding — await your choice. Two-layer relief is not a seasonal trend. It is a new standard that will remain.