


Article Contents:
- Why the wall next to the wardrobe should be decorated separately
- Which areas next to built-in furniture can be decorated with stucco molding
- The wall section between the wardrobe and the door
- Wall next to the wardrobe in the bedroom
- Area next to the built-in hallway
- Wall section next to the dressing room
- Wall next to the sliding wardrobe
- What to choose for the wall next to the wardrobe: a set, moldings, or a decorative frame
- Ready-Made Set of Decorative Molding
- Frame made of moldings
- Vertical stucco molding
- Decorative inserts and elements
- How to choose the size of stucco molding for the wall next to the wardrobe
- How to combine stucco decor with a built-in wardrobe
- What indents to leave when placing decor next to a wardrobe
- Where to use stucco decor next to built-in furniture
- Entry Hall
- Bedroom
- Hallway
- Wardrobe area
- One set of stucco decor or several moldings: what is better for a wall section
- Common mistakes when choosing stucco decor next to a wardrobe
- How to know if a set of stucco decor will fit next to a wardrobe
- FAQ: Answers to Popular Questions
- About the Company STAVROS
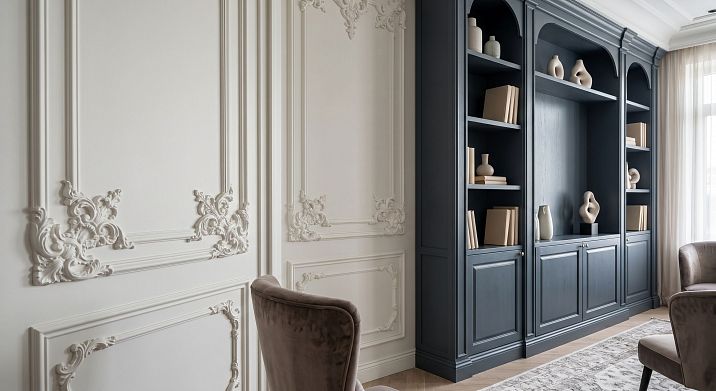
There is a situation that everyone who has experienced installing a built-in wardrobe or dressing room knows: the furniture is in place, everything is assembled, the craftsmen have left — and you are standing in front of a wall section. Narrow, clean, freshly painted. And completely empty.
Built-in furniture is good because it takes up exactly as much space as allocated. But it never occupies the entire wall — there is always something left next to it. A wall section between the wardrobe and the door. An area next to the dressing room. A free section of wall near the sliding wardrobe. A piece of wall between the end of the furniture system and the corner. This is not a problem — it is an opportunity. An opportunity to make the interior truly complete, not just assembled.
Stucco decor next to a wardrobe — one of the most practical and effective solutions for such an area. Moldings, vertical frames, ready-made polyurethane sets turn a faceless wall section into an architectural accent. And they do it without lengthy renovations, without dust, without construction crews. Only a tape measure, markings, and glue.


Why the wall next to the wardrobe should be decorated separately
Not everyone thinks about this in advance. The wardrobe is designed for a specific opening or wall, the furniture makers take measurements, then installation — and in the end, it is right next to the wardrobe that the very zone no one thought about ends up.
Decorating the wall next to the wardrobe solves several problems at once. First, it eliminates the feeling of incompleteness: an empty wall section against the backdrop of large furniture always attracts unnecessary attention — not as a design element, but as a forgotten spot. Second, it creates a visual transition between the furniture and the wall: the wardrobe integrates into the room's architecture rather than standing as a separate object in front of it. Third, it stretches the space: vertical decor on the wall section next to the wardrobe optically raises the ceiling and widens a narrow area.
The problem is especially acute in several typical cases:
-
A built-in wardrobe up to the ceiling in the bedroom — next to it remains a wall section about 2.5–3 meters high.
-
A walk-in closet with hinged doors — upon entering the area, the corner of the wall and the end of the furniture are visible.
-
A built-in hallway — besides the wardrobe, there is also a door, mirror, console, and all of this competes for limited space.
-
A sliding wardrobe in the corridor — a long furniture section, and next to it an empty wall with a single socket and switch.
In all these cases,decor of the wall section next to the wardrobemade of polyurethane — this is not a luxury, but an architectural necessity. Designers have known this for a long time. Now it is accessible even without a designer.


Which areas near built-in furniture can be decorated with stucco molding
Before choosing decor, you need to understand which area you are working with. Each type of wall section near built-in furniture has its own design logic.
Our factory also produces:


The wall section between the cabinet and the door
One of the most typical scenarios is a narrow vertical strip of wall sandwiched between the side of a cabinet and a doorway. The width of such an area can vary from 25 to 80 centimeters. At first glance, it's not a place for decor. On second glance, it's an ideal place for a vertical frame or a compact stucco accent.
Stucco decor for the wall between the cabinet and the doorworks as an architectural link: it turns a narrow void into a deliberate element. A vertical frame made of moldings, centered on the free wall section, transforms this gap from 'accidental' to 'intentional'. This is a subtle but powerful visual change.
When the area width is from 30 to 50 cm, it's better to choose one vertical molding or a thin frame. When the width is from 50 to 80 cm, a decorative frame with small side indentations is already suitable.
Get Consultation
The wall next to the wardrobe in the bedroom
In the bedroom, a built-in wardrobe often stands next to the bed, by one of the side walls, or opposite the bed. In each of these cases, the wall section becomes a visible area — one that a person sees every day, waking up and falling asleep.
Moldings near the wardrobe in the bedroomperform two functions at once: they decorate the wall and create a visual connection between the furniture and the headboard decor. If there is already a decorative frame or a set of stucco behind the bed, the moldings on the adjacent wall section near the wardrobe continue the same theme — and the interior gains consistency.
Option for a bedroom with a tall floor-to-ceiling wardrobe: a vertical set of stucco decor occupying most of the free wall space. It supports the verticality of the wardrobe and visually "holds" the space — preventing it from looking empty.
Area next to the built-in hallway
The hallway is a room where built-in furniture is especially active: wardrobe, shoe cabinet, shelves, mirror, hooks, console. All of this is concentrated in a small area, and an empty wall space next to the hallway is not uncommon. It can be by the entrance door, between the wardrobe and mirror, between the end of the furniture and an adjacent opening.
Set of stucco decor for the hallwayhere works as a tool for organizing space: it structures the chaotic entry zone, creates rhythm, connects disparate elements into a single picture. A frame of moldings next to the hallway mirror is a classic and always appropriate technique.
Wall space next to the dressing room
The dressing room is a large volume. Closed doors, blank facades, an elongated section — all of this creates a heavy visual block. And what is next to it looks insignificant by default.
Decor of the wall next to the dressing roomhelps soften this transition. A decorative frame or a vertical ready-made set next to the dressing room works as an architectural "pause" — a visual stop that prevents the interior from looking like a monolithic block of cabinets.
It is especially important to design the corner area: the place where the dressing room ends and the free wall begins. Without decor, this place looks like a break. With molding or a frame — like a completion.
Wall next to the sliding wardrobe
A sliding wardrobe is a special case. Its facades are usually smooth: mirror, matte film, acrylic, veneer. No relief framing. And that's exactly whywall decor next to a sliding wardroberequires precision: the decor should complement the facade, not conflict with it.
The best solution in this case is laconic moldings in the color of the wall. A frame of thin profiles without intricate ornamentation creates an architectural rhythm without competing with mirror or glossy facades. For more details on the correct combination of decor with the wall, see thestucco decor behind furniture.
The wall section next to the wardrobe is not a problem to hide. It's an area to turn into part of the design.
What to choose for the wall next to the wardrobe: a set, moldings, or a decorative frame
A practical question: what exactly to buy and install? The decor market is wide, but for wall sections next to built-in furniture, three main options work — each with its own logic.
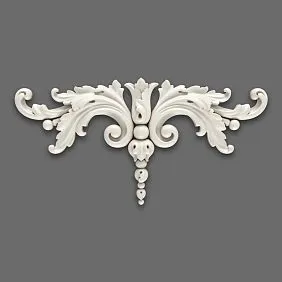
Ready-made set of stucco decor
Ready-made set of stucco decor for the wall sectionis the fastest and most straightforward solution. All elements are already matched in a single proportion, there are clear overall dimensions, and there is no need to independently calculate the layout of moldings.
For the wall section next to the wardrobe, a ready-made set is convenient because you can immediately apply it to the wall (or mark it with tape) and assess whether it fits the available width. If it fits, you buy and install it. If not, you take a smaller set or switch to a frame scheme made of moldings.
Ready-made kits are available in several style collections. For a classic or neoclassical interior, the following works well:Neoclassic Collection — with a frame structure, corner accents, and a clear rhythm. For a lighter solution without overload —Neoclassic Light collection. If the interior is in the style of Japanese minimalism or Scandinavian —Japandi collection offers concise, straight-line forms without excessive ornamentation.
Molding frame
A frame made of moldings next to the cabinet — a universal solution that adapts to any wall width and height. You take a molding profile, cut it to the desired size, join it at a 45° angle, and get a frame exactly to the dimensions of the wall section.
This solution is better than a ready-made kit when the area dimensions are non-standard: too narrow, too tall, or with an unusual proportion. The molding is cut exactly to the required size and does not require width adjustment. AndDecor for Molding — corner inserts, overlay elements, rosettes for joints — allows you to make the frame more expressive without additional calculations.
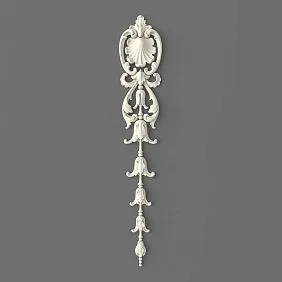
Vertical stucco decor
Vertical stucco decor next to the cabinet— a separate format that works specifically in high zones. If the cabinet reaches the ceiling and there is a wall section 2.5–3 meters high next to it, a horizontal frame in such a zone will look like a random rectangle. A vertical set, on the contrary, supports the logic of a high space: it stretches upward along with the cabinet, creates rhythm, and visually holds the wall section.
Forof stucco decor on a narrow walla vertical format is one of the best solutions. A narrow set, elongated vertically, does not overload the zone and at the same time gives it architectural weight.
Decorative appliqués and elements
Polyurethane decorative appliquesare used as an independent accent or as a complement to a frame system. They are placed inside the frame — at corners, in the center, along axes — or used as point decor where a full frame does not fit.
Overlays are especially useful in very narrow wall sections (up to 30 cm), where a frame physically cannot be placed. One or two decorative elements along the vertical axis — that is no longer an empty wall, but a deliberate detail.
How to choose the size of stucco decor for a wall next to a cabinet
Before purchasing — measurements. Not the other way around. It is this rule that separates successful results from situations where the set turns out to be too wide for the wall section or gets lost on a large wall.
The main logic: first, the width of the free wall area is measured, then the indentation on each side (from the cabinet, from the door, from the corner, from the trim) is subtracted — and only within the remaining space is the size of the set or frame chosen.
| Width of the pier | What to choose | Visual Result |
|---|---|---|
| Up to 40–50 cm | Thin vertical frame or single overlay element | Neat accent, the void is closed |
| 50–80 cm | Compact set of stucco decor for a pier | Full-fledged decorative zone |
| 80–110 cm | Ready-made set + additional moldings around the perimeter | Expressive pier |
| More than 110 cm | Multiple frames or extended composition | Wall as part of a unified design |
The height of the set is chosen by the same principle: from the bottom indent (from the baseboard or the top point of furniture) to the top indent (from the ceiling or cornice). A detailed breakdown of the calculation logic is in the articlehow to calculate moldings and stucco decor for a wall.
Before purchasing the set, check the width of the pier. Mark the future decor with painter's tape, leave indents from the cabinet, door, and baseboard — this makes it easier to choose a set that will look proportional and will not be a centimeter too wide or disappointingly smaller.
How to combine stucco decor with a built-in wardrobe
This is perhaps the most delicate question — and yet the most often overlooked. Stucco decor on a wall pier does not exist in a vacuum: it is always adjacent to built-in furniture and inevitably enters into a dialogue with it. This dialogue can be harmonious — or turn into a visual conflict.
Smooth modern wardrobe. If the wardrobe facades are mirror, matte film, acrylic, or frameless veneer — the decor nearby should be calm. Thin moldings in the color of the wall, a laconic frame without complex ornamentation, a minimum of decorative elements inside. The goal: to add architectural rhythm without competing with the smooth facades.
Framed classic facades. If the wardrobe has framed doors with milling — the wall decor nearby can support the same rhythm. Moldings next to this type of furniture facades create a sense of a unified system: the furniture and the wall speak the same architectural language.
Wardrobe up to the ceiling with solid doors. Here, decor nearby is needed as a visual pause. Solid large furniture without relief feels oppressive. A frame of moldings nearby is air, lightness, a transition from a monolith to a living wall.
Color scheme. Polyurethane stucco decor can be painted in any color. Three working strategies:
-
Decor in the color of the wall — the most delicate solution, adding relief without contrast. Works well next to any facades.
-
Decor a shade lighter than the wall — a slightly more noticeable accent. Creates a play of light and shadow.
-
Decor in a contrasting color — a bold solution for those who want to highlight the wall pier as an independent element.
How to combine moldings and a built-in wardrobe is always a question of the specific interior, specific facades, and specific color palette. But the basic principle remains unchanged: decor should connect the space, not break it apart.
What indents to leave when placing decor next to a wardrobe
Indents are what make decor proportional. No air — there is tightness. Too much air — decor gets lost. And there are rules for this.
From the side of the wardrobe. The molding or frame should not touch the end of the wardrobe closely. The minimum indent is 5–8 cm. This provides both visual air and practical necessity: when opening hinged doors or shifting sliding systems, the decor should not interfere.
For wardrobes with hinged doors, you need to additionally check the opening angle: stand by the wardrobe, open the door 90–110° and see where its plane ends. The decor should start beyond this point — otherwise the door will hit the molding.
From the door casing. If there is a doorway with a casing next to the wall section, the molding should be at least 5 cm away from the casing. This provides air between the two vertical elements and does not create a feeling of "tightness".
From the baseboard. The lower part of the decor — whether a frame or a set — should not be pressed against the baseboard. Optimal indent: 15–25 cm from the top edge of the baseboard. With a high designer baseboard, increase to 25–30 cm.
From the ceiling. The top edge of the decor should be no closer than 15–20 cm from the ceiling plane. If there is a ceiling cornice or cove, the indent is measured from the lower edge of the cornice, and it should not be less than 10 cm.
The indent when installing molding next to built-in furniture is a system that needs to be checked comprehensively, not by a single parameter. Before installation, all points — wardrobe, door, baseboard, ceiling, sockets, switches — should be marked on the wall.
The article details how to properly build this entire system step by stephow to place a set of decorative moldings on the wall: it covers indents from the floor, ceiling, and furniture applicable to any type of area.
Where to use stucco decoration next to built-in furniture
Built-in furniture is found in different rooms — and in each, the logic of decorating the wall sections differs slightly. Let's break it down by zones.
Entryway
The hallway is the first thing you see and the last thing you decorate. Here, built-in furniture is concentrated in a minimal area: a wardrobe, a shoe cabinet, a mirror, a coat rack. And at the same time, it is here that every wall section is seen most clearly — because the hallway is small, and your gaze covers it entirely.
Stucco decoration next to the wardrobe in the hallway — a tool that turns a household storage area into an interior space. A frame next to the mirror, a vertical set between the wardrobe and the door, a molding belt at the level of the wardrobe's top line — all of this works as organizing decor.
In the hallway, the following work especially well:Ready-made molding frames for the wall: they do not require complex assembly, are installed quickly, and provide an instant visual result. For a detailed article on how to decorate a hallway and corridor with polyurethane decor — see the materialstucco decoration for the hallway and corridor.
Bedroom
In the bedroom, a built-in wardrobe often takes up an entire wall. Next to it, there is either a narrow wall section between the wardrobe and the window, or an area between the wardrobe and the headboard of the bed. Both cases require a thoughtful approach.
If the wall section is between the wardrobe and the bed — stucco decoration here creates a visual connection between the two furniture volumes. A frame at the level of the bed's headboard "rhymes" with the decor behind the bed — and the bedroom acquires a systematic look.
If the wall between the window and the adjacent wall is a vertical decor, it rhymes well with the window casing or slopes if they have a frame design. Mouldings near the wardrobe in the bedroom are best chosen in the color of the wall — so that the decor works as a relief, not as an independent accent in a space intended for relaxation.
About selecting sets for the bedroom — in the articleStucco molding set for the bedroom: formats, height, styles, and typical mistakes are covered there.
Corridor
A corridor is a narrow space where built-in wardrobes stand in a row. The walls between sections of the wardrobe, between the wardrobe and the door, between furniture blocks and the turn of the corridor. This is exactly the place where wall decor near the wardrobe in the corridor most often remains unrealized.
And in vain. It is in the corridor that vertical frames made of mouldings give the greatest effect: they break the monotony of a straight corridor, create rhythm, and due to verticality, visually expand the space.
A set of stucco decor for the corridorin such areas should be strict and concise: without complex ornaments, without overload, in the color of the wall. The task is not to decorate, but to organize.
Dressing Room Area
A dressing room is either a separate room (then decorating its interior space is a separate topic) or a zone in the room marked by a large furniture block. In the latter case, the walls near the dressing room are especially important — they become the boundary of this zone.
Stucco decor near the dressing roomhere performs a zoning function: visually indicates where the furniture block ends and the free part of the room begins. A moulding frame on the wall at the entrance to the dressing room is like an architectural portal: a boundary without a wall.
One set of stucco decor or several moldings: which is better for a pier
A question that arises for everyone standing in front of a pier with a tape measure and a catalog. The answer depends on the specific situation, and there is no universal rule — only logic.
One ready-made set is better if:
-
The pier is small: width up to 80–90 cm, standard height.
-
You need a quick solution without lengthy design.
-
You want guaranteed correct proportions without self-selection.
-
The decor should be the only accent on this wall — without additional elements.
-
You are a beginner in working with stucco and don't want to risk calculations.
Several frames from moldings are better if:
-
The pier is wide: more than 100–120 cm.
-
You need to repeat the rhythm of the cabinet facades — create several symmetrical frames in a row.
-
The wall is long, and it needs to be divided into sections.
-
There are several doors or furniture sections nearby with different distances between them.
-
You want to do the installation in stages.
The optimal solution that combines both approaches: a ready-made set as a central element + moldings to expand the composition. The set sets the proportion and rhythm, andMoldings made of polyurethaneallow you to adapt it to the specific wall size.
This approach is especially effective where the wall section is slightly wider or narrower than the standard set. Instead of looking for a set "exactly to size," you take one that matches the proportion and bring it to the desired dimensions with moldings. Just like the masters of classical architecture did — only without plaster and sculptors.
Common mistakes when choosing stucco decor next to a cabinet
Each of these mistakes is the result of haste or incomplete inspection. Check yourself before purchasing.
1. The decor is glued flush to the side of the cabinet. No breathing room — no proportion. A molding pressed against the end of the furniture looks random and interferes with opening doors.
2. They don't check door opening. The molding is glued on, but the hinged door now hits it when opening. Rework needed.
3. They choose a set that is too wide. The set width is larger than the free wall space — the moldings hit the trim or the cabinet end. No "just a little bit" works here.
4. They don't account for the door trim. The trim is a protruding element. If the molding comes flush with it, the boundary looks like an installation error.
5. They forget about outlets and switches. In hallways and entryways, outlets are often located on the wall sections next to the cabinet. Molding at the junction with an outlet is bad both aesthetically and technically.
6. They make the decor too active next to decorative facades. Next to a framed cabinet with carving and decor — a heavy set with rich ornamentation. Two decorators on one wall, and neither wins.
7. They don't connect the decor with the cabinet height. The cabinet goes to the ceiling, but the frame is at waist level. No visual connection — there are two unrelated elements.
8. They use one small element on a large wall. A small applied medallion on a two-meter wall section next to a cabinet is not decor. It's a dot on a sheet of paper.
9. They install without preliminary marking with tape. They didn't look at the marking from a distance of 2–3 meters — and only after installation realized that "something is wrong."
10. They don't account for the baseboard and ceiling cornice. The lower molding is pressed against the baseboard. The upper one hits the cornice. The wall looks cramped. Indents are not a designer's whim, but a condition of proportion.
How to understand if a set of stucco decor will fit next to a cabinet
This is a step-by-step check that must be done before purchase. Not after.
Step 1. Measure the width of the free wall space from the end of the cabinet to the nearest vertical boundary (door casing, wall corner, next furniture section).
Step 2. Mark the cabinet side, door, and casing on the wall with a pencil or tape. These are your boundaries.
Step 3. Check the opening of doors and sliding mechanisms. Make sure you understand where the doors move when opened.
Step 4. Find the vertical center of the free area. Mark it with a pencil mark or a vertical strip of tape.
Step 5. Apply painter's tape along the contour of the future decor: bottom horizontal with an indent from the baseboard, top horizontal with an indent from the ceiling, side verticals with an indent from the cabinet and door.
Step 6. Check the indents: from the cabinet, from the door, from the baseboard, from the ceiling. All of them must be non-zero.
Step 7. Check outlets, switches, sconces, furniture handles. None of these should fall within the tape contour.
Step 8. Step back 2–3 meters. Look at the marking in the context of the cabinet and the entire room. If everything looks intentional — you have found the right spot.
Step 9. Compare the dimensions of the tape marking with the size of the selected set. If it matches — buy it. If not — adjust the size or format.
Step 10. Only now — installation. About how to carry it out technically correctly:installing polyurethane moldingandinstallation of polyurethane molding.
FAQ: Answers to popular questions
Can stucco decor be glued next to a built-in wardrobe?
Yes. The main thing is to maintain an indent from the side of the wardrobe and check the door opening. Polyurethane decor is lightweight, glued with acrylic glue or liquid nails, does not load the wall and does not require special equipment.
What is better to choose for a narrow wall section next to the wardrobe?
For a wall section up to 50 cm wide — a thin vertical frame made of moldings or a compact overlay element. From 50 to 80 cm — a ready-made set of stucco decor for the wall section or a frame made of moldings. Wider — a ready-made set with an addition of moldings.
Is it necessary to match the decor to the wardrobe facades?
It is advisable to consider the style of the facades. A smooth modern wardrobe — laconic decor in the color of the wall. Frame classic facades — moldings with the same rhythm. Mirror facades — minimal decor so as not to compete with the reflection.
What indent should be left from the wardrobe to the molding?
At least 5–8 cm from the end of the wardrobe. For hinged doors — additionally check the opening angle and make sure the molding does not fall into the door movement zone.
Is a ready-made set suitable for a narrow wall in the hallway?
Yes, if its width matches the width of the pier, taking into account the offsets. Before purchasing, mark the outline with tape, check all gaps, and only then make a decision.
How to hide an unsightly pier next to a wardrobe?
The best way is not to hide it, but to turn it into a decorative element. A frame made of moldings or a vertical set of stucco decoration turns an empty pier into a deliberate interior detail. This works better than a painting or mirror — because the decor integrates into the wall's architecture, rather than hanging on it.
Can stucco decoration be used next to a hidden door?
Yes, and this is one of the most interesting cases — detailed in the articleStucco decor for a wall with a hidden door. The decor helps visually unify the door and wall into a single plane.
About the company STAVROS
STAVROS is a Russian manufacturerpolyurethane productsfor interior decor: ready-made wall sets, moldings, cornices, baseboards, decorative overlays, and profiles for various areas — from bedrooms and living rooms to hallways, corridors, and dressing rooms.
All STAVROS products are manufactured in Russia. Polyurethane items are not afraid of moisture, are easily processed with hand tools, are glued without drilling, and can be painted in any wall color or contrast — without special preparation or complex technology.
The STAVROS catalog features collections of ready-made wall sets for different styles and tasks:Neoclassical, Neoclassic Light, Japandi, Versailles Light. Each collection features well-thought-out proportions, ready-to-install sets with precise dimensions and recommendations for application areas.
If there is an empty wall space next to your built-in wardrobe — in the catalog. Clear lines, created using modern technologies, emphasize the strict aesthetics of the room. Each decorative element harmoniously fits into the overall concept, creating a sense of order and thoughtfulness.there is a solution. Narrow and tall, wide and low, matching the wall color or with an accent — STAVROS creates decor that integrates into the interior as organically as built-in furniture integrates into the wall.


