Article Contents:
- Constructor Philosophy: Why Ready-Made Elements Are Better Than DIY Carpentry
- Table Anatomy: What the Structure Consists Of
- Legs
- Aprons
- Stretchers
- Tabletop
- Decorative elements
- Choosing a Ready-Made Frame: What to Pay Attention To
- Style and Proportions
- Sizes
- Wood species
- Quality of processing
- Decorative Overlays: How to Enhance the Effect
- Types of Overlays
- Where to Place Overlays
- Installing Appliqués
- Tabletop: Material and Shape Selection
- Materials
- Size and Shape
- End treatment
- Step-by-Step Process of Creating a Dining Table
- Step 1: Element Selection
- Step 2: Fitting and Preparation
- Step 3: Mounting Overlays on the Frame
- Step 4: Frame Finishing
- Step 5: Tabletop Processing
- Step 6: Table Assembly
- Step 7: Final Touches
- Creating a Coffee Table: A Compact Project
- Concept
- Elements
- Process
- Creative Variations: Non-Standard Ideas
- Two-Tone Finish
- Patination
- Tabletop with Frieze
- Inlay
- Glass Tabletop on a Carved Frame
- Finishing: Techniques and Materials
- Clear Finishes (Oil, Wax, Varnish)
- Painting
- Staining and Toning
- Upholstery Restoration: New Life for Soft Furniture
- Gilding
- Tools and Supplies: What You'll Need
- Where to Buy Quality Frames and Overlays
- Project Economics: Cost of a DIY Table vs. Store-Bought
- Frequently Asked Questions: Addressing Doubts
- Do I Need Special Carpentry Skills?
- Where to Get a Tabletop of the Right Size?
- How to Choose a Frame Size for the Desired Tabletop?
- Can I Use a Frame from One Wood Species and a Tabletop from Another?
- Are Decorative Overlays Mandatory?
- What's Stronger for a Tabletop: Solid Wood or Plywood?
- How Long Does the Whole Process Take?
- Can I Make a Table Without Varnish, Just with Oil?
- Where to Buy Tools If You Don't Have Them?
- Conclusion: Furniture Made with Soul
Dreaming of a table that becomes the centerpiece of your dining room, one that guests will ask, 'Where did you find this?' But the prices for designer solid wood furniture force you to abandon the dream, and standard tables from furniture stores look bland? There is a third way, which few know about: creating an exclusive table from ready-made elements —carved furniture frames, decorative overlays, custom tabletops. No machines, lathe work, or complex carving—just assembly, decoration, and finishing.
This approach offers fantastic possibilities. You choose a ready-made carved frame from solid oak with turned legs and shaped aprons, add decorative overlays with botanical patterns, order a tabletop in the desired size and shape, paint it in your chosen color—and you get a unique, authorial table that looks like an antique find or a cabinetmaker's work. At the same time, the costs are 3-4 times lower than buying a ready-made designer table, and the creation process is accessible even to those who have never held a chisel.


The Constructor Philosophy: Why Ready-Made Elements Are Better Than DIY Carpentry
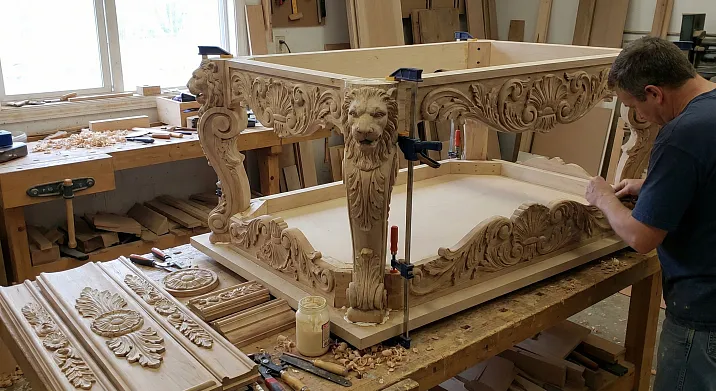
When it comes to creating furniture with your own hands, many imagine a workshop full of machines, piles of boards, and sawdust up to their knees. Yes, that's exactly how professional carpenters work. But to create a single table, there's no point in buying a router, lathe, sander, or mastering wood carving. It's much more rational to use ready-made, industrially produced elements that are made on professional equipment, from seasoned wood, with a quality guarantee.
Ready-madeTable frames— is not a compromise, but a sensible choice. These are turned legs with precise proportions, aprons with correct geometry, and sturdy mortise-and-tenon joints. Try turning four identical legs with smooth transitions and symmetrical thickenings yourself—even an experienced turner would need several hours of work. And ready-made legs are already waiting for you, flawlessly executed, sanded, at a price that wouldn't even cover the cost of the wood and electricity for making them yourself.
Decorativefurniture appliqués— is another element that cannot be made with quality at home. These are carved rosettes, cartouches, friezes, corner elements with botanical or geometric patterns. They are cut on CNC machines using digital models, ensuring identicality and clarity of relief. Hand carving at this level requires years of experience and special tools.
By combining ready-made elements, you work as a designer-composer, not as a craftsman. You choose the style, proportions, decor, color, create a composition—and this is a creative process, no less valuable than physically making the parts.


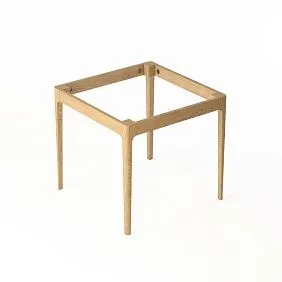
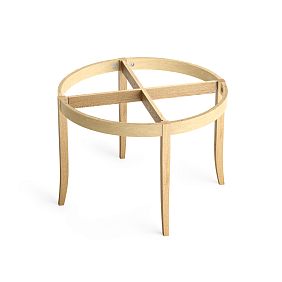
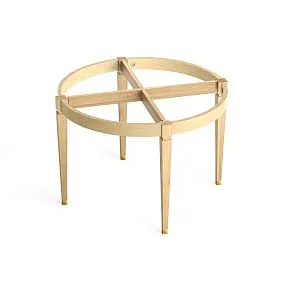
Anatomy of a Table: What the Structure Consists Of
Before starting the project, it's important to understand the basic table structure and the role of each element.
Our factory also produces:


Legs
Supporting elements that bear the weight of the tabletop and everything placed on it. For dining tables, legs with a diameter of 70-100 mm are used; for coffee tables, 50-70 mm. Legs can be cylindrical (simple turned profile), baluster-style (with thickenings and bindings), conical (tapering downwards), or cabriole (curved, in the Baroque style).
The number of legs depends on the size and type of table. Four legs are standard for rectangular and square tables. One central support is for small-diameter round tables. Two massive supports at the ends are for long dining tables in the refectory style.
Get Consultation
Aprons
Horizontal planks connecting the legs beneath the tabletop. Aprons serve two functions: structural (providing rigidity, preventing the legs from splaying) and decorative (forming the under-table, the visible part of the frame).
Aprons can be simple rectangular or profiled with a shaped lower edge. For classic tables, aprons with smooth curves are used; for modern ones, straight, laconic ones.
Stretchers
Additional horizontal planks connecting the legs at a height of 15-25 cm from the floor. Stretchers reinforce the structure, especially important for tall tables. Furthermore, they serve as a decorative element and a convenient footrest.
Not all tables have stretchers. In minimalist designs, they are often omitted to lighten the visual appearance.
Tabletop
The upper working surface. For dining tables, the tabletop thickness is 25-40 mm; for coffee tables, 20-30 mm. Material: solid wood (solid lamella panel), plywood with veneer finish, MDF, glass, stone.
The shape of the tabletop defines the character of the table: rectangular — classic and versatile, square — for small spaces, round — for creating coziness and equality among those seated, oval — a compromise between rectangle and circle.
Decorative elements
Overlays, rosettes, panels, friezes — elements that do not bear structural load but radically change the table's appearance. A carved rosette on the apron, corner overlays at the junctions of legs and tabletop, a panel along the tabletop perimeter — all this transforms a simple table into a piece of furniture art.
Choosing a ready-made frame: what to look for
The foundation of the future table is the frame. 80% of the result depends on its quality, proportions, and style.
Style and proportions
The frame must match the style of the interior where the table will be placed. For classic interiors, choose frames with turned baluster legs, shaped aprons, traditional proportions. For modern ones — laconic frames with simple geometric shapes, straight lines.
Proportions are critical. Too thin legs on a massive tabletop look flimsy. Too thick on an elegant tabletop — crude. General rule: the larger the tabletop, the more massive the legs and aprons should be.
Dimensions
Ready-made frames are produced in standard sizes, and it's important to understand if the chosen frame will suit your tabletop.
Frame height for a dining table — 70-75 cm (standard, comfortable for sitting on chairs 45 cm high). For a coffee table — 40-50 cm. For a bar table — 100-110 cm.
The distance between the legs determines the size of the tabletop that can be installed. If the legs are spaced 100 cm apart along the long side, the tabletop can be 110-140 cm (with an overhang of 5-20 cm on each side). Too large an overhang (more than 30 cm) can lead to instability — the tabletop may tip when weight is applied to the edge.
Tree species
Ready-made frames are made from solid oak, beech, ash, birch. Each wood species has its own characteristics.
Oak — the most durable, hard, with expressive grain. An oak frame will last for decades, is not afraid of loads, scratches. Color — from light honey to dark brown. Oak is ideal for classic tables that need solidity.
Beech — dense, uniform, light. A beech frame is good for tables that will be painted — beech provides a smooth surface without pronounced grain. Beech's strength is high, but it is more sensitive to humidity than oak.
Ash — a middle option between oak and beech. Beautiful grain, high strength, light warm shade. Ash is good for Scandinavian and modern interiors.
Birch — a budget option. Softer than oak, but quite strong for home furniture. Light, almost white wood. Birch frames are often used for painting.
Surface finish quality
Inspect the frame carefully (or clarify with the seller if buying online):
-
Legs should be identical, without warping, symmetrical.
-
Joints — tight, without gaps. The frame should not wobble.
-
Surface — smooth, well-sanded, without burrs, chips, cracks.
-
Aprons — straight, without bends or twisting.
A quality frame is a guarantee that the table will be stable, durable, pleasant to look at, and that the finish will lay flat.
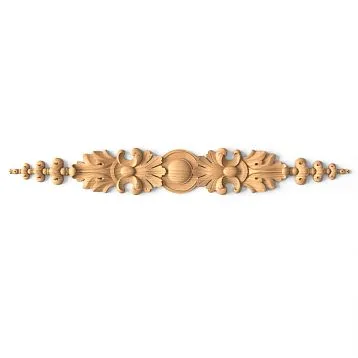
Decorative overlays: how to enhance the effect
The frame itself may look austere and simple. Decorative overlays add expressiveness, richness of detail, and individuality to it.
Types of overlays
Rosettes — round or oval elements with carved ornamentation (floral, geometric). Placed in the center of aprons, on panels, at the intersection of elements.
Cartouches — shields of complex shape with relief, often with monograms or coats of arms in the center. A classic element for furniture in Baroque, Rococo style.
Corner overlays — triangular or fan-shaped elements installed in corners: at the junctions of legs with aprons, legs with the tabletop. Visually reinforce joints, add structural solidity.
Friezes — long narrow strips with repeating ornamentation. Mounted along the perimeter of the tabletop, along the aprons. Create framing, completeness.
Panels — flat rectangular or shaped elements with relief or smooth, inserted into frames on aprons, creating a panel effect.
Where to place overlays
Skillful placement of overlays is an art. An excess of decor turns the table into an overloaded imitation, a lack — leaves it boring.
Center of aprons — ideal place for a rosette or cartouche. Symmetrically on all four aprons or only on the front ones (those visible when approaching the table).
Frame corners — corner overlays at the junctions of legs and aprons enhance the visual structure, make the table more substantial.
Tabletop perimeter — a frieze along the edge of the tabletop (on the underside, so it is visible when looking at the table from the side) adds volume, completeness.
Stretchers — if the frame has stretchers, small rosettes or carved inserts can also be placed on them.
The main rule: symmetry and balance. If you placed an overlay on one apron, do it symmetrically on the opposite one. If you decorated the front legs, don't leave the rear ones bare.
Mounting overlays
Overlays are attached with wood glue. Apply glue to the back of the overlay, press firmly against the frame surface, secure with clamps or painter's tape until dry (usually 2-4 hours).
For additional strength, you can use thin finishing nails, driven in inconspicuous places (along the edges of the overlay, in the depth of the relief where they won't be noticeable).
After the glue dries, remove any excess (if it squeezed out) with a sharp knife or chisel. Sand the joint area with fine sandpaper so the overlay and base blend into one plane.
Tabletop: material and shape selection
The tabletop is not just the top lid, it's the face of the table, its functional and visual dominant.
Materials
Solid wood (furniture panel) — solid-laminate gluing from wood blocks. Eco-friendly, strong, durable material. Solid wood can be sanded, restored, repainted. Disadvantage — price (higher than alternatives) and weight.
For tabletops, oak, ash, beech, pine are used. Oak tabletop — classic, heavy, hard, with expressive texture. Ash — lighter, softer. Pine — budget option, soft, requires careful handling.
Plywood with veneer facing — multi-layer plywood (usually birch), covered with a thin layer of natural veneer from valuable species. Visually indistinguishable from solid wood, but lighter and cheaper. Disadvantage — cannot be deeply sanded (veneer is thin), if chipped on the edge, the layered structure is visible.
MDF with coating — wood fiberboard, covered with veneer, paint, or film. Even, stable, inexpensive. But less noble than solid wood, and not suitable for tables in classic style where naturalness is important.
Glass — for modern interiors where visual lightness is needed. Glass tabletop on a wooden carved frame — an interesting contrast of traditional and modern.
Stone (marble, granite) — luxurious, heavy, cold. Stone tabletop on a wooden frame — a rare but effective solution for high-level classic interiors.
Size and Shape
The size of the tabletop should exceed the dimensions of the frame by 5-20 cm on each side. This creates visual completeness, allows comfortable placement of items on the table without fear of them falling.
For a dining table for 4 people — tabletop at least 90×90 cm (square) or 120×80 cm (rectangular). For 6 people — 150×90 cm. For 8 people — 180×90 cm or 200×100 cm.
For a coffee table — 80×80 cm, 100×60 cm, 120×70 cm depending on the size of the living room.
Shape depends on style and function. Rectangular — universal, accommodates more people along the long sides. Square — compact, suitable for small kitchens. Round — creates equality among those seated but takes up more space. Oval — a compromise, elegant, good for classic interiors.
Edge processing
The edge of the countertop is an important detail. It can be:
-
Straight — a simple perpendicular edge, strict, minimalist.
-
Chamfered (bevel) — removal of the sharp edge at an angle, safer, more pleasant to the touch.
-
Radiused — a smooth rounding of the edge, creates softness, coziness.
-
Profiled (ogee) — a complex profile with multiple transitions, characteristic of classic furniture.
-
With a frieze — the edge is framed by an additional strip (frieze), creating volume, massiveness.
Edge processing is done with a router. If you order a tabletop, specify the desired edge profile.
Step-by-step process of creating a dining table
Now that the theory is clear, let's move on to practice. We'll break down the creation of a dining table for 6 people from ready-made elements.
Step 1: Selecting elements
Frame: ready-made carved frame with four turned legs, shaped aprons, stretchers. Frame size (between legs): 120×80 cm, height 72 cm. Material — oak.
Tabletop: solid wood panel made of oak, size 150×90 cm, thickness 30 mm, edge — ogee.
Overlays: four carved rosettes with a diameter of 80 mm for the center of the aprons, eight corner overlays for the joints of legs and aprons.
Finishing materials: stain (color — dark walnut), matte varnish, wood filler, wood glue.
Step 2: Fitting and preparation
Lay out the frame on the floor or workbench, place the tabletop on top. Check that the tabletop overhangs evenly on all sides (15 cm along the long sides, 5 cm along the short sides).
Mark the position of the aprons on the underside of the tabletop — this will help attach the tabletop to the frame correctly.
Inspect all elements: frame, tabletop, overlays. If there are minor defects (burrs, unevenness), sand them with fine-grit sandpaper.
Step 3: Mounting overlays on the frame
Mark the centers on the aprons where the rosettes will be glued. Use a tape measure and pencil for accuracy.
Apply wood glue to the back of the rosette, place it on the apron according to the markings, press firmly. Secure with painter's tape or light clamps. Repeat for all four aprons.
Glue the corner overlays at the joints of the legs and aprons. Let the glue dry completely (according to the instructions on the package, usually 6-12 hours).
Step 4: Final finishing of the frame
After the glue dries, check the joints of the overlays. If there are gaps, fill them with wood filler to match the tone. After the filler dries, sand these areas.
Apply stain to the entire frame with a brush or sponge. Work carefully so the stain goes on evenly, without spots or drips. Let the stain dry (usually 4-6 hours).
Coat the frame with matte varnish in 2-3 layers. Between layers, do light sanding with fine-grit sandpaper (grit 320-400) to remove raised fibers and ensure smoothness. Do not sand the final layer.
Step 5: Processing the tabletop
Process the tabletop separately while the frame is drying. Sand the surface with a sander or by hand, starting with grit 120, then 180, finishing with 240.
If you plan to stain the tabletop the same color as the frame, apply wood stain. If you want to keep the natural oak color, skip this step.
Apply a protective finish to the tabletop. For a dining table, it's better to use a durable varnish or oil-wax. Varnish creates a hard film that is resistant to scratches and moisture. Oil-wax gives a natural look but requires periodic renewal (every 1-2 years).
Apply the finish in several coats (2-3 coats of varnish or 3-4 coats of oil), observing the drying time between coats.
Step 6: Assembling the Table
When the frame and tabletop are completely dry and finished, proceed with assembly.
Flip the tabletop face down onto a soft surface (blanket, cardboard) to avoid scratching.
Place the frame onto the tabletop, aligning it with the markings.
Attach the tabletop to the frame. There are several methods:
Metal brackets - screwed to the aprons and the tabletop with screws. Simple, reliable. Brackets are placed on the inside of the aprons, 2-3 brackets per apron.
Wooden mounting blocks - small blocks with holes are attached to the aprons, then screws are driven through the holes into the tabletop. Less noticeable than metal brackets.
Figured fasteners (Z-shaped plates) - allow the tabletop to 'breathe' a little (expand and contract with humidity changes) without creating stress. The optimal choice for solid wood tabletops.
Drive the screws carefully, do not overtighten to avoid splitting the wood. The screw length should be such that they securely enter the tabletop but do not go all the way through (usually 30-40 mm).
Step 7: Final Touches
Flip the table to its normal position. Inspect it from all sides. Check stability - the table should not wobble. If there is slight play, adjust by placing a thin shim under one of the legs or tightening the fasteners.
Attach felt or plastic pads to the legs to prevent scratching the floor and ensure quiet movement of the table.
Wipe the table free of dust, polish the surface with a soft cloth.
Done! Before you stands classic table that looks antique but was created by your hands over a weekend.
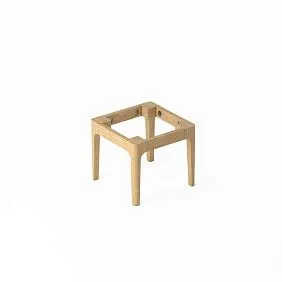
Creating a Coffee Table: A Compact Project
A coffee table is a simpler project, ideal for a first experience.
Concept
A small table 80×60 cm, height 45 cm. Frame with four turned legs and simple aprons. Tabletop - oak furniture panel. Decoration - minimal, only corner plates. Finish - light, oiled, in Scandinavian style.
Elements
-
Ready-made frame 70×50 cm (between legs), height 43 cm.
-
Tabletop 80×60 cm, thickness 25 mm, oak.
-
Four corner plates.
-
Wood oil (natural or white tint).
Process
Glue the corner plates at the joints of the legs and aprons. Sand the frame and tabletop. Apply oil in 3 coats. Assemble the table by attaching the tabletop with metal brackets. Attach felt pads to the legs.
Working time - 4-6 hours of pure work plus drying time. Result - a light, elegant table that will fit perfectly into a modern living room.
Creative Variations: Non-Standard Ideas
The basic "frame + tabletop + overlays" scheme allows for numerous variations.
Two-tone finish
The frame is painted in one color (e.g., white or graphite), the tabletop in another (natural oiled wood). The contrast creates a modern, stylish look.
Patina
The frame and overlays are painted in a base color (beige, gray), then a dark patina (brown, black) is applied into the recesses of the relief. This creates an aged, vintage effect, suitable for Provence and shabby chic interiors.
Tabletop with frieze
A frieze—a carved strip with an ornament—is glued along the perimeter of the tabletop (on the underside). This adds volume, making the tabletop visually thicker and more massive.
Inlay
Inlay can be added to the tabletop—inlaid elements made of wood in a contrasting color, forming a geometric or floral pattern. This is more complex, requiring precise router work, but the result is impressive.
Glass tabletop on a carved frame
Order tempered glass of the required size with finished edges, install it on a carved oak frame. The glass allows you to admire the carving of the frame, creates lightness, and visually does not clutter the space.
Finishing: techniques and materials
Finishing is the magic that turns a set of wooden parts into furniture. The choice of technique determines the style and character of the table.
Transparent finish (oil, wax, varnish)
Highlights the natural beauty of the wood. Oil penetrates deeply into the fibers, creating a velvety surface that is warm to the touch. Wax gives a soft sheen. Varnish provides a hard protective film.
For tables that will be used intensively, varnish or oil-wax (a combined composition) is better. For decorative tables—pure oil or wax.
Painting
Allows you to fit the table into any color scheme of the interior. Use acrylic paints for furniture—they apply well, dry quickly, and have no strong odor.
Priming is mandatory before painting—it ensures even paint application and reduces consumption. Apply the paint in 2-3 coats with a brush or roller.
To protect the painted surface, apply a layer of matte varnish on top.
Staining and toning
Stain changes the color of the wood while preserving the visibility of the grain. You can darken light wood (imitating more expensive species), lighten it (bleached oak effect), or add colored shades (gray, green).
Stain is applied with a brush, sponge, or cloth along the grain. Excess is wiped off. After drying, a protective coating—varnish or oil—is mandatory.
Decoupage Technique
For creative souls: images can be applied to the tabletop using the decoupage technique. Pictures are cut out from special decoupage cards, glued to the surface with special glue, and then covered with multiple layers of varnish (up to 10-15), creating the effect of a picture embedded in the thickness of the varnish.
This is labor-intensive, but the result is unique—the table becomes an art object.
Gilding
For luxurious classic interiors: carved overlays can be covered with gold leaf or gold paint. The frame is painted in a base color (white, beige, blue), and the gold on the overlays creates accents.
Gilding requires care and patience but gives the effect of palace furniture.
Tools and consumables: what you'll need
To create a table from ready-made elements, a minimal set of tools is needed.
Essential tools:
-
Screwdriver or screwdriver
-
Tape measure
-
Square
-
Pencil
-
Brushes for applying finishing materials
-
Sandpaper of various grits (120, 180, 240, 320)
Recommended tools:
-
Sander (orbital or random orbital) — speeds up sanding
-
Clamps — for securing parts during gluing
-
Painter's tape — for protecting surfaces during painting
Consumables:
-
Wood glue (PVA or polyurethane)
-
Screws (length 30-40 mm)
-
Metal brackets or decorative fasteners for the tabletop
-
Wood filler
-
Primer (if painting is planned)
-
Finish: oil, wax, varnish, or paint
-
Stain (optional)
-
Felt pads for legs
Workspace:
A well-ventilated area is needed for work (for applying varnish and stain), a workbench or large table, and protective floor covering (to avoid staining).
Where to buy quality frames and overlays
The quality of ready-made components is critical for the result. Purchase from a manufacturer with a good reputation.
The company STAVROS in St. Petersburg specializes in manufacturing furniture frames, decorative overlays, and solid wood moldings. The STAVROS catalog includes:
-
Carved table frames in various styles and sizes — from compact coffee tables to large dining tables
-
Turned legs of various shapes and diameters — balusters, cones, cylinders
-
Decorative overlays — rosettes, cartouches, corner elements, friezes
-
Custom-sized solid oak and beech tabletops
-
Molding products for additional decoration
STAVROS advantages:
Own production. All elements are manufactured on modern equipment, ensuring precision, quality of processing, and part uniformity.
Quality control. Each batch is checked for wood moisture content, geometry, and absence of defects.
Wide range. Dozens of frame, overlay, and leg types — elements can be selected for any style, from classic to modern.
Reasonable prices. Purchase directly from the manufacturer without intermediary markups.
Delivery. Across St. Petersburg, Leningrad Oblast, and all of Russia. Packaging ensures safe transportation.
Consultations. STAVROS specialists will help select elements for your project, calculate material quantities, and answer questions about assembly and finishing.
When you decidecreate furniture with your own hands, choosing STAVROS guarantees a quality foundation, without which a worthy result is impossible.
Project economics: cost of a homemade table vs. a purchased one
Let's calculate the real savings using the example of a dining table for 6 people.
Ready-made designer solid oak table 150×90 cm:
Price in furniture showrooms — 80,000 - 150,000 rubles depending on brand and complexity.
DIY table from ready-made elements:
-
Carved oak frame — 18,000 rub
-
Oak tabletop 150×90 cm — 12,000 rub
-
Decorative overlays (12 pcs) — 3,000 rub
-
Consumables (glue, varnish, fasteners) — 2,000 rub
-
Total: 35,000 rub
Savings: 45,000 - 115,000 rubles.
At the same time, in terms of quality and appearance, the homemade table is not inferior to a factory-made one, and often even surpasses it — you control every stage yourself, choose the best materials, and work with attention to detail.
Working time:
Pure time for assembly and finishing — 15-20 hours, spread over 3-5 days accounting for drying between stages. If you value your time in money and assume an hour costs 1,000 rubles, that's another 15-20 thousand. Total cost — 50-55 thousand. Savings still amount to 25-95 thousand rubles.
But it's not just about savings. It's the pleasure of creativity, pride in the result, the uniqueness of an item that no one else has.
Frequently asked questions: answers to doubts
Are special carpentry skills needed?
No, the project is accessible to beginners. Complex operations (turning, carving, joinery) are already done by the manufacturer. You only need to assemble, glue, finish — these are basic operations accessible to everyone.
Where to get a tabletop of the required size?
You can order from STAVROS or any furniture workshop that cuts and processes solid wood. You can buy a ready-made furniture panel at a hardware store and cut it to the desired size with a circular saw.
How to choose a frame size for the desired tabletop?
The frame should be 10-30 cm smaller than the tabletop in each dimension. For example, for a 140×90 cm tabletop, a 120×70 cm frame is suitable. A frame that's too small will make the table unstable, one that's too large won't leave room for the tabletop overhang.
Can I use a frame from one wood species and a tabletop from another?
Yes, contrasting combinations can be very effective. For example, a dark oak frame and a light ash tabletop. Or vice versa. The main thing is consistency in the finish (color, gloss level).
Is it mandatory to use decorative overlays?
No, it's an option. If you prefer a laconic style, you can do without overlays. But overlays add individuality, richness of detail, especially in classic interiors.
What is stronger for a tabletop: solid wood or plywood?
Solid wood is heavier, denser, and can be sanded and restored multiple times. But it's more expensive and can 'move' slightly with humidity changes. Plywood with veneer is more stable, cheaper, but less durable. For a family dining table meant to last decades, solid wood is better.
How long does the entire process take?
Active work takes 1-2 days. However, time is needed between stages for glue, stain, and varnish to dry. Considering this, it takes 4-7 days from start to complete readiness.
Can a table be made without varnish, using only oil?
Yes, oil is an excellent finish—eco-friendly and highlights the wood grain. However, an oil finish is less resistant to water and stains than varnish. For a dining table, the oil will need to be refreshed every 1-2 years. For a coffee table, oil is an ideal option.
Where can I buy tools if I don't have them?
All necessary tools are sold at any large hardware store. A basic set (screwdriver, sandpaper, brushes) costs 2-3 thousand rubles and will be useful for many household tasks. You can also rent tools or borrow them from friends.
Conclusion: Furniture Made with Soul
Creating a table from ready-made elements is not a compromise between buying and full-fledged woodworking. It is an independent creative path, accessible to anyone willing to spend a weekend working with their hands. It's an opportunity to get unique furniture that perfectly matches your taste, room dimensions, and interior style. It saves significant money without sacrificing quality. And it's immense pleasure from the process—from choosing the elements to the final brushstroke, from the first fitting to the moment the table takes its place in the home and gathers admiring glances from guests.
Ready-madecarved furniture frames, decorativefurniture appliquésSolid wood tabletops are not just semi-finished products, but quality building blocks from which a masterpiece is assembled. Each element is made professionally, with precise equipment, from seasoned wood. Your task is to combine them into a harmonious composition, add your own finishing touches, and put a piece of your soul into it.
The company STAVROS provides everything needed to implement such projects: a wide selection of frames and overlays, professional consultations, delivery, and quality guarantees. By turning to STAVROS, you get not just materials, but a partner interested in the success of your project, ready to support you at every stage—from choosing elements to final assembly.
Don't be afraid to create. Your home deserves furniture made with love, and you deserve the pride of a craftsman who can say, 'I made this myself.' Start with a simple coffee table, get a taste for creation—and perhaps your next project will be a dining table where the whole family gathers, or a console that becomes the highlight of your hallway. With ready-made elements from STAVROS, anything is possible!