




































































Polyurethane Molding Corners & Decorative Accents
Polyurethane Molding Corners for Decorative Wall Frames
A wall frame takes its character from the places where its lines turn, meet and end. A curved corner softens the outline. A leaf ornament makes the turn more expressive. A central motif gives a long border a focal point. STAVROS polyurethane molding corners and decorative accents let you choose these details as part of the complete frame.
Explore curved panel molding corners, ornamental corner onlays, central accents and decorative end pieces. The collection includes elements for several MLDPU molding profiles, with restrained contours alongside more elaborate leaf, shell and scroll designs. Select the connecting profile as carefully as the ornament itself so the straight molding and decorative element form a considered junction.
Use the pieces to develop wall panels, ceiling frames, door details and furniture decoration. For the rest of the scheme, browse the wider range of STAVROS polyurethane moldings and decor. Straight moldings and the decorative elements that complete them can be specified together for the project.
Match the Decorative Element to the Straight Molding
Start with the molding series. Its face width, thickness and contour establish the connection to the corner or accent. Two pieces can share a similar leaf pattern and still have different joining profiles.
The product illustrations identify the following combinations. Dimensions in this table describe the straight molding's cross-section, not the overall size of the decorative corner. Inch values are approximate conversions.
| Straight polyurethane molding | Profile width × thickness | Example corner or curved element |
|---|---|---|
| MLDPU-001 | 10 × 6 mm / 0.39 × 0.24 in | MLDPU-001U curved molding corner |
| MLDPU-004 | 15 × 8 mm / 0.59 × 0.31 in | MLDPU-004U panel molding corner |
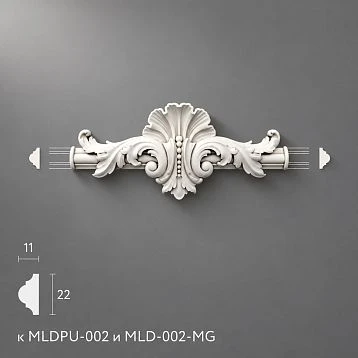
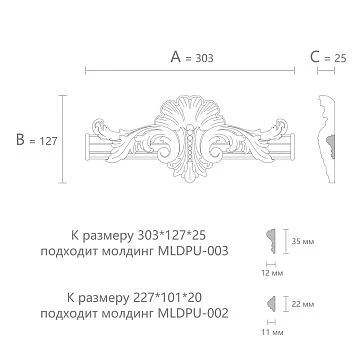
| MLDPU-002 | 22 × 11 mm / 0.87 × 0.43 in | MLDPU-002U curved corner |
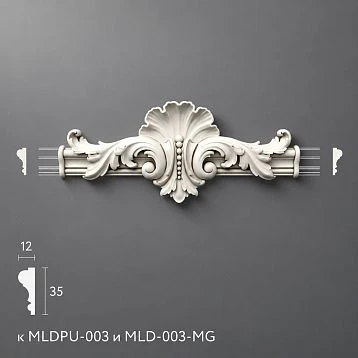
| MLDPU-003 | 35 × 12 mm / 1.38 × 0.47 in | MLDPU-003U decorative molding corner |
| MLDPU-027, 14 × 9 mm version | 14 × 9 mm / 0.55 × 0.35 in | MLDPU-027U-2 curved element |
| MLDPU-027, 20 × 12 mm version | 20 × 12 mm / 0.79 × 0.47 in | MLDPU-027U-1 curved element |
Once the series is established, compare the complete dimensions of the decorative piece. A small connecting profile may support an ornament that extends well beyond the molding line. Allow for that full outline when setting the frame's position near a door, ceiling border or adjacent panel.
Some product illustrations also identify corresponding MLD-MG primed MDF moldings. Record the material of each component when combining them. A polyurethane corner and an MDF straight profile remain separate materials even when their illustrated contours are intended to work together.
Choose the Detail That Defines the Frame
Curved Panel Molding Corners
A plain curved corner changes the outline while keeping attention on the proportions of the frame. It can suit a room where the furniture, wall finish or lighting already provides the main decoration.
The MLDPU-001U, MLDPU-004U, MLDPU-002U and MLDPU-003U pieces shown above offer curved transitions for their respective profiles. Compare their overall reach as well as the connecting molding size. A larger corner takes up more of the frame and leaves a shorter straight section between adjacent turns.
Draw the complete frame before deciding on its width and height. The outermost point of a curved corner may sit differently from the intersection of two straight reference lines. Mark both the decorative outline and the joining positions so the finished proportions remain clear.
Ornamental Corner Onlays
An ornamental corner brings leaf and scroll detail into the turn of the frame. Its silhouette may extend both inward and outward from the adjoining molding, making the surrounding open space part of the design.
For a developed corner detail, consider NPU-500 polyurethane molding decor. Its illustration identifies the MLDPU-003 profile connection. The listed overall size is approximately 8.19 × 8.19 × 0.71 inches, so allow for the ornament's footprint when planning the panel.
Use decorative molding corners in relation to the room's viewing distance. Fine details will be seen closely on a cabinet door; a high wall panel is usually read first as an overall outline. Choose a motif whose scale works in its intended position.
Centerpieces and Decorative Ends
A central accent can give a long horizontal border a focal point. A decorative end piece completes a line that stops before reaching another molding. These elements help shape a composition even when it does not form a closed rectangular frame.
The collection includes symmetrical leaf and shell motifs as well as small scroll ends. Decide whether the accent should sit at the visual center of the wall, above a piece of furniture, or within a particular panel. Establish that position before dividing the adjoining straight runs.
Plan Rounded Frames with MLDPU-027 Elements
MLDPU-027U-1 and MLDPU-027U-2 provide curved elements for the two MLDPU-027 profile sizes. Each product offers four size options. The illustrations show the available curves together for comparison; select the required size and quantity when ordering.
Choose the straight profile size first: 20 × 12 mm for MLDPU-027U-1, or 14 × 9 mm for MLDPU-027U-2. Then choose the curved element's overall dimensions from the product options. The connection size and the size of the curve are separate decisions.
A larger curve produces a more gradual turn and uses more of the available panel area. A smaller curve leaves longer straight runs within the same outer frame dimensions. Test the outline on a full-size drawing, especially when the frame surrounds a mirror, wallpaper insert or upholstered panel.
Plan a rounded arrangement from the actual component drawing. Identify where the curved piece ends and the straight molding begins, then calculate the connecting lengths. Avoid treating the overall corner dimensions as a cutting template without checking those junctions.
These are shaped decorative components. Their curved form does not by itself establish that the material can be bent further during installation. Choose the geometry that suits the layout and review any special fitting requirements before ordering.
Specify Left and Right Pieces Separately
Directional leafwork needs deliberate placement. Rotating a left-facing ornament does not necessarily produce the matching right-facing design, because the curve, leaf direction and profile connection can all change position.
The MLDPU-3U-2.1L corner and MLDPU-3U-2.1R corner illustrate a mirrored pair for the MLDPU-003 profile. Place the actual left and right outlines on the drawing before establishing the adjoining straight cuts.
Smaller details need the same attention. The Versailles NPU.VRS-008.1L end piece and NPU.VRS-008.1R end piece provide mirrored scroll endings for the MLDPU-001 profile shown in their illustrations.
List the full L and R codes separately on the order. A design with equal numbers of left and right pieces still requires two distinct entries. Keep their intended positions marked on the installation drawing so the ornament remains consistent across repeated panels.
Build Wall Frames Around the Room's Proportions
Begin with a wall elevation showing the doors, windows, outlets, switches and main furniture. Add the intended frame outlines, then place the corners and decorative accents at full scale. This reveals how much space the ornament needs beyond the straight molding line.
For a feature wall behind a sofa, a wider central panel can relate to the seating area while narrower panels complete the sides. On a bed wall, the central arrangement can follow the headboard's position. The architectural center of the wall and the center of the furniture may differ, so choose the reference deliberately.
Keep the spaces between panels consistent where the design calls for repetition. Measure the clear gap between the outermost decorative details, rather than only between the straight moldings. Two large corner ornaments can make an apparently generous interval feel crowded.
For double frames, draw the inner and outer corners together. Their curves should leave a considered band of wall between them throughout the turn. Simply reducing the dimensions of the outer frame may not produce an evenly spaced inner border when different corner elements are used.
Explore wall molding kits and decorative wall compositions when selecting an overall arrangement. The individual elements in this category let you develop the proportions further around the room and the chosen profile.
Use a Centerpiece to Organize a Decorative Panel
A central ornament establishes a focal point within the frame. It can rise above a horizontal border, hang below it, or connect two curved sides. Its position affects the entire composition, so choose the centerpiece before finalizing the panel's surrounding dimensions.
The NPU.VRS-001-1 decorative molding accent combines a central shell motif with scrolling arms. The product description specifies extended ends that can be trimmed to the required size. Its drawing identifies the MLDPU-002 connection; review the intended cuts before fitting it into the layout.
For a larger ornamental arrangement, NPU-413 polyurethane molding decor introduces a prominent central motif and curved side details. Its illustration also identifies the MLDPU-002 profile. Leave sufficient open space beneath and beside the ornament for its outline to remain readable.
Balance the centerpiece with the corners. If the center carries most of the detail, simpler corners may give it more presence. A more elaborate full frame can work when the wall area and viewing distance allow every element to be seen clearly.
Choose Ornament and Profile Size Together
Related ornamental designs can be available for different molding series. Compare the complete piece when moving between them, because the change may affect both the connection and the scale of the motif.
The MLDPU-1-2.1 molding centerpiece is illustrated with the MLDPU-001 connection and listed at approximately 5.39 × 5.67 × 0.47 inches. The MLDPU-4-2.1 decorative centerpiece is illustrated with MLDPU-004 and listed at approximately 7.80 × 8.19 × 0.71 inches.
Both feature an upright ornamental composition, but they occupy different amounts of wall space. Place the selected version at full scale within the proposed border before deciding on the panel dimensions. Keep enough open wall above the highest detail and beside the scrolling edges so the motif has room to be seen.
Add Molding Accents to Doors and Furniture
On an interior door, cupboard front or decorative furniture panel, the available field is smaller than a wall. Compare the complete ornament with handles, hinges and neighboring edges before selecting the profile.
A compact end piece can finish a short run above a drawer or within a cabinet panel. A curved corner can soften a simple applied frame. Where paired doors are involved, develop both sides together so the arrangement remains balanced when the doors are closed.
Check the ornament's projection against the door's movement. A decorative detail near a hinge or adjoining cabinet can interfere with opening even when it fits within the front elevation. Test the proposed position with a sample or a full-size template before installation.
For an independent motif inside the frame, explore polyurethane onlays and appliques. Keep its position separate from the molding junction unless the product is specifically designed to connect to that profile. The surrounding border and the central onlay can then be chosen for their different roles.
Coordinate the Frame with Other Room Details
Applied frames sit within the architecture of the whole room. Relate their lower edge to the baseboards and their sides to nearby door casings. Leave a deliberate interval between these elements, allowing for any corner ornament that extends beyond the straight profile.
For a smaller independent detail inside a panel, compare decorative polyurethane rosettes. Their centered forms offer a different composition from an ornament joined directly into the border. Position them on the same drawing as the corners and centerpiece to judge the balance of open space and relief.
A shared finish can connect the different elements. Matching every decorative motif is less important than establishing a clear relationship between their scale, placement and contour. Review the complete wall from the normal viewing positions before adding further ornament.
Develop Decorative Ceiling Frames
Panel molding corners can also contribute to applied frames on a ceiling surface. Plan the arrangement around light fixtures, vents and other fixed features, and consider how it will be viewed from the main seating positions.
For a dining area, the central frame may follow the table and light fixture rather than the geometric center of an open-plan room. Keep the relationship between the frame, ornament and furniture visible on the drawing.
Coordinate the applied outline with polyurethane ceiling decor or a ceiling medallion where the design includes a central feature. Leave enough clear ceiling around the ornament for the overall arrangement to read as a composed whole.
At the room perimeter, crown molding and ceiling cornices serve the wall-to-ceiling junction. The decorative panel corners on this page are selected for applied frames and profile connections, so review the mounting geometry of each element when developing the complete ceiling design.
Prepare an Order from the Finished Layout
Separate the specification into straight molding lengths and individual decorative pieces. Record the profile code, the corner or accent code, any size variant, and the quantity required. Keep left and right versions on separate lines.
Count the components from the drawing. Three frames with one decorative piece at each of four corners would require twelve corner pieces, but the number of each model depends on the chosen orientations. A design with central accents or open ends needs those pieces counted separately.
Calculate the straight molding after positioning the decorative elements. Their connecting arms occupy part of the border, so the full outer perimeter is not automatically the total length of straight profile required. Prepare a cutting list from the actual junctions and include an appropriate allowance for fitting.
For repeated rooms or panels, keep both a room schedule and a combined total by product code. This lets the order be checked as a whole while retaining the information needed during installation. Mark any agreed spare pieces separately.
When comparing prices, confirm whether the listed amount covers one piece, a pair or another specified unit. Product illustrations may show several size options or the relationship to a straight molding. Confirm the contents of the selected item rather than treating the illustration as a complete kit.
Dry-Fit the Composition Before Fixing It
Prepare a sound, clean receiving surface and mark the layout. Check the wall or panel for loose coatings and uneven areas that could affect the contact between the decoration and the background.
Lay out the straight moldings and decorative pieces together before applying adhesive. Review the main centerline, the frame diagonals where relevant, and the clearances around the ornament. On repeated panels, compare the first complete arrangement with the others before fixing the full set.
Pay particular attention to profile orientation at each junction. The connecting faces should align with the intended contour, and the decoration should sit in the position shown on the drawing. Make permitted adjustments only after checking the component's dimensions and installation guidance.
Use bonding and joint-finishing products compatible with polyurethane and the substrate. Follow their requirements for preparation, application and curing. Review the STAVROS finishing and installation guidance for the chosen materials, including any MDF components used alongside the polyurethane decor.
Prepare and paint a sample that includes both a decorative element and its adjoining molding. A single color can unify the composition through relief and shadow; a contrasting finish can make the ornament more prominent. The sample also shows how the joint preparation will appear under the final sheen.
Questions About Molding Corners and Accents
What Is a Panel Molding Corner?
A panel molding corner is a decorative component used where an applied frame changes direction. It may have a plain curved contour or an ornamental design. Its connecting profile needs to suit the straight molding used for the rest of the frame.
Are All Polyurethane Corner Onlays Interchangeable?
No. Compare the specified molding series, joining contour, overall dimensions and orientation. A shared material or similar decorative motif does not establish a matching connection. Use the product drawing and selected size to confirm the combination.
Do I Need Both Left and Right Versions?
That depends on the arrangement. Directional designs may require mirrored pieces to create a balanced frame. Count the L and R models separately from the layout rather than assuming one version can be used in every position.
Are Straight Moldings Included with the Decorative Pieces?
The category presents individual decorative elements. Specify the straight profiles and additional pieces required for the composition, and check the contents of the selected product. Complete wall arrangements can be explored in the separate wall decor section.
Buy Polyurethane Molding Corners and Accents from STAVROS
Choose the molding series, select the decorative corners and accents, and prepare the quantities from the finished layout. For an order inquiry, include the complete product codes, size options, left and right versions, and delivery location.
Explore samples and catalogs when comparing the profiles and ornamental details. Review the payment and delivery information and confirm availability and the arrangements applicable to your destination. A clear specification gives every curve, corner and accent its intended place in the finished composition.
Order a call
Do you have questions? Fill out the form and send it.
Your request has been sent!
Our manager will contact you within 5 minutes