Article Contents:
- Why the TV zone requires a compositional framework
- Three functions of the TV zone that aren't considered when buying a TV
- Slatted panel for TV: visual advantages and layout rules
- Batten Orientation: Vertical or Horizontal
- Slat width and gap: rhythm that defines character
- Height of the slatted field in the TV zone: three scenarios
- Polyurethane moldings: geometric framework for the TV wall
- Functions of moldings in the TV zone
- Types of moldings for the TV zone
- Why Polyurethane Moldings Are the Best Choice for a TV Wall
- TV Zone Lighting: Three Lighting Levels That Change Everything
- Level One: Bias Lighting – Light Behind the TV
- Level Two: Lighting Behind the Slats – Glow from the Gaps
- Level Three: Directional Lighting – 'Revealing' the Texture
- Molding with an LED Groove: Light as Part of the Architecture
- Cables, Niches, Hidden Joints: Technical Solutions That Create a 'Luxurious' Look
- Hidden Wiring Behind the Slatted Field
- TV Stand: Built-in or Freestanding
- Niches and Recesses in the Slatted TV Zone
- Molding inserts: geometric 'windows' in slatted surfaces
- Combination of slatted panels and moldings: modern and classic in one system
- Modern minimalism: slats + straight moldings
- Modern classic: slats + profile moldings
- Japandi: slats + invisible moldings
- Neoclassicism: slats + pilasters + entablature
- Full cycle of TV zone creation: from layout to finish
- Step one: Paper design
- Step two: Electrical work before slats
- Step three: Molding installation
- Step Four: Installing Battens and Slats
- Step Five: Mounting the TV
- Step Six: Painting and Finishing
- Mistakes That Make a TV Zone Look Cheap
- Mistake 1: Slats as an 'End in Themselves' Without a Molding Frame
- Mistake 2: Slats of Different Cross-Sections
- Mistake 3: Exposed Wires
- Mistake 4: Moldings at the Wrong Scale
- Mistake 5: Incorrect TV Height
- Mistake 6: Different Wood Species in One Space
- Error 7: No Dimming
- Five Ready-Made TV Zone Concepts: Rails + Mouldings
- Concept: Natural Minimalism
- Concept: Dark Japandi
- Concept: Urban Classic
- Concept: Monochrome Anthracite
- Concept: Architectural Neoclassic
- Frequently Asked Questions about TV Zone with Rail Panels and Mouldings
- Is it necessary to reinforce the wall for mounting a heavy TV through rails?
- Which polyurethane moulding to choose for a modern interior with wooden rails?
- Slatted panel for TV — can it be installed independently?
- How to hide TV wires with an already installed slatted field?
- Which material is better — natural oak or MDF — for a slatted panel in the TV zone?
- Slatted panels in living room interior — only TV wall or other zones too?
- Conclusion
A wall-mounted TV is a given in modern interior design. Arguing with it is pointless: a screen is present in every living room, in most bedrooms, and often in the kitchen. The question is not whether to have a TV, but how it exists in the space. A simple 'black rectangle on a white wall' is one scenario. An architecturally designed TV zone with a slatted panel and moldings is a completely different one.
The difference between these scenarios is not in the budget size. It lies in understanding that the TV zone is not a place where 'a TV is hung.' It is the visual center of the living room. The main wall of the room, towards which the furniture group is oriented, which is seen by everyone entering, which sets the tone for the entire interior. If this wall looks random — the interior looks random.
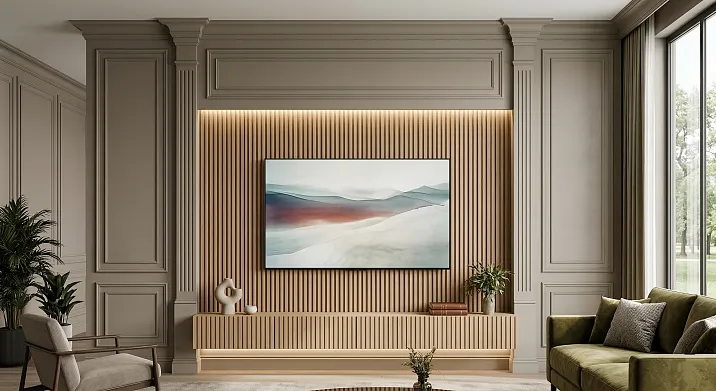
slatted panel for the televisionin combination withpolyurethane moldings— is a tool for transforming an ordinary wall with a screen into an architectural element. The vertical natural rhythm of wooden slats, a geometric frame of moldings, thoughtful lighting, and hidden wiring — and the wall ceases to be a background. It becomes the center around which the entire living room interior is built.
Let's examine this 'how' completely — from concept to the last fastener.


Why the TV zone requires a compositional frame
There is a simple test: cover the TV in any interior photograph. What remains? If a beautiful wall remains — that's a good TV zone. If an empty surface with holes from the bracket remains — that's just a TV attached to the wall.
Most living rooms fail this test. And the reason isn't the owners' lack of taste—it's a misunderstanding of the TV zone's architectural logic. The TV is just one element in a system. The wall with the TV should be organized as a composition: with a center, boundaries, rhythm, and completion.
Here's what happens without architectural design: the TV 'hangs'—without a base, without a frame, without context. The gaze of a person entering the room hits a black screen in the middle of a white wall—and receives a signal of 'incompleteness.' Psychologically, this creates a slight discomfort that's hard to articulate but that everyone feels.
A slatted panel on the wall behind the TV provides a base: the natural wooden surface behind the screen creates an 'architectural backdrop,' on which the TV doesn't 'hang,' but 'stands.' Moldings set boundaries: a rectangular frame made of polyurethane molding around the slatted field turns a section of the wall into a panel—a finished architectural element with clear geometry.
Together—slats and moldings—they create what most TV zones lack: a compositional framework.


Three functions of a TV zone that aren't considered when buying a TV
First function: The living room's visual anchor. The furniture group—sofa, armchairs, coffee table—is oriented toward the TV wall. This means the TV wall is the living room's 'horizon,' the point toward which gazes are directed. A weak wall makes the entire space weak. A strong one gives the room an architectural backbone.
Second function: Managing the scale of the space. Vertical slatted panels in the TV zone 'raise' the ceiling. Moldings around the perimeter of the slatted field 'set' the horizontal scale—the molding frame can be chosen to visually widen or, conversely, 'gather' the wall.TV area with slatted panels—it's a tool for managing space, not just decoration.
Third function: Acoustic environment. Wooden slats absorb some of the high-frequency sound pressure from a loud audio system. The felt backing behind the slats provides additional acoustic absorption. A TV zone with a slatted panel on the back wall sounds better than a TV zone with bare plaster behind it—this is a physically measurable effect.
Our factory also produces:


Slatted panel behind the TV: visual advantages and layout rules
Let's get specific. A slatted wall panel for a TV wall is not 'slat wallpaper'. It's a system with parameters: slat width, gap, orientation, field height. Each parameter affects the result.
Get Consultation
Slat orientation: vertical or horizontal
Vertical slats are the classic and most common choice for a TV zone. The vertical rhythm 'lifts' the ceiling, creates dynamism, and accentuates height. A TV against a background of vertical slats—a horizontal rectangle on a vertical background—creates a natural 'graphic contrast' that advantageously highlights the screen.
Horizontal slats are an alternative for low-ceilinged rooms (ceilings below 2.6 m) or for a 'low' Scandinavian concept. The horizontal rhythm of the slats 'extends' the line of the TV, creating a feeling of the screen being 'built into' the wooden surface. The 'TV as part of a wooden wall' effect works specifically with horizontal slats.
Diagonal slats are a non-standard solution for non-standard concepts. The diagonal rhythm of the slats gives the TV zone energy and dynamism. A rare technique—precisely why it's memorable.
Slat width and gap: the rhythm that defines the character
For a TV zone—the slat parameters must correspond to the scale of the television.
| TV Size | Batten width | Gap | Character |
|---|---|---|---|
| 55" (122 cm) | 25–35 mm | 12–15 mm | Delicate natural rhythm |
| 65" (145 cm) | 30–40 mm | 14–18 mm | Balanced architectural rhythm |
| 75″ (168 cm) | 35–50 mm | 16–20 mm | Expressive large-scale rhythm |
| 85″+ (190+ cm) | 40–55 mm | 18–22 mm | Monumental rhythm |
Rule: slat width and gap in an approximate 2:1 ratio. Wider slat relative to gap — surface appears 'denser', natural texture dominates. Narrower slat relative to gap — surface appears 'airier', gap rhythm is more noticeable.
For TV zone, 2:1 ratio (slat:gap) is optimal: sufficient wooden surface for warmth and natural feel, sufficient gaps for relief and shadow.
Height of slatted field in TV zone: three scenarios
Scenario 'floor to ceiling' — maximum architectural gesture. Vertical slats cover entire wall height. TV is 'inset' into wooden surface. Moldings around entire wall perimeter create monumental frame. Requires wall at least 3 m wide.
Scenario 'accent panel' — slatted field limited in height: starts 30–40 cm from floor and ends 30–40 cm from ceiling. Moldings frame this field, creating architectural 'panel'. TV mounted in panel center. Lighter and more intimate solution compared to fully slatted wall.
Scenario 'podium' — slatted field from floor to height of 160–180 cm (TV line), above — neutral wall or other material. This scenario works well with high-mounted TV (140–150 cm from floor to screen center) and horizontal slats — screen 'rests' on wooden 'podium'.
Polyurethane moldings: geometric framework for TV wall
If slatted panel is "natural texture", thenMoldings made of polyurethane— "geometric framework". Together they create architectural statement: naturalness + order.
Molding is a profile decorative strip that defines lines, angles, frames. In TV zone context, moldings work on several levels simultaneously.
Functions of moldings in TV zone
Framing slatted field. Perimeter frame from moldings along edges of slatted field transforms wall section with slats into architectural "panel". Without frame — slats are "just attached to wall". With frame — they become conscious design element.
Horizontal belts. Moldings can divide wall into horizontal zones: lower zone (under cabinet), middle zone (slatted panel with TV), upper zone (above TV to ceiling). Horizontal molding-belt between zones — architectural "stitching" organizing wall.
Vertical pilasters. Vertical moldings along sides of slatted field (pilaster imitation) give TV wall "classical" architectural character. Pilasters + horizontal cornice above slatted field + slatted panel inside — this is classical "aedicule", architectural frame-niche.
Cornice above TV zone. Horizontal profile molding along upper boundary of TV wall — architectural cornice completing vertical composition. Can have LED groove for top-down lighting.
Types of moldings for TV zone
polyurethane decorative moldingsare available in a wide range of profiles. For the TV zone, the following types are relevant:
Straight 'square' or 'rectangle' (10×10, 15×15, 20×20, 20×30 mm). A geometrically clean profile for modern concepts. Rectangular molding around the perimeter of the slatted field — a minimalist architectural frame without historical references.
'Shelf' profile (a shelf-protrusion with a small ledge). Creates a horizontal shadow beneath itself — an expressive 'stitch' on the wall with a natural light-and-shadow effect.
Profile with a chamfer. A corner molding with one beveled edge — for transitioning from the slatted field to the wall at a 45° angle. An elegant, 'sculptural' transition.
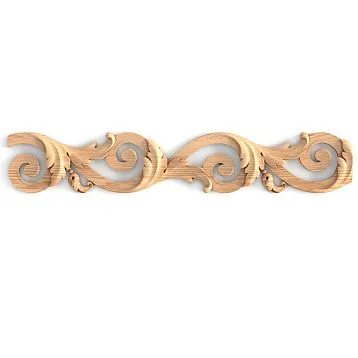
Classical 'egg-dart' or 'ovolo'. A profile with biomorphic forms for concepts referencing classical architecture. Suitable for TV zones with a historical context — a stucco frame around the slatted field as a 'picture frame'.
LED molding with a groove. Molding with an integrated or formed groove for an LED strip. Mounted along the top horizontal of the slatted field — light from the groove flows down the wooden slats. A crucial element for atmospheric lighting in the TV zone.
Molding size for the TV zone: from 15×15 mm to 50×40 mm depending on the scale of the wall. Rule: the molding should not 'overpower' the slats — it serves as a frame, not the center of attention. Molding width = 30–50% of the width of one slat.
Why polyurethane moldings are the best choice for a TV wall
Polyurethane wall moldings offer a number of practical advantages, critically important specifically for the TV zone:
-
Absolutely lightweight — mounted with mounting adhesive without dowels
-
Accept any paint, including fine gold or silver spray
-
Precise geometry — 45° joints at corners without visible gaps
-
Do not react to vibration from audio systems (unlike plaster moldings, which may crack)
-
Do not deform with changes in humidity
-
Can be painted to match the wall color (hidden moldings) or in a contrasting color (accent)
For the TV zone, where the wall is subject to acoustic impact from sound and thermal impact from equipment — polyurethane is more stable than plaster and safer than PVC.
TV zone lighting: three lighting levels that change everything
TV zone lighting is the most underrated element. Most people think: 'the TV glows on its own — why add more lighting?' This is a fundamental misconception that costs the expensive loss of the entire TV zone's potential.
Proper TV zone lighting does three things simultaneously: creates atmosphere, reduces eye strain during viewing (bias lighting), and 'reveals' the relief of wooden slats, turning them from a flat surface into a living architectural system.
Level one: Bias lighting — light behind the TV
Bias lighting is a warm or neutral LED backlight placed on the back wall of the TV (behind the screen) or around the TV on a slatted surface. This light reduces the contrast between the bright screen and the dark wall, minimizing eye strain during prolonged viewing.
Parameters: LED 2700–3000K, IP20, power 5–8 W/m. The strip is adhered to the back of the TV along the perimeter of the frame. For slats on the wall — additionally, a strip along the perimeter of the mounting bracket.
Visual effect: a warm 'halo' around the screen on a wooden surface. At night with subdued main lighting — one of the most atmospheric lighting effects in the living room.
Level two: Backlight behind slats — glow from gaps
Slatted panels with lighting— LED strip placed on the back surface of the slatted field behind the slats. Light from the gaps between slats creates a 'glowing wall' effect: warm or neutral light from dark gaps, with slats as dark silhouettes against a glowing background.
This effect works especially expressively when the main lighting is off during viewing: wooden slats transform into a 'natural screen' around the TV, softly glowing from within.
Parameters: LED 2700–3000K, IP20, 8–12 W/m. The strip is attached in horizontal bands on the back surface of the slatted field with a spacing of 150–200 mm. A dimmer is mandatory — the backlight intensity must be adjustable depending on the brightness of the main lighting.
Level three: Directional lighting — 'revealing' the texture
Track spotlights or recessed downlights, directed at the slatted surface at a 30–45° angle to the wall — 'reveal' the slat texture with side lighting. Each slat receives a highlight and a shadow. The wooden surface becomes three-dimensional, alive, 'sculptural'.
This is fundamentally important: A TV zone illuminated with uniform frontal light looks flat. The same surface under side lighting — completely different. Textured, natural, expressive.
Spotlight parameters: 2700–3000K, beam angle 24–36°, dimmable. Distance from wall: 50–80 cm for uniform illumination of the slatted surface.
Molding with LED slot: light as part of architecture
polyurethane wall moldingsMoldings with an integrated LED slot are mounted along the top horizontal of the slatted field. The LED strip in the molding slot is directed downward—light "flows" down the wooden slats from top to bottom, creating a descending light gradient.
When the molding is painted the same color as the wall—the light source is hidden, only the effect is visible. "Where is this light coming from?"—a question guests ask. The answer: from the architecture.
Cables, niches, hidden joints: technical solutions that create a "luxury" look
There is one element that is guaranteed to "ruin" the luxury look of any TV zone, regardless of the quality of the slats and moldings. It's the wires. Hanging cables from the TV to the outlet, to the media player, to the audio system—a visual "death sentence" for any design solution.
A proper TV zone with a slatted panel is designed with the logic of "hiding everything that is not part of the design."
Hidden wiring behind the slatted field
A slatted field with backing or battens is an ideal "channel" for hidden wiring. Cables are routed behind the slats before their installation—between the wall and the battens or in corrugated pipes. Outlets and connectors are brought out at precisely measured locations: under the cabinet (for connecting media devices) and at the point behind the TV (for power and HDMI).
Rule: all electrical work—before installing the battens and slats. After the slats are installed, the wires are hidden; only decorative outlet covers remain visible.
Wiring layout scheme in a slatted TV zone:
-
Outlet marking points: 1 220V outlet + 1–2 HDMI/USB behind the TV, 2–3 outlets + 1 HDMI under the console
-
Chasing the wall for power cable and low-voltage cables (separate channels)
-
Cable laying in corrugated conduit
-
Mounting flush-mounted socket boxes level with the wall plane
-
Mounting battens while bypassing socket boxes
-
Mounting slats: socket boxes protrude through cut openings in the slats
-
Socket covers — matching the slats' tone or in neutral white
TV console: built-in or freestanding
The TV console in the slatted zone should be part of the architectural system, not 'just furniture placed against the wall'.
Option "Built-in cabinet": a box made of MDF or plywood, finished with the same slats or moldings as the wall. The cabinet "grows" from the slatted surface as a single element. All sockets and ventilation gaps are hidden inside.
Option "Floating shelf": a solid wood shelf made from the same wood as the slats, mounted directly on the slatted surface. Media equipment is placed on the shelf, and wires go into the wall through a hole in the slat under the shelf.
Option "Separate cabinet": a separate furniture unit, placed 5–10 cm away from the wall. Wires go into the space between the cabinet and the wall—not visible from the front.
Niches and recesses in a slatted TV zone
If the slatted wall in the TV zone is installed with a frame depth of 40–60 mm—this space can be used to create decorative niches. A niche is cut into the slatted field at a planned location, and the edges are finished with moldings. Inside the niche—LED lighting.
Decorative niche in a slatted TV wall: a place for a vase, book, small plants, or decorative object. This is a "living" element in the wooden surface that prevents the feeling of "monotonous wood covering the entire wall."
Molding inserts: geometric "windows" in the slatted surface
A molding frame creating a rectangular "window" within the slatted field—an architectural technique that makes the TV wall multi-level. Inside the molding frame—the television. Around the frame—slats. Along the perimeter of the entire slatted field—a larger molding frame.
Three-level system: outer frame (large molding) → slatted field → inner frame (medium molding) → television. Each level is an architectural "layer," adding depth and complexity to the entire wall.
Combination of slatted panels and moldings: modern and classic in one system
At first glance — a paradox. Slatted panels are a natural material, Scandinavian minimalism, modernity. Moldings are historical architectural profiles, classicism, European tradition. How do they work together?
The answer lies in understanding their functions. Slats provide natural texture and rhythm. Moldings provide geometry and order. This is not a competition of styles — it's mutual complementation. The natural unpredictability of wood grain within the strict geometric frame of moldings — this contrast creates the tension that makes the TV area interesting.
Modern minimalism: slats + straight moldings
Natural or bleached oak, 30 mm slat / 14 mm gap, vertical. Rectangular section moldings 20×15 mm around the perimeter of the slatted field. Moldings painted the same color as the wall — a 'hidden' geometric frame. The moldings are not visible as a separate element, but create a sense of 'completeness' and finish.
Slatted panels in the living room interiorIn a minimalist concept — natural rhythm + geometry.
Modern classic: slats + profile moldings
Tobacco or walnut oak, 35 mm slat / 15 mm gap, vertical. Moldings with one profile step 40×25 mm around the perimeter of the slatted field. Moldings painted in cream-white (RAL 9001) — a contrasting white frame around the dark wood field. Horizontal cornice molding 55×35 mm along the upper border of the slatted field with an LED groove.
This is 'modern classic': wooden slats in a natural dark tone, white profile moldings as a 'picture frame'. The television — a 'painting' in this frame.
Japandi: slats + invisible moldings
Smoky ash or grain gray oak, 20–25 mm slat / 10–12 mm gap, vertical. 10×10 mm straight section moldings around the perimeter, painted the same color as the slats. The moldings are practically indistinguishable on the surface — only a light geometric shadow around the perimeter. A meditative, 'quiet' TV zone without accents.
Neoclassicism: battens + pilasters + entablature
Natural oak "natural" or "amber", 40 mm batten / 18 mm gap, vertical. Vertical molding-pilasters 60×30 mm on the sides of the batten field. Horizontal molding-entablature 80×40 mm along the upper border. Lower molding-baseboard 55×30 mm. Moldings painted in contrasting white or cream.
Batten "panel" in a classical architectural frame of the "temple" type. TV in the center — like a sculpture in an aedicule. A non-standard solution that requires confidence in the concept — and creates an irresistible architectural image.
Full cycle of TV zone creation: from layout to finish
Now — practice. Step-by-step algorithm for creating a TV zone with a batten panel and polyurethane moldings.
Step one: Design on paper
Before picking up a tool — draw the TV wall to scale. Indicate:
-
Wall size (width × height)
-
TV size and height of its center from the floor (optimum: 100–110 cm from floor to screen center in seated position)
-
Contour of the batten field
-
Molding frame outline
-
Outlet placement points
-
LED mounting points
A scaled drawing allows you to see proportions before starting work—and correct mistakes on paper, not in the finished interior.
Step two: Electrical work before slats
Electrical work—before any finishing. Chasing, laying cables in conduit, mounting junction boxes. Behind the TV: 220V outlet + low-voltage outlet (HDMI, USB, LAN). Under the cabinet: 2–3 220V outlets + low-voltage. Along the top edge of the slat field (in the cornice area): wire for LED strip in molding.
All chases are sealed with putty until completely dry—at least 24 hours.
Step three: Molding installation
Moldings are installed before slats. This ensures a smooth inner edge of the molding frame, allowing the slats to overlap by 5–8 mm.
Sequence:
-
Marking molding frame outlines with a laser level
-
Cutting moldings at 45° in corners (miter saw or miter box)
-
Applying mounting adhesive to the back surface of the molding
-
Installing moldings according to markings, maintaining level
-
Additional fastening with finishing nails
-
Filling joints and nail holes
Installing molding with LED groove: LED strip is mounted in the groove after molding installation, wire is routed to power source through a hole in the wall.
Step four: Installing battens and slats
Battens (if needed): 25×40 mm timber, spacing 400–500 mm, leveled with laser level. If additional acoustic insulation is needed: thin acoustic felt or mineral wool is placed between batten slats.
Installing slatsfrom bottom to topaccording to the same principle as for any slatted wall:
-
Acclimatization of slats: 72–96 hours indoors
-
First slat — strictly vertical (or horizontal) using a level
-
Spacers for maintaining a consistent gap
-
Adhesive + finishing nails or clips
Slats extend beyond the inner edge of the molding frame by 5–8 mm on each side.
Step five: Mounting the TV
The bracket is selected based on the diagonal and weight of the TV. For heavy TVs (from 15 kg) — the bracket is attached directly to the wall through the slats (anchors pass through the slats into the wall). For light ones — attachment to the battens is possible.
Mounting height: center of the screen at 100–110 cm from the floor with a standard sofa height of 45 cm and a comfortable viewing angle of 10–15° downward.
TV cables are routed through a hole in the slat directly behind the TV — into a hidden channel behind the slatted field — to the outlets.
Step Six: Painting and Finishing
Moldings are primed and painted after the battens are installed — the final color according to the concept.
Wooden battens with oil finish — re-oiling after installation if necessary (if ends and edges need treatment). Battens with varnish finish — ready for use without additional treatment.
Mistakes That Make a TV Area Look Cheap
Not all mistakes are obvious. Some are subtle but destructive. Write down this list.
Mistake 1: Battens as an 'End in Themselves' Without a Molding Frame
Battens glued to a wall without framing are an 'unfinished renovation.' A molding frame is the essential final touch that turns battens into an architectural element. Without a frame, a good idea remains unrealized.
Mistake 2: Battens of Different Cross-Sections
The gap between battens must be absolutely uniform across the entire height of the field. Different gaps create a 'crooked fence' instead of a rhythmic, natural surface. Tool: spacer shims of a single thickness — mandatory.
Mistake 3: Exposed Wires
Power and HDMI cables dangling from the TV are the finale where any concept 'falls apart'. Concealed wiring is not an option but a mandatory requirement. It is laid before mounting the slats.
Mistake 4: Moldings at the wrong scale
An overly massive molding 'overpowers' the slats, creating a feeling of 'the frame being more important than the picture'. The molding width for the TV zone is 30–50% of the slat width. If slats are 35 mm — molding 10–18 mm. If slats are 50 mm — molding 15–25 mm.
Mistake 5: Incorrect TV height
A TV mounted too high (screen center 150–160 cm from the floor) creates discomfort during prolonged viewing and visually 'lifts' the TV zone. Optimal height: 100–110 cm to the screen center from a seated position on the sofa.
Mistake 6: Different wood species in one space
Oak slats on the TV wall + pine paneling in the niche + 'walnut' laminate on the floor — three competing 'woods'. Rule: in the living room — one main wood species.Wooden slat panelsand parquet in the same tint — a unified natural system.
Mistake 7: Lack of dimming
Lighting the TV zone without dimmers means one intensity for all scenarios. Watching a movie requires subdued light. For regular leisure — working light. For evening relaxation — an atmospheric minimum. Dimmers for all light sources in the TV zone are not a luxury but a functional necessity.
Five ready-made TV zone concepts: battens + moldings
Concept "Natural Minimalism"
-
Battens: whitewashed oak "milk", 28 mm / 13 mm gap, vertical, floor to ceiling
-
Moldings: rectangular profile 12×10 mm around perimeter, color matching walls (RAL 9010 white)
-
Walls: RAL 9010 white
-
Lighting: LED 2700K behind battens, bias lighting 3000K behind TV
-
Cabinet: wooden ash shelf, "floating" at 45 cm height from floor
-
Image: airy, light, natural TV zone — whitewashed battens almost blend with white wall, moldings "hinted" as geometric outline
Concept "Dark Japandi"
-
Battens: ash "smoky", 22 mm / 10 mm gap, vertical
-
Moldings: straight profile 8×8 mm in slat color — 'invisible' frame
-
Walls: warm beige RAL 1015
-
Lighting: LED 2700K in grooved molding (downlight on slats), no bias lighting
-
Cabinet: black matte built-in
-
Style: meditative dark surface on light background — Japanese 'quiet wall' with minimal wooden rhythm
Concept 'Urban Classic'
-
Slats: natural oak 'tobacco', 35 mm / 15 mm gap, vertical
-
Moldings: stepped profile 45×28 mm, cream-white RAL 9001, perimeter + horizontal cornice with LED groove
-
Walls: warm gray RAL 7044
-
Lighting: LED 2700K in cornice (downlight), track with 2700K spotlights on slats
-
Cabinet: wooden 'floating' on metal brackets
-
Style: 'luxurious' warm TV zone — oak in a white classic frame on a warm gray background
Concept 'Monochrome Anthracite'
-
Slats: MDF with matte enamel RAL 7016 (anthracite), 30 mm / 12 mm gap, vertical
-
Moldings: straight profile 15×12 mm RAL 7016 — matching the slats
-
Walls: RAL 7016 anthracite — fully monochrome wall
-
Lighting: LED 3000K behind slats (warm contrast to dark surface) + bias lighting 3000K
-
Cabinet: built-in, matching the wall tone
-
Style: monumental dark TV zone — TV 'disappears' into the dark surface, light from gaps — the only lighting accent
Concept 'Architectural Neoclassical'
-
Reiki: natural amber oak, 40 mm / gap 18 mm, vertical, accent panel
-
Moldings: 65×30 mm pilasters on the sides + 85×40 mm cornice on top + 60×30 mm plinth at the bottom, all cream-white RAL 9001
-
Walls: warm cream RAL 1013
-
Lighting: LED in slotted cornice + track spotlights
-
Console: classic console on solid wood legs
-
Concept: "architectural aedicule" — wooden panel in a classic white frame. TV as a "painting" in a museum frame
Frequently asked questions about TV zone with slatted panels and moldings
Is it necessary to reinforce the wall for mounting a heavy TV through the slats?
For TVs weighing up to 20 kg — mounting the bracket directly through the slats into the concrete wall with 8×80 mm anchors is sufficiently strong. For TVs 20–40 kg — installation of a reinforced wooden backing (50×50 mm timber) behind the slats at the bracket mounting point is recommended.
WhatPolyurethane moldingchoose for a modern interior with wooden slats?
For a modern minimalist interior — a straight rectangular profile without ornaments, 10–20 mm depending on the width of the slats. Installation in the wall color — a 'hidden' frame. For a more expressive effect — in a contrasting color (white with dark slats or dark with light slats).
slatted panel for the television— can it be installed independently?
Yes, with basic tools: laser level, miter saw, mounting adhesive. Key skills: cutting moldings at 45°, aligning the first slat with the level. Main condition: complete electrical work in advance.
How to hide TV wires when the slatted wall is already installed?
If slats are already installed without hidden wiring — a decorative cable channel in the color of the slats, attached vertically along one slat, recessed into the gap. Or — remove several slats, lay the cable, reinstall. The second option is correct, the first is a workaround.
Which material is better — natural oak or MDF — for a slatted panel in the TV zone?
In the TV zone, there are no moisture resistance requirements for the material. The choice is determined by the concept: natural oak — for a natural, warm TV zone; MDF with matte enamel — for a monochrome concept with precise color matching. Both options are equally durable with proper varnish or oil coating.
Slatted panels in the living room interior— only the TV wall or other zones too?
The TV wall is the most logical and common place for slatted panels in the living room. But slatted panels also work on adjacent walls: the side wall in the sofa area, a fireplace niche, the living room entrance area. The main rule: there should be only one slatted wall in the living room. Multiple slatted walls in one room create visual competition, not architectural harmony.
Conclusion
The TV zone is not just a 'place for the TV'. It is the architectural center of the living room, towards which all glances are directed and around which the entire furniture group is arranged. A slatted panel behind the TV creates a natural, warm, rhythmic backdrop for the screen — a living background of wooden verticals that makes the wall three-dimensional and expressive. Polyurethane moldings define the geometric framework: frame, pilasters, cornice — architectural 'order' around the natural 'freedom' of the wooden rhythm.
Together — the slatted panel and moldings — form a system that transforms an ordinary wall with a TV into a full-fledged architectural element. One that works both when the screen is on and when it's off. Especially when it's off.
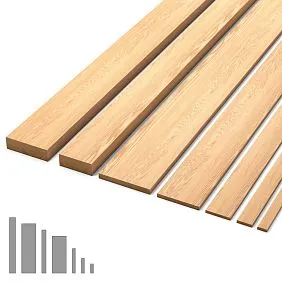
Wooden slat panelsmade of natural oak and ash,Pogonazh iz massivafor baseboards and molding frames,polyurethane decorative moldingsfor geometric framing — a complete system of materials for a professional TV zone of any scale and concept is presented in the STAVROS company catalog.
STAVROS is a Russian full-cycle manufacturer: slatted systems made of natural wood, solid wood millwork, polyurethane moldings and cornices. From wood selection to finishing — production is controlled at every stage. Professional consultation on material selection, slat parameters, and molding profiles for your TV zone — because the main wall of your living room deserves an architectural approach, not a random solution.