Article Contents:
- The Game-Changing Material: What is Polyurethane Decor
- Anatomy of Wall Decor: Types and Varieties of Elements
- Moldings: Classic Space Structuring
- Overlays and Panels: Volumetric Accents
- Baseboards: Finishing the Composition
- Cornices: The Transition from Wall to Ceiling
- Rosettes: central accents
- Brackets and Consoles: Functional Decorativeness
- Pilasters and Half Columns: Vertical Architecture
- Panels: Modern Solution
- Design Possibilities: From Classic to Futurism
- Classical Interiors: Palace Luxury in a Modern Apartment
- Neoclassicism: Modernized Classic
- Minimalism: Decor as Graphics
- Scandinavian Style: Modesty with Character
- Loft: Industrial Aesthetics with Classical Notes
- Art Deco: Geometric Luxury
- Eclecticism: freedom of combinations
- Installation Technology: From Planning to Finish
- Preparation: Decor Design
- Surface Preparation: The Foundation of Quality
- Adhesive Selection: Guarantee of Reliability
- Installation Technique: Step-by-Step Process
- Finishing: From Primer to Paint
- Practical Aspects: Tips and Recommendations
- Compatibility with Other Finishing Materials
- Maintenance and operation
- Common Mistakes and How to Avoid Them
- 2026 trends: what's relevant now
- Large-Format Elements
- Geometry Instead of Ornament
- Color and contrast
- Integration with lighting
- Ecological and natural properties
- Customization
- Economics of the Matter: Cost and Feasibility
- Comparison with alternatives
- Project Cost: Real Figures
- Return on Investment and Durability
- STAVROS: 23 Years of Creating Perfection
- Assortment for Any Project
- World-class quality
- Service and Reliability
- Trust of Professionals
- Development and Innovation

Walls are the canvas upon which a home's atmosphere is created. For many years, decorating possibilities were limited to wallpaper, paint, and plaster. Volumetric decor remained the prerogative of expensive interiors: plaster stucco required a master plasterer's work, wood carving cost exorbitant amounts, and installing any decorative element turned into a construction epic. The situation changed with the advent of polymer materials.polyurethane wall decorPolyurethane decor has become an accessible tool for interior transformation — easy to install, diverse in forms, durable, and visually indistinguishable from classic materials.
In 2026, polyurethane decor is experiencing a renaissance. Designers are using it not only in classic interiors, where it is historically appropriate, but also in modern spaces, creating unexpected combinations and bold solutions. Manufacturers are expanding their collections, offering elements for every taste—from strict geometric panels to Baroque ornaments. Production technologies are improving, making products increasingly realistic and high-quality. The market for polyurethane wall decor is growing at double-digit rates, and interest in it remains strong among both professional designers and private clients.


The Game-Changing Material: What is Polyurethane Decor
Polyurethane is a synthetic polymer obtained by mixing two components followed by polymerization. The result is a material with unique properties: lightweight, durable, moisture-resistant, and not susceptible to rot or degradation by microorganisms. For producing decorative elements, rigid cast polyurethane is used—it is poured into special molds where it hardens, acquiring the desired configuration.
The key advantage of the technology is the ability to reproduce the most complex forms with the highest detail. Sculptural stucco with many small elements, which a master plasterer would create over weeks, is cast in a mold in just a few minutes. At the same time, the surface quality and clarity of the relief are perfect—the mold conveys all the nuances of the original model.
ModernPolyurethane wall decorIt is produced from formulations specially developed for interior applications. The material density is 200-400 kg/m³—significantly lighter than plaster and incomparably lighter than wood. The surface after casting is smooth, without pores, which is critically important for subsequent finishing. Geometric dimensions are stable—the element does not shrink, swell, or warp due to temperature or humidity.
An important feature of polyurethane is its chemical inertness after polymerization. The material does not emit volatile substances, has no odor, and is hypoallergenic. This makes it safe for living spaces, including children's rooms and bedrooms. Polyurethane does not support combustion—it is classified as a flame-retardant material, which is important for fire safety.


Anatomy of Wall Decor: Types and Varieties of Elements
Our factory also produces:


Moldings: The Classic for Structuring Space
Moldings made of polyurethaneThese are linear products with a decorative profile, designed for creating frames, borders, and visually dividing a wall plane. They are sold in strips from one to three meters long, allowing installation with minimal joints.
The molding profile can be simple—one or two curves creating a play of light and shadow. Or complex—with relief ornamentation, carved details, and multi-step configurations. Width varies from 20 to 150 millimeters, relief height from 5 to 40 millimeters.
The main application of moldings is creating wall panels. A classic technique: the wall is divided into rectangular sections using vertical and horizontal moldings. Inside the sections, contrasting paint, patterned wallpaper, or decorative plaster can be used. Such a composition structures a large plane, makes it visually more interesting, and creates rhythm.
The second application is framing. Moldings frame mirrors, paintings, and photographs, creating a frame effect without the need to order custom frames. They frame doorways, giving them architectural expressiveness. They frame built-in niches, shelves, and shelving units.
The third application is zoning. In spacious rooms, moldings are used for visually dividing functional zones. For example, in a living-dining room, a molding on the wall can mark the boundary between the relaxation and dining areas.
Get Consultation
Overlays and Panels: Volumetric Accents
Polyurethane overlays are decorative elements with relief that are mounted on the wall as a whole. Sizes vary from miniature (10×10 cm) to large panels (100×150 cm and larger). Thickness is usually 10-20 millimeters, creating noticeable volume without making the element too protruding.
The themes of overlays are limitless. Classic ornaments: acanthus, grapevine, floral rosettes, Baroque scrolls. Geometric patterns: Greek meander, rhombuses, concentric circles, linear compositions. Narrative panels: mythological scenes, pastorals, battle compositions. Abstract forms: flowing lines, organic structures, modernist compositions.
Overlays are used as standalone accents—one large overlay in the center of the wall behind a bed headboard or above a sofa becomes a focal point of the interior. Or as compositional elements—several overlays of different sizes form a panel, complemented by moldings.
A special category is corner overlays. These are elements specially designed for installation in wall corners. They hide joints, soften the transition between planes, and add decorativeness to areas that usually go unnoticed.
Baseboards: Completing the Composition
Polyurethane BaseboardsThey cover the joint between the wall and floor, but their role is not limited to functionality. Wide baseboards with rich profiles are full-fledged decorative elements that set the tone for the entire interior.
Baseboard height varies from modest 50 millimeters to impressive 200-250 millimeters. High baseboards visually raise the ceiling, create a sense of monumentality characteristic of classic interiors. Low baseboards are appropriate in modern spaces where conciseness is important.
The baseboard profile can echo the profile of cornices and moldings, creating a unified stylistic line. Or contrast—for example, a simple baseboard with richly decorated cornices accentuates the upper part of the room without overloading the lower part.
A modern trend is using baseboards with hidden lighting. The baseboard design includes a channel for an LED strip, which creates soft lighting along the floor. This is not only beautiful but also functional—providing comfortable lighting for moving in the dark.
Cornices: The Transition from Wall to Ceiling
Polyurethane Crown MoldingThey cover the joint between the wall and ceiling. Their profile can be simple—a smooth curve or straight bevel. Or complex—multi-step configuration with relief ornamentation, carved details, and interplay of protrusions and recesses.
The width of the cornice affects the perception of space. A narrow cornice (50-80 mm) creates a neat frame without drawing attention. Medium (100-150 mm)—a classic choice for most interiors. Wide (200-300 mm and more)—an element of luxurious classic interiors, visually lowering the ceiling height but adding monumentality.
Cornices are used not only around the ceiling perimeter. They are mounted above doorways, creating architectural portals. Above windows—instead of traditional architraves or in addition to them. On walls—for zoning by height, creating horizontal divisions.
A popular technique is a cornice with hidden lighting. An LED strip is placed behind the protruding part of the cornice, directed at the ceiling. The light, reflecting off the ceiling, creates a floating ceiling effect and soft diffused lighting for the entire room.
Recesses: central accents
polyurethane rosettesThese are decorative elements of round, oval, or polygonal shape with relief ornamentation. The classic application is decorating the chandelier mounting point on the ceiling. But on walls, rosettes are used differently.
A rosette on the wall is a medallion, the central element of a composition. Above a bed headboard, a rosette becomes a replacement for a painting or panel. On an accent wall in the living room—a focal point to which all lines of the interior converge. In the hallway—an element that attracts attention and sets the tone for perceiving the entire home.
Rosette sizes vary from 200 millimeters to a meter or more in diameter. Small rosettes are used as additional compositional elements or on small surfaces. Large ones serve as independent accents on large walls.
Rosette ornaments are diverse: from strict geometric to lush botanical. A classic rosette consists of concentric relief circles radiating from the center, with floral or leafy motifs. Modern ones may feature abstract patterns, asymmetrical shapes, or minimalist relief.
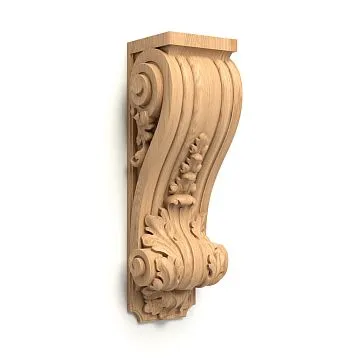
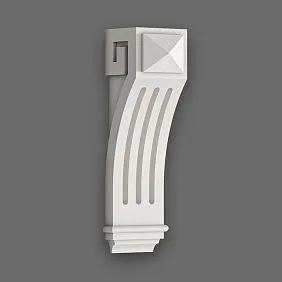
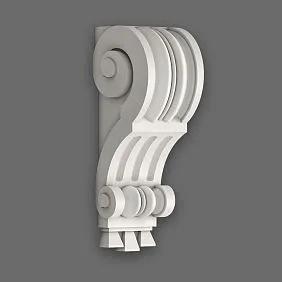
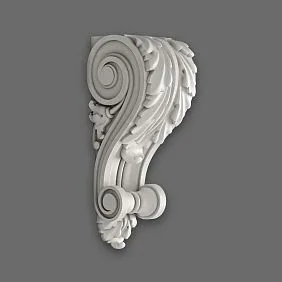
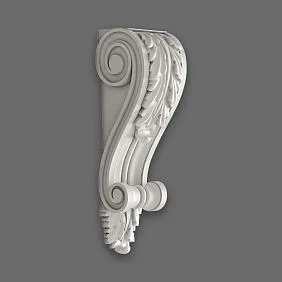
Brackets and Consoles: Functional Decorativeness
Polyurethane bracketsOriginally, they were structural elements—they supported protruding parts of a building: balconies, cornices, bay windows. In interiors, this function has transformed into a decorative one while retaining a hint of functionality.
A wall bracket can support a shelf—in which case it actually bears a load. Or it can be a purely decorative element, mimicking the support of a non-existent structure. Visually, there is no difference—the bracket looks like a load-bearing element, adding architectural depth to the wall.
Brackets are used to frame door and window openings—they are installed in the upper corners, creating the illusion that the opening is cut into a thick wall. In niches, brackets are placed on the sides and top, turning a simple wall recess into something resembling an antique sculpture niche.
Bracket sizes vary from compact (height 100-150 mm) to massive (400-500 mm). Shapes range from simple angular forms to complex sculptural compositions with scrolls, leaves, and figurative elements.
Pilasters and half-columns: vertical architecture
Pilasters are vertical decorative elements that imitate flat columns projecting from the wall plane. They create vertical rhythm, structure space, and add architectural monumentality.
A full pilaster consists of three parts: a base (lower part), a shaft (central part, usually with vertical flutes), and a capital (upper part with decorative ornamentation). Height can range from one to three meters—depending on the room's height.
Pilasters are used to frame door openings, create portals, and divide long walls into sections. A pair of pilasters on either side of a fireplace transforms it into an architectural element. Four pilasters at the corners of a room create a rotunda effect.
Half-columns are a more voluminous version of pilasters, projecting further from the wall. They create an even stronger architectural effect but require sufficient space to avoid cluttering the interior.
Panels: A Modern Solution
Decorative polyurethane panels are a relatively new product category. These are large-format elements ranging from 500×500 mm to 1000×2000 mm with volumetric relief or texture.
Panels are used to cover entire walls or large sections of them. They are mounted flush, creating a continuous decorative surface. The relief can be geometric (honeycombs, waves, pyramids), botanical (stylized leaves, branches), or abstract (arbitrary three-dimensional forms).
Panel finishing solves several tasks at once: it creates visual interest, improves room acoustics (the textured surface scatters sound), and conceals wall defects. This is especially relevant in new buildings where walls may have imperfections.
Panels are painted the same color as the wall—then the effect is built solely on the play of light and shadow on the relief. Or in a contrasting color—creating a graphic accent. They can be coated with metallic paints, patinated, or treated with decorative compounds.
Design Possibilities: From Classic to Futurism
Classical Interiors: Palace Luxury in a Modern Apartment
The classical style is the historical home of polyurethane decor. It is hereWall moldingthat it fully unfolds, reproducing the aesthetics of palaces and mansions of the past.
Baroque requires an abundance of decor. Walls are divided by moldings into panels, within which overlays with lush ornamentation are placed. Corners are adorned with corner elements, cornices are rich and wide, pilasters frame doors and windows. All elements are painted in light tones—ivory, cream, light gray—with gilding on the protruding parts.
Rococo prefers asymmetry and playfulness. Overlays with rocaille scrolls, shells, and floral garlands are arranged not on a strict grid but freely, creating a sense of movement. Colors are pastel—pink, blue, mint. Gilding is abundant but delicate, not coarse.
Classicism is stricter. Moldings form clear rectangular panels. Overlays are symmetrical, ornaments are strict—meanders, palmettes, laurel wreaths. Pilasters with classical capitals—Ionic, Corinthian—create an order structure. Colors are restrained—white, gray, beige.
Empire style is monumentality and imperial luxury. Military symbolism in overlays—eagles, wreaths, crossed weapons, trophies. Massive cornices, wide moldings, large rosettes. Colors are contrasting—white with gold, dark blue with gold, burgundy with gold.
Neoclassicism: Modernized Classic
Neoclassical style takes the proportions and principles of classicism but simplifies the decor, making it more laconic. Simple moldings without excessive ornamentation, overlays of restrained forms, and strict pilasters are appropriate here.
The color palette expands—besides traditional white and cream, various shades of gray, beige, and cool tones are used. Decor may not only be white—painting in the wall color with a tone-on-tone effect is popular, where elements are visible only due to the relief.
Neoclassicism is well-suited for modern apartments of medium size. It provides the nobility of classicism without bulkiness, elegance without overload. A small living room with moldings forming three vertical panels and a restrained cornice looks significantly richer than a simply painted room but doesn't feel museum-like.
Minimalism: Decor as Graphics
In a minimalist interior, decor is used sparingly, but its presence fundamentally changes perception. One overlay of strict geometric shape on an empty wall becomes a focal point. Thin moldings forming a single rectangle on an accent wall create a graphic accent.
The color of decor in minimalism is usually tone-on-tone with the wall. White on white, gray on gray. The effect is built solely on geometry and the play of light on the relief. No gilding, patina, or contrasting colors—only pure forms.
A popular technique is wide, flat moldings that create deep rectangular frames. Inside the frame, a different finish can be used—wallpaper with texture, decorative plaster, or paint in a similar but distinct shade. The depth of the frame (the height of the molding) creates shadows, adding volume to a flat wall.
Scandinavian style: Modesty with character
Scandinavian interiors reject excess but welcome details that add individuality to a space. Narrow moldings that divide the wall into panels are appropriate here. Inside the panels—light-colored paint, possibly with a barely noticeable pattern.
Polyurethane wall decorIn Scandinavian style, it is always painted white or very light tones. No gilding or contrasts. Profiles are simple, without complex ornaments. The number of elements is minimal—only what is functional or creates the necessary structure.
High baseboards (120-150 mm) with a simple profile, painted white, are popular. They visually raise the ceiling and create a neat framing for the floor. A simple white cornice softens the transition to the ceiling. This is enough to complete the interior.
Loft: Industrial aesthetics with classical notes
It might seem that loft and stucco are incompatible. But modern lofts are often created not in actual industrial buildings, but in ordinary apartments where industrial aesthetics are imitated. And here, polyurethane decor finds its place.
Brackets for ceiling beams (which are also often decorative, not load-bearing) add authenticity. Wide, simple moldings, painted in concrete or metal colors, zone the space without compromising the brutalism. Large rosettes of strict geometric shapes become industrial accents.
An important point is painting. In a loft, decor is never white. It is painted gray (imitating concrete or metal), black (graphite), dark brown (resembling rust or old wood). Patination effects are possible, creating a sense of age and wear.
Art Deco: geometric luxury
The Art Deco style of the 1920s-30s is trending again. Its characteristic features—geometric shapes, symmetry, use of expensive materials, richness without overload—are perfectly realized with polyurethane decor.
Overlays with geometric ornaments—ziggurats, sun rays, stepped forms—are placed symmetrically on walls. Moldings form vertical panels that emphasize the height of the room. Pilasters with capitals of simplified geometric shapes frame doorways.
The Art Deco color palette is contrasting. Black with gold, dark blue with silver, burgundy with bronze. Polyurethane decor is painted in these colors or coated with metallic paints, creating the effect of precious metals.
Eclecticism: freedom of combinations
An eclectic interior combines elements of different styles, eras, cultures. Here, polyurethane decor can be used in the most unexpected ways—a Baroque overlay on a minimalist bedroom wall, classical moldings in a loft space, an Art Deco rosette in a Scandinavian living room.
It's important not to descend into chaos. Eclecticism requires a sense of proportion and an understanding of combination principles. Unifying factors can be color (all elements painted in one tone, despite different shapes), scale (all elements are roughly the same size), rhythm (repeating placement of different-shaped but similar-in-spirit details).
Installation technology: From planning to finish
Preparation: Designing the decor
A quality result begins with planning. Before buying elements and starting installation, you need to design the future composition.
The first step is measurements. Measure the walls where the decor is planned to be installed. Consider the location of doors, windows, outlets, switches, furniture. All these elements will affect the placement of the decor.
The second step is a sketch. Draw the walls to scale (you can use graph paper or a graphics editor) and place decorative elements on them. Experiment with the composition—move moldings, change the placement of overlays, try different options.
The third step is quantity calculation. Calculate how many linear meters of moldings, cornices, baseboards will be needed. How many overlays, rosettes, brackets. Add a 10% reserve for cutting and possible defects.
The fourth step is on-site verification. If possible, buy one element and hold it against the wall. This will allow you to assess how well the size and style meet expectations, whether the element looks too large or too small for the given room.
Surface preparation: the foundation of quality
Polyurethane decor is mounted with adhesive, so surface quality is critically important. The wall must be level, clean, dry, and strong.
If the wall is plastered, check the strength of the plaster. Tap it—a hollow sound indicates delamination. Such areas need to be removed, re-plastered, and allowed to dry. The surface must be primed—this strengthens the base and improves adhesive adhesion.
If the wall is painted, check the paint's strength. Perform a test: stick a piece of masking tape, press it down, and rip it off sharply. If paint remains on the tape—the coating is not strong, it needs to be removed or strengthened with a deep-penetration primer.
If the wall is wallpapered, you cannot mount decor over wallpaper—the wallpaper will not support the weight of the elements and will peel off with them. Decor is mounted on a bare plastered wall, and wallpaper is glued around already installed elements.
Wall unevenness is a problem. A molding or baseboard glued to a wavy wall will have gaps where the plane deviates. If the unevenness is significant (more than 2-3 mm per meter), the wall needs to be leveled with plaster or putty before mounting the decor.
Choosing adhesive: A guarantee of reliability
Special adhesives are used for mounting polyurethane decor. Regular PVA is not suitable—it does not provide sufficient bond strength and may weaken over time.
Polymer mounting adhesives (like 'liquid nails')—a universal solution for most tasks. They provide a strong bond with various substrates (concrete, plaster, drywall, wood), set quickly, and do not require complex preparation. Applied from tubes using a caulking gun.
Acrylic mounting adhesives—water-soluble compounds, safe and without a strong odor. Suitable for living spaces where work is being done while occupied. The setting time is longer than with polymer ones, allowing for adjustment of the element's position after gluing.
Specialized polyurethane adhesives are formulations specifically designed for installing polyurethane products. They provide maximum adhesion, seam elasticity (important for thermal expansion), and moisture resistance. They are more expensive than universal adhesives but deliver better results.
For heavy elements (large overlays, panels), combined fastening is recommended: adhesive plus mechanical fasteners. Self-tapping screws are used, which are screwed through the element into the wall. After installation, the screw heads are covered with putty and painted—they become invisible.
Installation technique: step-by-step process
Installation of moldings and baseboards begins with marking. A line for installation is marked on the wall—usually using a laser level or chalk line. The line must be strictly horizontal (for horizontal elements) or vertical (for vertical ones).
Elements are cut to length. Straight cuts are made with a fine-toothed saw or a miter saw. Corner joints (in room corners) require cutting at a 45-degree angle—a miter box or miter saw set to the required angle is used.
Adhesive is applied to the back of the element. For narrow moldings—one strip in the center or in a zigzag pattern. For wide ones—two or three strips. Do not apply adhesive in a continuous layer—it will squeeze out when pressed, and you will waste time removing it.
The element is placed against the wall along the marking and pressed. The pressure should be even along the entire length. Press with your hands, not with a tool—this way you feel the element better and avoid the risk of damaging it.
Excess adhesive is immediately removed with a damp sponge (for acrylic adhesives) or a cloth with solvent (for polymer adhesives). If the adhesive hardens, it will be difficult to remove without damaging the element.
After pressing, the element is fixed until the adhesive sets. For light elements, painter's tape applied in several places is sufficient. For heavy elements, props, temporary fasteners, or weights are used.
Overlays are installed similarly, but the marking is individual for each element. It is important to determine the installation location precisely—any error of a few millimeters will be noticeable, especially if there are several overlays and they need to be positioned symmetrically.
Joints between elements require special attention. The ends must be cut evenly and fit tightly together. Gaps in joints are unacceptable—they will be visible after painting. If a gap does form, it is filled with acrylic sealant, excess is immediately removed, and after drying, the joint area is sanded with fine-grit sandpaper.
Finishing: from primer to paint
After the adhesive has completely dried (usually 24 hours, exact time is specified in the instructions), finishing begins.
First stage—repairing defects. Screw heads (if mechanical fasteners were used), minor chips, scratches, and gaps in joints are filled with acrylic putty. After drying, the puttied areas are sanded smooth.
Second stage—priming. Polyurethane has a smooth surface with low absorbency, so paint adheres poorly without primer. Acrylic primer is used, applied with a brush in a thin, even layer. The primer must reach all recesses of the relief—pay attention to this, otherwise unpainted areas will remain in the recesses after painting.
After the first coat of primer dries (1–2 hours), a second coat is applied. Two coats of primer provide an even white base, on which the paint will look perfect.
Third stage—painting. Acrylic or latex paints are used—they are odorless, dry quickly, and provide a durable finish. Paint is applied with a brush for detailed work on the relief or with a spray gun for speed.
The first coat of paint usually goes on unevenly—this is normal. After it dries (2–4 hours), a second coat is applied. Two coats provide an even, solid color.
If decorative finishing (patination, gilding, aging effect) is planned, it is done after the base painting. Patina—a dark paint applied to the recesses of the relief and partially wiped off the raised parts—highlights details and creates a depth effect. Gilding—applying gold or silver paint to the raised parts—adds luxury. Aging effect—lightly sanding the raised parts with fine sandpaper after painting, creating a worn appearance.
Practical aspects: tips and recommendations
Combination with other finishing materials
polyurethane wall decorcombines perfectly with any finishing materials, but there are nuances.
With wallpaper: the decor is installed on the wall first, then wallpaper is pasted around it. This is more difficult than regular wallpapering, but the result is worth it—it creates a 'wallpaper in frames' effect. An alternative: wallpaper is pasted on the entire wall, then decor is installed over it. This is simpler but less reliable—the wallpaper must be very durable to support the weight of the elements.
With decorative plaster: an ideal combination. The decor is installed on a prepared wall, then plaster is applied around it. Or vice versa—plaster first, then decor. Both options work well.
With paint: the simplest combination. The decor is installed, painted along with the wall or separately—depending on the design idea.
With panels (wood, MDF): decor is attached over the panels. It is important that the screws securing the decor go not only into the panel but also into the wall behind it—otherwise, the fastening will be weak.
With tiles: not the most common combination, but possible. In bathrooms and kitchens, polyurethane decor (usually baseboards and cornices) is installed along the tile border, covering the joint between the tile and other surfaces.
Care and Maintenance
Polyurethane decor is low-maintenance. The painted surface is wiped with a damp cloth to remove dust. Stains are removed with mild cleaning agents without abrasives.
In high-humidity areas (bathrooms, kitchens), the decor performs without issues—polyurethane is water-resistant, does not swell, and does not rot. It is only important to paint the elements with moisture-resistant paint or varnish them properly.
Mechanical damage (chips, scratches) is easily repaired. The damaged area is cleaned, filled with acrylic putty, sanded after drying, and painted to match the decor color. The repaired spot becomes invisible.
If you want to change the interior color over time, the decor can be easily repainted. Simply lightly sand the surface with fine sandpaper (to improve adhesion), prime, and paint in the new color. Polyurethane withstands multiple repaints without loss of quality.
Typical mistakes and how to avoid them
First mistake: scale mismatch. Decor that is too small in a large room gets lost and looks boring. Decor that is too large in a small room creates a feeling of crampedness. Choose the size of elements proportionally to the size of the room.
Second mistake: overloading. The desire to use many different elements leads to visual chaos. Less is more — a few well-chosen elements will create a stronger effect than an abundance of random details.
Third mistake: style mismatch. Baroque overlays in a minimalist interior, strict moldings in a boho space — such combinations are jarring. Decor should match the overall style of the interior.
Fourth mistake: poor installation. Crooked lines, gaps in joints, visible screw heads, unpainted areas — all of this kills the effect of even the most beautiful decor. Careful installation and finishing is critically important.
Fifth mistake: incorrect color. White decor on a white wall can look flat if the lighting does not create sufficient shadows. In such cases, it is better to paint the decor in a shade slightly different from the wall — lighter or darker. Or use effects — patina, metallic, mother-of-pearl.
Trends for 2026: what's relevant now
Large-format elements
One of the main trends is the enlargement of decor. Instead of many small overlays, one large one is used. Instead of narrow moldings — wide ones. Large decor creates a strong visual effect, makes the interior more graphic and modern.
Panels measuring one meter by two meters or more, covering a significant part of the wall, are popular. Rosettes with a diameter of 80-100 centimeters, becoming central elements of the composition. Wide baseboards 20-25 centimeters high, visually changing the proportions of the room.
Geometry Instead of Ornament
Complex floral ornaments are giving way to pure geometry. Rectangles, circles, hexagons, trapezoids — simple shapes create modern graphic decor without references to historical styles.
Overlays and panels with geometric relief are popular: honeycombs, waves, pyramids, cubes. Moldings with simple rectangular cross-sections without carvings or curls. Rosettes in the shape of regular polygons with minimalist relief.
Color and Contrast
White decor on a white wall is a classic, but not the only option. In 2026, colored solutions are actively used. Decor is painted in a color contrasting with the wall: black on light gray, dark blue on white, graphite on beige.
The tone-on-tone technique with a barely noticeable difference is popular: a light gray wall, decor one tone darker. The effect is soft, unobtrusive, but creating depth. Or vice versa — a dark wall, lighter decor.
Metallic paints are another trend. Decor painted to resemble bronze, copper, or brass creates the effect of metal inserts in the wall. Especially relevant for Art Deco and modern interiors.
Integration with lighting
Decor is becoming not only decorative but also a functional element of lighting. LED strips are placed behind wide moldings and cornices, creating hidden lighting. Rosettes are used as frames for built-in light fixtures.
Panels with built-in lighting are popular: an LED panel is placed behind a relief surface, which shines through the material (polyurethane in thin sections is translucent), creating the effect of glowing decor.
Ecological and natural
Although polyurethane is a synthetic material, modern manufacturers emphasize its eco-friendliness. Compositions without toxic components are used, receiving environmental certifications.
Painting decor in natural colors is popular: shades of wood, stone, terracotta. This allows polyurethane elements to be integrated into eco-interiors, where natural materials and colors are valued.
Customization
Standard catalog items are good, but custom ones are better. Demand for decor made from individual sketches is growing. The client brings a drawing or photo of the desired element, the manufacturer creates a mold and casts a unique overlay or panel.
This allows for truly exclusive interiors where the decor is not repeated anywhere else. The cost of custom production is higher than standard, but for those who value individuality, it is justified.
Economics of the matter: cost and feasibility
Comparison with alternatives
Gypsum stucco is a traditional alternative to polyurethane. Its advantages: naturalness of the material, the possibility of creating unique elements by hand, prestige. Disadvantages: heavy weight (requires reinforced fastening), fragility, high labor cost, lengthy production time. The cost of gypsum decor is 2-4 times higher than polyurethane of similar complexity.
Wood carving is a premium option. Advantages: naturalness, uniqueness of each element, tactile pleasantness, prestige. Disadvantages: very high cost, lengthy production time, susceptibility to moisture and temperature, difficulty of repair. The cost of carved wood decor is 5-10 times higher than polyurethane.
Polystyrene (foam) is a budget alternative. Advantages: low price, ease of installation. Disadvantages: fragility, less clear relief, limited range of shapes, visible cheapness. The cost of polystyrene decor is 2-3 times lower than polyurethane, but the quality is significantly lower.
Conclusion: polyurethane is optimal in terms of price-quality ratio. It provides a result visually indistinguishable from gypsum or wood, at a cost accessible to a wide range of customers.
Project cost: real numbers
Consider a typical project: a living room of 20 square meters, ceiling height 2.7 meters. The task is to create a classic interior with wall decor.
Baseboards around the perimeter (16 meters) 120 mm high, average price 400 rubles per meter — 6400 rubles.
Cornices around the perimeter (16 meters) 100 mm wide, average price 500 rubles per meter — 8000 rubles.
Moldings for creating panels on one accent wall (25 meters total) 50 mm wide, average price 300 rubles per meter — 7500 rubles.
Four overlays for placement in the centers of panels, size 30×40 cm, average price 1500 rubles each — 6000 rubles.
One large rosette with a diameter of 60 cm for the central composition — 3000 rubles.
Total materials: 30900 rubles.
Installation (average labor cost is 50% of material cost in regions, 100% in Moscow and St. Petersburg): 15000-30000 rubles.
Painting (if performed separately from wall painting): 5000-10000 rubles.
Total project cost: 51000-71000 rubles.
For comparison: similar decor made of plaster would cost 120000-180000 rubles, made of wood — from 250000 rubles.
Return on investment and durability
polyurethane wall decor— this is not a consumable, but a long-term investment in the interior. The service life of a quality-installed and painted decor is decades. It does not require replacement, repair, or special maintenance.
At the same time, the decor significantly increases the visual value of the interior. An apartment with decorated walls looks more expensive and prestigious, which is important when selling or renting out. The cost of housing with quality finishing, including decor, can be 10-15% higher than similar housing without decor.
For commercial premises (offices, restaurants, hotels, boutiques), decor is a tool for creating the desired atmosphere and attracting customers. A respectable interior with stucco creates an impression of reliability and status, which affects customer loyalty and their willingness to pay.
STAVROS: 23 years of creating perfection
When it comes to polyurethane wall decor for the Russian market, it is impossible not to mention the company STAVROS — the recognized industry leader with a 23-year history.
Over two decades, STAVROS has evolved from a small workshop to the largest manufacturer and supplier of decorative interior elements. Today, it is a company with a full production cycle, its own developments, an extensive dealer network, and an impeccable reputation.
Assortment for any project
The STAVROS catalog includes thousands of items.Wall molding is represented in all possible diversity: from miniature overlays to large-format panels, from strict geometric moldings to lush Baroque compositions, from classic white elements to ready-made painted solutions.
In addition to polyurethane decor, the company offers products made of wood — carved overlays, balusters, columns, furniture legs, cornices. This allows for the implementation of projects requiring a combination of polyurethane and natural wood, creating comprehensive solutions of the highest quality.
A separate direction is furniture hardware and components. Handles, overlays, legs, decorative elements for furniture complement the line of wall decor, allowing for the creation of holistic interiors where walls and furniture are designed in a unified style.
World-class quality
STAVROS uses polyurethane compounds from leading European manufacturers. This guarantees the stability of material properties, precision of product geometry, durability, and safety.
The production is equipped with modern equipment, allowing for the creation of elements of the most complex shapes with the highest detail. Multi-stage quality control prevents defective products from reaching the market.
The result is products trusted by professional designers, construction companies, and private clients throughout Russia. Complaints are practically non-existent, which is rare in the industry.
Service and reliability
STAVROS builds relationships with clients on the principles of reliability and responsibility. Stated production deadlines are strictly adhered to. A large stock program allows for the immediate shipment of popular items without waiting for production.
Delivery is organized throughout Russia — from a single piece to wagon lots. Small orders are shipped by transport companies, large ones — by their own transport or specialized carriers.
Technical support assists at all stages: from selecting elements and calculating quantities to consultations on installation and finishing. The company's specialists know their products thoroughly and willingly share their experience.
Trust of professionals
The quality of STAVROS's work is evidenced by a long list of regular clients. Among them are well-known design studios, large construction companies, furniture factories, and architectural bureaus.
Many clients have been working with STAVROS for years, knowing that they will get exactly what they need here: quality products, accurate deadlines, fair prices, honest relationships. In the furniture and construction industry, where deadlines and quality are critical, such a partner is worth its weight in gold.
Private clients value STAVROS for the breadth of its assortment, the ability to order everything needed in one place, and professional consultations. By purchasing decor here, the client receives not just a product, but a ready-made solution with support at all stages.
Development and innovation
STAVROS does not rest on its laurels. Every year, the catalog is replenished with new collections reflecting current design trends. The company monitors global innovations in interior decor and adapts them for the Russian market.
In-house production allows for the implementation of custom projects—manufacturing elements based on client sketches. This is in demand by designers creating exclusive interiors and companies needing unique solutions for their facilities.
STAVROS invests in quality and technology, expands production capacity, and improves logistics. The goal is to remain the best in the industry, offering clients products and services of the highest level.
Walls are the foundation of an interior, upon which the entire remaining composition is built.polyurethane wall decormakes it possible to turn simple planes into works of art, create an atmosphere, emphasize style, and add individuality. It is an affordable, practical, and aesthetically perfect tool for transforming space.
In 2026, the possibilities of polyurethane decor are broader than ever. Production technologies have reached perfection, the range of elements is vast, and prices remain affordable. Whether you are creating palatial classicism or minimalist modern, polyurethane decor will help bring your vision to life.
By choosing quality products from trusted manufacturers like STAVROS, you are investing in the beauty and durability of your interior. Transform the walls—transform the space you live in.