


Article Contents:
- Functions and role of trim
- Covering technological gaps
- Creating visual framing
- Protecting corner openings
- Improving thermal and acoustic insulation
- Connecting function in interior design
- Possibility of decorative accent
- How to choose trim by style
- Classic Interiors
- Modern minimalist styles
- Loft and Industrial Style
- Provence and Country Style
- Art Deco and glamour
- Installation and finishing options
- Preparation for installation
- Ways to join trim pieces
- Installation Technology
- Finishing options for trim
- Errors during installation
- Incorrect marking and measurement
- Cutting errors
- Issues with fastening
- Poor joint sealing
- Painting errors
- Conclusion
- Frequently Asked Questions
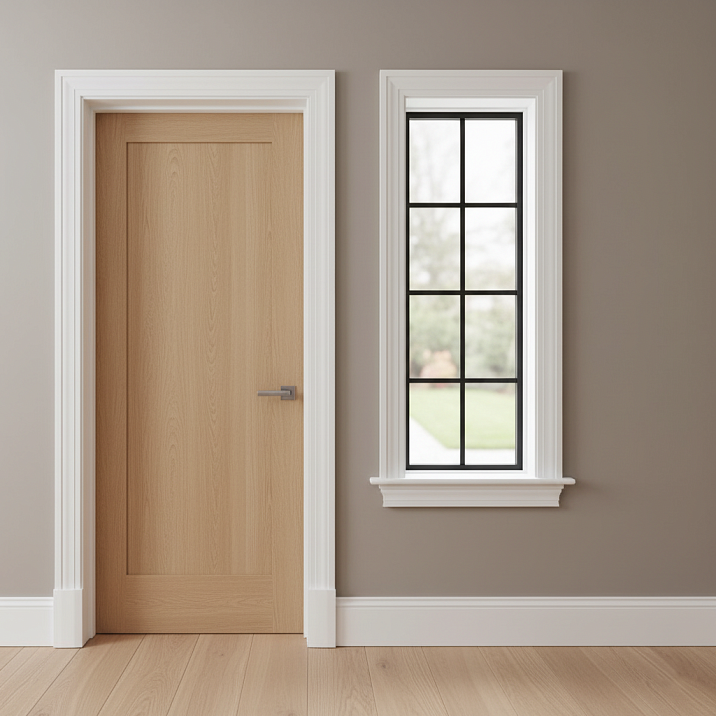
A door or window opening without trim is an incomplete phrase, an unfinished gesture, a picture without a frame. No matter how well the door is installed or how expensive the walls are, without proper framing, the interior looks unfinished.MDF trimIt is that very final touch that transforms a technical construction element into an architectural detail, creating the character and style of the space.
In modern interior design, trim is experiencing a second life. If in the era of modernism they tried to minimize or even eliminate them, today designers have once again appreciated their role in creating a finished, harmonious space. Properly selected trim can dramatically change the perception of the interior, unify various elements, and set the stylistic direction for the entire room.
MDF as a material for trim has gained strong positions due to its unique combination of characteristics. Dimensional stability, uniform structure, ability to create any profiles, ecological safety, and affordable price make MDF trim the optimal choice for most projects. After proper painting, MDF trim visually appears almost indistinguishable from solid wood products, but it performs more stably and requires less complex maintenance.
Choosing and installing trim is a process requiring attention to detail and understanding of basic design principles. Width, profile, color, installation method — each of these parameters affects the final result. Errors at this stage can spoil the impression of an expensive renovation, while correct decisions can enhance even a budget interior.


Functions and role of trim
Trim is much more than just decorative strips around openings. They perform a whole range of functions, each of which is important for creating a comfortable, beautiful, and long-lasting interior. Understanding these functions helps you make thoughtful choices when selecting trim, rather than simply buying the first available elements of the right color.


Covering technological gaps
The main and most obvious function of trim is to conceal the technological gap between the door frame and the wall. This gap is inevitable when installing a door — it is necessary to compensate for possible wall irregularities, to fill with mounting foam, and to ensure the correct geometry of the frame. The width of the gap can range from one to three centimeters and more, depending on the quality of the walls and the accuracy of installation.
An open gap looks extremely unattractive, revealing all the technical details of installation - mounting foam, wall irregularities, remnants of plaster or putty. Moreover, an unsealed gap becomes a place for dust and dirt accumulation, which is practically impossible to clean properly. Moisture entering the gap may lead to degradation of mounting foam and gradual weakening of the frame's fastening.
MDF Door TrimFully solves this problem, creating a neat visual boundary between the opening and the wall. The standard trim width of 60-80 millimeters, with a margin, covers the technological gap, making the door installation visually flawless. At the same time, the gap under the trim remains functional - the foam continues to serve as thermal and acoustic insulation, but all technical details are hidden from view.
It is important to understand that masking the gap is not deception or an attempt to hide flaws. It is a normal architectural practice used for centuries. Similarly, baseboards conceal the gap between the wall and floor, and cornices between the wall and ceiling. These are elements of architectural culture that make space complete and professionally finished.
Our factory also produces:


Creating a Visual Frame
Perception psychology dictates that any opening - door or window - requires a visual frame. An unframed opening appears as a hole in the wall, a rupture in the integrity of space. A framed opening with trim becomes a portal, an architectural element that not only allows passage but also attracts attention, sets a focal point, and creates a compositional structure.
Framing an opening with trim works on the same principle as a picture frame. Even a simple frame makes a picture more significant, complete, and distinct from its surroundings. An elaborate, complex frame can turn a modest engraving into a work of art. Similarly, trim works - they can be modest and delicate or luxurious and accentuating, but in any case, they structure space, making it more organized and professional.
The width of the trim determines the degree of visual emphasis on the opening. Narrow trims of 50-60 millimeters create a delicate frame, almost imperceptible, yet orderly. They suit modern minimalist interiors where restraint is important. Medium trims of 70-90 millimeters are a universal choice, creating a noticeable but non-dominant frame. Wide trims of 100 millimeters and more make the opening a significant architectural element, drawing attention.
The trim profile also affects the character of the framing. A simple rectangular profile creates a modern, graphic effect. A profiled trim with rounded edges and coves adds classic elegance. A carved trim with ornaments becomes a work of decorative art. The choice of profile should match the overall interior style and the decorative level of other elements.
Get Consultation
Protection of Opening Corners
Opening corners are the most vulnerable areas, susceptible to mechanical damage. When furniture or large items are moved, or during daily use of doors, corners regularly receive impacts, scratches, and abrasions. This is especially relevant for openings in frequently used rooms - hallways, kitchens, children's rooms.
Unprotected opening corners gradually lose neatness - paint or wallpaper chips appear, dents in plaster, scuffs. In the worst cases, wall corners may even be destroyed, especially if they are made of gypsum board. Repairing damaged corners is labor-intensive and often requires a complete redo of finishing in the opening area.
Trim takes the impact, protecting the wall. Even if the trim is damaged, it is much easier to repair or replace it than to restore a wall corner. MDF trim is sufficiently strong to withstand normal operational loads, yet it allows for localized repair - chips and scratches are filled with putty and repainted.
Protective function of trim is especially important in homes with children. Children's games, bicycles, scooters, toys regularly contact openings. Trim creates a buffer zone that absorbs children's activity. This is an investment in long-term repair durability and reduces costs for frequent minor repairs.
Improving Thermal and Acoustic Insulation
Although primary thermal and acoustic insulation is provided by the door leaf and mounting foam in the gap, trim also contributes to the insulation characteristics of the opening. They create an additional barrier, preventing air leakage through possible gaps between the frame and the wall, protecting mounting foam from destructive effects of ultraviolet radiation and mechanical damage.
Tight fitting of trim to the wall and frame minimizes the possibility of air convection currents that may arise in the gap between the frame and the wall. This is especially important for entrance doors and openings leading to unheated areas - balconies, loggias, storage rooms. Even a small reduction in air leakage provides a noticeable effect during cold weather.
Acoustic insulation effect of trim is related to their ability to dampen vibrations of the door frame. When a door slams or closes forcefully, the frame vibrates, transmitting sound to the wall. Trim, tightly fitted to the frame and glued to the wall, partially dampens these vibrations, reducing noise levels. The effect is small, but in combination with other acoustic insulation measures, it provides a noticeable result.
MDF as a material has good insulation properties. Its dense, uniform structure conducts sound and heat less effectively than plastic or metal. Wooden and MDF trim contribute more to insulation than plastic trim, although the difference is small. In combination with a quality door and proper trim installation, trim helps create the most comfortable environment in the room.
Connecting Function in Interior Design
Trim plays an important role as a connecting element, unifying different parts of the interior into a cohesive whole. They can be coordinated in color, material, and style with baseboards, ceiling cornices, and furniture facades, creating a unified finishing system. Such coordination is a sign of professionally designed interiors, where every detail is thoughtfully planned and connected with others.
Trim color can support the color of the door leaf, creating a unified composition of the opening. Alternatively, trim can be painted to match wall color, visually blending in and making the opening less noticeable. Contrasting trim - white on dark walls or dark on light walls - creates graphic contrast, clearly defining openings and making them accent elements in the interior.
Uniform trim style throughout all rooms of an apartment or house creates visual continuity of space. Even if rooms are decorated in different color palettes, identical trim acts as a unifying element. This is especially important in open floor plans, where several functional zones exist in one space and require connecting elements.
Coordinating trim with architectural details - wall moldings, ceiling cornices - creates stylistic unity in the interior. If classic profiled moldings are used on walls, trim should also have a classic profile. In minimalist interiors with simple baseboards, trim should also be minimalist. This is a basic design principle - details of the same scale and purpose should be coordinated in style.
Possibility of Decorative Accent
Trim can be not only a neutral frame but also a striking decorative accent that attracts attention and sets the tone of the interior. This is especially relevant for grand openings - entrance doors, hallways to living rooms, doors to offices or libraries. A richly decorated opening becomes a compositional center, demonstrating the owner's status and taste.
Carved trim with ornaments, patina, and gilding transforms a simple opening into a work of decorative art. Floral motifs, geometric patterns, stylized images create richness of form and depth. Such trim is characteristic of classical, baroque, and ethnic interiors, where decoration is part of the stylistic concept.
Contrasting trim color - bright colors, unexpected combinations - creates a modern, bold look. Red, blue, green, black trim on neutral walls becomes striking accents, setting the mood for the entire space. This solution requires boldness and good taste, but the result can be impressive.
Complex compositions using various elements - trim of different widths, decorative overlays, sashings - create unique, original solutions. The opening transforms into an architectural portal with its own hierarchy of elements, proportions, and rhythm. Such decoration is characteristic of exclusive interiors, where uniqueness of each detail is important.
How to Choose Trim by Style
The correct choice of door casings by style is the key to a harmonious interior where all elements work toward a unified concept. Casings must match the style of the doors, the character of wall finishes, and the overall atmosphere of the room. It is important not only to follow stylistic canons but also to consider room proportions, its functional purpose, and the owner's personal preferences.
Classic Interiors
Classic styles in all their manifestations — baroque, rococo, classicism, empire, neoclassicism — require casings with expressive profiles based on classical architectural orders. These are moldings with moldings, beads, scrolls, and ledges, creating a rich play of light and shadow and imparting architectural significance to the opening.
In classical interiors, the width of casings is usually 80-120 millimeters. This width ensures sufficient visual presence of the element and allows for complex profiles with multiple tiers. In rooms with high ceilings and spacious openings, even wider casings — up to 150 millimeters and more — can be used.
The profile of a classical casing is usually asymmetrical — the wider and more complex part faces the opening, while the simpler part faces the wall. This creates visual logic — the framing gradually increases from the wall to the opening, focusing attention on the door panel. Symmetrical profiles are also possible, but they create a more static, monumental effect.
The color solution for classical casings is traditionally white or cream, regardless of wall color. White casings create a clear frame, emphasize the architecture of the opening, and coordinate with white ceiling cornices and baseboards. In more luxurious interiors, gilding — full gilding of casings or accent gilding of protruding profile elements — is possible.
Additional elements enrich the classical framing of the opening. A cornice above the door — a decorative cornice with or without a pediment — adds solemnity. Capitals on vertical casings transform them into pilasters, imitating columns. Bases at the bottom of casings complete the composition, creating a visual support.Buy MDF casingWith the option to add these elements, it is possible to create a complete classical framing.
Modern minimalist styles
Minimalism, contemporary, Scandinavian style require casings with the simplest forms, not drawing excessive attention. Here, decorativeness is not important — it is the clarity of lines, quality of execution, and precision of installation. The casing should create a neat boundary around the opening, nothing more.
The profile of a minimalist casing is a simple rectangle or square in cross-section, without any curves or ornamentation. The maximum is a slight rounding or bevel on the front edge, softening the transition between planes. Such simplicity requires perfect surface quality — any defects, unevenness, or poor paint finish will be especially noticeable.
In minimalist interiors, the width of casings is usually small — 50-70 millimeters. Narrow casings create a delicate framing, almost invisible, yet performing their function of masking gaps and protecting corners. In some minimalist projects, ultra-narrow casings of 30-40 millimeters are used, creating almost a graphic line around the opening.
The color solution for minimalist casings is usually monochromatic — casings are painted to match wall color, visually dissolving and retaining only the relief. This creates an effect of a single surface, structured only by geometry. An alternative is white casings on any wall color, creating a clear boundary but not overloading the interior due to simplicity of form.
Hidden casings — the ultimate degree of minimalism, where the framing of the opening is flush with the wall, creating an effect of a cutout in the plane. Technically, this is a complex solution requiring perfectly flat walls and precise installation of the frame. Hidden casings can be made from the same material as the walls or from MDF painted to match wall color, making them practically invisible.
Loft and industrial style
Loft — a style born from industrial spaces converted into residential areas — has its own specifics regarding casings. Here, simplicity, roughness, and honesty of materials are valued. Classical profiled casings are inappropriate in a loft, but completely abandoning door openings framing is also not advisable.
Loft casings are usually simple rectangular strips made of wood or MDF with minimal processing. The profile is simple, sometimes deliberately rough. Width can vary — from narrow 50-60 millimeters to wide 100-120 millimeters, imitating thick wooden planks. What matters is not the complexity of the shape, but the character of the surface and color.
Color solutions for casings in a loft tend toward dark, natural tones. Dark brown, almost black wood, graphite gray tones, sometimes pure black color create contrast with brick walls or concrete surfaces. It is possible to imitate aged, weathered wood with scratches and traces of time.
Metallic elements — overlays, angles, rivets — can complement wooden casings in a loft, emphasizing the industrial character of the style. This is not a mandatory element, but it enhances the stylistic statement. Metal can be painted black or natural with a patina of rust.
Contrasting combinations are characteristic of eclectic lofts — classical white casings against brick walls, bright colored casings in industrial spaces. Such combinations create tension between different stylistic elements, which is the essence of loft as a style that unites the incompatible.
Provence and country
Provence, country, chalet — styles inspired by rural life — use casings that emphasize the connection with nature and traditions. Here, the naturalness of materials, traces of handwork, and noble simplicity of forms are valued.MDF trimAfter appropriate processing, it beautifully imitates aged wood, characteristic of these styles.
The profile of casings in Provence and country styles is moderately complex — not as rich as in classicism, but not as simple as in minimalism. Usually, this is one or two tiers with smooth curves, creating a soft, cozy silhouette. Sharp angles and abrupt transitions are not characteristic — all forms are rounded, soft, slightly naive.
The width of casings is medium — 70-90 millimeters, creating a noticeable but not dominant framing. Too narrow casings will disappear in rustic style, too wide ones will look heavy and inappropriate. Proper proportions are important — the casing should harmonize with the door and overall scale of the room.
Colors of casings in Provence and country styles — pastel, faded, as if bleached by the sun. White, cream, beige, light gray, pale blue, lavender — all these shades create an atmosphere of provincial simplicity and coziness. What matters is not the purity and brightness of color, but its softness, complexity, and multi-layered nature.
Patina and artificial aging — mandatory finishing techniques for casings in these styles. Dark patina in profile recesses emphasizes relief, creating a sense of age. Scratches on protruding parts imitate natural wear over time. Light cracks and uneven coloring add authenticity. All of this is achieved through special decorative painting techniques.
Art Deco and Glamour
Art Deco — a style of luxury and geometry from the 1920s — uses casings of a special character. Here, graphic quality, clear lines, contrasting combinations, and metallic accents are valued. Casings in Art Deco become noticeable interior elements participating in creating the overall atmosphere of glamour and sophistication.
The profile of casings in Art Deco is geometric, often stepped, with sharp edges. This is not the smooth curves of classicism, but sharp transitions, straight lines, broken forms. The profile can be symmetrical or asymmetrical, but always graphic and expressive. The width of casings is usually medium or wide — 80-120 millimeters.
Color solutions in Art Deco are contrasting and striking. Black casings on white or cream walls create a graphic, strict image. Gold or silver casings on dark walls — luxurious, glamorous effect. Bright accent colors — emerald, sapphire, ruby — in combination with neutral walls are also possible.
Metallic finishes are especially characteristic of Art Deco. Gold, silver, bronze, copper casings create a sense of preciousness, jewelry-like quality. This can be full coverage of the casing with metallic paint or accent gilding of individual profile elements. Glossy surfaces enhance the effect of shine and luxury.
Additional decorative elements - geometric inlays, glass or mirror inserts, metallic details - enrich art deco casings. This is not overloading, but a thoughtful addition of accents that emphasize the style. Each element should be in its place and contribute to the overall composition.
Installation and finishing options
Quality installation of casings is a process requiring precision, care, and adherence to technology. Even the most expensive casings will look poor with careless installation, while budget items installed professionally will create a great impression. Finishing options for casings determine their final appearance and compatibility with the interior.
Pre-installation preparation
Checking the opening geometry - the first step before installing casings. It is necessary to ensure that the door frame is installed vertically and lies in the same plane as the wall. Deviations exceeding 2-3 millimeters will cause problems during casing installation - gaps and uneven clearances will appear. If significant deviations are detected, it is better to correct them before installing the casings.
Checking the condition of the wall around the opening - the wall should be relatively flat, strong, and clean. Loose, crumbling areas must be reinforced with deep-penetration primer or removed and re-plastered. Irregularities exceeding 5 millimeters are best leveled with putty, as the casing will replicate all wall curves, creating gaps.
Trimming excess mounting foam - if the foam protrudes beyond the frame plane, it must be carefully trimmed flush with the frame using a sharp knife. Protruding foam will prevent the casing from fitting tightly. When trimming, it is important not to damage the frame and not to cut the foam too deeply, leaving voids.
Acclimatization of casings - MDF casings must rest in the room for at least 48 hours before installation. This allows the material to adapt to the room's temperature and humidity, preventing subsequent deformation. Casings are stored horizontally on a flat surface, protected from moisture and direct sunlight.
Tool preparation - for installing casings, you will need: a miter saw or miter gauge for precise corner trimming, a tape measure and pencil for marking, a level for checking vertical alignment, MDF adhesive or liquid nails, finishing nails or screws and a hammer, putty for filling mounting points, sandpaper for sanding.
Ways to join casings
45-degree angle joint - a classic method creating a neat corner joint without visible ends. Vertical and horizontal casings are mitered at 45 degrees and joined to form a right angle. This method requires precision - even a slight deviation in the cut angle or inaccurate dimensions will create a gap at the joint.
Advantages of 45-degree joint - aesthetic appearance, suitable for any casing profiles, creates a professional impression. Disadvantages - requires precise tools and skills, gaps may appear at joints due to material shrinkage, more difficult to repair - if one casing is damaged, the adjacent one must also be replaced.
90-degree angle joint - a simpler method where the horizontal casing is placed over vertical ones or vice versa. The end of one casing is visible, but with proper finishing and painting, this does not create problems. A 90-degree joint is easier to execute, does not require precise cutting angles.
Advantages of 90-degree joint - simplicity, does not require special tools, easier to repair - replacing one casing does not affect others, gaps due to shrinkage are less noticeable. Disadvantages - less aesthetic for profiled casings, ends are visible, in some interior styles appears simplistic.
The choice of joint method depends on the casing profile and installer's skill. For simple rectangular casings, both methods work equally well. For complex profiled casings, a 45-degree joint is preferred, as it maintains profile continuity at corners. If no experience or precise tools are available, a 90-degree joint is preferable.
Installation technology
Marking - the first practical step in installation. The casing is placed against the frame with a 3-5 millimeter gap from the inner edge of the frame. This gap is necessary so the casing does not interfere with door closing and creates a visual frame around the frame. The height of vertical casings is marked - the point where they will join the horizontal casing.
Cutting casings - measured dimensions are transferred to the casings according to the joint method. For 45-degree joints, the width of the casing is added to the height of the vertical casing. For 90-degree joints, the dimension is taken exactly from the measured height. The cut is made with a miter saw or miter gauge, precision of the angle and perpendicularity of the cut are crucial.
Trial fitting - before final mounting, all casings are tried on the opening, checking the quality of joints, tightness against the wall and frame. If gaps, inaccuracies are detected, casings are modified - trimmed, sanded, polished. It is better to spend time perfecting before mounting than to fix errors afterward.
Casing installation can be done in several ways. Adhesive method - the most aesthetically clean, leaves no visible mounting marks. Liquid nails or special MDF adhesive is applied to the back of the casing in a zigzag or dot pattern. The casing is pressed against the wall and held for several minutes until the adhesive sets. The adhesive method is suitable for flat, strong walls.
Finishing nail installation - traditional method ensuring reliability. Use thin, headless nails 40-50 mm long. Nails are driven in at 40-50 cm intervals, sunk 1-2 mm below the casing surface. Nail holes are then filled with putty and become invisible after painting.
Combined installation - adhesive plus nails - ensures maximum reliability. Adhesive provides constant clamping force along the entire length of the casing, while nails secure it until the adhesive sets and additionally reinforce the mounting. This is the optimal method for casings on uneven walls and high-traffic areas.
Filling joints and mounting points - final installation stage. All joints between casings, nail holes, and small gaps between casing and wall are filled with acrylic putty. Putty is applied with a rubber spatula, excess is immediately wiped off with a damp sponge. After drying, filled areas are sanded with fine sandpaper until perfectly smooth.
Finishing options for casings
Painting white - classic solution creating a clean, bright, elegant frame around the opening. White casings are universal, match any wall or door colors, visually expand space. Water-based acrylic paints are used, providing even matte or satin finish. Apply two to three coats with intermediate sanding.
Painting in wall color - modern solution creating a unified surface with relief texture. Casings visually blend in, leaving only volume. This visually increases space, makes the interior more cohesive. It is important to use the exact same paint as for walls to ensure perfect color match.
Painting in door panel color - solution creating a unified opening composition. Door and casings are perceived as a single element. This emphasizes the importance of the opening, making it more noticeable. Especially effective with contrasting door color - dark door with dark casings on light walls creates a graphic, expressive effect.
Contrasting paint - dark casings on light walls or bright colored casings on neutral walls - creates accent openings. This solution is for bold, modern interiors where expressiveness and individuality are valued. Contrasting casings become decorative elements participating in the interior's color composition.
Toning with texture retention - for those who want to emphasize that casings are made of wood material. Special toning compounds - stains, dyes, oils - give MDF the color of wood, but do not add texture, as MDF has a uniform structure. To imitate wood texture, special decorative techniques - brushes, sponges - are used to create wood grain patterns.
Patina and artificial aging - decorative techniques creating an effect of age and noble wear. Patina - dark paint applied into profile grooves and partially sanded off from raised parts. Wear marks are created by sanding painted casings in areas of natural wear. Cracks are imitated with craquelure compounds. All this creates a vintage, Provence, or country style.
Gilding and metalization - techniques for luxurious, glamorous interiors. Gilding can be done with leaf gold - ultra-thin sheets of real gold, applied to a prepared surface. Or with imitation compounds - gold, silver, or bronze paints. Gilding can cover the entire casing or only the protruding profile elements.
Lacquering - final finish protecting painted or toned casings and creating the desired gloss level. Matte lacquer preserves a noble surface without shine. Satin provides a slight sheen. Glossy creates a mirror-like finish. Lacquer is applied with a brush or spray gun in two to three coats with intermediate sanding using fine abrasive.
Installation Errors
Even experienced craftsmen sometimes make mistakes when installing trim, which can spoil the impression of a quality renovation. Knowing typical mistakes helps avoid or promptly correct them before it's too late.
Incorrect marking and measurement
The most common and critical error is inaccurate measurement of the height of vertical trim. An error of even a few millimeters leads to gaps at corner joints or asymmetry of the frame. Measurement should be taken from the floor (if the baseboard is not yet installed) or from the top edge of the baseboard to the point of intersection with the horizontal trim, accounting for a 3-5 millimeter setback from the edge of the casing.
Failure to account for the type of joint during marking - if a 45-degree joint is planned, the height must be increased by the width of the trim, as the trim is cut at an angle. If this is not done, the trim pieces will be too short after trimming. For a 90-degree joint, the dimension is taken exactly, without additions.
Asymmetric marking - vertical trim on both sides of the opening must have the same setback from the edge of the casing and the same height. Asymmetry is immediately noticeable and spoils the impression. Before marking, check that the casing is installed symmetrically relative to the opening, and only then mark the trim with the same setback on both sides.
Failure to account for wall irregularities - if the wall has waves or curves, the trim will not fit tightly along its entire length, forming gaps. Before installation, check the wall's flatness with a straightedge or level. Significant irregularities are better corrected in advance. Minor irregularities are compensated by the elasticity of the adhesive or additional nailing at problem areas.
Cutting errors
Incorrect cutting angle - the most noticeable error when joining at 45 degrees. If the cut angle is not exactly 45 degrees, the trim pieces will not align, forming a gap. Causes include inaccurate adjustment of the miter gauge or circular saw, displacement of the trim during cutting, or a dull saw blade. Before cutting the working trim pieces, make a test cut on scrap material and check the joint quality.
Cut not perpendicular to the trim plane - if the saw deviates from vertical during cutting, the end of the trim becomes beveled. When installed, such trim will not fit tightly against the mating element. Carefully monitor the saw's verticality, use guides, and avoid rushing during cutting.
Chips and scratches on cut edges - common when cutting MDF with a dull saw blade or at too high feed rate. Chips are especially noticeable after painting and spoil the appearance of joints. For a clean cut, use a sharp saw with fine teeth and slow feed rate. You can pre-mark the cut line with a sharp knife to prevent chipping.
Incorrect profile orientation during cutting - for asymmetrical profiles, it's important which side of the trim faces up during cutting. If confused, the angles will be mirror-image incorrect. Before cutting, clearly visualize how the trim will sit in the opening and position it in the miter gauge accordingly.
Problems with fastening
Insufficient adhesive - if there is not enough adhesive, the trim will hold poorly and may peel off over time. Adhesive should be applied along the entire length of the trim in a zigzag or dotted pattern. When pressing the trim into place, adhesive should slightly squeeze out at the edges - this is a sign of sufficient quantity. Excess adhesive is immediately wiped away with a damp cloth.
Insufficient pressing of the trim - adhesive does not set instantly; the trim must be pressed and held for 2-3 minutes. If released immediately, the trim may detach from the wall due to its own weight or elasticity. On uneven walls, temporary fixation of the trim with painter's tape or supports may be required until the adhesive fully sets.
Nails driven too close to the edge - MDF may split, especially at edges. Nails should be placed at least 15-20 millimeters from the trim edges. For complex profiles, nails are driven into the thickest parts, avoiding thin protrusions.
Nail heads visible on the surface - if nails are not driven deep enough, their heads remain visible even after spackling and painting. Nails should be countersunk using a nail set - a special tool that allows driving the nail 1-2 millimeters below the surface. The resulting depression is filled with spackling compound.
Poor joint sealing
Gaps at corner joints - often occur due to inaccurate cutting, material shrinkage, or wall irregularities. Small gaps up to 1-2 millimeters are filled with acrylic sealant or spackling compound. Wide gaps are harder to mask - may require re-cutting the trim. Prevention includes accurate cutting, proper acclimatization of material, and checking joint quality before final installation.
Incorrect choice of material for sealing - using gypsum spackling instead of acrylic results in cracking and peeling. For sealing joints and mounting points of MDF trim, use flexible acrylic spackling compound or sealant that retains elasticity and compensates for minor material movement.
Poor sanding of spackled areas - if spackled areas are not sanded or sanded insufficiently after drying, they remain visible even after painting. Spackling compound must be sanded flush with the trim surface using fine-grit sandpaper (grit 180-240). Quality of sanding is checked by running a hand over the surface - no roughness should be felt.
Visible seams between trim and wall - if the wall is uneven, a gap forms between the trim and wall. A narrow gap can be masked with sealant matching the wall color, carefully filling and smoothing it with a wet finger. A wide gap is more problematic - sealant may peel off, and painting won't mask the gap. Prevention includes leveling the wall before installing trim.
Painting errors
Painting unprepared surfaces - if trim is not primed, paint absorbs unevenly, consumption increases significantly, and the finish becomes inconsistent. MDF must be primed with a special primer before painting. Primer fills pores, creates an even absorbent surface, and improves paint adhesion.
Paint drips and runs - occur when applying too thick a layer or painting vertical surfaces with liquid paint. Especially noticeable on glossy finishes. Paint should be applied in thin layers with good intermediate drying. Three thin layers are better than one thick layer with drips.
Visible brush marks - if paint is too thick or the brush is stiff, brush bristle marks remain on the surface. For a smooth finish, use a quality soft brush, and paint should have the correct consistency. Alternative - use a short-bristle roller or spray gun.
Unpainted profile recesses - in complex profiles, paint may not reach deep recesses. Carefully paint all profile details with an appropriately sized brush, check paint quality under good lighting, and apply additional coats if necessary.
Different trim color tones - if trim is painted at different times or with different paint batches, tones may not match. It's better to paint all trim in one room simultaneously with paint from the same batch. If paint runs out, mix the remaining old paint with the new batch before continuing to ensure color consistency.
Conclusion
MDF trimTrim is indeed the final touch that completes the look of a door or window opening, transforming a structural element into a full architectural detail. Properly selected and installed trim can dramatically improve the interior's appearance, while their absence or incorrect choice inevitably creates a sense of incompleteness.
MDF as a trim material demonstrates an optimal combination of characteristics - dimensional stability, uniform structure, ability to create any profile, ecological safety, and affordable price make it the top choice for most projects. Modern manufacturing technologies provide quality comparable to solid wood, at significantly lower cost and with greater operational advantages.
Trim functions extend far beyond simple masking of technical gaps. They create visual framing of openings, protect corners from damage, improve thermal and acoustic insulation, serve as connecting elements in interiors, and can be a striking decorative accent. Understanding these functions helps make informed decisions when selecting trim, taking into account all aspects of their operation in interiors.
Choosing trim by style requires understanding basic design principles and knowledge of characteristics of different styles. Classic interiors require complex profiled trim, minimalism - simple rectangular trim, loft - rough wooden trim, Provence - aged pastel trim, art deco - geometric trim with metallic finish.Buy MDF casingThe right shape and size are only the beginning; it is important to finish and install them properly.
Quality installation of moldings requires careful preparation, precise measurements, accurate cutting, and proper selection of mounting method. Two main types of joints — 45 and 90 degrees — each have their advantages and disadvantages; the choice depends on the molding profile and the installer’s skill. Mounting can be adhesive, with nails, or combined — each method has its specific application.
Molding finishes are extremely diverse — from simple white paint to complex decorative techniques with patina and gold leaf. The finish determines the final appearance of the moldings and their harmony with the interior. Properly chosen finish can turn simple moldings into a work of decorative art; improper finish can ruin even high-quality items.
Knowing typical installation mistakes helps avoid them. Inaccurate measurements, incorrect cutting, weak mounting, poor joint sealing, painting errors — all these problems are easier to prevent than to fix. Attention to details at every stage of work ensures a perfect result.
Company Stavros offers a wide range ofMDF door moldingsAvailable in various profiles and sizes — from simple rectangular ones for modern interiors to complex profiled ones for classic styles — in the STAVROS catalog, everyone will find a solution for their project. High-quality E1 class MDF, precise dimensions, and perfect surface treatment ensure a professional result.
STAVROS specialists’ consultation support helps correctly calculate the quantity of moldings, choose the optimal profile and size, and get recommendations for installation and finishing. This is especially valuable for those who implement projects independently or work with contractors lacking extensive experience with moldings.
Choosing STAVROS moldings, you get quality proven over time, ecological safety, a wide range of solutions, and professional support. Your door and window openings will receive a worthy framing that will complete the interior and delight for many years.
Choosing STAVROS casings, you get time-tested quality, ecological safety, a wide range of solutions, and professional support. Your door and window openings will receive a worthy framing that will complete the interior and delight for many years.
Frequently asked questions
Why are MDF moldings better than wooden ones?
MDF moldings surpass wooden ones in dimensional stability — they do not deform due to humidity changes, do not crack, nor shrink. MDF has a uniform structure without knots or defects, ensuring ideal surface quality and predictable properties. MDF moldings are significantly cheaper than solid wood products, yet visually indistinguishable after painting. However, solid wood is more prestigious, has natural texture and aroma. For most projects, MDF is the optimal choice in terms of price, quality, and performance characteristics.
What width should the molding be?
Molding width is chosen based on the opening size, ceiling height, and interior style. For standard openings and ceilings 2.5–2.7 meters high, an optimal width of 70–90 millimeters is recommended. For small modern-style rooms, narrow moldings 50–70 millimeters are suitable. For spacious rooms with high ceilings, wide moldings 100–120 millimeters can be used. It is important that molding width matches baseboard width — usually they are similar or moldings are slightly wider. Too narrow moldings may not cover the technological gap, while too wide ones will look heavy and inappropriate in small rooms.
At what angle should casings be joined?
Two main types of molding joints exist — 45-degree and 90-degree angles. A 45-degree joint is more aesthetic, creating a neat corner connection without visible ends, suitable for any profile. However, it requires precise tools and skill, and gaps may appear due to material shrinkage. A 90-degree joint is easier to execute, does not require precise cutting angle, and is easier to repair. However, it is less aesthetic for profiled moldings, as ends are visible. Both methods work well for simple rectangular moldings. For complex profiled moldings, a 45-degree joint is preferred. Without experience, it is better to choose a 90-degree joint.
How to install MDF moldings?
MDF moldings are installed in three main ways: adhesive, with nails, or combined. The adhesive method uses liquid nails or special MDF glue applied to the back of the molding. The molding is pressed against the wall and held until the glue sets. This method leaves no visible mounting marks but requires flat, strong walls. Finishing nail installation — thin nails without heads, 40–50 mm long, are driven in at 40–50 cm intervals, recessed, and spackled. Reliable, but requires sealing mounting points. Combined mounting — glue plus nails — provides maximum reliability and is optimal for uneven walls.
Do moldings need priming before painting?
Priming MDF moldings before painting is mandatory and critically important for quality results. Primer fills material pores, creates an even absorbent surface, improves paint adhesion, and significantly reduces paint consumption. Without priming, paint absorbs unevenly, consumption increases 2–3 times, and the finish becomes uneven with streaks and spots. For MDF, use specialized wood primers or universal water-based acrylic primers. Apply primer with a brush or roller in one coat, and let it dry according to the manufacturer’s instructions. Only after the primer is fully dry can paint be applied.
Can MDF moldings be used in humid rooms?
Standard MDF is not recommended for rooms with very high humidity — bathrooms directly in the shower or bathtub zone. However, with proper painting using moisture-resistant paints and good room ventilation, MDF moldings can be used in bathrooms outside wet zones, kitchens, and hallways. It is important to protect the material on all sides — ends of moldings are primed before installation, and all joints are sealed after installation. The finish must be applied properly, without gaps. For rooms with extreme humidity, it is better to choose polyurethane moldings, which are completely water-resistant.
How to choose the color of casings?
Molding color is chosen based on the overall interior color scheme and desired effect. A classic solution — white moldings, universal and compatible with any wall or door color. Moldings in wall color create a unified surface effect, visually expanding the space. Moldings in door panel color unify the opening into a single composition. Contrasting moldings — dark on light walls or bright colors — become accent elements. It is important to coordinate molding color with baseboards and other architectural elements. All moldings in one room or even throughout an apartment are usually painted the same color to create stylistic unity.
How much does casing installation cost?
Installation cost of moldings depends on region, work complexity, and master’s skill. On average across Russia, installing standard moldings on one opening costs 500–1500 rubles. This includes marking, cutting, mounting, and joint sealing. If complex 45-degree joints with multi-layer profiles are required, the cost may be higher — up to 2000–2500 rubles per opening. Additional cost is paid for painting — from 200 to 500 rubles per linear meter depending on finish complexity. For a standard two-room apartment with 8–10 openings, full molding installation with painting will cost 8000–20000 rubles. DIY installation saves these funds but requires tools and skills.


