Article Contents:
- Why architraves and overlays are a smart alternative to door replacement
- MDF or solid wood: understanding materials for architraves
- Decorative overlays: from simple to exquisite
- How to properly choose MDF door architraves
- Interior styles and door decor selection
- Installation technology: doing everything right
- Painting MDF products: secrets of perfect coating
- Door panels for interior doors: creating paneled structure
- Where to buy quality architraves and overlays
- Comprehensive interior update: not just doors
- MDF product care: preserving beauty for years
- Economic calculation: how much does updating cost
- Common Installation Mistakes and How to Avoid Them
- Frequently asked questions about door updating
- Inspiring ideas for door decor
- Psychology of color in interior: choosing shades consciously
- Seasonality of work: when is the best time to update doors
- Eco-friendliness and safety of MDF products
- Alternative materials: when MDF is not suitable
- Integration with smart home systems
- Trends in door frame design
- Real experience: interior update stories
- Conclusion: STAVROS company — your partner in creating beauty

Want to refresh your interior but not ready to replace all doors completely? MDF door architraves and decorative overlays become a real lifesaver for those seeking change without unnecessary expenses. This approach allows you to radically transform the appearance of doorways while preserving your family budget and avoiding major renovations. Let's explore how to properly choose decorative elements, which materials to prefer, and why this interior update method has gained recognition from thousands of homeowners.


Why architraves and overlays are a smart alternative to door replacement
Replacing interior doors is an expensive undertaking requiring removal of old structures, installation of new frames, hanging of door leaves, and hardware adjustment. The entire process involves construction dust, noise, and the need to clear passageways. But there's a more rational path — updating withdecorative elements.
MDF door architraves dramatically change the perception of the doorway. They hide technological gaps between the frame and wall, create clear geometry, and set the tone for the entire space. Meanwhile, installation takes just a few hours, requires no special skills, and costs several times less than complete door block replacement. Add to thisDecorative door overlays— and a simple smooth door leaf transforms into an elegant paneled structure worthy of classic or neoclassical interiors.
Savings amount to 60-80% compared to buying new doors. Instead of 25-40 thousand rubles for a quality interior door with installation, you spend 5-8 thousand on a set of architraves and overlays. The difference is noticeable, especially if there are several doorways in an apartment or house. Meanwhile, the visual effect is comparable, and sometimes even surpasses the result of replacing with a budget door.
But it's not just about money. Preserving existing doors means no construction debris, unnecessary noise, or having to adjust to the installers' schedule. You can update the interior on weekends without disrupting your usual rhythm of life. Door panels for interior doors are attached with glue or liquid nails—the technology is extremely simple and doesn't require professional tools.


MDF or Solid Wood: Understanding Materials for Door Casings
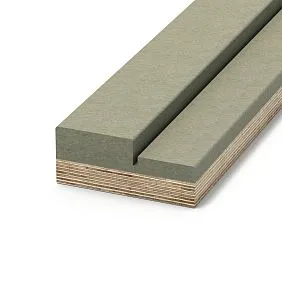
Choosing the material is the first question a buyer faces. The market offers door casings made of MDF, solid wood, polyurethane, and duropolymer. Each material has its advantages, but for a budget-friendly door update, MDF products are the optimal choice.
MDF is a medium-density fiberboard made by pressing fine wood particles under high temperature and pressure. The material is homogeneous, has no internal voids, knots, or cracks. It is stable, not prone to warping from humidity, and easy to work with.MDF baseboardsfeature a perfectly smooth surface, ready to be painted in any shade.
Solid wood is a premium choice for connoisseurs of natural materials. Oak, beech, and ash have expressive textures, natural beauty, and nobility.Oak door casings for interior doorsThey last for decades, acquiring a special patina over time. However, the cost of solid wood is 3-5 times higher than MDF, which puts such a solution beyond the scope of a budget update.
Polyurethane and duropolymer products are an alternative for wet areas. They are completely waterproof, do not swell, and do not deform. The surface imitates wood or plaster moldings, but upon closer inspection, the synthetic origin is obvious. For living rooms, natural or natural-like materials are preferable.
Returning to MDF, let's note its versatility. The boards are produced with various types of coatings: primed for painting, laminated with a wood-grain film, or veneered with a thin slice of natural wood. The first option offers complete freedom in color choice—you can match the exact tone to the existing interior or create a contrast. The second and third options are ready for installation immediately and do not require additional finishing.
The thickness of MDF casings is usually 8-16 mm, and the width varies from 50 to 120 mm. For standard interior doors, a width of 70-90 mm is optimal—it visually balances the proportions of the opening without looking bulky. Narrower strips are suitable for minimalist interiors, while wider ones are for classical and neoclassical styles.
Our factory also produces:


Decorative Overlays: From Simple to Sophisticated
If casings frame the opening from the outside, then decorative overlays transform the door itself. They turn a smooth panel door into a paneled structure, create relief, and add volume. The technology is simple: profiled strips are glued onto the door surface, forming frames—an imitation of classic panels.
Overlays for door decorationare made from the same materials as casings—MDF or solid wood. The selection principle is similar: for a budget update, choose MDF; for premium interiors, choose natural wood. It's important that the material of the casings and overlays matches—this ensures unity of texture and perception.
The width of overlays varies from 30 to 80 mm, and the thickness from 8 to 20 mm. The profile can be simple rectangular, beveled at an angle, or shaped with curves and beads. The choice depends on the desired style. For modern minimalism, flat strips without decoration are suitable. For classic styles, profiled moldings with elegant curves. For neoclassicism and art deco, a combination of different profiles creating a complex multi-level composition.
The layout of overlays on the door is a creative process. There are classic schemes: two horizontal and two vertical panels forming a symmetrical composition. Or three vertical zones with additional horizontal division. You can take a non-standard approach: create an asymmetrical composition, add diagonal elements, use overlays of different widths.
An important rule: the layout should correspond to the proportions of the door. A narrow door leaf should not be divided into many small panels—this will visually fragment the surface. A wide double door, on the contrary, requires a more complex composition, otherwise it looks empty. The golden ratio works here too: the optimal ratio of panel width to overlay width is approximately 3:1.
Installing overlays does not require special skills. The door surface is degreased, installation locations are marked, mounting adhesive or liquid nails are applied to the back of the overlays, and the elements are pressed onto the door leaf. After a day, the adhesive polymerizes, and the overlays hold securely. To enhance adhesion during drying, you can secure the elements with painter's tape.
After installing the overlays, the door can be painted. If the door leaf and decor are made of paintable MDF, priming and painting will create a single monolithic surface. It will seem as if the door was originally made as paneled. No one will guess that just a week ago it was a simple smooth panel.
Get Consultation
How to Choose the Right MDF Door Casing
Having decided on the material, move on to choosing a specific profile. Casings differ in the shape of the front surface and cross-section. Flat rectangular strips are the most budget-friendly option, universal for any style. Rounded ones soften the perception and are suitable for children's rooms and bedrooms. Shaped ones with beads and curves add classic notes.
Pay attention to the mounting method. Standard surface-mounted casings are fixed onto the door frame with finishing nails or adhesive. Telescopic ones have a special groove that fits into a protrusion on the frame—the fasteners become invisible. Telescopic constructions are more expensive but provide a more aesthetic result, especially if the walls are uneven.
The width of the casing affects the overall impression of the opening. Narrow strips of 50-60 mm create a sense of lightness and airiness. They are optimal for small rooms where every centimeter counts. Medium ones of 70-90 mm are a universal choice for most interiors. Wide ones of 100-120 mm are for spacious rooms with high ceilings where scale is needed.
Don't forget about completeness. A standard single-leaf opening requires 5 strips: two side posts and a top crossbar on each side of the door. The length of standard elements is 2200-2700 mm. For typical door openings with a height of 2000-2100 mm, this is sufficient with a margin for trimming. If the ceilings are higher, check the possibility of manufacturing casings of the required length.
Color and texture should harmonize with the door leaf and the overall interior. If the doors are dark, the casings can be matching or contrastingly light—this depends on the concept. White doors are universal—both white and colored casings suit them.MDF moldings for paintingThey allow you to realize any color idea.
Surface quality is a critical parameter. Inspect the strips: there should be no dents, chips, or unevenness. The ends should be evenly cut, without chips or tears. If the casings are for painting, check the quality of the primer—it should be applied in an even layer, without gaps or drips. Veneered products should not have veneer peeling, bubbles, or color variations.
Interior Styles and Choosing Door Decor
Door decor should match the overall style of the interior. Each design direction has its own requirements for shape, proportions, and detailing of elements. Let's analyze popular styles and suitable solutions for them.
Modern minimalism demands maximum restraint. Casing is flat rectangular strips without decoration, preferably with concealed mounting. Color is white, gray, matching the walls or doors. Door overlays are either absent or consist of simple rectangular frames of minimal width, creating a barely noticeable relief. The style's motto: "Less is more." Any decorative excess will disrupt the balance.
Scandinavian style is close to minimalism but allows for more warmth. Casing is light, often white or in natural wood tones. The profile may be slightly rounded. Overlays create a simple two- or three-panel composition. The eco-friendliness of materials is important, so MDF or solid wood with a natural finish is preferred.
Classical style is the triumph of symmetry and proportions. Casing with a pronounced profile, beads, and fillets. Width 80-100 mm. Color is noble: white, cream, walnut, wenge.Door casingsshould harmonize with baseboards and cornices. Overlays form a clear panel structure — usually two to three horizontal zones, each with one or two panels. The composition can be complemented bycarved inlaysin the center of the panels.
Neoclassicism combines classical proportions with modern conciseness. Casing is wide, but the profile is restrained. Decorative elements are permissible, but in moderation. The color palette expands: besides traditional shades, gray, gray-blue, gray-green tones are used. Overlays create an elegant frame composition, often with additionaldecorative elements for doors.
Provence and country styles lean towards naturalness and coziness. Casing made of solid wood or MDF with wood imitation, preferably in light tones or with an aging effect. The profile is simple but not flat — slightly rounded or beveled. Overlays form medium-sized panels. Light distressing, patination is welcome — this adds charm and history.
Loft and industrial styles are minimalist in door decor. Most often, casing is completely absent — the door opening remains "bare." If casing is used, it is maximally simple, narrow, often metal or painted to look like metal. Overlays are not used — doors remain smooth or have an industrial texture.
Art Deco is luxury and geometry. Casing is wide, with clear edges and angles. Colors are contrasting: black with gold, dark blue with silver, burgundy with bronze. Overlays create a complex multi-level composition using elements of different widths. Central panels may be adorned withcarved decorative overlayswith geometric or floral motifs.
Installation Technology: Doing Everything Right
Proper installation is half the success. Even the highest quality casing and overlays will not reveal their potential with careless installation. Let's examine the process step by step so the result pleases for years.
Surface preparation is the first stage. If installing casing, ensure the door frame is securely fastened, without play. The wall around the opening should be even, without bumps or depressions. If there are old casings, dismantle them carefully to avoid damaging the frame and wall. Fill all defects with putty, sand after drying.
When installing overlays on a door, the leaf must be clean, dry, and degreased. Wipe the surface with alcohol or a special degreaser. If the door is varnished, lightly sand the installation areas for the overlays with fine sandpaper — this will improve the adhesive's adhesion.
Marking is a crucial moment. For casing, use a level and pencil. Mark vertical lines on the wall where the side posts will be installed. Check verticality — even a slight tilt will create an impression of crookedness. Mark the horizontal crossbar after fitting the side elements.
For door overlays, first plan the composition. Draw a diagram on paper, calculate the panel sizes. Then transfer the markings to the door. Use a long ruler or level to draw parallel lines. Symmetry is critical — even a millimeter error will be noticeable to the naked eye.
Cutting elements is performed after marking. Casing is cut at a 45° angle at joining points — this creates neat corner joints. Use a miter box for cutting accuracy. If a miter box is not available, a protractor and a fine-toothed saw can be used, but the result will be less precise. A miter saw is the ideal tool, providing jewel-like precision.
Door overlays are usually cut at a right angle — joints are located at panel corners. Measure the required length, add a 2-3 mm allowance, cut. After fitting, make final adjustments. For cutting MDF overlays, a hacksaw for metal or a jigsaw is suitable. The cut should be clean, without chips.
Casing attachment is done in several ways. Finish nails — the classic method. Nails 40-50 mm long are driven in at 400-500 mm intervals. Heads are countersunk by 1-2 mm, the indentations are filled with putty to match or with a wax pencil. The method is reliable but requires care — a missed hammer strike will leave a dent.
Liquid nails or mounting adhesive — an alternative for MDF casing. Adhesive is applied in a zigzag pattern to the back of the strip, the element is pressed against the wall. Fixation occurs in 10-15 minutes, full polymerization — in a day. The method is not suitable for heavy solid wood casing — they may detach under their own weight.
Screws are used less frequently, mainly for telescopic systems. They provide maximum strength, but the heads are visible unless decorative caps are used.
Installing overlays on doors is simpler. Mounting adhesive or liquid nails is applied to the back of each element — a thin snake along the entire length. The overlay is placed on the door according to the markings, pressed. Excess adhesive is immediately removed with a damp cloth. For fixation during drying, use painter's tape — apply strips across the overlays, pressing them to the leaf.
After a day, remove the tape. If casing and overlays for painting were used, it's time to proceed with the final finishing. Joints and attachment points are puttied, sanded after drying. The surface is primed, then two to three coats of paint are applied with intermediate drying. The result is a monolithic structure that looks like a single whole.
Painting MDF Products: Secrets of a Perfect Finish
Casing and overlays made of MDF for painting are a blank canvas for realizing design ideas. Correct painting technology will ensure the durability and aesthetics of the finish. Let's break down the process in detail.
Paint selection is the first step. For MDF, acrylic water-dispersion paints, alkyd enamels, and polyurethane compounds are suitable. Acrylic paints are the most popular: they have no strong odor, dry quickly, form a durable coating, and do not yellow over time. Alkyd enamels create a harder film, resistant to abrasion, but smell stronger and take longer to dry. Polyurethane paints are the premium segment: maximum durability and wear resistance, but the price matches.
Finish sheen can be matte, semi-matte, semi-gloss, or gloss. For residential interiors, semi-matte is optimal — it hides minor defects, does not glare, but is easy to clean. Gloss highlights any unevenness, requires perfect surface preparation. Matte finish is the most noble but shows marks — fingerprints are visible on it.
Primer is mandatory. It ensures paint adhesion to MDF, evens out absorbency, and reduces the consumption of the final coating. Use acrylic primer for wood and MDF. Apply with a brush or roller in one coat, allowing it to dry completely — usually 2-4 hours. After drying, lightly sand the surface with fine sandpaper (grit 220-320) — this will remove raised fibers and create a perfectly smooth base.
Painting is done in two to three coats. The first coat is thin and feathered—it fills the pores and creates a base. Drying time 4-6 hours. The second coat is denser, more opaque—it forms the main color. Drying time 6-8 hours. The third coat is a thin finish coat—it evens out the tone and creates a protective film. Light sanding can be done between coats—this removes any adhered dust particles and creates a perfectly smooth finish.
Choose the tool depending on the area. For architraves, a 10-15 cm wide velour roller is convenient—it doesn't leave fibers or marks. Paint the ends and profiled parts with a synthetic bristle brush. For large volumes, a paint sprayer can be used—the finish is maximally even, but skill and equipment are required.
Temperature and humidity are important. Paint at a temperature of 18-25°C and humidity of 40-60%. In colder or more humid conditions, the paint will take longer to dry, and drips may appear. In hot weather, the paint dries too quickly, not having time to level—brush or roller marks remain.
Color options are limitless. Classic white is universal—it expands space, suits any interior, and never goes out of style. Gray in various shades—from light pearl to deep graphite—is elegant and modern. Pastel tones—blue, mint, lavender, peach—create a cozy atmosphere, suitable for bedrooms and children's rooms.
Dark colors—black, dark blue, emerald, burgundy—add drama and depth. They require good lighting and spacious rooms, otherwise they create a feeling of tightness. Contrasting solutions—white architraves against dark walls or vice versa—clearly zone the space and emphasize the architecture.
Don't be afraid to experiment. Painting is a reversible process. Didn't like the color? Repaint it. This is the advantage of paintable MDF over laminated or veneered products.
Door panels for interior doors: creating a paneled structure
Transforming a smooth door leaf into a paneled one is magic accessible to everyone. Door panels, also known as overlays, create a three-dimensional structure, visually complicate the plane, and add status to the door. The process doesn't require carpentry skills, but the result is impressive.
Planning the composition is the creative stage. Study photos of classic paneled doors, note the options you like. Typical schemes: two horizontal zones (top smaller, bottom larger) with vertical division into two or three parts. Or three equally high horizontal zones without vertical division. Or a complex composition with small panels in the top part and large ones in the bottom.
Draw a scaled diagram on graph paper. Consider proportions. The width of the overlay is usually 1/8 to 1/10 of the panel width. So, for a panel width of 300 mm, the overlay should be 30-40 mm. Wider overlays 'eat up' panel space, narrower ones look flimsy.
Select overlays according to the diagram. Calculate the linear footage of each type of element. Usually, strips of the same profile and width are used, but you can combine. For example, make the outer contour of the panels with wider overlays, and the internal partitions with narrow ones. This creates hierarchy, highlights the main elements.
The material of the overlays must match the door material. If the door is MDF, the overlays should also be MDF. If the door is wooden, you can use solid wood or MDF—after painting in one color, the difference is unnoticeable. It's important that the overlays and the door have the same base for painting or are already painted in the desired color.
Tools and materials: tape measure, level, pencil, square, ruler (preferably long, 1.5-2 m), fine-toothed saw or jigsaw, miter box (if there will be 45° miter joints), mounting adhesive or liquid nails, painter's tape, sandpaper, degreaser.
Marking on the door requires precision. Place the door horizontally on sawhorses or a table—it's more convenient to work this way. Measure the dimensions of the leaf. Determine the margins from the edges—usually 50-100 mm. Draw vertical and horizontal lines according to the diagram. Check the parallelism of the lines—use a square and level. Even a millimeter deviation will accumulate over the length and create visible curvature.
Cutting elements to size. Measure each section separately, don't rely on symmetry—actual dimensions may differ. Add a 1-2 mm allowance, finalize after test fitting. Cut carefully, without chips. Sand the ends with sandpaper for smoothness.
Start assembling the composition from the outer contour. Degrease the installation areas on the door. Apply adhesive to the back of the overlay—a thin bead along the entire length, 5 mm from the edges. Place the overlay on the door according to the markings, press firmly. Remove excess adhesive immediately with a damp cloth. Secure with painter's tape—apply strips across the overlay every 30-40 cm.
After installing the outer contour, move on to the internal elements. Follow the sequence: first horizontal crossbars, then vertical ones—this makes the joints neater. At the intersections of overlays, you can make 45° miter cuts for a tight fit, but this is not mandatory—during painting, the joints will be filled with putty and become invisible.
Curing after installation is mandatory. The adhesive needs at least 24 hours for full polymerization. Don't rush to remove the painter's tape prematurely. After drying, remove the tape, check the strength of the attachment. If there are any loose areas, re-glue them locally.
Finishing will give completeness. Fill the joints of the overlays and small gaps with acrylic wood putty. Sand after drying. Prime the entire door with overlays, then paint in two to three coats. The result will be a monolithic paneled door, indistinguishable from a factory one.
You can take a different approach: paint the overlays separately, before installation, and then glue them onto the door. This allows creating a contrasting composition—for example, light overlays on a dark door or vice versa. But this method requires greater care during installation—drops of adhesive on the painted surface are noticeable.
Where to buy quality architraves and overlays
The market offers many options, but not all are equal. MDF quality, geometric accuracy, finish quality—these are the parameters that distinguish premium-class products from budget ones. What to look for when buying?
MDF density is the foundation of durability. Quality boards have a density of 700-850 kg/m³. Lighter ones are loose, hold fasteners worse, and are easily damaged. It's difficult to check density visually, but you can estimate by weight—a quality architrave 2.2 m long and 80 mm wide weighs about 1.5-2 kg.
Geometry must be flawless. Place the architrave against a flat surface—there should be no gaps, bends, or twisting. Check the corners with a square—they should be strictly 90°. The length of elements in a batch should match with millimeter accuracy.
Surface quality for painting is a critical parameter. The primer should be applied evenly, without skips, drips, or orange peel. Dents, scratches, and dirt marks are unacceptable. Quality products are primed in factory conditions, in chambers with controlled temperature and humidity—this ensures coating uniformity.
The profile should be clear, without blurred edges and rounding. Shaped elements—beads, rolls, coves—should be symmetrical along the entire length. Check several strips from the batch—the profile should match perfectly, otherwise steps will be visible at the joints.
Packaging protects products during transportation. Quality manufacturers pack architraves in shrink film or cardboard sleeves. This prevents scratches, contamination, and moisture exposure. If architraves are piled loosely, there is a high risk of damage.
Price is an indicator of quality, but not an absolute one. Too cheap products usually have problems: low MDF density, poor geometry, low-quality primer. The optimal choice is the mid-price segment of proven manufacturers. Overpaying for premium brands is not always justified—often it's a markup for the name, not for quality.
The presence of certificates confirms safety. MDF must comply with formaldehyde emission class E1 or E0—this means minimal emission of harmful substances. Reputable manufacturers provide certificates of conformity and environmental reports.
Manufacturer warranties speak to their confidence in the product. The standard warranty for MDF products is 1 year, but some manufacturers offer 2-3 years. This covers the preservation of geometry and the absence of manufacturing defects, provided storage and operating conditions are met.
Specialist consultations will help you make a choice. An experienced manager will ask questions about interior style, opening dimensions, design preferences, and recommend optimal options. In stores with good service, they will help you calculate the required amount of material, advise on installation technology, and offer additional elements — corners, end caps, fasteners.
Pay attention to the assortment. A wide selection of profiles, sizes, and finishing options indicates that the company is seriously engaged in this direction and does not just sell "whatever is available." The ability to order non-standard size products or custom profiles is an additional plus.
Comprehensive interior update: not just doors
After updating doors with architraves and overlays, it's logical to continue transforming the interior with other elements. A comprehensive approach will create a harmonious space where all details complement each other.
Baseboards are a natural continuation of architraves. They should match in material, profile, and color. If you installed white MDF architraves, the baseboards should also be white MDF of a similar profile. This creates a unified horizontal-vertical line that unites the space. Baseboard height is usually chosen depending on ceiling height: for standard 2.7 m, a baseboard height of 70-80 mm is optimal; for high ceilings of 3-3.5 m — 100-120 mm.
Cornices and moldings on walls and ceilings develop the decorative theme. They can repeat the profile of the architraves or complement it. Horizontalmoldings on wallsat mid-height level (classical dado line) visually structure the space, allowing the use of different colors or textures above and below. Ceiling cornices create a soft transition between wall and ceiling, adding completeness to the interior.
Rosettes and corner elements are accents in wall corners or on the ceiling at chandelier installation points. They can be simple geometric or carved with ornamentation. Material — the same MDF or polyurethane. Color — matching the architraves and moldings. These elements add detailing, turning an ordinary room into a thoughtfully designed space.
Decorative wall panels are a way to create an accent surface. The technology is similar to decorating doors with overlays: frames made of moldings are glued onto the wall, forming rectangular or square sections. Inside the sections, the wall can be painted in a contrasting color, wallpapered, or finished with another material. The result is a boiserie effect — classic French wall paneling.
False fireplaces and portals are elements that can be created from the same materials. A portal is assembled from wide architraves and cornices, with an electric fireplace or decorative candles installed inside. This creates a focal point in the living room, adds coziness, and works year-round.
Furniture overlays are another application of decorative elements. Simple fronts of cabinets, dressers, and nightstands can be transformed by gluing frame overlays or carved elements. The furniture will acquire a classic look and become a harmonious part of the updated interior. The technology is the same: marking, degreasing, gluing, painting.
It is important to maintain stylistic unity. If you chose minimalist flat architraves for doors, you should not hang baroque carved moldings on the walls — it will result in an eclectic mishmash. Determine the stylistic direction and follow it in all decorative elements. Better less but consistent, than a lot and heterogeneous.
Care for MDF products: preserving beauty for years
Proper care will extend the life of architraves and overlays, preserving their aesthetics. MDF is an undemanding material but requires adherence to certain rules.
Regular cleaning is the basis of care. Wipe surfaces with a soft, slightly damp cloth once a week. This removes dust and prevents its accumulation in the profile relief. Do not use abrasive sponges and powders — they scratch the coating. For stubborn stains, use a mild soapy solution — add a little liquid soap to water, wipe, then go over with a clean damp cloth and dry thoroughly.
Protection from moisture is critical for MDF. The material is afraid of prolonged contact with water — it can swell when wet. Therefore, wipe up spilled liquid immediately and do not allow water to stagnate. In bathrooms and toilets, use MDF with moisture-resistant impregnation or choose alternative materials — polyurethane, duropolymer.
Avoid aggressive chemicals — solvents, acetone, chlorine-containing agents. They damage the paint coating, causing discoloration and dullness. For cleaning, use only special products for painted wooden surfaces or universal mild cleaners.
Protection from mechanical damage will extend service life. Medium-density MDF is relatively soft — it can be scratched by sharp objects, dented from impact. Be careful when moving furniture, vacuuming with hard attachments, and during children's play. Small scratches on a painted surface can be touched up with acrylic paint of a matched tone.
Refreshing the coating every 5-7 years will renew the appearance. The surface is lightly sanded with fine sandpaper, dusted, primed, and repainted. This will take a weekend, but the architraves and overlays will look like new. You can change the color, adapting the decor to the changed interior.
Climate control in the room is important for all wood and MDF products. Optimal temperature is 18-25°C, humidity 40-60%. Sharp fluctuations in temperature and humidity cause deformations — expansion/contraction of the material. Use humidifiers in winter when heating dries the air, and dehumidifiers in summer during high humidity.
Sun protection is relevant for painted surfaces. Prolonged exposure to direct sunlight causes fading and color change. If architraves are located on the sunny side, use curtains, blinds, or protective window films. Or choose lightfast paints with UV filters.
Repair damage promptly. Touch up small scratches with suitable paint. Fill deep dents with wood filler, sand and paint after drying. Re-glue detached overlays immediately — the situation will worsen over time. If an element is seriously damaged, it is easier to replace it entirely — fortunately, the cost is low.
Economic calculation: how much does the update cost
Specific numbers will help assess the real benefit of the budget-friendly way to update doors. Let's consider a typical situation: an apartment with three interior doors of standard sizes.
Option 1: Complete door replacement
-
Medium-quality interior door with frame and hardware: 15,000 rub. × 3 = 45,000 rub.
-
Installation (removal of old, installation of new, adjustment): 3,000 rub. × 3 = 9,000 rub.
-
Waste removal: 2,000 rub.
-
Adjustment of reveals, minor repairs: 3,000 rub.
Total: 59,000 rubles
Option 2: Installing architraves and overlays
-
Set of MDF architraves for painting per opening (5 planks): 1,200 rub. × 3 = 3,600 rub.
-
MDF overlays for door decoration (8-10 linear meters): 800 rub. × 3 = 2,400 rub.
-
Mounting adhesive, painter's tape: 500 rub.
-
Primer, paint, brushes, rollers: 2,500 rub.
-
Labor (if not doing it yourself): 3,000 rub. × 3 = 9,000 rub.
Total when hiring a specialist: 18,000 rubles
Total when doing it yourself: 9,000 rubles
Savings amount to 41,000 rubles when hiring a craftsman and 50,000 rubles when doing the work yourself. This is 70-85% of the cost of a full door replacement! The saved money can be used to update other interior elements: buy new lighting fixtures, textiles, paintings.
Note that the figures provided are market averages. The cost of quality solid wood interior doors starts from 30-40 thousand, elite models reach 100-150 thousand rubles per slab. Accordingly, the savings from updating with overlays will be even more significant.
The payback of decoration costs is debatable, as it's about aesthetics, not practical utility. But if considered from the perspective of increasing the property's appeal when selling, updated doors enhance the perceived value of the apartment. Buyers see a well-maintained, modern space, which positively influences their decision and bargaining potential.
Typical mistakes during installation and how to avoid them
Even the simple technology of installing architraves and overlays hides pitfalls. Let's examine common mistakes and ways to prevent them.
Mistake 1: Inaccurate marking
Consequences: crooked lines, asymmetrical panels, an overall impression of carelessness. Solution: use a long ruler or straightedge, level, square. Repeatedly check the parallelism of lines. Don't rely on visual estimation — even a millimeter error accumulates over the door's length.
Mistake 2: Incorrect miter cutting of architraves
Consequences: gaps in joints, untidy appearance. Solution: use a miter box for precise 45° cuts. If no miter box is available, make a template from thick cardboard — draw a 45° angle, cut it out, use it as a guide for the saw. Check the fit of elements before final fixation.
Mistake 3: Insufficient surface degreasing
Consequences: weak adhesive bond, overlay detachment. Solution: thoroughly wipe installation areas with alcohol or degreaser. Let dry before applying adhesive. Don't skip this step, even if the surface seems clean — there's always an invisible layer of dust and grease.
Mistake 4: Excess adhesive
Consequences: adhesive squeezing out from under overlays, stains on door and walls. Solution: apply adhesive in a thin serpentine line, stepping back from edges. If adhesive squeezes out, immediately remove with a damp cloth. Dried adhesive will have to be scraped off — this will damage the coating.
Mistake 5: Premature removal of fixation
Consequences: element displacement, detachment. Solution: adhere to adhesive polymerization time per instructions — usually at least 24 hours. Don't remove painter's tape prematurely. Don't load the structure until completely dry.
Mistake 6: Painting without primer
Consequences: uneven coverage, poor paint adhesion, base showing through. Solution: always prime MDF before painting. Use special primer for wood and MDF. Apply an even layer, let dry, lightly sand before painting.
Mistake 7: Thick paint layers
Consequences: drips, runs, long drying time, uneven surface. Solution: apply paint in thin layers. Three thin layers are better than one thick one. Let each layer dry completely before applying the next. Don't try to cover the surface in one pass.
Mistake 8: Ignoring wall irregularities
Consequences: gaps between architraves and wall, crooked lines. Solution: before installing architraves, assess wall evenness. Level significant irregularities with filler. For minor irregularities, use telescopic architraves — they compensate for variations. You can apply a strip of acrylic sealant to the back of the architrave — it will fill small gaps.
Mistake 9: Style mismatch
Consequences: dissonance in the interior, eclectic chaos. Solution: choose architrave and overlay profiles in accordance with the interior style. Minimalism — simple planks, classic — profiled moldings. Don't mix different styles in one room.
Error 10: Skimping on Materials
Consequences: low quality, rapid wear, need for rework. Solution: don't chase cheapness. Quality MDF products from trusted manufacturers last for years. The price difference between low-grade and quality products is 20-30%, but the difference in the result is manifold.
Frequently Asked Questions About Door Updating
Can MDF architraves be installed in damp rooms?
Standard MDF is not recommended for bathrooms and toilets with high humidity. The material may swell with prolonged contact with water. For wet areas, use moisture-resistant MDF (marked HDF with hydrophobic additives) or alternative materials - polyurethane, duropolymer, plastic. If you still install regular MDF, ensure good ventilation, coat the products with moisture-resistant paint in three layers, and avoid direct water contact.
How to calculate the required amount of material?
For one standard door opening, 5 architrave strips 2200-2500 mm long are required: two vertical posts (opening height + 100 mm for trimming) and three horizontal crossbars (opening width + double architrave width + 100 mm for trimming). Kits for one opening are usually sold. For door overlays, measure the perimeter of all planned panels, multiply by the number of panels, add 10% for trimming and possible errors.
How long does installation take?
An experienced craftsman installs architraves on one opening in 1-2 hours. A beginner will need 3-4 hours, including marking, trimming, and fitting. Door overlays - 3-4 hours for marking and installation. Plus 24 hours for glue drying. Painting - another 2-3 days, including priming, applying paint layers, and interlayer drying. In total, a complete update of one door with architraves takes 4-5 days, including all technological pauses.
Are special tools needed?
Minimum set: tape measure, level, pencil, fine-toothed saw (or jigsaw), hammer (if nailing), brushes and rollers for painting. It is advisable to have a miter box for precise angle cutting, a square for checking right angles. All these are affordable tools available in most home workshops or easily purchased at hardware stores.
Can overlays be re-glued if the result is unsatisfactory?
Yes, MDF overlays can be removed and re-glued. Carefully pry the element with a spatula or knife, starting from the edge. Proceed cautiously to avoid damaging the overlay and the door. Remove glue residue with solvent or mechanically - scrape with a blunt knife, then sand the surface. Clean and degrease the areas for new installation. Glue the overlays according to the corrected markings. This process requires patience but is technically feasible.
How to choose the color of architraves and overlays?
There are three main approaches. First - matching the doors: architraves and overlays match the color of the door leaf, creating a monolithic composition. Second - matching baseboards and other finishing elements: this unifies the space, creates a single rhythm. Third - contrasting: white architraves against dark walls or vice versa. Contrast emphasizes architecture, clearly zones the space. The choice depends on the interior concept and personal preferences.
What adhesive is best for installation?
The optimal option is polymer-based mounting adhesive like 'liquid nails' or special adhesive for MDF and wood. It provides strong adhesion, sets quickly, and after curing forms an elastic seam that compensates for minor deformations. Avoid water-based adhesives - they can cause MDF swelling. PVA is only suitable for light, thin overlays. Read the manufacturer's instructions - they indicate recommended materials and drying time.
Is it mandatory to paint MDF products?
If you purchase architraves and overlays already painted or laminated - painting is not needed. They are ready for installation. If you purchase primed products for painting - painting is necessary. Primer protects MDF from moisture but is not a finish coating. Without paint, products look unfinished, primer gradually wears off, and MDF becomes vulnerable. Painting protects the material and gives an aesthetic appearance.
How to care for painted casings?
Regularly wipe with a soft, slightly damp cloth. For stubborn stains, use a mild soap solution, then wipe dry. Avoid abrasives, aggressive chemicals, and excessive moisture. Touch up minor scratches immediately to prevent damage spread. Refresh the coating every few years - sand, prime, repaint. This will extend the service life and refresh the appearance.
Are overlays suitable for all door types?
Overlays are optimal for smooth panel doors made of MDF, chipboard, solid wood. Overlays are not installed on already paneled doors - the relief is inherent in their construction. Glass doors are not suitable for overlays - adhesive won't provide reliable adhesion, plus transparency is lost. Doors with film coating require thorough preparation - the surface needs to be treated with sandpaper to improve adhesion.
Can MDF architraves be combined with solid wood doors?
Yes, this is a common practice. After painting in one color, the difference between MDF and solid wood is visually indistinguishable. It's important to choose an architrave profile that matches the door style. For classic solid wood doors, choose profiled architraves with decorative elements. For modern, laconic doors - simple rectangular strips. Such combination allows saving without losing quality perception.
What if the walls are very uneven?
There are several solutions. First - leveling walls with putty in the architrave installation area (a strip 15-20 cm wide around the opening). Second - using telescopic architraves that compensate for unevenness via a movable connection. Third - using wide architraves that cover a larger area and hide significant defects. Fourth - filling gaps between architrave and wall with color-matched acrylic sealant, which becomes invisible after painting.
How long do MDF architraves and overlays last?
With proper installation and care, the service life is 15-20 years or more. MDF is a stable material, not prone to warping, cracking, or drying out. The limiting factor is the condition of the paint coating. Paint gradually fades, wears off, and may require refreshing after 5-7 years. But this is not a replacement of the products, only repainting - a simple and inexpensive process.
Inspiring Ideas for Door Decor
A creative approach turns a utilitarian task into an exciting process of creating a unique interior. Let's consider non-standard ideas for using architraves and overlays.
Two-color composition: the door is painted one color (e.g., deep blue), and the overlays - a contrasting color (gold, white, light gray). This creates an expressive accent, turning the door into an art object. The technique requires care: first, the entire door is painted, after drying, overlays are glued and painted. Or overlays are painted separately, then mounted.
Imitation of solid wood doors: using wide profiled overlays (60-80 mm), you can create the illusion of heavy solid wood doors. Layout - large rectangular panels in classic proportions. Color - noble wood tones: walnut, oak, wenge. Add patination - slight darkening in recesses - and the result will be indistinguishable from antique doors.
Geometric abstraction: abandoning symmetry in favor of asymmetric compositions. Overlays are placed at angles, forming diagonals, rhombuses, trapezoids. The style suits modern interiors, adds dynamism. Requires precise calculation and boldness - the result either delights or puzzles.
Minimalist elegance: thin overlays (30-40 mm) create a barely noticeable relief. The door and overlays are painted one color - the effect of subtle graphics, play of light and shadow. Perfect for Scandinavian and modern interiors where restraint and conciseness are valued.
Carved decor: in the center of panels, carvedCarved decorative elements— rosettes, ornaments, floral motifs. This adds luxury, turning a simple door into a work of art. Styles: classic, baroque, neoclassical. It's important not to overdo it — one or two carved elements per door, otherwise the composition becomes overloaded.
Texture combination: mixing smooth and textured surfaces. For example, the main panel is glossy, overlays are matte. Or vice versa. Playing with textures adds depth and creates tactile interest. The technique requires using paints of different types or different gloss levels.
Color zoning: the top third of the door is painted one color, the bottom two-thirds another. Overlays separate the color zones, creating a clear boundary. The classic scheme — light top, dark bottom — is practical (the bottom gets less dirty) and aesthetic. Suitable for Provence, English style, eclecticism.
Imitation of panel doors in loft style: narrow slats (40-50 mm) are placed vertically with small gaps, imitating the plank cladding of barn doors. Color — natural wood or dark tones with an aged effect. An option for lovers of industrial aesthetics.
Psychology of color in interior design: choosing a shade consciously
The color of doors and trims affects the perception of space and emotional state. Let's analyze the psychology of popular shades.
White — a classic that expands space. It reflects light, makes a room brighter, creates a feeling of cleanliness, order, freshness. White doors are universal, suitable for any style. Downside — shows dirt, especially in homes with children and pets. Solution — using washable paints with protective additives.
Gray — modern neutral. It is elegant, doesn't draw too much attention, goes with all colors. Light gray is close to white in its space-expanding effect. Dark gray (graphite) adds depth and solidity. Gray is the choice of rationalists who value balance and harmony.
Beige and cream — warm neutrals. They create a cozy atmosphere, soften perception. Suitable for classic interiors, Provence, Mediterranean style. Pair well with natural materials — wood, stone, textiles.
Brown in wood tones — association with nature, reliability, stability. Dark walnut, wenge — noble colors that add status. Light wood tones — oak, ash — are light and natural. Brown requires sufficient lighting, otherwise the room may seem dark.
Black — a dramatic accent. Black doors with white trims or vice versa — a graphic solution for modern interiors. Black visually reduces objects, requires spacious, light rooms. It is elegant but requires boldness.
Blue — the color of calm and depth. Light blue refreshes, creates a feeling of airiness, suitable for bedrooms and bathrooms. Dark blue (navy) — noble, refined, popular in neoclassicism and art deco. Blue reduces appetite, not recommended for kitchens.
Green — natural, calming. Mint, olive, emerald — shades that add freshness. Green harmonizes, reduces stress, suitable for offices, bedrooms, living rooms. Pairs well with natural wood, white, beige.
Yellow — cheerful, energetic. It stimulates activity, improves mood. Light yellow and lemon are suitable for children's rooms, kitchens. Mustard — a more restrained option for living rooms. An excess of bright yellow can be irritating.
Red and burgundy — colors of passion and energy. They attract attention, create accents. Red doors are rare in interiors — too active. Burgundy, wine — more noble, suitable for classic interiors, libraries, offices. Red raises blood pressure, not recommended for people with hypertension.
When choosing a color, consider the size of the room, lighting, overall color scheme, room function, personal preferences. Don't be afraid to experiment — paint can always be changed.
Seasonality of work: when is the best time to update doors
The time of year affects the quality of installation and painting. Optimal conditions — stable temperature 18-25°C and humidity 40-60%. Let's analyze seasonal features.
Spring (April-May) — ideal time. Heating is already off, air is not too dry. Temperature is comfortable, humidity moderate. Windows can be opened for ventilation during painting — fresh air speeds up drying, dissipates odors. Daylight hours are long — convenient for work. Downside — possible sharp temperature fluctuations, especially in northern regions.
Summer (June-August) — a period with caveats. In heat above 28-30°C, paint dries too quickly, not having time to level — brush marks remain. High humidity during rainy periods slows down the polymerization of glue and paint. Optimal to work in morning or evening hours when temperature is moderate. Summer's plus — the ability to take doors outside or to the balcony for painting.
Autumn (September-October) — the second optimal period. Temperature drops to comfortable values, humidity moderate. Heating is not yet on — air is not too dry. Conditions are close to spring. Downside — shortening daylight hours, by November additional lighting may be needed.
Winter (November-March) — a difficult period. Working heating dries the air significantly — humidity drops to 20-30%. This negatively affects MDF, glue, paint. Ventilation is difficult due to cold. Temperature difference between room and hallway/street causes condensation. Winter's plus — stable indoor temperature, absence of insects that can stick to fresh paint. During winter work, use air humidifiers, carefully control conditions.
Regardless of season, 3-4 days before starting work, bring materials into the room for acclimatization. MDF must adapt to temperature and humidity — this will prevent deformations after installation.
Eco-friendliness and safety of MDF products
Caring for family health is a priority when choosing finishing materials. Let's analyze the environmental aspects of MDF and related materials.
Formaldehyde emission — the main topic of discussion. MDF is produced by pressing wood fibers with binder resins containing formaldehyde. Modern technologies minimize the release of this substance. Quality MDF corresponds to class E1 (emission up to 0.124 mg/m³) or E0 (less than 0.062 mg/m³). For comparison: natural wood releases 0.02-0.04 mg/m³ of formaldehyde — it forms naturally.
When purchasing, request certificates of conformity. Reputable manufacturers indicate the emission class in documentation. Avoid cheap products of unknown origin — they may not meet standards.
Paints and primers also affect ecology. Choose compositions marked 'for interior use', 'safe for children's rooms', 'low VOC (volatile organic compounds) content'. Water-dispersed acrylic paints are the safest. Alkyd enamels smell stronger, but modern formulas are also low-toxicity. Avoid cheap paints with a strong odor — they may contain harmful solvents.
Choose glue for installation with low solvent content. Quality mounting adhesives and modern formula liquid nails are inert after polymerization, do not emit harmful substances. Work in a ventilated area, use gloves.
Wood dust from cutting MDF — fine, can irritate the respiratory tract. Use a respirator, work in a ventilated area or outdoors. After work, vacuum the room thoroughly.
After completing the work, ventilate the room for 2-3 days. This will air out residual glue and paint odors. After a week, all polymerization processes will be complete, and the materials will become completely inert.
Overall, quality MDF products from reputable manufacturers are safe for health. They have been used in residential spaces for decades without negative consequences. The key is to choose certified products and follow installation technology.
Alternative materials: when MDF is not suitable
Despite all the advantages of MDF, there are situations where other materials are preferable.
Solid wood — the choice for premium interiors and lovers of natural materials. Oak, ash, and beech possess natural beauty, expressive texture, and durability.Oak architraveslast for decades, acquiring a noble patina. Solid wood is not afraid of moisture (with proper treatment), withstands mechanical loads, and can be restored. The downside is the high price, 3-5 times more expensive than MDF.
Polyurethane — for wet rooms and complex shapes. The material is completely waterproof, does not rot or swell. It is used to make architraves with complex profiles that imitate plaster moldings. Polyurethane is lightweight, easy to install, and can be painted. The downside is its synthetic origin and less noble appearance compared to wood and MDF.
Duropolymer — an improved version of polyurethane. Denser, stronger, and more impact-resistant. Suitable for high-traffic areas. More expensive than regular polyurethane but cheaper than solid wood.
Aluminum and other metals — for industrial interiors in loft or high-tech style. Metal architraves are narrow, strict, and durable. Resistant to moisture, they do not require painting. The downside is the cold aesthetic, high price, and installation complexity.
Plastic (PVC) — a budget option for technical spaces. Moisture-resistant, cheap, and easy to install. However, it looks cheap and is not suitable for living rooms. Applicable in storage rooms, utility rooms, and garages.
Material selection is a balance between budget, aesthetic requirements, and operating conditions. For most living spaces, MDF is optimal. For premium interiors — solid wood. For wet areas — polyurethane or moisture-resistant MDF.
Integration with smart home systems
Modern technology is penetrating all aspects of life, including doors. Although architraves and overlays are traditional elements, they can be integrated into the smart home concept.
Hidden lighting in architraves creates a striking accent. LED strips are laid in profiled architraves with recesses. When turned on, the doorway is framed by soft light. Control is via a switch, dimmer, or smart home system. An option for those who love impressive solutions.
Motion sensors in doorways automatically turn on lighting when someone passes. The sensor is mounted at the top of the doorway, hidden behind the architrave. Convenient for nighttime trips around the apartment — no need to search for a switch.
Magnetic contacts on doors record their status (open/closed). The information is transmitted to the smart home system, which can turn off heating when windows are opened or activate an alarm during unauthorized opening. The contacts are discreetly mounted in the door frame.
Concealed automatic door closers ensure smooth, silent door closing. Especially relevant for families with children — the door won't slam or pinch fingers. The closer is built into the frame and is invisible from the outside.
Smart locks for interior doors (bedroom, office) open via fingerprint, code, or smartphone. They enhance privacy, especially relevant in large families or shared apartments.
Integrating technology does not contradict the classic aesthetic of architraves and overlays. All equipment is hidden; only elegant decor is visible from the outside.
Trends in doorway design
Fashion is cyclical, but some trends become classics. Let's look at current directions in door decor.
Wide architraves (100-150 mm) are returning to interiors. They create a sense of scale, emphasize ceiling height, and add importance to doorways. Especially effective when combined with high skirting boards and ceiling cornices — the interior gains architectural expressiveness.
Contrasting color schemes are gaining popularity. Dark doors with light architraves or vice versa create graphic clarity and clearly zone the space. Popular combinations: black/white, dark blue/cream, emerald/gold.
Hidden doors without architraves, where the door leaf is mounted flush with the wall, are a minimalist trend. However, this requires perfectly flat walls and special door systems. An alternative is narrow, minimalist architraves 40-50 mm wide, barely outlining the doorway.
Arched doorways with corresponding architraves add romance and soften geometry. Popular in Mediterranean style, Provence, and Eastern interiors. Architraves for arches are made flexible or assembled from small segments.
Asymmetry — a departure from classic symmetry in favor of dynamic compositions. Overlays are placed on one part of the door, creating an accent. Or different doors in the apartment are decorated differently while maintaining a common style.
Natural textures — imitation of untreated wood, knots, cracks. Creates an effect of roughness and naturalness. Suitable for country, rustic, and eco styles.
Metallic accents — narrow metal inserts, overlays with a patinated bronze or brass effect. Add luxury, popular in Art Deco and neoclassical styles.
Following trends is everyone's choice. But remember: fashion passes, style remains. Choose solutions that you like, not those dictated by magazines.
Real experience: stories of interior updates
Theory is important, but nothing compares to real experience. Here are a few stories from people who updated their doors using architraves and overlays.
Story 1: A young family from Moscow
They bought a secondary apartment with simple, smooth doors. Their budget was limited—all funds went to the down payment. They decided not to replace the doors but to decorate them with overlays. They ordered MDF architraves and overlays for painting, installed them themselves over a weekend. Painted them white—matching the walls. The result exceeded expectations: the apartment acquired a fresh, modern look. Friends couldn't believe these were the same doors. They saved about 70 thousand rubles compared to replacing all the doors.
Story 2: A restorer from Saint Petersburg
The owner of an apartment in a historical building wanted to recreate the atmosphere of the early 20th century. Ordered wide oak architraves with a classic profile and carved overlays with a floral ornament. The doors were ordinary modern ones, but after decoration, they were transformed. The architraves and overlays were painted in a noble walnut color with light patination. The result was an interior worthy of a museum. Guests admire it and ask where such antique doors were found. The secret is simple—skillful stylization of modern materials.
Story 3: A designer from Yekaterinburg
She was working on a modern-style apartment project. The client wanted bright accents. She suggested painting the doors a deep emerald green and leaving the architraves white. The contrast turned out to be striking. Additionally, thin overlays were applied to the doors, creating a geometric composition. The apartment gained individuality, and photos of the project were published in a design magazine. The client is satisfied, and the cost of door decoration was only 15 thousand rubles.
Story 4: Pensioners from Kazan
They have lived in the apartment for 40 years, the doors are the same age—sturdy but look tired. They didn't want to replace them—they were used to them. Their children gifted them a renovation: architraves, overlays, painting. They invited a craftsman. In three days, the apartment was transformed. The doors look new, the interior has freshened up. The pensioners are happy—they kept their familiar doors but got a new look.
These stories show: decorating doors with architraves and overlays is a universal solution for any budget, style, or situation.
Conclusion: STAVROS company is your partner in creating beauty
Updating interior doors using MDF architraves and decorative overlays is a sensible, economical, and effective way to transform an interior. You get a fresh look for your space while preserving your budget and avoiding major renovations. Properly selected materials, competent installation, and quality painting create a result indistinguishable from installing new premium-class doors.
Choosing a reliable supplier is important in this process. STAVROS company has specialized for over two decades in the production and supply of solid wood and MDF products for interiors.The assortmentfeatures architraves of various profiles and sizes, decorative overlays, moldings, cornices, baseboards—everything needed for comprehensivedoorway finishingand creating a harmonious space.
STAVROS guarantees high product quality: precise geometry of items, environmental safety of materials (emission class E1), professional surface treatment. The wide selection allows for implementing any design concept—from strict minimalism to luxurious classic. Experienced consultants will help select optimal solutions, calculate the required amount of material, and recommend installation technology.
By turning to STAVROS, you choose proven quality, a wide assortment, professional service, and reasonable prices. Transform your interior, make it unique and expressive—create a space that inspires every day!
Frequently Asked Questions (FAQ)
Q: Can I install architraves myself without experience?
A: Yes, installing architraves and overlays is a process accessible to beginners. The main things are precise marking, careful cutting, and following the technology. Follow the instructions, don't rush, check each step. The first door will take more time, subsequent ones will go faster.
Q: How long does paint take to dry on MDF?
A: Acrylic paint dries to the touch in 2-4 hours, completely in 6-8 hours. Allow at least 6 hours between coats. Full polymerization occurs over 7 days—during this period, avoid intensive loads on painted surfaces.
Q: What is the paint consumption for one set of architraves and overlays?
A: For one doorway with architraves and door overlays, approximately 0.3-0.5 liters of paint is required (including primer and two to three coats). A one-liter can is enough for 2-3 doors, depending on the width of the architraves and the number of overlays.
Q: Can MDF architraves be used in a wooden house?
A: Yes, but consider the shrinkage of the wooden house. In the first 2-3 years after construction, walls may 'shift,' which can lead to deformation of rigidly fixed elements. In log houses, use special compensation systems or wait for the main shrinkage to complete. In frame wooden houses, there is no problem.
Q: Are architraves for the right and left sides of the door different?
A: Standard surface-mounted architraves are universal—there is no difference between the right and left sides. Telescopic ones may have a mirrored groove configuration—clarify when purchasing. The top crosspiece usually differs only in length.
Q: Can you paint door casings after installation?
A: Yes, this is a common practice. After installation, fill the joints and fastener locations with putty, sand, prime, and paint. The plus side is that the paint will fill all gaps, creating a monolithic appearance. The minus side is that you need to protect walls and doors from paint splatter using painter's tape and plastic sheeting.
Q: What thickness of overlays is optimal for creating noticeable relief?
A: Overlays with a thickness of 12-20 mm create a pronounced volumetric effect. Thinner ones (8-10 mm) provide barely noticeable relief—suitable for minimalist interiors. Thicker ones (20+ mm) look massive—for classical and neoclassical styles.
Q: Is it necessary to remove doors to install overlays?
A: It is advisable but not mandatory. A removed door, lying horizontally on sawhorses, is more convenient for marking, installation, and painting. However, you can also work with a hung door—it just requires more care. Be sure to place something under the bottom edge so the door doesn't wobble.
Q: What to do if the purchased casings turn out to be too short?
A: If you're short by 5-10 cm, you can make a horizontal insert in the lower part of the side stiles—cut the casing horizontally, insert the missing piece, fill the joint with putty, and paint. After painting, the joint will be unnoticeable. If you're short by more—order casings of the required length.
Q: Do MDF door casings combine with solid wood casings on other doors in the same room?
A: After painting in the same color, MDF and solid wood are visually indistinguishable. The main thing is matching the profile and width. You can combine them: use solid wood for the entrance door (it's more durable) and MDF for interior doors. Guests won't notice the difference, and you'll save money.